

Vue 2.6已经发布一段时间了,主要的更新就是slot(插槽)。可能很多人从始至终都没用过slot,那可能是你对它不够了解,当你真正的了解它的时候,你就会知道当你封装一个可复用插件的时候它是多么的 perfect~
代码已放到Github上。可以下载跟着练习一下。
我们先看一个简单的例子:
<!--子组件-->
<template>
    <button class="custom-button">
        <slot></slot>
    </button>
</template>
<style>
.custom-button{
    color: #fff;
    background-color: #409eff;
    padding: 10px 20px;
    font-size: 14px;
    border-radius:6px;
    outline: none;
    border: 1px solid #dcdfe6;
}
</style>
<!--父组件-->
<template>
    <div class="button-list">
        <cus-bottom>确定</cus-bottom>
    </div>
</template>
<script>
import customButton from './customButton.vue'
export default{
    components:{
        'cus-bottom':customButton
    }
}
</script>
最终渲染:
<div class="button-list">
    <button class="custom-button">
        确定
    </button>
</div>

当子组件渲染的时候,<slot></slot> 将会被替换为“确定”。slot是不会被渲染的,它是用来接收父组件传过来的内容。
我们来看一张图,我觉得更容易理解插槽的概念:
slot标签,组合起来就是最终的渲染。
当然上述就是最简单的slot的使用,我们接着往下看。
插槽内容
<slot></slot>不仅可以接受字符串,还可以接收Html模板:
<!--父组件-->
<div class="button-list">
    <cus-bottom>
        <span>确定</span>
    </cus-bottom>
</div>
最终渲染:
<div class="button-list">
    <button class="custom-button">
        <span>确定</span>
    </button>
</div>
还可以接收其他组件:
<!--父组件-->
<div class="button-list">
    <cus-bottom>
        <!-- cus-font 图标组件 -->
        <cus-font></cus-font>
        <span>确定</span>
    </cus-bottom>
</div>
编译作用域
我们用例子来解释一下什么叫 编译作用域
<!--父组件-->
<template>
    <div class="button-list">
        <cus-bottom>{{buttonText}}</cus-bottom>
    </div>
</template>
<script>
import customButton from './customButton.vue'
export default{
    components:{
        'cus-bottom':customButton
    },
    data(){
        return{
            buttonText:'保存'
        }
    }
}
</script>
{{buttonText}}是父组件中的编译的,所以子组件获取不到buttonText变量,反之在子组件内编译的变量父组件也获取不到。
默认内容
官网叫后备内容。我觉得有点怪,这里就叫默认内容。
当我们button默认内容就是“确定”:
<button class="custom-button">
    <!--这里的确定就是默认内容-->
    <slot>确定</slot>
</button>
现在当我在一个父级组件中使用<cus-button>并且按钮也是“确定”的时候,就可以不提供任何内容:
<div class="button-list">
    <cus-bottom></cus-bottom>
</div>
当然如果我们父组件里的按钮是“保存”的时候,还可以这样写
<div class="button-list">
    <!--这里的保存 会替换掉子组件的默认内容-->
    <cus-bottom>保存</cus-bottom>
</div>
最终渲染:
<div class="button-list">
    <button class="custom-button">
        保存
    </button>
</div>
具名插槽
具有名字的插槽。为什么要有这个东西呢?我们在上面的例子中
slot只有一个,所以父组件传过来的内容都被子组件唯一的slot接收了。但是很多时候我们需要有多个slot来分别接收父组件传过来的 '多份' 内容。
这里我们使用官网的例子,带有如下内容的 <base-layout> 组件:
<div class="container">
  <header>
    <!-- 我们希望把头部内容放在这里 -->
  </header>
  <main>
    <!-- 我们希望把主要内容放在这里 -->
  </main>
  <footer>
    <!-- 我们希望把页脚放在这里 -->
  </footer>
</div>
现在我需要三个slot(插槽),来接收父组件传过来的三份内容。对于这样的情况,slot元素有一个特殊的特性:name。这个特性可以用来定义额外切独立的插槽:
<div class="container">
  <header>
    <slot name="header"></slot>
  </header>
  <main>
    <slot></slot>
  </main>
  <footer>
    <slot name="footer"></slot>
  </footer>
</div>
中间一个不带 name 的 slot的插槽 会带有隐含的名字“default”。相当于<slot name="default"></slot>。也就是说现在子组件里有三个名为:header default footer的插槽。
那么现在父组件使用 <base-layout>组件的时候需要传三份内容(都不是必须的),'header','default','footer'。这个时候就需要有个标识告诉子组件三份内容跟三个插槽如何对应上。
在向具名插槽提供内容的时候,我们可以在一个 <template> 元素上使用 v-slot 指令,并以 v-slot 的参数的形式提供其名称:
<base-layout>
  <template v-slot:header>
    <h1>这是header插槽的内容</h1>
  </template>

  <p>这里是default插槽的内容</p>
  <p>这里也是default插槽的内容</p>

  <template v-slot:footer>
    <p>这是footer插槽的内容</p>
  </template>
</base-layout>
v-slot :后面就是子组件对应的slot的name。因为子组件main标签里的slot没有name,默认name = default,所以还可以这样写
<base-layout>
  <template v-slot:header>
    <h1>这是header插槽的内容</h1>
  </template>

  <template v-slot:default>
    <p>这里是default插槽的内容</p>
    <p>这里也是default插槽的内容</p>
  </template>

  <template v-slot:footer>
    <p>这是footer插槽的内容</p>
  </template>
</base-layout>
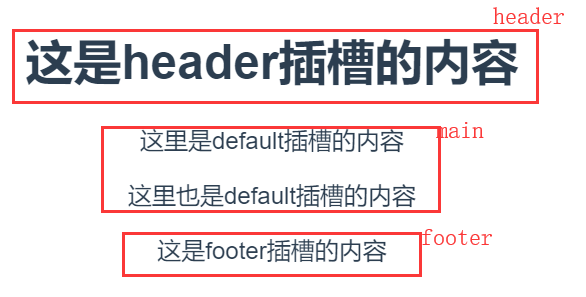
最终渲染:
<div class="container">
  <header>
    <h1>这是header插槽的内容</h1>
  </header>
  <main>
    <p>这里是default插槽的内容</p>
    <p>这里也是default插槽的内容</p>
  </main>
  <footer>
    <p>这是footer插槽的内容</p>
  </footer>
</div>
具名插槽的缩写
跟 v-on 和 v-bind 一样,v-slot 也有缩写,即把参数之前的所有内容 (v-slot:) 替换为字符 #。例如 v-slot:header 可以被重写为 #header:
<base-layout>
    <template #header>
        <h1>这是header插槽的内容</h1>
    </template>

    <template #default>
        <p>这里是default插槽的内容</p>
        <p>这里也是default插槽的内容</p>
    </template>

    <template #footer>
        <p>这是footer插槽的内容</p>
    </template>
</base-layout>
作用域插槽
这里讲作用域插槽我觉得叫插槽传值更贴切。
例如,设想一个带有如下模板的 <current-user> 组件:
<template>
    <span>
        <slot>{{ userInfo.name }}</slot>
    </span>
</template>

<script>
export default{
    data(){
        return{
            userInfo:{
                name:'erdong',
                sex:'boy',
                age:'26'
            }
        }
    }
}
</script>
包括当前用户的所有信息。插槽的默认内容是name。当我们使用 <current-user> 组件时:
父组件:
<current-user></current-user>
最终渲染:
<span>
    erdong
</span>
但是我想让父组件里显示sex该怎么办呢?很简单,改变子组件的插槽的默认内容:
<span>
    <slot>{{ userInfo.sex }}</slot>
</span>
但是这样达不到我们封装组件的特性:可复用性。
如果说父组件能拿到子组件里的infoData的值,那我们就可以这样写:
<!--父组件-->
<current-user>
    {{infoData.sex}}
</current-user>
这样就能覆盖子组件里的默认内容。但是我们在上面提到了 编译作用域 父组件是取不到子组件的变量的。
想让父组件取到infoData该怎么办呢?
这个时候我们需要更改子组件:
<!--子组件-->
<span>
    <slot v-bind:userInfo="userInfo" name='user'>{{ userInfo.sex }}</slot>
</span>
父组件:
<current-user>
    <template v-slot:user="infoData">
        {{infoData.userInfo.sex}}
    </template>
</current-user>
最终渲染:
<span>
    boy
</span>
子组件v-bind:userInfo="userInfo" name='user' 第一个userInfo是传给父组件的变量名称,第二个userInfo是传给父组件的值。name就是该slot的名称
父组件v-slot:user="infoData" user就是对应子组件的slot的name,infoData就是接收该slot传过来的值的集合的变量名称。为什么叫集合呢?因为子组件一个slot可以传多个值:
<!--子组件-->
<template>
   <span>
       <slot v-bind:userInfo="userInfo" v-bind:address='address' name='user'>{{ userInfo.name }}</slot>
   </span>
</template>

<script>
export default{
   data(){
       return{
           userInfo:{
               name:'erdong',
               sex:'boy',
               age:'26'
           },
           address:{
               city:'上海市',
           }
       }
   }
}
</script>
<!--父组件-->
<current-user>
    <template v-slot:user="infoData">
        {{infoData.userInfo.sex}}{{infoData.address.city}}
    </template>
</current-user>
最终渲染:
<span>
    boy上海市
</span>
解构插槽 Prop
<!--父组件-->
<current-user>
    <template v-slot:user="infoData">
        {{infoData.userInfo.sex}}{{infoData.address.city}}
    </template>
</current-user>
上面提到了 infoData是子组件名为user的插槽传过来的值得集合。
即:
infoData = {
    userInfo:{
        name:'erdong',
        sex:'boy',
        age:'26'
    },
    address:{
        city:'上海市',
    }
}
所以我们可以用ES6的语法来解构它:
<!--父组件-->
<current-user>
    <template v-slot:user="{userInfo,address}">
        {{userInfo.sex}}{{address.city}}
    </template>
</current-user>
总结
到这里我们基本上就把Vue的slot(插槽)使用过了一遍,还有一些没有提到,但是如果这些你全部学会的话,可以说你已经掌握了slot的使用。如果报错请查看你的Vue.js版本是否是2.6.x。
课后作业
在上面我们用封装button的例子来讲slot的基本用法。有兴趣的同学可以完善一下。封装一个类似于element UI的button组件。可以留着自己项目使用。
