

本文源码基于 Android sdk 26, 为了逻辑清晰,省略了无关代码,不排除后期重新加上相关代码
系统发送Message 绘制布局, 启动 requestLayout( )
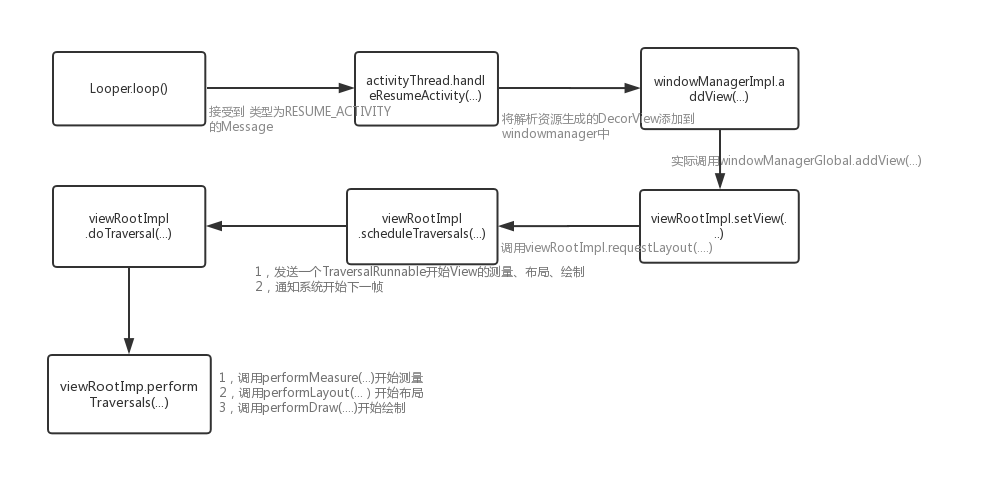
系统发送消息开始绘制API调用流程图如下:
这个要从应用程序启动开始, 因为Android sdk使用Java写的, 而Java程序运行是从main函数开始,所以我们要先看 ActivityThread 。
public static void main(String[] args) {
        SamplingProfilerIntegration.start();
        CloseGuard.setEnabled(false);
        Environment.initForCurrentUser();
        Looper.prepareMainLooper();

        ActivityThread thread = new ActivityThread();
        thread.attach(false);

        if (sMainThreadHandler == null) {
            sMainThreadHandler = thread.getHandler();
        }
        Looper.loop();

        throw new RuntimeException("Main thread loop unexpectedly exited");
    }
该方法最后调用 Looper.loop() 表示主线程进入消息队列循环,接下来的所有操作 需要 系统通过Binder机制主动向程序进程发送通知,子线程接受到信息后 向主线程发送Message,从而控制应用程序行为方式。
比如说当Activity显示的时候,系统发送RESUME_ACTIVITY 消息,控制activity开始绘制。
 private class H extends Handler {
        ·····
        public void handleMessage(Message msg) {
            switch (msg.what) {
                 ······
                case RESUME_ACTIVITY:
                    SomeArgs args = (SomeArgs) msg.obj;
                    handleResumeActivity((IBinder) args.arg1, true, args.argi1 != 0, true,args.argi3, "RESUME_ACTIVITY");
                    break;
                    ······
                }
        }
在handleResumeActivity()方法中,主要做两件事: 第一,调用Activity的生命周期函数onResume(); 第二,将之前创建的DecorView添加到 ViewRootImp中,开始测量、布局、绘制。
 final void handleResumeActivity(IBinder token, boolean clearHide, boolean isForward, boolean reallyResume, int seq, String reason) {
        // 该方法会调用到Activity的生命周期函数 onResume()
        r = performResumeActivity(token, clearHide, reason);

        if (r != null) {
            boolean willBeVisible = !a.mStartedActivity;
            if (r.window == null && !a.mFinished && willBeVisible) {
                r.window = r.activity.getWindow();
                View decor = r.window.getDecorView();
                decor.setVisibility(View.INVISIBLE);
                ViewManager wm = a.getWindowManager();
                WindowManager.LayoutParams l = r.window.getAttributes();
                a.mDecor = decor;

                if (a.mVisibleFromClient) {
                    if (!a.mWindowAdded) {
                        a.mWindowAdded = true;
                        //根据源码可以知道该方法的具体实现在WindowManagerImpl中
                        wm.addView(decor, l);
                    }
                }
              ......
WindowManagerImpl中调用
    //WindowManagerImpl中方法
    @Override
    public void addView(@NonNull View view, @NonNull ViewGroup.LayoutParams params) {
        applyDefaultToken(params);
        //mGlobal 即 WindowManagerGlobal
        mGlobal.addView(view, params, mContext.getDisplay(), mParentWindow);
    }
WindowManagerGlobal 中调用
    //WindowManagerGlobal 中方法
    public void addView(View view, ViewGroup.LayoutParams params,Display display, Window parentWindow) {
        ......
        synchronized (mLock) {
            root = new ViewRootImpl(view.getContext(), display);
            view.setLayoutParams(wparams);
            // do this last because it fires off messages to start doing things
            root.setView(view, wparams, panelParentView);
        }
    }
ViewRootImpl中调用
     //ViewRootImpl中方法
    public void setView(View view, WindowManager.LayoutParams attrs, View panelParentView) {
        synchronized (this) {
                ......
                requestLayout();
                ......
            }
        }
    }
   @Override
    public void requestLayout() {
        if (!mHandlingLayoutInLayoutRequest) {
            checkThread();
            scheduleTraversals();
        }
    }
经过一连串的调用,最后方法走到这里,方法主要做一件事,发送一个Runnable 开始View的测量、布局 、绘制,然后通知系统开始下一帧。
   void scheduleTraversals() {
        if (!mTraversalScheduled) {
           //mTraversalRunnable  中开始View的测量、布局、绘制
            mChoreographer.postCallback(Choreographer.CALLBACK_TRAVERSAL, mTraversalRunnable, null);
            //通知系统 绘制新一帧画面, 即将View显示到屏幕上
            notifyRendererOfFramePending();
        }
    }
   final class TraversalRunnable implements Runnable {
        @Override
        public void run() {
            doTraversal();
        }
    }
 void doTraversal() {
        if (mTraversalScheduled) {
            mTraversalScheduled = false;
            mHandler.getLooper().getQueue().removeSyncBarrier(mTraversalBarrier);
            performTraversals();
            if (mProfile) {
                Debug.stopMethodTracing();

                mProfile = false;
            }
        }
    }
private void performTraversals() {
    ......
    Rect frame = mWinFrame;
    ......

    // !!FIXME!! This next section handles the case where we did not get the
    // window size we asked for. We should avoid this by getting a maximum size from
    // the window session beforehand.
    if (mWidth != frame.width() || mHeight != frame.height()) {
       mWidth = frame.width();
       mHeight = frame.height();
    }
    ......
    //开始测量
    int childWidthMeasureSpec = getRootMeasureSpec(mWidth, lp.width);
    int childHeightMeasureSpec = getRootMeasureSpec(mHeight, lp.height);
    performMeasure(childWidthMeasureSpec, childHeightMeasureSpec);
    ......
     //布局
    performLayout(lp, mWidth, mHeight);
    ......
    //绘制
    performDraw();
    ......
测量
测量模式 MeasureSpec 介绍
程序使用一个32位 的 int型的整数 来表示view的尺寸信息, 其中该数据 高2位 表示测量模式, 低30位表示具体的大小数据。
EXACTLY: 精确模式,父控件 已经为子控制确定具体尺寸, 大小即为低30位数值
AT_MOST : 最大值模式,子控件自己确定自己的尺寸, 但不能超过父控件指定的最大值
UNSPECIFIED : 未确定模式,父控件没有做任何约束限制,子控件可以自己指定任意大小
public static class MeasureSpec {
        private static final int MODE_SHIFT = 30;
        private static final int MODE_MASK  = 0x3 << MODE_SHIFT;

        /** @hide */
        @IntDef({UNSPECIFIED, EXACTLY, AT_MOST})
        @Retention(RetentionPolicy.SOURCE)
        public @interface MeasureSpecMode {}

        /**
         * Measure specification mode: The parent has not imposed any constraint
         * on the child. It can be whatever size it wants.
         */
        public static final int UNSPECIFIED = 0 << MODE_SHIFT;

        /**
         * Measure specification mode: The parent has determined an exact size
         * for the child. The child is going to be given those bounds regardless
         * of how big it wants to be.
         */
        public static final int EXACTLY     = 1 << MODE_SHIFT;

        /**
         * Measure specification mode: The child can be as large as it wants up
         * to the specified size.
         */
        public static final int AT_MOST     = 2 << MODE_SHIFT;
        ......
}
父控件 确认子View的 MeasureSpec
开始测量子控件时, 父控件会根据自身的尺寸 和子控件的LayoutParam 确定子控件的MeasureSepc
如下源码可知,规则如下: 当前控件自身测量模式为
-
MeasureSpec.EXACTLY
当子控件LayoutParams 为 具体值:设置子控件 MeasureSpec.EXACTLY, 尺寸为当前设置的尺寸
当子控件LayoutParams 为 MATCH_PARENT : 设置子控件 MeasureSpec.EXACTLY, 尺寸为父控件尺寸
当子控件LayoutParams 为 WRAP_CONTENT:设置子控件MeasureSpec.AT_MOST,尺寸不超过父控件尺寸
-
MeasureSpec.AT_MOST :
当子控件LayoutParams 为 具体值:设置子控件 MeasureSpec.EXACTLY, 尺寸为当前设置的尺寸
当子控件LayoutParams 为 MATCH_PARENT 或 WRAP_CONTENT :设置子控件MeasureSpec.AT_MOST,尺寸不超过父控件尺寸
-
MeasureSpec.UNSPECIFIED :
当子控件LayoutParams 为 具体值:设置子控件 MeasureSpec.EXACTLY, 尺寸为当前设置的尺寸
当子控件LayoutParams 为 MATCH_PARENT 或 WRAP_CONTENT : 设置子控件 MeasureSpec.UNSPECIFIED,尺寸根据当前配置 设置为0 或当前父控件尺寸
    /**
     *
     * @param spec The requirements for this view
     * @param padding The padding of this view for the current dimension and
     *        margins, if applicable
     * @param childDimension How big the child wants to be in the current
     *        dimension
     * @return a MeasureSpec integer for the child
     */
    public static int getChildMeasureSpec(int spec, int padding, int childDimension) {
        int specMode = MeasureSpec.getMode(spec);
        int specSize = MeasureSpec.getSize(spec);

        int size = Math.max(0, specSize - padding);

        int resultSize = 0;
        int resultMode = 0;

        switch (specMode) {
        // Parent has imposed an exact size on us
        case MeasureSpec.EXACTLY:
            if (childDimension >= 0) {
                resultSize = childDimension;
                resultMode = MeasureSpec.EXACTLY;
            } else if (childDimension == LayoutParams.MATCH_PARENT) {
                // Child wants to be our size. So be it.
                resultSize = size;
                resultMode = MeasureSpec.EXACTLY;
            } else if (childDimension == LayoutParams.WRAP_CONTENT) {
                // Child wants to determine its own size. It can't be
                // bigger than us.
                resultSize = size;
                resultMode = MeasureSpec.AT_MOST;
            }
            break;

        // Parent has imposed a maximum size on us
        case MeasureSpec.AT_MOST:
            if (childDimension >= 0) {
                // Child wants a specific size... so be it
                resultSize = childDimension;
                resultMode = MeasureSpec.EXACTLY;
            } else if (childDimension == LayoutParams.MATCH_PARENT) {
                // Child wants to be our size, but our size is not fixed.
                // Constrain child to not be bigger than us.
                resultSize = size;
                resultMode = MeasureSpec.AT_MOST;
            } else if (childDimension == LayoutParams.WRAP_CONTENT) {
                // Child wants to determine its own size. It can't be
                // bigger than us.
                resultSize = size;
                resultMode = MeasureSpec.AT_MOST;
            }
            break;

        // Parent asked to see how big we want to be
        case MeasureSpec.UNSPECIFIED:
            if (childDimension >= 0) {
                // Child wants a specific size... let him have it
                resultSize = childDimension;
                resultMode = MeasureSpec.EXACTLY;
            } else if (childDimension == LayoutParams.MATCH_PARENT) {
                // Child wants to be our size... find out how big it should
                // be
                resultSize = View.sUseZeroUnspecifiedMeasureSpec ? 0 : size;
                resultMode = MeasureSpec.UNSPECIFIED;
            } else if (childDimension == LayoutParams.WRAP_CONTENT) {
                // Child wants to determine its own size.... find out how
                // big it should be
                resultSize = View.sUseZeroUnspecifiedMeasureSpec ? 0 : size;
                resultMode = MeasureSpec.UNSPECIFIED;
            }
            break;
        }
        //noinspection ResourceType
        return MeasureSpec.makeMeasureSpec(resultSize, resultMode);
    }
   /**
     * View.MeasureSpec中的方法
     */
      public static int makeMeasureSpec(@IntRange(from = 0, to = (1 << MeasureSpec.MODE_SHIFT) - 1) int size,
                                          @MeasureSpecMode int mode) {
            if (sUseBrokenMakeMeasureSpec) {
                return size + mode;
            } else {
                return (size & ~MODE_MASK) | (mode & MODE_MASK);
            }
        }
子view测量自己
通过父控件 为自己指定的 MeasureSpec 和自身需要的尺寸, 计算出自己最后的大小。规则如下
/**
     *
     * @param size 自身需要的尺寸
     * @param measureSpec 父控件为自己指定的MeasureSpec
     * @return  控件最后的尺寸
     */
    public static int getDefaultSize(int size, int measureSpec) {
        int result = size;
        int specMode = MeasureSpec.getMode(measureSpec);
        int specSize = MeasureSpec.getSize(measureSpec);
        switch (specMode) {
        case MeasureSpec.UNSPECIFIED:
             //该模式下, 父控件未确定
            result = size;
            break;
        case MeasureSpec.AT_MOST:
            //使用xml中设置的尺寸,但最大值不超过父控件规定的尺寸
            result =  Math.min(size, specSize);
           break;
        case MeasureSpec.EXACTLY:
            //精确模式,直接使用具体的值
            result = specSize;
            break;
        }
        return result;
    }
布局
通过ViewRootImpl中的performLayout(...)开始当前界面的布局。
使用getValidLayoutRequesters(...)方法 得到当前控件内所有需要进行布局的子View, (过滤掉状态为View.Gone的view)
    private void performLayout(WindowManager.LayoutParams lp, int desiredWindowWidth,int desiredWindowHeight) {
        final View host = mView;
        ......
        host.layout(0, 0, host.getMeasuredWidth(), host.getMeasuredHeight());
        ......
        ArrayList<View> validLayoutRequesters = getValidLayoutRequesters(mLayoutRequesters,false);
        int numValidRequests = validLayoutRequesters.size();
        for (int i = 0; i < numValidRequests; ++i) {
            final View view = validLayoutRequesters.get(i);
            view.requestLayout();
        }
      ......
    }
View.layout(...)方法 完成当前控件位置的设定,在该方法中会回调onLayout,继承view的ViewGroup会重写该方法,实现自己子控件 布局的逻辑。
    public void layout(int l, int t, int r, int b) {
        if ((mPrivateFlags3 & PFLAG3_MEASURE_NEEDED_BEFORE_LAYOUT) != 0) {
            onMeasure(mOldWidthMeasureSpec, mOldHeightMeasureSpec);
            mPrivateFlags3 &= ~PFLAG3_MEASURE_NEEDED_BEFORE_LAYOUT;
        }
        int oldL = mLeft;
        int oldT = mTop;
        int oldB = mBottom;
        int oldR = mRight;
        ......

        if (changed || (mPrivateFlags & PFLAG_LAYOUT_REQUIRED) == PFLAG_LAYOUT_REQUIRED) {
            onLayout(changed, l, t, r, b);
            ......
        }
     ......
    }
比如以下代码为 LinearLayout中的代码
    @Override
    protected void onLayout(boolean changed, int l, int t, int r, int b) {
        if (mOrientation == VERTICAL) {
            layoutVertical(l, t, r, b);
        } else {
            layoutHorizontal(l, t, r, b);
        }
    }
绘制
通过ViewRootImpl中的performDraw()开始当前界面的绘制。api调用流程图如下:
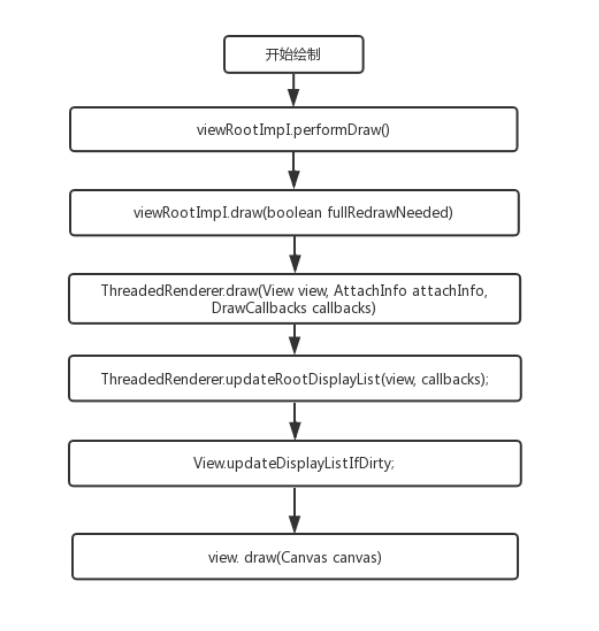
在View.draw()开始当前控件的绘制, 绘制步骤如注释
- 绘制背景
- 绘制当前控件内容
- 绘制子控件
- 绘制前景,滚动条装饰等
public void draw(Canvas canvas) {
       ......
        /*
         * Draw traversal performs several drawing steps which must be executed
         * in the appropriate order:
         *
         *      1. Draw the background
         *      2. If necessary, save the canvas' layers to prepare for fading
         *      3. Draw view's content
         *      4. Draw children
         *      5. If necessary, draw the fading edges and restore layers
         *      6. Draw decorations (scrollbars for instance)
         */

        // Step 1, draw the background, if needed
        int saveCount;

        if (!dirtyOpaque) {
            drawBackground(canvas);
        }

        // skip step 2 & 5 if possible (common case)
        final int viewFlags = mViewFlags;
        boolean horizontalEdges = (viewFlags & FADING_EDGE_HORIZONTAL) != 0;
        boolean verticalEdges = (viewFlags & FADING_EDGE_VERTICAL) != 0;
        if (!verticalEdges && !horizontalEdges) {
            // Step 3, draw the content
            if (!dirtyOpaque) onDraw(canvas);

            // Step 4, draw the children
            dispatchDraw(canvas);

            drawAutofilledHighlight(canvas);

            // Overlay is part of the content and draws beneath Foreground
            if (mOverlay != null && !mOverlay.isEmpty()) {
                mOverlay.getOverlayView().dispatchDraw(canvas);
            }

            // Step 6, draw decorations (foreground, scrollbars)
            onDrawForeground(canvas);

            // Step 7, draw the default focus highlight
            drawDefaultFocusHighlight(canvas);

            if (debugDraw()) {
                debugDrawFocus(canvas);
            }

            // we're done...
            return;
        }
View子类控件重写 onDraw()方法 绘制自身, 如LineaLayout中:
    @Override
    protected void onDraw(Canvas canvas) {
        if (mOrientation == VERTICAL) {
            drawDividersVertical(canvas);
        } else {
            drawDividersHorizontal(canvas);
        }
    }
viewGroup控件 重写dispatchDraw()方法 绘制 子控件
    @Override
    protected void dispatchDraw(Canvas canvas) {
       ......
       drawChild(canvas, child, drawingTime
       ......
    }
    protected boolean drawChild(Canvas canvas, View child, long drawingTime) {
        return child.draw(canvas, this, drawingTime);
    }
完~
(如有不足,欢迎指出,共同学习,共同进步)
