一、前言
在上一篇 OkHttp 请求流程分析中,分别介绍了同步和异步请求的具体流程,也了解到具体的的网路请求时通过 OkHttp 中的 RealCall 的拦截器链实现的,还没了解的朋友建议去看下上篇文章。
OkHttp 的拦截器总共分为以下几种:
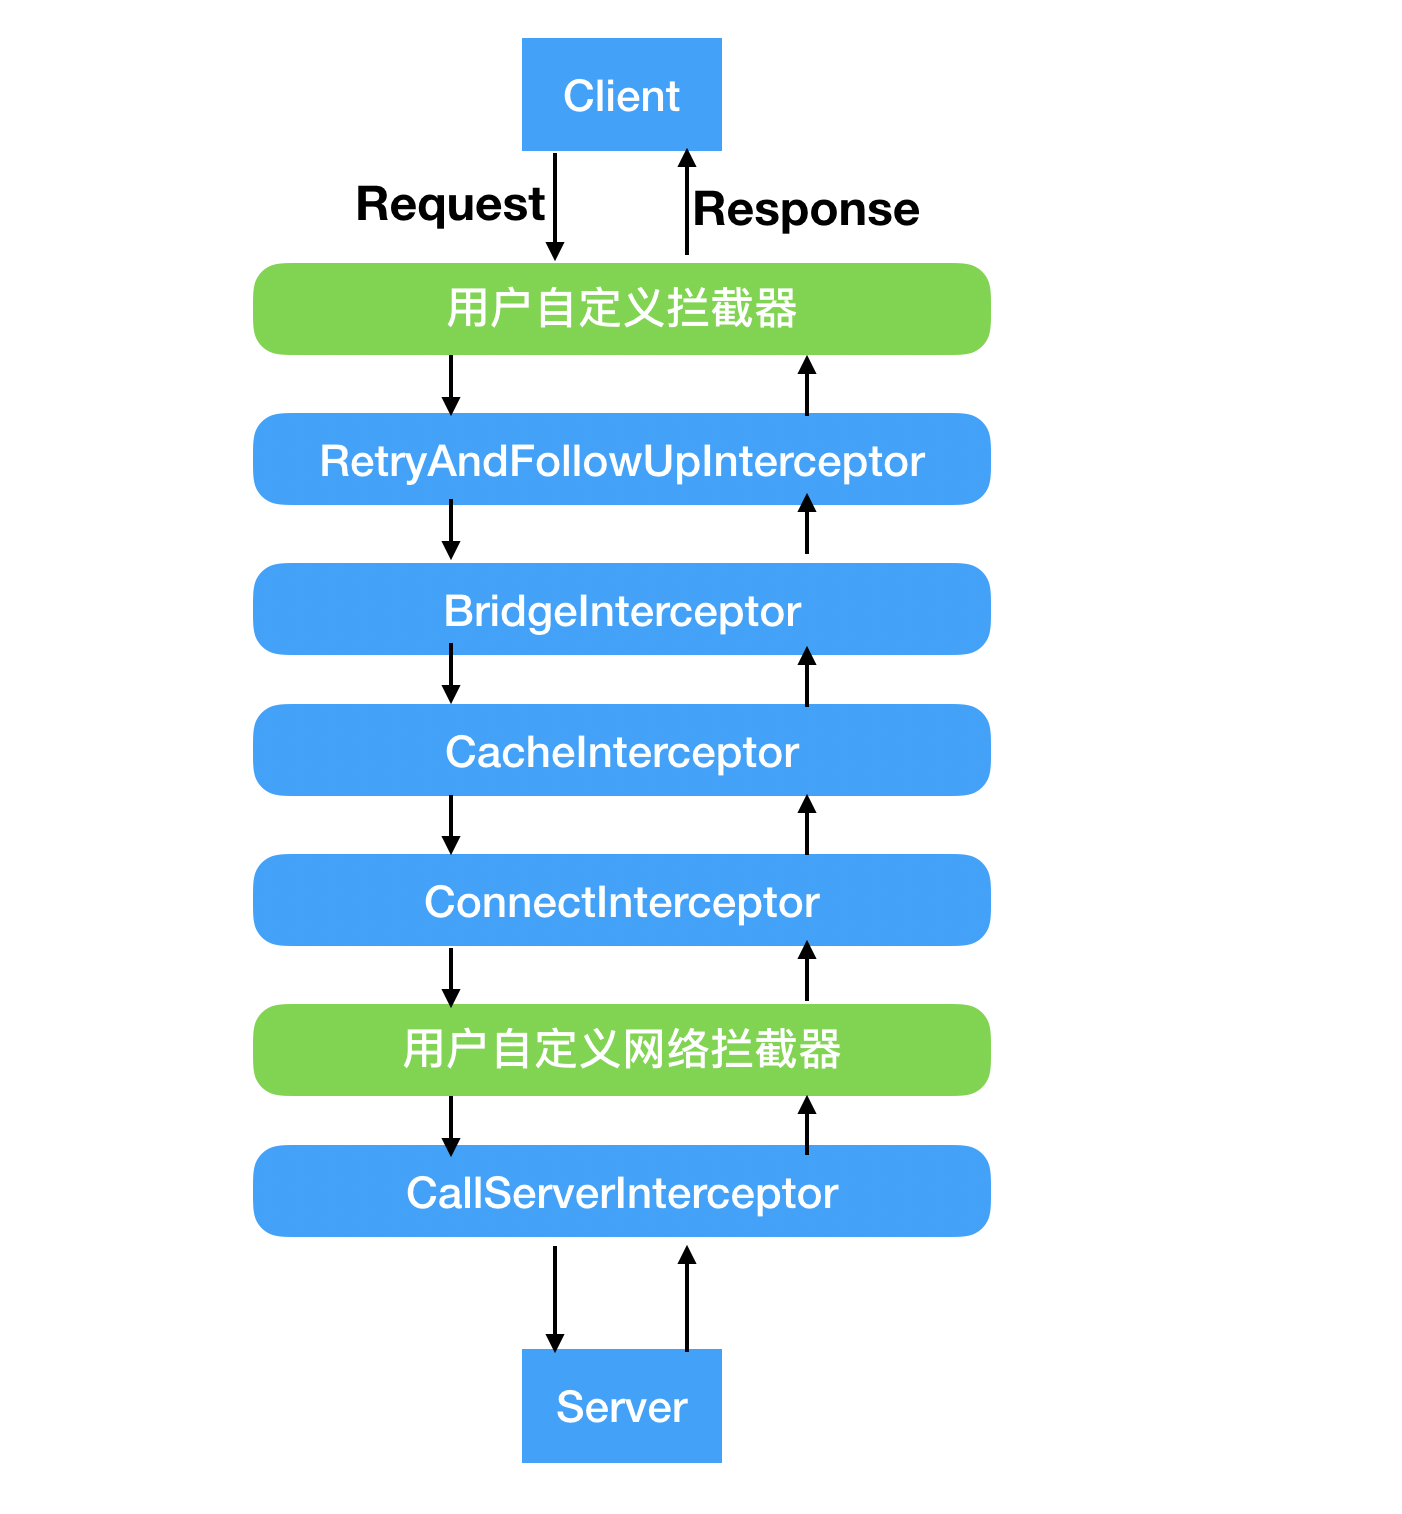
绿色的部分是我们用户可以自己去定义添加的,不设置就没有,蓝色的部分是 OkHttp 内部实现的,不设置也有,并且不可更改。
下面依次进行讲解分析:
二、用户自定义拦截器之-应用拦截器
应用拦截器的使用:
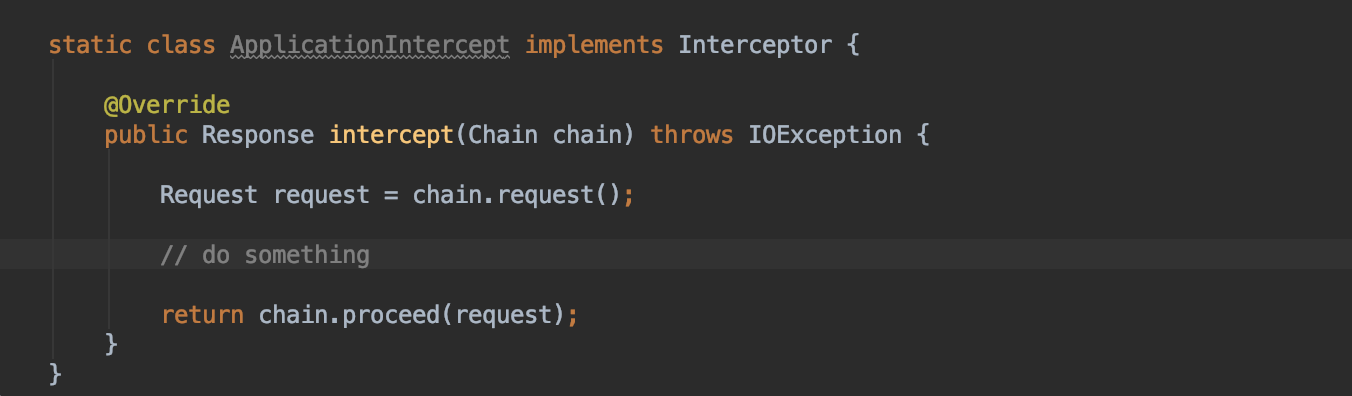
- 创建应用拦截器
-
设置拦截器

这样就添加了一个很普通的应用拦截器。
官方对应用拦截器的描述
- Don’t need to worry about intermediate responses like redirects and retries.
- Are always invoked once, even if the HTTP response is served from the cache.
- Observe the application’s original intent. Unconcerned with OkHttp-injected headers like If-None-Match.
- Permitted to short-circuit and not call Chain.proceed().
- Permitted to retry and make multiple calls to Chain.proceed().
中文:
- 不需要关心是否重定向或失败重连
- 即使有缓存,也只会调用一次
- 只考虑应用的初始意图,不去考虑Okhhtp注入的Header比如:if-None-Match,意思就是不管其他外在因素只考虑最终的返回结果
- 允许切断其他拦截器,不调用 Chain.proceed()
- 可以执行多次调用其他拦截器,通过Chain.proceed()
三、RetryAndFollowUpInterceptor 拦截器
RetryAndFollowUpInterceptor 拦截器是应用拦截器之后的第一个拦截器,主要是负责失败重连和重定向的。
但是并不是所有的网络请求可以进行重连的,在RetryAndFollowUpInterceptor 拦截器的内部会通过一定的逻辑进行判断。具体来看下源码是怎么实现的:
根据上一篇文章中讲述的,主要逻辑存在 intercept 方法中:
@Override public Response intercept(Chain chain) throws IOException {
  // 获取原始请求
  Request request = chain.request();
	// 创建 StreamAllocation对象,这里只是创建,具体处理交给后面的拦截器处理
  // 主要用户获取连接服务端的 Connect连接 和 用于服务端用于数据传输的输入输出流
  // 主要给 ConnectIntercept 使用的
  streamAllocation = new StreamAllocation(
      client.connectionPool(), createAddress(request.url()), callStackTrace);

  int followUpCount = 0;
  Response priorResponse = null;
  // 开启死循环
  while (true) {
    // 如果取消,就释放资源
    if (canceled) {
      streamAllocation.release();
      throw new IOException("Canceled");
    }

    Response response = null;
    boolean releaseConnection = true;
    try {
      // 传入创建的StreamAllocation对象,交给下个拦截器处理,至于下个拦截器处理不处理,不用管
      // 在 catch 和 finally 中做了一些异常处理和资源释放
      response = ((RealInterceptorChain) chain).proceed(request, streamAllocation, null, null);
      releaseConnection = false;
    } catch (RouteException e) {
       // 如果进入 RouteException 路由异常,则尝试是否可以重新进行请求,若可以则从头开始新的请求
      // The attempt to connect via a route failed. The request will not have been sent.
      if (!recover(e.getLastConnectException(), false, request)) {
        throw e.getLastConnectException();
      }
      releaseConnection = false;
      continue;
    } catch (IOException e) {
      // 若是进入 IOException IO异常,若可以重新尝试请求,则从头开始新的请求
      // An attempt to communicate with a server failed. The request may have been sent.
      boolean requestSendStarted = !(e instanceof ConnectionShutdownException);
      if (!recover(e, requestSendStarted, request)) throw e;
      releaseConnection = false;
      continue;
    } finally {
      // 释放资源。
      // We're throwing an unchecked exception. Release any resources.
      if (releaseConnection) {
        streamAllocation.streamFailed(null);
        streamAllocation.release();
      }
    }

    //如果之前发生过重定向,并且 priorResponse 不为空,则创建新的 响应对象,并将其 body 置位空
    if (priorResponse != null) {
      response = response.newBuilder()
          .priorResponse(priorResponse.newBuilder()
                  .body(null)
                  .build())
          .build();
    }

    // 等到一个接收 Response 的HTTP新请求。
    // 这将添加身份验证、遵循重定向、处理客户端请求超时。如果后续操作不必要或不适用,则返回null。
    Request followUp = followUpRequest(response);

    //  若 followUp 重试请求为空,返回当前的响应
    if (followUp == null) {
      if (!forWebSocket) {
        streamAllocation.release();
      }
      return response;
    }
    //关闭响应结果
    closeQuietly(response.body());

    // 如果重试次数超过最大值MAX_FOLLOW_UPS,释放资源,抛出异常
    if (++followUpCount > MAX_FOLLOW_UPS) {
      streamAllocation.release();
      throw new ProtocolException("Too many follow-up requests: " + followUpCount);
    }

    // 如果新请求的 body 属于不可重复请求的 body,释放资源
    if (followUp.body() instanceof UnrepeatableRequestBody) {
      streamAllocation.release();
      throw new HttpRetryException("Cannot retry streamed HTTP body", response.code());
    }
		// 判断是否是相同的连接,若不相同,释放 streamAllocation,创建新的 streamAllocation 对象
    if (!sameConnection(response, followUp.url())) {
      streamAllocation.release();
      streamAllocation = new StreamAllocation(
          client.connectionPool(), createAddress(followUp.url()), callStackTrace);
    } else if (streamAllocation.codec() != null) {
      throw new IllegalStateException("Closing the body of " + response
          + " didn't close its backing stream. Bad interceptor?");
    }

    request = followUp;
    priorResponse = response;
  }
}
总结主要作用下:
- 创建 StreamAllocation对象
- 调用 RealInterceptorChain.proceed() 方法进行下一阶段的网络请求
- 根据异常结果或者响应结果判断是否要进行重新请求
- 调用下一个拦截器,返回 Response 给上一个拦截器
四、BridgeInterceptor拦截器
BridgeInterceptor 主要作用就是添加头部、设置压缩等。
还是主要看下 Intercept 中的代码:
@Override public Response intercept(Chain chain) throws IOException {
  Request userRequest = chain.request();
  Request.Builder requestBuilder = userRequest.newBuilder();
	// 拿到请求体
  RequestBody body = userRequest.body();
  if (body != null) {
    // 设置编码方式
    MediaType contentType = body.contentType();
    if (contentType != null) {
      requestBuilder.header("Content-Type", contentType.toString());
    }
		// 设置传输长度
    long contentLength = body.contentLength();
    if (contentLength != -1) {
      requestBuilder.header("Content-Length", Long.toString(contentLength));
      requestBuilder.removeHeader("Transfer-Encoding");
    } else {
      requestBuilder.header("Transfer-Encoding", "chunked");
      requestBuilder.removeHeader("Content-Length");
    }
  }
	// 设置主机地址
  if (userRequest.header("Host") == null) {
    requestBuilder.header("Host", hostHeader(userRequest.url(), false));
  }
	// 设置连接方式,这里看到默认是开启持久连接的 使用 Keep-Alive
  if (userRequest.header("Connection") == null) {
    requestBuilder.header("Connection", "Keep-Alive");
  }

  // If we add an "Accept-Encoding: gzip" header field we're responsible for also decompressing
  // the transfer stream.
  // 默认不使用gzip 传输, 如果我们添加 gzip 压缩头字段,会对传输的数据进行编码解码处理
  boolean transparentGzip = false;
  if (userRequest.header("Accept-Encoding") == null && userRequest.header("Range") == null) {
    transparentGzip = true;
    requestBuilder.header("Accept-Encoding", "gzip");
  }
	// 设置 cookies
  List<Cookie> cookies = cookieJar.loadForRequest(userRequest.url());
  if (!cookies.isEmpty()) {
    requestBuilder.header("Cookie", cookieHeader(cookies));
  }
	// 设置 ua
  if (userRequest.header("User-Agent") == null) {
    requestBuilder.header("User-Agent", Version.userAgent());
  }
	// 调用下个拦截器,等待下个拦截器返回结果
  Response networkResponse = chain.proceed(requestBuilder.build());
	// 执行到这里,下面都是对返回值进行处理
  // 将网络请求返回的 Response 转换成用户可以使用的 Response
  HttpHeaders.receiveHeaders(cookieJar, userRequest.url(), networkResponse.headers());

  Response.Builder responseBuilder = networkResponse.newBuilder()
      .request(userRequest);
	// 如果请求的时候支持 gzip,并且服务器返回的 response 响应头也支持 gzip,,并且响应体有值,就要负责解压工作
  if (transparentGzip
      && "gzip".equalsIgnoreCase(networkResponse.header("Content-Encoding"))
      && HttpHeaders.hasBody(networkResponse)) {
    GzipSource responseBody = new GzipSource(networkResponse.body().source());
    Headers strippedHeaders = networkResponse.headers().newBuilder()
        .removeAll("Content-Encoding")
        .removeAll("Content-Length")
        .build();
    responseBuilder.headers(strippedHeaders);
    responseBuilder.body(new RealResponseBody(strippedHeaders, Okio.buffer(responseBody)));
  }

  return responseBuilder.build();
}
总结主要作用:
- 将用户构建好的一个 Request 通过添加一些请求头的操作,转换成能够进行网络访问的请求
- 调用 RealInterceptorChain.proceed() 方法进行下一阶段的网络请求
- 将服务器返回的 Response 转换成用户可以使用的 Response(添加响应头、解压 gzip 等)
- 调用下一个拦截器,返回 Response 给上一个拦截器
五、CacheInterceptor拦截器
缓存拦截器主要是对网络请求的缓存进行处理。使用很简单,主要通过 Cache 类实现的,在创建 OkHttpClient 的时候设置 cache 就行。
// 创建 Cache 类 "app/cache"是缓存的路径   20*1024*1024 是缓存大小
Cache cache = new Cache(new File("app/cache"), 20 * 1024 * 1024);
OkHttpClient client = new OkHttpClient.Builder()
        .connectTimeout(15, TimeUnit.SECONDS)
        .readTimeout(15, TimeUnit.SECONDS)
        .writeTimeout(15, TimeUnit.SECONDS)
        .addInterceptor(new ApplicationIntercept())
  			//设置缓存
        .cache(cache)
        .build();
这样就能够借助于 OkHttp 帮助我们实现缓存。
具体看下 CacheInterceptor 的 Intercept 方法:
public final class CacheInterceptor implements Interceptor {
  // 实现缓存功能的 InternalCache 类,下面讲解
  final InternalCache cache;

  public CacheInterceptor(InternalCache cache) {
    this.cache = cache;
  }

  @Override public Response intercept(Chain chain) throws IOException {
    // 如果 cache 为空,则用户没设置缓存,直接返回 null
    // 不为空,设置了缓存,通过 cache 对象的 get 方法去获取缓存,称之为候选缓存
    Response cacheCandidate = cache != null
        ? cache.get(chain.request())
        : null;

    long now = System.currentTimeMillis();
		// 创建缓存策略,并且分别得到 请求 networkRequest,和响应 cacheResponse
    // 里面维护了一个 Request 和 Response ,关于这个策略,下面分析
    // public final Request networkRequest; 如果不需要网络访问,为 null,不为 null,需要网络请求
    // public final Response cacheResponse; 不使用缓存,为 null,不为 null,表示可以使用本地缓存
    CacheStrategy strategy = new CacheStrategy.Factory(now, chain.request(), cacheCandidate).get();
    Request networkRequest = strategy.networkRequest;
    Response cacheResponse = strategy.cacheResponse;

    if (cache != null) {
      cache.trackResponse(strategy);
    }
		// 如果候选缓存不为空,并且通过缓存策略拿到的值为空,说明候选缓存不可用,关闭
    if (cacheCandidate != null && cacheResponse == null) {
      closeQuietly(cacheCandidate.body()); // The cache candidate wasn't applicable. Close it.
    }

    // If we're forbidden from using the network and the cache is insufficient, fail.
    // 如果网络不可用,并且没有缓存,通过构建者模式构建一个 504 的  Response。并返回
    if (networkRequest == null && cacheResponse == null) {
      return new Response.Builder()
          .request(chain.request())
          .protocol(Protocol.HTTP_1_1)
          .code(504)
          .message("Unsatisfiable Request (only-if-cached)")
          .body(Util.EMPTY_RESPONSE)
          .sentRequestAtMillis(-1L)
          .receivedResponseAtMillis(System.currentTimeMillis())
          .build();
    }

    // If we don't need the network, we're done.
    // 如果不需要网络,并且有缓存,则返回存储的缓存
    if (networkRequest == null) {
      return cacheResponse.newBuilder()
          .cacheResponse(stripBody(cacheResponse))
          .build();
    }

    // 这里是需要网络重新请求的
    Response networkResponse = null;
    try {
      // 调用下一个拦截器去获取 Response
      networkResponse = chain.proceed(networkRequest);
    } finally {
      // If we're crashing on I/O or otherwise, don't leak the cache body.
      if (networkResponse == null && cacheCandidate != null) {
        closeQuietly(cacheCandidate.body());
      }
    }

    // If we have a cache response too, then we're doing a conditional get.
    // 此时通过网络请求拿到了 Response ,并且本地有缓存的 response,
    if (cacheResponse != null) {
      // 如果响应码为 未修改,直接使用缓存的 Response作为最终的返回 Response
      if (networkResponse.code() == HTTP_NOT_MODIFIED) {
        Response response = cacheResponse.newBuilder()
            .headers(combine(cacheResponse.headers(), networkResponse.headers()))
            .sentRequestAtMillis(networkResponse.sentRequestAtMillis())
            .receivedResponseAtMillis(networkResponse.receivedResponseAtMillis())
            .cacheResponse(stripBody(cacheResponse))
            .networkResponse(stripBody(networkResponse))
            .build();
        networkResponse.body().close();

        // Update the cache after combining headers but before stripping the
        // Content-Encoding header (as performed by initContentStream()).
        cache.trackConditionalCacheHit();
        cache.update(cacheResponse, response);
        return response;
      } else {
        closeQuietly(cacheResponse.body());
      }
    }

    // 上面都没返回,根据网络请求响应生成最终的响应
    Response response = networkResponse.newBuilder()
        .cacheResponse(stripBody(cacheResponse))
        .networkResponse(stripBody(networkResponse))
        .build();

		// 如果返回的 Response 有请求体
    if (HttpHeaders.hasBody(response)) {
      // 通过调用 maybeCache() 方法,进而调用 cache 的 put 写入用户缓存
      CacheRequest cacheRequest = maybeCache(response, networkResponse.request(), cache);
      // 写入缓存
      response = cacheWritingResponse(cacheRequest, response);
    }

    return response;
  }
}
缓存策略CacheStrategy:
前面在 Intercept 方法中调用了
CacheStrategy strategy = new CacheStrategy.Factory(now, chain.request(), cacheCandidate).get();
Request networkRequest = strategy.networkRequest;
Response cacheResponse = strategy.cacheResponse;

// 看下静态内部类的 Factory 构造方法,主要是读取传入的 缓存 Response 的 headers 信息

    public Factory(long nowMillis, Request request, Response cacheResponse) {
      this.nowMillis = nowMillis;
      this.request = request;
      this.cacheResponse = cacheResponse;

      if (cacheResponse != null) {
        this.sentRequestMillis = cacheResponse.sentRequestAtMillis();
        this.receivedResponseMillis = cacheResponse.receivedResponseAtMillis();
				//拿到所有响应头,开始遍历
        Headers headers = cacheResponse.headers();
        for (int i = 0, size = headers.size(); i < size; i++) {
          // 响应头 key
          String fieldName = headers.name(i);
          // 响应头 value
          String value = headers.value(i);
          // 有 Date 头,服务器返回时间信息
          if ("Date".equalsIgnoreCase(fieldName)) {
            servedDate = HttpDate.parse(value);
            servedDateString = value;
           // 有 Expires 头,获取有效期信息
          } else if ("Expires".equalsIgnoreCase(fieldName)) {
            expires = HttpDate.parse(value);
           // 有 Last-Modified 头,获取最后修改时间,
          } else if ("Last-Modified".equalsIgnoreCase(fieldName)) {
            lastModified = HttpDate.parse(value);
            lastModifiedString = value;
           //  有 ETag 头,获取资源的版本
          } else if ("ETag".equalsIgnoreCase(fieldName)) {
            etag = value;
           //  有 Age 头,获取到现在的经历了多少时间
          } else if ("Age".equalsIgnoreCase(fieldName)) {
            ageSeconds = HttpHeaders.parseSeconds(value, -1);
          }
        }
      }
    }

// 然后调用 get 方法

/**
 * Returns a strategy to satisfy {@code request} using the a cached response {@code response}.
 */
public CacheStrategy get() {
  // 返回一个假设可以使用网络请求的缓存策略,也就是 networkRequest 不为 null
  CacheStrategy candidate = getCandidate();
  // 如果networkRequest 不为 null,表示需要使用网络,并且 Request 的 CacheControl 字段设置为只使用缓存
  // 就需要设置 都为 null,然后再 CacheInterceptor 中构建错误的返回。
  if (candidate.networkRequest != null && request.cacheControl().onlyIfCached()) {
    // We're forbidden from using the network and the cache is insufficient.
    // 返回不请求网络,不使用缓存
    return new CacheStrategy(null, null);
  }
  return candidate;
}
前面讲到的将响应 Response 添加到本地,主要是通过 CacheInterceptor 内部的 InternalCache 实现的,
public interface InternalCache {
  Response get(Request request) throws IOException;
  CacheRequest put(Response response) throws IOException;
  /**
   * Remove any cache entries for the supplied {@code request}. This is invoked when the client
   * invalidates the cache, such as when making POST requests.
   */
  void remove(Request request) throws IOException;
  /**
   * Handles a conditional request hit by updating the stored cache response with the headers from
   * {@code network}. The cached response body is not updated. If the stored response has changed
   * since {@code cached} was returned, this does nothing.
   */
  void update(Response cached, Response network);
  /** Track an conditional GET that was satisfied by this cache. */
  void trackConditionalCacheHit();
  /** Track an HTTP response being satisfied with {@code cacheStrategy}. */
  void trackResponse(CacheStrategy cacheStrategy);
}
而 InternalCache 是个接口,内部都是调用的 Cache 这个类中的方法,先看下 Cache 类:
public final class Cache implements Closeable, Flushable {
  private static final int VERSION = 201105;
  private static final int ENTRY_METADATA = 0;
  private static final int ENTRY_BODY = 1;
  private static final int ENTRY_COUNT = 2;

  // 这个 InternalCache 是个接口,里面定义了常用的增删改查等操作
  // 所有的 实现都是通过 外部的 Cache 类的对应方法实现的
  final InternalCache internalCache = new InternalCache() {
    @Override public Response get(Request request) throws IOException {
      return Cache.this.get(request);
    }

    @Override public CacheRequest put(Response response) throws IOException {
      return Cache.this.put(response);
    }

    @Override public void remove(Request request) throws IOException {
      Cache.this.remove(request);
    }

    @Override public void update(Response cached, Response network) {
      Cache.this.update(cached, network);
    }

    @Override public void trackConditionalCacheHit() {
      Cache.this.trackConditionalCacheHit();
    }

    @Override public void trackResponse(CacheStrategy cacheStrategy) {
      Cache.this.trackResponse(cacheStrategy);
    }
  };

  // 硬盘缓存实现
  final DiskLruCache cache;

  /* read and write statistics, all guarded by 'this' */
  int writeSuccessCount;
  int writeAbortCount;
  private int networkCount;
  // 命中次数
  private int hitCount;
  // 请求次数
  private int requestCount;

  public Cache(File directory, long maxSize) {
    this(directory, maxSize, FileSystem.SYSTEM);
  }

  Cache(File directory, long maxSize, FileSystem fileSystem) {
    this.cache = DiskLruCache.create(fileSystem, directory, VERSION, ENTRY_COUNT, maxSize);
  }
前面在讲 LruCache 的时候,既然是缓存就必然伴随着 插入缓存、更新缓存、删除缓存、查询缓存。
先来看下 插入缓存的 put 方法:
CacheRequest put(Response response) {
  // 获取请求方法
  String requestMethod = response.request().method();
  // 判断如果是 POST、PATCH、PUT、DELETE、MOVE几种请求方法,则不支持缓存,移除缓存,返回 null
  if (HttpMethod.invalidatesCache(response.request().method())) {
    try {
      remove(response.request());
    } catch (IOException ignored) {
      // The cache cannot be written.
    }
    return null;
  }
  // 如果不是 get 请求,返回 null。比如 post 没必要缓存
  if (!requestMethod.equals("GET")) {
    // Don't cache non-GET responses. We're technically allowed to cache
    // HEAD requests and some POST requests, but the complexity of doing
    // so is high and the benefit is low.
    return null;
  }

  if (HttpHeaders.hasVaryAll(response)) {
    return null;
  }
  // 生成 Entry 实体,Entry 封装了所有的返回值信息
  Entry entry = new Entry(response);
  // 缓存的实际操作,使用DiskLruCache实现硬盘缓存
  DiskLruCache.Editor editor = null;
  try {
    // 创建写入的 editor。
    // key 值就是 key() 方法生成的,md5 加密,然后换算成 16 进制。
    //  ByteString.encodeUtf8(url.toString()).md5().hex();
    editor = cache.edit(key(response.request().url()));
    if (editor == null) {
      return null;
    }
    // 将缓存写入磁盘,在 writeTo 方法中,将头部等信息进行缓存,如果是 https 请求,将会做特殊的处理
    entry.writeTo(editor);
    // 传入 editor 创建一个 CacheRequestImpl
    return new CacheRequestImpl(editor);
  } catch (IOException e) {
    abortQuietly(editor);
    return null;
  }
}
删除缓存的 remove 方法:
void remove(Request request) throws IOException {
  // 这里调用 DiskLruCache 中的 remove 方法移除缓存
  cache.remove(key(request.url()));
}
更新缓存的 update 方法:
void update(Response cached, Response network) {
  Entry entry = new Entry(network);
  DiskLruCache.Snapshot snapshot = ((CacheResponseBody) cached.body()).snapshot;
  DiskLruCache.Editor editor = null;
  try {
    editor = snapshot.edit(); // Returns null if snapshot is not current.
    if (editor != null) {
      entry.writeTo(editor);
      editor.commit();
    }
  } catch (IOException e) {
    abortQuietly(editor);
  }
}
这里是先生成一个实体,然后找到保存的快照,然后用执行写入
查找缓存的 get 方法:
Response get(Request request) {
  //先获得经过 md5 加密后的 url
  String key = key(request.url());
  // DiskLruCache 的快照
  DiskLruCache.Snapshot snapshot;
  // 保存缓存的实体
  Entry entry;
  try {
    // 从 DiskLruCache 中的 get 方法,查找到 快照。
    snapshot = cache.get(key);
    //为空,则没缓存
    if (snapshot == null) {
      return null;
    }
  } catch (IOException e) {
    // Give up because the cache cannot be read.
    return null;
  }
  try {
    // 创建Entry
    entry = new Entry(snapshot.getSource(ENTRY_METADATA));
  } catch (IOException e) {
    Util.closeQuietly(snapshot);
    return null;
  }
  // 从 Entry 照片中获得 Response
  Response response = entry.response(snapshot);
  if (!entry.matches(request, response)) {
    Util.closeQuietly(response.body());
    return null;
  }
  return response;
}
六、ConnectInterceptor拦截器
作用主要是打开与服务器之间的链接,正式开始网络请求。
  @Override public Response intercept(Chain chain) throws IOException {

    RealInterceptorChain realChain = (RealInterceptorChain) chain;
    Request request = realChain.request();
    // 拿到 RealInterceptorChain 中创建的 StreamAllocation 对象。
    StreamAllocation streamAllocation = realChain.streamAllocation();
    // We need the network to satisfy this request. Possibly for validating a conditional GET.
    boolean doExtensiveHealthChecks = !request.method().equals("GET");
    // 通过 newStream 创建一个 HttpCodec 对象,主要用来编码 Request 和解码 Response 的
    HttpCodec httpCodec = streamAllocation.newStream(client, doExtensiveHealthChecks);
    // 获得 RealConnection 的对象 connection。 用来进行实际的 io 传输
    RealConnection connection = streamAllocation.connection();
    // 调用下个拦截器
    return realChain.proceed(request, streamAllocation, httpCodec, connection);
  }


//来看下 newStream 方法

public HttpCodec newStream(OkHttpClient client, boolean doExtensiveHealthChecks) {
  // 设置超时
  int connectTimeout = client.connectTimeoutMillis();
  int readTimeout = client.readTimeoutMillis();
  int writeTimeout = client.writeTimeoutMillis();
  // 是否重试
  boolean connectionRetryEnabled = client.retryOnConnectionFailure();
  try {
    //	构建 RealConnection 对象
    RealConnection resultConnection = findHealthyConnection(connectTimeout, readTimeout,
        writeTimeout, connectionRetryEnabled, doExtensiveHealthChecks);
    // 构建一个 HttpCodec 对象
    HttpCodec resultCodec = resultConnection.newCodec(client, this);
    synchronized (connectionPool) {
      codec = resultCodec;
      return resultCodec;
    }
  } catch (IOException e) {
    throw new RouteException(e);
  }
}

// 看下 findHealthyConnection

private RealConnection findHealthyConnection(int connectTimeout, int readTimeout,
    int writeTimeout, boolean connectionRetryEnabled, boolean doExtensiveHealthChecks)
    throws IOException {
  while (true) {
    RealConnection candidate = findConnection(connectTimeout, readTimeout, writeTimeout,
        connectionRetryEnabled);
    // If this is a brand new connection, we can skip the extensive health checks.
    synchronized (connectionPool) {
      if (candidate.successCount == 0) {
        return candidate;
      }
    }
    // Do a (potentially slow) check to confirm that the pooled connection is still good. If it
    // isn't, take it out of the pool and start again.
    if (!candidate.isHealthy(doExtensiveHealthChecks)) {
      noNewStreams();
      continue;
    }
    return candidate;
  }
在 findHealthyConnection 方法 内部调用了 findConnection 方法,在findConnection 方法内部主要是去找有没有可以服用的链接
- 如果有就会复用连接,返回连接
- 如果没有就创建一个新的连接,然后放入到连接池中,返回连接
七、用户自定义网络拦截器拦截器
这个拦截器和应用拦截器都是用户自己设置的拦截器。使用方法可应用拦截器差不多,这里就不在讲了,看下官方对其描述:
-
Able to operate on intermediate responses like redirects and retries.
-
Not invoked for cached responses that short-circuit the network.
-
Observe the data just as it will be transmitted over the network.
-
Access to the
Connectionthat carries the request. -
能够对重定向和重试的时候进行操作(很好理解,重定向什么的在第二层,应用拦截器不会调用,但是网络拦截器可以调用)。
-
如果读取缓存中的数据,就不会执行网络拦截器
-
可以检测到所有需要网络传输的数据
-
可以访问完整的Request 请求
由于是在重定向拦截器之后的,所以在发生重定向的时候,网络拦截器可能会执行多次,可以较为完整的检测网络请求的状况。
而应用拦截器在请求重试拦截器之前,所以检测不到重定向的请求,只能检测到最初的请求和最终的返回。
八、CallServerInterceptor拦截器
CallServerInterceptor拦截器 是拦截器链中的最后一个拦截器,主要负责向服务器发送真正的网络请求和接收服务器返回的响应。
@Override public Response intercept(Chain chain) throws IOException {
  // 获取在 ConnectInterceptor 拦截器中创建的  httpCodec 对象
  HttpCodec httpCodec = ((RealInterceptorChain) chain).httpStream();
  // 获取 streamAllocation
  StreamAllocation streamAllocation = ((RealInterceptorChain) chain).streamAllocation();
  Request request = chain.request();

  long sentRequestMillis = System.currentTimeMillis();
  // 向 Socket 中写入请求的头部信息
  httpCodec.writeRequestHeaders(request);

  Response.Builder responseBuilder = null;
  // 判断该请求的请求方法是否允许被发送请求体,请求体是否为空
  if (HttpMethod.permitsRequestBody(request.method()) && request.body() != null) {
    // If there's a "Expect: 100-continue" header on the request, wait for a "HTTP/1.1 100
    // Continue" response before transmitting the request body. If we don't get that, return what
    // we did get (such as a 4xx response) without ever transmitting the request body.
    if ("100-continue".equalsIgnoreCase(request.header("Expect"))) {
      httpCodec.flushRequest();
      responseBuilder = httpCodec.readResponseHeaders(true);
    }

    // Write the request body, unless an "Expect: 100-continue" expectation failed.
    if (responseBuilder == null) {
      Sink requestBodyOut = httpCodec.createRequestBody(request, request.body().contentLength());
      BufferedSink bufferedRequestBody = Okio.buffer(requestBodyOut);
      // 向 Socket 中写入请求的 body 信息
      request.body().writeTo(bufferedRequestBody);
      bufferedRequestBody.close();
    }
  }

  // 完成网络请求的写入工作
  httpCodec.finishRequest();

  // 下面是读取操作
  if (responseBuilder == null) {
    // 读取响应的头部信息
    responseBuilder = httpCodec.readResponseHeaders(false);
  }

  // 构建返回的 Response
  Response response = responseBuilder
      .request(request)
      .handshake(streamAllocation.connection().handshake())
      .sentRequestAtMillis(sentRequestMillis)
      .receivedResponseAtMillis(System.currentTimeMillis())
      .build();

  int code = response.code();
  // 判断是否返回一个空的响应
  if (forWebSocket && code == 101) {
    // Connection is upgrading, but we need to ensure interceptors see a non-null response body.
    response = response.newBuilder()
        .body(Util.EMPTY_RESPONSE)
        .build();
  } else {
    // 读取响应中的响应体信息
    response = response.newBuilder()
        .body(httpCodec.openResponseBody(response))
        .build();
  }
  // 判断是否关闭长连接
  if ("close".equalsIgnoreCase(response.request().header("Connection"))
      || "close".equalsIgnoreCase(response.header("Connection"))) {
    streamAllocation.noNewStreams();
  }
  // 如果响应的状态码为 204 和 205 并且响应体不为空,则抛出异常
  if ((code == 204 || code == 205) && response.body().contentLength() > 0) {
    throw new ProtocolException(
        "HTTP " + code + " had non-zero Content-Length: " + response.body().contentLength());
  }

  return response;
}
HttpCodec 是一个接口,主要用来编码 Request 和解码 Response 的,主要有两个实现类:
/**A socket connection that can be used to send HTTP/1.1 messages. */
public final class Http1Codec implements HttpCodec {}
/** Encode requests and responses using HTTP/2 frames. */
public final class Http2Codec implements HttpCodec {}
都是现在主流的 Http 协议规范。
CallServerInterceptor拦截器主要就是完成最终的网络请求工作,遵循 HTTP 协议规范,通过 HttpCodec 对象写入请求头、请求主体,并且读取响应头和响应主体,写入 Response 中,依次返回给上级拦截器,最终传递到调用的地方,就完成了依次网络请求。
九、最后
到这里 OkHttp 源码就分析完了,可能有些地方理解的还不是很透彻,继续加油吧。
欢迎关注我的公众号: