

前段时间做冷启动优化,刚好也很久没写博文了,觉得还是很有必要记录下。
一.常规操作
public class MainActivity extends Activity {

    private static final Handler sHandler = new Handler(Looper.getMainLooper());

    @Override
    protected void onCreate(Bundle savedInstanceState) {
        super.onCreate(savedInstanceState);
        setContentView(R.layout.activity_main);
        sHandler.postDelay(new Runnable() {
            @Override
            public void run() {
                // 页面启动所需耗时初始化
                doSomething();
            }
        }, 200);
    }
}
大部分开发者在遇到页面冷启动耗时初始化时,会首先考虑通过Handler.postDelay()方法延迟执行。但延迟多久合适?100ms?500ms?还是1s?
延迟过晚,可能会有体验问题;延迟过早,对冷启动没效果。延迟的时间(比如200ms)在三星手机上测试时没问题,换了在华为手机试了就有问题了,然后就围绕着机型的适配不断调整延迟的时间,试图寻找最合适的值,结果发现根本就是不可能的。
二.起始终止点
先来看一张图
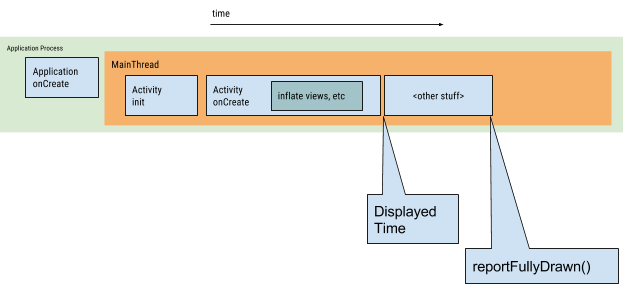
上图是Google提供的冷启动流程图,可以看到冷启动的起始点时Application.onCreate()方法,结束点在ActivityRecord.reportLanuchTimeLocked()方法。
我们可以通过以下两种方式查看冷启动的耗时
1.查看Logcat
在 Android Studio Logcat 过滤关键字 “Displayed”,可以查看到如下日志:
2019-07-03 01:49:46.748 1678-1718/? I/ActivityManager: Displayed com.tencent.qqmusic/.activity.AppStarterActivity: +12s449ms
后面的12s449ms就是冷启动耗时
2.adb dump
通过终端执行“adb shell am start -W -S <包名/完整类名> ”

“ThisTime:1370”即为本次冷启动耗时(单位ms)
三、寻找有效结束回调
上面知道,冷启动计时起始点是Application.onCreate(),结束点是ActivityRecord.reportLanuchTimeLocked(),但这不是我们可以写业务写逻辑的地方啊,大部分应用业务都以Activity为载体,那么结束回调在哪?
1.IdleHandler
从冷启动流程图看,结束时间是在UI渲染完计算的,所以很明显,Activity生命周期中的onCreate()、onResume()、onStart()都不能作为冷启动的结束回调。
常规操作中用Handler.postDelay()问题在于Delay的时间不固定,但我们知道消息处理机制中,MessageQueue有个ArrayList<IdleHandler>
public final class MessageQueue {

    Message mMessages;
    priavte final ArrayList<IdleHandler> mIdelHandlers = new ArrayList<IdelHandler>();

    Message next() {
        ...
        int pendingIdelHandlerCount = -1; // -1 only during first iteration
        for(;;) {
            ...
            // If first time idle, then get the number of idlers to run.
            // Idle handles only run if the queue is empty or if the first message
            // in the queue (possibly a barrier) is due to be handled in the future.
            if (pendingIdleHandlerCount < 0 && (mMessages == null || now < mMessages.when)) {
                pendingIdleHandlerCount = mIdleHandlers.size();
            }
            if (pendingIdleHandlerCount <= 0) {
                // No idle handlers to run.  Loop and wait some more.
                mBlocked = true;
                continue;
            }
            // Run the idle handlers.
            // We only ever reach this code block during the first iteration.
            for (int i = 0; i < pendingIdleHandlerCount; i++) {
                final IdleHandler idler = mPendingIdleHandlers[i];
                mPendingIdleHandlers[i] = null;
                // release the reference to the handler
                boolean keep = false;
                try {
                     keep = idler.queueIdle();
                } catch (Throwable t) {
                     Log.wtf(TAG, "IdleHandler threw exception", t);
                }
            }
            ...
        }
    }
}
可以在列表中添加Idle任务,Idle任务列表只有MessageQueue队列为空时才会执行,也就是所在线程任务已经执行完时,线程处于空闲状态时才会执行Idle列表中的任务。
冷启动过程中,在Activity.onCreate()中将耗时初始化任务放置到Idle中
public class MainActivity extends Activity {

    private static final Handler sHandler = new Handler(Looper.getMainLooper());

    @Override
    protected void onCreate(Bundle savedInstanceState) {
        super.onCreate(savedInstanceState);
        setContentView(R.layout.activity_main);
        Looper.myQueue().addIdleHandler(new MessageQueue.IdleHandler() {
        @Override
        public boolean queueIdle() {
            // 页面启动所需耗时初始化
            doSomething();
            return false;
        }});
    }
}
正常情况下,初始化任务是在UI线程所有任务执行完才开始执行,且该方案也不用考虑机型问题。但有个问题,如果UI线程的任务一直不执行完呢?会有这情况?举个🌰,Activity首页顶部有个滚动的Banner,banner的滚动是通过不断增加延迟Runnable实现。那么,初始化任务就可能一直没法执行。
另外,如果初始化的任务会关系到UI的刷新,这时,在Activity显示后再去执行,在体验上也可能会有所折损。
回顾冷启动流程图,冷启动结束时,刚好是UI渲染完,如果我们能确保在UI渲染完再去执行任务,这样,既能提升冷启动数据,又能解决UI上的问题。
因此,解铃还须系铃人,要想找到最合适的结束回调,还是得看源码。
2.onWindowFocusChanged()
首先,我们找到了第一种方案
public class BaseActivity extends Activity {

    private static final Handler sHandler = new Handler(Looper.getMainLooper());
    private boolean onCreateFlag;

    @Override
    protected void onCreate(Bundle savedInstanceState) {
        super.onCreate(savedInstanceState);
        onCreateFlag = true;
        setContentView(R.layout.activity_main);
    }

    @Override
    public void onWindowFocusChanged(boolean hasFocus) {
        super.onWindowFocusChanged(hasFocus);
        if (onCreateFlag && hasFocus) {
            onCreateFlag = false;

            sHandler.post(new Runnable() {
                @Override
                public void run() {
                    onFullyDrawn();
                }
            })
        }
    }

    @CallSuper
    protected void onFullyDrawn() {
        // TODO your logic
    }
}关于onWindowFocusChanged()的系统调用流程感兴趣的可以看看我的上一篇文章《Activity.onWindowFocusChanged()调用流程》
至于为什么要在onWindowFocusChanged()再通过Handler.post()延后一个任务,一开始我是通过打点,发现没post()时,onWindowFocusChanged()打点在Log“Displayed”之前,增加post()便在Log“Displayed”之后,梳理了下调用流程,大概是渲染调用requestLayout()也是增加任务监听,只有SurfaceFlinger渲染信号回来时才会触发渲染,因此延后一个任务,刚好在其之后

3.View.post(Runnable runnable)
第二种方案,我们通过View.post(Runnable runnable)方法实现
public class BaseActivity extends Activity {

    private static final Handler sHandler = new Handler(Looper.getMainLooper());
    @Override
    protected void onCreate(Bundle savedInstanceState) {
        super.onCreate(savedInstanceState);
        setContentView(R.layout.activity_main);
    }

    // 方案只有在onResume()或之前调用有效
    protected void postAfterFullDrawn(final Runnable runnable) {
        if (runnable == null) {
            return;
        }
        getWindow().getDecorView().post(new Runnable() {
            @Override
            public void run() {
                sHandler.post(runnable);
            }
        });
    }
}
需要注意的是,该方案只有在onResume()或之前调用有效。为什么?
先看View.post()源码实现
public boolean post(Runnable action) {
    final AttachInfo attachInfo = mAttachInfo;
    // 这里要注意啦!attachInfo 不为空,实际是通过Handler.post()延迟一个任务
    if (attachInfo != null) {
        return attachInfo.mHandler.post(action);
    }

    // Postpone the runnable until we know on which thread it needs to run.
    // Assume that the runnable will be successfully placed after attach.
    getRunQueue().post(action);
    return true;
}

private HandlerActionQueue mRunQueue;

private HandlerActionQueue getRunQueue() {
    if (mRunQueue == null) {
        mRunQueue = new HandlerActionQueue();
    }
    return mRunQueue;
}
通过View.post()调用了HandlerActionQueue.post()
public class HandlerActionQueue {

    private HandlerAction[] mActions;
    private int mCount;

    public void post(Runnable action) {
        postDelayed(action, 0);
    }

    /**
    * 该方法仅仅是将传入的任务Runnable存放到数组中
    **/
    public void postDelayed(Runnable action, long delayMillis) {
        final HandlerAction handlerAction = new HandlerAction(action, delayMillis);
        synchronized (this) {
            if (mActions == null) {
                mActions = new HandlerAction[4];
            }
            mActions = GrowingArrayUtils.append(mActions, mCount, handlerAction);
            mCount++;
        }
    }
}
到此,我们调用View.post(Runnable runnable)仅仅是把任务Runnable以HandlerAction姿势存放在HandlerActionQueue的HandlerAction[]数组中。那这个数组什么时候会被访问调用?
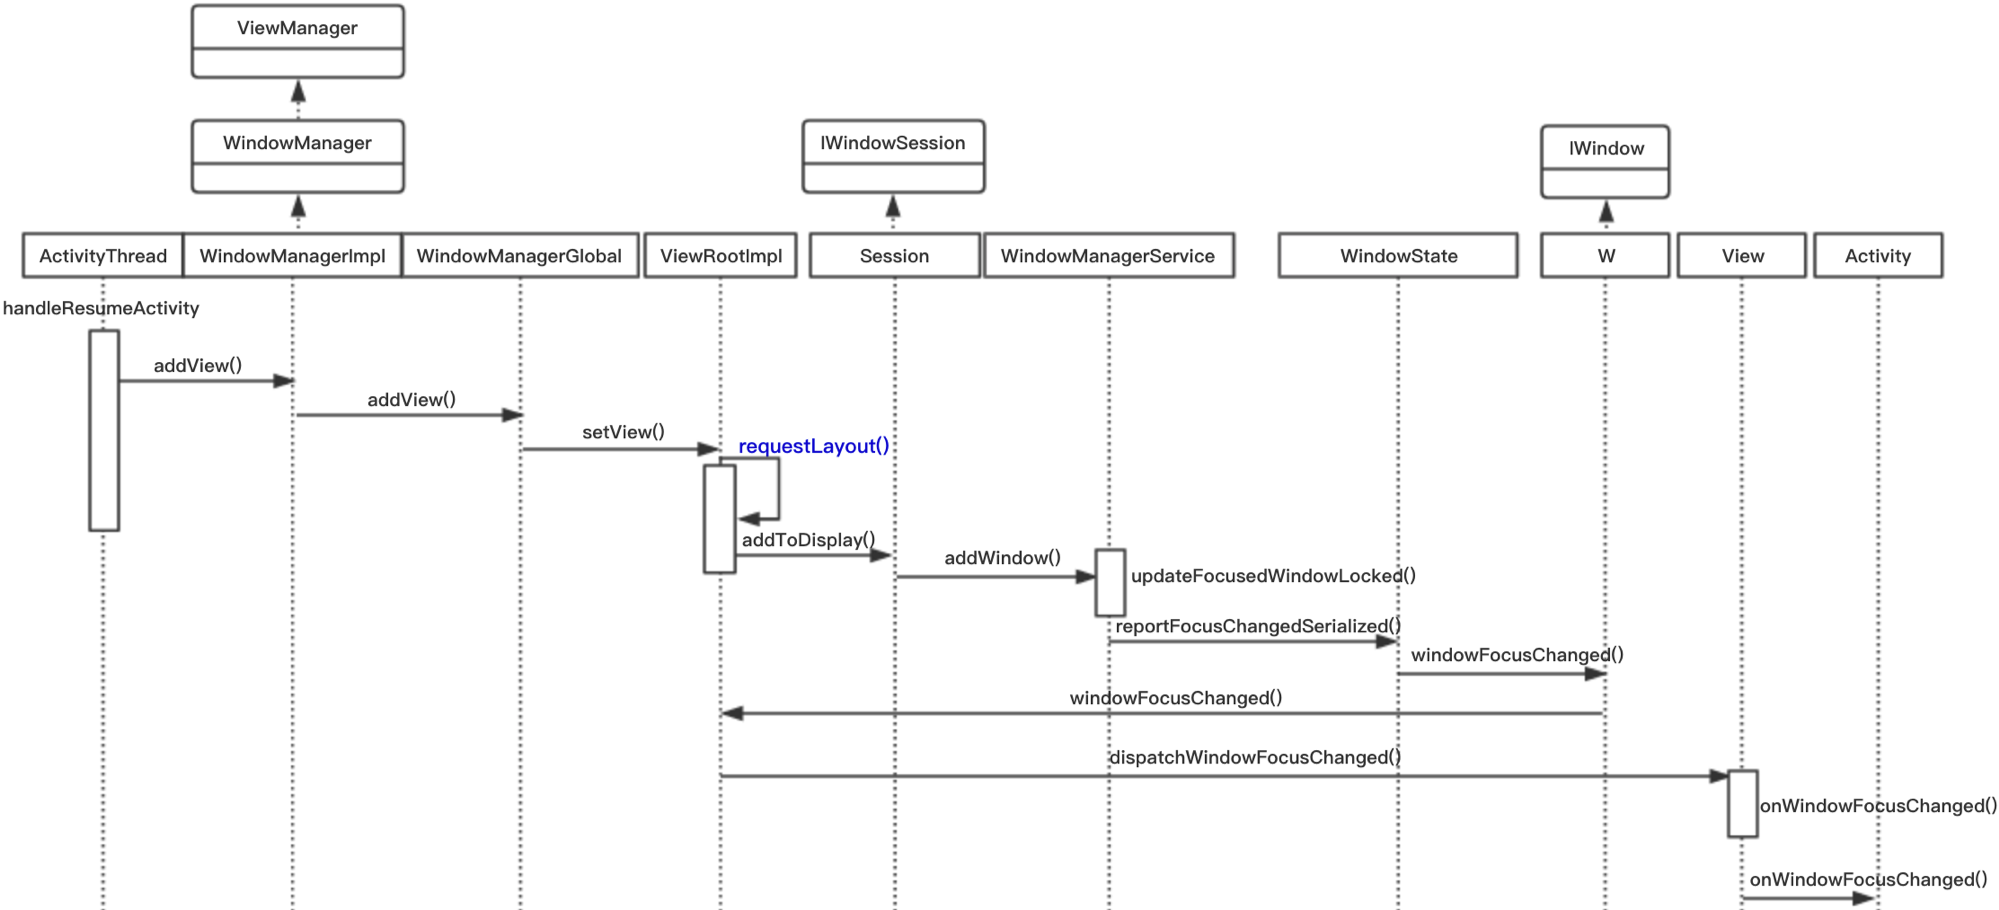
既然是冷启动,那还是得看冷启动系统的回调,直接看ActivityThread.handleResumeActivity()
final void handleResumeActivity(IBinder token,
    boolean clearHide, boolean isForward, boolean reallyResume, int seq, String reason) {
    ActivityClientRecord r = mActivities.get(token);
    ...
    r = performResumeActivity(token, clearHide, reason);    ...
    if (r != null) {
        if (r.window == null && !a.mFinished && willBeVisible) {
            r.window = r.activity.getWindow();
            View decor = r.window.getDecorView();
            decor.setVisibility(View.INVISIBLE);
            ViewManager wm = a.getWindowManager();
            WindowManager.LayoutParams l = r.window.getAttributes();
            a.mDecor = decor;
            l.type = WindowManager.LayoutParams.TYPE_BASE_APPLICATION;
            l.softInputMode |= forwardBit;
            if (r.mPreserveWindow) {
                a.mWindowAdded = true;
                r.mPreserveWindow = false;
                ViewRootImpl impl = decor.getViewRootImpl();
                if (impl != null) {
                    impl.notifyChildRebuilt();
                }
            }
            if (a.mVisibleFromClient) {
                if (!a.mWindowAdded) {
                    a.mWindowAdded = true;
                    // 上面一大串操作基本可以不看,因为到这我们基本都知道下一步是渲染,也就是ViewRootImpl上场了
                    wm.addView(decor, l);
                } else {
                    a.onWindowAttributesChanged(l);
                }
            }
        }
    }
}
到渲染了,直接进ViewRootImpl.performTraversals()
public final class ViewRootImpl implements ViewParent,
     View.AttachInfo.Callbacks, ThreadedRenderer.DrawCallbacks {

    boolean mFirst;

    public ViewRootImpl(Context context, Display display) {
        ...
        mFirst = true; // true for the first time the view is added
        ...
    }

    private void performTraversals() {
        final View host = mView;
        ...
        if (mFirst) {
            ...
            host.dispatchAttachedToWindow(mAttachInfo, 0);
            ...
        }
        ...
        performMeasure();
        performLayout();
        preformDraw();
        ...
        mFirst = false;
    }
}
再进到View.dispatchAttachedToWindow()去瞧瞧
void dispatchAttachedToWindow(AttachInfo info, int visibility) {
    // 倒车请注意!倒车请注意!这里mAttachInfo != null啦!
    mAttachInfo = info;
    ...
    // Transfer all pending runnables.
    // 系统也提示了,到这里执行pending的任务runnbales
    if (mRunQueue != null) {
        mRunQueue.executeActions(info.mHandler);
        mRunQueue = null;
    }
    ...
}

// 开始访问前面存放的任务,看看executeActions()怎么工作
public class HandlerActionQueue {
    private HandlerAction[] mActions;

    /**
    * 我裤子都脱了,你给我看这些?实际也是调用Handler.post()执行任务
    **/
    public void executeActions(Handler handler) {
        synchronized (this) {
            final HandlerAction[] actions = mActions;
            for (int i = 0, count = mCount; i < count; i++) {
                final HandlerAction handlerAction = actions[i];
                handler.postDelayed(handlerAction.action, handlerAction.delay);
            }
            mActions = null;
            mCount = 0;
        }
    }
}
也就是说,View内部维护了一个HandlerActionQueue,我们可以在DecorView attachToWindow前,通过View.post()将任务Runnables存放到HandlerActionQueue中。当DecorView attachToWindow时会先遍历先前存放在HandlerActionQueue的任务数组,通过handler挨个执行。
1.在View.dispatchAttachedToWindow()时mAttachInfo就被赋值了,因此,之后通过View.post()实际就是直接调用Handler.post()执行任务。再往前看,performResumeActivity()在渲染之前先执行,也就说明了为什么只有在onResume()或之前调用有效
2.在View.post()的Runnable run()方法回调中在延迟一个任务,从performTraverals()调用顺序看刚好是在渲染完后下一个任务执行
四.被忽略的Theme
先来看两张效果图
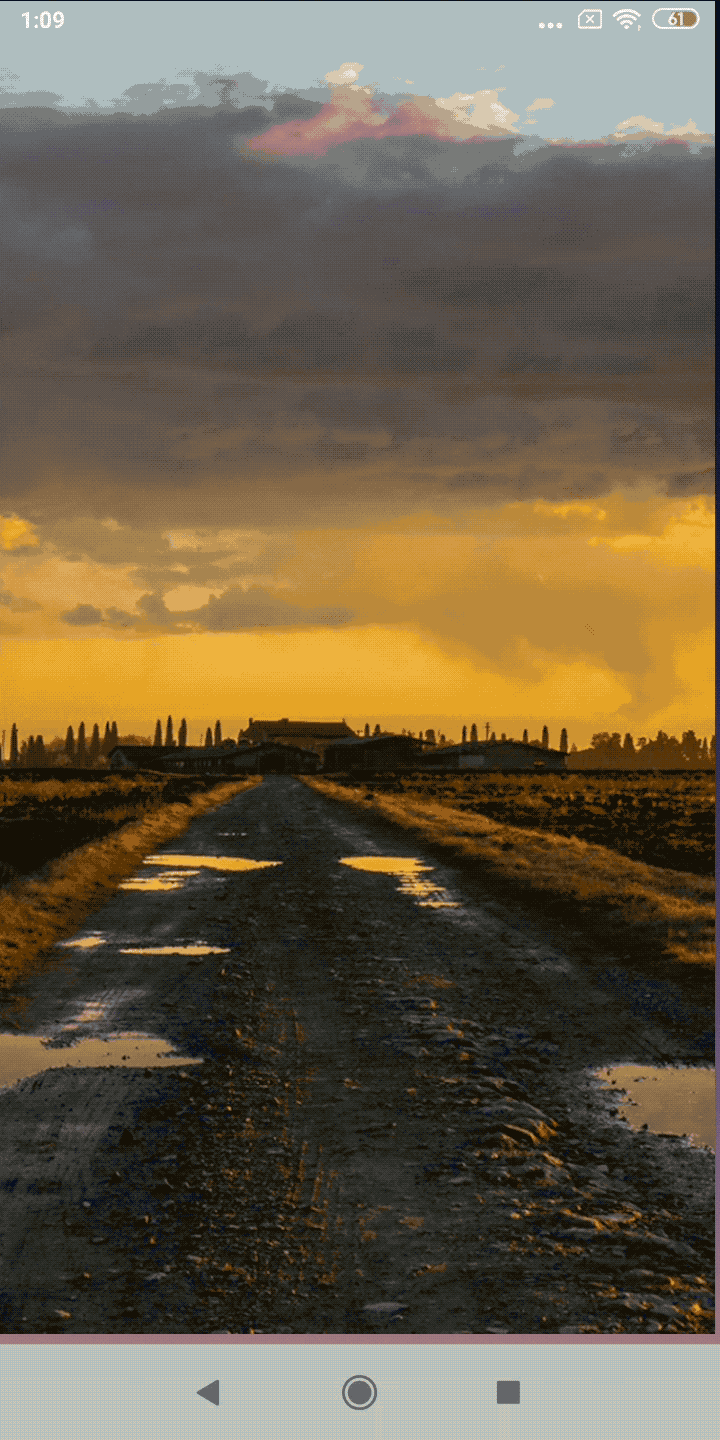

第一张点击完桌面Icon后并没有马上拉起应用,而是停顿了下,给人感觉是手机卡顿了;
第二张点击完桌面Icon后立即出现白屏,然后隔了一段时间后才出现背景图,体验上很明显觉得是应用卡了。
那是什么导致它们的差异?答案就是把闪屏Activity主题设置成全屏无标题栏透明样式
<activity
	android:name="com.huison.test.MainActivity"
	...
	android:theme="@style/TranslucentTheme" />

<style name="TranslucentTheme" parent="android:Theme.Translucent.NoTitleBar.Fullscreen" />
这样可以解决冷启动白屏或黑屏问题,体验上会更好。
五.总结
关于冷启动优化,总结为12个字“减法为主,异步为辅,延迟为补”
减法为主
尽量做减法,能不做的尽量不做!
Application.onCreate()一定要轻!一定要轻!一定要轻!项目中多多少少会涉及到第三方SDK的接入,但不要全部在Application.onCreate()中初始化,尽量懒加载。
Debug包可以加日志打印和部分统计,但Release能不加的就不加
异步为辅
耗时任务尽量异步!见过好多RD都不怎么喜欢做回调,获取某个状态值时,即使调用的函数很耗时,也是直接调用,异步回调重新刷新转态值也能满足业务需求。
当然也不是所有的场景都采用异步回调,因为异步就涉及线程切换,在某些场景下可能会出现闪动,UI体验极差,所以说要尽量!
延迟为补
其实前面找结束点都是为延迟铺路的,但延迟方案并不是最佳的,当我们把冷启动的任务都延迟到结束时执行,冷启动是解决了,但有可能出现结束时任务过多、负载过大而引发其他问,比如ANR、交互卡顿。以前做服务端时,前端(当时几百万DAU)有一个哥们直接写死早上9点请求某个接口,导致接口直接报警了,如果他把9点改为10点,结果肯定一样,后面改成了区段性随机请求,这样就把峰值磨平了。同样,冷启动过程如果把任务都延迟到结束点,那结束点也有可能负载过大出问题。
削峰填谷,离散化任务,合理地利用计算机资源才是解决根本问题!
其他
1.冷启动尽量减少SharedPreferences使用,尤其是和文件操作一起,底层ContextImpl同步锁经常直接卡死。网上有人说用微信的MMKV替换SP,我试了下,效果不是很明显,可能和项目有关系吧,不过MMKV初始化也需要时间。
2.关注冷启动的常驻内存和GC情况,如果GC过于频繁也会有所影响,支付宝做过这方面的分析
支付宝客户端架构解析:Android 客户端启动速度优化之「垃圾回收」
到此,冷启动优化总结也算告一段落,有人会问做了那么多,效果到底如何?好像是哦,最怕就是"一顿操作猛如虎,上线review二百五"!GP-Vitals有冷启动指标,项目优化前冷启动时间过长(>5s)百分比为3.63%,一顿操作后百分比下降到0.95%,哇!Surprise!
