

SwiftUI是一个非常新的框架,目前有一些bug。然而,构建相同的接口所需的代码比在任何其他环境中编写的代码少5倍。这正是我将在本教程中向您展示的内容。
1.开发环境
首先,必须下载最新的XCode 11.0和macOS 10.15.
2.在XCode中创建一个新的工程
3.创建第一个View
创建新项目时,您将看到一个全新的代码结构。不要害怕未知。你必须学习一次,然后你可以在任何地方使用它:在iOS,新的iPad OS,watchOS,甚至MacOS! WWDC2019上展示的最新功能表明,如果您可以为iOS构建应用程序,您可以轻松地将其转换为任何其他Apple平台,而无需其他知识。
在SwiftUI中构建应用程序实际上让我想起了使用21世纪初的HTML编辑器创建网站。
4.在View上添加你的第一条信息
好的,我们在这个视图中添加一些消息。用下面的代码替换您的代码并仔细阅读我的所有注释。
import SwiftUI

// let's create a structure that will represent each message in chat
struct ChatMessage : Hashable {
    var message: String
    var avatar: String
}

struct ContentView : View {

    // let's add some dummy values to the messages
    // suppose, there are only two messages in the chat room sent by two users: A and B
    // A sent "Hello world" with a red message bubble color
    // B sent "Hi" with a blue message color
    var messages = [
        ChatMessage(message: "Hello world", avatar: "A"),
        ChatMessage(message: "Hi", avatar: "B")
    ]

    var body: some View {

        // I've removed the text line from here and replaced it with a list
        // List is the way you should create any list in SwiftUI
        List {
            // we have several messages so we use the For Loop
            ForEach(messages.identified(by: \.self)) {
                // then we just show the avatars of the users and their messages
                // by using these two Text functions
                Text($0.avatar)
                Text($0.message)
            }
        }
    }
}

#if DEBUG
struct ContentView_Previews : PreviewProvider {
    static var previews: some View {
        ContentView()
    }
}
#endif
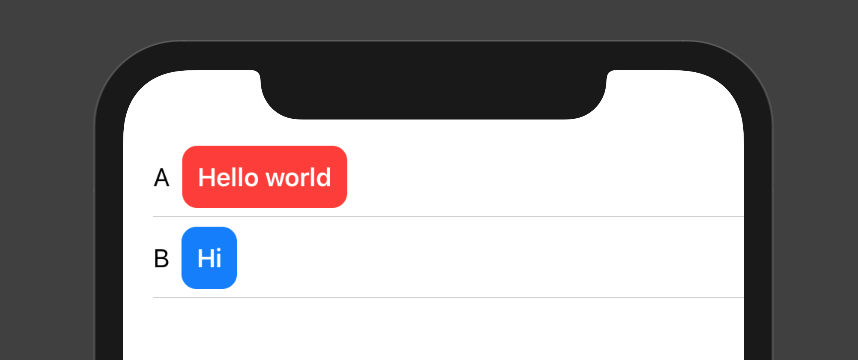
现在,你看到了什么
5.为信息列表添加设计
现在,让我们让这些消息看起来像真正的消息气泡。为此,我们必须将color var添加到ChatMessage结构中:
struct ChatMessage : Hashable {
var message: String
var avatar: String
var color: Color
}
```然后我们需要使用color参数填充消息列表:
var messages = [ ChatMessage(message: “Hello world”, avatar: “A”, color: .red), ChatMessage(message: “Hi”, avatar: “B”, color: .blue) ]
List { ForEach(messages.identified(by: .self)) { Text($0.avatar) Text($0.message) .bold() .foregroundColor(Color.white) .padding(10) .background($0.color, cornerRadius: 10) } }
是不是很酷?伙计们,看,我们通过编写几行代码在iOS应用程序中制作了消息气泡。

现在让我们将姓名与消息放在一行里。为了不使For循环的内容过于混乱,让我们利用在SwiftUI中如何轻松格式化代码。创建一个新结构并将文本放在那里:
// ChatRow will be a view similar to a Cell in standard Swift struct ChatRow : View {
// we will need to access and represent the chatMessages here
var chatMessage: ChatMessage

// body - is the body of the view, just like the body of the first view we created when opened the project
var body: some View {
    // HStack - is a horizontal stack. We let the SwiftUI know that we need to place
    // all the following contents horizontally one after another
    HStack {
        Text(chatMessage.avatar)
        Text(chatMessage.message)
            .bold()
            .foregroundColor(Color.white)
            .padding(10)
            .background(chatMessage.color, cornerRadius: 10)
    }
}
}
ForEach(messages.identified(by: .self)) { ChatRow(chatMessage: $0) }
如果您愿意,您可以使用头像并对其进行样式的更改。
### 6.使用老的带有网络请求的swift文件与swift ui进行桥接
我们已经学会了如何显示消息字典中的消息。但是我们如何从其他地方获取消息,比如从标准的Swift文件中获取消息,我们可以使用老的流行库和框架处理所有网络部分?而且...我们如何发送自己的消息?
首先,让我们创建一个没有SwiftUI支持的标准Swift文件:
将其命名为ChatController.swift并放入SwiftUI Chat文件夹中。我们将使用此文件作为旧Swift代码与用SwiftUI编写的新代码之间的桥梁。这意味着您可以使用ChatController文件使用Google FireBase连接到您的数据库。然后提取数据并将其发送到SwiftUI View。为了使它工作,我们将不得不导入Combine和SwiftUI框架。
import Combine import SwiftUI
// ChatController needs to be a BindableObject in order // to be accessible by SwiftUI class ChatController : BindableObject { // didChange will let the SwiftUI know that some changes have happened in this object // and we need to rebuild all the views related to that object var didChange = PassthroughSubject<Void, Never>()
// We've relocated the messages from the main SwiftUI View. Now, if you wish, you can handle the networking part here and populate this array with any data from your database. If you do so, please share your code and let's build the first global open-source chat app in SwiftUI together
var messages = [
    ChatMessage(message: "Hello world", avatar: "A", color: .red),
    ChatMessage(message: "Hi", avatar: "B", color: .blue)
]

// this function will be accessible from SwiftUI main view
// here you can add the necessary code to send your messages not only to the SwiftUI view, but also to the database so that other users of the app would be able to see it
func sendMessage(_ chatMessage: ChatMessage) {
    // here we populate the messages array
    messages.append(chatMessage)
    // here we let the SwiftUI know that we need to rebuild the views
    didChange.send(())
}
}
var window: UIWindow? var chatController = ChatController()
let window = UIWindow(frame: UIScreen.main.bounds) window.rootViewController = UIHostingController(rootView: ContentView().environmentObject(chatController)) self.window = window
在名为ContentView.swift的主SwiftUI视图文件中,我们还应该将新的environmentObject添加到Debug中,以使其可以通过预览访问:
#if DEBUG struct ContentView_Previews : PreviewProvider { static var previews: some View { ContentView() .environmentObject(ChatController()) } } #endif
### 7.添加一个TextField和一个按钮来发送消息
不要失去你的能量!我们差不多完成了。现在我们需要添加一个TextField和一个Button来发送消息。检查ContentView.swift文件的当前版本以获取更改和注释:
import SwiftUI
// let's create a structure that will represent each message in chat struct ChatMessage : Hashable { var message: String var avatar: String var color: Color // isMe will be true if We sent the message var isMe: Bool = false }
struct ContentView : View {
// @State here is necessary to make the composedMessage variable accessible from different views
@State var composedMessage: String = ""
@EnvironmentObject var chatController: ChatController

var messages = [
    ChatMessage(message: "Hello world", avatar: "A", color: .red),
    ChatMessage(message: "Hi", avatar: "B", color: .blue)
]

var body: some View {

    // the VStack is a vertical stack where we place all our substacks like the List and the TextField
    VStack {
        // I've removed the Hello World text line from here and replaced it with a list
        // List is the way you should create any list in SwiftUI
        List {
            ForEach(chatController.messages.identified(by: \.self)) {
                // we have several messages so we use the For Loop
                ChatRow(chatMessage: $0)
            }
        }

        // TextField are aligned with the Send Button in the same line so we put them in HStack
        HStack {
            // this textField generates the value for the composedMessage @State var
            TextField($composedMessage, placeholder: Text("Message...")).frame(minHeight: 30)
            // the button triggers the sendMessage() function written in the end of current View
            Button(action: sendMessage) {
                Text("Send")

            }
            }.frame(minHeight: 50).padding()
            // that's the height of the HStack
        }
}

func sendMessage() {
    chatController.sendMessage(ChatMessage(message: composedMessage, avatar: "C", color: .green, isMe: true))
    composedMessage = ""
}
}
// ChatRow will be a view similar to a Cell in standard Swift struct ChatRow : View { var chatMessage: ChatMessage
// body - is the body of the view, just like the body of the first view we created when opened the project
var body: some View {
    Group {
        // if the message is sent by the user,
        // show it on the right side of the view
        if !chatMessage.isMe {
            // HStack - is a horizontal stack. We let the SwiftUI know that we need to place
            // all the following contents horizontally one after another
            HStack {
                Text(chatMessage.avatar)
                Text(chatMessage.message)
                    .bold()
                    .foregroundColor(Color.white)
                    .padding(10)
                    .background(chatMessage.color, cornerRadius: 10)
                // Spacer fills the gaps of the Horizontal stack between the content and the borders
                Spacer()
            }
        } else {
            // else show the message on the left side
            HStack {
                Spacer()
                Text(chatMessage.message)
                    .bold()
                    .foregroundColor(Color.white)
                    .padding(10)
                    .background(chatMessage.color, cornerRadius: 10)
                Text(chatMessage.avatar)
            }
        }
    }
}
}
#if DEBUG struct ContentView_Previews : PreviewProvider { static var previews: some View { ContentView() .environmentObject(ChatController()) } } #endif
要使这个功能正常,您应该在iOS模拟器上运行应用程序:

然后,您将看到来自ChatController的消息以及新的TextField和“发送”按钮。要发送消息,请单击TextField,然后按Cmd + K以显示键盘(新的XCode仍有一些错误与硬件键盘一起使用,因此我们必须切换软件键盘)。

输入消息“What are up guys?”。再次按Cmd + K可隐藏模拟器的键盘,然后按“发送”按钮。

### 总结
SwiftUI是一个全新的框架,可以帮助我们创建更多功能并编写更少的代码。尽管如此,它仍然是新的,并没有太多关于如何做你想做的事情的文档,所以我试着在本文中提供非常丰富的信息,并尽可能清楚地描述每一步。