

背景
支付宝的会员页的卡片,有一个左右翻转手机,光线随手势移动的效果。

我们也要实现这种效果,但是我们的卡片是在RN页里的,那么RN能否实现这样的功能呢?
调研
开始先看了一下react-native-sensors, 大概写法是这样
subscription = attitude.subscribe(({ x, y, z }) =>
    {
        let newTranslateX = y * screenWidth * 0.5 + screenWidth/2 - imgWidth/2;
        this.setState({
            translateX: newTranslateX
        });
    }
);
这还是传统的刷新页面的方式——setState,最终JS和Native之间是通过bridge进行异步通信,所以最后的结果就是会卡顿。
如何能不通过bridge,直接让native来更新view的呢 答案是有——Using Native Driver for Animated!!!
Using Native Driver for Animated
什么是Animated
Animated API能让动画流畅运行,通过绑定Animated.Value到View的styles或者props上,然后通过Animated.timing()等方法操作Animated.Value进而更新动画。更多关于Animated API可以看这里。
Animated默认是使用JS driver驱动的,工作方式如下图:
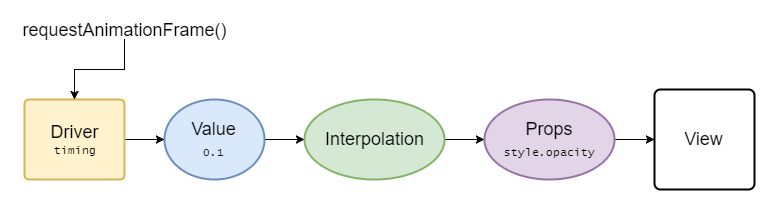
此时的页面更新流程为:
[JS] The animation driver uses
requestAnimationFrameto updateAnimated.Value[JS] Interpolate calculation [JS] UpdateAnimated.Viewprops
[JS→N] Serialized view update events
[N] TheUIVieworandroid.Viewis updated.
Animated.event
可以使用Animated.event关联Animated.Value到某一个View的事件上。
<ScrollView
  scrollEventThrottle={16}
  onScroll={Animated.event(
    [{ nativeEvent: { contentOffset: { y: this.state.animatedValue } } }]
  )}
>
  {content}
</ScrollView>
useNativeDriver
RN文档中关于useNativeDriver的说明如下:
The
AnimatedAPI is designed to be serializable. By using the native driver, we send everything about the animation to native before starting the animation, allowing native code to perform the animation on the UI thread without having to go through the bridge on every frame. Once the animation has started, the JS thread can be blocked without affecting the animation.
使用useNativeDriver可以实现渲染都在Native的UI线程,使用之后的onScroll是这样的:
<Animated.ScrollView // <-- Use the Animated ScrollView wrapper
  scrollEventThrottle={1} // <-- Use 1 here to make sure no events are ever missed
  onScroll={Animated.event(
    [{ nativeEvent: { contentOffset: { y: this.state.animatedValue } } }],
    { useNativeDriver: true } // <-- Add this
  )}
>
  {content}
</Animated.ScrollView>
使用useNativeDriver之后,页面更新就没有JS的参与了
[N] Native use
CADisplayLinkorandroid.view.Choreographerto updateAnimated.Value[N] Interpolate calculation
[N] UpdateAnimated.Viewprops
[N] TheUIVieworandroid.Viewis updated.
我们现在想要实现的效果,实际需要的是传感器的实时翻转角度数据,如果有一个类似ScrollView的onScroll的event映射出来是最合适的,现在就看如何实现。
实现
首先看JS端,Animated API有个createAnimatedComponent方法,Animated内部的API都是用这个函数实现的
const Animated = {
  View: AnimatedImplementation.createAnimatedComponent(View),
  Text: AnimatedImplementation.createAnimatedComponent(Text),
  Image: AnimatedImplementation.createAnimatedComponent(Image),
  ...
}
然后看native,RCTScrollView的onScroll是怎么实现的
RCTScrollEvent *scrollEvent = [[RCTScrollEvent alloc] initWithEventName:eventName
                                                                 reactTag:self.reactTag
                                                               scrollView:scrollView
                                                                 userData:userData
                                                            coalescingKey:_coalescingKey];
[_eventDispatcher sendEvent:scrollEvent];
这里是封装了一个RCTScrollEvent,其实是RCTEvent的一个子类,那么一定要用这种方式么?不用不可以么?所以使用原始的调用方式试了一下:
if (self.onMotionChange) {
    self.onMotionChange(data);
}
发现,嗯,不出意料地not work。那我们调试一下onScroll最后在native的调用吧:

所以最后还是要调用[RCTEventDispatcher sendEvent:]来触发Native UI的更新,所以使用这个接口是必须的。然后我们按照RCTScrollEvent来实现一下RCTMotionEvent,主体的body函数代码为:
- (NSDictionary *)body
{
    NSDictionary *body = @{
                           @"attitude":@{
                                   @"pitch":@(_motion.attitude.pitch),
                                   @"roll":@(_motion.attitude.roll),
                                   @"yaw":@(_motion.attitude.yaw),
                                   },
                           @"rotationRate":@{
                                   @"x":@(_motion.rotationRate.x),
                                   @"y":@(_motion.rotationRate.y),
                                   @"z":@(_motion.rotationRate.z)
                                   },
                           @"gravity":@{
                                   @"x":@(_motion.gravity.x),
                                   @"y":@(_motion.gravity.y),
                                   @"z":@(_motion.gravity.z)
                                   },
                           @"userAcceleration":@{
                                   @"x":@(_motion.userAcceleration.x),
                                   @"y":@(_motion.userAcceleration.y),
                                   @"z":@(_motion.userAcceleration.z)
                                   },
                           @"magneticField":@{
                                   @"field":@{
                                           @"x":@(_motion.magneticField.field.x),
                                           @"y":@(_motion.magneticField.field.y),
                                           @"z":@(_motion.magneticField.field.z)
                                           },
                                   @"accuracy":@(_motion.magneticField.accuracy)
                                   }
                           };

    return body;
}
最终,在JS端的使用代码为
var interpolatedValue = this.state.roll.interpolate(...)

<AnimatedDeviceMotionView
  onDeviceMotionChange={
    Animated.event([{
      nativeEvent: {
        attitude: {
          roll: this.state.roll,
        }
      },
    }],
    {useNativeDriver: true},
    )
  }
/>

<Animated.Image style={{height: imgHeight, width: imgWidth, transform: [{translateX:interpolatedValue}]}} source={require('./image.png')} />
最终实现效果:

继续优化
上面的实现方式有一点不太好,就是需要在render中写一个无用的AnimatedMotionView,来实现Animated.event和Animated.Value的连接。那么有没有方法去掉这个无用的view,像一个RN的module一样使用我们的组件呢?
Animated.event做的事情就是将event和Animated.Value关联起来,那么具体是如何实现的呢?
首先我们看一下node_modules/react-native/Libraries/Animated/src/AnimatedImplementation.js中createAnimatedComponent的实现,里面调用到attachNativeEvent这个函数,然后调用到native:
NativeAnimatedAPI.addAnimatedEventToView(viewTag, eventName, mapping);
我们看看native代码中这个函数是怎么实现的:
- (void)addAnimatedEventToView:(nonnull NSNumber *)viewTag
                     eventName:(nonnull NSString *)eventName
                  eventMapping:(NSDictionary<NSString *, id> *)eventMapping
{
  NSNumber *nodeTag = [RCTConvert NSNumber:eventMapping[@"animatedValueTag"]];
  RCTAnimatedNode *node = _animationNodes[nodeTag];
......
  NSArray<NSString *> *eventPath = [RCTConvert NSStringArray:eventMapping[@"nativeEventPath"]];

  RCTEventAnimation *driver =
    [[RCTEventAnimation alloc] initWithEventPath:eventPath valueNode:(RCTValueAnimatedNode *)node];

  NSString *key = [NSString stringWithFormat:@"%@%@", viewTag, eventName];
  if (_eventDrivers[key] != nil) {
    [_eventDrivers[key] addObject:driver];
  } else {
    NSMutableArray<RCTEventAnimation *> *drivers = [NSMutableArray new];
    [drivers addObject:driver];
    _eventDrivers[key] = drivers;
  }
}
eventMapping中的信息最终构造出一个eventDriver,这个driver最终会在我们native构造的RCTEvent调用sendEvent的时候调用到:
- (void)handleAnimatedEvent:(id<RCTEvent>)event
{
  if (_eventDrivers.count == 0) {
    return;
  }

  NSString *key = [NSString stringWithFormat:@"%@%@", event.viewTag, event.eventName];
  NSMutableArray<RCTEventAnimation *> *driversForKey = _eventDrivers[key];
  if (driversForKey) {
    for (RCTEventAnimation *driver in driversForKey) {
      [driver updateWithEvent:event];
    }

    [self updateAnimations];
  }
}
等等,那么那个viewTag和eventName的作用,就是连接起来变成了一个key?What?

这个标识RN中的view的viewTag最后只是变成一个唯一字符串而已,那么我们是不是可以不需要这个view,只需要一个唯一的viewTag就可以了呢?
顺着这个思路,我们再看看生成这个唯一的viewTag。我们看一下JS加载UIView的代码(RN版本0.45.1)
mountComponent: function(
  transaction,
  hostParent,
  hostContainerInfo,
  context,
) {
  var tag = ReactNativeTagHandles.allocateTag();

  this._rootNodeID = tag;
  this._hostParent = hostParent;
  this._hostContainerInfo = hostContainerInfo;
...
  UIManager.createView(
    tag,
    this.viewConfig.uiViewClassName,
    nativeTopRootTag,
    updatePayload,
  );
...
  return tag;
}
我们可以使用ReactNativeTagHandles的allocateTag方法来生成这个viewTag。
2019.02.25更新:在RN0.58.5中,由于没有暴露allocateTag()方法,所以只能赋给tag一个大数来作为workaround
到此为止,我们就可以使用AnimatedImplementation中的attachNativeEvent方法来连接Animated.event和Animated.Value了,不必需要在render的时候添加一个无用的view。
详细代码请移步Github: github.com/rrd-fe/reac…,觉得不错请给个star :)
最后,欢迎大家star我们的人人贷大前端团队博客,所有的文章还会同步更新到知乎专栏 和 掘金账号,我们每周都会分享几篇高质量的大前端技术文章。
Reference
facebook.github.io/react-nativ…
