

-
React Navigation 简介
React Navigation提供了一种在屏幕之间切换并管理导航历史记录的方式。 如果您的应用程序只使用一个 stack navigator ,则它在概念上类似于Web浏览器处理导航状态的方式 - 当用户与它进行交互时,应用程序会从导航堆栈中新增和删除页面,这会导致用户看到不同的页面。 Web浏览器和 React Navigation 工作原理的一个主要区别是:React Navigation 的 stack navigator 提供了在 Android 和 iOS 设备上,在堆栈中的路由之间导航时你期望的手势和动画。
-
安装
yarn add react-navigation
# or with npm
# npm install --save react-navigation
npm install --save react-native-gesture-handler react-native link react-native-gesture-handlernpm install然后把依赖引入到Android项目中:
第一步:setting.gradle文件中添加
include ':react-native-gesture-handler'
project(':react-native-gesture-handler').projectDir = new File(rootProject.projectDir, '../node_modules/react-native-gesture-handler/android')

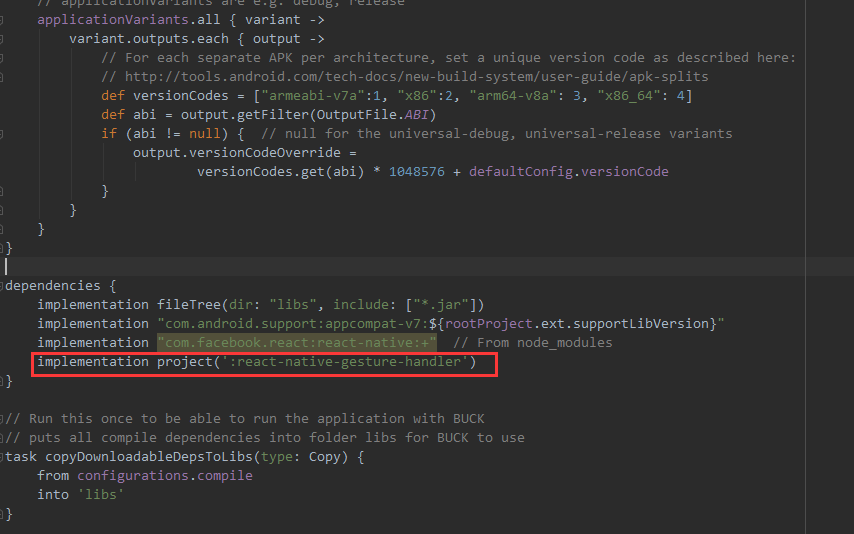
第二步: 在Android/app/文件夹下的build.gradle文件中添加
implementation project(':react-native-gesture-handler')
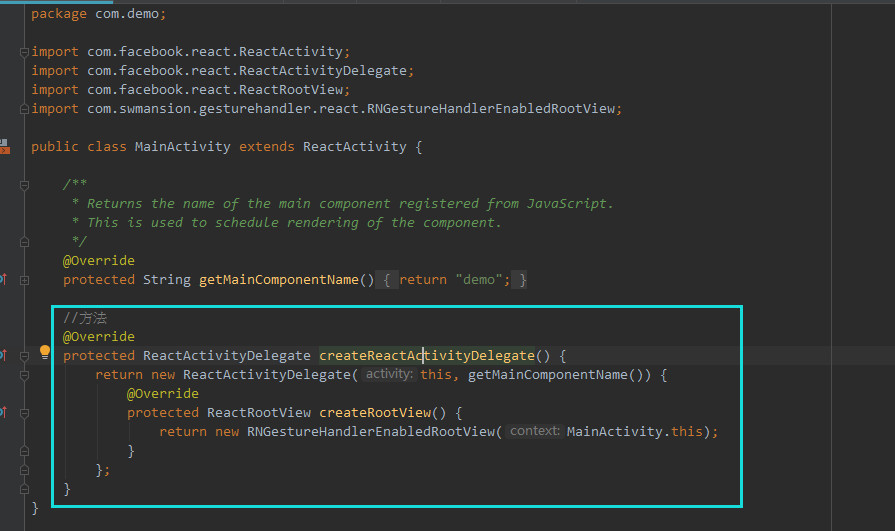
第三步: 修改Application

第四步: 修改Activity
    import com.facebook.react.ReactActivity;
    import com.facebook.react.ReactActivityDelegate;
    import com.facebook.react.ReactRootView;
    import com.swmansion.gesturehandler.react.RNGestureHandlerEnabledRootView;

    public class MainActivity extends ReactActivity {

        /**
         * Returns the name of the main component registered from JavaScript.
         * This is used to schedule rendering of the component.
         */
        @Override
        protected String getMainComponentName() {
            return "demo";
        }

        @Override
        protected ReactActivityDelegate createReactActivityDelegate() {
            return new ReactActivityDelegate(this, getMainComponentName()) {
                @Override
                protected ReactRootView createRootView() {
                    return new RNGestureHandlerEnabledRootView(MainActivity.this);
                }
            };
        }
    }
-
页面切换
首先需要添加两个页面,在项目的根目录下新建了一个文件夹reactSrc用来存放react-native代码。下面新建pages文件夹专门存放页面文件。
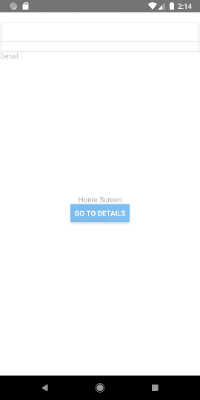
pages/home/home.js ↓
import React from 'react'
import { Text, Button, View, TouchableNativeFeedback } from 'react-native'
export default class Home extends React.Component {
    render() {
        return (
            <View style={{ flex: 1, alignItems: 'center', justifyContent: 'center' }}>
                <Text>Home Screen</Text>
                <TouchableNativeFeedback >
                    <Button
                        title="Go to Details"
                        onPress={() => this.props.navigation.navigate('Details')}
                    /></TouchableNativeFeedback>
            </View>
        )
    }

}
pages/detail/detail.js ↓
import React from 'react'
import { StyleSheet, Text } from 'react-native'
export default class Detail extends React.Component {
    render() {
        return (
            <Text>Detail</Text>
        )
    }

}
const style = StyleSheet.create({
    webview: {
        flex: 1
    }
})
然后修改App.js文件 ↓
import React, { Component } from 'react';
import { createStackNavigator, createAppContainer } from 'react-navigation';
import HomeScreen from './reactSrc/pages/home/home'
import DetailsScreen from './reactSrc/pages/detail/detail'
const AppNavigator = createStackNavigator({
  Home: {
    screen: HomeScreen,
  },
  Details: {
    screen: DetailsScreen,
  },
}, {
    initialRouteName: 'Home',
  });
const AppContainer = createAppContainer(AppNavigator);

export default class App extends React.Component {
  render() {
    return <AppContainer />;
  }
}
如果我再Detail页面再调用this.props.navigation.navigate('Details')会发生什么?
答案是什么都不会发生。这是因为我们已经在 Details 路由上了。 导航功能粗略地意味着“去这个页面”,如果你已经在那个页面上,那么意味着它不会做任何事情。
如果你想再次进入Detail页面。请用Push方法。
每次调用 push 时, 我们会向导航堆栈中添加新路由。 当你调用 navigate 时, 它首先尝试查找具有该名称的现有路由, 并且只有在堆栈上没有一个新路由时才会推送该路由。
如果当前页面可以执行返回操作,则 stack navigator 会自动提供一个包含返回按钮的标题栏(如果导航堆栈中只有一个页面,则没有任何可返回的内容,因此也不存在返回键)。
有时候你希望能够以编程的方式触发此行为,可以使用this.props.navigation.goBack()
-
传递参数给路由
将上面两个页面的代码稍加修改:
pages/home/home.js ↓
import React from 'react'
import { Text, Button, View, TouchableNativeFeedback } from 'react-native'
export default class Home extends React.Component {
    render() {
        const itemId = this.props.navigation.getParam('itemId', 'NO-ID');
        return (
            <View style={{ flex: 1, alignItems: 'center', justifyContent: 'center' }}>
                <Text>Home Screen</Text>
                <TouchableNativeFeedback >
                    <Button
                        title={itemId}
                        onPress={() => this.props.navigation.navigate('Details', {
                            itemId: 86,
                            otherParam: 'anything you want here',
                        })}
                    /></TouchableNativeFeedback>
            </View>
        )
    }
}
pages/detail/detail.js ↓
import React from 'react'
import { View, Text, Button } from 'react-native'
export default class Detail extends React.Component {
    render() {
        /* 2. Get the param, provide a fallback value if not available */
        const { navigation } = this.props;
        const itemId = navigation.getParam('itemId', 'NO-ID');
        const otherParam = navigation.getParam('otherParam', 'some default value');
        return (
            <View style={{ flex: 1, alignItems: 'center', justifyContent: 'center' }}>
                <Text>Details Screen</Text>
                <Text>itemId: {JSON.stringify(itemId)}</Text>
                <Text>otherParam: {JSON.stringify(otherParam)}</Text>
                <Button
                    title="Go to Details... again"
                    onPress={() =>
                        this.props.navigation.push('Details', {
                            itemId: Math.floor(Math.random() * 100),
                        })}
                />
                <Button
                    title="Go to Home"
                    onPress={() => this.props.navigation.navigate('Home', {
                        itemId: "Back From Detail:" + navigation.getParam('itemId', 'NO-ID')
                    })}
                />
                <Button
                    title="Go back"
                    onPress={() => this.props.navigation.goBack()}
                />
            </View>
        );
    }

}
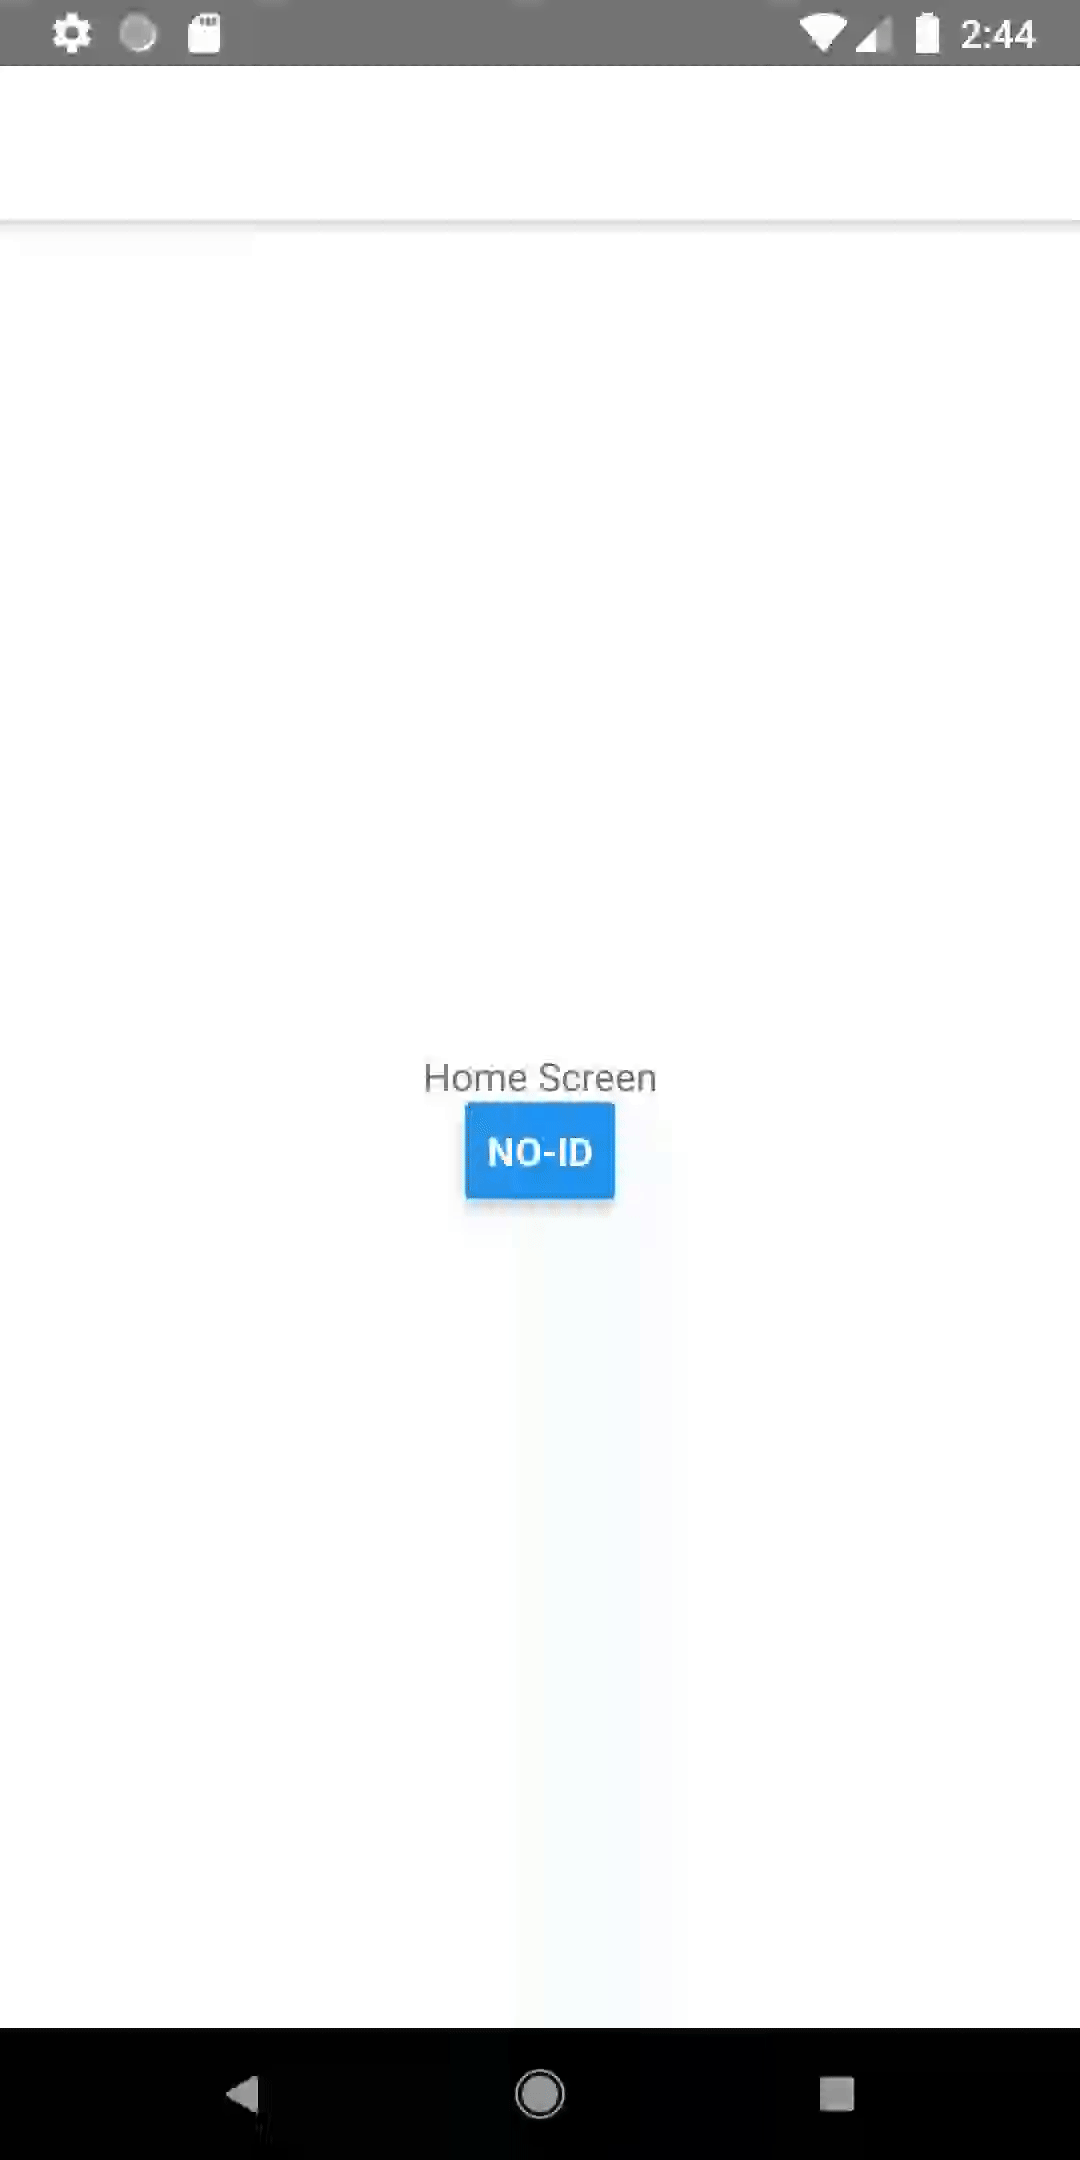
一开始进入Home页面,路由里面没有‘itemId’对应的值,所以按钮上显示NO-ID。
点击这个按钮进入到Detail页面,Detail页面上显示从Home页面传过来的数据。
点击‘Go to Details... again’ 会新刷新数据。 点击‘Go to Home’会返回Home页,并传回数据。
navigate
调用此方法可跳转到应用程序中的另一个页面.如果已存在,将后退到此路由
goBack
关闭当前页面并返回上一个页面
StackNavigator提供了以下方法:
push
推一个新的路由到堆栈
pop
返回堆栈中的上一个页面
popToTop
跳转到堆栈中最顶层的页面
-
路由的种类
createStackNavigator
一次渲染一个页面,并支持页面切换, 当我们打开一个新的页面时,该页面会被置于堆栈的顶层。
默认情况下,stack navigator 被配置为具有熟悉的iOS和Android外观 & 感觉:新屏幕从iOS右侧滑入,从Android底部淡入。 在iOS上,stack navigator 也可以配置为屏幕从底部滑入的模式样式。
SwitchNavigator
在一个页面和另一个页面之间进行切换,在屏幕上没有 UI,在页面变为非活动状态时卸载页面。
DrawerNavigator提供从左侧滑入的抽屉。
TabNavigator标签栏,可让您在不同路由之间进行切换。 路由被懒加载 - 它们的屏幕组件只有在第一次获取焦点时才会被加载。
-
打开全屏模式(对话框)
一个modal就像一个弹出窗口 — 它不是主要导航流程的一部分 — 它通常有一个不同的转换,一个不同的关闭方式,并且打算专注于一个特定的内容或交互。
class HomeScreen extends React.Component {
  static navigationOptions = ({ navigation }) => {
    const params = navigation.state.params || {};

    return {
      headerLeft: (
        <Button
          onPress={() => navigation.navigate('MyModal')}
          title="Info"
          color="#fff"
        />
      ),
      /* the rest of this config is unchanged */
    };
  };

  /* render function, etc */
}

class ModalScreen extends React.Component {
  render() {
    return (
      <View style={{ flex: 1, alignItems: 'center', justifyContent: 'center' }}>
        <Text style={{ fontSize: 30 }}>This is a modal!</Text>
        <Button
          onPress={() => this.props.navigation.goBack()}
          title="Dismiss"
        />
      </View>
    );
  }
}

const MainStack = createStackNavigator(
  {
    Home: {
      screen: HomeScreen,
    },
    Details: {
      screen: DetailsScreen,
    },
  },
  {
    /* Same configuration as before */
  }
);

const RootStack = createStackNavigator(
  {
    Main: {
      screen: MainStack,
    },
    MyModal: {
      screen: ModalScreen,
    },
  },
  {
    mode: 'modal',
    headerMode: 'none',
  }
);
说明:我们将一个 stack navigator 嵌套到另一个stack navigator 中。mode配置可以是card(默认)或modal。 在 iOS 上,modal表现为从页面底部划入,并允许用户从页面顶部向下缩小以关闭它。 modal配置对Android没有影响。当我们调用navigate方法时,我们不需要指定除我们想要导航的路由之外的任何东西。 没有必要限定它属于哪个堆栈, React Navigation 尝试在最近的导航器上查找路线,然后在那里执行操作。将页面从HomeScreen切换到MainStack 。我们知道MainStack无法处理路由MyModal,因此它会将其传递到可以处理该路由的RootStack,从而实现页面的跳转。
-
withNavigation
withNavigation是一个高阶组件,它可以将 navigation 这个 prop 传递到一个包装的组件。 当你无法直接将 navigation 这个 prop 传递给组件,或者不想在深度嵌套的子组件中传递它时,它将非常有用。注:一般情况下navigation只会在navigation启动的组件中作为prop传递。
import React from 'react'; import { Button } from 'react-native'; import { withNavigation } from 'react-navigation'; class MyBackButton extends React.Component { render() { return <Button title="Back" onPress={() => { this.props.navigation.goBack() }} />; } } // withNavigation returns a component that wraps MyBackButton and passes in the // navigation prop export default withNavigation(MyBackButton); -
深度链接
处理外部 URI,通过一个URI打开一个React-Native页面。
新建一个页面 pages/person/person.js ↓
import React from 'react'
import { View, Text, Button } from 'react-native'
export default class Person extends React.Component {
    render() {

        return (
            <View style={{ flex: 1, alignItems: 'center', justifyContent: 'center' }}>
                <Text>Person Screen {this.props.navigation.getParam('user', 'NO-USER')}</Text>
            </View>
        );
    }

}
App.js添加person页面的路由, person页面使用独立的栈 ↓
import React, { Component } from 'react';
import { createStackNavigator, createAppContainer, createSwitchNavigator } from 'react-navigation';
import HomeScreen from './reactSrc/pages/home/home'
import DetailsScreen from './reactSrc/pages/detail/detail'
import PersonScreen from './reactSrc/pages/person/person'
const HomeNavigator = createStackNavigator({
  Home: {
    screen: HomeScreen,
  },
  Details: {
    screen: DetailsScreen,
  },
});

const MainNavigator = createSwitchNavigator({
  HomeNavigator: {
    screen: HomeNavigator,
  },
  PersonNavigator: {
    screen: PersonScreen,
    path: 'person/:user',
  },
});

const AppContainer = createAppContainer(MainNavigator);

export default class App extends React.Component {
  render() {
    return <AppContainer uriPrefix='reactdemo://demoproject/' />;
  }
}
Android清单文件AndroidManifest.xml中给ReactNative的宿祖Activity加上intent-filter,
<?xml version="1.0" encoding="utf-8"?>
<manifest xmlns:android="http://schemas.android.com/apk/res/android"
    package="com.demo">

    <uses-permission android:name="android.permission.INTERNET" />

    <application
        android:name=".MainApplication"
        android:allowBackup="false"
        android:icon="@mipmap/ic_launcher"
        android:label="@string/app_name"
        android:roundIcon="@mipmap/ic_launcher_round"
        android:theme="@style/AppTheme">
        <activity android:name=".Main2Activity">
            <intent-filter>
                <action android:name="android.intent.action.MAIN" />

                <category android:name="android.intent.category.LAUNCHER" />
            </intent-filter>
        </activity>
        <activity
            android:name=".MainActivity"
            android:configChanges="keyboard|keyboardHidden|orientation|screenSize"
            android:label="@string/app_name"
            android:windowSoftInputMode="adjustResize">
            <intent-filter>
                <action android:name="android.intent.action.VIEW"/>

                <category android:name="android.intent.category.DEFAULT"/>
                <category android:name="android.intent.category.BROWSABLE"/>

                <data
                    android:host="demoproject"
                    android:scheme="reactdemo"/>
            </intent-filter>
        </activity>
        <activity android:name="com.facebook.react.devsupport.DevSettingsActivity" />
    </application>

</manifest>
我新建了一个安卓原生界面Main2Activity,上面有两个按钮分别演示两种跳转方法(这里使用了安卓的anko库):
Main2Activity.kt ↓
package com.demo

import android.content.Intent
import android.net.Uri
import android.support.v7.app.AppCompatActivity
import android.os.Bundle
import kotlinx.android.synthetic.main.activity_main2.*
import org.jetbrains.anko.startActivity

class Main2Activity : AppCompatActivity() {

    override fun onCreate(savedInstanceState: Bundle?) {
        super.onCreate(savedInstanceState)
        setContentView(R.layout.activity_main2)
        button2.setOnClickListener {
            val intent = Intent()
            intent.action = Intent.ACTION_VIEW
            intent.data = Uri.parse("reactdemo://demoproject/person/:John")
            startActivity(intent)
        }
        button1.setOnClickListener {
            startActivity<MainActivity>()
        }
    }
}
activity_main2.xml ↓
<?xml version="1.0" encoding="utf-8"?>
<android.support.constraint.ConstraintLayout xmlns:android="http://schemas.android.com/apk/res/android"
    xmlns:app="http://schemas.android.com/apk/res-auto"
    xmlns:tools="http://schemas.android.com/tools"
    android:layout_width="match_parent"
    android:layout_height="match_parent"
    tools:context=".Main2Activity">

    <Button
        android:id="@+id/button1"
        android:layout_width="wrap_content"
        android:layout_height="wrap_content"
        android:layout_marginBottom="8dp"
        android:text="跳ReactNativeActivity"
        app:layout_constraintBottom_toTopOf="@+id/button2"
        app:layout_constraintLeft_toLeftOf="parent"
        app:layout_constraintRight_toRightOf="parent"
        app:layout_constraintTop_toTopOf="parent" />

    <Button
        android:id="@+id/button2"
        android:layout_width="wrap_content"
        android:layout_height="wrap_content"
        android:layout_marginTop="8dp"
        android:text="URI跳"
        app:layout_constraintBottom_toBottomOf="parent"
        app:layout_constraintLeft_toLeftOf="parent"
        app:layout_constraintRight_toRightOf="parent"
        app:layout_constraintTop_toTopOf="parent" />
</android.support.constraint.ConstraintLayout>

附:Android打包
在android/app/build.gradle文件写了注释:
/**
 * The react.gradle file registers a task for each build variant (e.g. bundleDebugJsAndAssets
 * and bundleReleaseJsAndAssets).
 * These basically call `react-native bundle` with the correct arguments during the Android build
 * cycle. By default, bundleDebugJsAndAssets is skipped, as in debug/dev mode we prefer to load the
 * bundle directly from the development server. Below you can see all the possible configurations
 * and their defaults. If you decide to add a configuration block, make sure to add it before the
 * `apply from: "../../node_modules/react-native/react.gradle"` line.
 *
 * project.ext.react = [
 *   // the name of the generated asset file containing your JS bundle
 *   bundleAssetName: "index.android.bundle",
 *
 *   // the entry file for bundle generation
 *   entryFile: "index.android.js",
 *
 *   // whether to bundle JS and assets in debug mode
 *   bundleInDebug: false,
 *
 *   // whether to bundle JS and assets in release mode
 *   bundleInRelease: true,
 *
 *   // whether to bundle JS and assets in another build variant (if configured).
 *   // See http://tools.android.com/tech-docs/new-build-system/user-guide#TOC-Build-Variants
 *   // The configuration property can be in the following formats
 *   //         'bundleIn${productFlavor}${buildType}'
 *   //         'bundleIn${buildType}'
 *   // bundleInFreeDebug: true,
 *   // bundleInPaidRelease: true,
 *   // bundleInBeta: true,
 *
 *   // whether to disable dev mode in custom build variants (by default only disabled in release)
 *   // for example: to disable dev mode in the staging build type (if configured)
 *   devDisabledInStaging: true,
 *   // The configuration property can be in the following formats
 *   //         'devDisabledIn${productFlavor}${buildType}'
 *   //         'devDisabledIn${buildType}'
 *
 *   // the root of your project, i.e. where "package.json" lives
 *   root: "../../",
 *
 *   // where to put the JS bundle asset in debug mode
 *   jsBundleDirDebug: "$buildDir/intermediates/assets/debug",
 *
 *   // where to put the JS bundle asset in release mode
 *   jsBundleDirRelease: "$buildDir/intermediates/assets/release",
 *
 *   // where to put drawable resources / React Native assets, e.g. the ones you use via
 *   // require('./image.png')), in debug mode
 *   resourcesDirDebug: "$buildDir/intermediates/res/merged/debug",
 *
 *   // where to put drawable resources / React Native assets, e.g. the ones you use via
 *   // require('./image.png')), in release mode
 *   resourcesDirRelease: "$buildDir/intermediates/res/merged/release",
 *
 *   // by default the gradle tasks are skipped if none of the JS files or assets change; this means
 *   // that we don't look at files in android/ or ios/ to determine whether the tasks are up to
 *   // date; if you have any other folders that you want to ignore for performance reasons (gradle
 *   // indexes the entire tree), add them here. Alternatively, if you have JS files in android/
 *   // for example, you might want to remove it from here.
 *   inputExcludes: ["android/**", "ios/**"],
 *
 *   // override which node gets called and with what additional arguments
 *   nodeExecutableAndArgs: ["node"],
 *
 *   // supply additional arguments to the packager
 *   extraPackagerArgs: []
 * ]
 */
project.ext.react = [
        entryFile: "index.js"
]

apply from: "../../node_modules/react-native/react.gradle"
……
react.gradle文件被引入,为每个编译版本都注册了任务,然后下面是提供了一些可自定义的参数。当然它们都有默认值。默认在Debug模式下是不打bundle包的,在Release模式下才会打。并且官方推荐在Debug模式下从 development server 直接加载bundle包。
默认参数下会在"$buildDir/intermediates/assets/debug"下生成名为index.android.bundle的文件
但是网上都是推荐把这个文件生成到app/src/main/assets/文件夹下面:
首先创建一个assets文件夹 然后在React-Native项目的根目录下执行:
react-native bundle --platform android --dev false --entry-file index.js --bundle-output android/app/src/main/assets/index.android.bundle --assets-dest android/app/src/main/res/
然后文件就会自动生成了,然后直接打包就可以了。

