在开发中,我们很有可能会遇见这种需求:
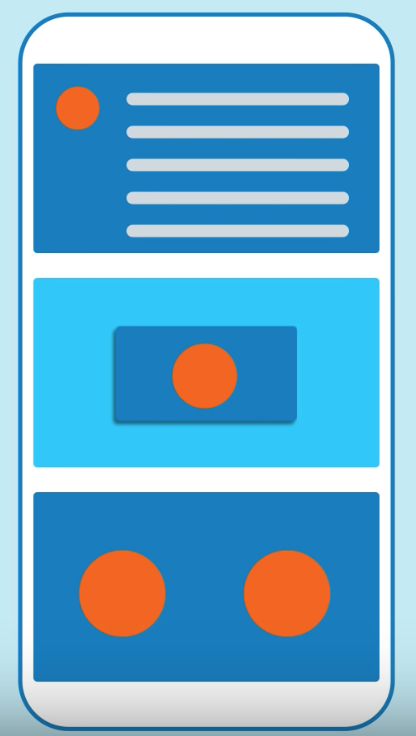
这里每一个圆形都是同一个数据。
现在这个圆形的数据被修改了,我们要更新这个页面上所有的数据,是不是很麻烦?
Flutter为我们考虑到了。
ValueListenableBuilder
看名字我们也就能看出来这个控件是干嘛的,监听值的构造器。
那我们照例先看官方文档:
A widget whose content stays synced with a ValueListenable.

Given a ValueListenable<T> and a builder which builds widgets from concrete values of T, this class will automatically register itself as a listener of the ValueListenable and call the builder with updated values when the value changes.
使内容 和 ValueListenable 保持一致的控件。
给定ValueListenable 一个泛型和一个构建器,它从泛型的具体值构建小部件,这个类将自动注册为ValueListenable 的侦听器,并在值更改时用更新的值调用构建器。
说了这么多 ValueListenable,它到底是个啥?
点进去看:
// 用于公开值的可侦听子类的接口。
An interface for subclasses of Listenable that expose a value.

// 这个接口由ValueNotifier和Animation实现,并且允许其他API交替接受这些实现中的任何一个。
This interface is implemented by ValueNotifier<T> and Animation<T>, and allows other APIs to accept either of those implementations interchangeably.
那也就是说,这个类被ValueNotifier和Animation实现,从名字我们也能理解他们是干嘛的。
一个是值,一个是动画。
官方 Demo
再来看一下官方Demo,来确认怎么使用:
class MyHomePage extends StatefulWidget {
  MyHomePage({Key key, this.title}) : super(key: key);
  final String title;

  @override
  _MyHomePageState createState() => _MyHomePageState();
}

class _MyHomePageState extends State<MyHomePage> {
  final ValueNotifier<int> _counter = ValueNotifier<int>(0);
  final Widget goodJob = const Text('Good job!');
  @override
  Widget build(BuildContext context) {
    return Scaffold(
      appBar: AppBar(
        title: Text(widget.title)
      ),
      body: Center(
        child: Column(
          mainAxisAlignment: MainAxisAlignment.center,
          children: <Widget>[
            Text('You have pushed the button this many times:'),
            ValueListenableBuilder(
              builder: (BuildContext context, int value, Widget child) {
								// 只有在更新计数器时才会调用此生成器。
                return Row(
                  mainAxisAlignment: MainAxisAlignment.spaceEvenly,
                  children: <Widget>[
                    Text('$value'),
                    child,
                  ],
                );
              },
              valueListenable: _counter,
							// 如果child 的构建成本很高,并且不依赖于通知程序的值,则child参数非常有用。
              child: goodJob,
            )
          ],
        ),
      ),
      floatingActionButton: FloatingActionButton(
        child: Icon(Icons.plus_one),
        // 点击的时候用 ValueNotifier 来更新值
        onPressed: () => _counter.value += 1,
      ),
    );
  }
}
代码还是比较简单的,就是在平常的布局上面添加了一个 ValueListenableBuilder。
然后在点击 FAB 的时候更新值。
我们运行一下程序,看看是什么样子:
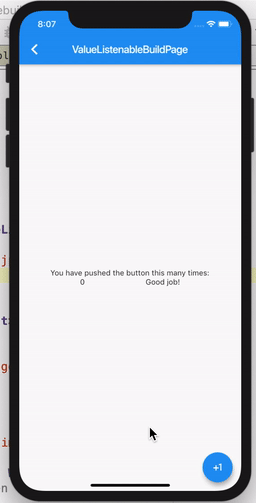
官方这个例子把该控件所有的信息都写上去了,但是并不直观,显示不出来这个控件的威力。
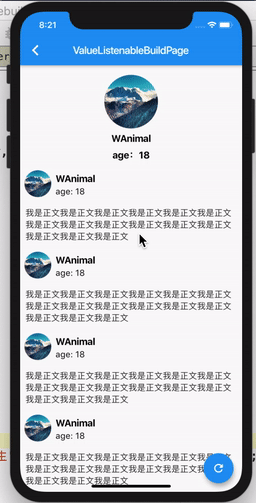
自定义页面展示 ValueListenableBuilder
我也写了一个小Demo:
代码如下:
class _ValueListenableBuildPageState extends State<ValueListenableBuildPage> {

  ValueNotifier<Person> _valueListenable = ValueNotifier<Person>(
      Person(name: 'WAnimal', age: 18, head: 'images/bg.jpg'));
  Widget _contentWidget;

  @override
  void initState() {
    super.initState();
    _contentWidget =
        Padding(
          padding: const EdgeInsets.all(10.0),
          child: Text(
            '我是正文我是正文我是正文我是正文我是正文我是正文我是正文我是正文我是正文我是正文我是正文我是正文我是正文我是正文我是正文',
            style: TextStyle(fontSize: 16),
          ),
        );
  }

  @override
  Widget build(BuildContext context) {
    return Scaffold(
      appBar: AppBar(
        title: Text('ValueListenableBuildPage'),
      ),
      body: ValueListenableBuilder(
        valueListenable: _valueListenable,
        builder: (BuildContext context, Person value, Widget child) {
          return SingleChildScrollView(
            child: Column(
              children: <Widget>[
                Padding(
                  padding: const EdgeInsets.only(top: 18.0),
                  child: ClipOval(
                    child: Image.asset(
                      value.head,
                      fit: BoxFit.cover,
                      width: 100,
                      height: 100,
                    ),
                  ),
                ),
                Padding(
                  padding: const EdgeInsets.symmetric(vertical: 8.0),
                  child: Text(
                    '${value.name}',
                    style: TextStyle(
                      fontSize: 18,
                      fontWeight: FontWeight.bold,
                      color: Colors.black,
                    ),
                  ),
                ),
                Padding(
                  padding: const EdgeInsets.only(bottom: 8.0),
                  child: Text(
                    'age:${value.age}',
                    style: TextStyle(
                      fontSize: 18,
                      fontWeight: FontWeight.bold,
                      color: Colors.black,
                    ),
                  ),
                ),
                ListView.builder(
                  shrinkWrap: true,
                  itemCount: 10,
                  physics: NeverScrollableScrollPhysics(),
                  itemBuilder: (context, index) {
                    return Column(
                      children: <Widget>[
                        Row(
                          children: <Widget>[
                            Padding(
                              padding: const EdgeInsets.all(8.0),
                              child: ClipOval(
                                child: Image.asset(
                                  value.head,
                                  fit: BoxFit.cover,
                                  width: 50,
                                  height: 50,
                                ),
                              ),
                            ),
                            Column(
                              crossAxisAlignment: CrossAxisAlignment.start,
                              children: <Widget>[
                                Padding(
                                  padding:
                                  const EdgeInsets.symmetric(vertical: 4.0),
                                  child: Text(
                                    '${value.name}',
                                    style: TextStyle(
                                      fontSize: 18,
                                      fontWeight: FontWeight.bold,
                                      color: Colors.black,
                                    ),
                                  ),
                                ),
                                Text(
                                  'age: ${value.age}',
                                  style: TextStyle(
                                    fontSize: 16,
                                    color: Colors.black,
                                  ),
                                ),
                              ],
                            ),
                          ],
                        ),
                        child
                      ],
                    );
                  },
                )
              ],
            ),
          );
        },
        child: _contentWidget,
      ),
      floatingActionButton: FloatingActionButton(
        onPressed: () {
          _valueListenable.value = Person(name: '91李先生', age: 24, head: 'images/bg.png');
        },
        child: Icon(Icons.refresh),
      ),
    );
  }
}
按照官方Demo 所说,不需要监听值的控件我们放在别的地方初始化后,放入 child 参数中。
所以我们在 initState() 方法中初始化了 _contentWidget,来作为ListView 的 ·正文·。
然后我们在ValueListenableBuilder 中,包裹了一个 最上层的 ·用户信息· ,还有下面该用户所发表的文章的用户信息。
最后在FAB 中更改 Person对象来达到更新信息的目的。
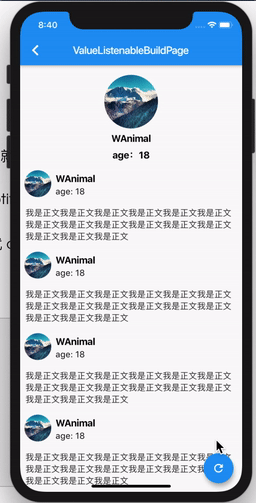
自定义 ValueNotifier
看到这肯定有人会说,我也不可能每次都更新这一个对象啊,我只想更新其中的一个字段就达到这种效果。
没问题老铁,这时候就像ValueListenable的文档中所说,需要用到自己定义 ValueNotifier。
自定义也没什么难得,只需要记住一点,在需要更改的地方调用 notifyListeners() 就 ok了。
自定义 PersonNotifier 代码如下:
class PersonNotifier extends ValueNotifier<Person>{
  PersonNotifier(Person value) : super(value);

  void changePersonName(String name){
    value.name = name;
    notifyListeners();
  }
}
相当简单的代码,定义了一个方法来修改名字,调用通知就ok了。
看一下效果:
总结
我们在这里只是简单的使用了一下 ValueListenableBuilder 其中的一个ValueNotifier 的功能
还可以使用 Animation,使用方法都差不多,可以自行研究一下。
Flutter 确实为我们提供了特别多特别方便的控件。
关注我,每天更新 Flutter & Dart 知识🌝。
完整代码已经传至GitHub:github.com/wanglu1209/…