

proto通讯资料 github.com/protocolbuf… github.com/dcodeIO/pro…
或者你可以直接使用作者封装好proto通讯的开发脚手架 地址github.com/oujin-nb/vu…
Protocol Buffers 是一种轻便高效的结构化数据存储格式,可以用于结构化数据串行化,或者说序列化。它很适合做数据存储或 RPC 数据交换格式。可用于通讯协议、数据存储等领域的语言无关、平台无关、可扩展的序列化结构数据格式
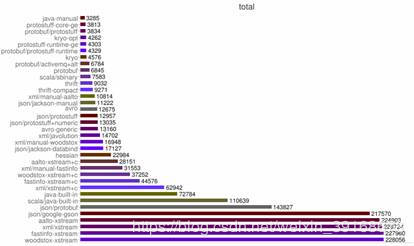
首先我们之前使用Json进行通讯是使用文本进行通讯,而protobuf是使用二进制通讯,通讯效率可以见下图
这里是介绍在es6前端模块化项目中如何简单高效的使用protobuf进行通讯
首先理清思路:1 将通用的.proto文件解析生成前端能够使用的js文件 2将普通的js对象引用protobuf提供的方法序列化成指定的二进制数据 3 将后端传来的数据解析成js对象
步骤
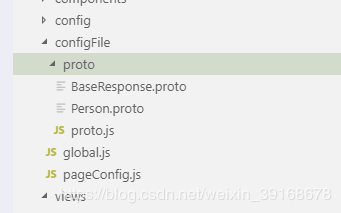
1 解析.proto文件 准备一个文件夹专门来放.proto文件
  "scripts": {
    "dev": "webpack-dev-server --inline --progress --config build/webpack.dev.conf.js",
    "start": "npm run dev",
    "build": "node build/build.js",
    "proto": "pbjs -t json-module -w commonjs -o src/configFile/proto/proto.js  src/configFile/proto/*.proto"
  },
直接执行 npm run proto
便会生成proto.js文件
2 封装proto请求
一个完整的请求如下 首先看后台给我们的proto文件 BaseResponse
syntax = "proto3";
option csharp_namespace = "probofu.Controllers";
import "google/protobuf/any.proto";

message BaseResponse {
  bool IsSuccess = 1;
  string Message = 2;
  string Token = 3;
  google.protobuf.Any data = 4;
}
Person
syntax = "proto3";
option csharp_namespace = "probofu.Controllers";

message Person {
  int32 Id = 1;
  string Name = 2;
  Address  Address=3;
}
message Address {
  string Line1 = 1;
  string Line2 = 2;
}
引用生成的js文件发送请求如下
  requestTest1() {
      let person = require("@/configFile/proto/proto");
      let protobufRoot = require("protobufjs").Root;
      let root = protobufRoot.fromJSON(person);
      let userInfo = root.lookupType("Person");
      let BaseResponse = root.lookupType("BaseResponse");
      let infoData = {Name:'xiaoming',Id:24};
      // 将js对象序列化成二进制
      let infoEncodeMessage = userInfo
        .encode(userInfo.create(infoData))
        .finish();
      let blob = new Blob([infoEncodeMessage], {type: 'buffer'});
      // 新建一个axios对象
      const httpService = axios.create({
        timeout: 45000,
        method: "post",
        headers: {
          "X-Requested-With": "XMLHttpRequest",
          "Content-Type": "application/octet-stream"
        },
        responseType: "arraybuffer"
      });


      httpService
        .post(
          "http://192.168.1.31:5000/api/system/getsth",
        blob
        )
        .then(e => {
          // 将二进制数据生成js对象
          const buf = protobuf.util.newBuffer(e.data);
          let res = BaseResponse.decode(buf);
          let person = userInfo.decode(res.data.value);
        });
    },
但是在实际开发中我们不能每次都这样发送请求应该封装一层,通过直接传入请求参数模板和返参解析模板,做到传入js对象请求完成后返回js对象,而通讯的时候用protobuf进行通讯
先准备一份配置文件
export default [
   { test:{url:'system/getsth',requestTmp:'Person',responseTmp:'Person'}},
]
补充配置文件一般是按照接口文档往里面写,但是实际开发中往往有几百个接口,写起来来繁琐而且容易出错,我这边的处理建议是让后台将接口文档写成固定格式的excel然后我们前端直接解析excel生成js配置对象,这样既方便又能甩锅
方法如下(注意异步处理):
import axios from 'axios'
import XLSX from 'xlsx'

async function  getConfigList(){
    let interfaceList = []
    // 读取本地excel文件
    let x = await  axios({
        url: "../../static/file/proto接口文档.xlsx",
        method: 'get',
        responseType:'arraybuffer'
      })
      var data = new Uint8Array(x.data);
      var arr = new Array();
      for(var i = 0; i != data.length; ++i) arr[i] = String.fromCharCode(data[i]);
      var bstr = arr.join("");
      var workbook = XLSX.read(bstr, {type:"binary"});
      workbook.SheetNames.forEach(y=>{
          let jsonSheet = XLSX.utils.sheet_to_json(workbook.Sheets[y])
          if(jsonSheet.length>0){
            jsonSheet.forEach(z=>{
                let interfaceObj={}
                interfaceObj[z['路由']+z['方法名']]={
                    url:z['路由']+'/'+z['方法名'],
                    requestTmp:z['参数Proto文件'],
                    responseTmp:z['返回响应Proto']
                }
                interfaceList.push(interfaceObj)
            })
          }
      })
      return interfaceList
}
export default getConfigList
引入配置文件生成配置好可用作proto通讯的axios对象并挂载在vue的原型上
import protoRoot from "@/configFile/proto/proto"
import protobuf from 'protobufjs'
import axios from 'axios'
import apiConfig from './protoApi/index'

// 基础response模板
let BaseResponse = protoRoot.lookupType("BaseResponse");

const createRequest = (option) => {
  return axios.create({
    timeout: 10000,
    method: "post",
    headers: {
      "X-Requested-With": "XMLHttpRequest",
      "Content-Type": "application/octet-stream",
      'token': localStorage.getItem("token")
    },
    baseURL: process.env.NODE_ENV == 'development' ? process.env.API_HOST : HOST,
    responseType: "arraybuffer"
  });
}
const getApiInstance = (option) => {
  console.log(option)
  // 根据参数配置请求模板和解析模板
   let requetProto = protoRoot.lookupType(option.requestTmp);
   let responseProto = protoRoot.lookupType(option.responseTmp);
  let api = createRequest()
  api.interceptors.request.use(
    config => {
      config.url = option.url;
      let data = Object.assign({},config.data)
      config.data = new Blob([requetProto.encode(requetProto.create(data)).finish()], { type: 'buffer' });
      return config;
    },
    error => {
      return Promise.reject(error);
    }
  );
  api.interceptors.response.use(
    response => {
      const buf = protobuf.util.newBuffer(response.data);
      let res = BaseResponse.decode(buf);
      let resData = responseProto.decode(res.data.value);
      return resData
    },
    error => {
    }
  );

  return api
}

/*
如果采用excel生成js配置文件
*/
// const getApiMap = async () => {
//   let apiList = {}
//   let d = await apiConfig()
//   d.forEach((s) => {
//     let key = Object.keys(s)[0]
//     let val = s[key]
//     apiList[key] = getApiInstance(val)
//   })
//   return apiList
// }
/*
如果是手写js配置文件
*/
const getApiMap = ()=>{
  let apiList = {}
  apiConfig.forEach((s)=>{
    let key = Object.keys(s)[0]
    let val = s[key]
    apiList[key]= getApiInstance(val)
  })
  return apiList
}


getApiMap()

export default getApiMap()
挂载在vue的原型上
注意:如果你是采用读取excel生成配置文件,那么在main方法你将得到一个promise对象(async方法返回一个primise对象)所以这里我们需要做同步处理
import api from '../src/config/protoReqConfig'

Vue.prototype.api = api

// excel文件生成配置文件
function creatVue(){
	new Vue({
        el: '#app',
        router,
        store,
        components: {App},
        template: '<App/>'
    })
}
console.log(api)
api.then(x=>{
    Vue.prototype.api =  x // proto格式http请求
	creatVue()
}).catch(x=>{
	console.log('创建api对象失败')
	console.log(x)
    creatVue()
})
3 实际应用 直接调用之前配置好的方法即可
  this.api.test({data:{Name:'daming',Id:25}}).then((s)=>{
        console.log(s)
      })
github github.com/oujin-nb/vu…
