大家好,下面和大学一起学习如何使用帧缓存FrameBuffer来暂存中间渲染结果,在我的github上有一个项目OpenGLES2.0SamplesForAndroid,我会不断地编写学习样例,文章和代码同步更新,欢迎关注,链接:github.com/kenneycode/…
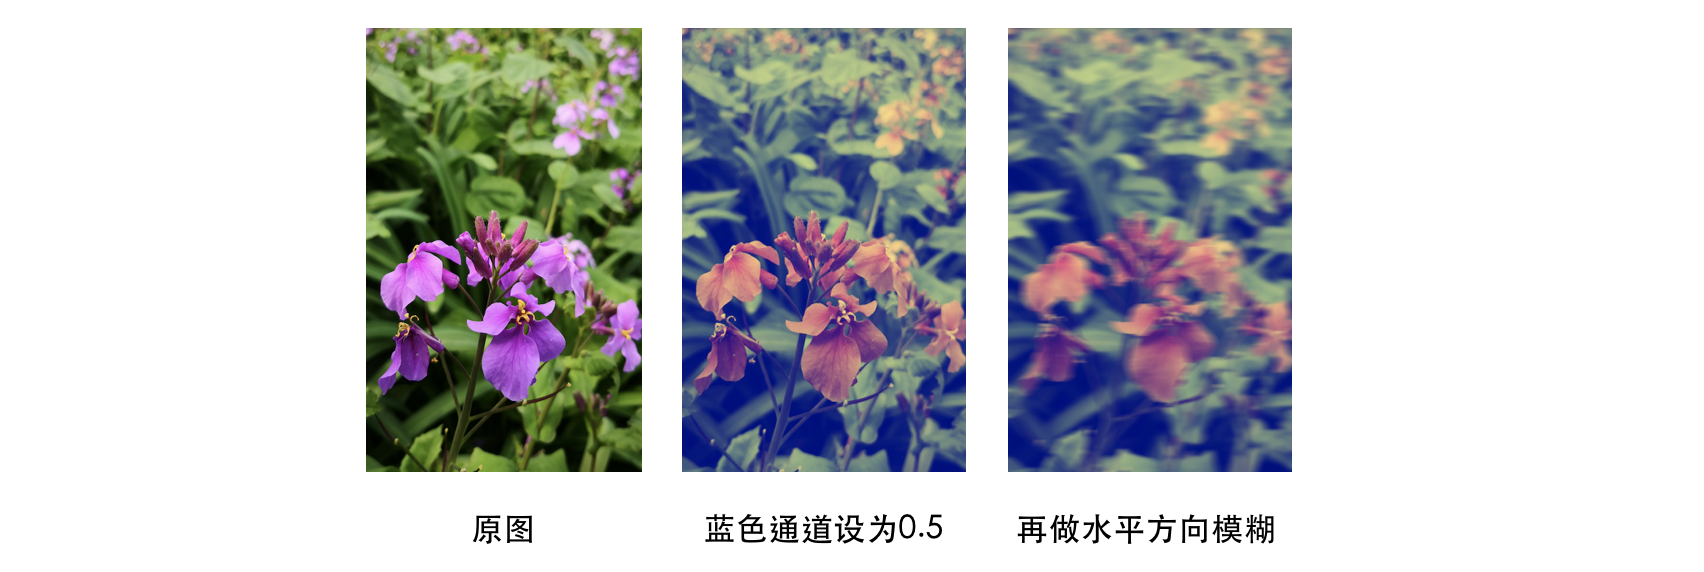
frame buffer,即帧缓存,顾名思义,它就是能缓存一帧的这么个东西,它有什么用呢?大家回想我们之前的教程,我们都是通过一次渲染把内容渲染到屏幕(严格来说是渲染到GLSurfaceview上),如果我们的渲染由多个步骤组成,而每个步骤的渲染结果会给到下一个步骤作为输入,那么就要用到frame buffer,比如说我们今天的例子中的一个效果:先把图片的蓝色通道全都设置为0.5,得到的结果再去做一个水平方向的模糊,这时渲染过程就由2步组成,第一步的操作不应该显示到屏幕上,应该有个地方存着它的结果,作为第二步的输入,然后第二步的渲染结果才直接显示到屏幕上。实际上这两步可以合成一步,大家可以思考一下如何用一步实现,这里分成两步主要是为了展示如果使用frame buffer。
我们先来看看frame buffer长什么样:

frame buffer有一些个attachment,例如color attachment、depth attachment、stencil attachment,frame buffer具有什么样的功能,就与frame buffer绑定的attachment有关。
其中color attachment就是用来绑定texture的,当将一个color attachment绑定到一个texture上后,就可以用这个frame buffer来承载渲染的结果,渲染的结果实际上是到了这个绑定的texture上。
depth attachment是用来存储深度信息的,在3D渲染时才会用到,stencil attachment则是在模板测试时会用到,这里先不介绍。
可以看到,frame buffer本身其实并不会存储数据,都是通过attachment去绑定别的东西来存储相应的数据,我们今天要讲的就是color attachment,我们会将frame buffer中的一个attachment绑定到一个texture上,然后先将第一步的效果渲染到这个frame buffer上作为中间结果,然后将这个texture作为第二步的输入。
我们先看看shader:
// vertex shader
precision mediump float;
attribute vec4 a_position;
attribute vec2 a_textureCoordinate;
varying vec2 v_textureCoordinate;
void main() {
    v_textureCoordinate = a_textureCoordinate;
    gl_Position = a_position;
}

// fragment shader 0
precision mediump float;
varying vec2 v_textureCoordinate;
uniform sampler2D u_texture;
void main() {
    vec4 color = texture2D(u_texture, v_textureCoordinate);
    color.b = 0.5;
    gl_FragColor = color;
}

// fragment shader 1
precision mediump float;
varying vec2 v_textureCoordinate;
uniform sampler2D u_texture;
void main() {
    float offset = 0.005;
    vec4 color = texture2D(u_texture, v_textureCoordinate) * 0.11111;
    color += texture2D(u_texture, vec2(v_textureCoordinate.x - offset, v_textureCoordinate.y)) * 0.11111;
    color += texture2D(u_texture, vec2(v_textureCoordinate.x + offset, v_textureCoordinate.y)) * 0.11111;
    color += texture2D(u_texture, vec2(v_textureCoordinate.x - offset * 2.0, v_textureCoordinate.y)) * 0.11111;
    color += texture2D(u_texture, vec2(v_textureCoordinate.x + offset * 2.0, v_textureCoordinate.y)) * 0.11111;
    color += texture2D(u_texture, vec2(v_textureCoordinate.x - offset * 3.0, v_textureCoordinate.y)) * 0.11111;
    color += texture2D(u_texture, vec2(v_textureCoordinate.x + offset * 3.0, v_textureCoordinate.y)) * 0.11111;
    color += texture2D(u_texture, vec2(v_textureCoordinate.x - offset * 4.0, v_textureCoordinate.y)) * 0.11111;
    color += texture2D(u_texture, vec2(v_textureCoordinate.x + offset * 4.0, v_textureCoordinate.y)) * 0.11111;
    gl_FragColor = color;
}
我们要渲染两个效果,这两个效果使用的vertex shader是一样的,主要是fragment shader不同,fragment shader 0将蓝色通道全部设置了0.5,fragment shader 1是做了水平方向的模糊。
我们先创建好2个GL Program:
// 创建2个GL Program,第一个用来做均值模糊,第二做普通纹理贴图
// Create two GL programs, and one is used for mean blur, while the other is used for common texture rendering
programId0 = createGLProgram(vertexShaderCode, fragmentShaderCode0)
programId1 = createGLProgram(vertexShaderCode, fragmentShaderCode1)
private fun createGLProgram(vertexShaderCode : String, fragmentShaderCode : String) : Int {

    // 创建GL程序
    // Create the GL program
    val programId = GLES20.glCreateProgram()

    // 加载、编译vertex shader和fragment shader
    // Load and compile vertex shader and fragment shader
    val vertexShader = GLES20.glCreateShader(GLES20.GL_VERTEX_SHADER)
    val fragmentShader= GLES20.glCreateShader(GLES20.GL_FRAGMENT_SHADER)
    GLES20.glShaderSource(vertexShader, vertexShaderCode)
    GLES20.glShaderSource(fragmentShader, fragmentShaderCode)
    GLES20.glCompileShader(vertexShader)
    GLES20.glCompileShader(fragmentShader)

    // 将shader程序附着到GL程序上
    // Attach the compiled shaders to the GL program
    GLES20.glAttachShader(programId, vertexShader)
    GLES20.glAttachShader(programId, fragmentShader)

    // 链接GL程序
    // Link the GL program
    GLES20.glLinkProgram(programId)

    Util.checkGLError()

    return programId

}
拉下来看看如何创建frame buffer
我们先创建一个texture作为和frame buffer的color attachment绑定的texture:
// 创建frame buffer绑定的纹理
// Create texture which binds to frame buffer
val textures = IntArray(1)
GLES20.glGenTextures(textures.size, textures, 0)
frameBufferTexture = textures[0]
接下来创建一个frame buffer,它和创建一个texture非常类似:
// 创建frame buffer
// Create frame buffer
val frameBuffers = IntArray(1)
GLES20.glGenFramebuffers(frameBuffers.size, frameBuffers, 0)
frameBuffer = frameBuffers[0]
然后将texture与frame buffer的color attachment绑定:
// 将frame buffer与texture绑定
// Bind the texture to frame buffer
GLES20.glBindTexture(GLES20.GL_TEXTURE_2D, frameBufferTexture)
GLES20.glTexParameteri(GLES20.GL_TEXTURE_2D, GLES20.GL_TEXTURE_MIN_FILTER, GLES20.GL_LINEAR)
GLES20.glTexParameteri(GLES20.GL_TEXTURE_2D, GLES20.GL_TEXTURE_MAG_FILTER, GLES20.GL_LINEAR)
GLES20.glTexParameteri(GLES20.GL_TEXTURE_2D, GLES20.GL_TEXTURE_WRAP_S, GLES20.GL_CLAMP_TO_EDGE)
GLES20.glTexParameteri(GLES20.GL_TEXTURE_2D, GLES20.GL_TEXTURE_WRAP_T, GLES20.GL_CLAMP_TO_EDGE)
GLES20.glTexImage2D(GLES20.GL_TEXTURE_2D, 0, GLES20.GL_RGBA, width, height, 0, GLES20.GL_RGBA, GLES20.GL_UNSIGNED_BYTE, null)
GLES20.glBindFramebuffer(GLES20.GL_FRAMEBUFFER, frameBuffer)
GLES20.glFramebufferTexture2D(GLES20.GL_FRAMEBUFFER, GLES20.GL_COLOR_ATTACHMENT0, GLES20.GL_TEXTURE_2D, frameBufferTexture, 0)
GLES20.glTexImage2D(GLES20.GL_TEXTURE_2D, 0, GLES20.GL_RGBA, width, height, 0, GLES20.GL_RGBA, GLES20.GL_UNSIGNED_BYTE, null)
我们先绑定了frameBufferTexture,因此拉下来的操作都会对frameBufferTexture生效,紧接着我们给frameBufferTexture设置了一些参数并分配,这些参数的作用可以参考我上一篇文章《Android OpenGL ES 2.0 手把手教学(6)- 纹理》。
然后和绑定frameBufferTexture类似,要对一个frame buffer进行操作,也需要先将它进行绑定,接下来的glFramebufferTexture2D()就是将frameBufferTexture绑定到frameBuffer的0号attachment上,即GL_COLOR_ATTACHMENT0,这里大家注意一点,frame buffer有多个color attachment,但在OpenGL ES 2.0中,只能将texture绑定到0号attachment上,以下是官方API说明对attachment参数的描述:
attachment
Specifies the attachment point to which an image from texture should be attached.
Must be one of the following symbolic constants:
GL_COLOR_ATTACHMENT0, GL_DEPTH_ATTACHMENT, or GL_STENCIL_ATTACHMENT.
详细可查看:www.khronos.org/registry/Op…
现在我们已经将frameBufferTexture与frameBuffer进行了绑定,接下来我们要使用它,使用的方法非常简单,就是在渲染前将它绑定即可:
override fun onDrawFrame(gl: GL10?) {

    // 绑定第0个GL Program
    // Bind GL program 0
    bindGLProgram(programId0, imageTexture, textureCoordinateDataBuffer0)

    // 绑定frame buffer
    // Bind the frame buffer
    bindFrameBuffer(frameBuffer)

    // 执行渲染,渲染效果为将图片的蓝色通道全部设为0.5
    // Perform rendering, and we can get the result of blue channel set to 0.5
    render()

    // 绑定第1个GL Program
    // Bind GL program 1
    bindGLProgram(programId1, frameBufferTexture, textureCoordinateDataBuffer1)

    // 绑定0号frame buffer
    // Bind the 0# frame buffer
    bindFrameBuffer(0)

    // 执行渲染,渲染效果水平方向的模糊
    // Perform rendering, and we can get the result of horizontal blur base on the previous result
    render()

}
private fun bindFrameBuffer(frameBuffer : Int) {

    // 绑定frame buffer
    // Bind the frame buffer
    GLES20.glBindFramebuffer(GLES20.GL_FRAMEBUFFER, frameBuffer)

}
这里注意一点,0号frame buffer是一个特殊的frame buffer,它是默认的frame buffer,即如果我们没有使用glBindFramebuffer()去绑定过frame buffer,它就是绑定到0号frame buffer上的,0号frame buffer通常代表屏幕,离屏渲染除外,这个暂不讨论,现在大家只需要知道将frame buffer绑定到0就能渲染到屏幕上就行了。
我们来看看效果:

代码在我github的OpenGLES2.0SamplesForAndroid项目中,本文对应的是SampleFrameBufferRenderer,项目链接:github.com/kenneycode/…
感谢阅读!