首发于公众号
UIKit 提供的 UIButton 在普通场景下已经很好用了,但是也有缺点,就是定制能力不强,开发者往往需要子类化定制自己的风格才能满足 UI 的需求。
UI 对于 Button 有以下几个需求:
- 左边图片,右边文字
- 左边文字,右边图片
- 上面图片,下面文字
- 上面文字,下面图片
不仅如此,还要求图片和文字之间还要求有一定的间隔。
系统的 UIButton 默认情况下只能支持第 1 种场景,其他情况都需要自己定制化,然而基于 UIButton 定制也有一些麻烦要处理,比如在自动布局机制下能自适应大小,而且对于上面列举的场景来说,仅仅只有显示风格不一样而已,UIButton 要是有一个接口直接设置风格就方便多了。
基于以上分析,我决定基于 UIControl 来重新实现一个 Button,基本使用接口保持和 UIButton 一致,而且支持定制布局风格,只需要简单设置一个参数就行了。
图片和文字的排列组合一共有 4 种,两种横行排列,两种竖向排列,通过一个枚举类型定义如下:
public enum SFButtonDirection: Int {
    case row
    case rowReverse
    case column
    case columnReverse
}
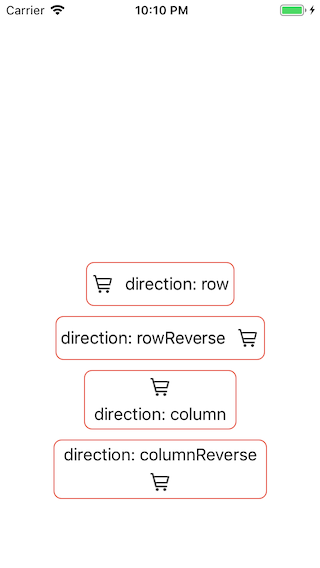
横向的排列叫 row,竖向的排列叫 column,分别对应之前提到的 4 种场景:
- 左边图片,右边文字 (row)
- 左边文字,右边图片 (rowReverse)
- 上面图片,下面文字 (column)
- 上面文字,下面图片 (columnReverse)
图片和文字之间还要能设置间距,再增加一个属性:space。
有时候 UI 要求 Button 的大小需要由内容来决定,而且上下左右还要有一定的间距,满足这个场景只需要再增加一个属性:contentInset。
有了以上 3 个关键属性,就可以满足大多数的应用场景了,而且使用起来也非常简单: 创建一个 Button
func makeButton() -> SFButton {
    let btnNormalBGImage = UIImage(named: "button_normal")!.resizableImage(withCapInsets: UIEdgeInsets(top: 15, left: 15, bottom: 15, right: 15))
    let btnHighlightedBGImage = UIImage(named: "button_highlighted")!.resizableImage(withCapInsets: UIEdgeInsets(top: 15, left: 15, bottom: 15, right: 15))

    let button = SFButton(frame: .zero)
    button.setImage(UIImage(named: "icon-test"), for: .normal)
    button.setBackgroundImage(btnNormalBGImage, for: .normal)
    button.setBackgroundImage(btnHighlightedBGImage, for: .highlighted)

    return button
}
- 图片左,文字右
let button = makeButton()
button.space = 10
button.contentInset = UIEdgeInsets(top: 10, left: 5, bottom: 10, right: 5)
button.setTitle("direction: row", for: .normal)
- 文字左,图片右
let button2 = makeButton()
button2.space = 10
button2.contentInset = UIEdgeInsets(top: 10, left: 5, bottom: 10, right: 5)
button2.direction = .rowReverse
button2.setTitle("direction: rowReverse", for: .normal)
- 图片上,文字下
let button3 = makeButton()
button3.space = 5
button3.contentInset = UIEdgeInsets(top: 5, left: 10, bottom: 5, right: 10)
button3.direction = .column
button3.setTitle("direction: column", for: .normal)
- 文字上,图片下
let button4 = makeButton()
button4.space = 5
button4.contentInset = UIEdgeInsets(top: 5, left: 10, bottom: 5, right: 10)
button4.direction = .columnReverse
button4.setTitle("direction: columnReverse", for: .normal)
以下是运行效果,完整实现代码请到我的 github: SFButton