作者:崔静
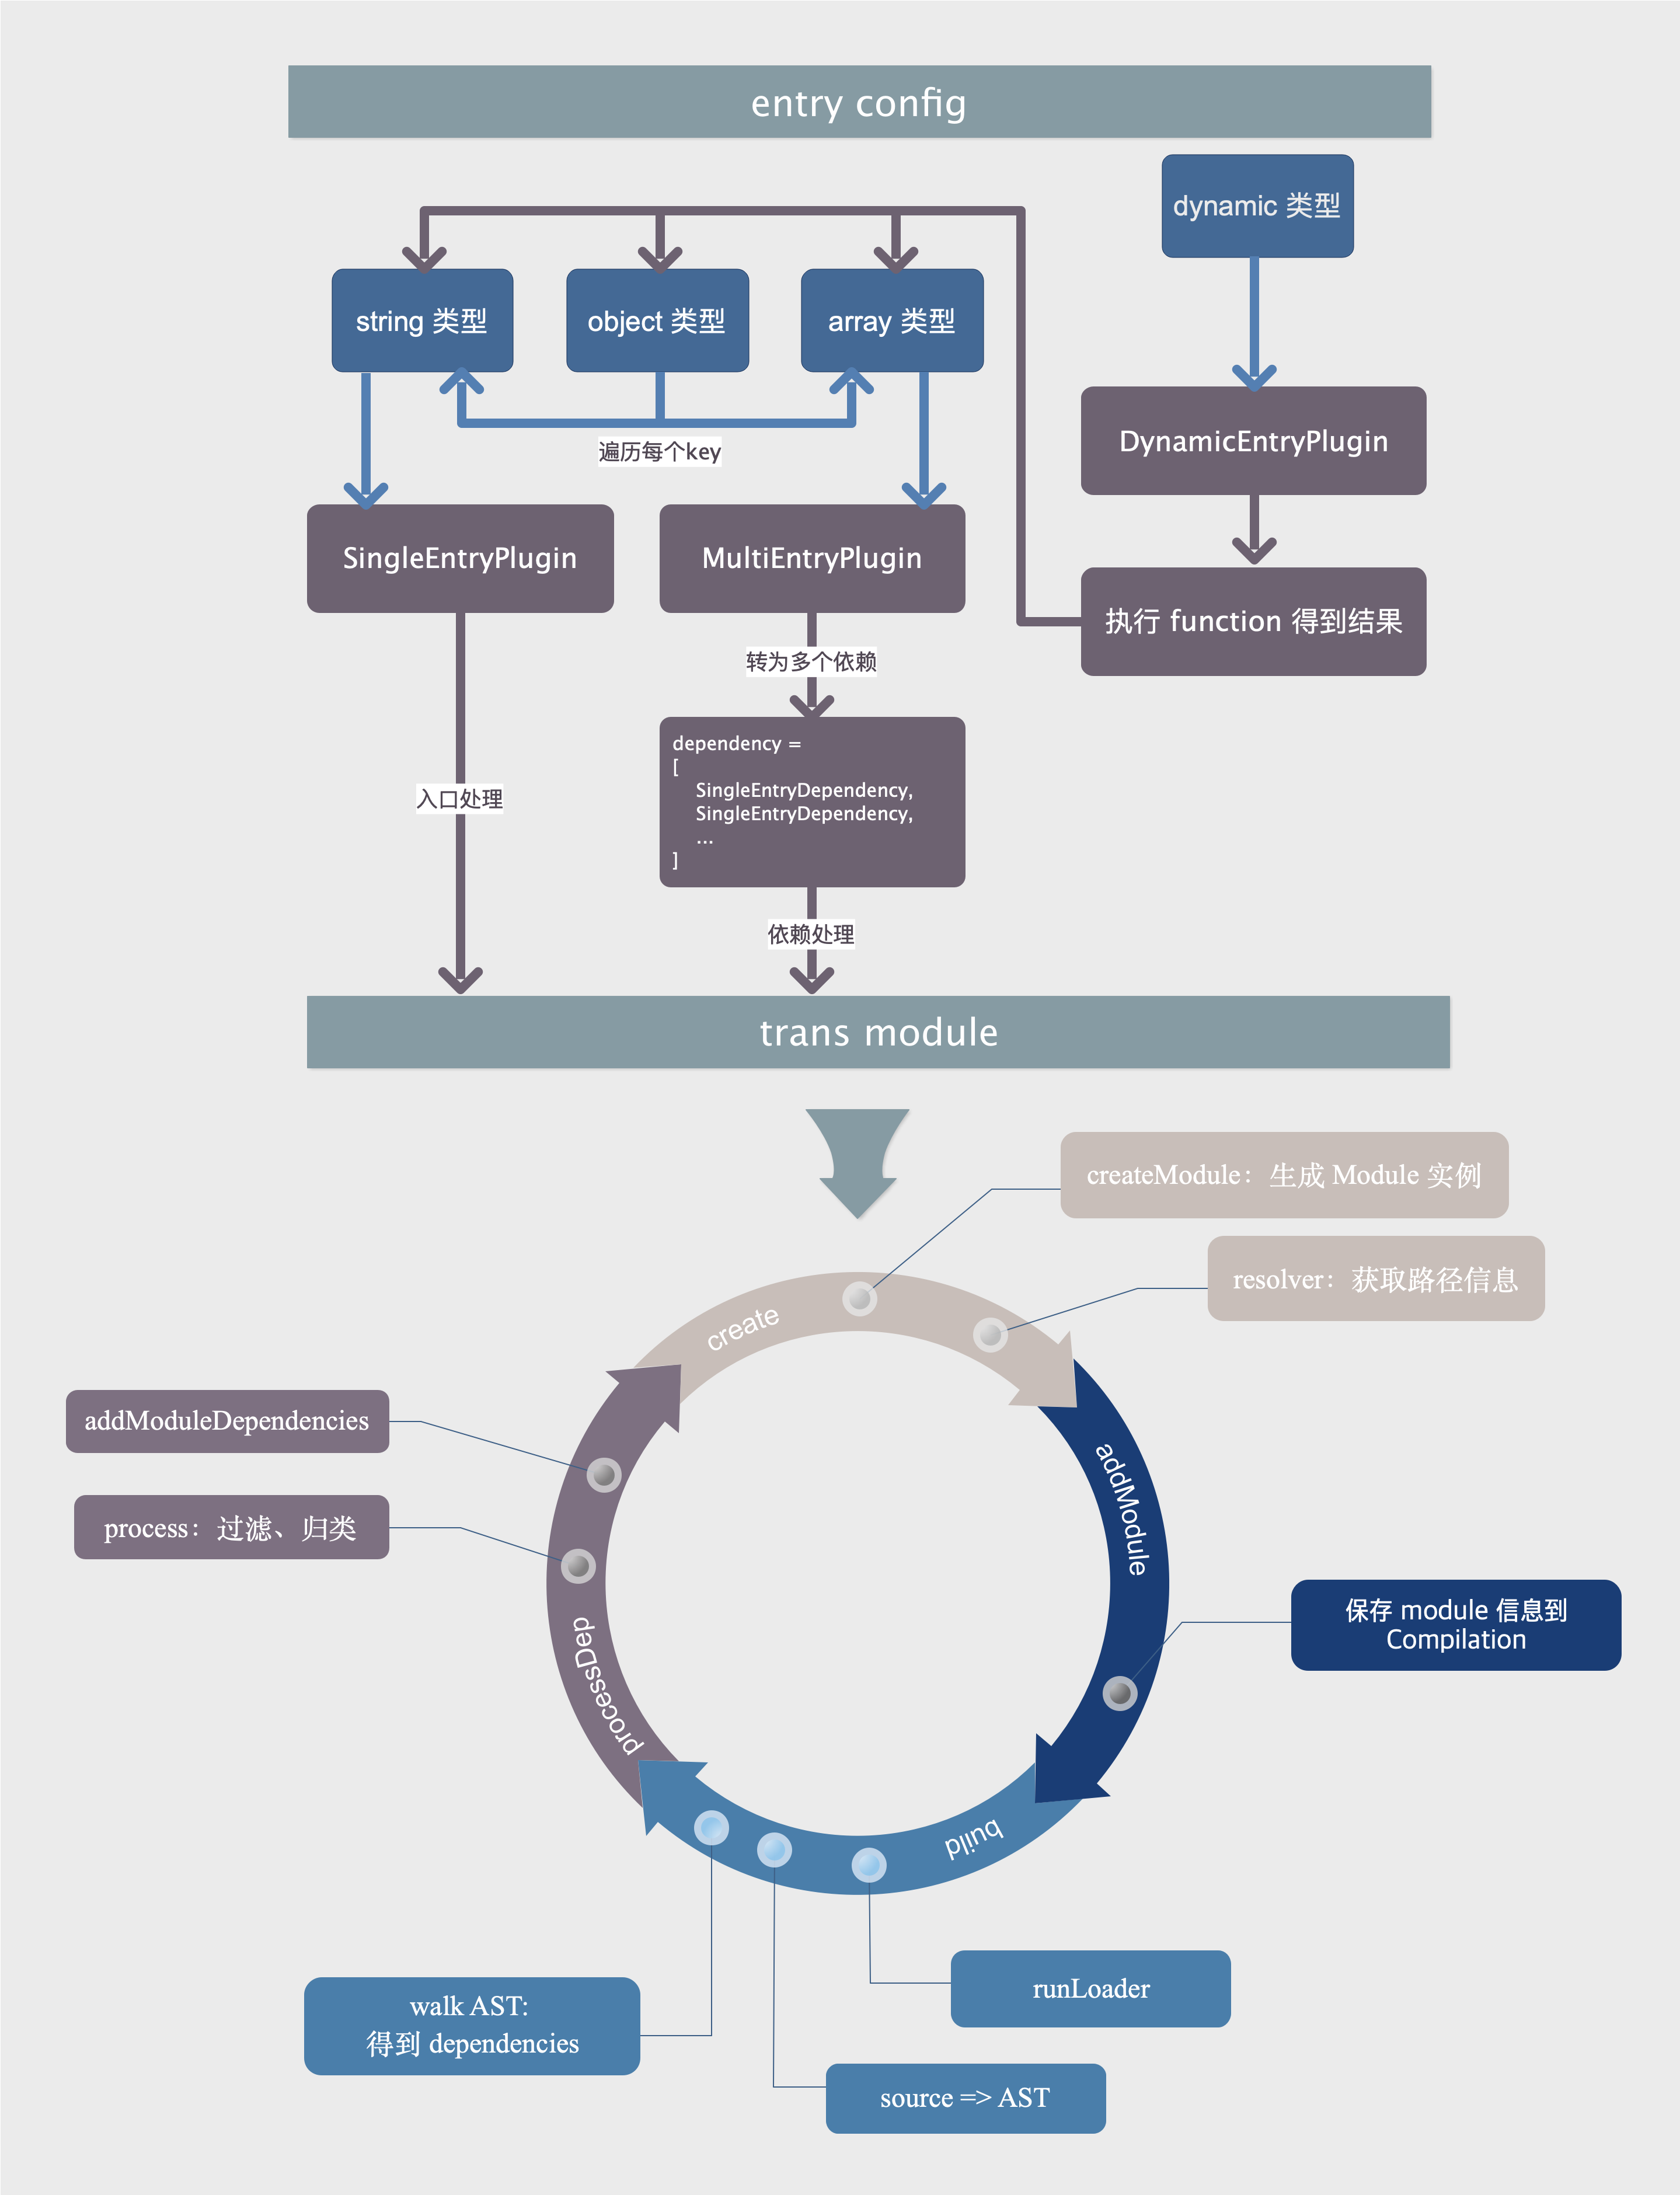
在上一篇 module生成1中我们已经分析了 webpack 是如何根据 entry 配置找到对应的文件的,接下来就是将文件转为 module 了。这个长长的过程,可以分成下面几个阶段
- create: 准备数据,生成 module 实例。
- add: 信息保存到 Compilation 实例上。
- build: 分析文件内容。
- processDep: 处理3步骤中解析得到的依赖,添加到编译链条中。
后面会以一个简单的 js 文件为例,看整个主流程
// a.js
export const A = 'a'

// demo.js,webpack 入口文件
import { A } from './a.js'
function test() {
  const tmp = 'something'
  return tmp + A
}
const r = test()
create
_addModuleChain 之后就是文件的 create 阶段,正式进入文件处理环节。上面一节我们介绍 MultipleEntryPlugin 中曾简单提到过:_addModuleChain 的回调中执行的是 moduleFactory.create。对于上面例子来说这里 create 方法,其实执行是 nromalModuleFactory.create 方法,代码主逻辑如下:
create(data, callback) {
	//...省略部分逻辑
	this.hooks.beforeResolve.callAsync(
		{
			contextInfo,
			resolveOptions,
			context,
			request,
			dependencies
		},
		(err, result) => {
			//...
			// 触发 normalModuleFactory 中的 factory 事件。
			const factory = this.hooks.factory.call(null);
			// Ignored
			if (!factory) return callback();
			factory(result, (err, module) => {
				//...
				callback(null, module);
			});
		}
	);
}
单独看 create 内部逻辑:
- 触发 beforeResolve 事件:这里 beforeResolve 事件中没有做任务处理,直接进入回调函数
- 触发 NormalModuleFactory 中的 factory 事件。在 NormalModuleFactory 的 constructor 中有一段注册 factory 事件的逻辑。
- 执行 factory 方法(具体代码位于 NormalModuleFactory 的 constructor 中),主要流程如下:
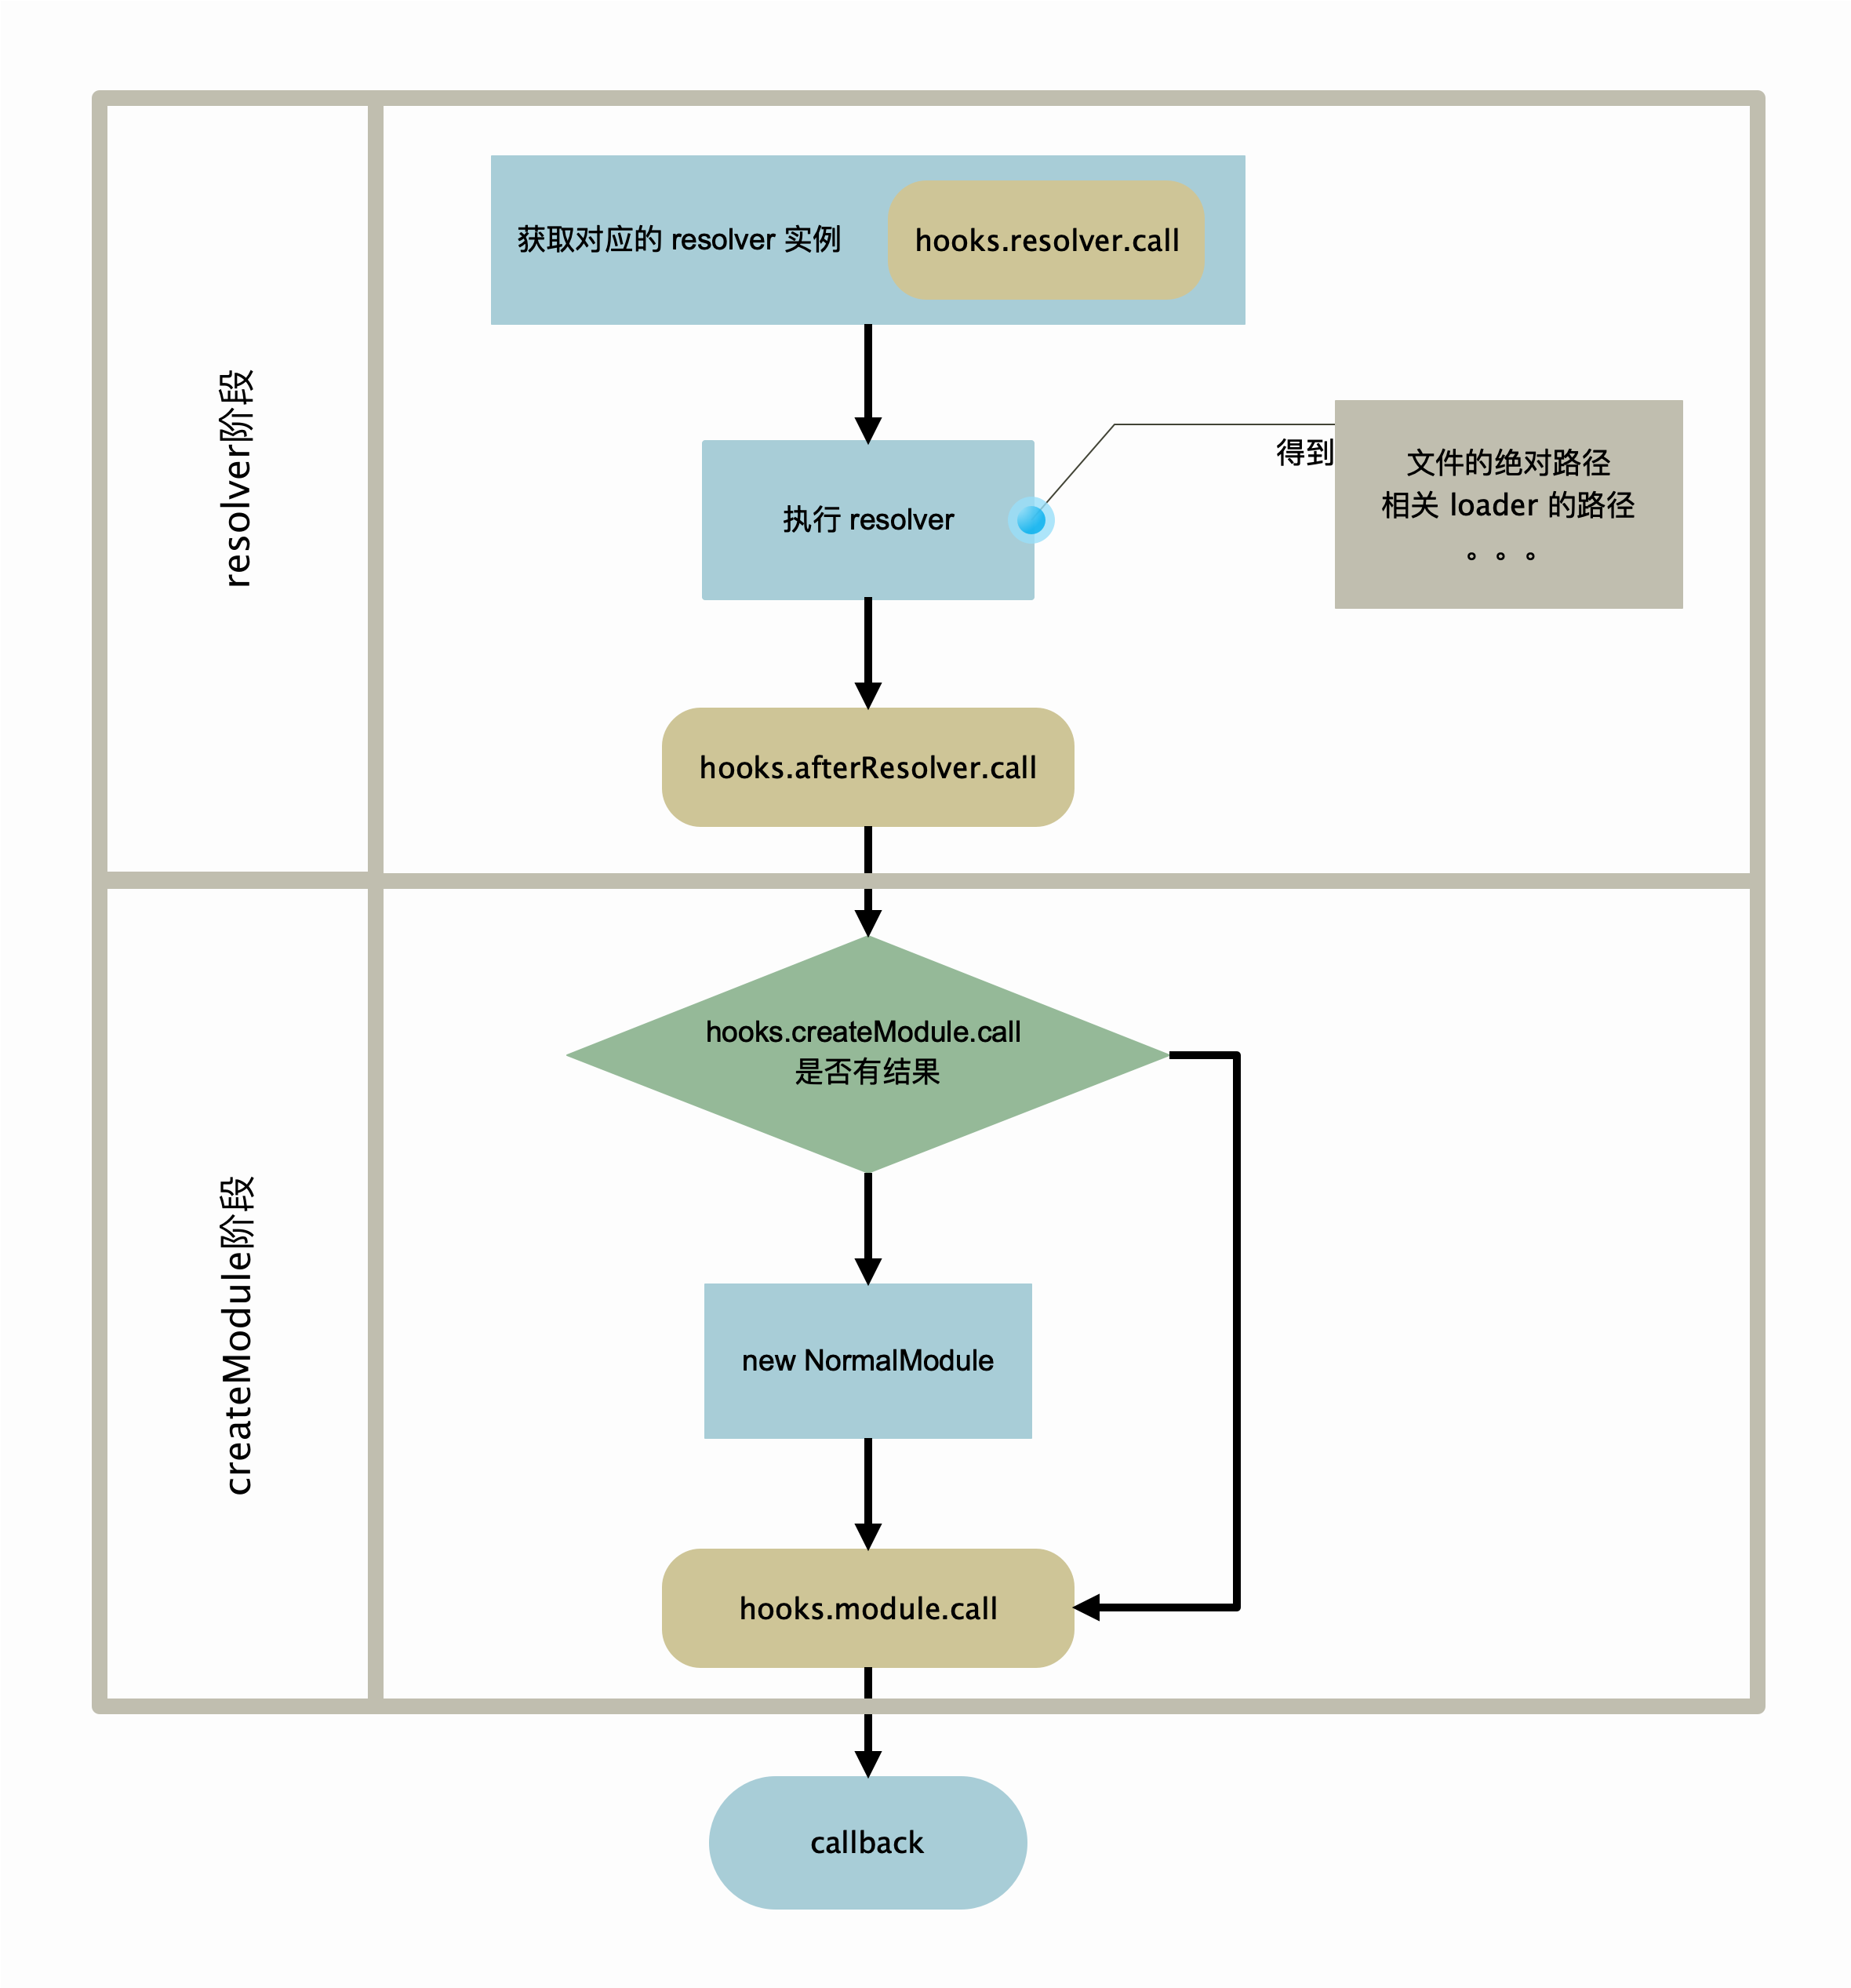
- resolver 阶段:得到 demo.js 的路径信息以及涉及到的 loader 和 loader 的路径(详细过程参考 resolver 和 loader)。这一步完成后,生成 module 的准备工作已经完成。
- createModule 阶段:生成一个 module 实例,将上一步的数据存入实例中。
到此已经得到了一个 module 实例。为了方便,后文我们将这个 module 实例称为 demo module。
addModule
得到 demo module 之后,需要将其保存到全局的 Compilation.modules 数组中和 _modules 对象中。
这个过程中还会为 demo module 添加 reason ,即哪个 module 中依赖了 demo module。由于是 demo.js 是入口文件,所以这个 reason 自然就是 SingleEntryDependency。 并且对于入口文件来说,还会被添加到 Compilation.entries 中。
// moduleFactory.create 的 callback 函数
(err, module) => {
	//...

	let afterFactory;

	//...

	// addModule 会执行 this._modules.set(identifier, module); 其中 identifier 对于 normalModule 来说就是 module.request,即文件的绝对路径
	// 和 this.modules.push(module);
	const addModuleResult = this.addModule(module);
	module = addModuleResult.module;

	// 对于入口文件来说,这里会执行 this.entries.push(module);
	onModule(module);

	dependency.module = module;
	module.addReason(null, dependency);

	//... 开始 build 阶段
}
这个阶段可以认为是 add 阶段,将 module 的所有信息保存到 Compilation 中,以便于在最后打包成 chunk 的时候使用。随后在这个回调函数中,会调用 this.buildModule 进入 build 阶段。
build
demo module 是 NormalModule 的实例,所以 Compilation.buildModule 中调用的 module.build 方法实际为 NormalModule.build 方法。build 方法主逻辑如下:
// NormalModule.build 方法
build(options, compilation, resolver, fs, callback) {
  //...
  return this.doBuild(options, compilation, resolver, fs, err => {
    //...
    try {
       // 这里会将 source 转为 AST,分析出所有的依赖
		const result = this.parser.parse(/*参数*/);
		if (result !== undefined) {
			// parse is sync
			handleParseResult(result);
		}
	} catch (e) {
		handleParseError(e);
	}
  })
}

// NormalModule.doBuild 方法
doBuild(options, compilation, resolver, fs, callback) {
	//...
	// 执行各种 loader
	runLoaders(
		{
			resource: this.resource,
			loaders: this.loaders,
			context: loaderContext,
			readResource: fs.readFile.bind(fs)
		},
		(err, result) => {
			//...
			// createSource 会将 runLoader 得到的结果转为字符串以便后续处理
			this._source = this.createSource(
				this.binary ? asBuffer(source) : asString(source),
				resourceBuffer,
				sourceMap
			);
			//...
		}
	);
}
build 分成两大块: doBuild 和 doBuild 的回调。
doBuild:获取 source
在 doBuild 之前,我们实际上只得到了文件的路径,并没有获取到文件的真正内容,而在这一环节在 doBuild 的 runLoader 方法中会根据这个路径得到读取文件的内容,然后经过各种 loader 处理,得到最终结果,这部分已经在 loader 中分析过,参见 webpack系列之四loader详解2。
回调:处理 source
上一步得到了文件的 source 是 demo.js 的字符串形式,如何从这个字符串中得到 demo.js 的依赖呢?这就需要对这个字符串进行处理了,this.parser.parse 方法被执行。
接下来我们详细看一下 parse 的过程,具体的代码在 lib/Parser.js 中。代码如下:
parse(source, initialState) {
	let ast;
	let comments;
	if (typeof source === "object" && source !== null) {
		ast = source;
		comments = source.comments;
	} else {
		comments = [];
		ast = Parser.parse(source, {
			sourceType: this.sourceType,
			onComment: comments
		});
	}

	const oldScope = this.scope;
	const oldState = this.state;
	const oldComments = this.comments;

	// 设置 scope,可以理解为和代码中个作用域是一致的
	this.scope = {
		topLevelScope: true,
		inTry: false,
		inShorthand: false,
		isStrict: false,
		definitions: new StackedSetMap(),
		renames: new StackedSetMap()
	};
	const state = (this.state = initialState || {});
	this.comments = comments;

	// 遍历 AST,找到所有依赖
	if (this.hooks.program.call(ast, comments) === undefined) {
		this.detectStrictMode(ast.body);
		this.prewalkStatements(ast.body);
		this.walkStatements(ast.body);
	}
	this.scope = oldScope;
	this.state = oldState;
	this.comments = oldComments;
	return state;
}
在 parse 方法中,source 参数可能会有两种形式:ast 对象或者 string。为什么会有 ast 对象呢?要解释这个问题,我们先看一个参数 source 从哪里来的。回到 runLoaders 的回调中看一下
runLoaders({...}, (err, result) => {
  //...省略其他内容
  const source = result.result[0];
  const sourceMap = result.result.length >= 1 ? result.result[1] : null;
  const extraInfo = result.result.length >= 2 ? result.result[2] : null;
  //...
  this._ast =
		typeof extraInfo === "object" &&
		extraInfo !== null &&
		extraInfo.webpackAST !== undefined
			? extraInfo.webpackAST
			: null;
})
runLoader 结果是一个数组: [source, sourceMap, extraInfo], extraInfo.webpackAST 如果存在,则会被保存到 module._ast 中。也就是说,loader 除了返回处理完了 source 之后,还可以返回一个 AST 对象。在 doBuild 的回调中会优先使用 module._ast 。
const result = this.parser.parse(
	this._ast || this._source.source(),
	//...
)
这时传入 parse 方法中的就是 loader 处理之后,返回的 extraInfo.webpackAST,类型是 AST 对象。这么做的好处是什么呢?如果 loader 处理过程中已经执行过将文件转化为 AST 了,那么这个 AST 对象保存到 extraInfo.webpackAST 中,在这一步就可以直接复用,以避免重复生成 AST,提升性能。
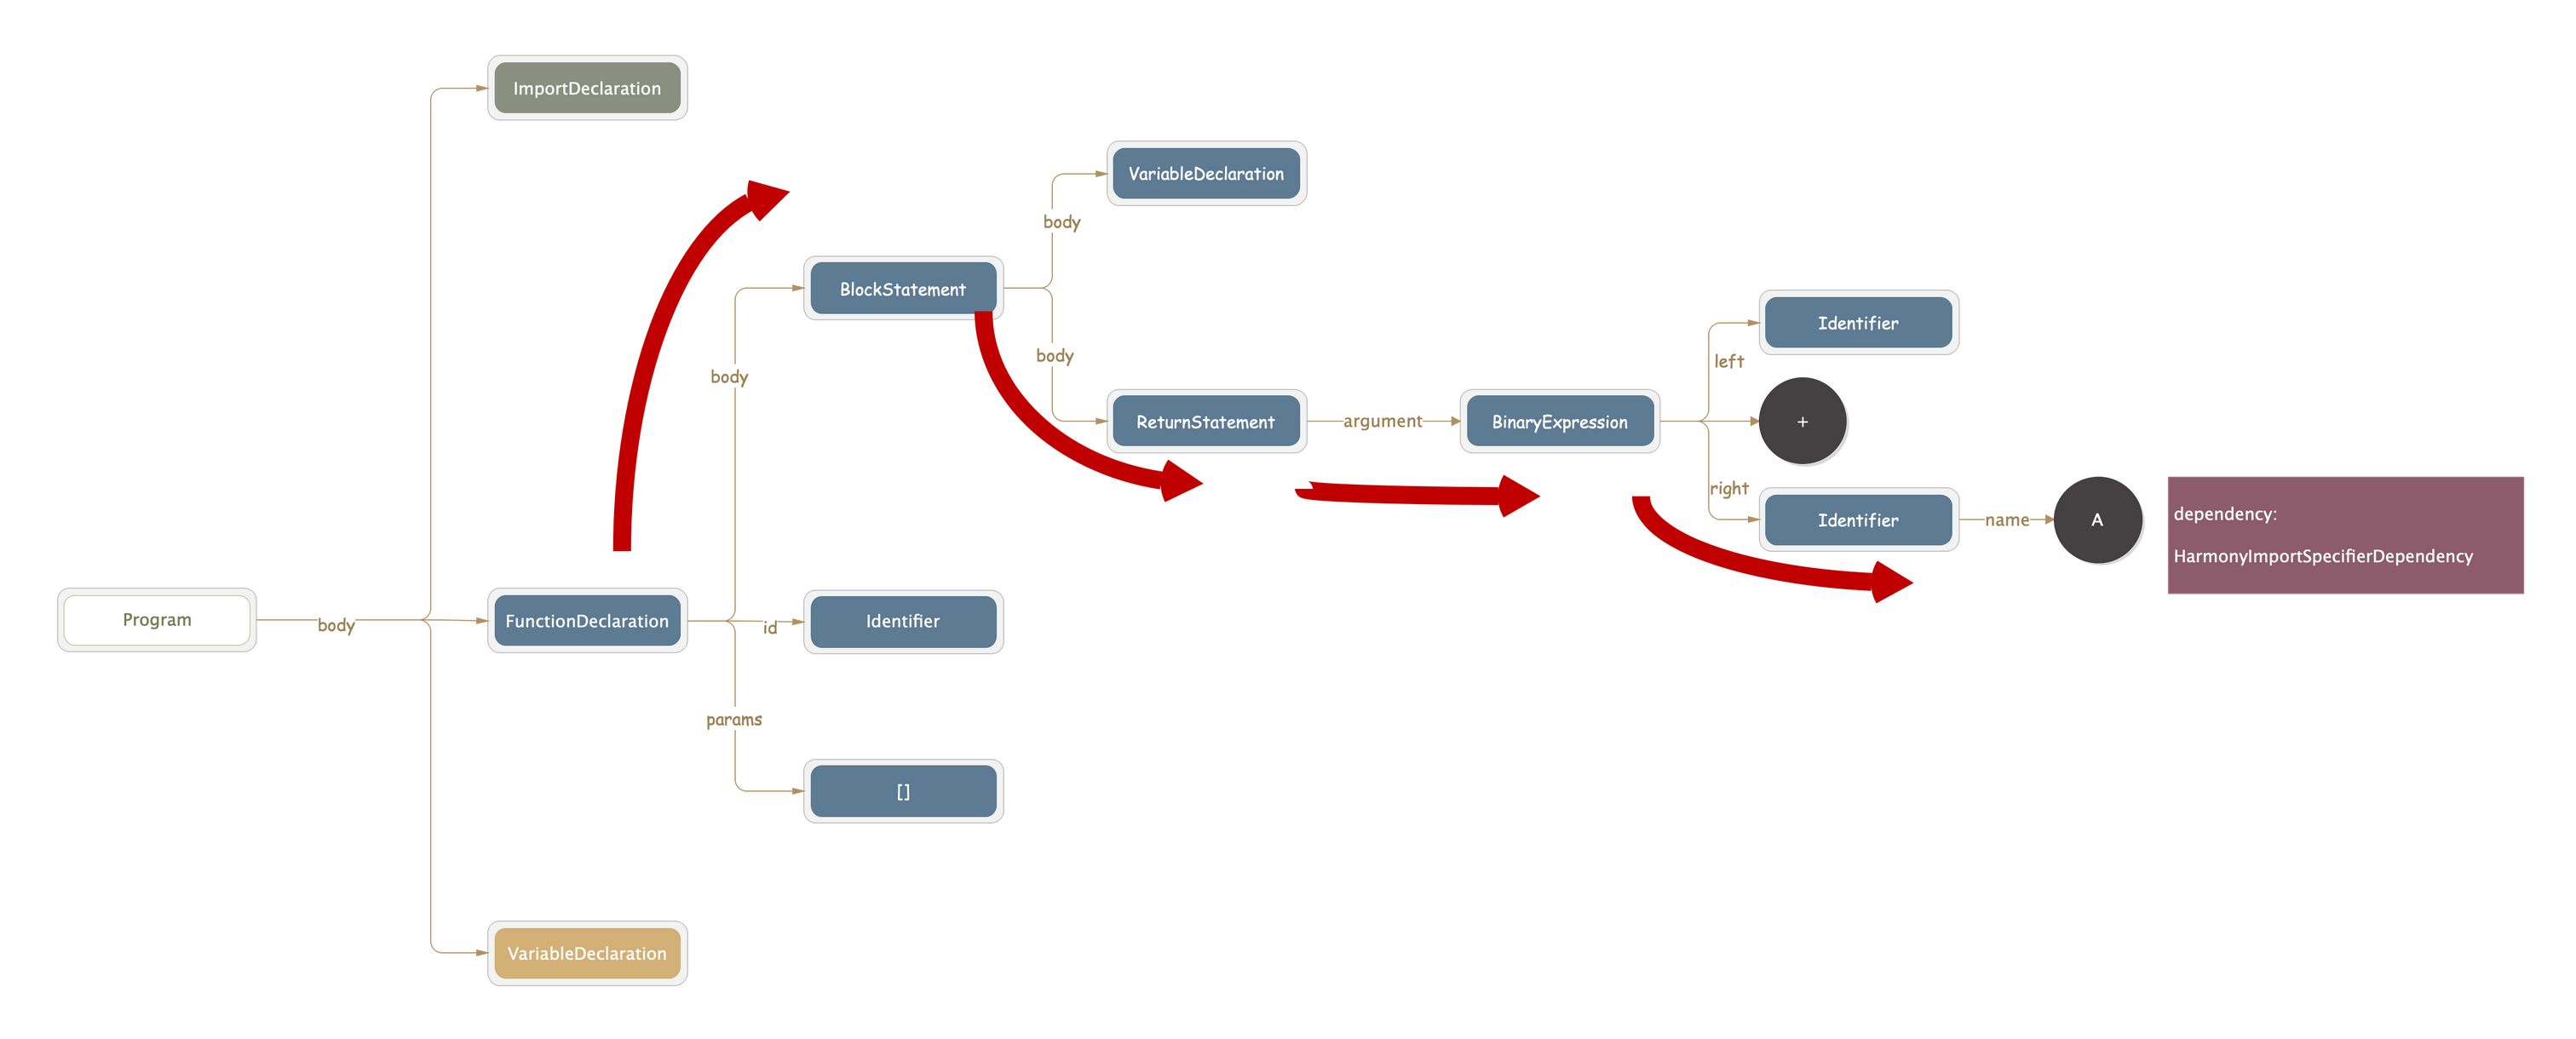
回到正题 parse 方法中,如果 source 是字符串,那么会经过 Parser.parse 之后被转化为 AST(webpack 中使用的是 acorn)。到这里 demo.js 中的源码会被解析成一个树状结构,大概结构如下图
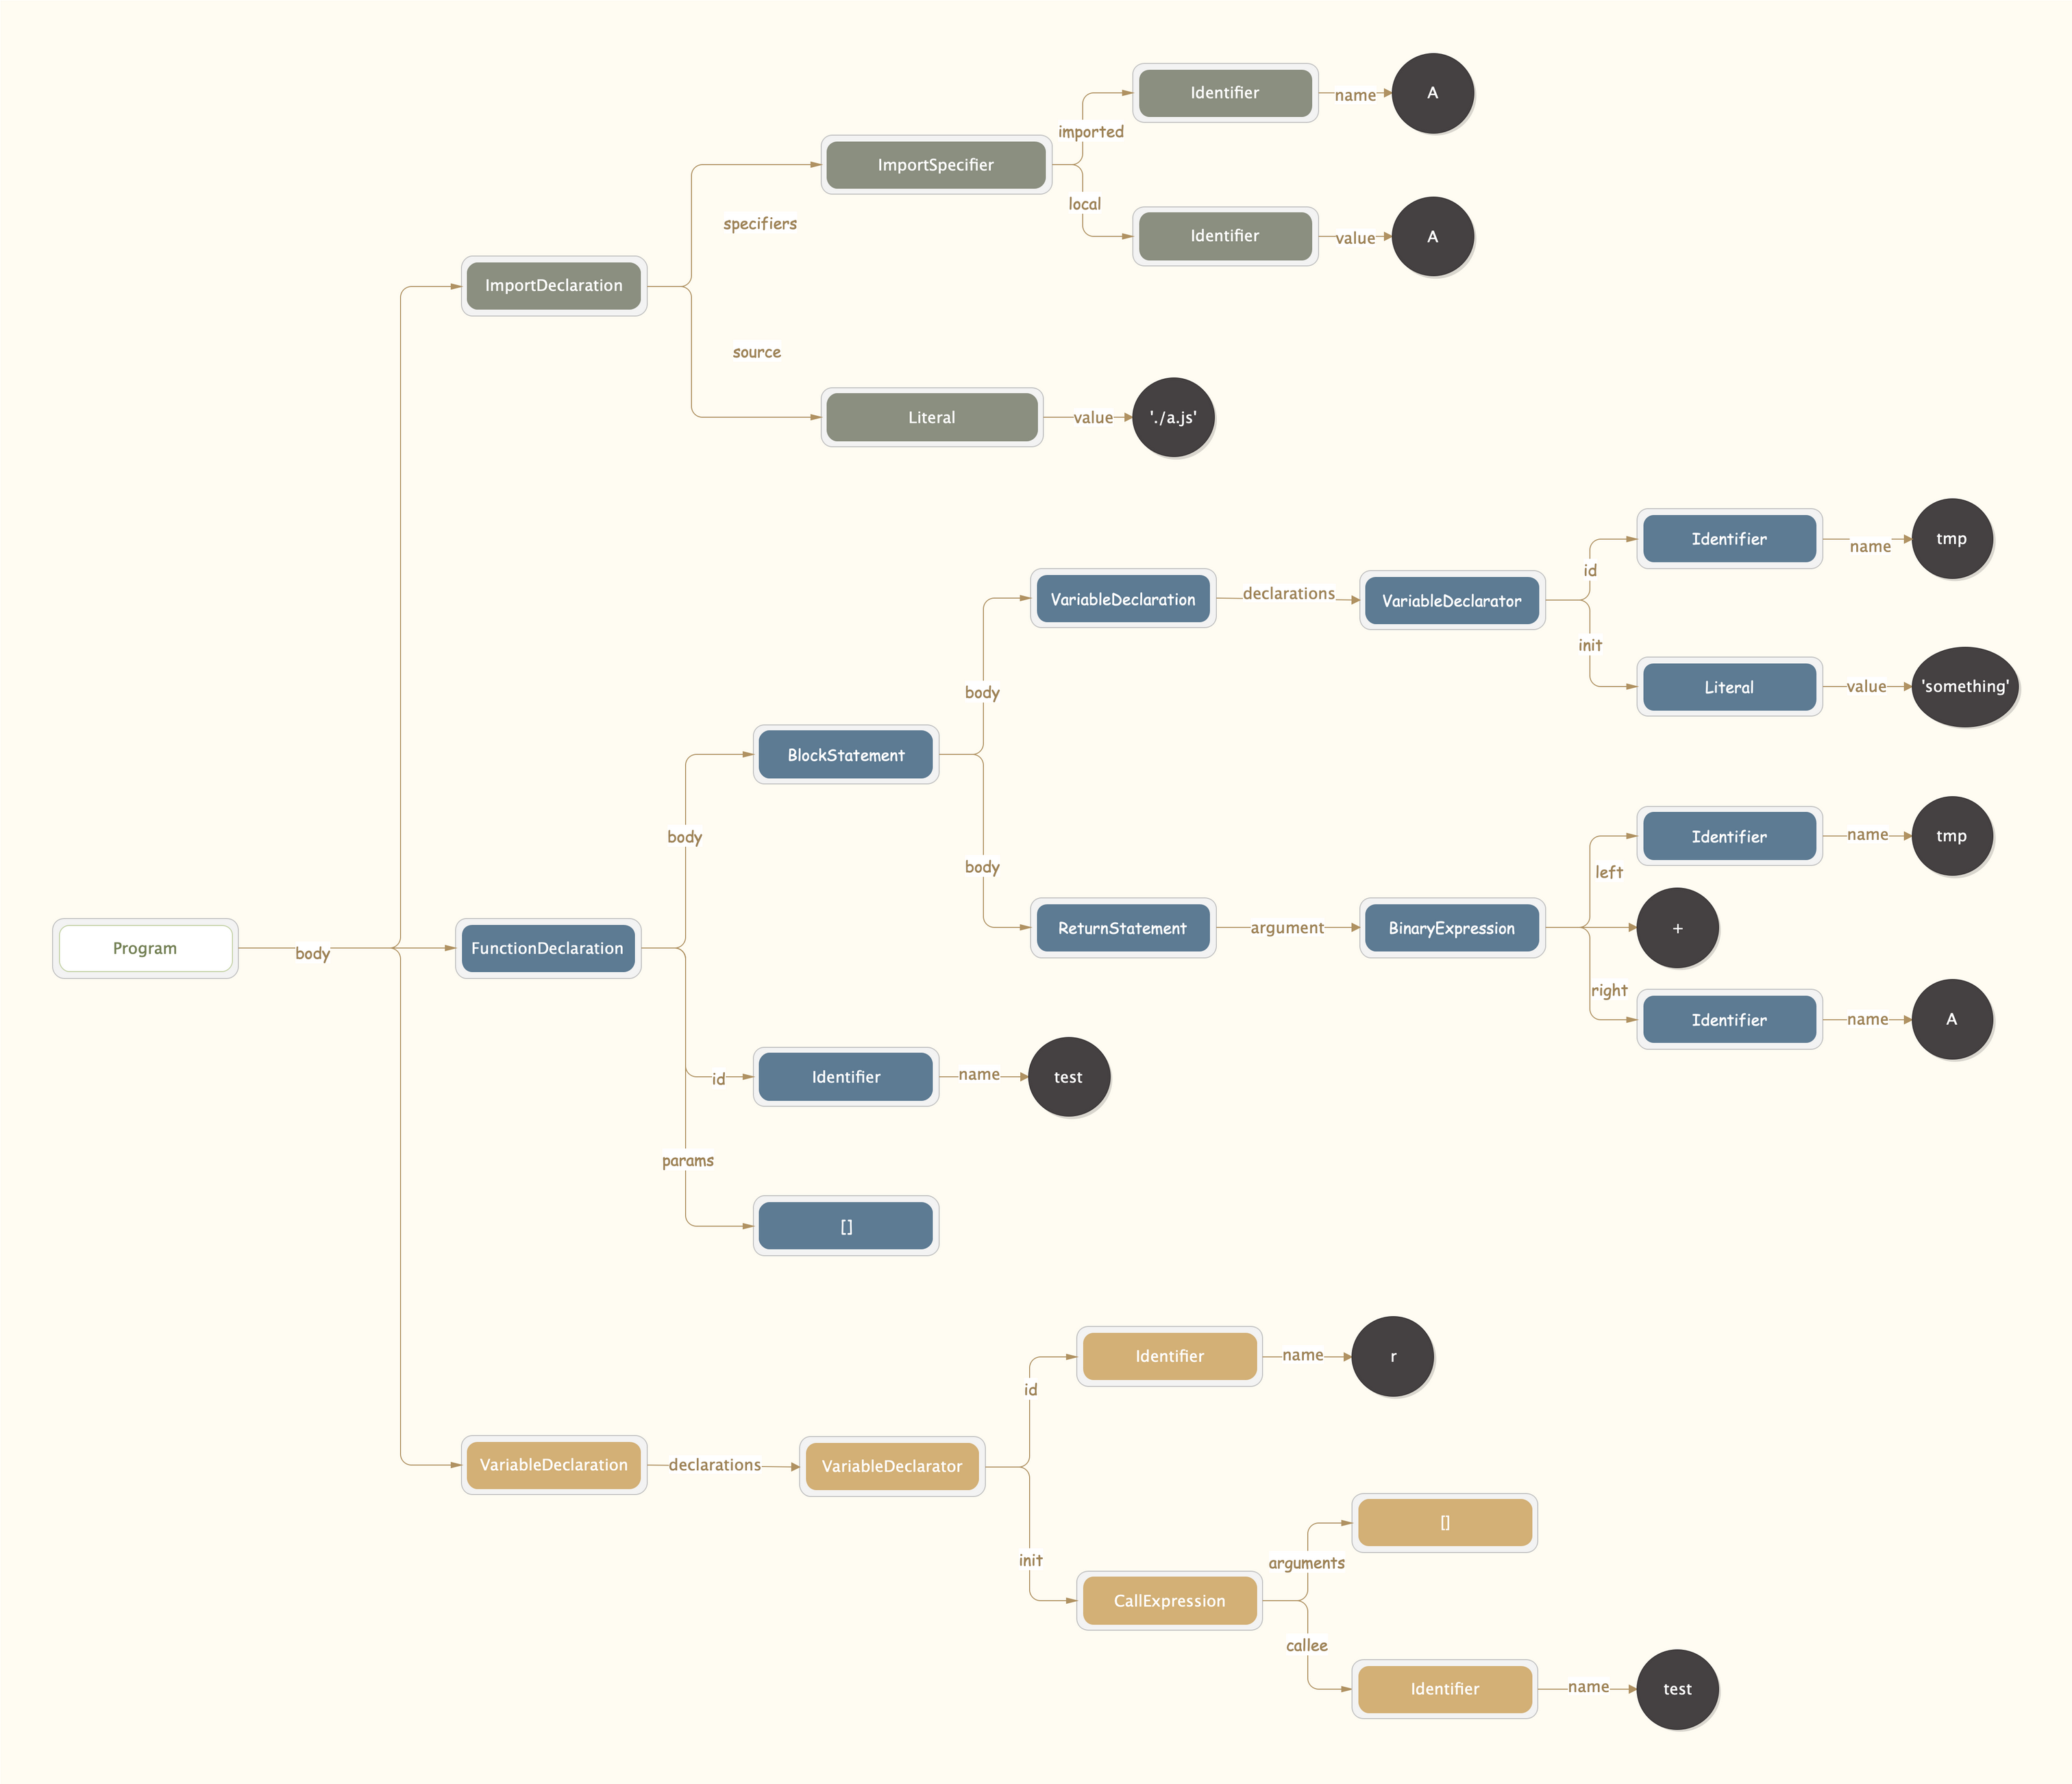
接下来就是对这个树进行遍历了,流程为: program事件 -> detectStrictMode -> prewalkStatements -> walkStatements。这个过程中会给 module 增加很多 dependency 实例。每个 dependency 类都会有一个 template 方法,并且保存了原来代码中的字符位置 range,在最后生成打包后的文件时,会用 template 的结果替换 range 部分的内容。所以最终得到的 dependency 不仅包含了文件中所有的依赖信息,还被用于最终生成打包代码时对原始内容的修改和替换,例如将 return 'sssss' + A 替换为 return 'sssss' + _a_js__WEBPACK_IMPORTED_MODULE_0__["A"]
program 事件
program 事件中,会触发两个 plugin 的回调:HarmonyDetectionParserPlugin 和 UseStrictPlugin
HarmonyDetectionParserPlugin 中,如果代码中有 import 或者 export 或者类型为 javascript/esm,那么会增加了两个依赖:HarmonyCompatibilityDependency, HarmonyInitDependency 依赖。
UseStrictPlugin 用来检测文件是否有 use strict,如果有,则增加一个 ConstDependency 依赖。这里估计大家会有一个疑问:文件中已经有了,为什么还有增加一个这样的依赖呢?在 UseStrictPlugin.js 的源码中有一句注释
Remove "use strict" expression. It will be added later by the renderer again. This is necessary in order to not break the strict mode when webpack prepends code.
意识是说,webpack 在处理我们的代码的时候,可能会在开头增加一些代码,这样会导致我们原本写在代码第一行的 "use strict" 不在第一行。所以 UseStrictPlugin 中通过增加 ConstDependency 依赖,来放置一个“占位符”,在最后生成打包文件的时候将其再转为 "use strict"。
总的来说,program 事件中,会根据情况给 demo module 增加依赖。
detectStrictMode
检测当前执行块是否有 use strict,并设置 this.scope.isStrict = true
prewalkStatements
prewalk 阶段负责处理变量。结合上面的 demo AST ,我们看 prewalk 代码怎么处理变量的。
首先进入 prewalkStatements 函数,该函数,对 demo AST 中第一层包含的三个结点分别调用 prewalkStatement
prewalkStatements(statements) {
	for (let index = 0, len = statements.length; index < len; index++) {
		const statement = statements[index];
		this.prewalkStatement(statement);
	}
}
prewalkStatement 函数是一个巨大的 switch 方法,根据 statement.type 的不同,调用不同的处理函数。
prewalkStatement(statement) {
	switch (statement.type) {
		case "BlockStatement":
			this.prewalkBlockStatement(statement);
			break;
	    //...
	}
}
第一个节点的 type 是 importDeclaration,所以会进入 prewalkImportDeclaration 方法。
prewalkImportDeclaration(statement) {
   // source 值为 './a.js'
	const source = statement.source.value;
	this.hooks.import.call(statement, source);
	// 如果原始代码为 import x, {y} from './a.js',则 statement.specifiers 包含 x 和 { y } ,也就是我们导入的值
	for (const specifier of statement.specifiers) {
		const name = specifier.local.name; // 这里是 import { A } from './a.js' 中的 A
		// 将 A 写入 renames 和 definitions
		this.scope.renames.set(name, null);
		this.scope.definitions.add(name);
		switch (specifier.type) {
			case "ImportDefaultSpecifier":
				this.hooks.importSpecifier.call(statement, source, "default", name);
				break;
			case "ImportSpecifier":
				this.hooks.importSpecifier.call(
					statement,
					source,
					specifier.imported.name,
					name
				);
				break;
			case "ImportNamespaceSpecifier":
				this.hooks.importSpecifier.call(statement, source, null, name);
				break;
		}
	}
}
涉及到的几个插件: import 事件会触发 HarmonyImportDependencyParserPlugin,增加 ConstDependency 和 HarmonyImportSideEffectDependency。
importSpecifier 事件触发 HarmonyImportDependencyParserPlugin,这个插件中会在 rename 中设置 A 的值为 'imported var'
parser.hooks.importSpecifier.tap(
	"HarmonyImportDependencyParserPlugin",
	(statement, source, id, name) => {
	   // 删除 A
		parser.scope.definitions.delete(name);
		// 然后将 A 设置为 import var
		parser.scope.renames.set(name, "imported var");
		if (!parser.state.harmonySpecifier)
			parser.state.harmonySpecifier = new Map();
		parser.state.harmonySpecifier.set(name, {
			source,
			id,
			sourceOrder: parser.state.lastHarmonyImportOrder
		});
		return true;
	}
);
第一个节结束后,继续第二个节点,进入 prewalkFunctionDeclaration。这里只会处理函数名称,并不会深入函数内容进行处理。
prewalkFunctionDeclaration(statement) {
	if (statement.id) {
	   // 将 function 的名字,test 添加到 renames 和 definitions 中
		this.scope.renames.set(statement.id.name, null);
		this.scope.definitions.add(statement.id.name);
	}
}
其余的这里不一一介绍了,prewalkStatements 过程中会处理当前作用域下的变量,将其写入 scope.renames 中,同时为 import 语句增加相关的依赖。
walkStatements
上一步中 prewalkStatements 只负责处理当前作用域下的变量,如果遇到函数并不会深入内部。而在 walk 这一步则主要负责深入函数内部。对于 demo 的 AST 会深入第二个节点 FunctionDeclaration。
walkFunctionDeclaration(statement) {
	const wasTopLevel = this.scope.topLevelScope;
	this.scope.topLevelScope = false;
	for (const param of statement.params) this.walkPattern(param);
	// inScope 方法会生成一个新的 scope,用于对函数的遍历。在这个新的 scope 中会将函数的参数名 和 this 记录到 renames 中。
	this.inScope(statement.params, () => {
		if (statement.body.type === "BlockStatement") {
			this.detectStrictMode(statement.body.body);
			this.prewalkStatement(statement.body);
			this.walkStatement(statement.body);
		} else {
			this.walkExpression(statement.body);
		}
	});
	this.scope.topLevelScope = wasTopLevel;
}
在遍历之前会先调用 inScope 方法,生成一个新的 scope,然后对于 function(){} 的方法,继续 detectStrictMode -> prewalkStatement -> walkStatement。这个过程和遍历 body 类似,我们这里跳过一下,直接看 return temp + A 中的 A,即 AST 中 BinaryExpression.right 叶子节点。因为其中的 A 是我们引入的变量, 所以会有所不同,代码如下
walkIdentifier(expression) {
    // expression.name = A
	if (!this.scope.definitions.has(expression.name)) {
		const hook = this.hooks.expression.get(
			this.scope.renames.get(expression.name) || expression.name
		);
		if (hook !== undefined) {
			const result = hook.call(expression);
			if (result === true) return;
		}
	}
}
在 prewalk 中针对 A 变量有一个处理,重新设置会将其从 definitions 中删除掉(HarmonyImportDependencyParserPlugin 插件中逻辑)。
// 删除 A
parser.scope.definitions.delete(name);
// 然后将 A 设置为 import var
parser.scope.renames.set(name, "imported var");
所以这里会进入到 if 逻辑中,同时this.scope.renames.get(expression.name) 这个值的结果就是 'import var'。同样是在 HarmonyImportDependencyParserPlugin 插件中,还注册了一个 'import var' 的 expression 事件:
parser.hooks.expression
.for("imported var")
.tap("HarmonyImportDependencyParserPlugin", expr => {
	const name = expr.name;// A
	// parser.state.harmonySpecifier 会在 prewalk 阶段写入
	const settings = parser.state.harmonySpecifier.get(name);
	// 增加一个 HarmonyImportSpecifierDependency 依赖
	const dep = new HarmonyImportSpecifierDependency(
		settings.source,
		parser.state.module,
		settings.sourceOrder,
		parser.state.harmonyParserScope,
		settings.id,
		name,
		expr.range,
		this.strictExportPresence
	);
	dep.shorthand = parser.scope.inShorthand;
	dep.directImport = true;
	dep.loc = expr.loc;
	parser.state.module.addDependency(dep);
	return true;
});
因此在 walkIdentifier 方法中通过 this.hooks.expression.get 获取到这个事件的 hook,然后执行。执行结束后,会给 module 增加一个 HarmonyImportSpecifierDependency 依赖,同样的,这个依赖同时也是一个占位符,在最终生成打包文件的时候会对 return tmp + A 中的 A 进行替换。
parse总结
整个 parse 的过程关于依赖的部分,我们总结一下:
- 将 source 转为 AST(如果 source 是字符串类型)
- 遍历 AST,遇到 import 语句就增加相关依赖,代码中出现 A(import 导入的变量) 的地方也增加相关的依赖。 ('use strict'的依赖和我们 module 生成的主流程无关,这里暂时忽略)
所有的依赖都被保存在 module.dependencies 中,一共有下面4个
HarmonyCompatibilityDependency
HarmonyInitDependency
ConstDependency
HarmonyImportSideEffectDependency
HarmonyImportSpecifierDependency
到此 build 阶段就结束了,回到 module.build 的回调函数。接下来就是对依赖的处理
依赖处理阶段
首先回到的是 module.build 回调中,源码位于 Compilation.js 的 buildModule 中。对 dependencies 按照代码在文件中出现的先后顺序排序,然后执行 callback,继续返回,回到 buildModule 方法的回调中,调用 afterBuild。
const afterBuild = () => {
	if (currentProfile) {
		const afterBuilding = Date.now();
		currentProfile.building = afterBuilding - afterFactory;
	}

	// 如果有依赖,则进入 processModuleDependencies
	if (addModuleResult.dependencies) {
		this.processModuleDependencies(module, err => {
			if (err) return callback(err);
			callback(null, module);
		});
	} else {
		return callback(null, module);
	}
};
这时我们有4个依赖,所以会进入 processModuleDependencies。
processModuleDependencies(module, callback) {
	const dependencies = new Map();

	// 整理 dependency
	const addDependency = dep => {
		const resourceIdent = dep.getResourceIdentifier();
		// 过滤掉没有 ident 的,例如 constDependency 这些只用在最后打包文件生成的依赖
		if (resourceIdent) {
		   // dependencyFactories 中记录了各个 dependency 对应的 ModuleFactory。
		   // 还记得前一篇文章中介绍的处理入口的 xxxEntryPlugin 吗?
		   // 在 compilation 事的回调中会执行 `compilation.dependencyFactories.set` 方法。
		   // 类似的,ImportPlugin,ConstPlugin 等等,也会在 compilation 事件回调中执行 set 操作,
		   // 将 dependency 与用来处理这个 dependency 的 moduleFactory 对应起来。
			const factory = this.dependencyFactories.get(dep.constructor);
			if (factory === undefined)
				throw new Error(
					`No module factory available for dependency type: ${
						dep.constructor.name
					}`
				);
			let innerMap = dependencies.get(factory);
			if (innerMap === undefined)
				dependencies.set(factory, (innerMap = new Map()));
			let list = innerMap.get(resourceIdent);
			if (list === undefined) innerMap.set(resourceIdent, (list = []));
			list.push(dep);
		}
	};

	const addDependenciesBlock = block => {
		if (block.dependencies) {
			iterationOfArrayCallback(block.dependencies, addDependency);
		}
		if (block.blocks) {
			iterationOfArrayCallback(block.blocks, addDependenciesBlock);
		}
		if (block.variables) {
			iterationBlockVariable(block.variables, addDependency);
		}
	};

	try {
		addDependenciesBlock(module);
	} catch (e) {
		callback(e);
	}

	const sortedDependencies = [];
	// 将上面的结果转为数组形式
	for (const pair1 of dependencies) {
		for (const pair2 of pair1[1]) {
			sortedDependencies.push({
				factory: pair1[0],
				dependencies: pair2[1]
			});
		}
	}

	this.addModuleDependencies(/*参数*/);
}
block, variable 哪里来的?
build 阶段得到的 dependency 在这一步都会进入 addDependency 逻辑。我们 demo 中得到的全部都是 dependency,但是除此之外还有 block 和 variable 两种类型。
block 依赖
当我们使用 webpack 的懒加载时 import('xx.js').then() 的写法,在 parse 阶段,解析到这一句时会执行
//...省略其他逻辑
else if (expression.callee.type === "Import") {
	result = this.hooks.importCall.call(expression);
	//...
}
//...
这时会进入到 ImportParserPlugin 中,这个插件中默认是 lazy 模式,即懒加载。在该模式下,会生成一个 ImportDependenciesBlock 类型的依赖,并加入到 module.block 中。
// ImportParserPlugin
const depBlock = new ImportDependenciesBlock(
	param.string,
	expr.range,
	Object.assign(groupOptions, {
		name: chunkName
	}),
	parser.state.module,
	expr.loc,
	parser.state.module
);
// parser.state.current 为当前处理的 module
parser.state.current.addBlock(depBlock);
ImportDependenciesBlock 是一个单独的 chunk ,它自己也会有 dependency, block, variable 类型的依赖。
variables 依赖
如果我们使用到了 webpack 内置的模块变量 __resourceQuery ,例如下面的代码
// main.js
require('./a.js?test')

// a.js
const a = __resourceQuery
console.log(a)
a.js 的模块中 module.variables 中就会存在一个 __resourceQuery 。variables 依赖用来存放 webpack 内全局变量(测试的时候暂时只发现 __resourceQuery 会存入 variables 中),一般情况下也很少用到(在最新的 webpack5 处理模块依赖中关于 variables 的部分已经被去掉了)。
回到我们的 demo 中,前面我们得到的 4 个 dependency 中,有一些是纯粹用作“占位符”(HarmonyCompatibilityDependency,HarmonyInitDependency,ConstDependency),addDependency 中第一步dep.getResourceIdentifier(); 逻辑则会将这些依赖都过滤掉,然后再将剩下的 dependency 按照所对应的 moduleFactory 和 dependency 的 ident 归类,最终得到下面的结构:
dependencies = {
  NormalModuleFactory: {
    "module./a.js": [
       HarmonyImportSideEffectDependency,
       HarmonyImportSpecifierDependency
    ]
  }
}
之后再转化为数组形式
sortedDependencies = [
  {
    factory: NormalModuleFactory,
    dependencies: [
      HarmonyImportSideEffectDependency,
      HarmonyImportSpecifierDependency
    ]
  }
]
然后在 addModuleDependencies 方法中会对 sortedDependencies 数组中的每一项执行相同的处理,将其加入到编译链条中。细看一下 addModuleDependencies 中处理依赖的代码
// addModuleDependencies
addModuleDependencies(
  module,
  dependencies,
  bail,
  cacheGroup,
  recursive,
  callback
) {
  //...
  asyncLib.forEach(
    dependencies,
    (item, callback) => {
      const dependencies = item.dependencies;
      //...
      semaphore.acquire(() => {
        const factory = item.factory;
        // create 阶段
        factory.create(
          {/*参数*/},
          (err, dependentModule) => {
            let afterFactory;
            const isOptional = () => {
              return dependencies.every(d => d.optional);
            };
            //...
            // addModule 阶段
            const iterationDependencies = depend => {
              for (let index = 0; index < depend.length; index++) {
                const dep = depend[index];
                dep.module = dependentModule;
                dependentModule.addReason(module, dep);
              }
            };
            const addModuleResult = this.addModule(
              dependentModule,
              cacheGroup
            );
            dependentModule = addModuleResult.module;
            // 将 module 信息写入依赖中
            iterationDependencies(dependencies);

            // build 阶段
            const afterBuild = () => {
              //...
              // build 阶段结束后有依赖的话继续处理依赖
              if (recursive && addModuleResult.dependencies) {
                this.processModuleDependencies(dependentModule, callback);
              } else {
                return callback();
              }
            };
            //...
            if (addModuleResult.build) {
              this.buildModule(/*参数*/);
            } else {
              //...
            }
          }
        );
      });
    },
    err => {
      //...
    }
  );
}
上面代码可以看到,对于所有的依赖再次经过 create->build->add->processDep。如此递归下去,最终我们所有的文件就都转化为了 module,并且会得到一个 module 和 dependencies 的关系结构
_preparedEntrypoints:
  \
    module: demo.js module
			  |\
			  |  HarmonyImportSideEffectDependency
			  |    module: a.js module
			   \
			     HarmonyImportSpecifierDependency
			       module: a.ja module
这个结构会交给后续的 chunck 和 生成打包文件代码使用。module 生成的过程结束之后,最终会回到 Compiler.js 中的 compile 方法的 make 事件回调中:
compile(callback) {
	const params = this.newCompilationParams();
	this.hooks.beforeCompile.callAsync(params, err => {
		//...
		this.hooks.make.callAsync(compilation, err => {
		   // 回到这个回调中
			if (err) return callback(err);

			compilation.finish();

			compilation.seal(err => {
				if (err) return callback(err);

				this.hooks.afterCompile.callAsync(compilation, err => {
					if (err) return callback(err);

					return callback(null, compilation);
				});
			});
		});
	});
回调的 seal 方法中,将运用这些 module 以及 module 的 dependencies 信息整合出最终的 chunck(具体过程,我们会在下一篇文章《webpack 系列之chunk生成》中介绍)。
总结
到此,module 生成的过程就结束了,我们以一张流程图来整体总结一下 module 生成的过程: