

MVVM模式
介绍
首先上一张MVVM的架构图
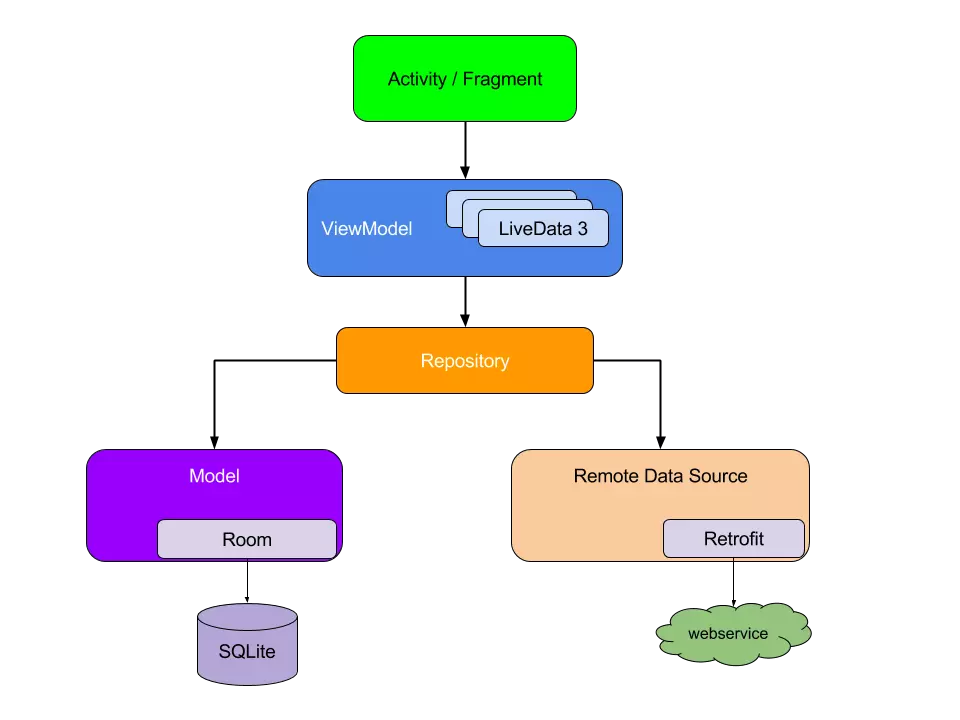
- View层即是图中绿色的Activity/Fragment,它的主要职责是负责UI中的绘制以及与用户交互,由ViewModel驱动,同时也监听UI事件及其生命周期,驱动ViewModel。
- ViewModel层即是图中蓝色的ViewModel,它创建关联,将model和view进行绑定,它只做业务逻辑的操作,不持有任何控件的引用。当model更改后,通过ViewModel传递给View来进行更新。
- Model层即是图中的橘色Repository并包括其下都是。Model层就是数据层,它的数据来源包括本地数据、缓存数据以及网络数据。
本文将以谷歌推出的MVVM框架DataBinding作为示例。
基本使用
- 启用DataBingding
在模块的build.gradle中添加以下代码。
    dataBinding {
        enabled = true
    }
- 创建一个Bean类,这个bean类充当的就是Model。
public class StudentBean extends BaseObservable{

    private String name;
    private int age;

    public StudentBean(String name, int age) {
        this.name = name;
        this.age = age;
    }

    @Bindable
    public String getName() {
        return name;
    }

    public void setName(String name) {
        this.name = name;
        notifyPropertyChanged(BR.name);
    }

    @Bindable
    public int getAge() {
        return age;
    }

    public void setAge(int age) {
        this.age = age;
        notifyPropertyChanged(BR.age);
    }
}
- 修改Activity的xml布局文件,View层
<?xml version="1.0" encoding="utf-8"?>
<layout xmlns:android="http://schemas.android.com/apk/res/android">

    <data>

        <variable
            name="student"
            type="cn.panf.mvvm_new.bean.StudentBean" />
    </data>

    <LinearLayout xmlns:tools="http://schemas.android.com/tools"
        android:layout_width="match_parent"
        android:layout_height="match_parent"
        android:orientation="vertical"
        tools:context="cn.panf.mvvm_new.MvvmActivity">

        <TextView
            android:layout_width="match_parent"
            android:layout_height="wrap_content"
            android:text="@{student.name}"
            android:textAlignment="center" />

        <TextView
            android:layout_width="match_parent"
            android:layout_height="wrap_content"
            android:text="@{String.valueOf(student.age)}"
            android:textAlignment="center" />

    </LinearLayout>
</layout>
- 修改Activity类,ViewModel层
public class MvvmActivity extends AppCompatActivity {

    @Override
    protected void onCreate(Bundle savedInstanceState) {
        super.onCreate(savedInstanceState);
//        setContentView(R.layout.activity_mvvm);
        ActivityMvvmBinding activityMvvmBinding =
                DataBindingUtil.setContentView(this, R.layout.activity_mvvm);
        StudentBean xiaoMing = new StudentBean("xiaoMing", 12);
        activityMvvmBinding.setStudent(xiaoMing);
    }
}
这样一个最简单的databinding就完成了,那么只要我们随意修改StudentBean中的任一对象,UI界面就会刷新。下面添加一个button按钮测试一下。
首先新建一个处理点击事件的类:
public interface HandleClick {
    void buttonClick(View view);
}
在布局文件中添加:
<variable
            name="clickhHandler"
            type="cn.panf.mvvm_new.HandleClick" />

<Button
            android:layout_width="match_parent"
            android:layout_height="wrap_content"
            android:onClick="@{clickhHandler::buttonClick}" />
最后在Activity中:
//处理点击事件
        activityMvvmBinding.setClickhHandler(new HandleClick() {
            @Override
            public void buttonClick(View view) {
                xiaoMing.setAge(13);
            }
        });
这样你只要点击按钮,那么textView的数据就会自动刷新而不需要任何手动赋值,这就是所谓的数据驱动。
进阶使用
下面我们将databinding在RecyclerView中来进行使用。
首先修改布局文件
<layout xmlns:android="http://schemas.android.com/apk/res/android">

    <LinearLayout xmlns:tools="http://schemas.android.com/tools"
        android:layout_width="match_parent"
        android:layout_height="match_parent"
        android:orientation="vertical"
        tools:context="cn.panf.mvvm_new.MvvmActivity">

        <android.support.v7.widget.RecyclerView
            android:id="@+id/rv"
            android:layout_width="match_parent"
            android:layout_height="match_parent" />

    </LinearLayout>
</layout>
为RecyclerView的item新建一个布局layout_item_student.xml
<layout xmlns:android="http://schemas.android.com/apk/res/android">

    <data>

        <variable
            name="student"
            type="cn.panf.mvvm_new.bean.StudentBean" />
    </data>

    <LinearLayout
        android:layout_width="match_parent"
        android:layout_height="50dp"
        android:orientation="horizontal">

        <TextView
            android:layout_width="0dp"
            android:layout_height="match_parent"
            android:layout_weight="1"
            android:gravity="center"
            android:text="@{student.name}" />

        <TextView
            android:layout_width="0dp"
            android:layout_height="match_parent"
            android:layout_weight="1"
            android:gravity="center"
            android:text="@{String.valueOf(student.age)}" />

    </LinearLayout>
</layout>
新建Adapter类:
public class StudentAdapter extends RecyclerView.Adapter<StudentAdapter.StudentViewHolder> {

    private List<StudentBean> mList;
    private Context context;

    public StudentAdapter(Context context, List<StudentBean> mList) {
        this.mList = mList;
        this.context = context;
    }

    @Override
    public StudentViewHolder onCreateViewHolder(ViewGroup parent, int viewType) {
        LayoutInflater inflater = (LayoutInflater) context.getSystemService(Context.LAYOUT_INFLATER_SERVICE);
        LayoutItemStudentBinding layoutItemStudentBinding = DataBindingUtil
                .inflate(inflater, R.layout.layout_item_student, parent, false);
        return new StudentViewHolder(layoutItemStudentBinding);
    }

    @Override
    public void onBindViewHolder(StudentViewHolder holder, int position) {
        StudentBean studentBean = mList.get(position);
        holder.getLayoutItemStudentBinding().setStudent(studentBean);
    }

    @Override
    public int getItemCount() {
        return mList == null ? 0 : mList.size();
    }

    class StudentViewHolder extends RecyclerView.ViewHolder {

        private LayoutItemStudentBinding layoutItemStudentBinding;

        LayoutItemStudentBinding getLayoutItemStudentBinding() {
            return layoutItemStudentBinding;
        }

        StudentViewHolder(LayoutItemStudentBinding layoutItemStudentBinding) {
            super(layoutItemStudentBinding.getRoot());
            this.layoutItemStudentBinding = layoutItemStudentBinding;
        }

    }

}
注意,在上文的StudentViewHolder的构造函数中,我把item对应的布局的View对象改成了item对应布局的ViewDataBinding对象,然后提供一个get方法来给外部调用,这样做的好处是你不需要再去操作view去对数据进行修改,而是只需要把你获取到的数据直接传给Bean即可,因为你在item布局文件里已经把数据和View进行绑定了。
最后再来修改一下Activity:
public class MvvmActivity extends AppCompatActivity {

    private List<StudentBean> mList = new ArrayList<>();

    @Override
    protected void onCreate(Bundle savedInstanceState) {
        super.onCreate(savedInstanceState);
//        setContentView(R.layout.activity_mvvm);
        ActivityMvvmBinding activityMvvmBinding =
                DataBindingUtil.setContentView(this, R.layout.activity_mvvm);
//        final StudentBean xiaoMing = new StudentBean("xiaoMing", 12);
        addData();

        StudentAdapter adapter = new StudentAdapter(this, mList);
        LinearLayoutManager manager = new LinearLayoutManager(this, OrientationHelper.VERTICAL, false);
        activityMvvmBinding.rv.setLayoutManager(manager);
        activityMvvmBinding.rv.setAdapter(adapter);

    }

    private void addData() {
        for (int i = 0; i < 15; i++) {
            int age = new Random().nextInt(20);
            StudentBean studentBean = new StudentBean("student" + i, age);
            mList.add(studentBean);
        }
    }
}
OK, it works!
总结
通过介绍了MVVM的相关定义以及提供了两个实例来帮助理解,相信理解了本文的两个例子,必然会理解MVVM这种数据驱动的魅力所在,所有代码没有一处对控件进行赋值即可让数据进行自动刷新。但是,没有最好,只有最合适。目前在android中最广泛使用的还是MVP,而且在2017年谷歌推出了新的MVVM框架LiveData。
note: 目的在于以DataBinding来介绍MVVM,对DataBinding的更多用法并未详细介绍,有兴趣的可以去查阅更多相关资料。
更新
宫影让我看看能不能把databinding针对recyclerView在多布局上应用,我进行了尝试发现确实可行。
- 首先是要对不同的viewType进行区分,在上面我们已经将对于数据完全和Bean进行绑定了,所以最好在绑定数据时在Bean中进行区分。那么可以定义一个接口,使所有的Bean来实现它。
public interface IBaseItem {
    int getItemViewType();
}
修改StudentBean类,并添加TeacherBean类。
//只放一张图片,仅为了做区分
public class TeacherBean extends BaseObservable implements IBaseItem {

    private int resId;

    public TeacherBean(int resId) {
        this.resId = resId;
    }

    @Bindable
    public int getResId() {
        return resId;
    }

    public void setResId(int resId) {
        this.resId = resId;
        notifyPropertyChanged(BR.resId);
    }

    @Override
    public int getItemViewType() {
        return R.layout.layout_item_teacher;
    }
}

public class StudentBean extends BaseObservable implements IBaseItem{

    ......

    @Override
    public int getItemViewType() {
        return R.layout.layout_item_student;
    }
}
layout_item_teacher.xml
<layout xmlns:android="http://schemas.android.com/apk/res/android"
    xmlns:app="http://schemas.android.com/apk/res-auto">

    <data>

        <variable
            name="teacher"
            type="cn.panf.mvvm_new.bean.TeacherBean" />
    </data>

    <LinearLayout
        android:layout_width="match_parent"
        android:layout_height="50dp"
        android:orientation="horizontal">

        <ImageView
            android:layout_width="match_parent"
            android:layout_height="match_parent"
            android:scaleType="center"
            app:imgUrl="@{teacher.resId}"/>

    </LinearLayout>
</layout>
显示图片时由于dataBinding不支持直接写int类型,这里需要额外提供显示image的方法。 可以新建一个类页可以直接写在Adapter里面,看喜好。
public class ImgUtil {

    @BindingAdapter("imgUrl")
    public static void showImgByUrl(ImageView iv, int resId) {
        iv.setImageResource(resId);
    }
}
- 修改原本的StudentAdapter类,因为添加了Teacher,这里修改名称为SchoolAdapter。
package cn.panf.mvvm_new;

import android.content.Context;
import android.databinding.DataBindingUtil;
import android.support.v7.widget.RecyclerView;
import android.view.LayoutInflater;
import android.view.View;
import android.view.ViewGroup;

import java.util.List;

import cn.panf.androidknowledge.R;
import cn.panf.androidknowledge.databinding.LayoutItemStudentBinding;
import cn.panf.androidknowledge.databinding.LayoutItemTeacherBinding;
import cn.panf.mvvm_new.bean.IBaseItem;
import cn.panf.mvvm_new.bean.StudentBean;
import cn.panf.mvvm_new.bean.TeacherBean;

/**
 * author: aaron.pf
 * date: 2019/4/17 19:49.
 * desc:
 */

public class SchoolAdapter extends RecyclerView.Adapter {

    private List<IBaseItem> mList;
    private LayoutInflater inflater;

    public SchoolAdapter(Context context, List<IBaseItem> mList) {
        this.mList = mList;
        inflater = (LayoutInflater) context.getSystemService(Context.LAYOUT_INFLATER_SERVICE);
    }

    @Override
    public RecyclerView.ViewHolder onCreateViewHolder(ViewGroup parent, int viewType) {

        switch (viewType) {
            case R.layout.layout_item_student:
                LayoutItemStudentBinding layoutItemStudentBinding = DataBindingUtil
                        .inflate(inflater, R.layout.layout_item_student, parent, false);
                return new StudentViewHolder(layoutItemStudentBinding);
            case R.layout.layout_item_teacher:
                LayoutItemTeacherBinding layoutItemTeacherBinding = DataBindingUtil
                        .inflate(inflater, R.layout.layout_item_teacher, parent, false);
                return new TeacherViewHolder(layoutItemTeacherBinding);
            default:
                LayoutItemTeacherBinding layoutItemTeacherBinding1 = DataBindingUtil
                        .inflate(inflater, R.layout.layout_item_teacher, parent, false);
                return new TeacherViewHolder(layoutItemTeacherBinding1);
        }

    }

    @Override
    public void onBindViewHolder(RecyclerView.ViewHolder holder, int position) {
        if (holder instanceof StudentViewHolder) {
            StudentBean studentBean = (StudentBean) mList.get(position);
            ((StudentViewHolder) holder).getLayoutItemStudentBinding().setStudent(studentBean);
            //防止数据刷新闪烁
            ((StudentViewHolder) holder).getLayoutItemStudentBinding().executePendingBindings();
        } else if (holder instanceof TeacherViewHolder) {
            TeacherBean teacherBean = (TeacherBean) mList.get(position);
            ((TeacherViewHolder) holder).getLayoutItemTeacherBinding().setTeacher(teacherBean);
            ((TeacherViewHolder) holder).getLayoutItemTeacherBinding().executePendingBindings();
        }
    }

    @Override
    public int getItemViewType(int position) {
        return mList.get(position).getItemViewType();
    }

    @Override
    public int getItemCount() {
        return mList == null ? 0 : mList.size();
    }

    class StudentViewHolder extends RecyclerView.ViewHolder {

        private LayoutItemStudentBinding layoutItemStudentBinding;

        LayoutItemStudentBinding getLayoutItemStudentBinding() {
            return layoutItemStudentBinding;
        }

        StudentViewHolder(LayoutItemStudentBinding layoutItemStudentBinding) {
            super(layoutItemStudentBinding.getRoot());
            this.layoutItemStudentBinding = layoutItemStudentBinding;
        }
    }

    class TeacherViewHolder extends RecyclerView.ViewHolder {

        private LayoutItemTeacherBinding layoutItemTeacherBinding;

        public LayoutItemTeacherBinding getLayoutItemTeacherBinding() {
            return layoutItemTeacherBinding;
        }

        public TeacherViewHolder(LayoutItemTeacherBinding layoutItemTeacherBinding) {
            super(layoutItemTeacherBinding.getRoot());
            this.layoutItemTeacherBinding = layoutItemTeacherBinding;
        }
    }

}
- 最后在Activity中来测试一下
public class MvvmActivity extends AppCompatActivity {

    private List<IBaseItem> mList = new ArrayList<>();

    @Override
    protected void onCreate(Bundle savedInstanceState) {
        super.onCreate(savedInstanceState);
//        setContentView(R.layout.activity_mvvm);
        ActivityMvvmBinding activityMvvmBinding =
                DataBindingUtil.setContentView(this, R.layout.activity_mvvm);
//        final StudentBean xiaoMing = new StudentBean("xiaoMing", 12);

        addData();

        SchoolAdapter adapter = new SchoolAdapter(this, mList);
        LinearLayoutManager manager = new LinearLayoutManager(this, OrientationHelper.VERTICAL, false);
        activityMvvmBinding.rv.setLayoutManager(manager);
        activityMvvmBinding.rv.setAdapter(adapter);

    }

    private void addData() {
        for (int i = 0; i < 10; i++) {
            mList.add(new StudentBean("stu1", 12));
            mList.add(new StudentBean("stu2", 15));
            mList.add(new TeacherBean(R.mipmap.ic_launcher));
            mList.add(new StudentBean("stu3", 16));
            mList.add(new TeacherBean(R.mipmap.ic_launcher));
            mList.add(new StudentBean("stu4", 18));
            mList.add(new TeacherBean(R.mipmap.ic_launcher));
        }

    }
}
OK, it works again!

思考
这里虽然实现了功能,但是能否更进一步将Adapter抽取成通用的呢?能否将ViewHolder抽取一下呢?毕竟这两个ViewHolder重复的代码略多呀。
