

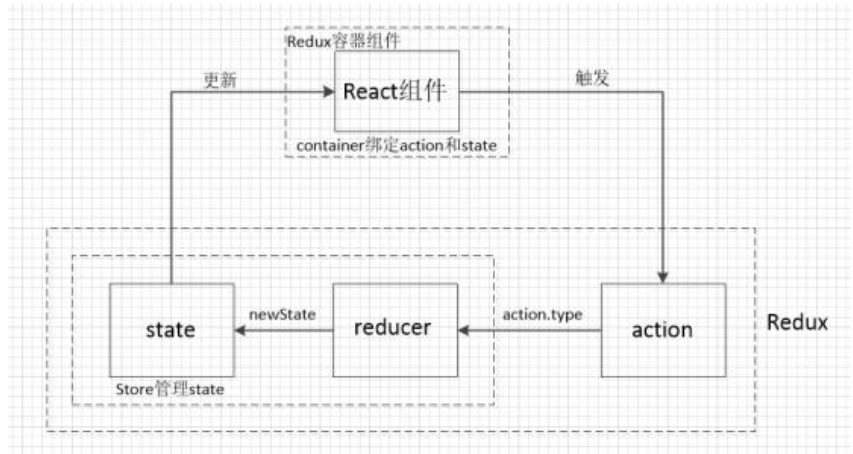
最近在翻boss,感觉今年前端的风向标的确是react,火爆程度完全超过了其他框架,所以为了跟上潮流,不得不开始使用react了,既然用了react就免不了要研究一下redux。关于redux的使用场景,就看自己得业务需要了,就不多说了。这里就简单描述一下redux的使用原理和一些核心的结构,主要针对一些还没有理解redux工作流的童鞋。 先看一下redux的流程图
class MyRedux {
  constructor(reducer, defaultState) {
    this.reducer = reducer;
    this.subscribeIndex = 0;
    this.state = defaultState
      ? { ...defaultState }
      : this.reducer(undefined, {
          type: "qweqwe"
        });
    this.subscribeMap = {};
  }
  subscribe = func => {
    let indexKey = this.subscribeIndex++;
    this.subscribeMap[indexKey] = func;
    return () => {
      delete this.subscribeMap[indexKey];
    };
  };
  getState = () => {
    return this.state;
  };
  dispatch = action => {
    this.state = Object.assign(this.state, this.reducer(this.state, action));
      Object.keys(this.subscribeMap).forEach(key => {
      let subscribeFunc = this.subscribeMap[key];
          subscribeFunc && subscribeFunc();
    });
  };
}
大概解释一下,constructor里面就是接受reducers和初始化state,这里的'qweqwe'是随便写的,源码中用的是'@@redux/INIT',subscribe就是注册监听,dispatch就是接受action然后通过reducers改变state,接着就触发注册的监听。 应该很好理解吧,再看一下redux其他的一些方法。
export function CreateStore(reducer) {
  return new MyRedux(reducer);
}
export function combineReducers(reducerMap) {
  return function(state = {}, action) {
    const nextState = {};
    Object.keys(reducerMap).forEach(key => {
      const reducer = reducerMap[key];
      nextState[key] = reducer(state[key], action);
    });
    return nextState;
  };
}
这两个方法就比较简单了,创建store和合并reducers。 接下来就是provider,这个其实只要理解了context就好办了,来我们直接看代码:
const MyReactContext = React.createContext();

export class MyProvider extends Component {
  static propTypes = {
    store: PropTypes.instanceOf(MyRedux),
    children: PropTypes.node
  };
  render() {
    const MyReactProvider = MyReactContext.Provider;
    return (
      <MyReactProvider value={this.props.store}>
        {this.props.children}
      </MyReactProvider>
    );
  }
}
这是一个react节点,直接创建一个context,然后把子节点扔在provider里面就行了,这样就能在这个里面通过consumer获取到store了。最后就是connect了,这个对一些初学者来说还是有些绕的,使用的时候需要传入两次参数,一次是需要并入props的一些参数,一个是当前的组件,这块是柯里化一个很好的应用,个人感觉柯里化的好处就是能把参数分类,切换频次低的可以复用,不过用的还是比较少,理解太到位。接着说connect,这个是高阶组件的用法,我们在外层函数传入并入的参数,然后返回一个函数,这个函数接受一个react组件,返回一个新的包装过后的组件。来看一下代码:
export function MyConnect(mapStateToProps, mapDispatchToProps) {
  function connectHOC(RawComponent) {
    return class NewComponent extends Component {
      unsubscribe = null;

      constructor(props) {
        super(props);
        this.state = {
        };
      }

      setSubscribe(store) {
        if (!this.unsubscribe) {
          this.unsubscribe = store.subscribe(() => {
            this.setState(prevState => {
                return {
                };
            });
          });
        }
      }

      componentWillUnmount() {
        this.unsubscribe && this.unsubscribe();
      }

      getState = store => {
        if (!mapStateToProps) {
          return store.getState();
        } else {
          return mapStateToProps(store.getState(), this.props);
        }
      };

      getDispatch = store => {
        if (!mapDispatchToProps) {
          return {
            dispatch: store.dispatch
          };
        } else {
          return mapDispatchToProps(store.dispatch, this.props);
        }
      };

      render() {
        const MyReactConsumer = MyReactContext.Consumer;
        return (
          <MyReactConsumer>
            {store => {
                this.setSubscribe(store);
                let mixedProps = {
                  ...this.getState(store),
                  ...this.getDispatch(store),
                  ...this.props
               }
              return <RawComponent store={store} {...mixedProps} />;
            }}
          </MyReactConsumer>
        );
      }
    };
  }

  return connectHOC;
}
这就是connect方法,通过高阶组件返回一个被包装起来的组件,这样就能消费store了,还有在render 的时候,我们要把监听事件注册进来,这个方法目前只是用来重新渲染,这个地方用的是函数式的方法,因为setState是异步的,不可信(这个地方只是为了重新渲染,不要在意没有东西。。。)。不过个人认为这个地方可以做更多的事情,不过老师告诉我没有实际场景就不要过度设计,属于伪设计(受教了。。。),最后要记得删除监听。
以上就是简易的redux代码,应该还比较好理解的把。感觉能看的下去的话,麻烦点个赞哈。。
最后,,,求一份内推。。。
