


我们曾经不止一次为大家分享过游戏中的实时音视频,例如怎么实现游戏中的听声辨位、狼人杀游戏中的语音聊天挑战等。基本上,都是从技术原理和 Agora SDK 出发来分享的。这次我们换一个角度。我们将从 Unity 开发者的角度分享一下,在 Unity 中如何给自己的多人在线游戏增加实时语音通话功能。

我们在这里利用了 Unity 上流行的 “Tanks!!! asset reference” 坦克游戏作为多人在线游戏作为基础,相信很多人都不会陌生。大家可以在 Unity Asset Store 中搜到它。然后,我们会利用 Unity Asset Store 中的 Agora Voice SDK 为它增加多人语音聊天功能。
在开始前,你需要做以下准备:
- 安装 Unity 并注册 Unity 账号
- 了解如果在 Unity 中创建 iOS、Android 项目
- 一款跨移动平台多玩家的 Unity 游戏(本文中我们选择的是 Tanks)
- 了解 C# 和 Unity 脚本
- 注册一个 Agora 开发者账户
- 至少两个移动设备(如果有一个 iOS 设备,一个 Android 设备就再理想不过了)
- 安装 Xcode
新建 Unity 项目
我们默认大家都是用过 Unity 的开发者,但是为了照顾更多的人。我们还是要从头讲起。当然,开始的操作步骤很简单,所以我们会尽量以图片来说明。
首先,打开 Unity 后,让我们先创建一个新的项目。
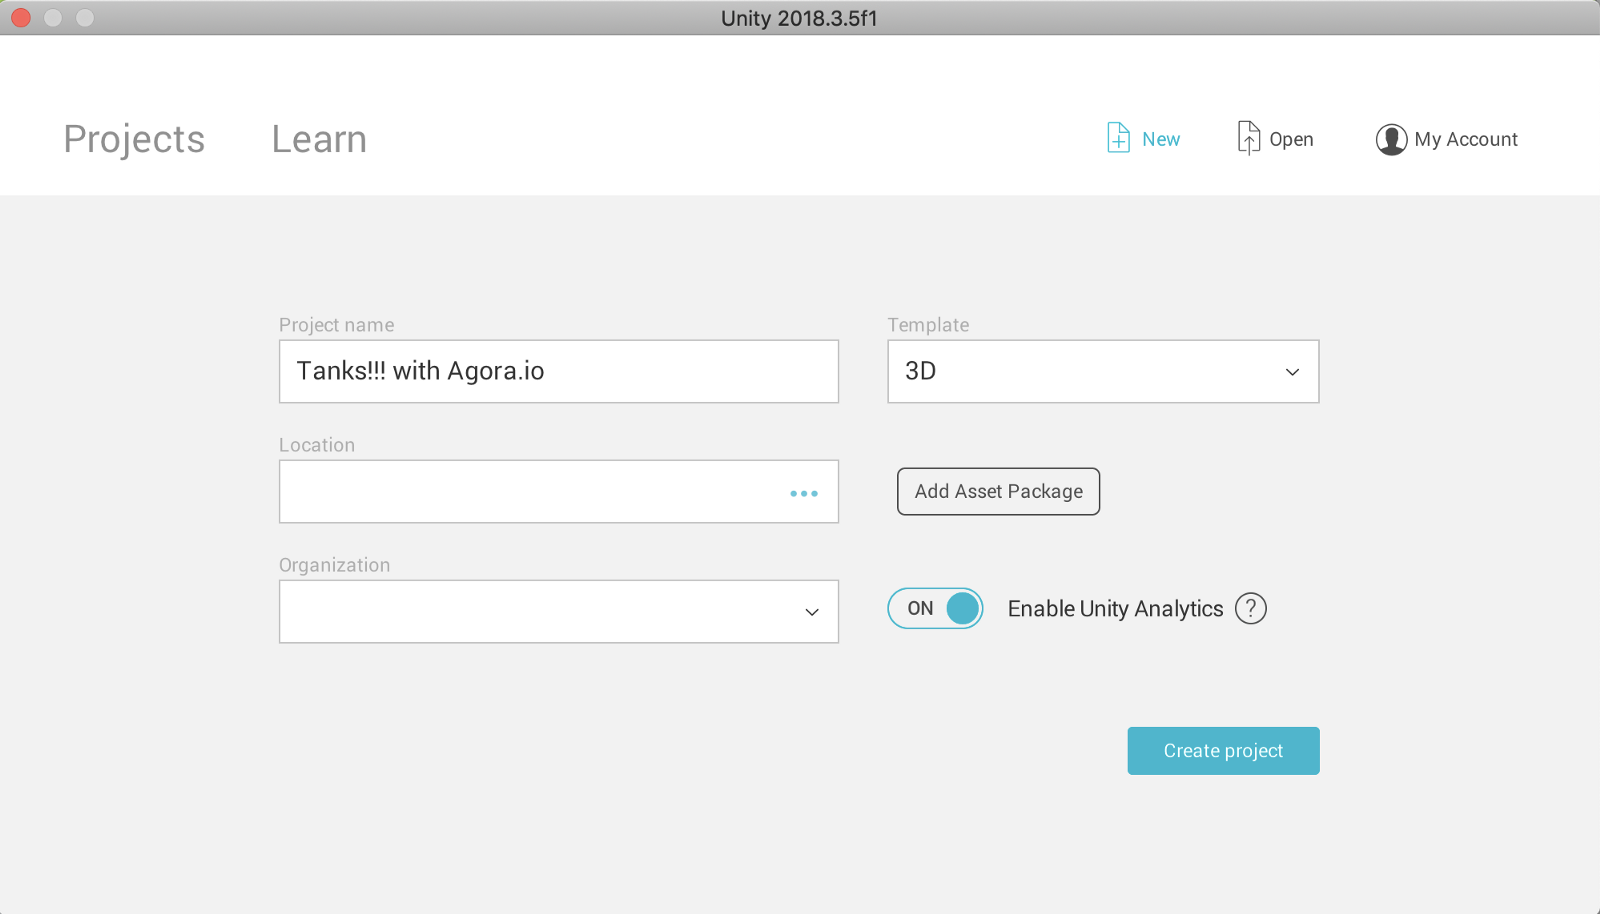
如果你之前已经下载过 Tanks!!! ,那么我们点击页面旁边的“Add Asset Package”按钮,选择添加它即可。
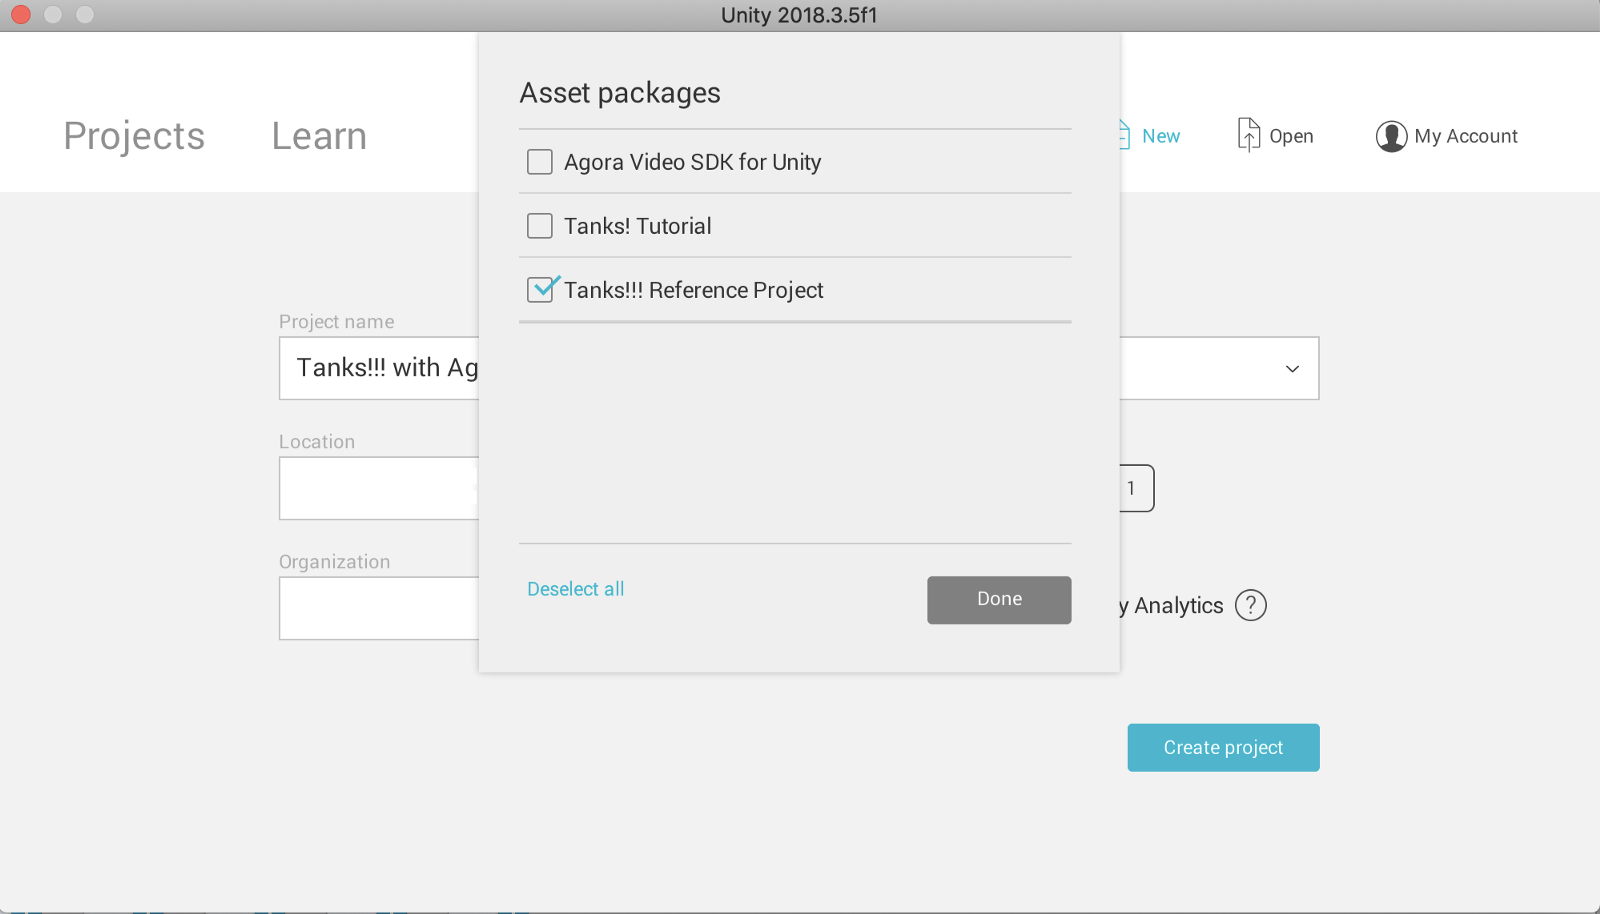
如果你还未下载过 Tanks!!! 那么可以在 Unity Store 中下载它。

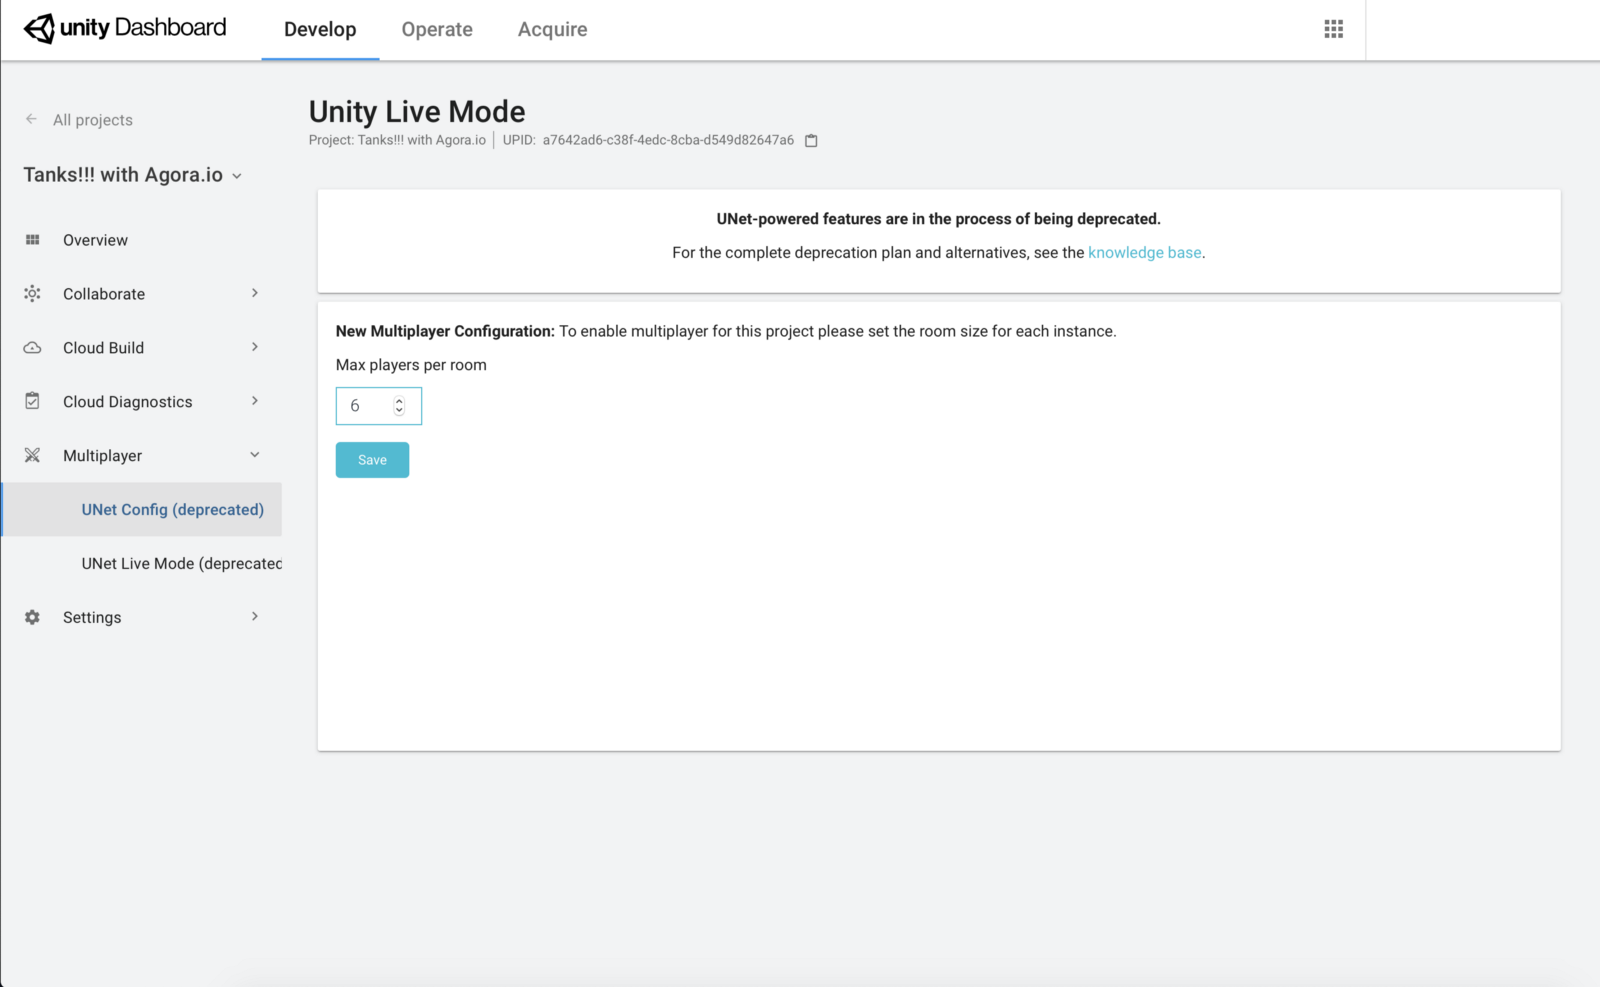
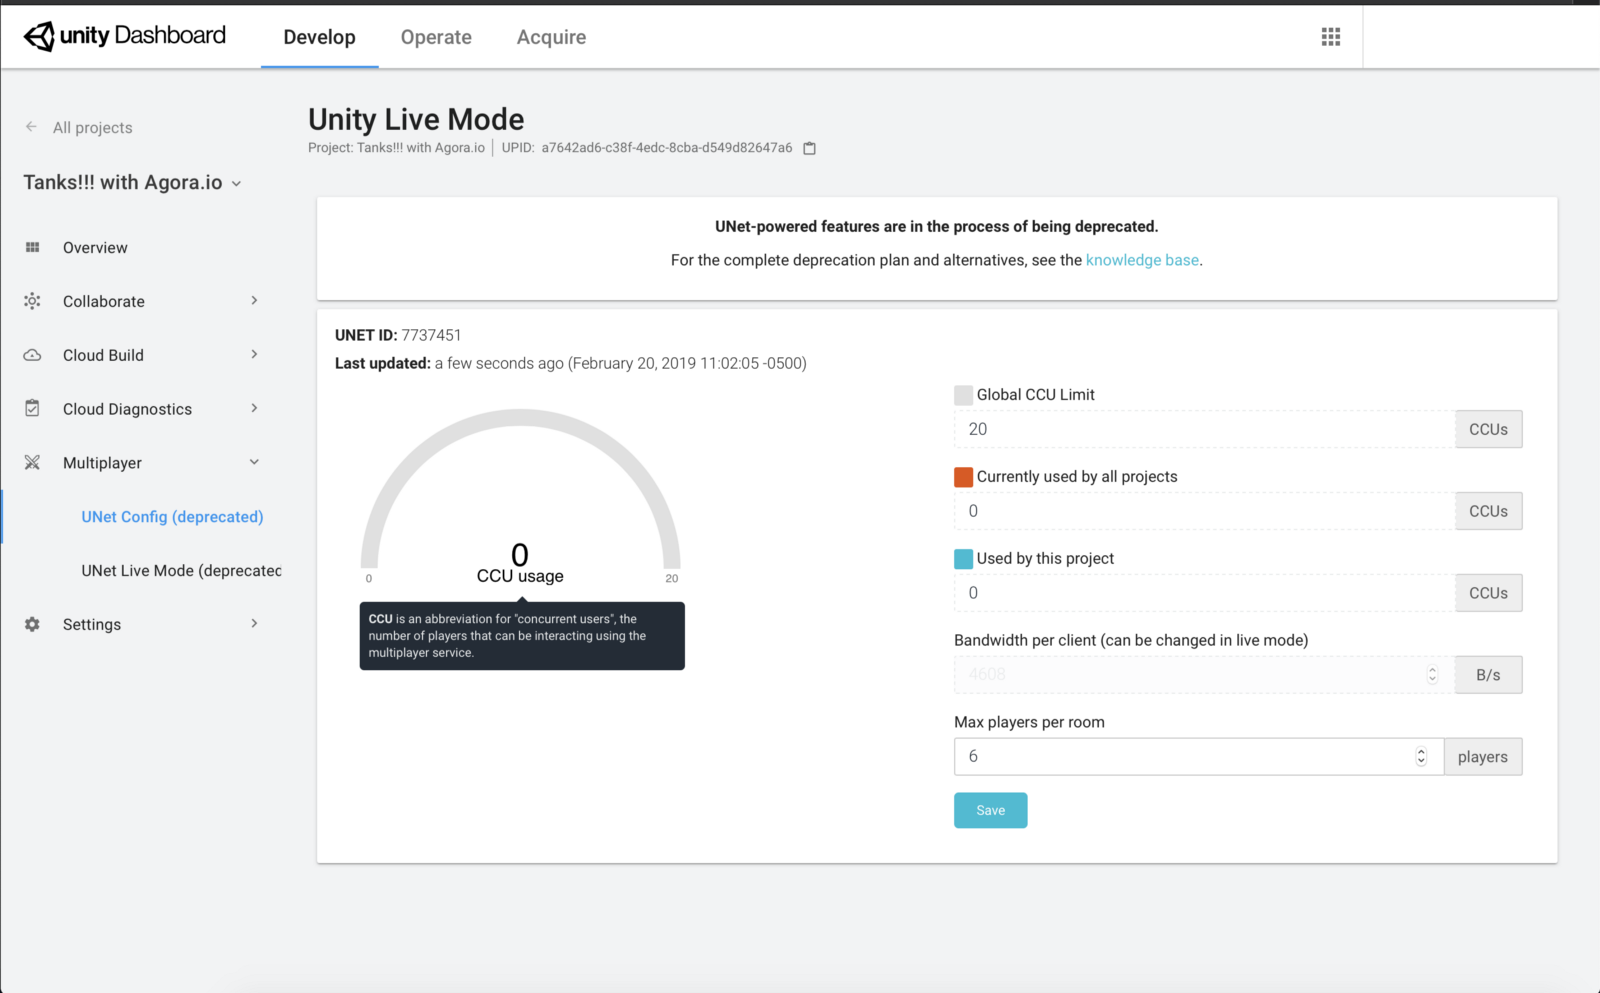
在将 Tanks!!! 参考项目部署到手机之前,还有几步需要做。首先,我们需要在 Unity Dashboard 中,为这个项目开启 Unity Live Mode。该设置的路径是:project → Multiplayer → Unet Config。尽管 Tanks!!! 只支持最多四个玩家4,但我们在将“Max Player per room”设置为6。
Building for iOS
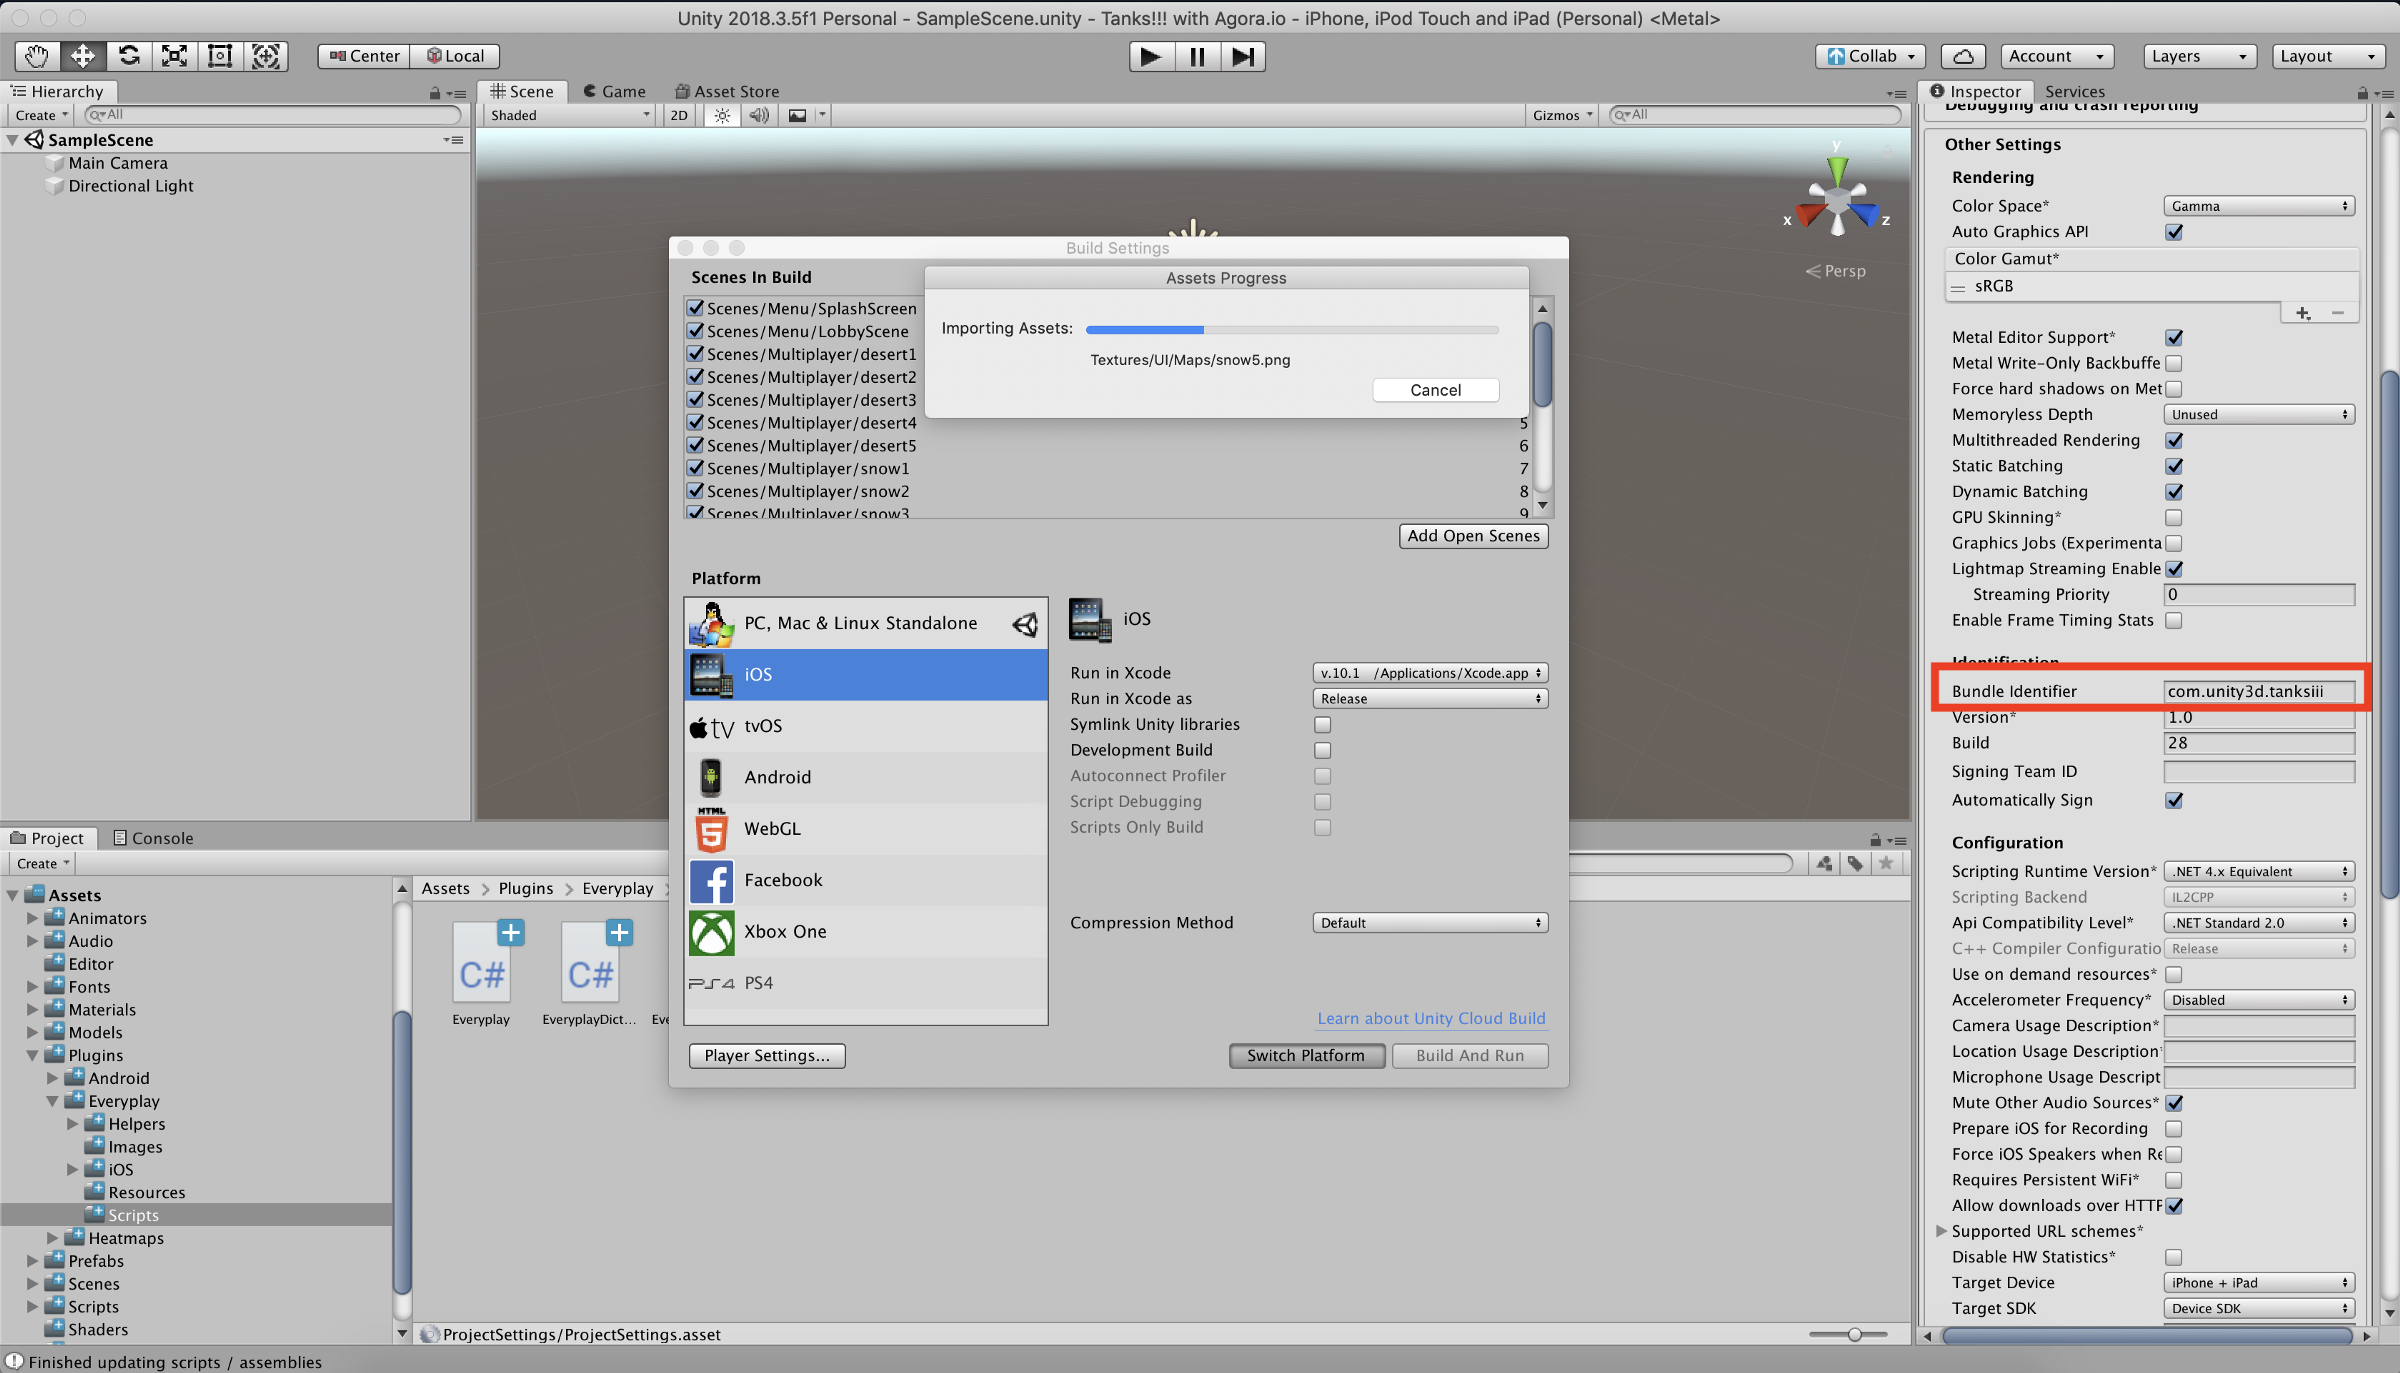
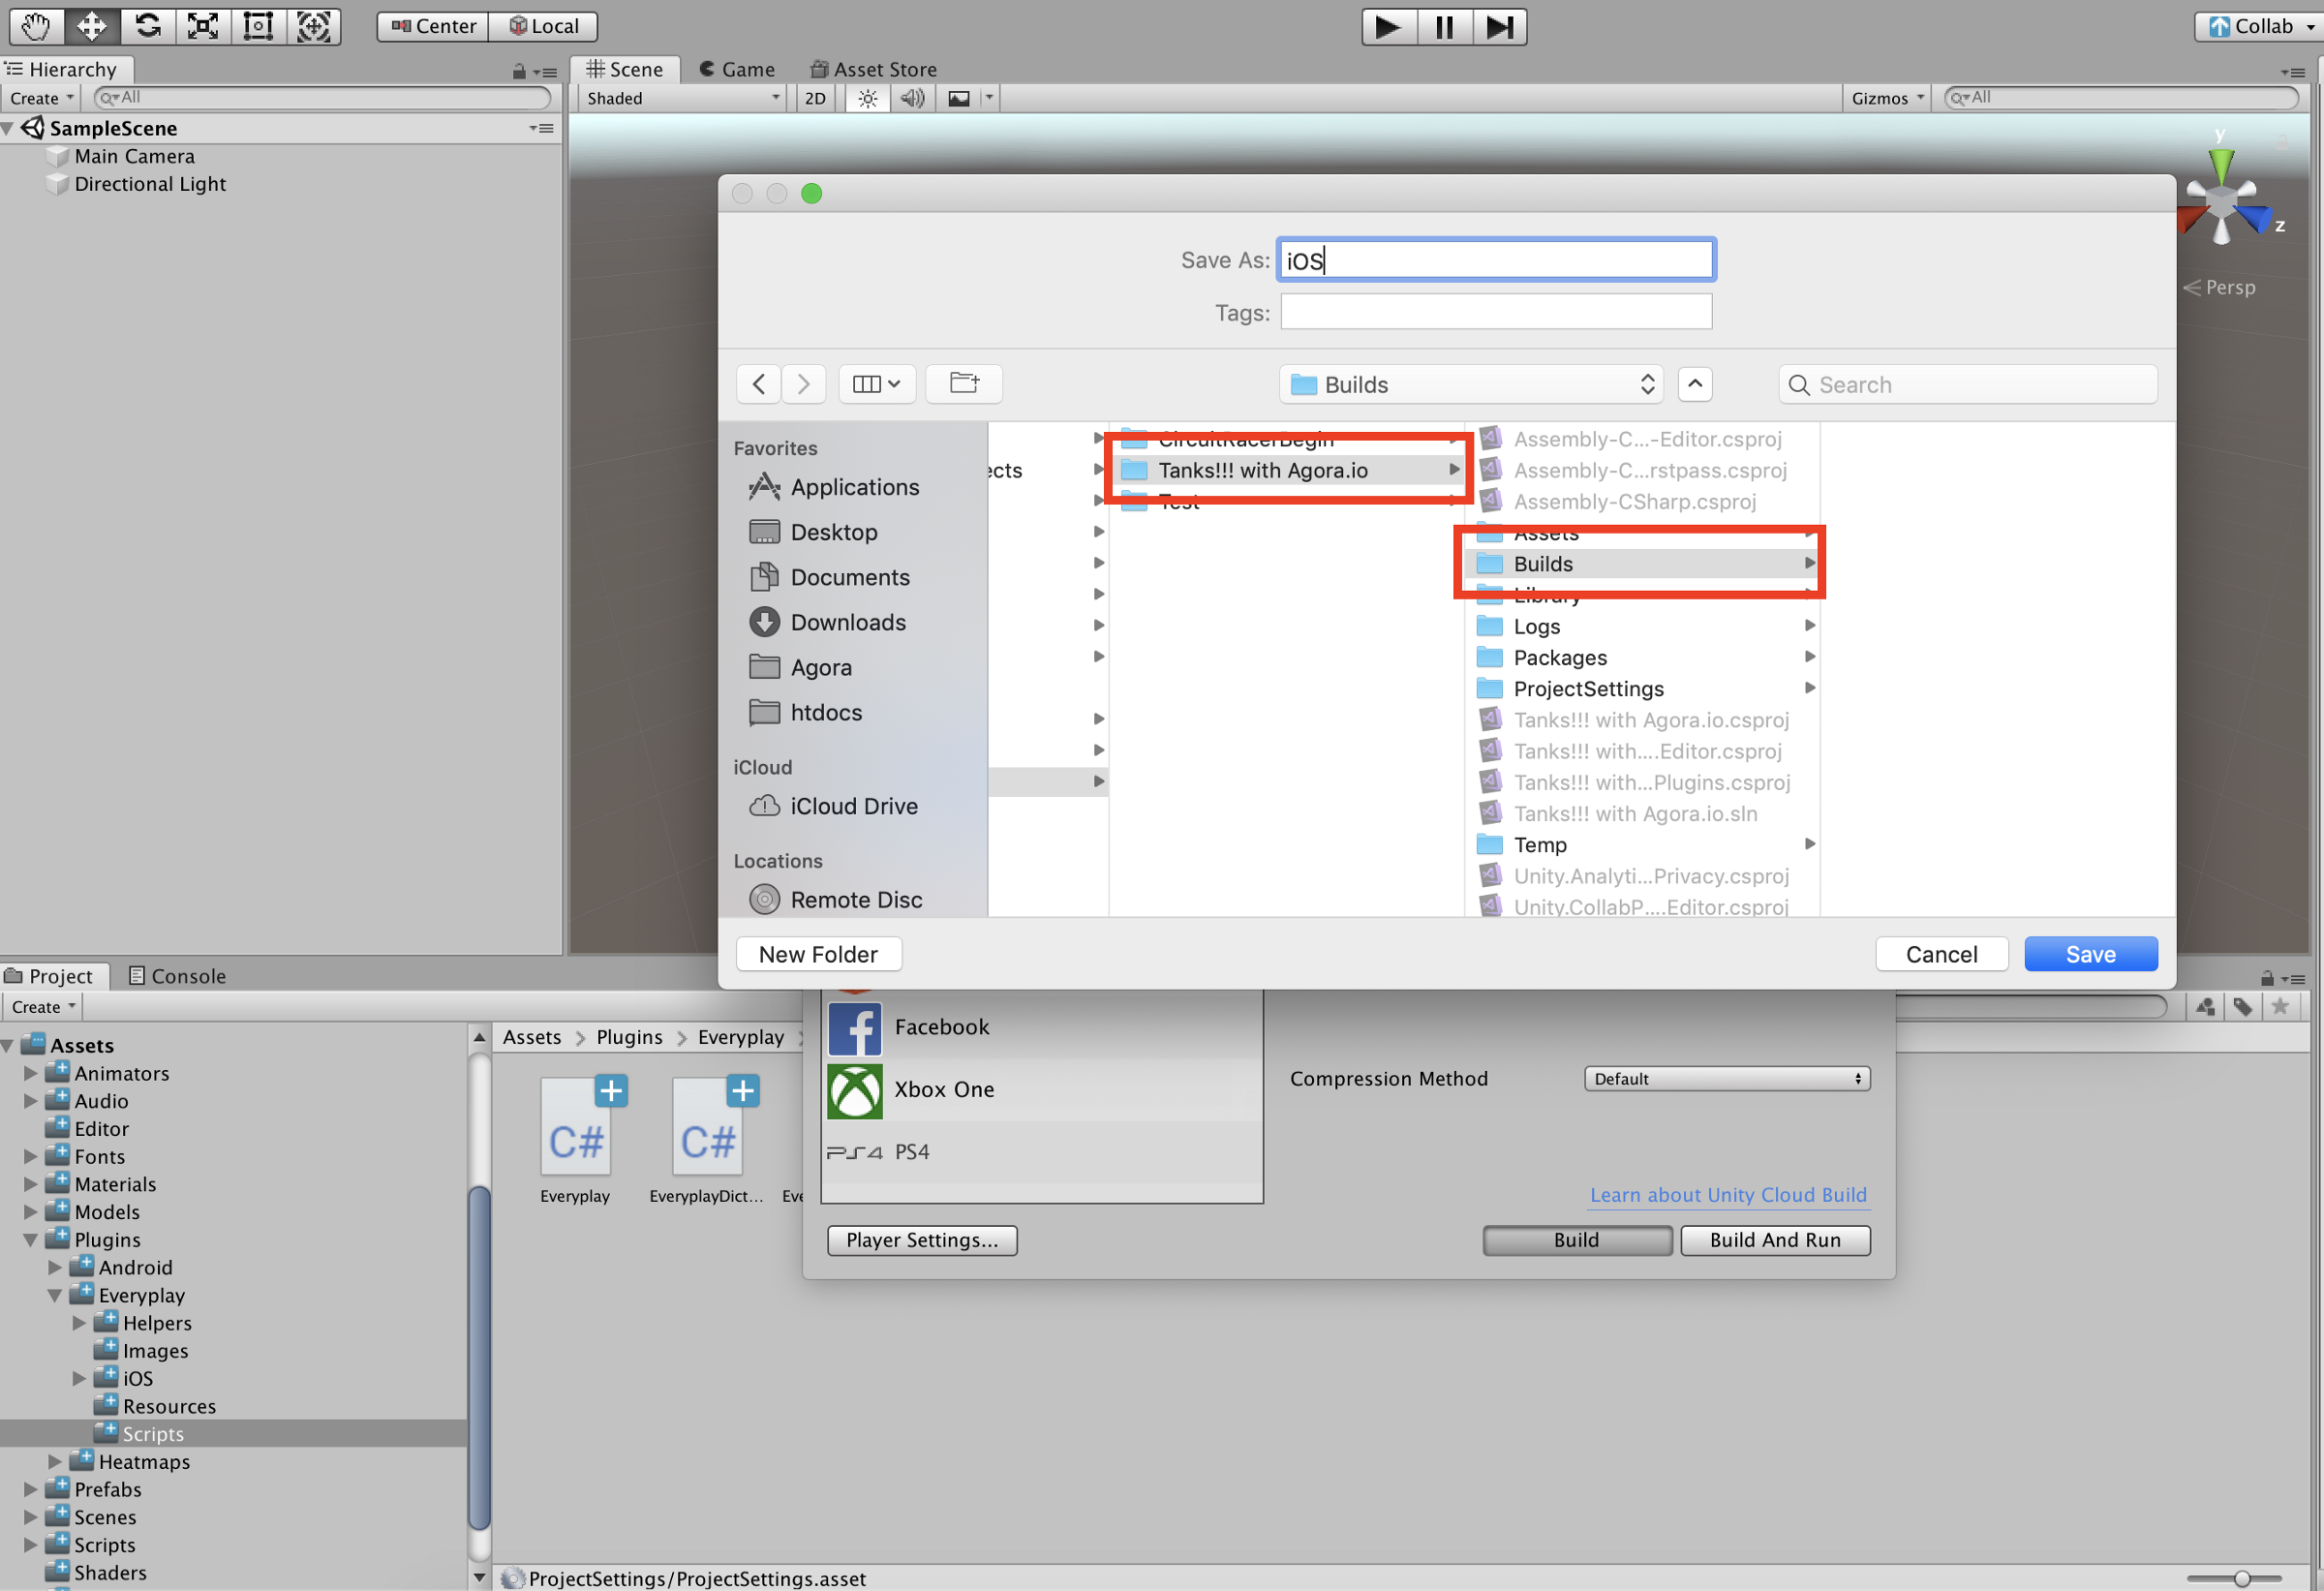
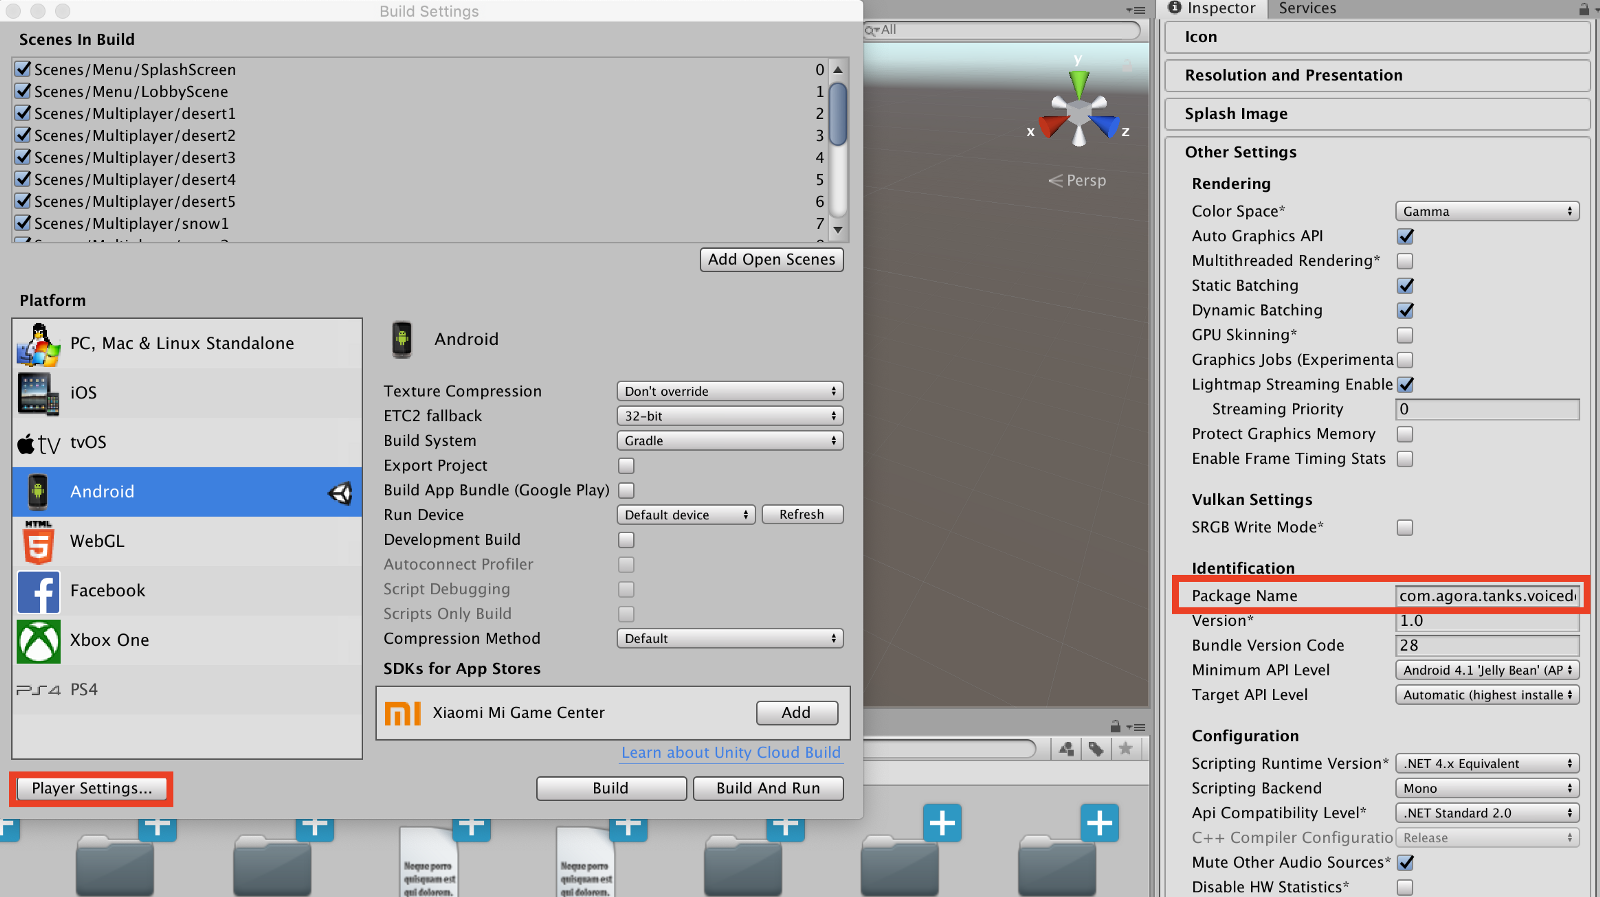
现在我们已经准备好来创建 iOS 版本了。打开 Build Setting,将系统平台切换到 iOS,然后 Build。在切换系统平台后,请记得更新 Bundle Identifier(如下图所示)。
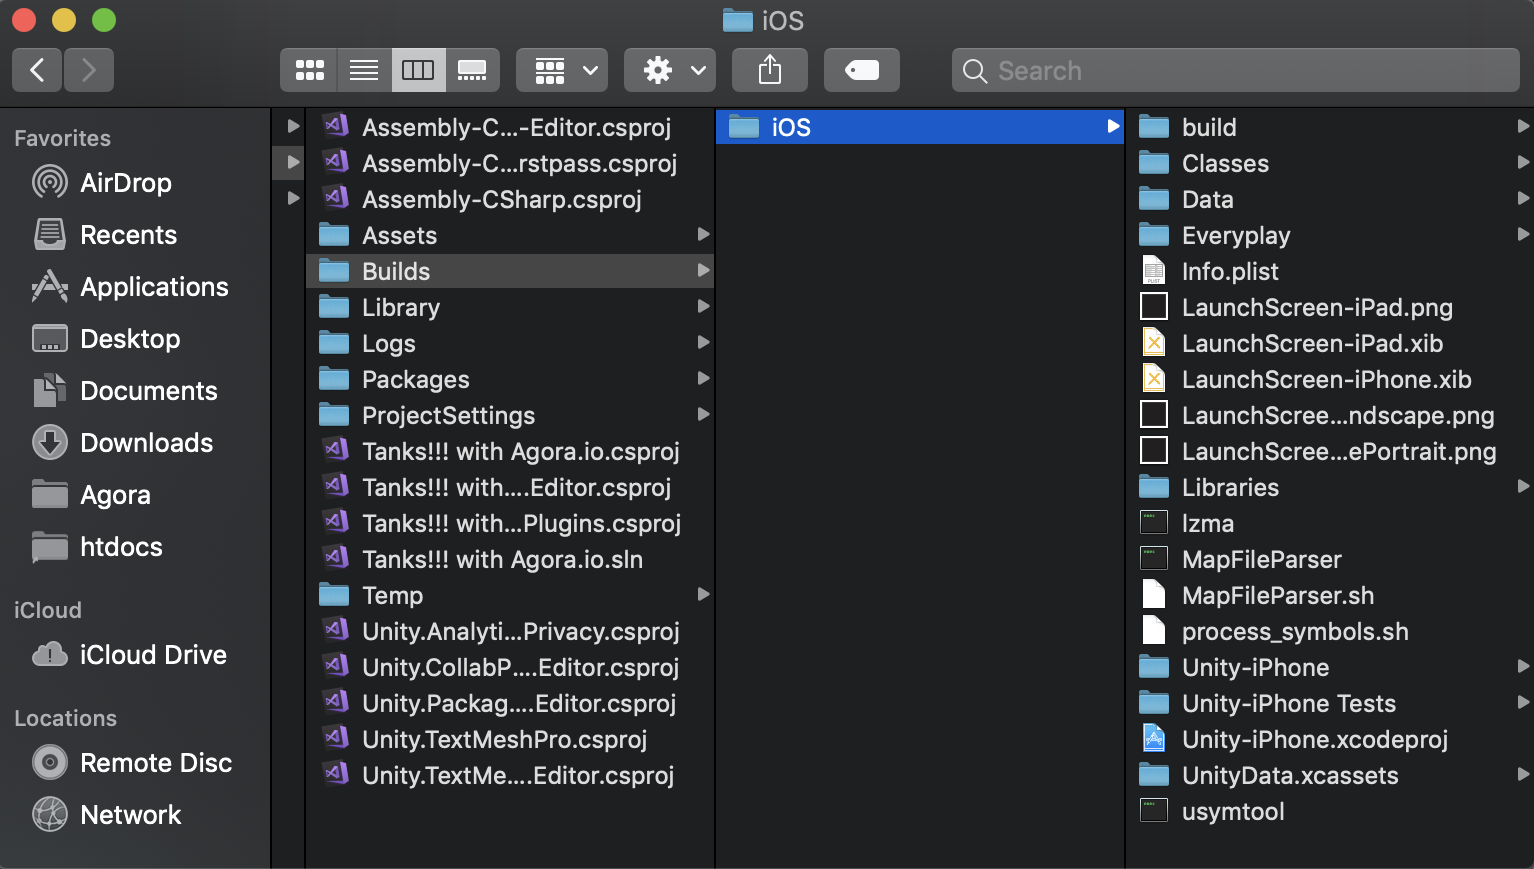
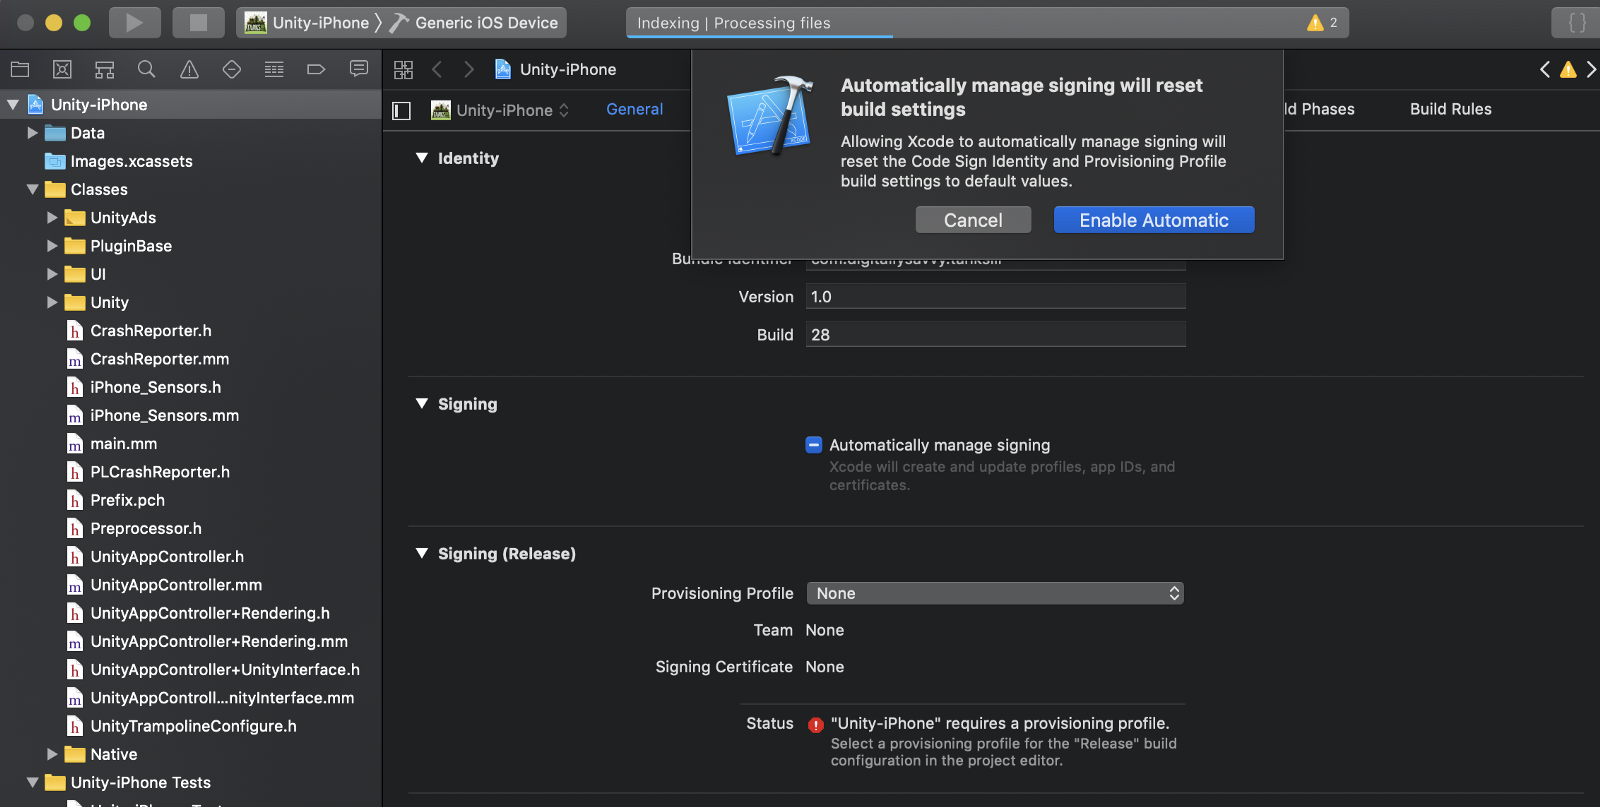
让我们打开 Unity-iPhone.xcodeproj,sign 并让它在测试设备上运行。
现在我们已经完成了 iOS 项目的创建。接下来我们要创建 Android 项目了。
Building for Android
Android 项目相比 iOS 来讲要更简单一些。因为 Unity 可以直接创建、sign 和部署运行,无需借助 Android Studio。我默认大家已经将 Unity 与 Android SDK 文件夹关联起来了。现在我们要打开 Build Setting,然后将系统平台切换到 Android。
在我们创建并运行之前,我们还需要对代码做出一些简单的调整。我们只需要注释掉几行代码,加一个简单的返回声明,再替换一个文件。
背景信息:Tanks!!! Android 包含了 Everyplay 插件,用以实现游戏屏幕录制和分享。问题是,Everyplay 在2018年十月停止了服务,而插件仍然存在一些未解决的问题,如果我们不对其进行处理会导致编译失败。
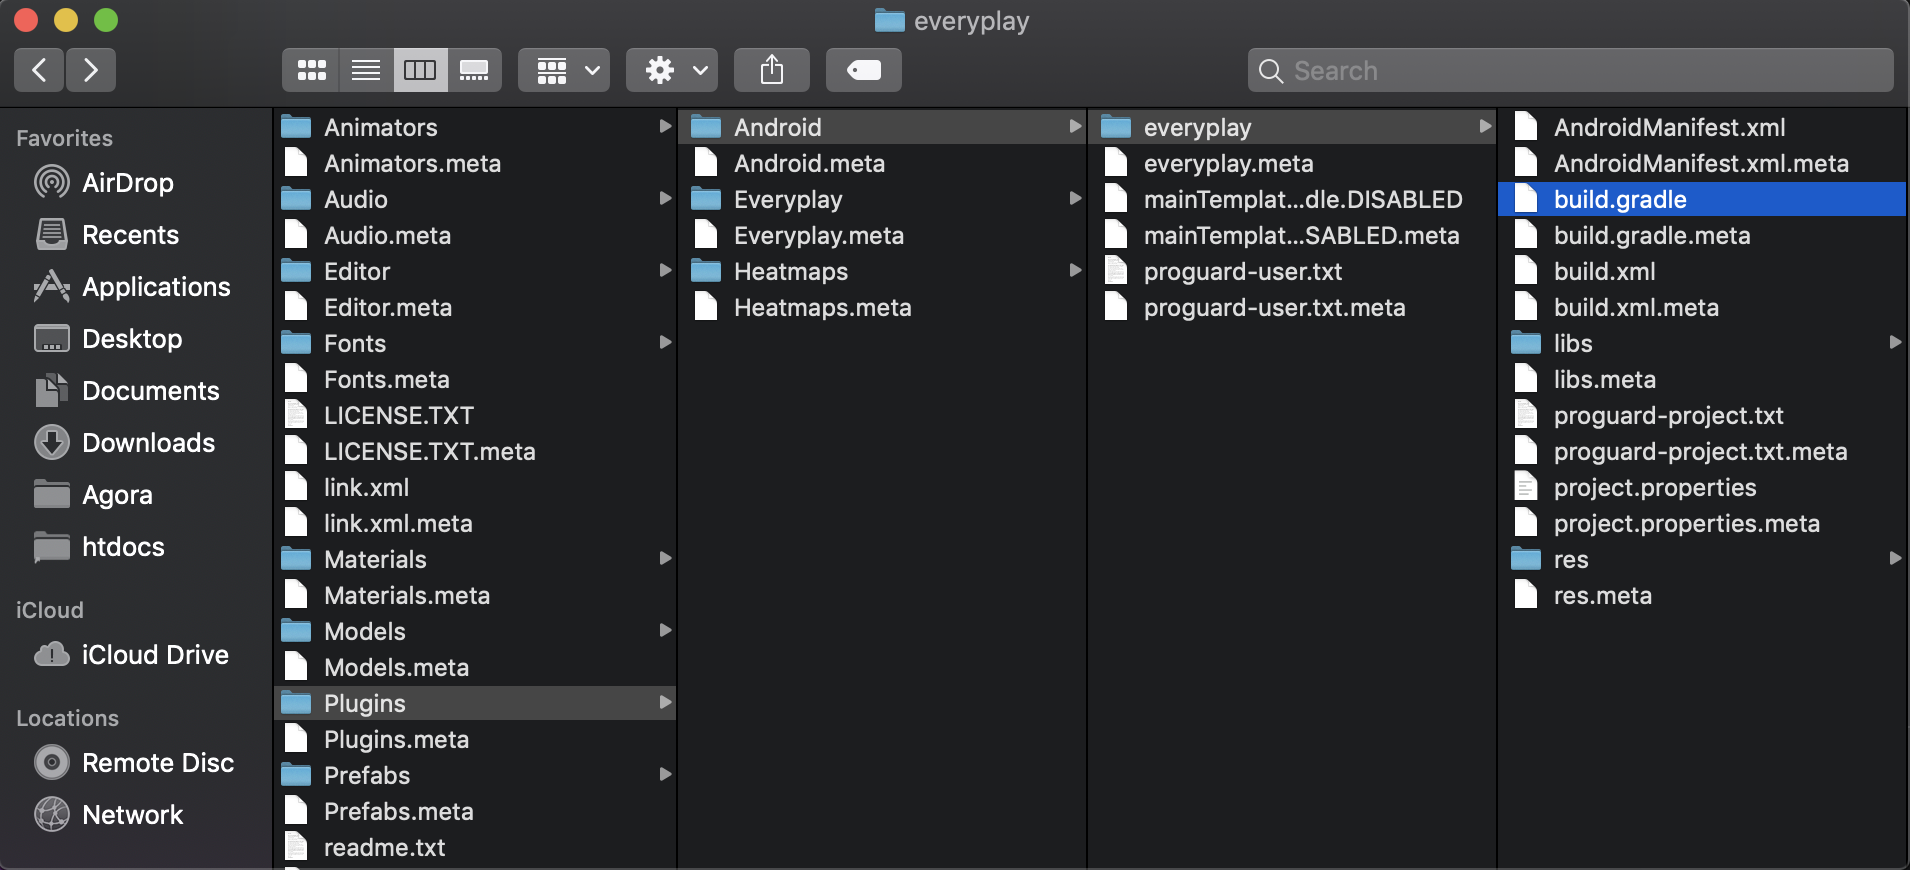
首先,我们要纠正一下 Everyplay 插件 build.gradle 文件中的语法错误。该文件的路径是:Plugins → Android → everyplay → build.gradle。
现在,我们打开了 gradle 文件,全选所有代码,然后将下方的代码替换上去。Tanks!!! 团队在 Github 上更新了代码,但是不知道为什么并没能更新到插件中。
// UNITY EXPORT COMPATIBLE
apply plugin: 'com.android.library'

repositories {
    mavenCentral()
}

buildscript {
    repositories {
        mavenCentral()
    }
    dependencies {
        classpath 'com.android.tools.build:gradle:1.0.0'
    }
}

dependencies {
    compile fileTree(dir: 'libs', include: ['*.jar'])
}

android {
    compileSdkVersion 23
    buildToolsVersion "25.0.3"
    defaultPublishConfig "release"

    defaultConfig {
        versionCode 1600
        versionName "1.6.0"
        minSdkVersion 16
    }

    buildTypes {
        debug {
            debuggable true
            minifyEnabled false
        }

        release {
            debuggable false
            minifyEnabled true
            proguardFile getDefaultProguardFile('proguard-android.txt')
            proguardFile 'proguard-project.txt'
        }
    }

    sourceSets {
        main {
            manifest.srcFile 'AndroidManifest.xml'
            java.srcDirs = ['src']
            aidl.srcDirs = ['src']
            renderscript.srcDirs = ['src']
            res.srcDirs = ['res']
            jniLibs.srcDirs = ['libs']
        }
    }

    lintOptions {
        abortOnError false
    }
}
最后我们要做的修改就是关闭 Everyplay。你可能想问:为什么我们要关闭 Everyplay 呢?因为当插件初始化时会导致 Android 应用崩溃。我发现最快速的方法就是在 EveryPlaySettings.cs 文件中更新几行代码(该文件的路径:Assets → Plugins → EveryPlay → Scripts),如此一来,每当 Everyplay 视图检测自身是否处于开启状态时,我们都会给它返回“false”。
public class EveryplaySettings : ScriptableObject
{
    public string clientId;
    public string clientSecret;
    public string redirectURI = "https://m.everyplay.com/auth";

    public bool iosSupportEnabled;
    public bool tvosSupportEnabled;
    public bool androidSupportEnabled;
    public bool standaloneSupportEnabled;

    public bool testButtonsEnabled;
    public bool earlyInitializerEnabled = true;

    public bool IsEnabled
    {
        get
        {
            return false;
        }
    }

#if UNITY_EDITOR
    public bool IsBuildTargetEnabled
    {
        get
        {
            return false;
        }
    }
#endif

    public bool IsValid
    {
        get
        {
            return false;
        }
    }
}
现在我们已经准备好 Build 了。在 Unity 中打开 Build Settings,选择 Android 平台,然后按下“Switch Platform”按钮。随后,在 Player Settings 中为 Android App 修改 bundle id。在这里,我使用的是 com.agora.tanks.voicedemo。
集成语音聊天功能
接下来,我们要利用 Unity 中的 Agora voice SDK for Unity 来给跨平台项目增加语音聊天功能了。我们打开 Unity Asset Store ,搜索 Agora Voice SDK for Unity。
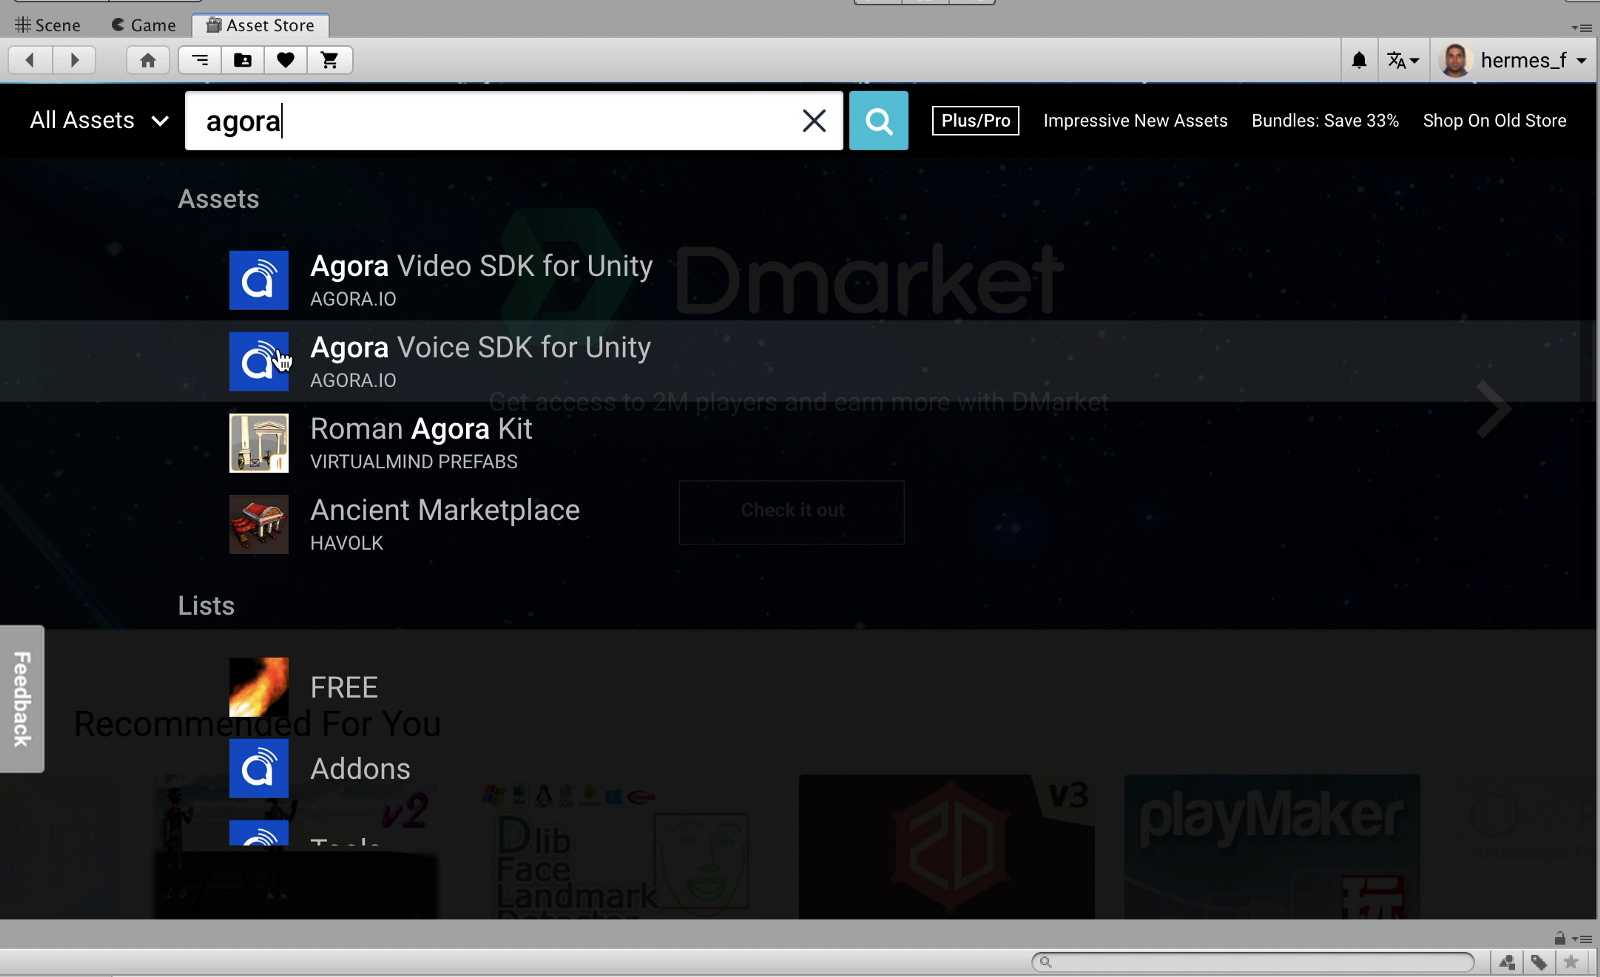

当插件页面完成加载后,点击“Download”开始下载。下载完成后,选择“Import”,将它集成到你的项目中。
我们需要创建一个脚本来让游戏与 Agora Voice SDK 进行交互。我们在项目中新建一个 C# 文件(AgoraInterface.cs),然后在 Visual Studio 中打开它。
在这个脚本中有两个很重要的变量:
static IRtcEngine mRtcEngine;
public static string appId = "Your Agora AppId Here";
先要将“Your Agora AppId Here” 替换成 App ID,我们可在登录 Agora.io ,进入 Agora Dashboard 获取。mRtcEngine是静态的,这样在OnUpdate 调用的时候,才不会丢失。由于游戏中的其它脚本可能会引用 App ID,所以它是public static。
考虑到节省时间,我已经将AgoraInterface.cs的代码写好了(如下所示)。大家可以直接使用,避免重复造车轮。
在这里简单解释一下代码。首先,我们在开头有一些逻辑,用于 check/requset Android Permission。然后我们用 App ID 初始化 Agora RTC Engine,然后我们附加了一些事件回调,这部分很简单易懂。
mRtcEngine.OnJoinChannelSuccess表示用户已经成功加入指定频道。
最后一个重要功能就是update,当启用了 Agora RTC Engine 时,我们想要调用引擎的.Pull()方法,它对于插件是否能运行起来很关键。
using System;
using System.Collections;
using System.Collections.Generic;
using UnityEngine;
using UnityEngine.UI;
using UnityEngine.SceneManagement;

using agora_gaming_rtc;

#if(UNITY_2018_3_OR_NEWER)
using UnityEngine.Android;
#endif

public class AgoraInterface : MonoBehaviour
{
   static IRtcEngine mRtcEngine;

    // PLEASE KEEP THIS App ID IN SAFE PLACE
    // Get your own App ID at https://dashboard.agora.io/
    // After you entered the App ID, remove ## outside of Your App ID
    public static string appId = "Your Agora AppId Here";

    void Awake()
    {
        QualitySettings.vSyncCount = 0;
        Application.targetFrameRate = 30;
    }

    // Start is called before the first frame update
    void Start()
    {
#if (UNITY_2018_3_OR_NEWER)
        if (Permission.HasUserAuthorizedPermission(Permission.Microphone))
        {

        }
        else
        {
            Permission.RequestUserPermission(Permission.Microphone);
        }
#endif

        mRtcEngine = IRtcEngine.GetEngine(appId);
        Debug.Log("Version : " + IRtcEngine.GetSdkVersion());

        mRtcEngine.OnJoinChannelSuccess += (string channelName, uint uid, int elapsed) => {
            string joinSuccessMessage = string.Format("joinChannel callback uid: {0}, channel: {1}, version: {2}", uid, channelName, IRtcEngine.GetSdkVersion());
            Debug.Log(joinSuccessMessage);
        };

        mRtcEngine.OnLeaveChannel += (RtcStats stats) => {
            string leaveChannelMessage = string.Format("onLeaveChannel callback duration {0}, tx: {1}, rx: {2}, tx kbps: {3}, rx kbps: {4}", stats.duration, stats.txBytes, stats.rxBytes, stats.txKBitRate, stats.rxKBitRate);
            Debug.Log(leaveChannelMessage);
        };

        mRtcEngine.OnUserJoined += (uint uid, int elapsed) => {
            string userJoinedMessage = string.Format("onUserJoined callback uid {0} {1}", uid, elapsed);
            Debug.Log(userJoinedMessage);
        };

        mRtcEngine.OnUserOffline += (uint uid, USER_OFFLINE_REASON reason) => {
            string userOfflineMessage = string.Format("onUserOffline callback uid {0} {1}", uid, reason);
            Debug.Log(userOfflineMessage);
        };

        mRtcEngine.OnVolumeIndication += (AudioVolumeInfo[] speakers, int speakerNumber, int totalVolume) => {
            if (speakerNumber == 0 || speakers == null)
            {
                Debug.Log(string.Format("onVolumeIndication only local {0}", totalVolume));
            }

            for (int idx = 0; idx < speakerNumber; idx++)
            {
                string volumeIndicationMessage = string.Format("{0} onVolumeIndication {1} {2}", speakerNumber, speakers[idx].uid, speakers[idx].volume);
                Debug.Log(volumeIndicationMessage);
            }
        };

        mRtcEngine.OnUserMuted += (uint uid, bool muted) => {
            string userMutedMessage = string.Format("onUserMuted callback uid {0} {1}", uid, muted);
            Debug.Log(userMutedMessage);
        };

        mRtcEngine.OnWarning += (int warn, string msg) => {
            string description = IRtcEngine.GetErrorDescription(warn);
            string warningMessage = string.Format("onWarning callback {0} {1} {2}", warn, msg, description);
            Debug.Log(warningMessage);
        };

        mRtcEngine.OnError += (int error, string msg) => {
            string description = IRtcEngine.GetErrorDescription(error);
            string errorMessage = string.Format("onError callback {0} {1} {2}", error, msg, description);
            Debug.Log(errorMessage);
        };

        mRtcEngine.OnRtcStats += (RtcStats stats) => {
            string rtcStatsMessage = string.Format("onRtcStats callback duration {0}, tx: {1}, rx: {2}, tx kbps: {3}, rx kbps: {4}, tx(a) kbps: {5}, rx(a) kbps: {6} users {7}",
                stats.duration, stats.txBytes, stats.rxBytes, stats.txKBitRate, stats.rxKBitRate, stats.txAudioKBitRate, stats.rxAudioKBitRate, stats.users);
            Debug.Log(rtcStatsMessage);

            int lengthOfMixingFile = mRtcEngine.GetAudioMixingDuration();
            int currentTs = mRtcEngine.GetAudioMixingCurrentPosition();

            string mixingMessage = string.Format("Mixing File Meta {0}, {1}", lengthOfMixingFile, currentTs);
            Debug.Log(mixingMessage);
        };

        mRtcEngine.OnAudioRouteChanged += (AUDIO_ROUTE route) => {
            string routeMessage = string.Format("onAudioRouteChanged {0}", route);
            Debug.Log(routeMessage);
        };

        mRtcEngine.OnRequestToken += () => {
            string requestKeyMessage = string.Format("OnRequestToken");
            Debug.Log(requestKeyMessage);
        };

        mRtcEngine.OnConnectionInterrupted += () => {
            string interruptedMessage = string.Format("OnConnectionInterrupted");
            Debug.Log(interruptedMessage);
        };

        mRtcEngine.OnConnectionLost += () => {
            string lostMessage = string.Format("OnConnectionLost");
            Debug.Log(lostMessage);
        };

        mRtcEngine.SetLogFilter(LOG_FILTER.INFO);

        // mRtcEngine.setLogFile("path_to_file_unity.log");

        mRtcEngine.SetChannelProfile(CHANNEL_PROFILE.GAME_FREE_MODE);

        // mRtcEngine.SetChannelProfile (CHANNEL_PROFILE.GAME_COMMAND_MODE);
        // mRtcEngine.SetClientRole (CLIENT_ROLE.BROADCASTER);
    }

    // Update is called once per frame
    void Update ()
    {
        if (mRtcEngine != null) {
            mRtcEngine.Poll ();
        }
    }
}
注意,以上代码可复用于所有 Unity 项目。
离开频道
如果你曾经使用过 Agora SDK,你可能注意到了,这里没有加入频道和离开频道。让我们先从“离开频道”开始动手,创建一个新的 C# 脚本LeaveHandler.cs,我们需要在用户返回到主菜单的时候调用 theleaveHandler。最简单的方法就是在 LobbyScene 打开后,为特定游戏对象开启该方法。
using System.Collections;
using System.Collections.Generic;
using UnityEngine;

using agora_gaming_rtc;

public class LeaveHandler : MonoBehaviour
{
    // Start is called before the first frame update
    void OnEnable()
    {
        // Agora.io Implimentation
        IRtcEngine mRtcEngine = IRtcEngine.GetEngine(AgoraInterfaceScript.appId); // Get a reference to the Engine
        if (mRtcEngine != null)
        {
            Debug.Log("Leaving Channel");
            mRtcEngine.LeaveChannel();// leave the channel
        }

    }
}
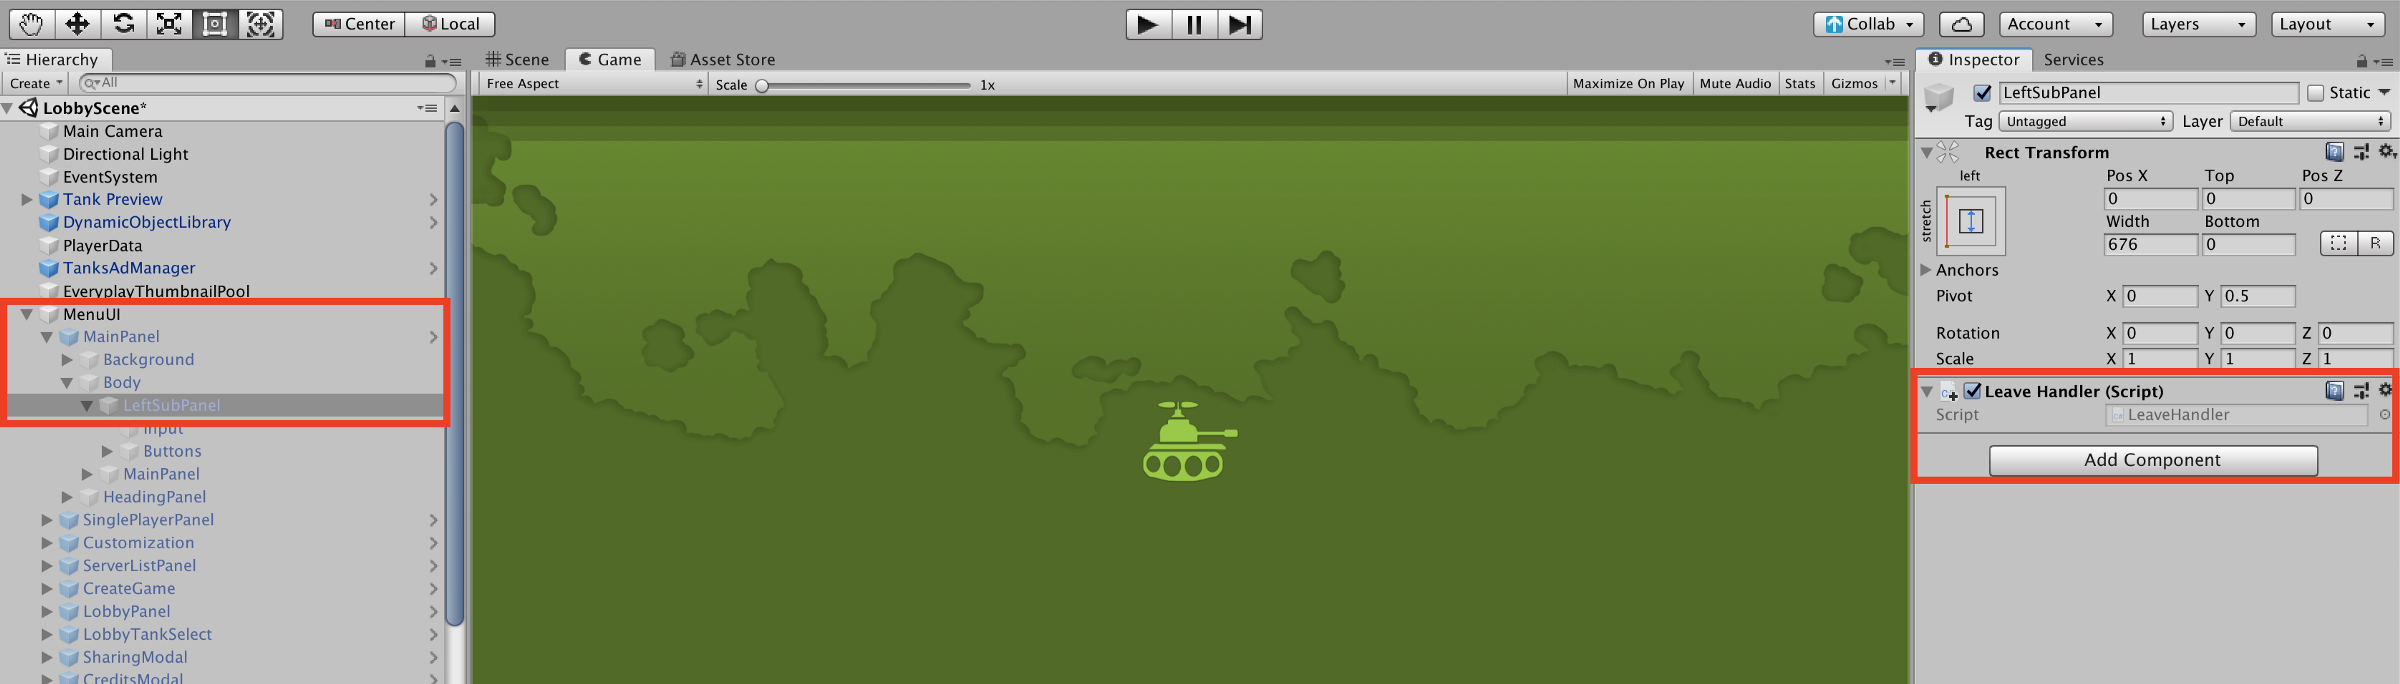
在这里,我们要找的游戏对象是 LeftSubPanel (如下图,MainPanel → MenuUI → LeftSubPanel )。
Tanks!!! 中有两种方法加入多人游戏,一种是创建新游戏,另一种是加入游戏。所以有两个地方,我们需要增加“加入频道”的命令。
让我们先找到 UI Script Asset 文件夹(该文件夹路径:Assets → Scripts → UI),然后打开CreateGame.cs文件。在第61行,你会找到游戏用于匹配玩家的方法,在这里我们可以加入一些逻辑用于加入频道。首先我们要做的就是应用 Agora SDK 库。
using agora_gaming_rtc;
在StartMatchmakingGame()的第78行,我们需要加入一些逻辑来获取正在运行中的Agora RTC Engine,然后将“用户输入的内容”作为频道名称(m_MatchNameInput.text)。
private void StartMatchmakingGame()
{
  GameSettings settings = GameSettings.s_Instance;
  settings.SetMapIndex(m_MapSelect.currentIndex);
  settings.SetModeIndex(m_ModeSelect.currentIndex);

  m_MenuUi.ShowConnectingModal(false);

  Debug.Log(GetGameName());
  m_NetManager.StartMatchmakingGame(GetGameName(), (success, matchInfo) =>
    {
      if (!success)
      {
        m_MenuUi.ShowInfoPopup("Failed to create game.", null);
      }
      else
      {
        m_MenuUi.HideInfoPopup();
        m_MenuUi.ShowLobbyPanel();

        // Agora.io Implimentation

        var channelName = m_MatchNameInput.text; // testing --> prod use: m_MatchNameInput.text
        IRtcEngine mRtcEngine = IRtcEngine.GetEngine(AgoraInterfaceScript.appId); // Get a reference to the Engine
        mRtcEngine.JoinChannel(channelName, "extra", 0); // join the channel with given match name
        Debug.Log("joining channel:" + channelName);
      }
    });
}
StartMatchmakingGame()包含了加入频道
现在我们需要打开LobbyServerEntry.cs(Assets → Scripts → UI),然后加入一些逻辑,以实现让用户可以通过“Find a Game”来加入其他人的房间。
在 Visual Studio 打开 LobbyServerEntry.cs,然后找到第63行,这里有一个 JoinMatch()。我们在第80行增加几行代码。
private void JoinMatch(NetworkID networkId, String matchName)
{
  MainMenuUI menuUi = MainMenuUI.s_Instance;

  menuUi.ShowConnectingModal(true);

  m_NetManager.JoinMatchmakingGame(networkId, (success, matchInfo) =>
    {
      //Failure flow
      if (!success)
      {
          menuUi.ShowInfoPopup("Failed to join game.", null);
      }
      //Success flow
      else
      {
          menuUi.HideInfoPopup();
          menuUi.ShowInfoPopup("Entering lobby...");
          m_NetManager.gameModeUpdated += menuUi.ShowLobbyPanelForConnection;

          // Agora.io Implimentation
          var channelName = matchName; // testing --> prod use: matchName
          IRtcEngine mRtcEngine = IRtcEngine.GetEngine(AgoraInterfaceScript.appId); // Get a reference to the Engine
          mRtcEngine.JoinChannel(channelName, "extra", 0); // join the channel with given match name

          // testing
          string joinChannelMessage = string.Format("joining channel: {0}", channelName);
          Debug.Log(joinChannelMessage);
      }
    }
  );
}
完成了!
现在我们已经完成了Agora SDK 的集成,并且已经准备好进行 iOS 端和 Android 端的 Build 与测试。我们可以参照上述内容中的方法来进行 Building 与部署。
为了便于大家参考,我已经将这份 Tutorial 中的脚本上传了一份到 Github: github.com/digitallysa…
如果你遇到 Agora SDK API 调用问题,可以参考我们的官方文档(docs.agora.io),也欢迎在 RTC 开发者社区 的 Agora 版块与我们的工程师和更多同行交流、分享。
如遇到开发问题,欢迎访问声网 Agora问答版块,发帖与我们的工程师交流。
