开源库路径https://github.com/square/leakcanary
源码结构
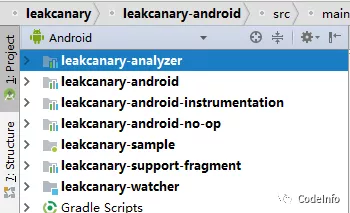
- leakcanary-watcher: 这是一个通用的内存检测器,对外提供一个 RefWatcher#watch(Object watchedReference),它不仅能够检测Activity,还能监测任意常规的 Java Object 的泄漏情况。
- leakcanary-android: 这个 module 是与 Android 的接入点,用来专门监测 Activity 的泄漏情况,内部使用了 application#registerActivityLifecycleCallbacks 方法来监听 onDestory 事件,然后利用 leakcanary-watcher 来进行弱引用+手动 GC 机制进行监控。
- leakcanary-analyzer: 这个 module 提供了 HeapAnalyzer,用来对 dump 出来的内存进行分析并返回内存分析结果AnalysisResult,内部包含了泄漏发生的路径等信息供开发者寻找定位。
- leakcanary-android-no-op: 这个 module 是专门给 release 的版本用的,内部只提供了两个完全空白的类 LeakCanary 和 RefWatcher,这两个类不会做任何内存泄漏相关的分析。因为 LeakCanary 本身会由于不断 gc 影响到 app 本身的运行,而且主要用于开发阶段的内存泄漏检测。因此对于 release 则可以 disable 所有泄漏分析。
原理简介
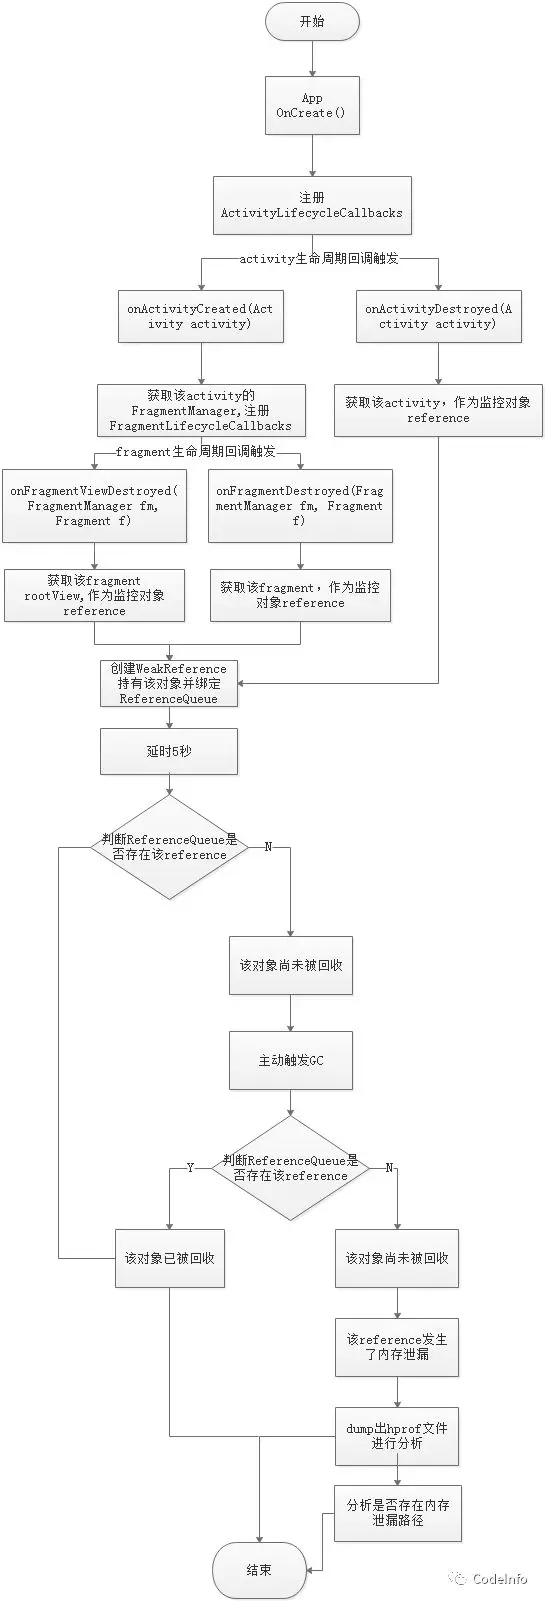
LeakCanary的原理非常简单。正常情况下一个Activity在执行Destroy之后就要销毁,LeakCanary做的就是在一个Activity/Fragment Destroy之后将它放在一个WeakReference中,然后将这个WeakReference关联到一个ReferenceQueue,查看ReferenceQueue是否存在Activity的引用,如果不在这个队列中,执行一些GC清洗操作,再次查看。如果不存在则证明该Activity/Fragment泄漏了,之后Dump出heap信息,并用haha这个开源库去分析泄漏路径。
基本原理图示
源码分析
简单分析,只分析如何实现内存泄漏检测的基本思路
第一步:入口函数分析LeakCanary.install(Application application)
集成使用LeakCanary基本上是在Application onCreate中调用即可LeakCanary.install(this); ,这是总的入口函数,第一步分析就从这里开始。
/**
   * Creates a {@link RefWatcher} that works out of the box, and starts watching activity
   * references (on ICS+).
   */
  public static @NonNull RefWatcher install(@NonNull Application application) {
    //返回的是AndroidRefWatcherBuilder继承自RefWatcher对象
    return refWatcher(application).listenerServiceClass(DisplayLeakService.class)
        .excludedRefs(AndroidExcludedRefs.createAppDefaults().build())
        .buildAndInstall();
  }

  分析一:返回AndroidRefWatcherBuilder对象
  refWatcher(application)

  分析二:调用返回AndroidRefWatcherBuilder.buildAndInstall
  buildAndInstall
分析一: refWatcher(application)
该方法调用的refWatcher返回了AndroidRefWatcherBuilder对象:
public static @NonNull AndroidRefWatcherBuilder refWatcher(@NonNull Context context) {
    return new AndroidRefWatcherBuilder(context);
  }
分析二:AndroidRefWatcherBuilder.buildAndInstall
进行设置监控所需要的相关系统lifeCycle回调,包含ActivityLifecycleCallbacks以及FragmentLifecycleCallbacks。
/**
   * Creates a {@link RefWatcher} instance and makes it available through {@link
   * LeakCanary#installedRefWatcher()}.
   *
   * Also starts watching activity references if {@link #watchActivities(boolean)} was set to true.
   *
   * @throws UnsupportedOperationException if called more than once per Android process.
   */
  public @NonNull RefWatcher buildAndInstall() {
    //buildAndInstall只允许调用一次
    if (LeakCanaryInternals.installedRefWatcher != null) {
      throw new UnsupportedOperationException("buildAndInstall() should only be called once.");
    }
    //创建用于实际处理判断内存泄漏的监控对象RefWatcher,放在内容第二步分析
    RefWatcher refWatcher = build();
    if (refWatcher != DISABLED) {
      LeakCanaryInternals.setEnabledAsync(context, DisplayLeakActivity.class, true);
      if (watchActivities) {
        //watchActivities默认为true,开始activity引用的监控
        ActivityRefWatcher.install(context, refWatcher);
      }
      if (watchFragments) {
        //watchFragments默认为true,开始fragment引用的监控
        FragmentRefWatcher.Helper.install(context, refWatcher);
      }
    }
    //赋值installedRefWatcher,用于判断已创建成功
    LeakCanaryInternals.installedRefWatcher = refWatcher;
    return refWatcher;
  }

  分析三:设置activity资源泄漏监控:
  ActivityRefWatcher.install
  分析四:设置Fragment资源泄漏监控:
  FragmentRefWatcher.Helper.install
分析三:ActivityRefWatcher.install
这边主要是对app注册了个ActivityLifecycleCallbacks,在每次activity被销毁后都会回调到onActivityDestroyed,在onActivityDestroyed中获取在理论上即将被销毁的activity对象,调用refWatcher.watch检测其是否发生泄漏
public static void install(@NonNull Context context, @NonNull RefWatcher refWatcher) {
    Application application = (Application) context.getApplicationContext();
    ActivityRefWatcher activityRefWatcher = new ActivityRefWatcher(application, refWatcher);
    //注册个lifecycleCallbacks,在里面分析activity的内存泄漏问题
    application.registerActivityLifecycleCallbacks(activityRefWatcher.lifecycleCallbacks);
  }

  //app所有activity生命周期结束自动回调
  private final Application.ActivityLifecycleCallbacks lifecycleCallbacks =
      new ActivityLifecycleCallbacksAdapter() {
        @Override public void onActivityDestroyed(Activity activity) {
          //调用的还是refWatcher操作,ActivityRefWatcher只是为了activity周期监听
          refWatcher.watch(activity);
        }
      };

      下文第二步分析activity是否存在内存泄漏:
      refWatcher.watch(activity)
分析四:FragmentRefWatcher.Helper.install
这边主要用于ActivityLifecycleCallbacks中各个activity创建的时候, 获取到activity对应的FragmentManager注册FragmentLifecycleCallbacks.后续当有Fragment消耗触发onFragmentViewDestroyed或者onFragmentDestroyed时,则获取理论上即将被销毁的view/fragment对象,调用refWatcher.watch检测其是否发生泄漏。
public static void install(Context context, RefWatcher refWatcher) {
      List<FragmentRefWatcher> fragmentRefWatchers = new ArrayList<>();

      if (SDK_INT >= O) {
        //添加了个AndroidOFragmentRefWatcher用于对android.app.FragmentManager设置FragmentLifecycleCallbacks
        fragmentRefWatchers.add(new AndroidOFragmentRefWatcher(refWatcher));
      }

      try {
        //反射添加SupportFragmentRefWatcher用于对android.support.v4.app.FragmentManager设置FragmentLifecycleCallbacks
        Class<?> fragmentRefWatcherClass = Class.forName(SUPPORT_FRAGMENT_REF_WATCHER_CLASS_NAME);
        Constructor<?> constructor =
            fragmentRefWatcherClass.getDeclaredConstructor(RefWatcher.class);
        FragmentRefWatcher supportFragmentRefWatcher =
            (FragmentRefWatcher) constructor.newInstance(refWatcher);
        fragmentRefWatchers.add(supportFragmentRefWatcher);
      } catch (Exception ignored) {
        ignored.printStackTrace();
      }

      if (fragmentRefWatchers.size() == 0) {
        return;
      }

      Helper helper = new Helper(fragmentRefWatchers);

      //这边再次注册了另外一个ActivityLifecycleCallbacks
      Application application = (Application) context.getApplicationContext();
      application.registerActivityLifecycleCallbacks(helper.activityLifecycleCallbacks);
    }

    //该ActivityLifecycleCallbacks主要在onActivityCreated回调的时候执行上面添加的FragmentRefWatcher.watchFragments方法
    private final Application.ActivityLifecycleCallbacks activityLifecycleCallbacks =
        new ActivityLifecycleCallbacksAdapter() {
          @Override public void onActivityCreated(Activity activity, Bundle savedInstanceState) {
            for (FragmentRefWatcher watcher : fragmentRefWatchers) {
              watcher.watchFragments(activity);
            }
          }
        };

    分析五:fragmentRefWatchers.add(new AndroidOFragmentRefWatcher(refWatcher)):
    用于对android.app.FragmentManager设置FragmentLifecycleCallbacks

    分析六:fragmentRefWatchers.add(supportFragmentRefWatcher):
    用于对android.support.v4.app.FragmentManager设置FragmentLifecycleCallbacks
分析五:fragmentRefWatchers.add(new AndroidOFragmentRefWatcher(refWatcher)):
添加了个AndroidOFragmentRefWatcher用于对android.app.FragmentManager设置FragmentLifecycleCallbacks,后续在fragment生命周期结束时获取并判断是否存在fragment内存泄漏。
AndroidOFragmentRefWatcher.watchFragments:
private final FragmentManager.FragmentLifecycleCallbacks fragmentLifecycleCallbacks =
      new FragmentManager.FragmentLifecycleCallbacks() {

        @Override public void onFragmentViewDestroyed(FragmentManager fm, Fragment fragment) {
          //检测即将被回收的view是否存在泄漏
          View view = fragment.getView();
          if (view != null) {
            refWatcher.watch(view);
          }
        }

        @Override
        public void onFragmentDestroyed(FragmentManager fm, Fragment fragment) {
        //检测即将被回收的fragment是否存在泄漏
          refWatcher.watch(fragment);
        }
      };

  @Override public void watchFragments(Activity activity) {
    FragmentManager fragmentManager = activity.getFragmentManager();
    //对activity注册FragmentLifecycleCallbacks生命周期监听
    fragmentManager.registerFragmentLifecycleCallbacks(fragmentLifecycleCallbacks, true);
  }
分析六:fragmentRefWatchers.add(supportFragmentRefWatcher):
添加了个SupportFragmentRefWatcher用于对android.support.v4.app.FragmentManager设置FragmentLifecycleCallbacks,后续在fragment生命周期结束时获取并判断是否存在fragment内存泄漏。
SupportFragmentRefWatcher.watchFragments:
private final FragmentManager.FragmentLifecycleCallbacks fragmentLifecycleCallbacks =
      new FragmentManager.FragmentLifecycleCallbacks() {

        @Override public void onFragmentViewDestroyed(FragmentManager fm, Fragment fragment) {
        //检测即将被回收的view是否存在泄漏
          View view = fragment.getView();
          if (view != null) {
            refWatcher.watch(view);
          }
        }

        @Override public void onFragmentDestroyed(FragmentManager fm, Fragment fragment) {
        //检测即将被回收的fragment是否存在泄漏
          refWatcher.watch(fragment);
        }
      };

  @Override public void watchFragments(Activity activity) {
    if (activity instanceof FragmentActivity) {
    //对activity注册FragmentLifecycleCallbacks生命周期监听
      FragmentManager supportFragmentManager =
          ((FragmentActivity) activity).getSupportFragmentManager();
      supportFragmentManager.registerFragmentLifecycleCallbacks(fragmentLifecycleCallbacks, true);
    }
  }
第二步:内存是否泄漏判断refWatcher.watch()
首先从RefWatcher对象的创建开始
/** Creates a {@link RefWatcher}. */
 public final RefWatcher build() {
    if (isDisabled()) {
      return RefWatcher.DISABLED;
    }

    if (heapDumpBuilder.excludedRefs == null) {
      heapDumpBuilder.excludedRefs(defaultExcludedRefs());
    }

    HeapDump.Listener heapDumpListener = this.heapDumpListener;
    if (heapDumpListener == null) {
      heapDumpListener = defaultHeapDumpListener();
    }

    //默认为null
    DebuggerControl debuggerControl = this.debuggerControl;
    if (debuggerControl == null) {
      debuggerControl = defaultDebuggerControl();
    }

    HeapDumper heapDumper = this.heapDumper;
    if (heapDumper == null) {
      heapDumper = defaultHeapDumper();
    }

    //设置默认的监控执行处理器defaultWatchExecutor,调用AndroidRefWatcherBuilder.defaultWatchExecutor()获取
    WatchExecutor watchExecutor = this.watchExecutor;
    if (watchExecutor == null) {
      watchExecutor = defaultWatchExecutor();
    }
    //获取Gc处理器RefWatcherBuilder.defaultGcTrigger()
    GcTrigger gcTrigger = this.gcTrigger;
    if (gcTrigger == null) {
      gcTrigger = defaultGcTrigger();
    }

    if (heapDumpBuilder.reachabilityInspectorClasses == null) {
      heapDumpBuilder.reachabilityInspectorClasses(defaultReachabilityInspectorClasses());
    }
   //返回内存泄漏监控处理者RefWatcher
    return new RefWatcher(watchExecutor, debuggerControl, gcTrigger, heapDumper, heapDumpListener,
        heapDumpBuilder);
  }

  分析七:defaultWatchExecutor();
分析七:defaultWatchExecutor
AndroidWatchExecutor对象的创建:
//默认延时参数5秒
private static final long DEFAULT_WATCH_DELAY_MILLIS = SECONDS.toMillis(5);

    @Override protected @NonNull WatchExecutor defaultWatchExecutor() {
    return new AndroidWatchExecutor(DEFAULT_WATCH_DELAY_MILLIS);
  }
AndroidWatchExecutor实现的功能
AndroidWatchExecutor主要是做了一个简单的延时功能,因为activity、fragment等处罚ondestroy时,这些对象理论上即将被回收,但是还未被回收,所以AndroidWatchExecutor默认将检测任务发送到异步线程中做了个5秒的延时,注意这边是在异步线程,不阻塞主线程。在延时时间到了后,将检测任务再发送回主线程进行检测,注意这边之所以再发送回主线程,是因为gc操作只能在主线程触发。
AndroidWatchExecutor类:
  public final class AndroidWatchExecutor implements WatchExecutor {

  static final String LEAK_CANARY_THREAD_NAME = "LeakCanary-Heap-Dump";
  private final Handler mainHandler;
  private final Handler backgroundHandler;
  private final long initialDelayMillis;
  private final long maxBackoffFactor;

  public AndroidWatchExecutor(long initialDelayMillis) {
    //创建运行与主线程的mainHandler
    mainHandler = new Handler(Looper.getMainLooper());
    HandlerThread handlerThread = new HandlerThread(LEAK_CANARY_THREAD_NAME);
    handlerThread.start();
    //创建运行于后台线程的backgroundHandler
    backgroundHandler = new Handler(handlerThread.getLooper());
    //默认为5s
    this.initialDelayMillis = initialDelayMillis;
    maxBackoffFactor = Long.MAX_VALUE / initialDelayMillis;
  }

  @Override public void execute(@NonNull Retryable retryable) {
    if (Looper.getMainLooper().getThread() == Thread.currentThread()) {
      //当前是主线程则执行waitForIdle
      waitForIdle(retryable, 0);
    } else {
      //当前是后台线程则执行postWaitForIdle
      postWaitForIdle(retryable, 0);
    }
  }

  private void postWaitForIdle(final Retryable retryable, final int failedAttempts) {
    //将检测任务Retryable post到主线程中去执行
    mainHandler.post(new Runnable() {
      @Override public void run() {
        waitForIdle(retryable, failedAttempts);
      }
    });
  }

  private void waitForIdle(final Retryable retryable, final int failedAttempts) {
    // This needs to be called from the main thread.
    //当主线程空闲时则执行postToBackgroundWithDelay
    Looper.myQueue().addIdleHandler(new MessageQueue.IdleHandler() {
      @Override public boolean queueIdle() {
        postToBackgroundWithDelay(retryable, failedAttempts);
        return false;
      }
    });
  }

  private void postToBackgroundWithDelay(final Retryable retryable, final int failedAttempts) {
    long exponentialBackoffFactor = (long) Math.min(Math.pow(2, failedAttempts), maxBackoffFactor);
    long delayMillis = initialDelayMillis * exponentialBackoffFactor;
    //延时5秒执行Retryable检测
    backgroundHandler.postDelayed(new Runnable() {
      @Override public void run() {
        Retryable.Result result = retryable.run();
        if (result == RETRY) {
          postWaitForIdle(retryable, failedAttempts + 1);
        }
      }
    }, delayMillis);
  }
}
判断是否存在内存泄漏调用RefWatcher.watch:
public void watch(Object watchedReference, String referenceName) {
    if (this == DISABLED) {
      return;
    }
    checkNotNull(watchedReference, "watchedReference");
    checkNotNull(referenceName, "referenceName");
    //开始检测的时间
    final long watchStartNanoTime = System.nanoTime();
    //产生随机的key , 作为需要检测的对象的唯一标识
    String key = UUID.randomUUID().toString();
    //保存该key
    retainedKeys.add(key);
    //创建对应的对需要监控的watchedReference对象的弱引用并与ReferenceQueue绑定
    final KeyedWeakReference reference =
        new KeyedWeakReference(watchedReference, key, referenceName, queue);
   //开始确认该对象是否被回收了
    ensureGoneAsync(watchStartNanoTime, reference);
  }
做了个简单的线程判断ensureGoneAsync
这边看到使用到了上面watchExecutor延时5秒后,再执行ensureGone
private void ensureGoneAsync(final long watchStartNanoTime, final KeyedWeakReference reference) {
    watchExecutor.execute(new Retryable() {
      @Override public Retryable.Result run() {
        return ensureGone(reference, watchStartNanoTime);
      }
    });
  }
确认是否回收ensureGone
该函数执行的一个基本操作就是: 1.首先判断ReferenceQueue是否存在要检测内存泄漏的reference对象,不存在则代表可能发生泄漏
2.主动触发一次gc,进行内存回收
3.再次判断ReferenceQueue是否存在要检测内存泄漏的reference对象,不存在则代表可能发生泄漏
4.若发生泄漏则dump出内存hprof文件,进行分析,从中分析出内存泄漏的路径
Retryable.Result ensureGone(final KeyedWeakReference reference, final long watchStartNanoTime) {
    //gc准备开启的时间
    long gcStartNanoTime = System.nanoTime();
    //开始监控到准备gc的时间,大概5秒多,因为前边延时5秒
    long watchDurationMs = NANOSECONDS.toMillis(gcStartNanoTime - watchStartNanoTime);
    //移除已经被回收内存的监控对象的Key
    removeWeaklyReachableReferences();

    if (debuggerControl.isDebuggerAttached()) {
      // The debugger can create false leaks.
      return RETRY;
    }
    //判断该reference对象是否被回收了,如果已经被回收,返回DONE,
    if (gone(reference)) {
      return DONE;
    }
    //如果尚未被回收,则主动触发一次gc
    gcTrigger.runGc();
    //移除已经被回收内存的监控对象的Key
    removeWeaklyReachableReferences();
    //判断该reference对象是否被回收了,如果已经被回收,返回DONE,
    if (!gone(reference)) {
      //该reference对象尚未被回收
      long startDumpHeap = System.nanoTime();
      long gcDurationMs = NANOSECONDS.toMillis(startDumpHeap - gcStartNanoTime);
      //主动dump出内存Hprof文件
      File heapDumpFile = heapDumper.dumpHeap();
      if (heapDumpFile == RETRY_LATER) {
        // Could not dump the heap.
        return RETRY;
      }
      long heapDumpDurationMs = NANOSECONDS.toMillis(System.nanoTime() - startDumpHeap);

      HeapDump heapDump = heapDumpBuilder.heapDumpFile(heapDumpFile).referenceKey(reference.key)
          .referenceName(reference.name)
          .watchDurationMs(watchDurationMs)
          .gcDurationMs(gcDurationMs)
          .heapDumpDurationMs(heapDumpDurationMs)
          .build();
      //将hprof进行分析出泄漏的点并通过ui通知用户
      heapdumpListener.analyze(heapDump);
    }
    return DONE;
  }
参考
allenwu.itscoder.com/leakcanary-…
公众号