

承接上文,假如我给你一个virtual DOM对象,那么你该如何实现将它渲染到真实的文档中去呢?这个时候就涉及到原生DOM接口的一些增删改查的知识点了:
// 增:根据标签名,创建一个元素节点(element node)
let divElement = document.createElement('div')

// 增:根据文本内容,创建一个文本节点(text node)
const textNode = document.createTextNode('我是文本节点')

// 查:通过一个id字符串来获取文档中的元素节点
const bodyElement = document.getElementsByTagName('body')[0]

// 改:设置元素节点的非事件类型的属性(property)
divElement['id'] = 'test'
divElement['className'] = 'my-class'

// 改:给元素设置事件监听器
divElement.addEventListener('click',() => { console.log('I been clicked!')})

// 改:改变文档树结构
divElement.appendChild(textNode)
bodyElement.appendChild(divElement)

// 删:从文档结构树中删除
bodyElement.removeChild(divElement)
上面有一个注意点,那就是我们设置元素属性的写法是设置property而不是设置attibute。在DOM里面,property和attribute是两种概念。而设置property意味着只有有效的属性才会生效。
在react中,“react element”是一个术语,指的就是一个virtual DOM对象。并且在react.js的源码中,都是用element来指代的。为了统一,我们也使用elment这个名字来命名virtual DOM对象,如下:
const element = {
  type:'div',
  props:{
    id:'test',
    children:['我是文本节点']
  }
}
我们暂时不考虑引入“component”这个概念,所以,type的值的类型是只有字符串。因为有些文档标签是可以没有属性的,所以props的值可以是空对象(注意,不是null)。props的children属性值是数组类型,数组中的每一项又都是一个react element。因为有些文档标签是可以没有子节点,所以,props的children属性值也是可以是空数组。这里面我们看到了一个嵌套的数据结构,可想而知,具体的现实里面很可能会出现递归。
大家有没有发现,即使我们不考虑引入“component”这个概念,我们到目前为止,前面所提的都是对应于element node的,我们并没有提到text node在virtual DOM的世界是如何表示的。咋一想,我们可能会这样设计:
const element = {
  type:'我是文本节点',
  props:{}
}
从技术实现方面讲,这是可行的。但是仔细思考后,这样做显然是混淆了当初定义type字段的语义的。为了维持各字段(type,props)语义的统一化,我们不妨这样设计:
const element = {
  type:'TEXT_ELEMENT',
  props:{
    nodeValue:'我是文本节点'
  }
}
这样一来, text node和element node在virtual DOM的世界里面都有了对应的表示形式了:DOMElement 和 textElement
// 元素节点表示为:
const DOMElement = {
   type:'div',
   props:{
    id:'test',
    children:[
        {
            type:'TEXT_ELEMENT',
            props:{
                nodeValue:'我是文本节点'
       }
    ]
   }
}

// 文本节点表示为:
const textElement = {
   type:'TEXT_ELEMENT',
   props:{
    nodeValue:'我是文本节点'
   }
}
对react element的数据结构补充完毕后,我们可以考虑具体的实现了。我们就叫这个函数为render(对应ReactDOM.render()方法)吧。根据我们的需求,render函数的签名大概是这样的:
render : (element,domContainer) => void
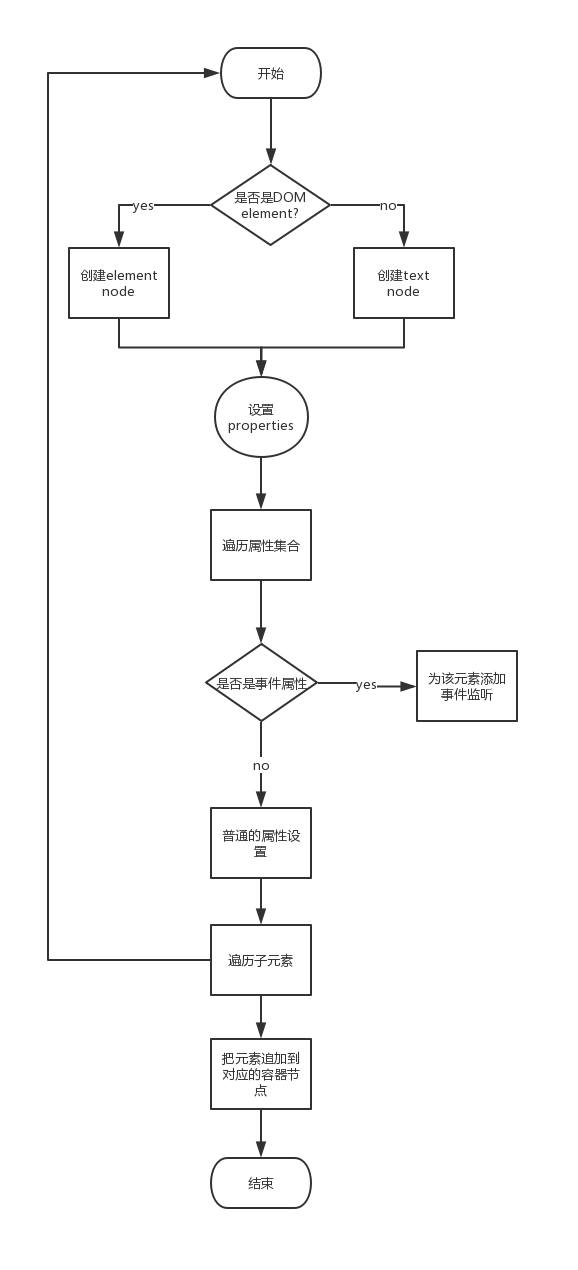
细想之下,这个函数的实现逻辑的流程图大概是这样的:
那好,为了简便,我们暂时不考虑edge case,并使用ES6的语法来实现这个逻辑:
function render(element,domContainer){
    const { type, props } = element

    // 创建对应的DOM节点
    const isTextElement = type === 'TEXT_ELEMENT'
    const domNode = isTextElement ? document.createTextNode('') : document.createElement(type)

    // 给DOM节点的属性分类:事件属性,普通属性和children
    const keys = Object.keys(props)
    const isEventProp = prop => /^on[A-Z]/.test(prop)
    const eventProps = keys.filter(isEventProp) // 事件属性
    const normalProps = keys.filter((key) => !isEventProp(key) && key !== 'children') // 普通属性
    const children = props.children // children

    // 对事件属性,添加对应的事件监听器
    eventProps.forEach(name => {
        const eventType = name.toLowerCase().slice(2)
        const eventHandler = props[name]
        domNode.addEventListener(eventType,eventHandler)
    })

    // 对普通属性,直接设置
     normalProps.forEach(name => {
        domNode[name] = props[name]
    })

    // 遍历children,递归调用render函数
    if(children && children.length){
        children.forEach(child => render(child,domNode))
    }

    // 最终追加到容器节点中去
    domContainer.appendChild(domNode)
}
至此,我们完成了从virtual DOM -> real DOM的映射的实现。现在,我们可以用以下的virtual DOM:
const element = {
    type:'div',
    props:{
    id:'test',
    onClick:() => { alert('I been clicked') },
    children:[
        {
            type:'TEXT_ELEMENT',
            props:{
                nodeValue:'我是文本节点'
            }
        }
    ]
    }
}
来映射这样的文档结构:
<div id="test" onClick={() => { alert('I been clicked')}>
    我是文本节点
</div>
你可以把下面完整的代码复制到codepen里面验证一下:
 const element = {
            type: 'div',
            props: {
                id: 'test',
                onClick: () => { alert('I been clicked') },
                children: [
                    {
                        type: 'TEXT_ELEMENT',
                        props: {
                            nodeValue: '我是文本节点'
                        }
                    }
                ]
            }
        }

        function render(element, domContainer) {
            const { type, props } = element

            // 创建对应的DOM节点
            const isTextElement = type === 'TEXT_ELEMENT'
            const domNode = isTextElement ? document.createTextNode('') : document.createElement(type)

            // 给DOM节点的属性分类:事件属性,普通属性和children
            const keys = Object.keys(props)
            const isEventProp = prop => /^on[A-Z]/.test(prop)
            const eventProps = keys.filter(isEventProp) // 事件属性
            const normalProps = keys.filter((key) => !isEventProp(key) && key !== 'children') // 普通属性
            const children = props.children // children

            // 对事件属性,添加对应的事件监听器
            eventProps.forEach(name => {
                const eventType = name.toLowerCase().slice(2)
                const eventHandler = props[name]
                domNode.addEventListener(eventType, eventHandler)
            })

            // 对普通属性,直接设置
            normalProps.forEach(name => {
                domNode[name] = props[name]
            })

            // 遍历children,递归调用render函数
            if (children && children.length) {
                children.forEach(child => render(child, domNode))
            }

            // 最终追加到容器节点中去
            domContainer.appendChild(domNode)
        }

        window.onload = () => {
            render(element, document.body)
        }
虽然我们已经完成了基本映射的实现,但是你有没有想过,假如我们要用virtual DOM对象去描述一颗深度很深,广度很广的文档树的时候,那我们写javascript对象是不是要写断手啦?在这个Node.js赋能前端,语法糖流行的年代,我们有没有一些即优雅又省力的手段来完成这个工作呢?答案是:“有的,那就是JSX”。 说到这里,那肯定要提到无所不能的babel编译器了。现在,我无意讲babel基于Node.js+AST的编译原理和它的基于插件的扩展机制。我们只是假设我们手上有一个叫transform-react-jsx的plugin。它能够把我们写的jsx:
const divElement = (
    <div id="test" onClick={() => { alert('I been clicked')}>
        我是文本节点1
        <a href="https://www.baidu.com">百度一下</a>
    </div>
)
编译成对应的javascript函数调用:
const divElement = createElement(
    'div',
    {
        id:test,
        onClick:() => { alert('I been clicked') }
    },
    '我是文本节点',
    createElement(
        'a',
        {
            href:'https://www.baidu.com'
        },
        '百度一下'
    )
    )
而作为配合,我们需要手动实现这个createElement函数。从上面的假设我们可以看出,这个createElement函数的签名大概是这样的:
createElement:(type,props,children1,children2,...) => element
我们已经约定好了element的数据结构了,现在我们一起来实现一下:
function createElement(type,props,...childrens){
    const newProps = Object.assign({},props)
    const hasChildren = childrens.length > 0
    newProps.children = hasChildren ? [].concat(...childrens) : []
    return {
        type,
        props:newProps
    }
}
上面这种实现在正常情况下是没有问题的,但是却把children是字符串(代表着文本节点)的情况忽略了。除此之外,我们也忽略了children是null,false,undefined等falsy值的情况。好,我们进一步完善一下:
function createElement(type,props,...childrens){
    const newProps = Object.assign({},props)
    const hasChildren = childrens.length > 0
    const rawChildren = hasChildren ? [].concat(...childrens) : []
    newProps.children = rawChildren.filter(child => !!child).map(child => {
        return child instanceof Object ? child : createTextElement(child)
    })
    return {
        type,
        props:newProps
    }
}

function createTextElement(text){
    return {
        type:'TEXT_ELEMENT',
        props:{
            nodeValue:text
        }
    }
}
好了,有了babel的jsx编译插件,再加上我们实现的createElement函数,我们现在就可以像往常写HTML标记一样编写virtual DOM对象了。
下面,我们来总结一下。我们写的是:
 <div id="test" onClick={() => { alert('I been clicked')}>
    我是文本节点1
    <a href="https://www.baidu.com">百度一下</a>
</div>
babel会将我们的jsx转换为对应的javascript函数调用代码:
createElement(
    'div',
    {
        id:test,
        onClick:() => { alert('I been clicked') }
    },
    '我是文本节点',
    createElement(
        'a',
        {
            href:'https://www.baidu.com'
        },
        '百度一下'
    )
    )
而在createElement函数的内部实现里面,又会针对字符串类型的children调用createTextElement来获得对应的textElement。
最后,我们把已实现的函数和jsx语法结合起来,一起看看完整的写法和代码脉络:
//  jsx的写法
const divElement = (
    <div id="test" onClick={() => { alert('I been clicked')}>
        我是文本节点1
        <a href="https://www.baidu.com">百度一下</a>
    </div>
)

function render(){/* 内部实现,已给出 */}
function createElement(){/* 内部实现,已给出 */}
function createTextElement(){/* 内部实现,已给出 */}

window.onload = () => {
    render(divElement,document.body)
}
到这里,virtual DOM -> real DOM映射的简单实现也完成了,省时省力的jsx语法也“发明”了。那么下一步,我们就来谈谈整树映射过程中协调的实现。
