前言
目录整理:
设计模式在vue中的应用(一)
设计模式在vue中的应用(二)
设计模式在vue中的应用(三)
设计模式在vue中的应用(四)
设计模式在vue中的应用(五)
设计模式在vue中的应用(六)
设计模式在vue中的应用(七)
为什么要写这些文章呢。正如设计模式(Design Pattern)是一套被反复使用、多数人知晓的、经过分类的、代码设计经验的总结(来自百度百科)一样,也是想通过分享一些工作中的积累与大家探讨设计模式的魅力所在。
在这个系列文章中为了辅助说明引入的应用场景都是工作中真实的应用场景,当然无法覆盖全面,但以此类推也覆盖到了常见的业务场景
这一篇要讲的可能和之前有点区别,前面几篇要达到我们的目的不得不造出很多对象(组件),而本文的主角是让我们减少对象——享元模式。
定义(来自网络):
享元模式使用共享技术实现相同或者相似对象的重用。也就是说实现相同或者相似对象的代码共享。
使用场景(来自百度百科):
如果一个应用程序使用了大量的对象,而这些对象造成了很大的存储开销的时候就可以考虑是否可以使用享元模式。
一、需求
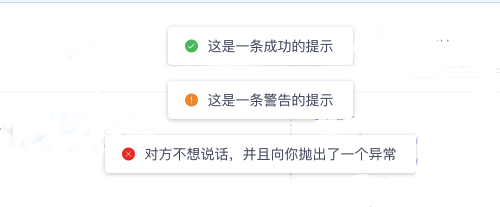
截图来自iView官方文档(Message组件)

Message组件相信大家不会陌生,不知道大家有没有亲自实现过
二、需求分析
Message组件有以下几个特点:
- 交互方式一样
- 有三种类型:
success、warning、error,对应三种不用的页面效果:提示icon、背景样式、字体样式 - 接收一段提示文字
可以知道:
交互方式——弹出、隐藏,由共享对象所拥有
提示icon、背景样式、字体样式提供接口可配置
使用api统一
三、设计实现
常规使用方式this.$Message.success()、this.$Message.warning()、this.$Message.error()所以我们需要以vue插件的形式扩展vue的prototype
//Message.js 伪代码
export default {
  install (Vue) {
    // 扩展Vue的`prototype`
    Vue.prototype.$Message = {
      success (text) {
        // 通常我们可能如下操作,每次new一个新的组件对象
        const Dialog = new Vue({
          ...
        })
        document.body.appendChild(Dialog.$el)
      },
      warning (text) {
        // 同上,new一个新的组件对象
        const Dialog = new Vue({
          ...
        })
        document.body.appendChild(Dialog.$el)
      },
      error (text) {
        // 同上,new一个新的组件对象
        const Dialog = new Vue({
          ...
        })
        document.body.appendChild(Dialog.$el)
      }
    }
  }
}
如上例子所示每次使用Message组件都需new一个Dialog出来,下面我们使用享元模式的思想达到减少组件对象的目的
//Message.js 伪代码
export default {
  install (Vue) {
    // 在使用插件Vue.use(Message)时实例化一个Dialog组件对象
    const Dialog = new Vue({
      data () {
        return {
          icon: '',
          fontStyle: '',
          backgroundStyle: '',
          text: ''
        }
      }
      ...
    })

    // 扩展Vue的`prototype`
    Vue.prototype.$Message = {
      success (text) {
        // 改变Dialog的data.xx的值触发Dialog的更新
        Dialog.icon = successIcon
        Dialog.fontStyle = successFontStyle
        Dialog.backgroundStyle = successBackgroundStyle
        Dialog.text = text
        // 获取Dialog的最新DOM添加到body标签中
        document.body.appendChild(Dialog.$el)
      },
      warning (text) {
        // 同上
        ...
        document.body.appendChild(Dialog.$el)
      },
      error (text) {
        // 同上
        ...
        document.body.appendChild(Dialog.$el)
      }
    }
  }
}
四、结果
都说做事是结果导向的,现在看看我们的设计得到了什么结果
Dialog只会在项目初始化时被
new一次,每次使用Message组件通过改变Dialog的状态获取组件DOM,其实很容易知道new一个组件的成本要比一个组件的更新成本高很多
与常规的实现方案相比缺点是就算没使用也会执行
new Dialog()并占用内存
五、附完整实现(示例)
如有bug还请见谅随手写的
import './index.scss'

let zIndex = 2001;

export default {
  install (Vue) {
    const Dialog = new Vue({
      data () {
        return {
          text: '这是一个提示',
          icon: 'icon-waiting',
          iconColor: '#308AFE',
          background: '#ddd'
        }
      },
      render (h) {
        zIndex++
        const selfStyle = {
          background: this.background,
          zIndex
        }
        return h('div',
          {
            class: 'm-message',
            style: selfStyle
          },
          [
            h('i', {
              style: {marginRight: '8px', color: this.iconColor},
              class: `iconfont ${this.icon}`
            }),
            this.text
          ]
        )
      }
    }).$mount()

    function appendDialog(message, icon, iconColor, bgColor, time = 3) {
      Dialog.text = message
      Dialog.icon = icon
      Dialog.iconColor = iconColor
      Dialog.background = bgColor
      let timer = ''
      let element = document.createElement('div')
      Dialog.$nextTick(() => {
        element = Dialog.$el.cloneNode(true)
        document.body.appendChild(element)
      })
      if(time > 0) {
        timer = setTimeout(() => {
            element.classList.add('outer')
            setTimeout(() => {
              document.body.removeChild(element)
            }, 500);
            clearTimeout(timer)
        }, time * 1000);
      }
    }

    Vue.prototype.$message = {
      tips (message, time) {
        appendDialog(message, 'icon-waiting', '#308AFE', '#ADD8F7', time)
      },
      warning(message, time) {
        appendDialog(message, 'icon-warn', '#FFAF0D', '#FCCCA7', time)
      },
      success(message, time) {
        appendDialog(message, 'icon-success', '#36B37E', '#A7E1C4', time)
      },
      error(message, time) {
        appendDialog(message, 'icon-error', '#E95B5B', '#FFF4F4', time)
      },
      destory() {
        document.querySelectorAll('.m-message').forEach(ele => ele.remove())
      }
    }
  }
}
六、总结
回想一下在讲解讲享元模式时大多会例举的一个场景
有男女衣服各50套,现在要给这些衣服拍照怎么办呢?

土豪做法:new 100个模特对象一人穿一套慢慢拍,有钱任性(内存占有率高)
理性做法:new 一个男模特和一个女模特拍完一套换一套接着拍(暴露一个换衣服的接口),
         也没差,主要是省钱(对象从100个减少为2个)
熟悉设计模式同学的可能觉得这个场景不太好,我认同你的观点,不过用来学习享元模式个人觉得还能接受。
Message组件的具体实现方案不拒绝也不推荐本文的方式(哈哈哈~)
更新:发现elemnet-ui的MessageBox组件就是类似的思路传送门
本文实现同样适用于react,为什么文章以vue做题?vue的template让我们在理解一些概念的时候可能会有点不适应,而react的jsx可以看做就是在写JavaScript对各种概念实现更灵活
友情提示:设计模式在vue中的应用应该会写一个系列,喜欢的同学记得关注下