- 原文地址:Accepting Payments with Stripe, Vue.js, and Flask
- 原文作者:Michael Herman
- 译文出自:掘金翻译计划
- 本文永久链接:github.com/xitu/gold-m…
- 译者:Mcskiller
- 校对者:kasheemlew
在本教程中,我们将会开发一个使用 Stripe(处理付款订单),Vue.js(客户端应用)以及 Flask(服务端 API)的 web 应用来售卖书籍。
这是一个进阶教程。我们默认您已经基本掌握了 Vue.js 和 Flask。如果你还没有了解过它们,请查看下面的链接以了解更多:
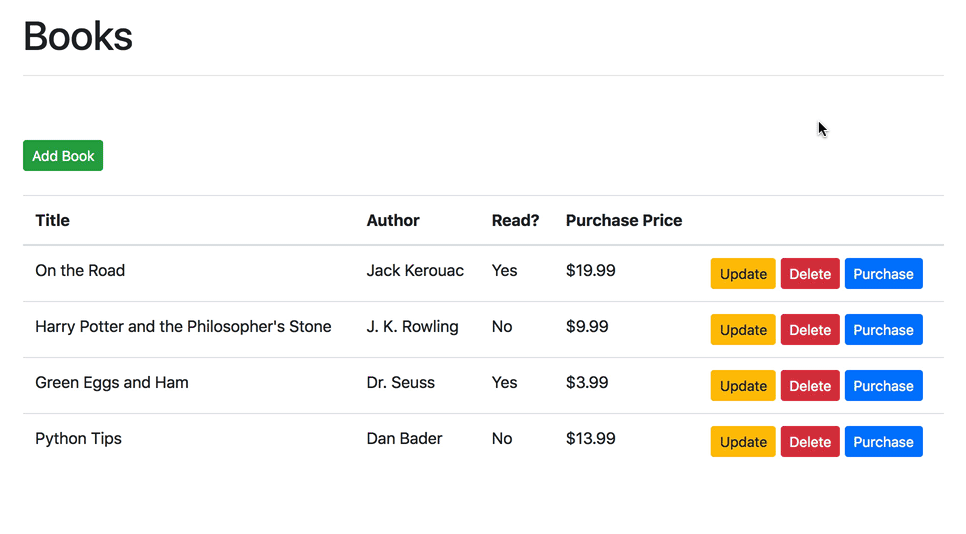
最终效果:
主要依赖:
- Vue v2.5.2
- Vue CLI v2.9.3
- Node v10.3.0
- NPM v6.1.0
- Flask v1.0.2
- Python v3.6.5
目录
目的
在本教程结束的时候,你能够...
- 获得一个现有的 CRUD 应用,由 Vue 和 Flask 驱动
- 创建一个订单结算组件
- 使用原生 JavaScript 验证一个表单
- 使用 Stripe 验证信用卡信息
- 通过 Stripe API 处理付款
项目安装
Clone flask-vue-crud 仓库,然后在 master 分支找到 v1 标签:
$ git clone https://github.com/testdrivenio/flask-vue-crud --branch v1 --single-branch
$ cd flask-vue-crud
$ git checkout tags/v1 -b master
搭建并激活一个虚拟环境,然后运行 Flask 应用:
$ cd server
$ python3.6 -m venv env
$ source env/bin/activate
(env)$ pip install -r requirements.txt
(env)$ python app.py
上述搭建环境的命令可能因操作系统和运行环境而异。
用浏览器访问 http://localhost:5000/ping。你会看到:
"pong!"
然后,安装依赖并在另一个终端中运行 Vue 应用:
$ cd client
$ npm install
$ npm run dev
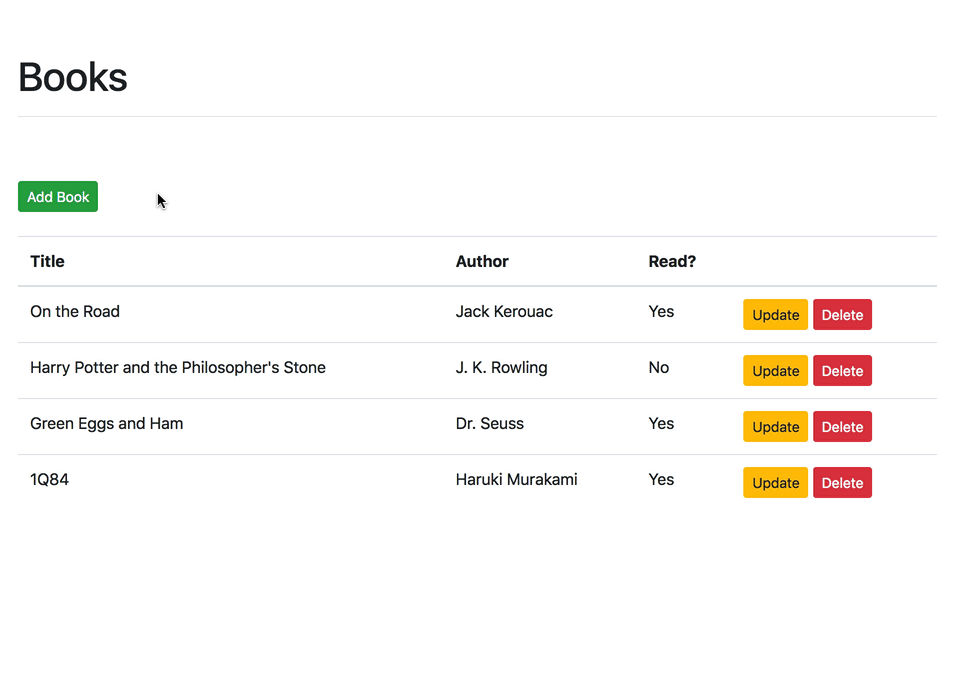
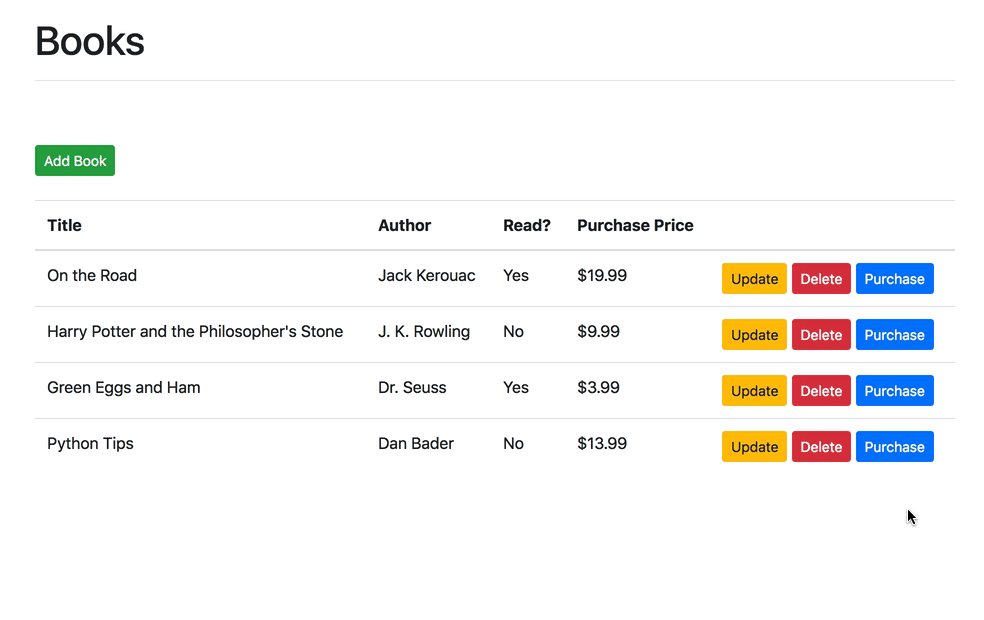
转到 http://localhost:8080。确保 CRUD 基本功能正常工作:
想学习如何构建这个项目?查看 用 Flask 和 Vue.js 开发一个单页面应用 文章。
我们要做什么?
我们的目标是构建一个允许终端用户购买书籍的 web 应用。
客户端 Vue 应用将会显示出可供购买的书籍并记录付款信息,然后从 Stripe 获得 token,最后发送 token 和付款信息到服务端。
然后 Flask 应用获取到这些信息,并把它们都打包发送到 Stripe 去处理。
最后,我们会用到一个客户端 Stripe 库 Stripe.js,它会生成一个专有 token 来创建账单,然后使用服务端 Python Stripe 库和 Stripe API 交互。

和之前的 教程 一样,我们会简化步骤,你应该自己处理产生的其他问题,这样也会加强你的理解。
CRUD 书籍
首先,让我们将购买价格添加到服务器端的现有书籍列表中,然后在客户端上更新相应的 CRUD 函数 GET,POST 和 PUT。
GET
首先在 server/app.py 中添加 price 到 BOOKS 列表的每一个字典元素中:
BOOKS = [
    {
        'id': uuid.uuid4().hex,
        'title': 'On the Road',
        'author': 'Jack Kerouac',
        'read': True,
        'price': '19.99'
    },
    {
        'id': uuid.uuid4().hex,
        'title': 'Harry Potter and the Philosopher\'s Stone',
        'author': 'J. K. Rowling',
        'read': False,
        'price': '9.99'
    },
    {
        'id': uuid.uuid4().hex,
        'title': 'Green Eggs and Ham',
        'author': 'Dr. Seuss',
        'read': True,
        'price': '3.99'
    }
]
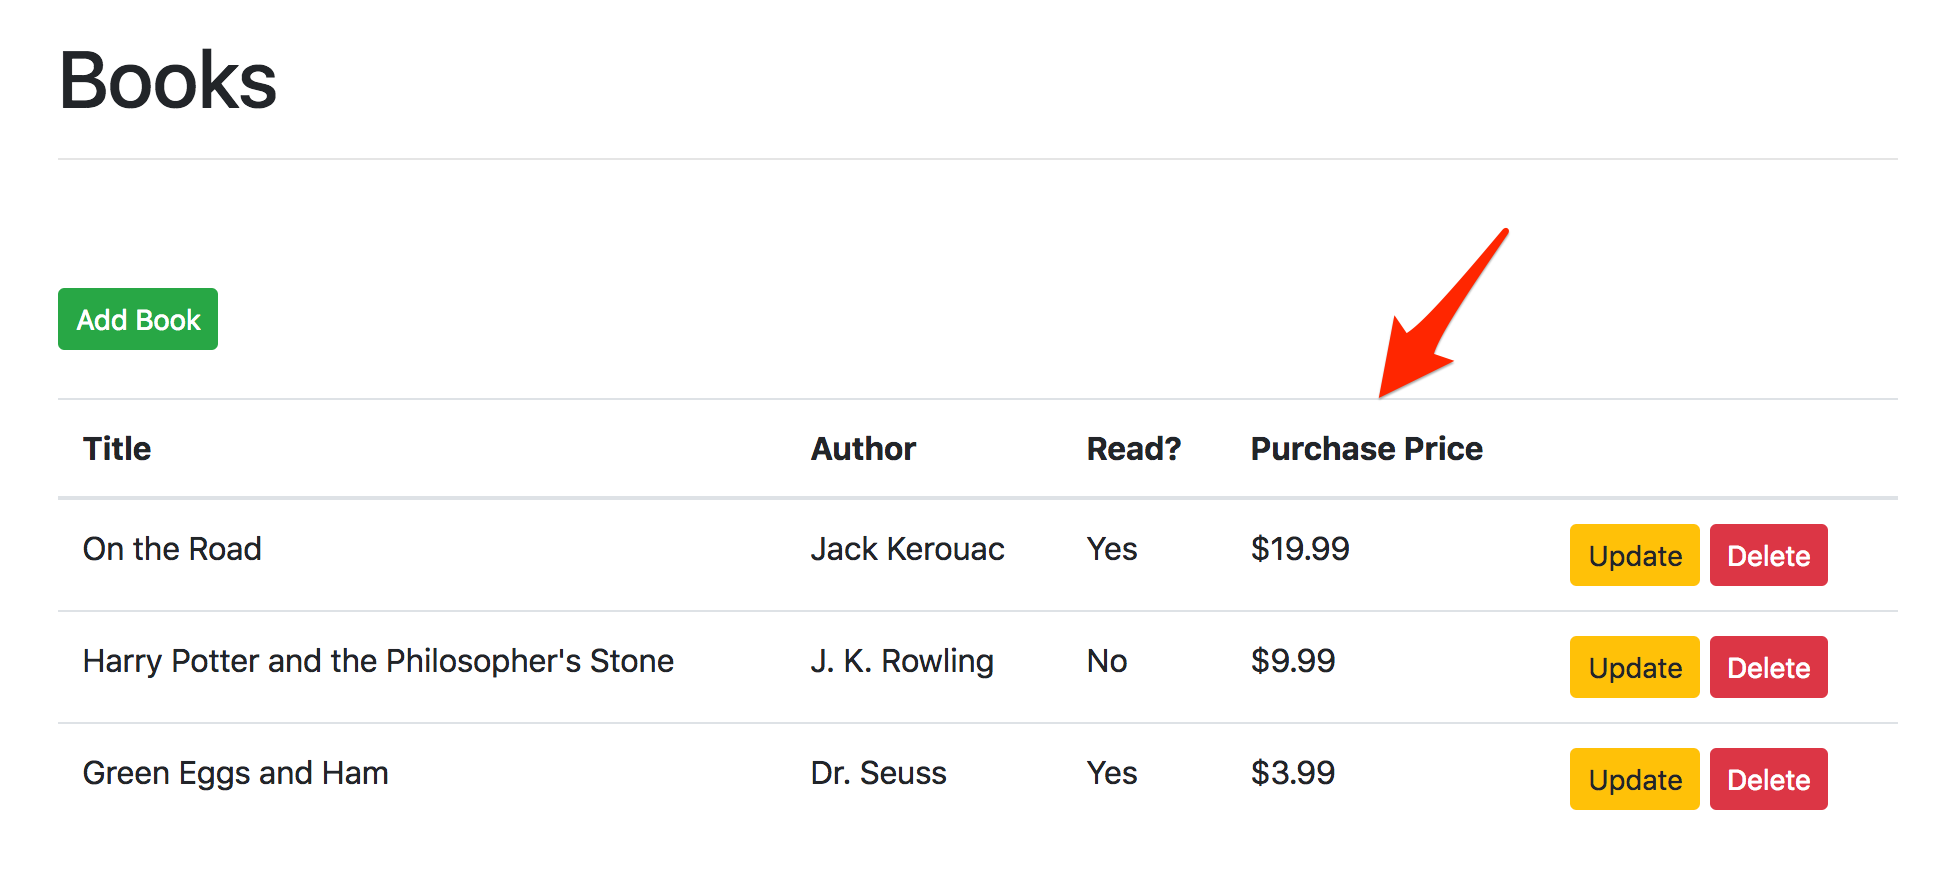
然后,在 Books 组件 client/src/components/Books.vue 中更新表格以显示购买价格。
<table class="table table-hover">
  <thead>
    <tr>
      <th scope="col">Title</th>
      <th scope="col">Author</th>
      <th scope="col">Read?</th>
      <th scope="col">Purchase Price</th>
      <th></th>
    </tr>
  </thead>
  <tbody>
    <tr v-for="(book, index) in books" :key="index">
      <td>{{ book.title }}</td>
      <td>{{ book.author }}</td>
      <td>
        <span v-if="book.read">Yes</span>
        <span v-else>No</span>
      </td>
      <td>${{ book.price }}</td>
      <td>
        <button type="button"
                class="btn btn-warning btn-sm"
                v-b-modal.book-update-modal
                @click="editBook(book)">
            Update
        </button>
        <button type="button"
                class="btn btn-danger btn-sm"
                @click="onDeleteBook(book)">
            Delete
        </button>
      </td>
    </tr>
  </tbody>
</table>
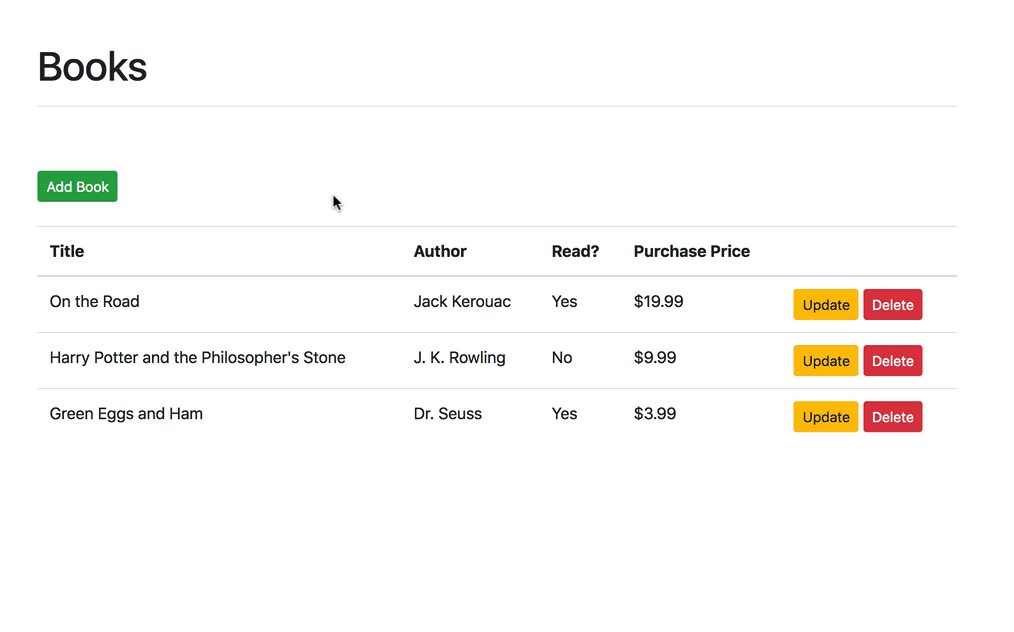
你现在应该会看到:
POST
添加一个新 b-form-group 到 addBookModal 中,在 Author 和 read 的 b-form-group 类之间:
<b-form-group id="form-price-group"
              label="Purchase price:"
              label-for="form-price-input">
  <b-form-input id="form-price-input"
                type="number"
                v-model="addBookForm.price"
                required
                placeholder="Enter price">
  </b-form-input>
</b-form-group>
这个模态现在看起来应该是这样:
<!-- add book modal -->
<b-modal ref="addBookModal"
         id="book-modal"
        title="Add a new book"
        hide-footer>
  <b-form @submit="onSubmit" @reset="onReset" class="w-100">
    <b-form-group id="form-title-group"
                  label="Title:"
                  label-for="form-title-input">
        <b-form-input id="form-title-input"
                      type="text"
                      v-model="addBookForm.title"
                      required
                      placeholder="Enter title">
        </b-form-input>
    </b-form-group>
    <b-form-group id="form-author-group"
                  label="Author:"
                  label-for="form-author-input">
      <b-form-input id="form-author-input"
                    type="text"
                    v-model="addBookForm.author"
                    required
                    placeholder="Enter author">
      </b-form-input>
    </b-form-group>
    <b-form-group id="form-price-group"
                  label="Purchase price:"
                  label-for="form-price-input">
      <b-form-input id="form-price-input"
                    type="number"
                    v-model="addBookForm.price"
                    required
                    placeholder="Enter price">
      </b-form-input>
    </b-form-group>
    <b-form-group id="form-read-group">
        <b-form-checkbox-group v-model="addBookForm.read" id="form-checks">
          <b-form-checkbox value="true">Read?</b-form-checkbox>
        </b-form-checkbox-group>
    </b-form-group>
    <b-button type="submit" variant="primary">Submit</b-button>
    <b-button type="reset" variant="danger">Reset</b-button>
  </b-form>
</b-modal>
然后,添加 price 到 addBookForm 属性中:
addBookForm: {
  title: '',
  author: '',
  read: [],
  price: '',
},
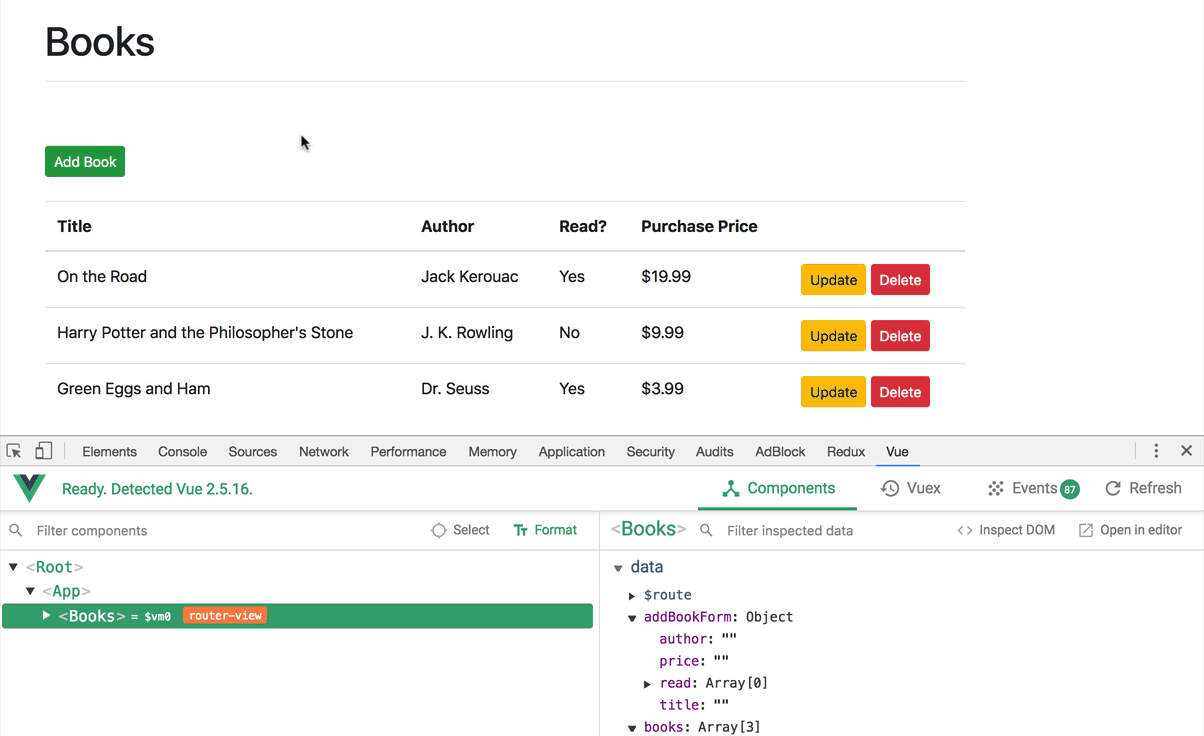
addBookForm 现在和表单的输入值进行了绑定。想想这意味着什么。当 addBookForm 被更新时,表单的输入值也会被更新,反之亦然。以下是 vue-devtools 浏览器扩展的示例。
将 price 添加到 onSubmit 方法的 payload 中,像这样:
onSubmit(evt) {
  evt.preventDefault();
  this.$refs.addBookModal.hide();
  let read = false;
  if (this.addBookForm.read[0]) read = true;
  const payload = {
    title: this.addBookForm.title,
    author: this.addBookForm.author,
    read, // property shorthand
    price: this.addBookForm.price,
  };
  this.addBook(payload);
  this.initForm();
},
更新 initForm 函数,在用户提交表单点击 "重置" 按钮后清除已有的值:
initForm() {
  this.addBookForm.title = '';
  this.addBookForm.author = '';
  this.addBookForm.read = [];
  this.addBookForm.price = '';
  this.editForm.id = '';
  this.editForm.title = '';
  this.editForm.author = '';
  this.editForm.read = [];
},
最后,更新 server/app.py 中的路由:
@app.route('/books', methods=['GET', 'POST'])
def all_books():
    response_object = {'status': 'success'}
    if request.method == 'POST':
        post_data = request.get_json()
        BOOKS.append({
            'id': uuid.uuid4().hex,
            'title': post_data.get('title'),
            'author': post_data.get('author'),
            'read': post_data.get('read'),
            'price': post_data.get('price')
        })
        response_object['message'] = 'Book added!'
    else:
        response_object['books'] = BOOKS
    return jsonify(response_object)
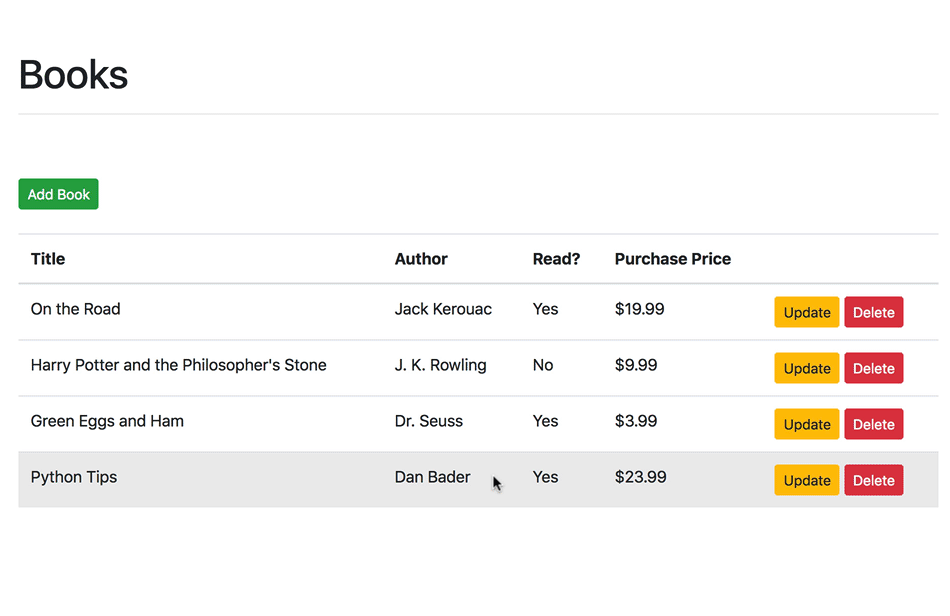
赶紧测试一下吧!
不要忘了处理客户端和服务端的错误!
PUT
同样的操作,不过这次是编辑书籍,该你自己动手了:
- 添加一个新输入表单到模态中
- 更新属性中的
editForm部分 - 添加
price到onSubmitUpdate方法的payload中 - 更新
initForm - 更新服务端路由
需要帮助吗?重新看看前面的章节。或者你可以从 flask-vue-crud 仓库获得源码。
订单页面
接下来,让我们添加一个订单页面,用户可以在其中输入信用卡信息来购买图书。
TODO:添加图片
添加一个购买按钮
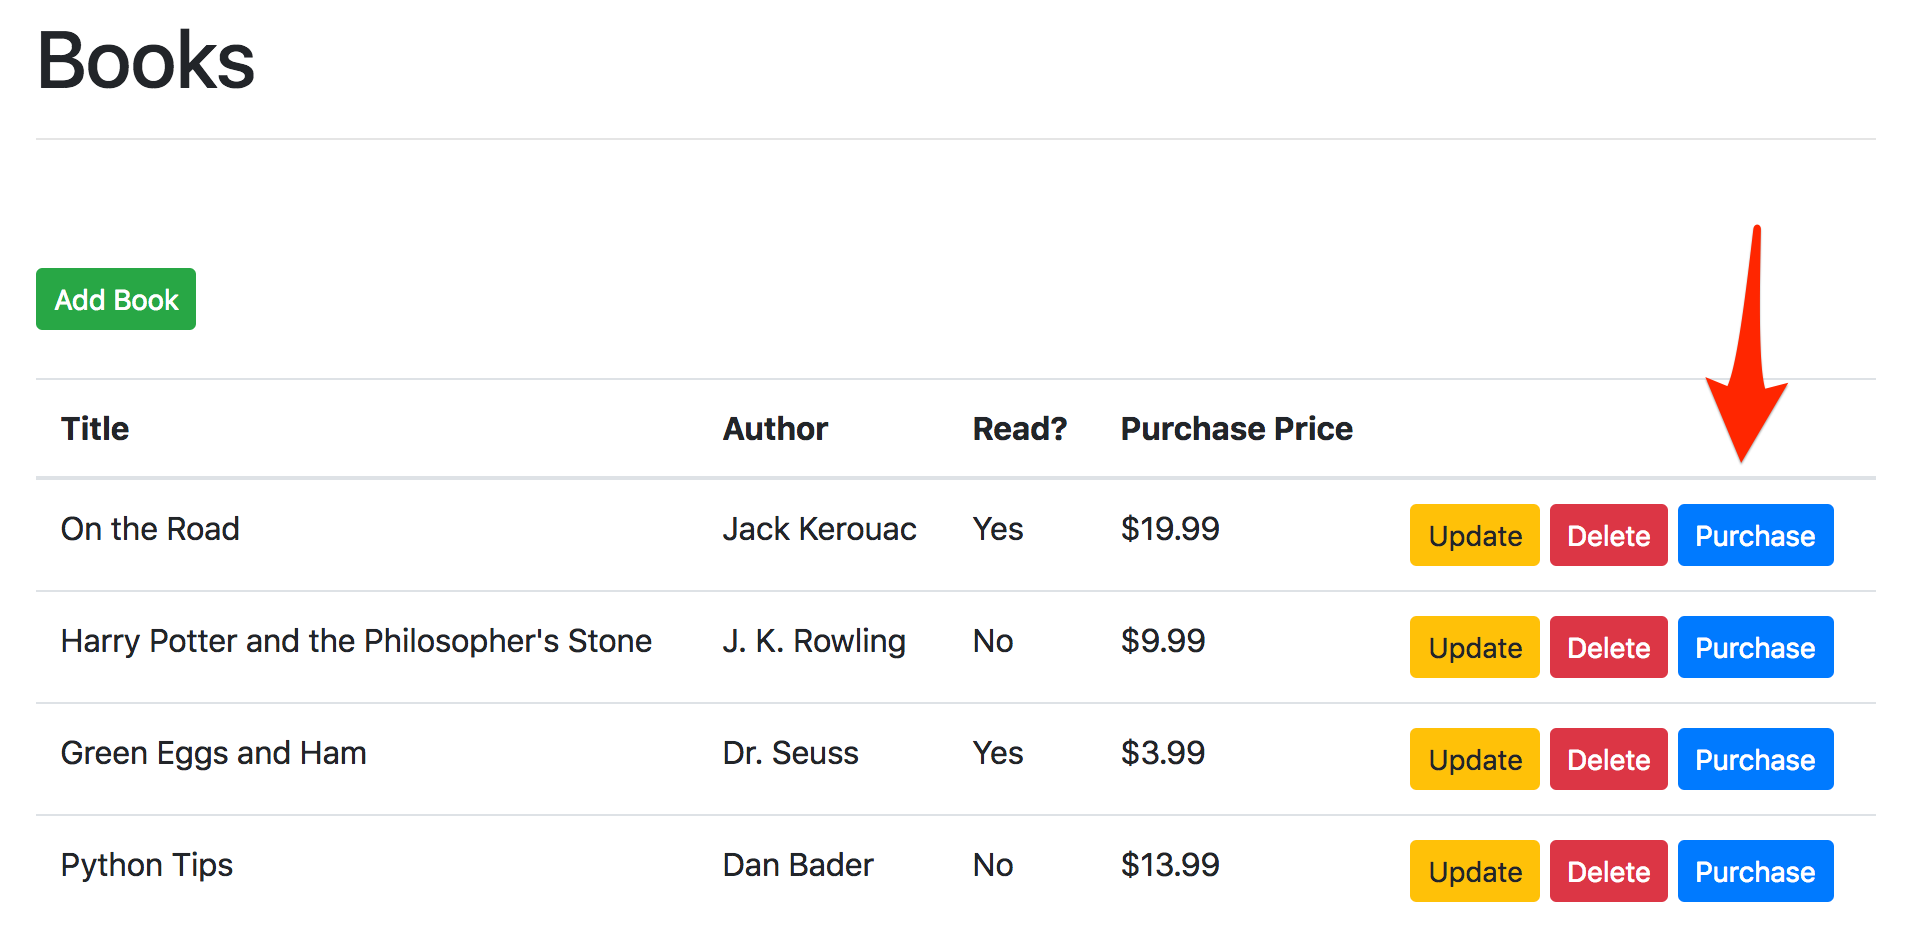
首先给 Books 组件添加一个“购买”按钮,就在“删除”按钮的下方:
<td>
  <button type="button"
          class="btn btn-warning btn-sm"
          v-b-modal.book-update-modal
          @click="editBook(book)">
      Update
  </button>
  <button type="button"
          class="btn btn-danger btn-sm"
          @click="onDeleteBook(book)">
      Delete
  </button>
  <router-link :to="`/order/${book.id}`"
               class="btn btn-primary btn-sm">
      Purchase
  </router-link>
</td>
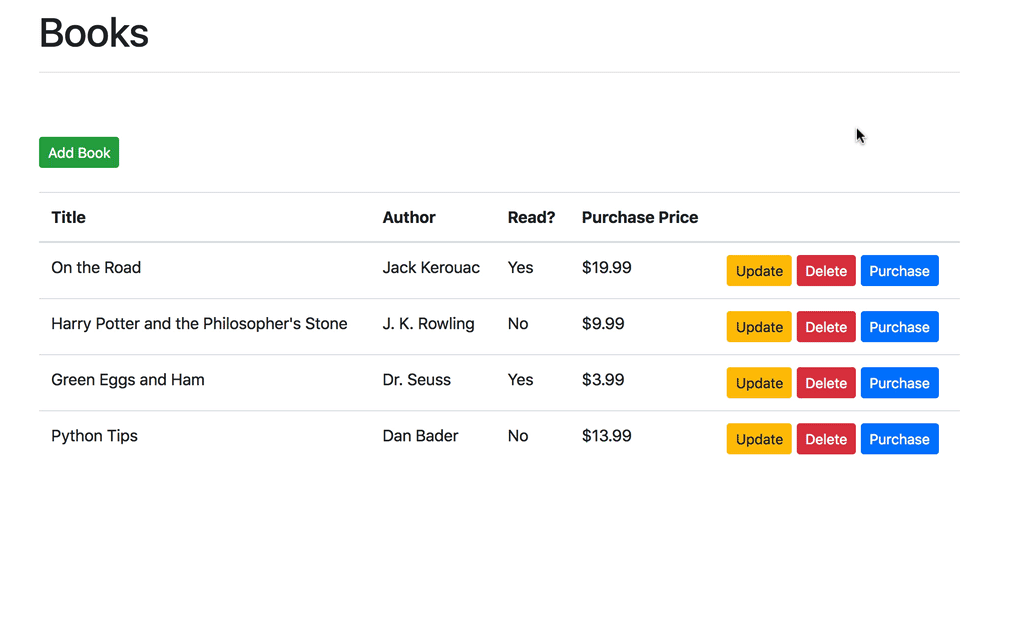
这里,我们使用了 router-link 组件来生成一个连接到 client/src/router/index.js 中的路由的锚点,我们马上就会用到它。
创建模板
添加一个叫做 Order.vue 的新组件文件到 client/src/components:
<template>
  <div class="container">
    <div class="row">
      <div class="col-sm-10">
        <h1>Ready to buy?</h1>
        <hr>
        <router-link to="/" class="btn btn-primary">
          Back Home
        </router-link>
        <br><br><br>
        <div class="row">
          <div class="col-sm-6">
            <div>
              <h4>You are buying:</h4>
              <ul>
                <li>Book Title: <em>Book Title</em></li>
                <li>Amount: <em>$Book Price</em></li>
              </ul>
            </div>
            <div>
              <h4>Use this info for testing:</h4>
              <ul>
                <li>Card Number: 4242424242424242</li>
                <li>CVC Code: any three digits</li>
                <li>Expiration: any date in the future</li>
              </ul>
            </div>
          </div>
          <div class="col-sm-6">
            <h3>One time payment</h3>
            <br>
            <form>
              <div class="form-group">
                <label>Credit Card Info</label>
                <input type="text"
                       class="form-control"
                       placeholder="XXXXXXXXXXXXXXXX"
                       required>
              </div>
              <div class="form-group">
                <input type="text"
                       class="form-control"
                       placeholder="CVC"
                       required>
              </div>
              <div class="form-group">
                <label>Card Expiration Date</label>
                <input type="text"
                       class="form-control"
                       placeholder="MM/YY"
                       required>
              </div>
              <button class="btn btn-primary btn-block">Submit</button>
            </form>
          </div>
        </div>
      </div>
    </div>
  </div>
</template>
你可能会想收集买家的联系信息,比如姓名,邮件地址,送货地址等等。这就得靠你自己了。
添加路由
client/src/router/index.js:
import Vue from 'vue';
import Router from 'vue-router';
import Ping from '@/components/Ping';
import Books from '@/components/Books';
import Order from '@/components/Order';

Vue.use(Router);

export default new Router({
  routes: [
    {
      path: '/',
      name: 'Books',
      component: Books,
    },
    {
      path: '/order/:id',
      name: 'Order',
      component: Order,
    },
    {
      path: '/ping',
      name: 'Ping',
      component: Ping,
    },
  ],
  mode: 'hash',
});
测试一下。
获取产品信息
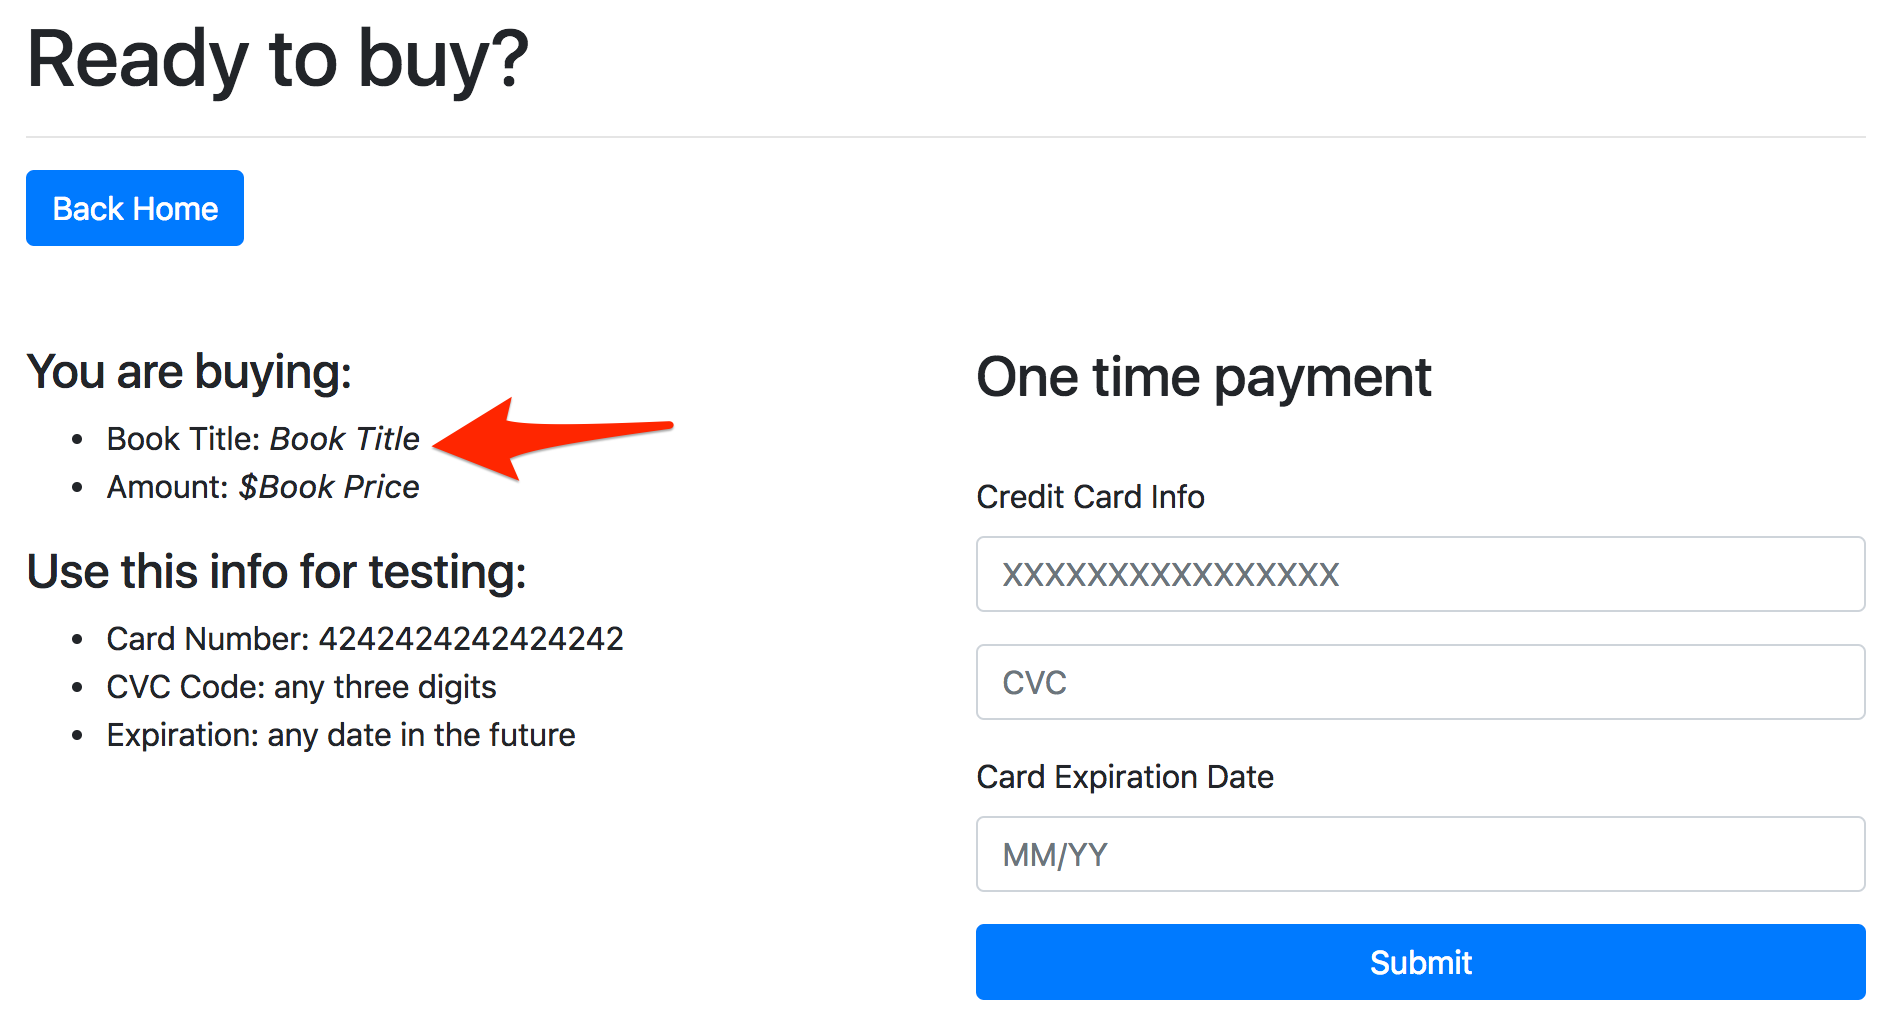
接下来,让我们在订单页面 上更新书名和金额的占位符:
回到服务端并更新以下路由接口:
@app.route('/books/<book_id>', methods=['GET', 'PUT', 'DELETE'])
def single_book(book_id):
    response_object = {'status': 'success'}
    if request.method == 'GET':
        # TODO: refactor to a lambda and filter
        return_book = ''
        for book in BOOKS:
            if book['id'] == book_id:
                return_book = book
        response_object['book'] = return_book
    if request.method == 'PUT':
        post_data = request.get_json()
        remove_book(book_id)
        BOOKS.append({
            'id': uuid.uuid4().hex,
            'title': post_data.get('title'),
            'author': post_data.get('author'),
            'read': post_data.get('read'),
            'price': post_data.get('price')
        })
        response_object['message'] = 'Book updated!'
    if request.method == 'DELETE':
        remove_book(book_id)
        response_object['message'] = 'Book removed!'
    return jsonify(response_object)
我们可以在 script 中使用这个路由向订单页面添加书籍信息:
<script>
import axios from 'axios';

export default {
  data() {
    return {
      book: {
        title: '',
        author: '',
        read: [],
        price: '',
      },
    };
  },
  methods: {
    getBook() {
      const path = `http://localhost:5000/books/${this.$route.params.id}`;
      axios.get(path)
        .then((res) => {
          this.book = res.data.book;
        })
        .catch((error) => {
          // eslint-disable-next-line
          console.error(error);
        });
    },
  },
  created() {
    this.getBook();
  },
};
</script>
转到生产环境?你将需要使用环境变量来动态设置基本服务器端 URL(现在 URL 为
http://localhost:5000)。查看 文档 获取更多信息。
然后,更新 template 中的第一个 ul:
<ul>
  <li>Book Title: <em>{{ book.title }}</em></li>
  <li>Amount: <em>${{ book.price }}</em></li>
</ul>
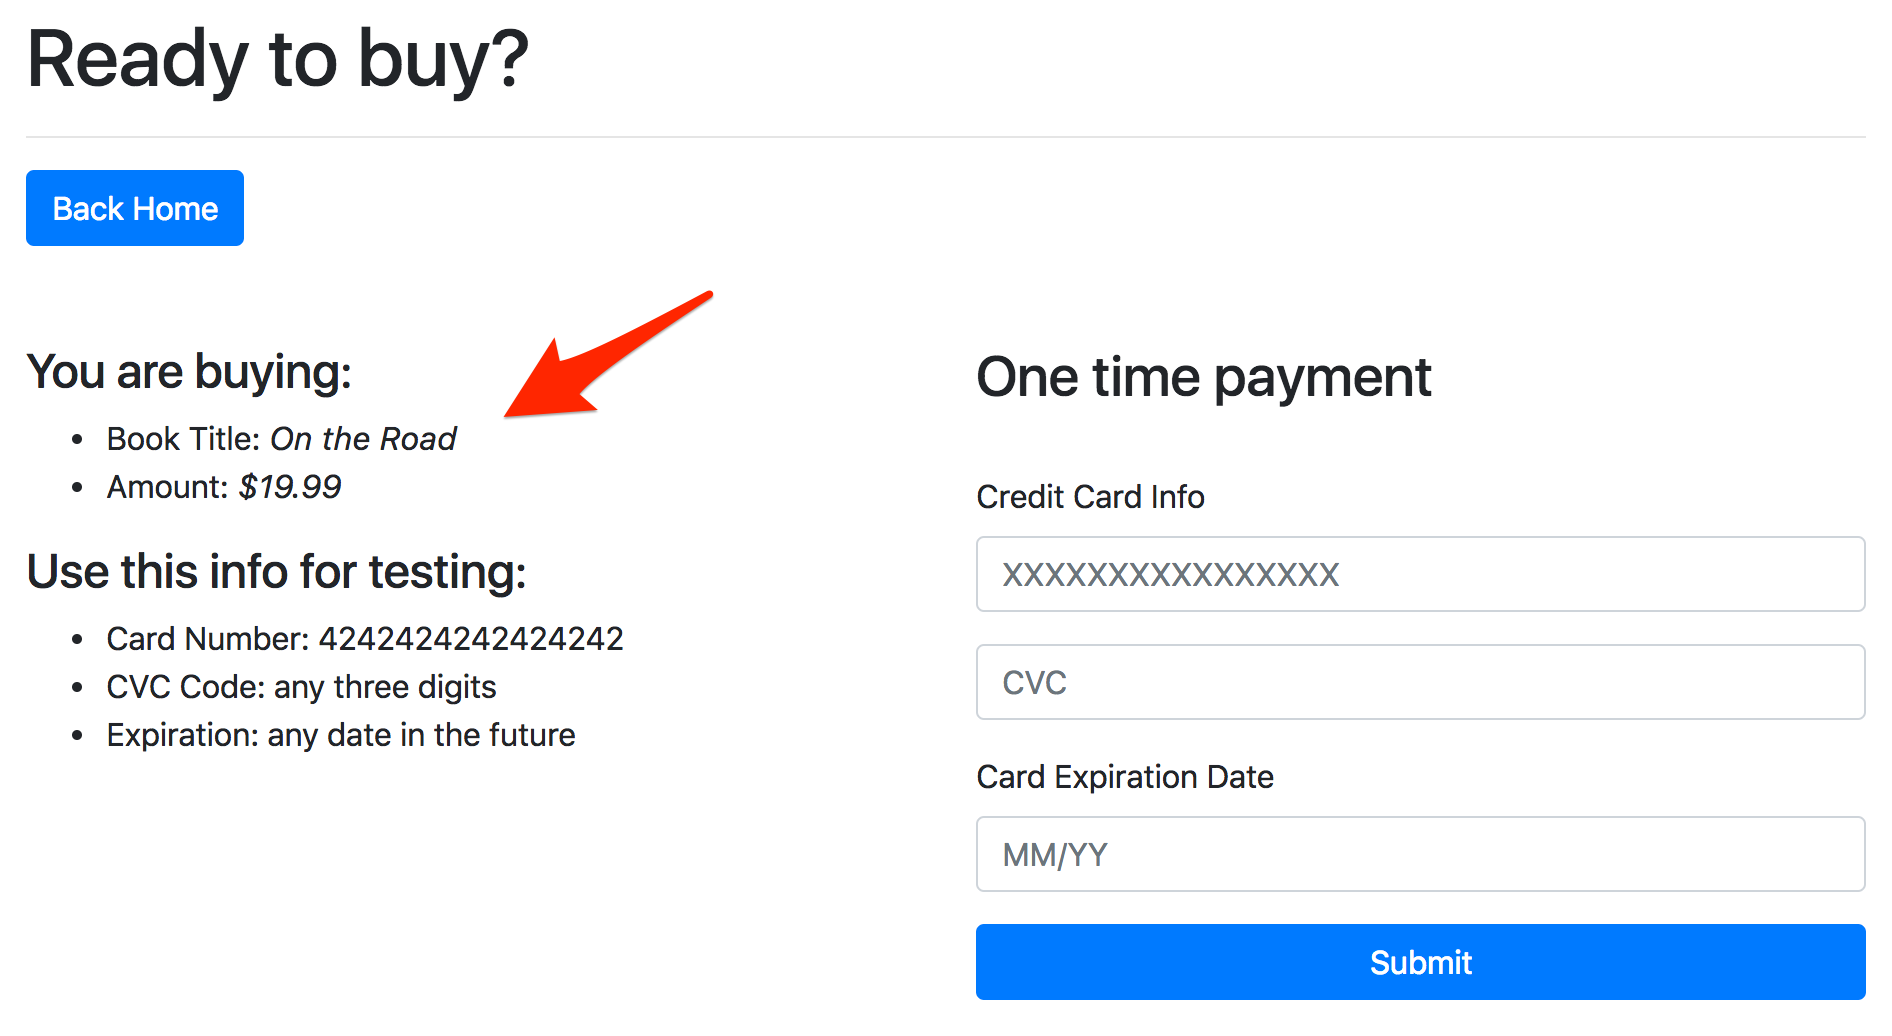
你现在会看到:
表单验证
让我们设置一些基本的表单验证。
使用 v-model 指令去 绑定 表单输入值到属性中:
<form>
  <div class="form-group">
    <label>Credit Card Info</label>
    <input type="text"
           class="form-control"
           placeholder="XXXXXXXXXXXXXXXX"
           v-model="card.number"
           required>
  </div>
  <div class="form-group">
    <input type="text"
           class="form-control"
           placeholder="CVC"
           v-model="card.cvc"
           required>
  </div>
  <div class="form-group">
    <label>Card Expiration Date</label>
    <input type="text"
           class="form-control"
           placeholder="MM/YY"
           v-model="card.exp"
           required>
  </div>
  <button class="btn btn-primary btn-block">Submit</button>
</form>
添加 card 属性,就像这样:
card: {
  number: '',
  cvc: '',
  exp: '',
},
接下来,更新“提交”按钮,以便在单击按钮时忽略正常的浏览器行为,并调用 validate 方法:
<button class="btn btn-primary btn-block" @click.prevent="validate">Submit</button>
将数组添加到属性中以保存验证错误信息:
data() {
  return {
    book: {
      title: '',
      author: '',
      read: [],
      price: '',
    },
    card: {
      number: '',
      cvc: '',
      exp: '',
    },
    errors: [],
  };
},
就添加在表单的下方,我们能够依次显示所有错误:
<div v-show="errors">
  <br>
  <ol class="text-danger">
    <li v-for="(error, index) in errors" :key="index">
      {{ error }}
    </li>
  </ol>
</div>
添加 validate 方法:
validate() {
  this.errors = [];
  let valid = true;
  if (!this.card.number) {
    valid = false;
    this.errors.push('Card Number is required');
  }
  if (!this.card.cvc) {
    valid = false;
    this.errors.push('CVC is required');
  }
  if (!this.card.exp) {
    valid = false;
    this.errors.push('Expiration date is required');
  }
  if (valid) {
    this.createToken();
  }
},
由于所有字段都是必须填入的,而我们只是验证了每一个字段是否都有一个值。Stripe 将会验证下一节你看到的信用卡信息,所以你不必过度验证表单信息。也就是说,只需要保证你自己添加的其他字段通过验证。
最后,添加 createToken 方法:
createToken() {
  // eslint-disable-next-line
  console.log('The form is valid!');
},
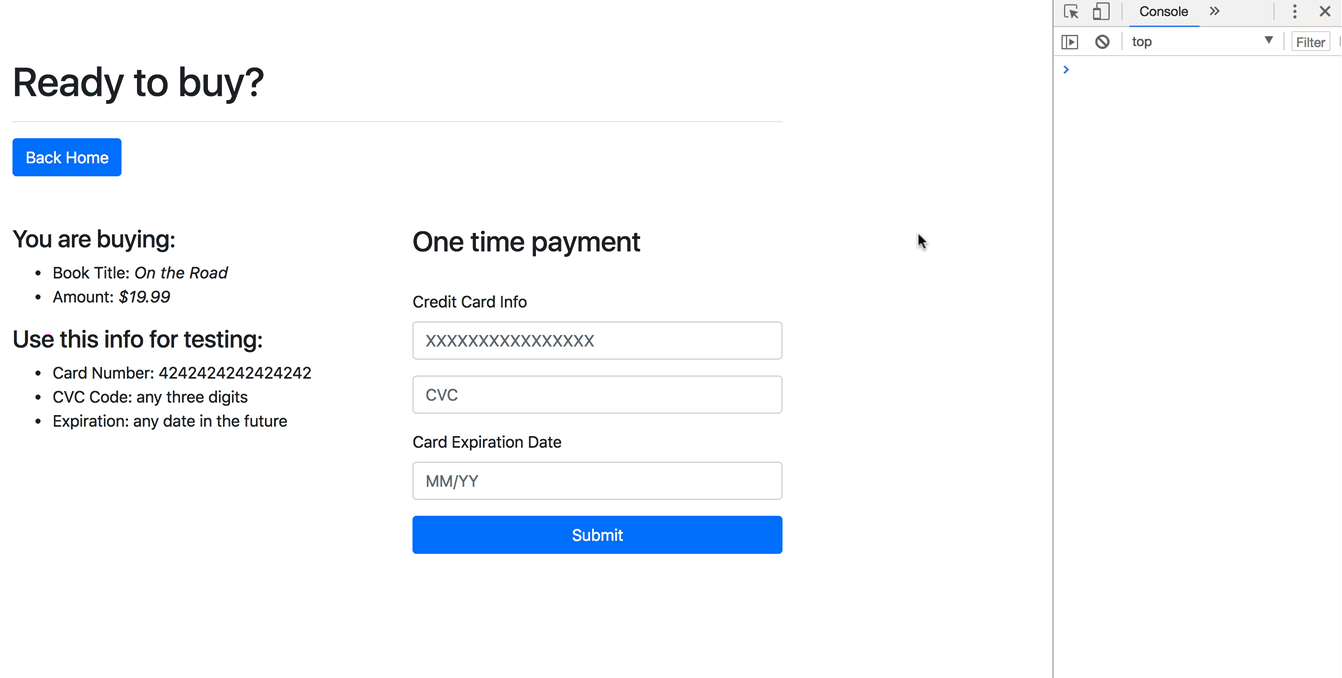
测试一下。
Stripe
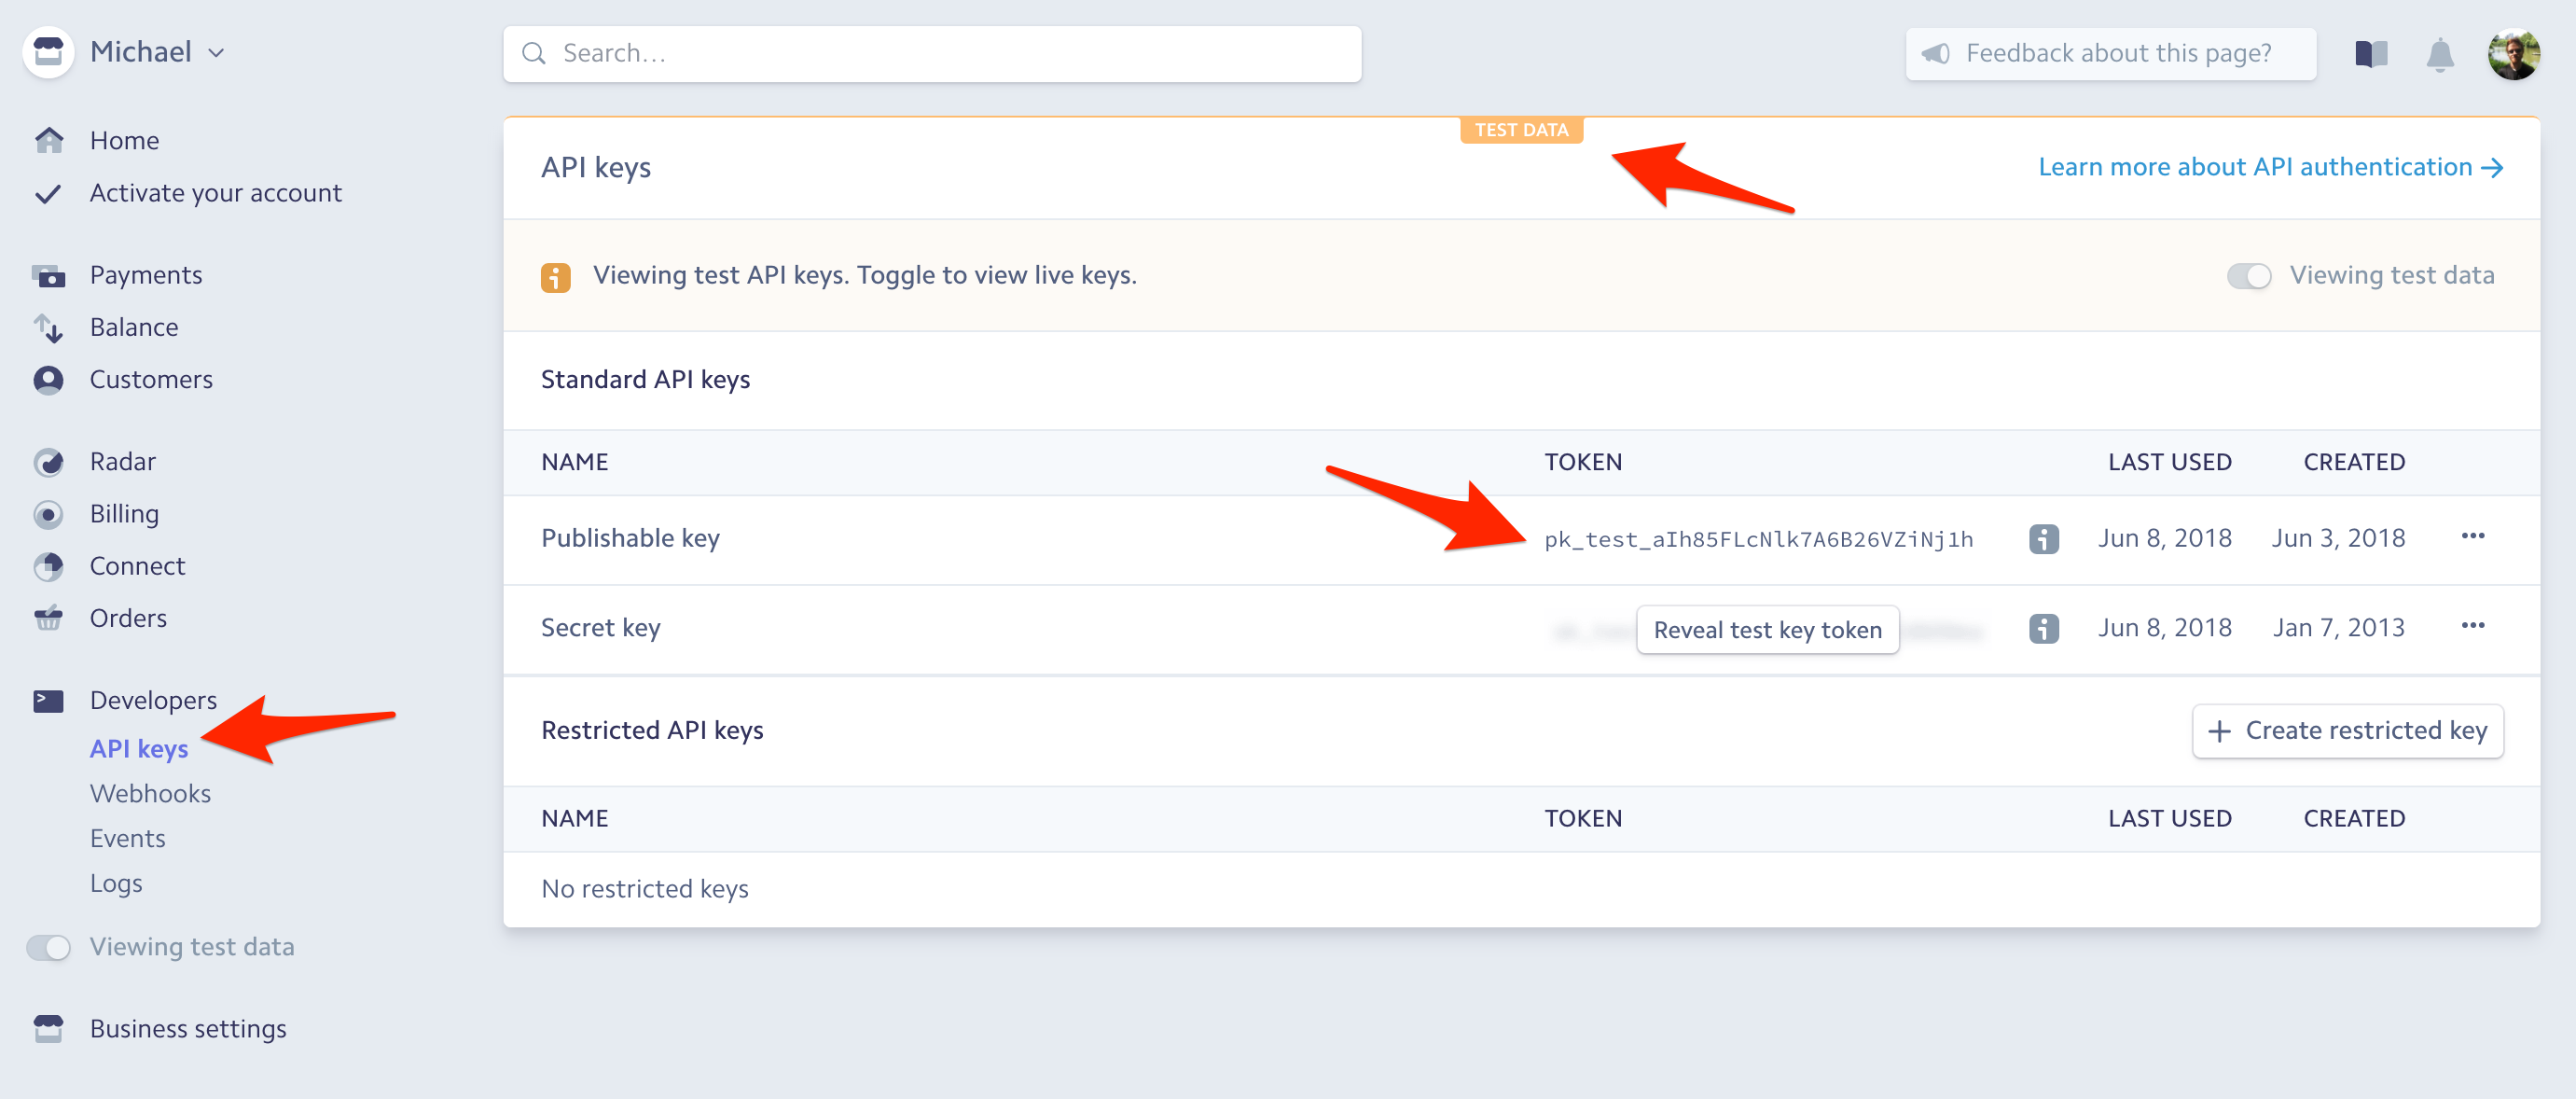
如果你没有 Stripe 账号的话需要先注册一个,然后再去获取你的 测试模式 API Publishable key。
客户端
添加 stripePublishableKey 和 stripeCheck(用来禁用提交按钮)到 data 中:
data() {
  return {
    book: {
      title: '',
      author: '',
      read: [],
      price: '',
    },
    card: {
      number: '',
      cvc: '',
      exp: '',
    },
    errors: [],
    stripePublishableKey: 'pk_test_aIh85FLcNlk7A6B26VZiNj1h',
    stripeCheck: false,
  };
},
确保添加你自己的 Stripe key 到上述代码中。
同样,如果表单有效,触发 createToken 方法(通过 Stripe.js)验证信用卡信息然后返回一个错误信息(如果无效)或者返回一个 token(如果有效):
createToken() {
  this.stripeCheck = true;
  window.Stripe.setPublishableKey(this.stripePublishableKey);
  window.Stripe.createToken(this.card, (status, response) => {
    if (response.error) {
      this.stripeCheck = false;
      this.errors.push(response.error.message);
      // eslint-disable-next-line
      console.error(response);
    } else {
      // pass
    }
  });
},
如果没有错误的话,我们就发送 token 到服务器,在那里我们会完成扣费并把用户转回主页:
createToken() {
  this.stripeCheck = true;
  window.Stripe.setPublishableKey(this.stripePublishableKey);
  window.Stripe.createToken(this.card, (status, response) => {
    if (response.error) {
      this.stripeCheck = false;
      this.errors.push(response.error.message);
      // eslint-disable-next-line
      console.error(response);
    } else {
      const payload = {
        book: this.book,
        token: response.id,
      };
      const path = 'http://localhost:5000/charge';
      axios.post(path, payload)
        .then(() => {
          this.$router.push({ path: '/' });
        })
        .catch((error) => {
          // eslint-disable-next-line
          console.error(error);
        });
    }
  });
},
按照上述代码更新 createToken(),然后添加 Stripe.js 到 client/index.html 中:
<!DOCTYPE html>
<html>
  <head>
    <meta charset="utf-8">
    <meta name="viewport" content="width=device-width,initial-scale=1.0">
    <title>Books!</title>
  </head>
  <body>
    <div id="app"></div>
    <!-- built files will be auto injected -->
    <script type="text/javascript" src="https://js.stripe.com/v2/"></script>
  </body>
</html>
Stripe 支持 v2 和 v3(Stripe Elements)版本的 Stripe.js。如果你对 Stripe Elements 和如何把它集成到 Vue 中感兴趣,参阅以下资源:1. Stripe Elements 迁移指南 2. 集成 Stripe Elements 和 Vue.js 来创建一个自定义付款表单
现在,当 createToken 被触发是,stripeCheck 值被更改为 true,为了防止重复收费,我们在 stripeCheck 值为 true 时禁用“提交”按钮:
<button class="btn btn-primary btn-block"
        @click.prevent="validate"
        :disabled="stripeCheck">
    Submit
</button>
测试一下 Stripe 验证的无效反馈:
- 信用卡卡号
- 安全码
- 有效日期
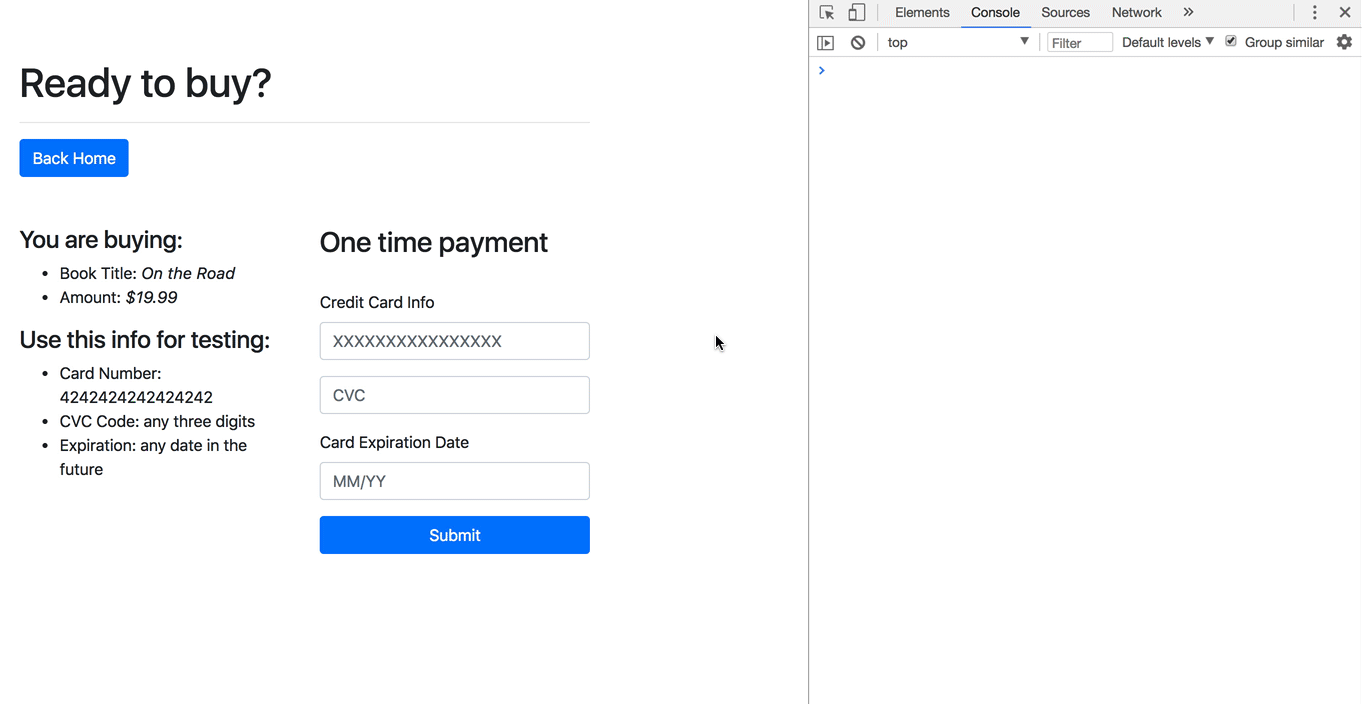
现在,让我们开始设置服务端路由。
服务端
安装 Stripe 库:
$ pip install stripe==1.82.1
添加路由接口:
@app.route('/charge', methods=['POST'])
def create_charge():
    post_data = request.get_json()
    amount = round(float(post_data.get('book')['price']) * 100)
    stripe.api_key = os.environ.get('STRIPE_SECRET_KEY')
    charge = stripe.Charge.create(
        amount=amount,
        currency='usd',
        card=post_data.get('token'),
        description=post_data.get('book')['title']
    )
    response_object = {
        'status': 'success',
        'charge': charge
    }
    return jsonify(response_object), 200
在这里设定书籍价格(转换为美分),专有 token(来自客户端的 createToken 方法),以及书名,然后我们利用 API Secret key 生成一个新的 Stripe 账单。
了解更多创建账单的信息,参考官方 API 文档。
Update the imports:
import os
import uuid

import stripe
from flask import Flask, jsonify, request
from flask_cors import CORS
获取 测试模式 API Secret key:
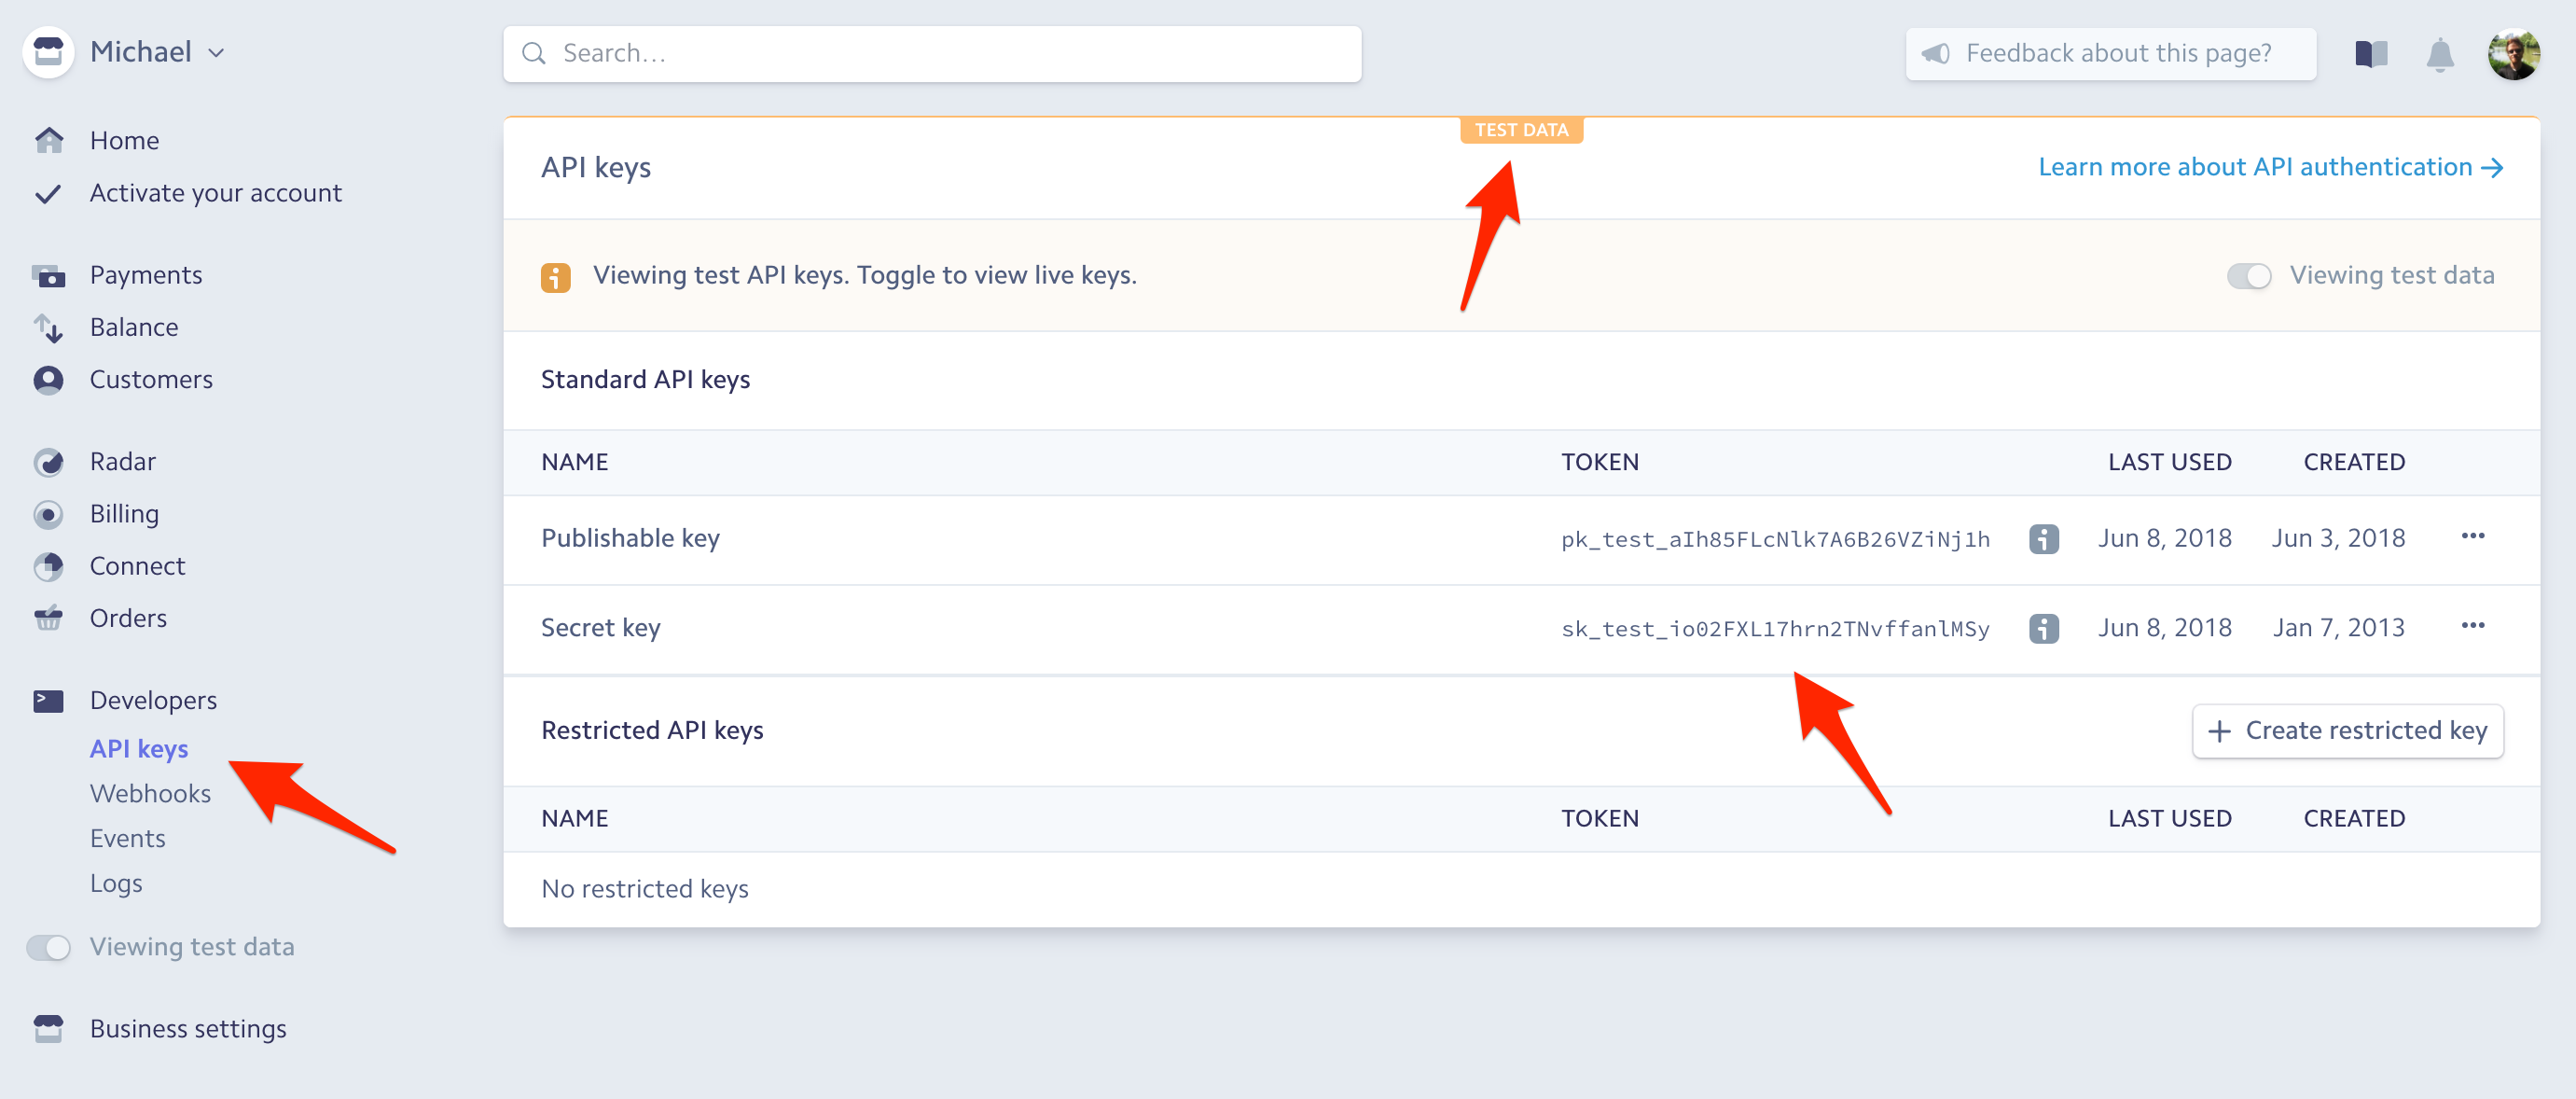
把它设置成一个环境变量:
$ export STRIPE_SECRET_KEY=sk_test_io02FXL17hrn2TNvffanlMSy
确保使用的是你自己的 Stripe key!
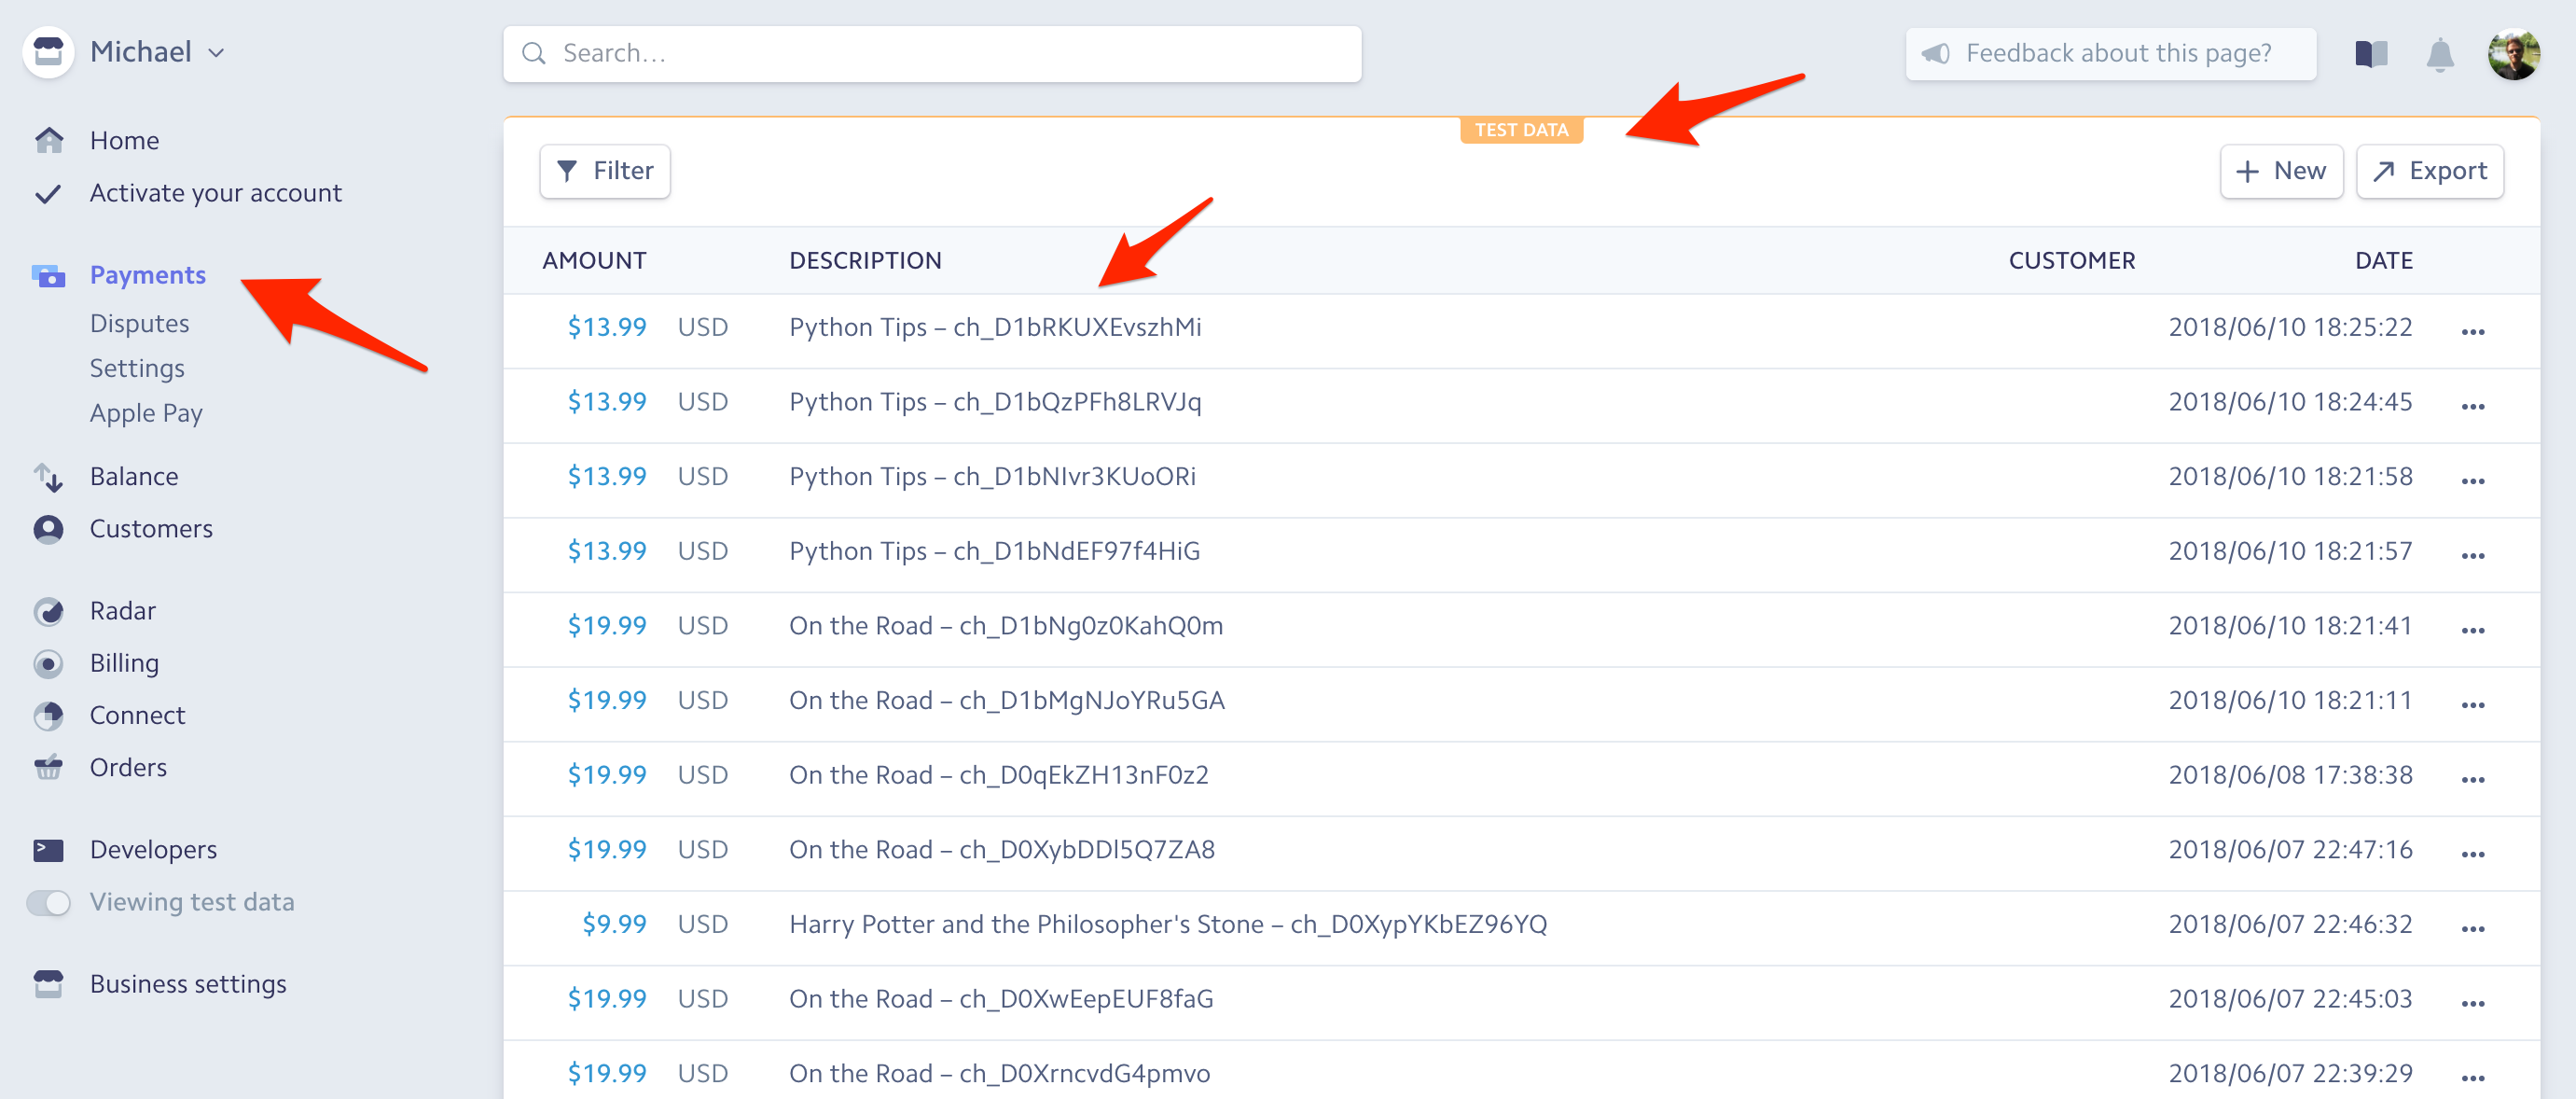
测试一下吧!
在 Stripe Dashboard 中你应该会看到购买记录:
你可能还想创建 顾客,而不仅仅是创建账单。这样一来有诸多优点。你能同时购买多个物品,以便跟踪客户购买记录。你可以向经常购买的用户提供优惠,或者向许久未购买的用户联系,还有许多用处这里就不做介绍了。它还可以用来防止欺诈。参考以下 Flask 项目 来看看如何添加客户。
订单完成页面
比起把买家直接转回主页,我们更应该把他们重定向到一个订单完成页面,以感谢他们的购买。
添加一个叫 OrderComplete.vue 的新组件文件到 “client/src/components” 中:
<template>
  <div class="container">
    <div class="row">
      <div class="col-sm-10">
        <h1>Thanks for purchasing!</h1>
        <hr><br>
        <router-link to="/" class="btn btn-primary btn-sm">Back Home</router-link>
      </div>
    </div>
  </div>
</template>
更新路由:
import Vue from 'vue';
import Router from 'vue-router';
import Ping from '@/components/Ping';
import Books from '@/components/Books';
import Order from '@/components/Order';
import OrderComplete from '@/components/OrderComplete';

Vue.use(Router);

export default new Router({
  routes: [
    {
      path: '/',
      name: 'Books',
      component: Books,
    },
    {
      path: '/order/:id',
      name: 'Order',
      component: Order,
    },
    {
      path: '/complete',
      name: 'OrderComplete',
      component: OrderComplete,
    },
    {
      path: '/ping',
      name: 'Ping',
      component: Ping,
    },
  ],
  mode: 'hash',
});
在 createToken 方法中更新重定向:
createToken() {
  this.stripeCheck = true;
  window.Stripe.setPublishableKey(this.stripePublishableKey);
  window.Stripe.createToken(this.card, (status, response) => {
    if (response.error) {
      this.stripeCheck = false;
      this.errors.push(response.error.message);
      // eslint-disable-next-line
      console.error(response);
    } else {
      const payload = {
        book: this.book,
        token: response.id,
      };
      const path = 'http://localhost:5000/charge';
      axios.post(path, payload)
        .then(() => {
          this.$router.push({ path: '/complete' });
        })
        .catch((error) => {
          // eslint-disable-next-line
          console.error(error);
        });
    }
  });
},

最后,你还可以在订单完成页面显示客户刚刚购买的书籍的(标题,金额,等等)。
获取唯一的账单 ID 然后传递给 path:
createToken() {
  this.stripeCheck = true;
  window.Stripe.setPublishableKey(this.stripePublishableKey);
  window.Stripe.createToken(this.card, (status, response) => {
    if (response.error) {
      this.stripeCheck = false;
      this.errors.push(response.error.message);
      // eslint-disable-next-line
      console.error(response);
    } else {
      const payload = {
        book: this.book,
        token: response.id,
      };
      const path = 'http://localhost:5000/charge';
      axios.post(path, payload)
        .then((res) => {
          // updates
          this.$router.push({ path: `/complete/${res.data.charge.id}` });
        })
        .catch((error) => {
          // eslint-disable-next-line
          console.error(error);
        });
    }
  });
},
更新客户端路由:
{
  path: '/complete/:id',
  name: 'OrderComplete',
  component: OrderComplete,
},
然后,在 OrderComplete.vue 中,从 URL 中获取账单 ID 并发送到服务端:
<script>
import axios from 'axios';

export default {
  data() {
    return {
      book: '',
    };
  },
  methods: {
    getChargeInfo() {
      const path = `http://localhost:5000/charge/${this.$route.params.id}`;
      axios.get(path)
        .then((res) => {
          this.book = res.data.charge.description;
        })
        .catch((error) => {
          // eslint-disable-next-line
          console.error(error);
        });
    },
  },
  created() {
    this.getChargeInfo();
  },
};
</script>
在服务器上配置新路由来 检索 账单:
@app.route('/charge/<charge_id>')
def get_charge(charge_id):
    stripe.api_key = os.environ.get('STRIPE_SECRET_KEY')
    response_object = {
        'status': 'success',
        'charge': stripe.Charge.retrieve(charge_id)
    }
    return jsonify(response_object), 200
最后,在 template 中更新 <h1></h1>:
<h1>Thanks for purchasing - {{ this.book }}!</h1>
最后一次测试。
总结
完成了!一定要从最开始进行阅读。你可以在 GitHub 中的 flask-vue-crud 仓库找到源码。
想挑战更多?
- 添加客户端和服务端的单元和集成测试。
- 创建一个购物车以方便顾客能够一次购买多本书。
- 使用 Postgres 来储存书籍和订单。
- 使用 Docker 整合 Vue 和 Flask(以及 Postgres,如果你加入了的话)来简化开发工作流程。
- 给书籍添加图片来创建一个更好的产品页面。
- 获取 email 然后发送 email 确认邮件(查阅 使用 Flask、Redis Queue 和 Amazon SES 发送确认电子邮件)。
- 部署客户端静态文件到 AWS S3 然后部署服务端应用到一台 EC2 实例。
- 投入生产环境?思考一个最好的更新 Stripe key 的方法,让它们基于环境动态更新。
- 创建一个分离组件来退订。
如果发现译文存在错误或其他需要改进的地方,欢迎到 掘金翻译计划 对译文进行修改并 PR,也可获得相应奖励积分。文章开头的 本文永久链接 即为本文在 GitHub 上的 MarkDown 链接。
掘金翻译计划 是一个翻译优质互联网技术文章的社区,文章来源为 掘金 上的英文分享文章。内容覆盖 Android、iOS、前端、后端、区块链、产品、设计、人工智能等领域,想要查看更多优质译文请持续关注 掘金翻译计划、官方微博、知乎专栏。