

Overlay与OverlayEntry
Overlay是一个Stack的widget,可以将overlay entry插入到overlay中,使独立的child窗口悬浮于其他widget之上。 因为Overlay本身使用的是[Stack]布局,所以overlay entry可以使用[Positioned] 或者 [AnimatedPositioned]在overlay中定位自己的位置。 当我们创建MaterialApp的时候,它会自动创建一个Navigator,然后创建一个Overlay; 然后利用这个Navigator来管理路由中的界面。 就我感觉,有点类似Android中的WindowManager,可以利用addView和removeView方法添加或删除View到界面中。
Overlay的使用方法
主要就是两个方法,往Overlay中插入entry,删除Overlay中的entry。
//创建OverlayEntry
Overlay entry=new OverlayEntry(builder:(){/*在这里创建对应的widget*/});
//往Overlay中插入插入OverlayEntry
Overlay.of(context).insert(overlayEntry);
//调用entry自身的remove()方法,从所在的overlay中移除自己
entry.remove();
Overlay的使用场景
要将某个widget悬浮到页面顶部,就可以利用Overlay来实现。挺多场景都会用到,比如下面的例子。
自定义Toast
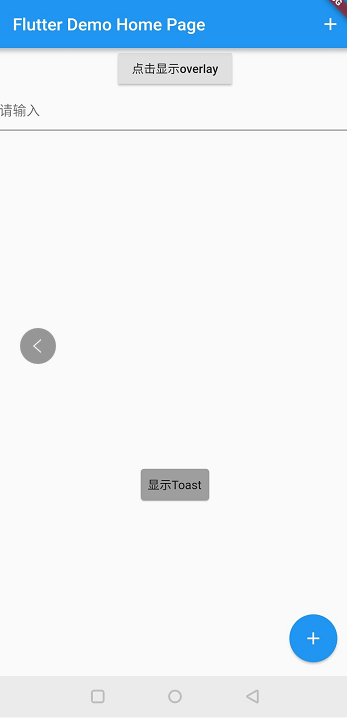
/**
 * 利用overlay实现Toast
 */
class Toast {
  static void show({@required BuildContext context, @required String message}) {
    //创建一个OverlayEntry对象
    OverlayEntry overlayEntry = new OverlayEntry(builder: (context) {
    //外层使用Positioned进行定位,控制在Overlay中的位置
      return new Positioned(
          top: MediaQuery.of(context).size.height * 0.7,
          child: new Material(
            child: new Container(
              width: MediaQuery.of(context).size.width,
              alignment: Alignment.center,
              child: new Center(
                child: new Card(
                  child: new Padding(
                    padding: EdgeInsets.all(8),
                    child: new Text(message),
                  ),
                  color: Colors.grey,
                ),
              ),
            ),
          ));
    });
    //往Overlay中插入插入OverlayEntry
    Overlay.of(context).insert(overlayEntry);
    //两秒后,移除Toast
    new Future.delayed(Duration(seconds: 2)).then((value) {
      overlayEntry.remove();
    });
  }
}
类似PopupWindow的弹窗效果
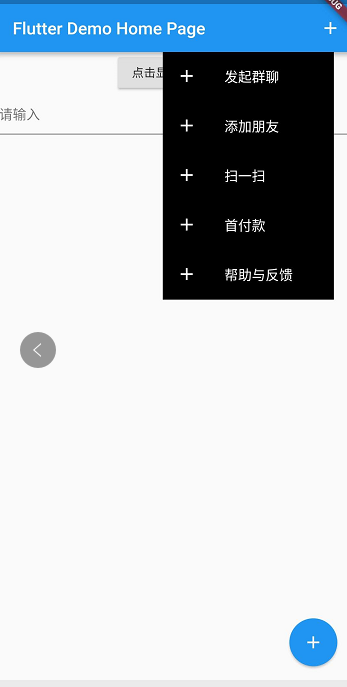
比如实现微信首页右上角,点击“+”后的显示的弹窗效果。
(TODO:如何监听某个widget的焦点变化,我知道textform可以用focusNode来监听焦点变化,那其他widget如何监听焦点变化呢?)
/**
   * 展示微信下拉的弹窗
   */
  void showWeixinButtonView() {
    weixinOverlayEntry = new OverlayEntry(builder: (context) {
      return new Positioned(
          top: kToolbarHeight,
          right: 20,
          width: 200,
          height: 320,
          child: new SafeArea(
              child: new Material(
            child: new Container(
              color: Colors.black,
              child: new Column(
                children: <Widget>[
                  Expanded(
                    child: new ListTile(
                      leading: Icon(
                        Icons.add,
                        color: Colors.white,
                      ),
                      title: new Text(
                        "发起群聊",
                        style: TextStyle(color: Colors.white),
                      ),
                    ),
                  ),
                  Expanded(
                    child: new ListTile(
                      leading: Icon(Icons.add, color: Colors.white),
                      title: new Text("添加朋友",
                          style: TextStyle(color: Colors.white)),
                    ),
                  ),
                  Expanded(
                    child: new ListTile(
                      leading: Icon(Icons.add, color: Colors.white),
                      title: new Text("扫一扫",
                          style: TextStyle(color: Colors.white)),
                    ),
                  ),
                  Expanded(
                    child: new ListTile(
                      leading: Icon(Icons.add, color: Colors.white),
                      title: new Text("首付款",
                          style: TextStyle(color: Colors.white)),
                    ),
                  ),
                  Expanded(
                    child: new ListTile(
                      leading: Icon(Icons.add, color: Colors.white),
                      title: new Text("帮助与反馈",
                          style: TextStyle(color: Colors.white)),
                    ),
                  ),
                ],
              ),
            ),
          )));
    });
    Overlay.of(context).insert(weixinOverlayEntry);
  }
}
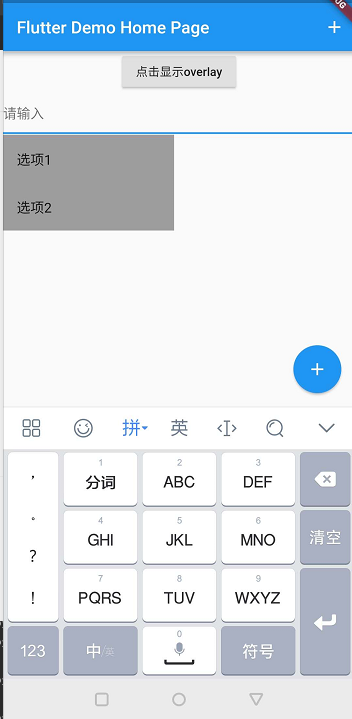
比如,在某个TextForm获得焦点的时候,在TextForm下方显示一个listview的选择项
 FocusNode focusNode = new FocusNode();
  OverlayEntry overlayEntry;

  LayerLink layerLink = new LayerLink();

  @override
  void initState() {
    super.initState();
    focusNode.addListener(() {
      if (focusNode.hasFocus) {
        overlayEntry = createSelectPopupWindow();
        Overlay.of(context).insert(overlayEntry);
      } else {
        overlayEntry.remove();
      }
    });
  }


  /**
     * 利用Overlay实现PopupWindow效果,悬浮的widget
     * 利用CompositedTransformFollower和CompositedTransformTarget
     */
    OverlayEntry createSelectPopupWindow() {
      OverlayEntry overlayEntry = new OverlayEntry(builder: (context) {
        return new Positioned(
          width: 200,
          child: new CompositedTransformFollower(
            offset: Offset(0.0, 50),
            link: layerLink,
            child: new Material(
              child: new Container(
                  color: Colors.grey,
                  child: new Column(
                    children: <Widget>[
                      new ListTile(
                        title: new Text("选项1"),
                        onTap: () {
                          Toast.show(context: context, message: "选择了选项1");
                          focusNode.unfocus();
                        },
                      ),
                      new ListTile(
                          title: new Text("选项2"),
                          onTap: () {
                            Toast.show(context: context, message: "选择了选项1");
                            focusNode.unfocus();
                          }),
                    ],
                  )),
            ),
          ),
        );
      });
      return overlayEntry;
    }
代码地址
Overlay的源码(涉及Render方面的暂时没理解,就没翻译了)
//源文件:overlay.dart

import 'dart:async';
import 'dart:collection';

import 'package:flutter/foundation.dart';
import 'package:flutter/rendering.dart';
import 'package:flutter/scheduler.dart';

import 'basic.dart';
import 'debug.dart';
import 'framework.dart';
import 'ticker_provider.dart';

/// [Overlay]中的任意位置都可以包含一个widget。因为Overlay本身使用的是[Stack]布局,所以overlay entry
/// 可以使用[Positioned] 或者 [AnimatedPositioned]在overlay中定位自己的位置。
///
/// Overlay entries 使用[OverlayState.insert] or [OverlayState.insertAll]方法就可以插入到
/// [Overlay]中。可以使用[Overlay.of]方法和利用所给的[BuildContext] 去找到最近的overlay实例并拿到OverlayState对象
///
///一个overlay entry在同一个时间只能被插入到最多一个overlay中。可以调用overlay entry自身的[remove]方法,去移除它所在的overlay
///
///
/// For example, [Draggable] uses an [OverlayEntry] to show the drag avatar that
/// follows the user's finger across the screen after the drag begins. Using the
/// overlay to display the drag avatar lets the avatar float over the other
/// widgets in the app. As the user's finger moves, draggable calls
/// [markNeedsBuild] on the overlay entry to cause it to rebuild. It its build,
/// the entry includes a [Positioned] with its top and left property set to
/// position the drag avatar near the user's finger. When the drag is over,
/// [Draggable] removes the entry from the overlay to remove the drag avatar
/// from view.
///
/// By default, if there is an entirely [opaque] entry over this one, then this
/// one will not be included in the widget tree (in particular, stateful widgets
/// within the overlay entry will not be instantiated). To ensure that your
/// overlay entry is still built even if it is not visible, set [maintainState]
/// to true. This is more expensive, so should be done with care. In particular,
/// if widgets in an overlay entry with [maintainState] set to true repeatedly
/// call [State.setState], the user's battery will be drained unnecessarily.

class OverlayEntry {
  /// OverlayEntry的构造方法,
  ///
  /// 为了将overlay entry插入到 [Overlay]中, 首先是使用[Overlay.of]方法去拿到OverlayState对象,
  /// 然后再调用[OverlayState.insert]将overlay entry插入到overlay中。
  /// 调用overlay entry自身的[remove]方法,去移除它所在的overlay
  OverlayEntry({
    @required this.builder,
    bool opaque = false,
    bool maintainState = false,
  }) : assert(builder != null),
       assert(opaque != null),
       assert(maintainState != null),
       _opaque = opaque,
       _maintainState = maintainState;


  /// 通过builder进行创建对应的widget,并显示在overlay中的对应位置
  /// 如果想再次调用这个builder方法,需要调用overlay entry自身的[markNeedsBuild]方法
  final WidgetBuilder builder;

  /// Whether this entry occludes the entire overlay.
  ///
  /// If an entry claims to be opaque, then, for efficiency, the overlay will
  /// skip building entries below that entry unless they have [maintainState]
  /// set.
  bool get opaque => _opaque;
  bool _opaque;
  set opaque(bool value) {
    if (_opaque == value)
      return;
    _opaque = value;
    assert(_overlay != null);
    _overlay._didChangeEntryOpacity();
  }

  /// Whether this entry must be included in the tree even if there is a fully
  /// [opaque] entry above it.
  ///
  /// By default, if there is an entirely [opaque] entry over this one, then this
  /// one will not be included in the widget tree (in particular, stateful widgets
  /// within the overlay entry will not be instantiated). To ensure that your
  /// overlay entry is still built even if it is not visible, set [maintainState]
  /// to true. This is more expensive, so should be done with care. In particular,
  /// if widgets in an overlay entry with [maintainState] set to true repeatedly
  /// call [State.setState], the user's battery will be drained unnecessarily.
  ///
  /// 这个字段,是给[Navigator]和[Route]使用的,确保路由即使在后台也能维持状态。
  bool get maintainState => _maintainState;
  bool _maintainState;
  set maintainState(bool value) {
    assert(_maintainState != null);
    if (_maintainState == value)
      return;
    _maintainState = value;
    assert(_overlay != null);
    _overlay._didChangeEntryOpacity();
  }

  OverlayState _overlay;
  final GlobalKey<_OverlayEntryState> _key = GlobalKey<_OverlayEntryState>();

  /// 从overlay中移除overlay entry.
  /// 这个方法只能被调用一次
  void remove() {
    assert(_overlay != null);
    final OverlayState overlay = _overlay;
    _overlay = null;
    if (SchedulerBinding.instance.schedulerPhase == SchedulerPhase.persistentCallbacks) {
      SchedulerBinding.instance.addPostFrameCallback((Duration duration) {
        overlay._remove(this);
      });
    } else {
      overlay._remove(this);
    }
  }


  /// 需要在[builder]所创建的widget发生变化的时候,调用这个方法,会导致entry在下一次管道刷新期间进行rebuild操作。
  void markNeedsBuild() {
    _key.currentState?._markNeedsBuild();
  }

  @override
  String toString() => '${describeIdentity(this)}(opaque: $opaque; maintainState: $maintainState)';
}

class _OverlayEntry extends StatefulWidget {
  _OverlayEntry(this.entry)
    : assert(entry != null),
      super(key: entry._key);

  final OverlayEntry entry;

  @override
  _OverlayEntryState createState() => _OverlayEntryState();
}

class _OverlayEntryState extends State<_OverlayEntry> {
  @override
  Widget build(BuildContext context) {
    return widget.entry.builder(context);
  }

  void _markNeedsBuild() {
    setState(() { /* the state that changed is in the builder */ });
  }
}

/// A [Stack] of entries that can be managed independently.
/// Overlay是一个[Stack]布局,可以独立管理存放在它里面的overlay entry。
///
/// 通过将entry插入到overlay的[Stack]中,Overlay可以让child widget悬浮于其他可视化的widgets上面。
/// 虽然你可以直接创建一个[Overlay],但是最常见的用法,是在[WidgetsApp]或者[MaterialApp]中使用由Navigator创建的overlay对象就行。
/// Navigator的原理,是使用它的overlay来管理路由中的可视化界面。
class Overlay extends StatefulWidget {
  /// Overlay的构造方法.
  ///
  /// 在与它所关联的[OverlayState]被初始化后,initialEntries被插入到overlay中。
  /// 与其自己创建一个overlay,比如考虑直接使用由[WidgetsApp]或者 [MaterialApp]为应用程序所创建的overlay就行。
  const Overlay({
    Key key,
    this.initialEntries = const <OverlayEntry>[]
  }) : assert(initialEntries != null),
       super(key: key);

  /// 这些entries是overlay初始化的时候,被会插入到overlay中的entry.
  /// 插入方法和删除方法,跟上面讲的是一样的。
  /// 使用[Overlay.of]方法去拿到OverlayState对象,
  /// 然后再调用[OverlayState.insert]将overlay entry插入到overlay中。
  /// 调用overlay entry自身的[remove]方法,去移除它所在的overlay
  final List<OverlayEntry> initialEntries;

  /// The state from the closest instance of this class that encloses the given context.
  /// 通过所传的context上下文对象,利用context.ancestorStateOfType方法,返回与给定state类型匹配的最接近的祖先小部件State对象
  /// 这个其实是InheritedWidget的原理,利用context.ancestorStateOfType方法,找到应用程序中的OverlayState祖先对象。
  /// 使用方法:
  /// ```dart
  /// OverlayState overlay = Overlay.of(context);
  /// ```
  static OverlayState of(BuildContext context, { Widget debugRequiredFor }) {
    final OverlayState result = context.ancestorStateOfType(const TypeMatcher<OverlayState>());
    assert(() {
      if (debugRequiredFor != null && result == null) {
        final String additional = context.widget != debugRequiredFor
          ? '\nThe context from which that widget was searching for an overlay was:\n  $context'
          : '';
        throw FlutterError(
          'No Overlay widget found.\n'
          '${debugRequiredFor.runtimeType} widgets require an Overlay widget ancestor for correct operation.\n'
          'The most common way to add an Overlay to an application is to include a MaterialApp or Navigator widget in the runApp() call.\n'
          'The specific widget that failed to find an overlay was:\n'
          '  $debugRequiredFor'
          '$additional'
        );
      }
      return true;
    }());
    return result;
  }

  @override
  OverlayState createState() => OverlayState();
}

/// [Overlay]当前的State对象
/// 可以用来插入overlay entry到overlay中
class OverlayState extends State<Overlay> with TickerProviderStateMixin {
  final List<OverlayEntry> _entries = <OverlayEntry>[];

  @override
  void initState() {
    super.initState();
    insertAll(widget.initialEntries);
  }

  /// 把给定的entry插入到overlay中
  /// 如果[above]不为空,则entry会被插入到[above]上面。默认,一般是直接插入到最顶部。
  void insert(OverlayEntry entry, { OverlayEntry above }) {
    assert(entry._overlay == null);
    assert(above == null || (above._overlay == this && _entries.contains(above)));
    entry._overlay = this;
    setState(() {
      final int index = above == null ? _entries.length : _entries.indexOf(above) + 1;
      _entries.insert(index, entry);
    });
  }

  /// 把多个entry插入到overlay中
  void insertAll(Iterable<OverlayEntry> entries, { OverlayEntry above }) {
    assert(above == null || (above._overlay == this && _entries.contains(above)));
    if (entries.isEmpty)
      return;
    for (OverlayEntry entry in entries) {
      assert(entry._overlay == null);
      entry._overlay = this;
    }
    setState(() {
      final int index = above == null ? _entries.length : _entries.indexOf(above) + 1;
      _entries.insertAll(index, entries);
    });
  }

  void _remove(OverlayEntry entry) {
    if (mounted) {
      _entries.remove(entry);
      setState(() { /* entry was removed */ });
    }
  }

  /// (DEBUG ONLY) Check whether a given entry is visible (i.e., not behind an
  /// opaque entry).
  ///
  /// This is an O(N) algorithm, and should not be necessary except for debug
  /// asserts. To avoid people depending on it, this function is implemented
  /// only in checked mode.
  bool debugIsVisible(OverlayEntry entry) {
    bool result = false;
    assert(_entries.contains(entry));
    assert(() {
      for (int i = _entries.length - 1; i > 0; i -= 1) {
        final OverlayEntry candidate = _entries[i];
        if (candidate == entry) {
          result = true;
          break;
        }
        if (candidate.opaque)
          break;
      }
      return true;
    }());
    return result;
  }

  void _didChangeEntryOpacity() {
    setState(() {
      // We use the opacity of the entry in our build function, which means we
      // our state has changed.
    });
  }

  @override
  Widget build(BuildContext context) {
    // These lists are filled backwards. For the offstage children that
    // does not matter since they aren't rendered, but for the onstage
    // children we reverse the list below before adding it to the tree.
    final List<Widget> onstageChildren = <Widget>[];
    final List<Widget> offstageChildren = <Widget>[];
    bool onstage = true;
    for (int i = _entries.length - 1; i >= 0; i -= 1) {
      final OverlayEntry entry = _entries[i];
      if (onstage) {
        onstageChildren.add(_OverlayEntry(entry));
        if (entry.opaque)
          onstage = false;
      } else if (entry.maintainState) {
        offstageChildren.add(TickerMode(enabled: false, child: _OverlayEntry(entry)));
      }
    }
    return _Theatre(
      onstage: Stack(
        fit: StackFit.expand,
        children: onstageChildren.reversed.toList(growable: false),
      ),
      offstage: offstageChildren,
    );
  }

  @override
  void debugFillProperties(DiagnosticPropertiesBuilder properties) {
    super.debugFillProperties(properties);
    // TODO(jacobr): use IterableProperty instead as that would
    // provide a slightly more consistent string summary of the List.
    properties.add(DiagnosticsProperty<List<OverlayEntry>>('entries', _entries));
  }
}
