

前言
在本系列的第一部分和第二部分中,我们介绍了 MotionLayout,并给出了各种示例:
- basic motion
- swipe handling
- custom attribute interpolation
- keyframes
第一部分和第二部分概述了 MotionLayout 中引入的基本概念。
现在将介绍如何在现有应用程序中使用 MotionLayout,并将其集成到现有布局(如 CoordinatorLayout,DrawerLayout或ViewPager)中。
配合 CoordinatorLayout 使用
(注意,MotionLayout 可以用来实现类似于 CoordinatorLayout的行为。我们将在下一篇文章中展示这些例子)
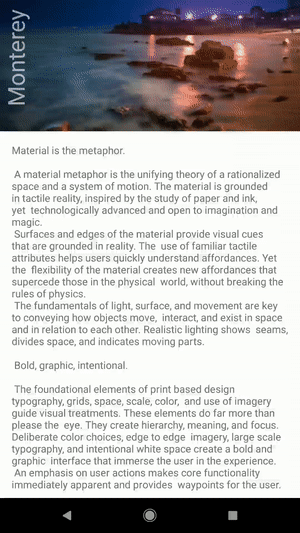
利用 MotionLayout 的一个简单方法让屏幕中的部分内容做指定动画。通过这种方式,你可以向应用程序中的现有布局添加更多有趣的运动,而不必从头开始。
例如,你想要的效果可能如下:
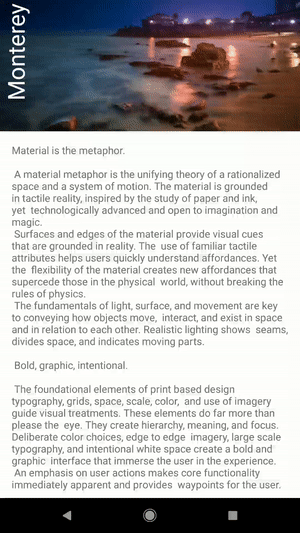
这里的基本思路是用 MotionLayout 替换 AppBarLayout 中的 Toolbar 元素。然后让 CoordinatorLayout 驱动动画进度。
由于你可以通过调用setProgress()来控制 MotionLayout 的过渡进度,因此我们可以创建一个简单的子类,通过监听 AppBarLayout 偏移量来跟踪改变:
package com.google.androidstudio.motionlayoutexample.utils

import android.content.Context
import android.support.constraint.motion.MotionLayout
import android.support.design.widget.AppBarLayout
import android.util.AttributeSet

class CollapsibleToolbar @JvmOverloads constructor(
        context: Context, attrs: AttributeSet? = null, defStyleAttr: Int = 0
) : MotionLayout(context, attrs, defStyleAttr), AppBarLayout.OnOffsetChangedListener {

    override fun onOffsetChanged(appBarLayout: AppBarLayout?, verticalOffset: Int) {
        progress = -verticalOffset / appBarLayout?.totalScrollRange?.toFloat()!!
    }

    override fun onAttachedToWindow() {
        super.onAttachedToWindow()
        (parent as? AppBarLayout)?.addOnOffsetChangedListener(this)
    }
}
然后用这个子类代替 CoordinatorLayout XML 文件中的 Toolbar。
<?xml version="1.0" encoding="utf-8"?>
<android.support.design.widget.CoordinatorLayout xmlns:android="http://schemas.android.com/apk/res/android"
    xmlns:app="http://schemas.android.com/apk/res-auto"
    xmlns:tools="http://schemas.android.com/tools"
    android:id="@+id/content"
    android:layout_width="match_parent"
    android:layout_height="match_parent"
    android:fitsSystemWindows="false"
    android:background="@color/contentBackground">

    <android.support.design.widget.AppBarLayout
        android:id="@+id/app_bar"
        android:layout_width="match_parent"
        android:layout_height="@dimen/app_bar_height"
        android:theme="@style/AppTheme.AppBarOverlay">

        <include layout="@layout/motion_09_coordinatorlayout_header"/>

    </android.support.design.widget.AppBarLayout>

    <include layout="@layout/content_scrolling" />

</android.support.design.widget.CoordinatorLayout>
接下来唯一要做的就是创建一个包含了我们想要动画的控件的 MotionLayout 文件。这里我们有一个 作为背景的 ImageView 和一个 TextView:
<?xml version="1.0" encoding="utf-8"?>
<com.google.androidstudio.motionlayoutexample.utils.CollapsibleToolbar
    xmlns:android="http://schemas.android.com/apk/res/android"
    xmlns:tools="http://schemas.android.com/tools"
    xmlns:app="http://schemas.android.com/apk/res-auto"
    android:id="@+id/motionLayout"
    app:layoutDescription="@xml/scene_09"
    android:layout_width="match_parent"
    android:layout_height="match_parent"
    android:minHeight="50dp"
    android:fitsSystemWindows="false"
    app:layout_scrollFlags="scroll|enterAlways|snap|exitUntilCollapsed">

    <ImageView
        android:id="@+id/background"
        android:layout_width="match_parent"
        android:layout_height="200dp"
        android:background="@color/colorAccent"
        android:scaleType="centerCrop"
        android:src="@drawable/monterey"/>

    <TextView
        android:id="@+id/label"
        android:layout_width="wrap_content"
        android:layout_height="wrap_content"
        android:transformPivotX="0dp"
        android:transformPivotY="0dp"
        android:text="Monterey"
        android:textColor="#FFF"
        android:textSize="32dp" />

</com.google.androidstudio.motionlayoutexample.utils.CollapsibleToolbar>
最后在 MotionScene 中定义它的动画效果:
<?xml version="1.0" encoding="utf-8"?>
<MotionScene
    xmlns:android="http://schemas.android.com/apk/res/android"
    xmlns:motion="http://schemas.android.com/apk/res-auto">

    <Transition
        motion:constraintSetStart="@+id/start"
        motion:constraintSetEnd="@+id/end" />

    <ConstraintSet android:id="@+id/start">
        <Constraint
            android:id="@+id/background"
            android:layout_width="match_parent"
            android:layout_height="match_parent"
            android:alpha="1.0"
            motion:layout_constraintBottom_toBottomOf="parent"/>
        <Constraint
            android:id="@+id/label"
            android:layout_width="wrap_content"
            android:layout_height="wrap_content"
            android:rotation="-90.0"
            motion:layout_constraintBottom_toBottomOf="@+id/background"
            motion:layout_constraintStart_toStartOf="parent"/>
    </ConstraintSet>

    <ConstraintSet android:id="@+id/end">
        <Constraint
            android:id="@+id/background"
            android:layout_width="match_parent"
            android:layout_height="match_parent"
            android:alpha="0.2"
            motion:layout_constraintBottom_toBottomOf="parent"/>
        <Constraint
            android:id="@+id/label"
            android:layout_width="wrap_content"
            android:layout_height="wrap_content"
            android:layout_marginStart="8dp"
            android:layout_marginBottom="8dp"
            android:rotation="0.0"
            motion:layout_constraintBottom_toBottomOf="@+id/background"
            motion:layout_constraintStart_toStartOf="parent" />
    </ConstraintSet>
</MotionScene>
配合 DrawerLayout 使用
DrawerLayout 是另一个 Android framework 中的类,用于打开一个侧边栏。
相比通常的菜单,我们可能希望来一些更有趣的东西:
和把 MotionLayout 整合到 CoordinatorLayout 中类似,我们需要创建一个设置 MotionLayout 进度的子类:
package com.google.androidstudio.motionlayoutexample.utils

import android.content.Context
import android.support.constraint.motion.MotionLayout
import android.support.v4.widget.DrawerLayout
import android.util.AttributeSet
import android.view.View

class DrawerContent @JvmOverloads constructor(
        context: Context, attrs: AttributeSet? = null, defStyleAttr: Int = 0
) : MotionLayout(context, attrs, defStyleAttr), DrawerLayout.DrawerListener {
    override fun onDrawerStateChanged(newState: Int) {
    }

    override fun onDrawerSlide(drawerView: View, slideOffset: Float) {
        progress = slideOffset
    }

    override fun onDrawerClosed(drawerView: View) {
    }

    override fun onDrawerOpened(drawerView: View) {
    }

    override fun onAttachedToWindow() {
        super.onAttachedToWindow()
        (parent as? DrawerLayout)?.addDrawerListener(this)
    }
}
这个子类将通过onDrawerSlide() 回调来跟踪过渡进度。
使用这个子类,我们可以很容易地在DrawerLayout中集成MotionLayout:
<?xml version="1.0" encoding="utf-8"?>
<android.support.v4.widget.DrawerLayout
    xmlns:android="http://schemas.android.com/apk/res/android"
    android:layout_width="match_parent"
    android:layout_height="match_parent"
    xmlns:app="http://schemas.android.com/apk/res-auto"
    android:id="@+id/motionLayout"
    android:background="@color/colorPrimaryDark">

    <include layout="@layout/motion_12_drawerlayout_content"/>

    <include layout="@layout/motion_13_drawerlayout_menu"/>

</android.support.v4.widget.DrawerLayout>
这个 xml 文件像我们前面 CoordinatorLayout 例子一样,包含了几个简单控件。
下面是一个使用了 MotionLayout 的菜单文件 (menu file):
<?xml version="1.0" encoding="utf-8"?>
<com.google.androidstudio.motionlayoutexample.utils.DrawerContent
    xmlns:android="http://schemas.android.com/apk/res/android"
    xmlns:app="http://schemas.android.com/apk/res-auto"
    xmlns:tools="http://schemas.android.com/tools"
    android:id="@+id/menu"
    android:layout_width="180dp"
    android:layout_height="match_parent"
    android:layout_gravity="start"
    app:layoutDescription="@xml/scene_13_menu"
    android:background="@color/colorPrimaryDark">

    <TextView
        android:id="@+id/textView"
        android:layout_width="wrap_content"
        android:layout_height="wrap_content"
        android:layout_marginTop="32dp"
        android:text="Monterey"
        android:textSize="20sp"
        android:textStyle="italic"
        android:typeface="serif"
        android:textColor="#FFF"
        app:layout_constraintBottom_toTopOf="@+id/textView3"
        app:layout_constraintEnd_toEndOf="parent"
        app:layout_constraintHorizontal_bias="0.5"
        app:layout_constraintStart_toStartOf="parent"
        app:layout_constraintTop_toTopOf="parent"
        app:layout_constraintVertical_bias="0.0"
        app:layout_constraintVertical_chainStyle="packed" />

    <TextView
        android:id="@+id/textView2"
        android:layout_width="wrap_content"
        android:layout_height="wrap_content"
        android:layout_marginTop="16dp"
        android:text="Information"
        app:fontFamily="sans-serif-smallcaps"
        android:textColor="#FFF"
        app:layout_constraintBottom_toTopOf="@+id/textView4"
        app:layout_constraintEnd_toEndOf="parent"
        app:layout_constraintHorizontal_bias="0.5"
        app:layout_constraintStart_toStartOf="parent"
        app:layout_constraintTop_toBottomOf="@+id/view" />

    <TextView
        android:id="@+id/textView4"
        android:layout_width="wrap_content"
        android:layout_height="wrap_content"
        android:layout_marginTop="16dp"
        android:text="Directions"
        app:fontFamily="sans-serif-smallcaps"
        android:textColor="#FFF"
        app:layout_constraintBottom_toTopOf="@+id/textView5"
        app:layout_constraintEnd_toEndOf="parent"
        app:layout_constraintHorizontal_bias="0.5"
        app:layout_constraintStart_toStartOf="parent"
        app:layout_constraintTop_toBottomOf="@+id/textView2" />

    <TextView
        android:id="@+id/textView5"
        android:layout_width="wrap_content"
        android:layout_height="wrap_content"
        android:layout_marginTop="16dp"
        android:text="Sight-Seeing"
        app:fontFamily="sans-serif-smallcaps"
        android:textColor="#FFF"
        app:layout_constraintBottom_toBottomOf="parent"
        app:layout_constraintEnd_toEndOf="parent"
        app:layout_constraintHorizontal_bias="0.5"
        app:layout_constraintStart_toStartOf="parent"
        app:layout_constraintTop_toBottomOf="@+id/textView4" />

    <View
        android:id="@+id/view"
        android:background="#c2c1c1"
        android:layout_width="100dp"
        android:layout_height="1dp"
        android:layout_marginTop="16dp"
        app:layout_constraintBottom_toTopOf="@+id/textView2"
        app:layout_constraintEnd_toEndOf="parent"
        app:layout_constraintHorizontal_bias="0.5"
        app:layout_constraintStart_toStartOf="parent"
        app:layout_constraintTop_toBottomOf="@+id/textView3" />

    <TextView
        android:id="@+id/textView3"
        android:layout_width="wrap_content"
        android:layout_height="wrap_content"
        android:text="California"
        android:textColor="#FFF"
        app:fontFamily="cursive"
        app:layout_constraintBottom_toTopOf="@+id/view"
        app:layout_constraintEnd_toEndOf="parent"
        app:layout_constraintHorizontal_bias="0.5"
        app:layout_constraintStart_toStartOf="parent"
        app:layout_constraintTop_toBottomOf="@+id/textView" />
</com.google.androidstudio.motionlayoutexample.utils.DrawerContent>
MotionScene 文件只是旋转不同的元素 (检查 rotation 属性)
<?xml version="1.0" encoding="utf-8"?>
<MotionScene xmlns:android="http://schemas.android.com/apk/res/android"
    xmlns:motion="http://schemas.android.com/apk/res-auto">

    <Transition
        motion:constraintSetEnd="@+id/end"
        motion:constraintSetStart="@+id/start"
        motion:duration="250" />

    <ConstraintSet android:id="@+id/start">
        <Constraint
            android:id="@+id/textView"
            android:layout_width="wrap_content"
            android:layout_height="wrap_content"
            android:layout_marginTop="32dp"
            android:rotation="90"
            android:translationX="100dp"
            motion:layout_constraintBottom_toTopOf="@+id/textView3"
            motion:layout_constraintEnd_toEndOf="parent"
            motion:layout_constraintStart_toStartOf="parent"
            motion:layout_constraintTop_toTopOf="parent"
            motion:layout_constraintVertical_chainStyle="spread" />

        <Constraint
            android:id="@+id/textView2"
            android:layout_width="wrap_content"
            android:layout_height="wrap_content"
            android:layout_marginTop="16dp"
            android:rotation="90"
            android:translationX="100dp"
            motion:layout_constraintBottom_toTopOf="@+id/textView4"
            motion:layout_constraintEnd_toEndOf="parent"
            motion:layout_constraintStart_toStartOf="parent"
            motion:layout_constraintTop_toBottomOf="@+id/view" />

        <Constraint
            android:id="@+id/textView4"
            android:layout_width="wrap_content"
            android:layout_height="wrap_content"
            android:layout_marginTop="16dp"
            android:rotation="90"
            android:translationX="100dp"
            motion:layout_constraintBottom_toTopOf="@+id/textView5"
            motion:layout_constraintEnd_toEndOf="parent"
            motion:layout_constraintStart_toStartOf="parent"
            motion:layout_constraintTop_toBottomOf="@+id/textView2" />

        <Constraint
            android:id="@+id/textView5"
            android:layout_width="wrap_content"
            android:layout_height="wrap_content"
            android:layout_marginTop="16dp"
            android:rotation="90"
            android:translationX="100dp"
            motion:layout_constraintBottom_toBottomOf="parent"
            motion:layout_constraintEnd_toEndOf="parent"
            motion:layout_constraintStart_toStartOf="parent"
            motion:layout_constraintTop_toBottomOf="@+id/textView4" />

        <Constraint
            android:id="@+id/view"
            android:layout_width="100dp"
            android:layout_height="1dp"
            android:layout_marginTop="16dp"
            android:rotation="90"
            android:translationX="100dp"
            motion:layout_constraintBottom_toTopOf="@+id/textView2"
            motion:layout_constraintEnd_toEndOf="parent"
            motion:layout_constraintStart_toStartOf="parent"
            motion:layout_constraintTop_toBottomOf="@+id/textView3" />

        <Constraint
            android:id="@+id/textView3"
            android:layout_width="wrap_content"
            android:layout_height="wrap_content"
            android:rotation="90"
            android:translationX="100dp"
            motion:layout_constraintBottom_toTopOf="@+id/view"
            motion:layout_constraintEnd_toEndOf="parent"
            motion:layout_constraintStart_toStartOf="parent"
            motion:layout_constraintTop_toBottomOf="@+id/textView" />
    </ConstraintSet>

    <ConstraintSet android:id="@+id/end">
        <Constraint
            android:id="@+id/textView"
            android:layout_width="wrap_content"
            android:layout_height="wrap_content"
            android:layout_marginTop="32dp"
            motion:layout_constraintBottom_toTopOf="@+id/textView3"
            motion:layout_constraintEnd_toEndOf="parent"
            motion:layout_constraintHorizontal_bias="0.5"
            motion:layout_constraintStart_toStartOf="parent"
            motion:layout_constraintTop_toTopOf="parent"
            motion:layout_constraintVertical_bias="0.0"
            motion:layout_constraintVertical_chainStyle="packed" />

        <Constraint
            android:id="@+id/textView2"
            android:layout_width="wrap_content"
            android:layout_height="wrap_content"
            android:layout_marginTop="16dp"
            motion:layout_constraintBottom_toTopOf="@+id/textView4"
            motion:layout_constraintEnd_toEndOf="parent"
            motion:layout_constraintHorizontal_bias="0.5"
            motion:layout_constraintStart_toStartOf="parent"
            motion:layout_constraintTop_toBottomOf="@+id/view" />

        <Constraint
            android:id="@+id/textView4"
            android:layout_width="wrap_content"
            android:layout_height="wrap_content"
            android:layout_marginTop="16dp"
            motion:layout_constraintBottom_toTopOf="@+id/textView5"
            motion:layout_constraintEnd_toEndOf="parent"
            motion:layout_constraintHorizontal_bias="0.5"
            motion:layout_constraintStart_toStartOf="parent"
            motion:layout_constraintTop_toBottomOf="@+id/textView2" />

        <Constraint
            android:id="@+id/textView5"
            android:layout_width="wrap_content"
            android:layout_height="wrap_content"
            android:layout_marginTop="16dp"
            motion:layout_constraintBottom_toBottomOf="parent"
            motion:layout_constraintEnd_toEndOf="parent"
            motion:layout_constraintHorizontal_bias="0.5"
            motion:layout_constraintStart_toStartOf="parent"
            motion:layout_constraintTop_toBottomOf="@+id/textView4" />

        <Constraint
            android:id="@+id/view"
            android:layout_width="100dp"
            android:layout_height="1dp"
            android:layout_marginTop="16dp"
            motion:layout_constraintBottom_toTopOf="@+id/textView2"
            motion:layout_constraintEnd_toEndOf="parent"
            motion:layout_constraintHorizontal_bias="0.5"
            motion:layout_constraintStart_toStartOf="parent"
            motion:layout_constraintTop_toBottomOf="@+id/textView3" />

        <Constraint
            android:id="@+id/textView3"
            android:layout_width="wrap_content"
            android:layout_height="wrap_content"
            motion:layout_constraintBottom_toTopOf="@+id/view"
            motion:layout_constraintEnd_toEndOf="parent"
            motion:layout_constraintHorizontal_bias="0.5"
            motion:layout_constraintStart_toStartOf="parent"
            motion:layout_constraintTop_toBottomOf="@+id/textView" />
    </ConstraintSet>
在 ViewPager中使用
类似的,我们可能希望有一个有趣的 ViewPager 。
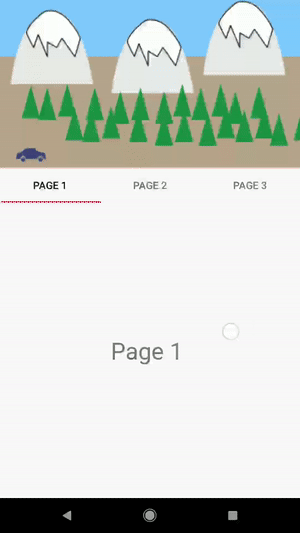
我们也可以使用类似的技巧来集成 ViewPager 。创建一个子类来传递当前的位置。
package com.google.androidstudio.motionlayoutexample.utils

import android.content.Context
import android.support.constraint.motion.MotionLayout
import android.support.v4.view.ViewPager
import android.util.AttributeSet

class ViewpagerHeader @JvmOverloads constructor(
        context: Context, attrs: AttributeSet? = null, defStyleAttr: Int = 0
) : MotionLayout(context, attrs, defStyleAttr), ViewPager.OnPageChangeListener {

    override fun onPageScrollStateChanged(state: Int) {
    }

    override fun onPageScrolled(position: Int, positionOffset: Float, positionOffsetPixels: Int) {
        var numPages = 3
        progress = (position + positionOffset) / (numPages - 1)
    }

    override fun onPageSelected(position: Int) {
    }
}
计算非常简单——onPageScrolled()给我们提供了页面的位置索引(我们有三个页面的时候,这里是0,1或2),偏移量(对应偏移位置从0到1)。动画的进度更新我们可以通过下面的公式来得到:
progress = (position + positionOffset) / (numPages-1)
配合 Lottie 使用
前面的例子用了简单的图片来作为头部。你也可以 Lottie集成到你的 MotionLayout中,然后直接设置它的进度从而播放它。
让我们把上一个例子改成 LottieAnimationView:
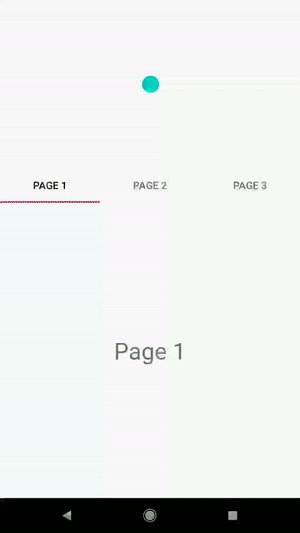
简单起见,我们把基于 MotionLayout 的 ViewPager Header 改成只包含一个 LottieAnimationView 的样式:
<?xml version="1.0" encoding="utf-8"?>
<com.google.androidstudio.motionlayoutexample.utils.ViewpagerHeader xmlns:android="http://schemas.android.com/apk/res/android"
    xmlns:tools="http://schemas.android.com/tools"
    xmlns:app="http://schemas.android.com/apk/res-auto"
    android:id="@+id/motionLayout"
    app:layoutDescription="@xml/scene_23"
    android:layout_width="match_parent"
    app:progress="0"
    android:layout_height="230dp">

    <com.airbnb.lottie.LottieAnimationView
        android:id="@+id/animation_view"
        android:layout_width="match_parent"
        android:layout_height="match_parent"
        app:lottie_rawRes="@raw/walkthrough"/>

</com.google.androidstudio.motionlayoutexample.utils.ViewpagerHeader>
在 MotionScene 中关键的修改是使用motion:progress属性:
<Constraint
    android:id="@+id/animation_view"
    android:layout_width="match_parent"
    android:layout_height="match_parent"
    motion:progress="0"/>
由于 LottieAnimationView 有一个setProgress() 函数,这将导致 MotionLayout 通过它直接播放 Lottie 的对应进度。
完整的 MotionScene 文件如下:
<?xml version="1.0" encoding="utf-8"?>
<MotionScene
    xmlns:android="http://schemas.android.com/apk/res/android"
    xmlns:motion="http://schemas.android.com/apk/res-auto">

    <Transition
        motion:constraintSetStart="@+id/start"
        motion:constraintSetEnd="@+id/end">
    </Transition>

    <ConstraintSet android:id="@+id/start">
        <Constraint
            android:id="@+id/animation_view"
            android:layout_width="match_parent"
            android:layout_height="match_parent"
            motion:progress="0"/>
    </ConstraintSet>

    <ConstraintSet android:id="@+id/end">
        <Constraint
            android:id="@+id/animation_view"
            android:layout_width="match_parent"
            android:layout_height="match_parent"
            motion:progress="1"/>
    </ConstraintSet>

</MotionScene>
总结
本篇介绍了如何在现有布局中轻松集成 MotionLayout。
你可以在 ConstraintLayout examples github repository找到这些例子的源码。
本系列文章还有更多内容:
- Introduction to MotionLayout (part I)
- Custom attributes, image transitions, keyframes (part II)
- Taking advantage of MotionLayout in your existing layouts (CoordinatorLayout, DrawerLayout, ViewPager) (part III)
- All about Keyframes! (part IV)
- MotionLayout as a choreographer of root layout
- Nesting MotionLayout & other Views
- MotionLayout with fragments
