

前言:
随着物联网时代的到来,越来越多的智能硬件设备开始流行起来,比如智能手环、心率检测仪、以及各式各样的智能家具和玩具类产品。安卓4.3(API 18)为BLE的核心功能提供平台支持和API,App可以利用它来发现设备、查询服务和读写特性。相比传统的蓝牙,BLE更显著的特点是低功耗。本文主要讲解Android低功耗蓝牙的api使用以及蓝牙扫描、连接、发送数据、接收数据等一系列操作,并主要介绍本人封装的BleLib蓝牙库,非常适合蓝牙初学者使用,只需要一行代码注入就OK了,而且用法也极其简单,下面会专门讲解BleLib库的使用。
目录
-
原生API的详细讲解
-
BleLib库的优点
-
如何使用该库
-
BleLib库的详细分析
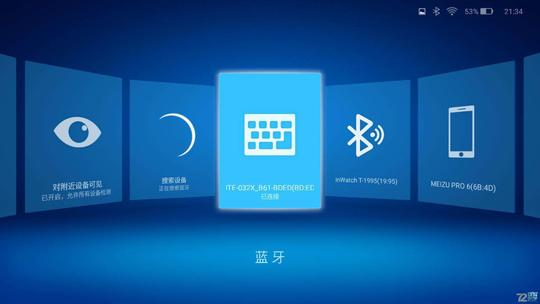
废话不说,先来看下Demo中的效果图:
一、原生API的详细讲解
在BLE协议中,有两个角色,周边(Periphery)和中央(Central);周边是数据提供者,中央是数据使用/处理者,一个中央可以同时连接多个周边,但是一个周边某一时刻只能连接一个中央。
首先使用蓝牙就不得不说BluetoothGatt和BluetoothGattCallback这两个类,该类继承自BluetoothProfile,BluetoothGatt作为中央来使用和处理数据,通过BluetoothGatt可以连接设备(connect),发现服务(discoverServices),并把相应地属性返回到BluetoothGattCallback,BluetoothGattCallback返回中央的状态和周边提供的数据。
1. 蓝牙开发流程:
我们蓝牙操作的主要目的就是为了拿到中央BluetoothGatt这个对象,进而进行接下来的所有一系列操作,如下:
1.先拿到BluetoothManager bluetoothManager
        = (BluetoothManager) getSystemService(Context.BLUETOOTH_SERVICE);

2.再拿到BluetoothAdapt btAdapter = bluetoothManager.getAdapter();

3.开始扫描:btAdapter.startLeScan( BluetoothAdapter.LeScanCallback);

4.从LeScanCallback中得到BluetoothDevice
public void onLeScan(BluetoothDevice device, int rssi, byte[] scanRecord) {…..}

5.用BluetoothDevice得到BluetoothGatt:gatt = device.connectGatt(this, true, gattCallback);
这时总算拿到中央BluetoothGatt了,它有很多的方法,调用这些方法,你就可以通过BluetoothGattCallback和周边BluetoothGattServer交互了。
2. 主要类的大致理解:
-
BluetoothProfile: 一个通用的规范,按照这个规范来收发数据。
-
BluetoothManager:通过BluetoothManager来获取BluetoothAdapter
如:BluetoothManager bluetoothManager = (BluetoothManager) getSystemService(Context.BLUETOOTH_SERVICE);-
BluetoothAdapter:一个Android系统只有一个BluetoothAdapter ,通过BluetoothManager 获取
BluetoothAdapter mBluetoothAdapter = bluetoothManager.getAdapter();-
BluetoothGattDescriptor:可以看成是描述符,对Characteristic的描述,包括范围、计量单位等。
-
BluetoothGattService:服务,Characteristic的集合。
-
BluetoothGattCallback:已经连接上设备,对设备的某些操作后返回的结果。这里必须提醒下,已经连接上设备后的才可以返回,没有返回的认真看看有没有连接上设备。
private BluetoothGattCallback GattCallback = new BluetoothGattCallback() {

  // 这里有9个要实现的方法,看情况要实现那些,用到那些就实现那些

  public void onConnectionStateChange(BluetoothGatt gatt, int status, int newState){};

  public void onCharacteristicWrite(BluetoothGatt gatt,
                      BluetoothGattCharacteristic characteristic, int status){

                      };

          };
 BluetoothDevice device = mBluetoothAdapter.getRemoteDevice(address);

 BluetoothGatt gatt = device.connectGatt(this, false, mGattCallback);
3. 上面所说的9个要实现的方法,所对应蓝牙交互的主要对应关系:

(1) notification对应onCharacteristicChanged;
gatt.setCharacteristicNotification(characteristic, true);该方法一般是在发现服务后,进行设置的,设置该方法的目的是让硬件在数据改变的时候,发送数据给app,app则通过onCharacteristicChanged方法回调给用户,从参数中可获取到回调回来的数据。
(2) readCharacteristic对应onCharacteristicRead;
gatt.readCharacteristic(characteristic);(3) writeCharacteristic对应onCharacteristicWrite;
gatt.wirteCharacteristic(mCurrentcharacteristic);(4) 连接蓝牙或者断开蓝牙 对应 onConnectionStateChange;
bluetoothDevice.connectGatt(this, false, mGattCallback);
或
gatt.disconnect();(断开连接后务必记得gatt.close();)
(5) readDescriptor对应onDescriptorRead;
gatt.readDescriptor(descriptor);(6) writeDescriptor对应onDescriptorWrite;
gatt.writeDescriptor(descriptor);(7) readRemoteRssi对应onReadRemoteRssi;
gatt.readRemoteRssi();(8) executeReliableWrite对应onReliableWriteCompleted;
gatt.executeReliableWrite();(9) discoverServices对应onServicesDiscovered
gatt.discoverServices();开启蓝牙所具备的权限:
 <uses-permission android:name="android.permission.BLUETOOTH"/>
<uses-permission android:name="android.permission.ACCESS_FINE_LOCATION"/>
<uses-permission android:name="android.permission.ACCESS_COARSE_LOCATION"/>
<uses-permission android:name="android.permission.BLUETOOTH_ADMIN"/>
<uses-feature android:name="android.hardware.bluetooth_le" android:required="true"/>
如果 android.hardware.bluetooth_le设置为false,可以安装在不支持的设备上使用,判断是否支持蓝牙4.0用以下代码就可以了,如:
  if (!getPackageManager().hasSystemFeature(PackageManager.FEATURE_BLUETOOTH_LE)) {
          Toast.makeText(this, “设备不支持蓝牙4.0”, Toast.LENGTH_SHORT).show();
          finish();
    }
对蓝牙的启动关闭操作:
1、利用系统默认开启蓝牙对话框
if (mBluetoothAdapter == null || !mBluetoothAdapter.isEnabled()) {
    Intent enableBtIntent = new Intent(BluetoothAdapter.ACTION_REQUEST_ENABLE);
    startActivityForResult(enableBtIntent, REQUEST_ENABLE_BT);
  }
2、后台打开蓝牙,不做任何提示,这个也可以用来自定义打开蓝牙对话框啦
mBluetoothAdapter.enable();3、后台关闭蓝牙
mBluetoothAdapter.disable();二、BleLib库的优点
-
最简洁的植入(近乎一行代码)

private void initBle() {
    mBle = Ble.options()
            .setLogBleExceptions(true)//设置是否输出打印蓝牙日志(非正式打包请设置为true,以便于调试)
            .setThrowBleException(true)//设置是否抛出蓝牙异常
            .setAutoConnect(true)//设置是否自动连接
            .setConnectFailedRetryCount(3)
            .setConnectTimeout(10 * 1000)//设置连接超时时长(默认10*1000 ms)
            .setScanPeriod(12 * 1000)//设置扫描时长(默认10*1000 ms)
            .setUuid_service(UUID.fromString("0000fee9-0000-1000-8000-00805f9b34fb"))//主服务的uuid
            .setUuid_write_cha(UUID.fromString("d44bc439-abfd-45a2-b575-925416129600"))//可写特征的uuid
            .create(getApplicationContext());
 }
最大程度简化了代码量

有对比才有伤害,那就来看下原生api调用蓝牙流程和该库之间的对比:
例如扫描设备
原生API写法:
private void scanLeDevice(final boolean enable) {
        if (enable) {
        // 经过预定扫描期后停止扫描
        mHandler.postDelayed(new Runnable() {
            @Override
            public void run() {
                mScanning = false;
                mBluetoothAdapter.stopLeScan(mLeScanCallback);
            }
        }, SCAN_PERIOD);
            mScanning = true;
            mBluetoothAdapter.startLeScan(mLeScanCallback);
        } else {
        mScanning = false;
        mBluetoothAdapter.stopLeScan(mLeScanCallback);
        }
        ...
    }

然后在mLeScanCallback的回调中拿到扫描结果:

    // Device scan callback.
    private BluetoothAdapter.LeScanCallback mLeScanCallback =
        new BluetoothAdapter.LeScanCallback() {
    @Override
    public void onLeScan(final BluetoothDevice device, int rssi,
            byte[] scanRecord) {
        runOnUiThread(new Runnable() {
           @Override
           public void run() {
               ...
           }
       });
    }
BleLib中扫描的写法:
mBle.startScan(scanCallback);
回调结果:
BleScanCallback<BleDevice> scanCallback = new BleScanCallback<BleDevice>() {
        @Override
        public void onLeScan(final BleDevice device, int rssi, byte[] scanRecord) {
                ...
            }
        }
    };
提供了独一无二的OTA升级接口(即蓝牙硬件进行更新升级的接口)
这绝对是其他蓝牙库所没有的,具体API请看下面的库使用步骤三、如何使用该库
首先buidl.gradle中添加依赖(最新版本请参阅Demo中的README文件):
compile 'cn.com.superLei:blelibrary:2.5.2-beta'1. 初始化蓝牙(动态授权蓝牙操作权限、打开蓝牙、判断设备是否支持蓝牙等操作请看DEMO)
    private void initBle() {
        mBle = Ble.options()
                .setLogBleExceptions(true)//设置是否输出打印蓝牙日志(非正式打包请设置为true,以便于调试)
                .setThrowBleException(true)//设置是否抛出蓝牙异常
                .setAutoConnect(true)//设置是否自动连接
                .setConnectFailedRetryCount(3)//设置连接失败的重试次数
                .setConnectTimeout(10 * 1000)//设置连接超时时长(默认10*1000 ms)
                .setScanPeriod(12 * 1000)//设置扫描时长(默认10*1000 ms)
                .setUuid_service(UUID.fromString("0000fee9-0000-1000-8000-00805f9b34fb"))//主服务的uuid
                .setUuid_write_cha(UUID.fromString("d44bc439-abfd-45a2-b575-925416129600"))//可写特征的uuid
                .create(getApplicationContext());
     }
2. 扫描周边设备
mBle.startScan(scanCallback);
//扫描回调
BleScanCallback<BleDevice> scanCallback = new BleScanCallback<BleDevice>() {
        @Override
        public void onLeScan(final BleDevice device, int rssi, byte[] scanRecord) {
            ...
            //获取到蓝牙设备对象,根据自身需求进行操作(库中已进行相同设备的过滤)
        }
    };
3.开始连接
mBle.connect(device, connectCallback);
//连接回调
private BleConnCallback<BleDevice> connectCallback = new BleConnCallback<BleDevice>() {
        @Override
        public void onConnectionChanged(BleDevice device) {
            if (device.isConnected()) {
                //连接成功之后设置通知(切记,很重要)
                setNotify(device);
            }
            Log.e(TAG, "onConnectionChanged: " + device.isConnected());
        }

        @Override
        public void onConnectException(BleDevice device, int errorCode) {
            super.onConnectException(device, errorCode);
            Toast.makeText(BleActivity.this, "连接异常,异常状态码:" + errorCode, Toast.LENGTH_SHORT).show();
        }
    };
连接异常状态码可参阅该项目的wiki
4.设置通知及回调
private void setNotify(BleDevice device) {
         /*连接成功后,设置通知*/
        mBle.startNotify(device, new BleNotiftCallback<BleDevice>() {
            @Override
            public void onChanged(BleDevice device, BluetoothGattCharacteristic characteristic) {
                Log.e(TAG, "onChanged: 表示返回硬件MCU发来的数据"+Arrays.toString(characteristic.getValue()));
            }

            @Override
            public void onReady(BleDevice device) {
                Log.e(TAG, "onReady: 表示一切准备就绪,可以进行读写(发送数据或者读取数据)的标志");
            }

            @Override
            public void onServicesDiscovered(BluetoothGatt gatt) {
                Log.e(TAG, "onServicesDiscovered is success ");
            }

            @Override
            public void onNotifySuccess(BluetoothGatt gatt) {
                Log.e(TAG, "onNotifySuccess is success ");
            }
        });
    }
当收到onChanged(BluetoothGattCharacteristic characteristic)回调时,则说明蓝牙设备的数据发生改变了,通知程序作出改变。还有很多回调,他们对应的情况不懂得可以参考上面的原生API的详细讲解。
5.读取远程Rssi
mBle.readRssi(mBle.getConnetedDevices().get(0), new BleReadRssiCallback<BleDevice>() {
                    @Override
                    public void onReadRssiSuccess(int rssi) {
                        super.onReadRssiSuccess(rssi);
                        Log.e(TAG, "onReadRssiSuccess: " + rssi);
                        Toast.makeText(BleActivity.this, "onReadRssiSuccess:"+ rssi, Toast.LENGTH_SHORT).show();
                    }
                });
6.主动读取数据
public void read(BleDevice device) {
        boolean result = mBle.read(device, new BleReadCallback<BleDevice>() {
            @Override
            public void onReadSuccess(BluetoothGattCharacteristic characteristic) {
                super.onReadSuccess(characteristic);
                byte[] data = characteristic.getValue();
                Log.w(TAG, "onReadSuccess: " + Arrays.toString(data));
            }
        });
        if (!result) {
            Log.d(TAG, "读取数据失败!");
        }
7.写入数据
boolean result = mBle.write(device, changeLevelInner(), new BleWriteCallback<BleDevice>() {
            @Override
            public void onWriteSuccess(BluetoothGattCharacteristic characteristic) {
                Toast.makeText(BleActivity.this, "发送数据成功", Toast.LENGTH_SHORT).show();
            }
        });
        if (!result) {
            Log.e(TAG, "changeLevelInner: " + "发送数据失败!");
        }
8.发送大数据包(如:文件等)
try {
        //获取整个文件的总字节
        byte[]data = toByteArray(getAssets().open("WhiteChristmas.bin"));
        //发送大数据量的包(参数请查阅Demo Code)
        mBle.writeEntity(mBle.getConnetedDevices().get(0), data, 20, 50, new BleWriteEntityCallback<BleDevice>() {
            @Override
            public void onWriteSuccess() {
                L.e("writeEntity", "onWriteSuccess");
            }

            @Override
            public void onWriteFailed() {
                L.e("writeEntity", "onWriteFailed");
            }
        });
    } catch (IOException e) {
        e.printStackTrace();
    }
9.设置MTU(BLE4.2)
if(Build.VERSION.SDK_INT >= Build.VERSION_CODES.LOLLIPOP){
        //此处第二个参数  不是特定的   比如你也可以设置500   但是如果设备不支持500个字节则会返回最大支持数
        mBle.setMTU(mBle.getConnetedDevices().get(0).getBleAddress(), 250, new BleMtuCallback<BleDevice>() {
            @Override
            public void onMtuChanged(BleDevice device, int mtu, int status) {
                super.onMtuChanged(device, mtu, status);
                ToastUtil.showToast("最大支持MTU:"+mtu);
            }
        });
    }else {
        ToastUtil.showToast("设备不支持MTU");
    }
10.OTA升级
//找到你需要升级文件的路径(一般情况都是保存再服务器上,一旦有更新会自动提示,然后APP下载并保存到本地,生成对应的file对象)
File file = new File(...);
//读写SD卡权限,此处略(6.0及以上需添加)
OtaManager mOtaManager = new OtaManager(BleActivity.this);
boolean result = mOtaManager.startOtaUpdate(file, (BleDevice) mBle.getConnetedDevices().get(0), mBle);
Log.e("OTA升级结果:", result + "");
四、BleLib库封装的详细分析
分析之前先来张BleLib库API的结构图供大家参考(下图是1.x库的结构,API名称部分与当前有点不同):
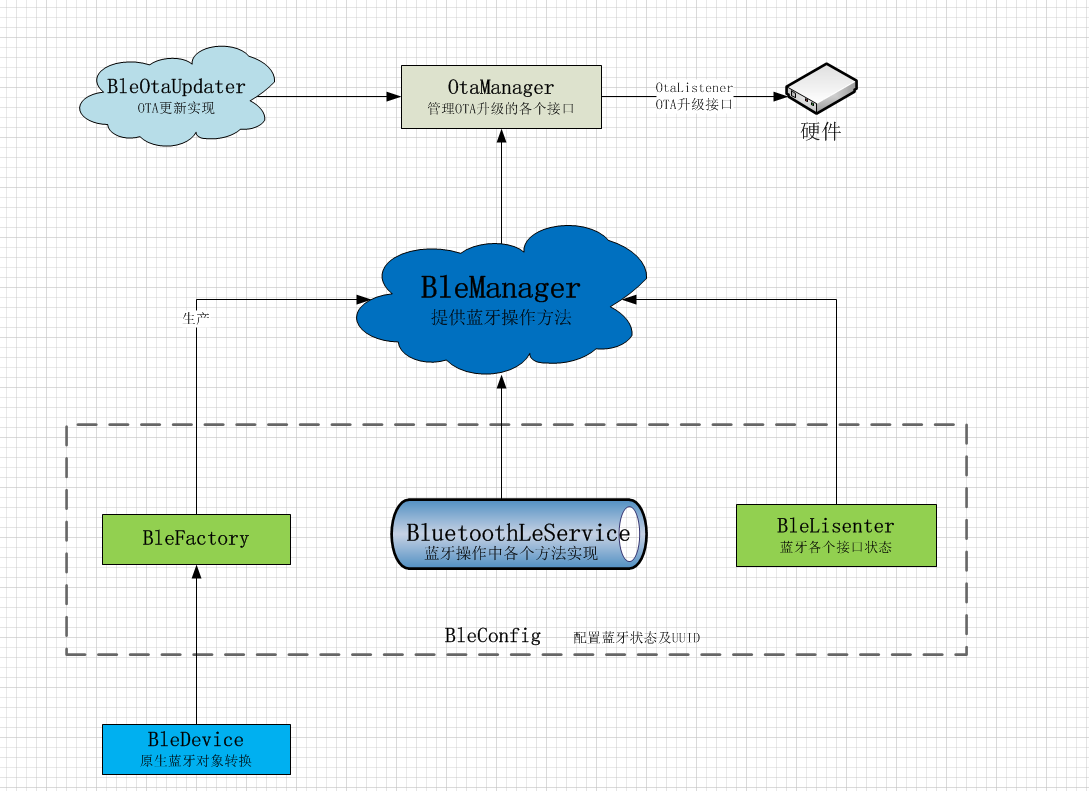

1、我们先来看一下该库的结构,以及每个类的作用。如下图:
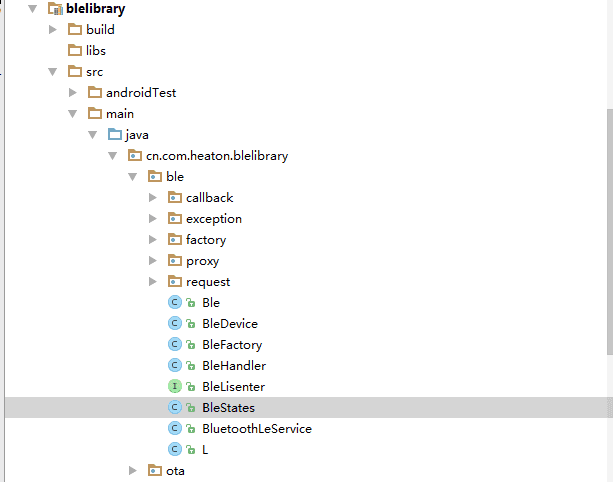
Ble:
该类提供了几乎所有你需要用到的方法,包括蓝牙扫描、连接、断开、蓝牙当前连接状态等等,管理了蓝牙操作的所有接口和方法。
BleDevice:
该类的主要是来描述并记录蓝牙的属性和状态,如记录蓝牙名称、蓝牙MAC地址、蓝牙别名(即修改之后的名称)、蓝牙连接状态等。

BleStatus:
该类是蓝牙状态类,定义了蓝牙扫描、连接、通知使能、发送、接收等状态的常量值(连接异常等状态码可参考该类)
BluetoothLeService:
该类是最重要的一个核心蓝牙处理类,主要是蓝牙操作中用到的各个方法的实现类,是整个蓝牙的核心功能实现,Ble是对外提供所有蓝牙操作接口的管理类。
在此要注意一些细节,比如大多数设备扫描的时候会重复扫描到相同蓝牙设备,必须要进行过滤,开发应用时,必须还要进行产品过滤,比如通过设备的广播包过滤,或者通过设备名过滤都是可以的,如下(注意:要根据自己产品提供的广播包进行过滤,下图是我们自己产品的):
  /**
 * Verify the product broadcast parameters
 * @param data Parameter data
 * @return Whether the match
 */
public static boolean matchProduct(byte[] data) {
    if (data == null || data.length <= 0) {
        return false;
    }
    int i = 0;
    do {
        // Read packet size
        int len = data[i++] & 0xff;
        if (len > 0) {
            // Read packet data
            byte[] d = new byte[len];
            int j = 0;
            do {
                d[j++] = data[i++];
            } while (j < len);
            // Authentication Type and Length
            if (d.length > BROADCAST_SPECIFIC_PRODUCT.length && (d[0] & 0xFF) == BLE_GAP_AD_TYPE_MANUFACTURER_SPECIFIC_DATA) {
                // Matching product parameters
                boolean passed = true;
                for (int x = 0; x < BROADCAST_SPECIFIC_PRODUCT.length; x++) {
                    passed = passed && d[x + 1] == BROADCAST_SPECIFIC_PRODUCT[x];
                }
                //Match successful
                if (passed) {
                    return true;
                }
            }
        }

    } while (i < data.length);
    return false;
}
OK,要注意的细节问题已经介绍的差不多了,如果感兴趣的朋友可以去应用该库到自己的项目中。
