

版权声明:本套技术专栏是作者(秦凯新)平时工作的总结和升华,通过从真实商业环境抽取案例进行总结和分享,并给出商业应用的调优建议和集群环境容量规划等内容,请持续关注本套博客。期待加入IOT时代最具战斗力的团队。QQ邮箱地址:1120746959@qq.com,如有任何学术交流,可随时联系。
1 DataStreamAPI
1.1 DataStream Data Sources
-
source是程序的数据源输入,你可以通过StreamExecutionEnvironment.addSource(sourceFunction)来为你的程序添加一个source。
-
flink提供了大量的已经实现好的source方法,可以自定义source 通过实现sourceFunction接口来自定义无并行度的source。
  1 使用并行度为1的source
  public class MyNoParalleSource implements SourceFunction<Long>{

      private long count = 1L;

      private boolean isRunning = true;

      /**
       * 主要的方法
       * 启动一个source
       * 大部分情况下,都需要在这个run方法中实现一个循环,这样就可以循环产生数据了
       *
       * @param ctx
       * @throws Exception
       */
      @Override
      public void run(SourceContext<Long> ctx) throws Exception {
          while(isRunning){
              ctx.collect(count);
              count++;
              //每秒产生一条数据
              Thread.sleep(1000);
          }
      }
      * 取消一个cancel的时候会调用的方法
      @Override
      public void cancel() {
          isRunning = false;
      }
  }

  2 Main方法执行
  public class StreamingDemoWithMyNoPralalleSource {
      public static void main(String[] args) throws Exception {
      //获取Flink的运行环境
      StreamExecutionEnvironment env = StreamExecutionEnvironment.getExecutionEnvironment();
      //获取数据源
      DataStreamSource<Long> text = env.addSource(new MyNoParalleSource()).setParallelism(1); //注意:针对此source,并行度只能设置为1
      DataStream<Long> num = text.map(new MapFunction<Long, Long>() {
          @Override
          public Long map(Long value) throws Exception {
              System.out.println("接收到数据:" + value);
              return value;
          }
      });

  //每2秒钟处理一次数据
  DataStream<Long> sum = num.timeWindowAll(Time.seconds(2)).sum(0);
  //打印结果
  sum.print().setParallelism(1);
  String jobName = StreamingDemoWithMyNoPralalleSource.class.getSimpleName();
  env.execute(jobName);
   }
  }
版权声明:本套技术专栏是作者(秦凯新)平时工作的总结和升华,通过从真实商业环境抽取案例进行总结和分享,并给出商业应用的调优建议和集群环境容量规划等内容,请持续关注本套博客。QQ邮箱地址:1120746959@qq.com,如有任何学术交流,可随时联系。
-
可以通过实现ParallelSourceFunction接口或者继承RichParallelSourceFunction来自定义有并行度的source。继承RichParallelSourceFunction的那些SourceFunction意味着它们都是并行执行的并且可能有一些资源需要open/close
public class MyParalleSource implements ParallelSourceFunction<Long> { private long count = 1L; private boolean isRunning = true; /** * 主要的方法 * 启动一个source * 大部分情况下,都需要在这个run方法中实现一个循环,这样就可以循环产生数据了 * * @param ctx * @throws Exception */ @Override public void run(SourceContext<Long> ctx) throws Exception { while(isRunning){ ctx.collect(count); count++; //每秒产生一条数据 Thread.sleep(1000); } } /** * 取消一个cancel的时候会调用的方法 * */ @Override public void cancel() { isRunning = false; } } public class StreamingDemoWithMyPralalleSource { public static void main(String[] args) throws Exception { //获取Flink的运行环境 StreamExecutionEnvironment env = StreamExecutionEnvironment.getExecutionEnvironment(); //获取数据源 DataStreamSource<Long> text = env.addSource(new MyParalleSource()).setParallelism(2); DataStream<Long> num = text.map(new MapFunction<Long, Long>() { @Override public Long map(Long value) throws Exception { System.out.println("接收到数据:" + value); return value; } }); //每2秒钟处理一次数据 DataStream<Long> sum = num.timeWindowAll(Time.seconds(2)).sum(0); //打印结果 sum.print().setParallelism(1); String jobName = StreamingDemoWithMyPralalleSource.class.getSimpleName(); env.execute(jobName); } } public class MyRichParalleSource extends RichParallelSourceFunction<Long> { private long count = 1L; private boolean isRunning = true; /** * 主要的方法 * 启动一个source * 大部分情况下,都需要在这个run方法中实现一个循环,这样就可以循环产生数据了 * @param ctx * @throws Exception */ @Override public void run(SourceContext<Long> ctx) throws Exception { while(isRunning){ ctx.collect(count); count++; //每秒产生一条数据 Thread.sleep(1000); } } /** * 取消一个cancel的时候会调用的方法 * */ @Override public void cancel() { isRunning = false; } /** * 这个方法只会在最开始的时候被调用一次 * 实现获取链接的代码 * @param parameters * @throws Exception */ @Override public void open(Configuration parameters) throws Exception { System.out.println("open............."); super.open(parameters); } /** * 实现关闭链接的代码 * @throws Exception */ @Override public void close() throws Exception { super.close(); } } public class StreamingDemoWithMyRichPralalleSource { public static void main(String[] args) throws Exception { //获取Flink的运行环境 StreamExecutionEnvironment env = StreamExecutionEnvironment.getExecutionEnvironment(); //获取数据源 DataStreamSource<Long> text = env.addSource(new MyRichParalleSource()).setParallelism(2); DataStream<Long> num = text.map(new MapFunction<Long, Long>() { @Override public Long map(Long value) throws Exception { System.out.println("接收到数据:" + value); return value; } }); //每2秒钟处理一次数据 DataStream<Long> sum = num.timeWindowAll(Time.seconds(2)).sum(0); //打印结果 sum.print().setParallelism(1); String jobName = StreamingDemoWithMyRichPralalleSource.class.getSimpleName(); env.execute(jobName); } } -
基于文件 readTextFile(path) 读取文本文件,文件遵循TextInputFormat 读取规则,逐行读取并返回。
-
基于socket socketTextStream从socker中读取数据,元素可以通过一个分隔符切开。
public class SocketDemoFullCount { public static void main(String[] args) throws Exception{ //获取需要的端口号 int port; try { ParameterTool parameterTool = ParameterTool.fromArgs(args); port = parameterTool.getInt("port"); }catch (Exception e){ System.err.println("No port set. use default port 9010--java"); port = 9010; } //获取flink的运行环境 StreamExecutionEnvironment env = StreamExecutionEnvironment.getExecutionEnvironment(); String hostname = "SparkMaster"; String delimiter = "\n"; //连接socket获取输入的数据 DataStreamSource<String> text = env.socketTextStream(hostname, port, delimiter); DataStream<Tuple2<Integer,Integer>> intData = text.map(new MapFunction<String, Tuple2<Integer,Integer>>() { @Override public Tuple2<Integer,Integer> map(String value) throws Exception { return new Tuple2<>(1,Integer.parseInt(value)); } }); intData.keyBy(0) .timeWindow(Time.seconds(5)) .process(new ProcessWindowFunction<Tuple2<Integer,Integer>, String, Tuple, TimeWindow>() { @Override public void process(Tuple key, Context context, Iterable<Tuple2<Integer, Integer>> elements, Collector<String> out) throws Exception { System.out.println("执行process"); long count = 0; for(Tuple2<Integer,Integer> element: elements){ count++; } out.collect("window:"+context.window()+",count:"+count); } }).print(); //这一行代码一定要实现,否则程序不执行 env.execute("Socket window count"); } } -
基于集合 fromCollection(Collection) 通过java 的collection集合创建一个数据流,集合中的所有元素必须是相同类型的。
   public class StreamingFromCollection {
      public static void main(String[] args) throws Exception {
          //获取Flink的运行环境
          StreamExecutionEnvironment env = StreamExecutionEnvironment.getExecutionEnvironment();
          ArrayList<Integer> data = new ArrayList<>();
          data.add(10);
          data.add(15);
          data.add(20);

          //指定数据源
          DataStreamSource<Integer> collectionData = env.fromCollection(data);
          //通map对数据进行处理
          DataStream<Integer> num = collectionData.map(new MapFunction<Integer, Integer>() {
              @Override
              public Integer map(Integer value) throws Exception {
                  return value + 1;
              }
          });
          //直接打印
          num.print().setParallelism(1);
          env.execute("StreamingFromCollection");
      }
}
-
自定义输入 addSource 可以实现读取第三方数据源的数据 系统内置提供了一批connectors,连接器会提供对应的source支持【kafka】
1.2 DataStream Transformations
-
map:输入一个元素,然后返回一个元素,中间可以做一些清洗转换等操作
-
flatmap:输入一个元素,可以返回零个,一个或者多个元素
-
keyBy:根据指定的key进行分组,相同key的数据会进入同一个分区
dataStream.keyBy("someKey") // 指定对象中的 "someKey"字段作为分组key dataStream.keyBy(0) //指定Tuple中的第一个元素作为分组key 注意:以下类型是无法作为key的 1:一个实体类对象,没有重写hashCode方法,并且依赖object的hashCode方法 2:一个任意形式的数组类型 3:基本数据类型,int,long -
filter:过滤函数,对传入的数据进行判断,符合条件的数据会被留下。
  public class StreamingDemoFilter {
      public static void main(String[] args) throws Exception {
          //获取Flink的运行环境
          StreamExecutionEnvironment env = StreamExecutionEnvironment.getExecutionEnvironment();
          //获取数据源
          DataStreamSource<Long> text = env.addSource(new MyNoParalleSource()).setParallelism(1);//注意:针对此source,并行度只能设置为1
          DataStream<Long> num = text.map(new MapFunction<Long, Long>() {
              @Override
              public Long map(Long value) throws Exception {
                  System.out.println("原始接收到数据:" + value);
                  return value;
              }
          });

          //执行filter过滤,满足条件的数据会被留下
          DataStream<Long> filterData = num.filter(new FilterFunction<Long>() {
              //把所有的奇数过滤掉
              @Override
              public boolean filter(Long value) throws Exception {
                  return value % 2 == 0;
              }
          });

          DataStream<Long> resultData = filterData.map(new MapFunction<Long, Long>() {
              @Override
              public Long map(Long value) throws Exception {
                  System.out.println("过滤之后的数据:" + value);
                  return value;
              }
          });


          //每2秒钟处理一次数据
          DataStream<Long> sum = resultData.timeWindowAll(Time.seconds(2)).sum(0);

          //打印结果
          sum.print().setParallelism(1);

          String jobName = StreamingDemoFilter.class.getSimpleName();
          env.execute(jobName);
      }
  }
版权声明:本套技术专栏是作者(秦凯新)平时工作的总结和升华,通过从真实商业环境抽取案例进行总结和分享,并给出商业应用的调优建议和集群环境容量规划等内容,请持续关注本套博客。QQ邮箱地址:1120746959@qq.com,如有任何学术交流,可随时联系。
-
reduce:对数据进行聚合操作,结合当前元素和上一次reduce返回的值进行聚合操作,然后返回一个新的值
-
aggregations:sum(),min(),max()等
-
window:在后面单独详解
-
Union:合并多个流,新的流会包含所有流中的数据,但是union是一个限制,就是所有合并的流类型必须是一致的。
  public class StreamingDemoUnion {
  public static void main(String[] args) throws Exception {
      //获取Flink的运行环境
      StreamExecutionEnvironment env = StreamExecutionEnvironment.getExecutionEnvironment();

      //获取数据源
      DataStreamSource<Long> text1 = env.addSource(new MyNoParalleSource()).setParallelism(1);//注意:针对此source,并行度只能设置为1

      DataStreamSource<Long> text2 = env.addSource(new MyNoParalleSource()).setParallelism(1);

      //把text1和text2组装到一起
      DataStream<Long> text = text1.union(text2);

      DataStream<Long> num = text.map(new MapFunction<Long, Long>() {
          @Override
          public Long map(Long value) throws Exception {
              System.out.println("原始接收到数据:" + value);
              return value;
          }
      });
      //每2秒钟处理一次数据
      DataStream<Long> sum = num.timeWindowAll(Time.seconds(2)).sum(0);
      //打印结果
      sum.print().setParallelism(1);
      String jobName = StreamingDemoUnion.class.getSimpleName();
      env.execute(jobName);
  }
}
-
Connect:和union类似,但是只能连接两个流,两个流的数据类型可以不同,会对两个流中的数据应用不同的处理方法。
-
CoMap, CoFlatMap:在ConnectedStreams中需要使用这种函数,类似于map和flatmap
public class StreamingDemoConnect { public static void main(String[] args) throws Exception { //获取Flink的运行环境 StreamExecutionEnvironment env = StreamExecutionEnvironment.getExecutionEnvironment(); //获取数据源 DataStreamSource<Long> text1 = env.addSource(new MyNoParalleSource()).setParallelism(1);//注意:针对此source,并行度只能设置为1 DataStreamSource<Long> text2 = env.addSource(new MyNoParalleSource()).setParallelism(1); SingleOutputStreamOperator<String> text2_str = text2.map(new MapFunction<Long, String>() { @Override public String map(Long value) throws Exception { return "str_" + value; } }); ConnectedStreams<Long, String> connectStream = text1.connect(text2_str); SingleOutputStreamOperator<Object> result = connectStream.map(new CoMapFunction<Long, String, Object>() { @Override public Object map1(Long value) throws Exception { return value; } @Override public Object map2(String value) throws Exception { return value; } }); //打印结果 result.print().setParallelism(1); String jobName = StreamingDemoConnect.class.getSimpleName(); env.execute(jobName); } } -
Split:根据规则把一个数据流切分为多个流:
-
Select:和split配合使用,选择切分后的流
public class StreamingDemoSplit {
      public static void main(String[] args) throws Exception {
          //获取Flink的运行环境
          StreamExecutionEnvironment env = StreamExecutionEnvironment.getExecutionEnvironment();

          //获取数据源
          DataStreamSource<Long> text = env.addSource(new MyNoParalleSource()).setParallelism(1);//注意:针对此source,并行度只能设置为1

          //对流进行切分,按照数据的奇偶性进行区分
          SplitStream<Long> splitStream = text.split(new OutputSelector<Long>() {
              @Override
              public Iterable<String> select(Long value) {
                  ArrayList<String> outPut = new ArrayList<>();
                  if (value % 2 == 0) {
                      outPut.add("even");//偶数
                  } else {
                      outPut.add("odd");//奇数
                  }
                  return outPut;
              }
          });

          //选择一个或者多个切分后的流
          DataStream<Long> evenStream = splitStream.select("even");
          DataStream<Long> oddStream = splitStream.select("odd");

          DataStream<Long> moreStream = splitStream.select("odd","even");


          //打印结果
          moreStream.print().setParallelism(1);

          String jobName = StreamingDemoSplit.class.getSimpleName();
          env.execute(jobName);
      }
  }
1.3 DataStream API之partition
-
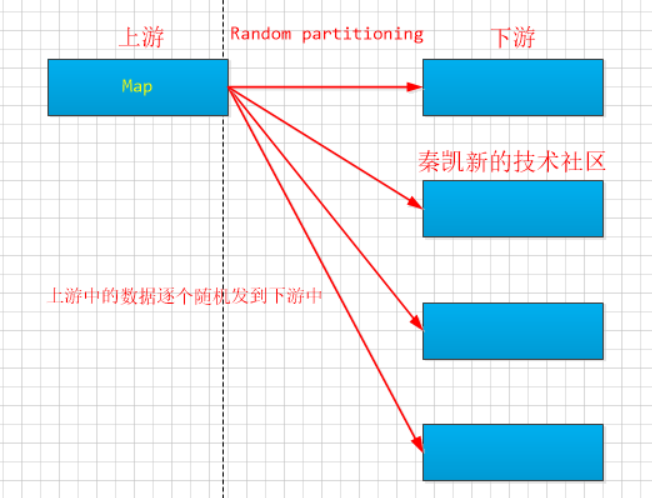
Random partitioning:随机分区
dataStream.shuffle()

-
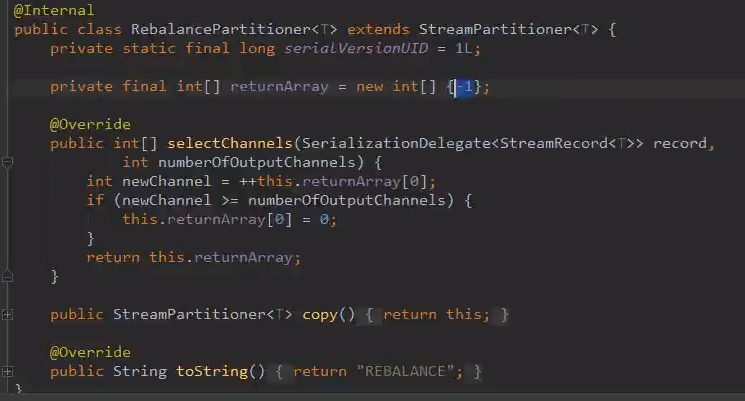
Rebalancing:对数据集进行再平衡,重分区,消除数据倾斜
dataStream.rebalance()

-
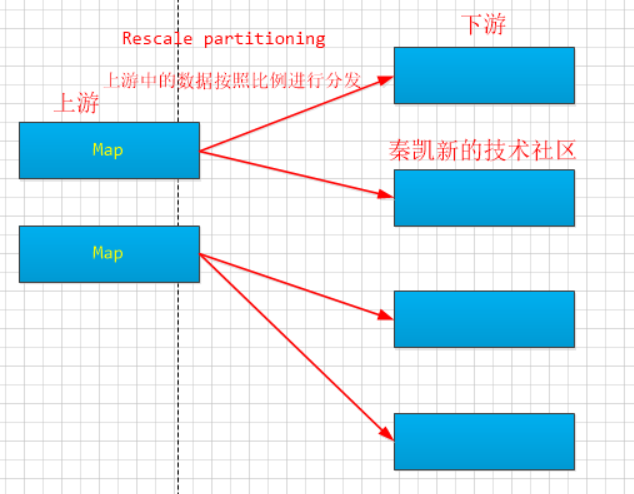
Rescaling:如果上游操作有2个并发,而下游操作有4个并发,那么上游的一个并发结果分配给下游的两个并发操作,另外的一个并发结果分配给了下游的另外两个并发操作。另一方面,下游有两个并发操作而上游又4个并发操作,那么上游的其中两个操作的结果分配给下游的一个并发操作而另外两个并发操作的结果则分配给另外一个并发操作。
-
Rescaling与Rebalancing的区别: Rebalancing会产生全量重分区,而Rescaling不会。
dataStream.rescale()
-
Custom partitioning:自定义分区需要实现Partitioner接口
dataStream.partitionCustom(partitioner, "someKey") 针对对象
dataStream.partitionCustom(partitioner, 0) 针对Tuple
public class MyPartition implements Partitioner<Long> { @Override public int partition(Long key, int numPartitions) { System.out.println("分区总数:"+numPartitions); if(key % 2 == 0){ return 0; }else{ return 1; } } } public class SteamingDemoWithMyParitition { public static void main(String[] args) throws Exception{ StreamExecutionEnvironment env = StreamExecutionEnvironment.getExecutionEnvironment(); env.setParallelism(2); DataStreamSource<Long> text = env.addSource(new MyNoParalleSource()); //对数据进行转换,把long类型转成tuple1类型 DataStream<Tuple1<Long>> tupleData = text.map(new MapFunction<Long, Tuple1<Long>>() { @Override public Tuple1<Long> map(Long value) throws Exception { return new Tuple1<>(value); } }); //分区之后的数据 DataStream<Tuple1<Long>> partitionData= tupleData.partitionCustom(new MyPartition(), 0); DataStream<Long> result = partitionData.map(new MapFunction<Tuple1<Long>, Long>() { @Override public Long map(Tuple1<Long> value) throws Exception { System.out.println("当前线程id:" + Thread.currentThread().getId() + ",value: " + value); return value.getField(0); } }); result.print().setParallelism(1); env.execute("SteamingDemoWithMyParitition"); } } -
Broadcasting:在后面单独详解
1.4 DataStream Sink
-
writeAsText():将元素以字符串形式逐行写入,这些字符串通过调用每个元素的toString()方法来获取
-
print() / printToErr():打印每个元素的toString()方法的值到标准输出或者标准错误输出流中
-
自定义输出addSink【kafka、redis】
  <dependency>
      <groupId>org.apache.bahir</groupId>
      <artifactId>flink-connector-redis_2.11</artifactId>
      <version>1.0</version>
  </dependency>


 public class StreamingDemoToRedis {
      public static void main(String[] args) throws Exception{
          StreamExecutionEnvironment env = StreamExecutionEnvironment.getExecutionEnvironment();
          DataStreamSource<String> text = env.socketTextStream("hadoop100", 9000, "\n");

          //对数据进行组装,把string转化为tuple2<String,String>
          DataStream<Tuple2<String, String>> l_wordsData = text.map(new MapFunction<String, Tuple2<String, String>>() {
              @Override
              public Tuple2<String, String> map(String value) throws Exception {
                  return new Tuple2<>("l_words", value);
              }
          });

          //创建redis的配置
          FlinkJedisPoolConfig conf = new FlinkJedisPoolConfig.Builder().setHost("SparkMaster").setPort(6379).build();

          //创建redissink
          RedisSink<Tuple2<String, String>> redisSink = new RedisSink<>(conf, new MyRedisMapper());

          l_wordsData.addSink(redisSink);

          env.execute("StreamingDemoToRedis");
      }

      public static class MyRedisMapper implements RedisMapper<Tuple2<String, String>>{
          //表示从接收的数据中获取需要操作的redis key
          @Override
          public String getKeyFromData(Tuple2<String, String> data) {
              return data.f0;
          }
          //表示从接收的数据中获取需要操作的redis value
          @Override
          public String getValueFromData(Tuple2<String, String> data) {
              return data.f1;
          }

          @Override
          public RedisCommandDescription getCommandDescription() {
              return new RedisCommandDescription(RedisCommand.LPUSH);
          }
      }
  }
2 DataSet API
2.1 DataSet Sources
-
基于文件 readTextFile(path)
public class BatchWordCountJava { public static void main(String[] args) throws Exception{ String inputPath = "D:\\data\\file"; String outPath = "D:\\data\\result"; //获取运行环境 ExecutionEnvironment env = ExecutionEnvironment.getExecutionEnvironment(); //获取文件中的内容 DataSource<String> text = env.readTextFile(inputPath); DataSet<Tuple2<String, Integer>> counts = text.flatMap(new Tokenizer()).groupBy(0).sum(1); counts.writeAsCsv(outPath,"\n"," ").setParallelism(1); env.execute("batch word count"); } public static class Tokenizer implements FlatMapFunction<String,Tuple2<String,Integer>>{ public void flatMap(String value, Collector<Tuple2<String, Integer>> out) throws Exception { String[] tokens = value.toLowerCase().split("\\W+"); for (String token: tokens) { if(token.length()>0){ out.collect(new Tuple2<String, Integer>(token,1)); } } } } } -
基于集合 fromCollection(Collection)
2.2 DataSet Transformations
-
Map:输入一个元素,然后返回一个元素,中间可以做一些清洗转换等操作
-
FlatMap:输入一个元素,可以返回零个,一个或者多个元素
-
MapPartition:类似map,一次处理一个分区的数据【如果在进行map处理的时候需要获取第三方资源链接,建议使用MapPartition】
public class BatchDemoMapPartition { public static void main(String[] args) throws Exception{ //获取运行环境 ExecutionEnvironment env = ExecutionEnvironment.getExecutionEnvironment(); ArrayList<String> data = new ArrayList<>(); data.add("hello you"); data.add("hello me"); DataSource<String> text = env.fromCollection(data); /*text.map(new MapFunction<String, String>() { @Override public String map(String value) throws Exception { //获取数据库连接--注意,此时是每过来一条数据就获取一次链接 //处理数据 //关闭连接 return value; } });*/ DataSet<String> mapPartitionData = text.mapPartition(new MapPartitionFunction<String, String>() { @Override public void mapPartition(Iterable<String> values, Collector<String> out) throws Exception { //获取数据库连接--注意,此时是一个分区的数据获取一次连接【优点,每个分区获取一次链接】 //values中保存了一个分区的数据 //处理数据 Iterator<String> it = values.iterator(); while (it.hasNext()) { String next = it.next(); String[] split = next.split("\\W+"); for (String word : split) { out.collect(word); } } //关闭链接 } }); mapPartitionData.print(); } } -
Filter:过滤函数,对传入的数据进行判断,符合条件的数据会被留下
-
Reduce:对数据进行聚合操作,结合当前元素和上一次reduce返回的值进行聚合操作,然后返回一个新的值
-
Aggregate:sum、max、min等
-
Distinct:返回一个数据集中去重之后的元素,data.distinct()
public class BatchDemoDistinct { public static void main(String[] args) throws Exception{ //获取运行环境 ExecutionEnvironment env = ExecutionEnvironment.getExecutionEnvironment(); ArrayList<String> data = new ArrayList<>(); data.add("hello you"); data.add("hello me"); DataSource<String> text = env.fromCollection(data); FlatMapOperator<String, String> flatMapData = text.flatMap(new FlatMapFunction<String, String>() { @Override public void flatMap(String value, Collector<String> out) throws Exception { String[] split = value.toLowerCase().split("\\W+"); for (String word : split) { System.out.println("单词:"+word); out.collect(word); } } }); flatMapData.distinct()// 对数据进行整体去重 .print(); } } -
Join:内连接
public class BatchDemoJoin { public static void main(String[] args) throws Exception{ //获取运行环境 ExecutionEnvironment env = ExecutionEnvironment.getExecutionEnvironment(); //tuple2<用户id,用户姓名> ArrayList<Tuple2<Integer, String>> data1 = new ArrayList<>(); data1.add(new Tuple2<>(1,"zs")); data1.add(new Tuple2<>(2,"ls")); data1.add(new Tuple2<>(3,"ww")); //tuple2<用户id,用户所在城市> ArrayList<Tuple2<Integer, String>> data2 = new ArrayList<>(); data2.add(new Tuple2<>(1,"beijing")); data2.add(new Tuple2<>(2,"shanghai")); data2.add(new Tuple2<>(3,"guangzhou")); DataSource<Tuple2<Integer, String>> text1 = env.fromCollection(data1); DataSource<Tuple2<Integer, String>> text2 = env.fromCollection(data2); text1.join(text2).where(0)//指定第一个数据集中需要进行比较的元素角标 .equalTo(0)//指定第二个数据集中需要进行比较的元素角标 .with(new JoinFunction<Tuple2<Integer,String>, Tuple2<Integer,String>, Tuple3<Integer,String,String>>() { @Override public Tuple3<Integer, String, String> join(Tuple2<Integer, String> first, Tuple2<Integer, String> second) throws Exception { return new Tuple3<>(first.f0,first.f1,second.f1); } }).print(); //注意,这里用map和上面使用的with最终效果是一致的。 /*text1.join(text2).where(0)//指定第一个数据集中需要进行比较的元素角标 .equalTo(0)//指定第二个数据集中需要进行比较的元素角标 .map(new MapFunction<Tuple2<Tuple2<Integer,String>,Tuple2<Integer,String>>, Tuple3<Integer,String,String>>() { @Override public Tuple3<Integer, String, String> map(Tuple2<Tuple2<Integer, String>, Tuple2<Integer, String>> value) throws Exception { return new Tuple3<>(value.f0.f0,value.f0.f1,value.f1.f1); } }).print();*/ } } -
OuterJoin:外链接
public class BatchDemoOuterJoin { public static void main(String[] args) throws Exception{ //获取运行环境 ExecutionEnvironment env = ExecutionEnvironment.getExecutionEnvironment(); //tuple2<用户id,用户姓名> ArrayList<Tuple2<Integer, String>> data1 = new ArrayList<>(); data1.add(new Tuple2<>(1,"zs")); data1.add(new Tuple2<>(2,"ls")); data1.add(new Tuple2<>(3,"ww")); //tuple2<用户id,用户所在城市> ArrayList<Tuple2<Integer, String>> data2 = new ArrayList<>(); data2.add(new Tuple2<>(1,"beijing")); data2.add(new Tuple2<>(2,"shanghai")); data2.add(new Tuple2<>(4,"guangzhou")); DataSource<Tuple2<Integer, String>> text1 = env.fromCollection(data1); DataSource<Tuple2<Integer, String>> text2 = env.fromCollection(data2); /** * 左外连接 * * 注意:second这个tuple中的元素可能为null * */ text1.leftOuterJoin(text2) .where(0) .equalTo(0) .with(new JoinFunction<Tuple2<Integer,String>, Tuple2<Integer,String>, Tuple3<Integer,String,String>>() { @Override public Tuple3<Integer, String, String> join(Tuple2<Integer, String> first, Tuple2<Integer, String> second) throws Exception { if(second==null){ return new Tuple3<>(first.f0,first.f1,"null"); }else{ return new Tuple3<>(first.f0,first.f1,second.f1); } } }).print(); /** * 右外连接 * * 注意:first这个tuple中的数据可能为null * */ text1.rightOuterJoin(text2) .where(0) .equalTo(0) .with(new JoinFunction<Tuple2<Integer,String>, Tuple2<Integer,String>, Tuple3<Integer,String,String>>() { @Override public Tuple3<Integer, String, String> join(Tuple2<Integer, String> first, Tuple2<Integer, String> second) throws Exception { if(first==null){ return new Tuple3<>(second.f0,"null",second.f1); } return new Tuple3<>(first.f0,first.f1,second.f1); } }).print(); /** * 全外连接 * * 注意:first和second这两个tuple都有可能为null * */ text1.fullOuterJoin(text2) .where(0) .equalTo(0) .with(new JoinFunction<Tuple2<Integer,String>, Tuple2<Integer,String>, Tuple3<Integer,String,String>>() { @Override public Tuple3<Integer, String, String> join(Tuple2<Integer, String> first, Tuple2<Integer, String> second) throws Exception { if(first==null){ return new Tuple3<>(second.f0,"null",second.f1); }else if(second == null){ return new Tuple3<>(first.f0,first.f1,"null"); }else{ return new Tuple3<>(first.f0,first.f1,second.f1); } } }).print(); } } -
Cross:获取两个数据集的笛卡尔积
public class BatchDemoCross { public static void main(String[] args) throws Exception{ //获取运行环境 ExecutionEnvironment env = ExecutionEnvironment.getExecutionEnvironment(); //tuple2<用户id,用户姓名> ArrayList<String> data1 = new ArrayList<>(); data1.add("zs"); data1.add("ww"); //tuple2<用户id,用户所在城市> ArrayList<Integer> data2 = new ArrayList<>(); data2.add(1); data2.add(2); DataSource<String> text1 = env.fromCollection(data1); DataSource<Integer> text2 = env.fromCollection(data2); CrossOperator.DefaultCross<String, Integer> cross = text1.cross(text2); cross.print(); } -
Union:返回两个数据集的总和,数据类型需要一致
-
First-n:获取集合中的前N个元素
-
Sort Partition:在本地对数据集的所有分区进行排序,通过sortPartition()的链接调用来完成对多个字段的排序
public class BatchDemoFirstN {
  public static void main(String[] args) throws Exception{
      //获取运行环境
      ExecutionEnvironment env = ExecutionEnvironment.getExecutionEnvironment();
      ArrayList<Tuple2<Integer, String>> data = new ArrayList<>();
      data.add(new Tuple2<>(2,"zs"));
      data.add(new Tuple2<>(4,"ls"));
      data.add(new Tuple2<>(3,"ww"));
      data.add(new Tuple2<>(1,"xw"));
      data.add(new Tuple2<>(1,"aw"));
      data.add(new Tuple2<>(1,"mw"));

      DataSource<Tuple2<Integer, String>> text = env.fromCollection(data);
      //获取前3条数据,按照数据插入的顺序
      text.first(3).print();
      System.out.println("==============================");

      //根据数据中的第一列进行分组,获取每组的前2个元素
      text.groupBy(0).first(2).print();
      System.out.println("==============================");

      //根据数据中的第一列分组,再根据第二列进行组内排序[升序],获取每组的前2个元素
      text.groupBy(0).sortGroup(1, Order.ASCENDING).first(2).print();
      System.out.println("==============================");

      //不分组,全局排序获取集合中的前3个元素,针对第一个元素升序,第二个元素倒序
      text.sortPartition(0,Order.ASCENDING).sortPartition(1,Order.DESCENDING).first(3).print();
  }
}
2.3 DataSet partition
-
Rebalance:对数据集进行再平衡,重分区,消除数据倾斜
-
Hash-Partition:根据指定key的哈希值对数据集进行分区
partitionByHash()
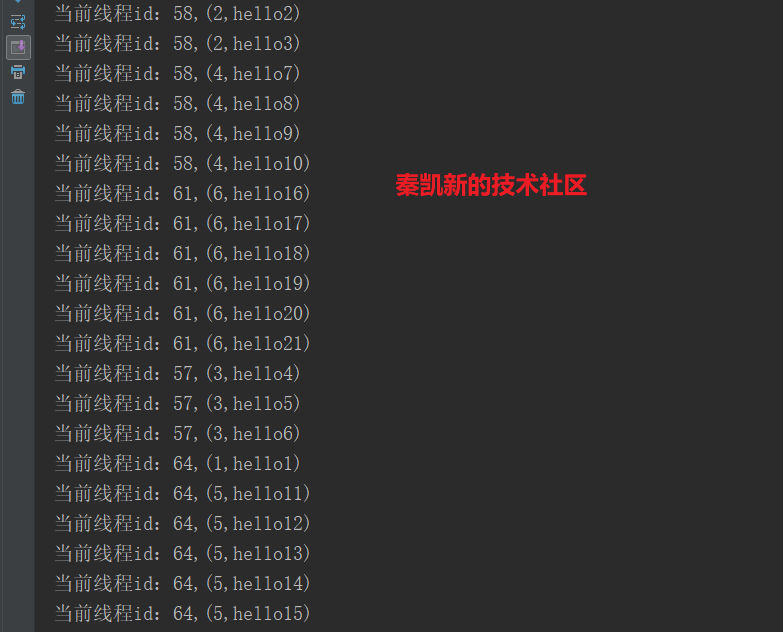
- Range-Partition:根据指定的key对数据集进行范围分区 .partitionByRange()
-
Custom Partitioning:自定义分区规则
自定义分区需要实现Partitioner接口
partitionCustom(partitioner, "someKey")
partitionCustom(partitioner, 0)
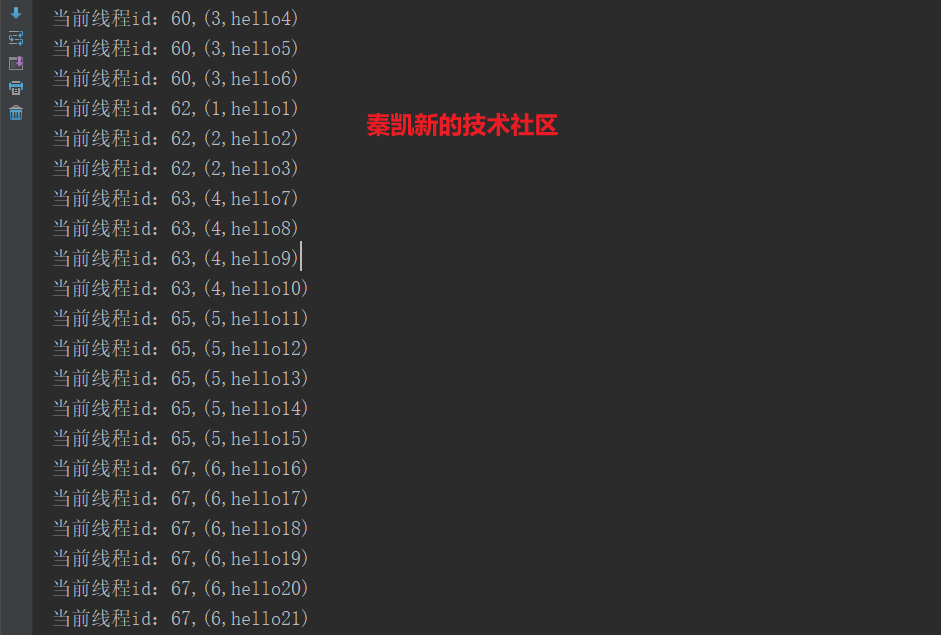
  public class BatchDemoHashRangePartition {
      public static void main(String[] args) throws Exception{
          //获取运行环境
          ExecutionEnvironment env = ExecutionEnvironment.getExecutionEnvironment();

          ArrayList<Tuple2<Integer, String>> data = new ArrayList<>();
          data.add(new Tuple2<>(1,"hello1"));
          data.add(new Tuple2<>(2,"hello2"));
          data.add(new Tuple2<>(2,"hello3"));
          data.add(new Tuple2<>(3,"hello4"));
          data.add(new Tuple2<>(3,"hello5"));
          data.add(new Tuple2<>(3,"hello6"));
          data.add(new Tuple2<>(4,"hello7"));
          data.add(new Tuple2<>(4,"hello8"));
          data.add(new Tuple2<>(4,"hello9"));
          data.add(new Tuple2<>(4,"hello10"));
          data.add(new Tuple2<>(5,"hello11"));
          data.add(new Tuple2<>(5,"hello12"));
          data.add(new Tuple2<>(5,"hello13"));
          data.add(new Tuple2<>(5,"hello14"));
          data.add(new Tuple2<>(5,"hello15"));
          data.add(new Tuple2<>(6,"hello16"));
          data.add(new Tuple2<>(6,"hello17"));
          data.add(new Tuple2<>(6,"hello18"));
          data.add(new Tuple2<>(6,"hello19"));
          data.add(new Tuple2<>(6,"hello20"));
          data.add(new Tuple2<>(6,"hello21"));


          DataSource<Tuple2<Integer, String>> text = env.fromCollection(data);

          /*text.partitionByHash(0).mapPartition(new MapPartitionFunction<Tuple2<Integer,String>, Tuple2<Integer,String>>() {
              @Override
              public void mapPartition(Iterable<Tuple2<Integer, String>> values, Collector<Tuple2<Integer, String>> out) throws Exception {
                  Iterator<Tuple2<Integer, String>> it = values.iterator();
                  while (it.hasNext()){
                      Tuple2<Integer, String> next = it.next();
                      System.out.println("当前线程id:"+Thread.currentThread().getId()+","+next);
                  }

              }
          }).print();*/

          text.partitionByRange(0).mapPartition(new MapPartitionFunction<Tuple2<Integer,String>, Tuple2<Integer,String>>() {
              @Override
              public void mapPartition(Iterable<Tuple2<Integer, String>> values, Collector<Tuple2<Integer, String>> out) throws Exception {
                  Iterator<Tuple2<Integer, String>> it = values.iterator();
                  while (it.hasNext()){
                      Tuple2<Integer, String> next = it.next();
                      System.out.println("当前线程id:"+Thread.currentThread().getId()+","+next);
                  }
              }
          }).print();
      }
  }
2.4 DataSet Sink
- writeAsText():将元素以字符串形式逐行写入,这些字符串通过调用每个元素的toString()方法来获取
- writeAsCsv():将元组以逗号分隔写入文件中,行及字段之间的分隔是可配置的。每个字段的值来自对象的toString()方法
- print():打印每个元素的toString()方法的值到标准输出或者标准错误输出流中
3 Flink 序列化器
-
Flink自带了针对诸如int,long,String等标准类型的序列化器
-
针对Flink无法实现序列化的数据类型,我们可以交给Avro和Kryo
-
使用方法:ExecutionEnvironment env = ExecutionEnvironment.getExecutionEnvironment();
  使用avro序列化:env.getConfig().enableForceAvro();
  使用kryo序列化:env.getConfig().enableForceKryo();
  使用自定义序列化:env.getConfig().addDefaultKryoSerializer(Class<?> type, Class<? extends Serializer<?>> serializerClass)
  https://ci.apache.org/projects/flink/flink-docs-release-1.6/dev/custom_serializers.html
4 Flink 数据类型
-
Java Tuple 和 Scala case class
-
Java POJOs:java实体类
-
Primitive Types
默认支持java和scala基本数据类型
-
General Class Types
默认支持大多数java和scala class
-
Hadoop Writables 支持hadoop中实现了org.apache.hadoop.Writable的数据类型
-
Special Types
例如scala中的Either Option 和Try
https://ci.apache.org/projects/flink/flink-docs-release-1.6/dev/api_concepts.html#supported-data-types
4 总结

秦凯新 于深圳 201812022220
