

此文基于react natve的 September 2018 - revision 5 版本
本人学校毕业后就当了安卓爬坑专业户,3年来总算爬习惯了,不料今年掉进了RN这个天坑,从此开始了我的悲惨人生。。。Anyway,RN的思想还是值得学习的,今天就从Android的角度开始分析一下react native的基础组件如何加载,看看它们与原生控件间的映射关系。
Android端源码浅析
安卓老司机看页面的实现原理,必然首先看Activity,其次看View,RN在安卓端的加载开端也是如此。
以下是截至此文发布前最新的RN官方教程中的例子(RN官方教程和RN源码一样,一日三变,习惯就好) :
public class MyReactActivity extends Activity implements DefaultHardwareBackBtnHandler {
    private ReactRootView mReactRootView;
    private ReactInstanceManager mReactInstanceManager;

    @Override
    protected void onCreate(Bundle savedInstanceState) {
        super.onCreate(savedInstanceState);

        mReactRootView = new ReactRootView(this);
        mReactInstanceManager = ReactInstanceManager.builder()
                .setApplication(getApplication())
                .setBundleAssetName("index.android.bundle")
                .setJSMainModulePath("index")
                .addPackage(new MainReactPackage())
                .setUseDeveloperSupport(BuildConfig.DEBUG)
                .setInitialLifecycleState(LifecycleState.RESUMED)
                .build();
        mReactRootView.startReactApplication(mReactInstanceManager, "MyReactNativeApp", null);

        setContentView(mReactRootView);
    }
}
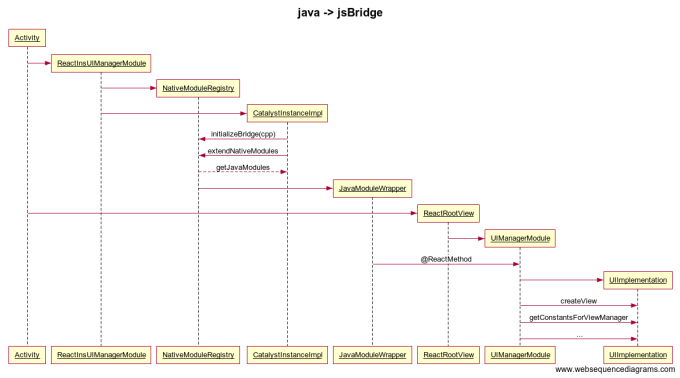
从上面的代码中可以看出,承载RN页面显示的也是一个普通的Activity,但setContentView中传入的却是一个特定的ReactRootView,也就是说加载全部在这个ReactRootView中完成。ReactInstanceManager类似于一个代理,承接了IO,通信,布局及其他一些逻辑性操作,下文中还会提到。
public class ReactRootView extends SizeMonitoringFrameLayout
    implements RootView, MeasureSpecProvider {
  ...
  @Override
  protected void onLayout(boolean changed, int left, int top, int right, int bottom) {
    // No-op since UIManagerModule handles actually laying out children.
  }
}
上面的代码省略了大部分与本文无关的代码,但也可以看出ReactRootView并没有三头六臂,它只不过是一个很普通的继承自SizeMonitoringFrameLayout(FrameLayout)的控件容器,而且它的onLayout方法是空的,从注释中可以看出子控件的布局在UIManagerModule中实现。
public class UIManagerModule extends ReactContextBaseJavaModule
    implements OnBatchCompleteListener, LifecycleEventListener, UIManager {
  private final UIImplementation mUIImplementation;
  ...
  @ReactMethod(isBlockingSynchronousMethod = true)
  public @Nullable WritableMap getConstantsForViewManager(final String viewManagerName) {
    ...
    // 根据viewManagerName获取ViewManager的映射
    return computeConstantsForViewManager(viewManagerName);
  }

  @Override
  public <T extends SizeMonitoringFrameLayout & MeasureSpecProvider> int addRootView(
      final T rootView, WritableMap initialProps, @Nullable String initialUITemplate) {
    ...
    // 获取ReactRootView对象的引用,以便于再里面添加View
    mUIImplementation.registerRootView(rootView, tag, themedRootContext);
    ...
  }
  // 该注解的方法都是可以在js代码中调用的
  @ReactMethod
  public void createView(int tag, String className, int rootViewTag, ReadableMap props) {
    if (DEBUG) {
      ...
    }
    // 实现的是reactRootView.addView()
    mUIImplementation.createView(tag, className, rootViewTag, props);
  }
  ...
}
同样,UIManagerModule里面也没有太多东西,它主要是用于暴露方法供js调用的,具体实现是由UIImplementation来完成的。被@ReactMethod注解的方法都可以在js代码中被调用到,包括:removeRootView,createView,measure,measureLayout,manageChildren等等,可见子控件的add,measure,layout,remove等操作都是由js调用UIManagerModule相应的方法后完成。
public class UIImplementation {
  ...
  public void createView(int tag, String className, int rootViewTag, ReadableMap props) {
    //构建ReactShadowNode
    ReactShadowNode cssNode = createShadowNode(className);
    ReactShadowNode rootNode = mShadowNodeRegistry.getNode(rootViewTag);
    Assertions.assertNotNull(rootNode, "Root node with tag " + rootViewTag + " doesn't exist");
    cssNode.setReactTag(tag);
    cssNode.setViewClassName(className);
    cssNode.setRootTag(rootNode.getReactTag());
    cssNode.setThemedContext(rootNode.getThemedContext());

    mShadowNodeRegistry.addNode(cssNode);
    ...
  }
  ...
}
以上就是createView的具体实现,它主要做的是构造了一个ReactShadowNode。
再看看createShadowNode:
protected ReactShadowNode createShadowNode(String className) {
  ViewManager viewManager = mViewManagers.get(className);
  return viewManager.createShadowNodeInstance(mReactContext);
}
它是通过className获取到ViewManager。问题来了,ViewManager是什么?看它的源码可知它是一个抽象类,从它的源码很难看出它是干什么用的,但一看继承自它的子类就豁然开朗了,它的子类包括ReactTextInputManager,ReactTextViewManager,ReactImageManager,SwipeRefreshLayoutManager,ReactCheckBoxManager,ReactProgressBarViewManager,ReactScrollViewManager等等等。从类名上看,这不就是Android的各种控件吗?查看源码后果然如此。
以ReactTextViewManager为例:
public class ReactTextViewManager
    extends ReactTextAnchorViewManager<ReactTextView, ReactTextShadowNode> {
    ...
}
public class ReactTextView extends TextView implements ReactCompoundView {
  ...
}
它就是对TextView的封装。由此可见js代码最终都映射到了原生的控件上。
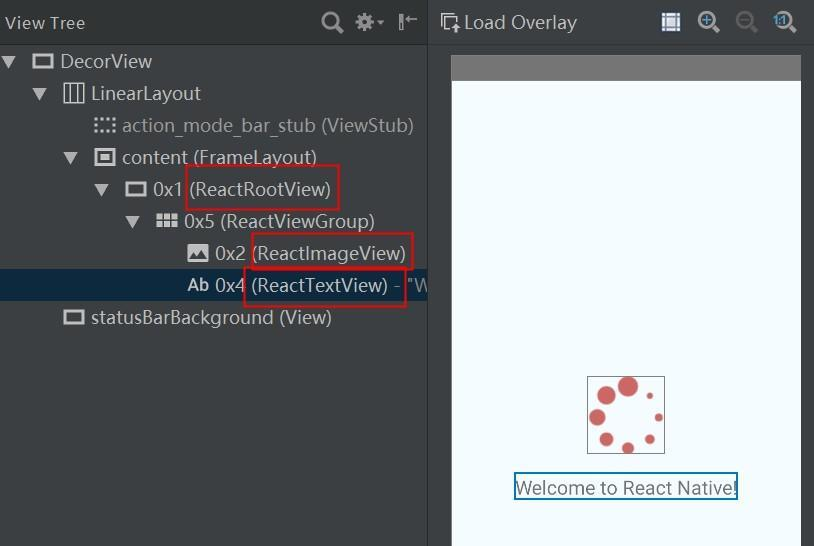
我写了一个很简单的RN页面,只有一个Text和一个Image,通过AS上的Layout Inspector可以清晰地看到,最终显示的是封装过的TextView和ImageView。
再回到@ReactMethod注解,它在JavaModuleWrapper中被获取,再通过NativeModuleRegistry被放到了一个映射表里面:
public class JavaModuleWrapper {
  ...
  private void findMethods() {
    ...
    for (Method targetMethod : targetMethods) {
      // 获取@ReactMethod注解
      ReactMethod annotation = targetMethod.getAnnotation(ReactMethod.class);
    ...
    }
  }
}
public class NativeModuleRegistry {
  /* package */ Collection<JavaModuleWrapper> getJavaModules(JSInstance jsInstance) {
    ArrayList<JavaModuleWrapper> javaModules = new ArrayList<>();
    // 生成映射表
    for (Map.Entry<String, ModuleHolder> entry : mModules.entrySet()) {
      if (!entry.getValue().isCxxModule()) {
        javaModules.add(new JavaModuleWrapper(jsInstance, entry.getValue()));
      }
    }
    return javaModules;
  }
}
public class CatalystInstanceImpl implements CatalystInstance {
  static {
    // jni
    ReactBridge.staticInit();
  }

  @Override
  public void extendNativeModules(NativeModuleRegistry modules) {
    mNativeModuleRegistry.registerModules(modules);
    Collection<JavaModuleWrapper> javaModules = modules.getJavaModules(this);
    Collection<ModuleHolder> cxxModules = modules.getCxxModules();
    // 将原生方法的映射表传给jsBridge
    jniExtendNativeModules(javaModules, cxxModules);
  }

  // C++的方法
  private native void jniExtendNativeModules(
    Collection<JavaModuleWrapper> javaModules,
    Collection<ModuleHolder> cxxModules);
  ...
}
最后定位到CatalystInstanceImpl,它内部初始化了ReactBridge(jsBridge),也就是说@ReactMethod注解的方法都放到了一个注册表里面供jsBridge随时调用。
而CatalystInstanceImpl也是在ReactInstanceManager内部实例化的,兜兜转转又回到了开头的ReactInstanceManager,也就是说jsBridge映射到原生控件的逻辑都在它内部实现。
小结
Android端的加载过程大致如下:
- jsBridge映射到
UIManagerModule中有@ReactMethod的方法上; UIManagerModule中针对控件的操作由UIImplementation代理,完成控件的add,measure,layout,remove等操作;- 所有控件最终添加到
ReactRootView中,最终由它完成总体的加载并显示。
至此,Android端相关的逻辑已经差不多了,接下来看看在js端又是怎么映射的。
js端源码浅析
先来一段上文中提到过的RN页面的代码:
type Props = {};
class App extends Component<Props> {
    render() {
        return (
            <View style={styles.container}>
                <Image
                    style={styles.image}
                    source={require('./img.png')}>
                </Image>
                <Text style={styles.welcome}>Welcome to React Native!</Text>
            </View>
        );
    }
}

export default App;
css代码不是重点,所以被我省略了,上面只有js和,JSX,一种js的语法糖,所有基础组件都会以JSX的形式置于Component的render方法中。
接下来看看Component是怎么实现的:
const Component = class extends RealComponent {
    render() {
      const name = RealComponent.displayName || RealComponent.name;
      return React.createElement(
        name.replace(/^(RCT|RK)/,''),
        this.props,
        this.props.children,
      );
    }
  };
最终JSX会在React.createElement方法中被翻译成js代码,有兴趣的童鞋可以查查React框架,这里就不多展开了。
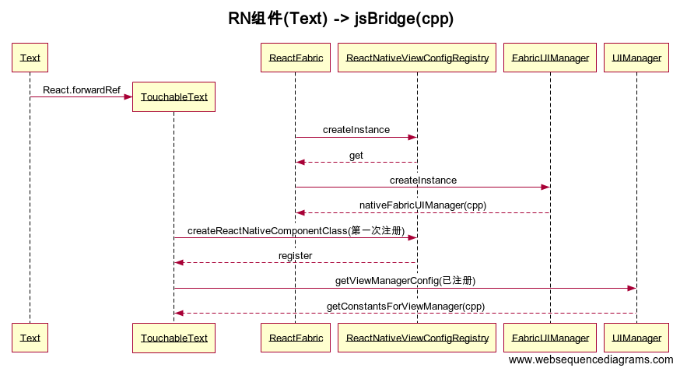
现在回到例子代码中的基础组件,以Text为例,看看它的源码:
...
const RCTVirtualText =
  UIManager.getViewManagerConfig('RCTVirtualText') == null
    ? RCTText
    : createReactNativeComponentClass('RCTVirtualText', () => ({
        validAttributes: {
          ...ReactNativeViewAttributes.UIView,
          isHighlighted: true,
          maxFontSizeMultiplier: true,
        },
        uiViewClassName: 'RCTVirtualText',
      }));

const Text = (
  props: TextProps,
  forwardedRef: ?React.Ref<'RCTText' | 'RCTVirtualText'>,
) => {
  return <TouchableText {...props} forwardedRef={forwardedRef} />;
};
const TextToExport = React.forwardRef(Text);
TextToExport.displayName = 'Text';
TextToExport.propTypes = DeprecatedTextPropTypes;
module.exports = (TextToExport: Class<NativeComponent<TextProps>>);
Text的源码不少,对于非专业前端,看起来比较吃力,但也有捷径,从对外暴露点开始找,也就是从module.exports开始,到TextToExport,再到Text,再到RCTVirtualText,最后定位到了UIManager.getViewManagerConfig。
UIManager.getViewManagerConfig = function(viewManagerName: string) {
  if (
    viewManagerConfigs[viewManagerName] === undefined &&
    UIManager.getConstantsForViewManager
  ) {
    try {
      viewManagerConfigs[
        viewManagerName
      ] = UIManager.getConstantsForViewManager(viewManagerName);
    } catch (e) {
      viewManagerConfigs[viewManagerName] = null;
    }
  }
  ...
};
看到getConstantsForViewManager,是不是觉得很眼熟?没错,它就是上一板块Android源码中提到的UIManagerModule中的方法,让我们再来回顾一下java源码:
  @ReactMethod(isBlockingSynchronousMethod = true)
  public @Nullable WritableMap getConstantsForViewManager(final String viewManagerName) {
    ...
    return computeConstantsForViewManager(viewManagerName);
  }

  private @Nullable WritableMap computeConstantsForViewManager(final String viewManagerName) {
    ViewManager targetView =
        viewManagerName != null ? mUIImplementation.resolveViewManager(viewManagerName) : null;
    if (targetView == null) {
      return null;
    }

    SystraceMessage.beginSection(
            Systrace.TRACE_TAG_REACT_JAVA_BRIDGE, "UIManagerModule.getConstantsForViewManager")
        .arg("ViewManager", targetView.getName())
        .arg("Lazy", true)
        .flush();
    try {
      Map<String, Object> viewManagerConstants =
          UIManagerModuleConstantsHelper.createConstantsForViewManager(
              targetView, null, null, null, mCustomDirectEvents);
      if (viewManagerConstants != null) {
        return Arguments.makeNativeMap(viewManagerConstants);
      }
      return null;
    } finally {
      SystraceMessage.endSection(Systrace.TRACE_TAG_REACT_JAVA_BRIDGE).flush();
    }
  }
这个方法的作用就是从缓存中获取ViewManager对象,装入WritableMap后回传给了js,而WritableMap在js中以对象的形式存在。
再回到UIManager,它除了可以调用getConstantsForViewManager,上个板块提到的被@ReactMethod注解的方法诸如removeRootView,createView,measure,measureLayout等等在js中的映射都是由它来调用,也就是说js调用原生控件的映射都由UIManager来完成。
再看一眼UIManager的源码:
const NativeModules = require('NativeModules');
const {UIManager} = NativeModules;
...
module.exports = UIManager;
看来UIManager只不过是对NativeModules的二次封装。写过RN的童鞋对此肯定不陌生,写js和原生通信的相关代码中肯定会用到NativeModules,它是js和原生代码通信的桥梁。
至于NativeModules和C++的交互过程,这里就简单讲一下,NativeModules内部的有一个BatchedBridge(即MessageQueue)的对象:
class MessageQueue {
  // js注册的回调,供原生代码调用
  _lazyCallableModules: {[key: string]: (void) => Object};
  // js调用原生代码请求的缓存列表
  _queue: [number[], number[], any[], number];

  // js调用原生方法的请求
  enqueueNativeCall(
    moduleID: number,
    methodID: number,
    params: any[],
    onFail: ?Function,
    onSucc: ?Function,
  ) {
    ...
    // 把请求打包成一个Message,放入缓存列表
    this._queue[MODULE_IDS].push(moduleID);
    this._queue[METHOD_IDS].push(methodID);
    this._queue[PARAMS].push(params);
    if (
      global.nativeFlushQueueImmediate &&
      (now - this._lastFlush >= MIN_TIME_BETWEEN_FLUSHES_MS ||
        this._inCall === 0)
    ) {
      var queue = this._queue;
      this._queue = [[], [], [], this._callID];
      this._lastFlush = now;
      // 如果是同步请求,则请求的message立即入列,否则等待flushedQueue()的执行
      // 这是一个C++的函数
      global.nativeFlushQueueImmediate(queue);
    }
  }

  // 将缓存的请求列表全部入列
  flushedQueue() {
    this.__guard(() => {
      this.__callImmediates();
    });

    const queue = this._queue;
    this._queue = [[], [], [], this._callID];
    return queue[0].length ? queue : null;
  }

  // 注册回调接口
  registerCallableModule(name: string, module: Object) {
    this._lazyCallableModules[name] = () => module;
  }
  ...
}
它内部保存了js中对外暴露的方法和模块的映射表供jsBridge调用,如果需要调用原生代码中的方法,MessageQueue会将请求封装成一个Message放入一个请求队列,然后触发原生的方法。看着怎么这么像Android中的Handler机制?原因很简单,js执行的线程是独立于原生代码所在的UI线程的,线程间通信最简单的还是类似Handler这样的方式。
小结
RN基础组件映射到原生在js端的表现大致如下:
- JSX形式的RN基础组件首先会被翻译成js代码;
- 组件会在js代码中调用
UIManager相应的方法; - 由
UIManager通过jsBridge映射到原生方法UIManagerModule中;
C++源码浅析
Android端和js端都已经介绍完毕了,就像扁担两头的货物都准备完毕了,就差根扁担了,jsBridge就是这根扁担。
先来看一下与CatalystInstanceImpl.java对应的CatalystInstanceImpl.cpp:
void CatalystInstanceImpl::registerNatives() {
  registerHybrid({
     // jniExtendNativeModules就是CatalystInstanceImpl.java中那个传入原生方法映射表的native方法
     // 它被指向了extendNativeModules方法
     makeNativeMethod("jniExtendNativeModules", CatalystInstanceImpl::extendNativeModules),
     ...
   });

   JNativeRunnable::registerNatives();
}

void CatalystInstanceImpl::extendNativeModules(
    jni::alias_ref<jni::JCollection<JavaModuleWrapper::javaobject>::javaobject> javaModules,
    jni::alias_ref<jni::JCollection<ModuleHolder::javaobject>::javaobject> cxxModules) {
      // 注册映射表
      moduleRegistry_->registerModules(buildNativeModuleList(
        std::weak_ptr<Instance>(instance_),
        javaModules,
        cxxModules,
        moduleMessageQueue_));
 }
可见CatalystInstanceImpl的这部分代码就是用来注册原生方法的映射表的。
再来看看js中调用C++的方法nativeFlushQueueImmediate,以下代码位于JSIExecutor.cpp中:
runtime_->global().setProperty(
      *runtime_,
      "nativeFlushQueueImmediate",
      Function::createFromHostFunction(
          *runtime_,
          PropNameID::forAscii(*runtime_, "nativeFlushQueueImmediate"),
          1,
          [this](
              jsi::Runtime&,
              const jsi::Value&,
              const jsi::Value* args,
              size_t count) {
            if (count != 1) {
              throw std::invalid_argument(
                  "nativeFlushQueueImmediate arg count must be 1");
            }
            // 调用已注册的原生模块
            callNativeModules(args[0], false);
            return Value::undefined();
          }));
以下代码位于JsToNativeBridge.cpp中,它以委托的形式存在,执行上述代码中的callNativeModules:
void callNativeModules(
      JSExecutor& executor, folly::dynamic&& calls, bool isEndOfBatch) override {
    ...
    for (auto& call : parseMethodCalls(std::move(calls))) {
      // 执行已注册的原生模块中的方法
      m_registry->callNativeMethod(call.moduleId, call.methodId, std::move(call.arguments), call.callId);
    }
    ...
  }
最后殊途同归都到了ModuleRegistry.cpp:
// 注册原生模块
void ModuleRegistry::registerModules(std::vector<std::unique_ptr<NativeModule>> modules) {
  ...
}

// 执行原生模块的方法
void ModuleRegistry::callNativeMethod(unsigned int moduleId, unsigned int methodId, folly::dynamic&& params, int callId) {
  ...
  modules_[moduleId]->invoke(methodId, std::move(params), callId);
}
至此,一条完整的映射链已经全部讲完。
总结
本文以一般看源码的顺序来展开,依次解读了Android端,js端和C++的源码,分析了RN基础组件是如何一步步地映射成为原生控件的整个过程,展示了一条完整地映射链条。
最后整理一下整个映射的链条:

以下是一些常用的rn组件与Android原生控件之间的对应关系:
- Text -> TextView
- Image -> ImageView
- TextInput -> EditText
- CheckBox -> AppCompatCheckBox
- RefreshControl -> SwipeRefreshLayout
- ScrollView -> ScrollView
- Slider -> SeekBar
- Switch -> SwitchCompat
