LSP简介
LSP的全称是Language Server Protocol,是微软推出的一项标准化协议,旨在用来统一开发工具与Language Server之前的通信。它支持语言的自动补全、定义跳转、查看定义、查看引用、lint、语法高亮等等,但具体实现要看各种语言的LS支持是否完善。在这之前,各种IDE都需要自己实现一套类似的东西,显得比较重复。借助于LSP,开发工具只要按规则接入该协议,便可以享受到各种语言提供的服务。
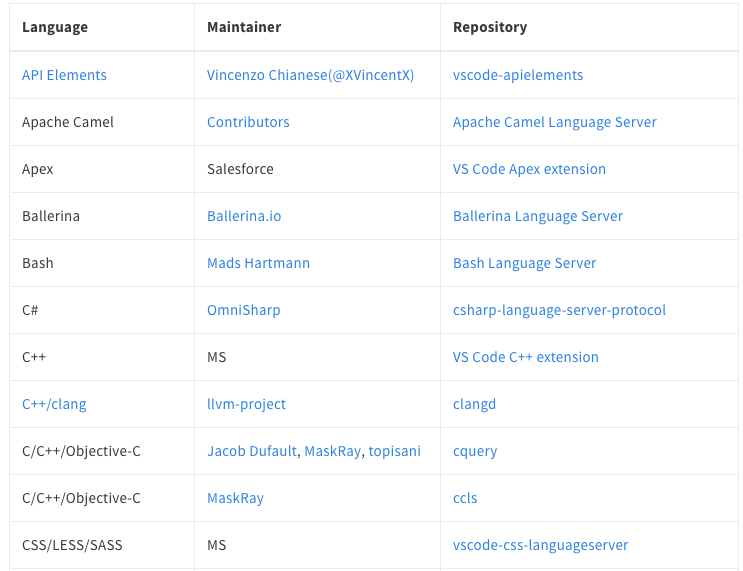
目前支持的语言汇总在这里,下图只截出了部分,维护者有民间组织,微软,还有正牌。比如对swift的支持就是Apple维护的sourcekit-lsp。
LSP如何工作
官网上有段介绍LSP是如何工作的。
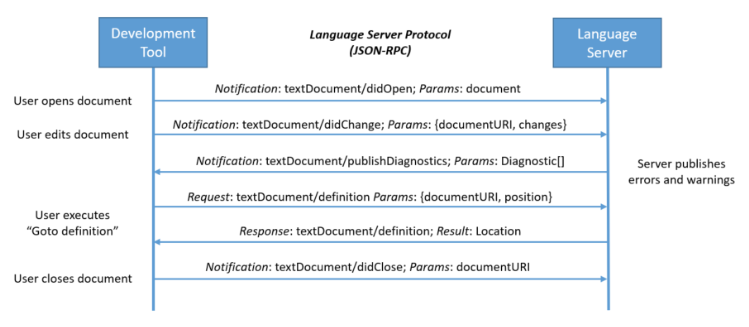
client和server之前使用JSONRPC进行通信,采用request-response的方式,如下图。
主要步骤:
- 用户打开文档,client发送
textDocument/didOpen通知,告诉服务器。这时文件内容保存在内存中。 - 用户编辑文档,client发送
textDocument/didChange通知,然后server会发回textDocument/publishDiagnostics通知,会分析出error和warning。client根据这些error和warning进行对应的UI显示。 - 用户执行跳转到符号定义,client发起
textDocument/definition请求,server返回相关的位置信息。 - 用户关闭文档,client发送
textDocument/didClose通知,文件内容更新到磁盘。
下面来看下具体的request和response,以textDocument/definition来举例。
request:
其主要参数是method,params。params会带上当前的文件信息,要查询定义的符号信息(第几行,第几个字符)
{
    "jsonrpc": "2.0",
    "id" : 1,
    "method": "textDocument/definition",
    "params": {
        "textDocument": {
            "uri": "file:///p%3A/mseng/VSCode/Playgrounds/cpp/use.cpp"
        },
        "position": {
            "line": 3,
            "character": 12
        }
    }
}
response: 响应包括符号定义的文件位置,符号的起始和终止位置。
{
    "jsonrpc": "2.0",
    "id": 1,
    "result": {
        "uri": "file:///p%3A/mseng/VSCode/Playgrounds/cpp/provide.cpp",
        "range": {
            "start": {
                "line": 0,
                "character": 4
            },
            "end": {
                "line": 0,
                "character": 11
            }
        }
    }
}
LSP定义
LSP中定义了很多method,用来区分不同事件。包括请求和通知。
如initialize,是client发给server的第一个请求。
Shutdown,关闭请求。
textDocument/definition,查看符号定义的请求。
...
其详细定义文档在这里。
VSCode中安装swift LSP
众所周知,VSCode是一款功能强大的编辑器,其提供了非常丰富的插件来支持各种语言的开发,并且它是众多编辑器中率先支持LSP的。
Swift For LSP还在早期开发的阶段,因此并没有提供安装包或者插件。所以目前我们只能手动下载安装。步骤如下:
安装XCode
这步应该可以略过。
安装VSCode
这步应该也可以略过。
安装最新swift toolChain
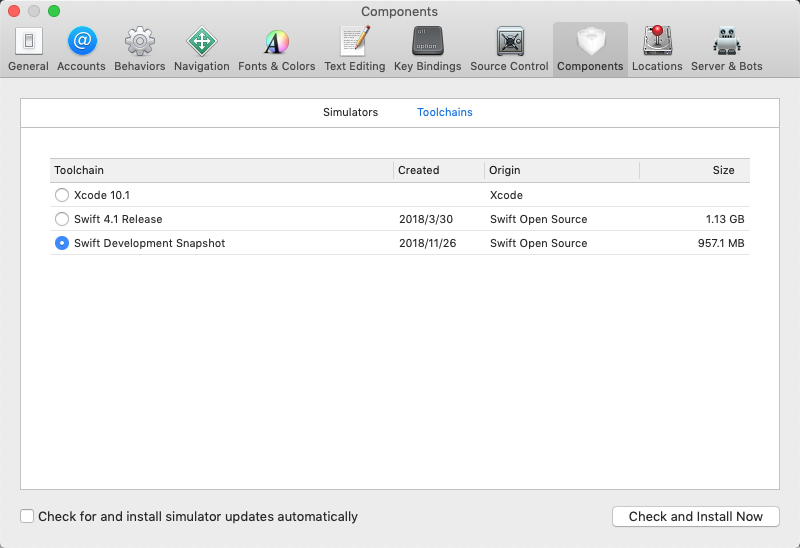
到Swift.org下载最新的主干包,安装好之后,到XCode->Preferences->Components选择刚安装的toolchain。或者这里不选择,在vscode中设置toolchain的路径。
安装node和npm
由于VSCode的插件都是用js/ts来写的,所以需要js的运行环境。推荐直接下载安装包来安装。
验证是否装好了,可以执行以下命令
nmp --version
编译并安装SourceKit-LSP
clone仓库:
git clone https://github.com/apple/sourcekit-lsp.git
跳转到sourcekit-lsp目录:
cd sourcekit-lsp
编译:
swift build
编译成功后,会在.build/debug找到二进制文件。我们将其移到/usr/local/bin目录下,以便可以直接使用。
mv .build/debug/sourcekit-lsp /usr/local/bin
这个命令会启动lsp的进程。
sourcekit-lsp
安装SourceKit-LSP插件
该插件的作用是让VSCode与SourceKit-LSP之间可以进行通信。
- 进入到sourceKit-lsp下面的
Editors/vscode/目录
cd Editors/vscode/
- 执行
npm run createDevPackage
npm run createDevPackage
如果在这步遇到npm ERR! 404 Not Found: flatmap-stream@0.1.1的问题,可以尝试删除lock文件,清除缓存试试。
rm package-lock.json
npm cache clean --force
- 安装
sourcekit-lsp-vscode-dev.vsix
code --install-extension out/sourcekit-lsp-vscode-dev.vsix
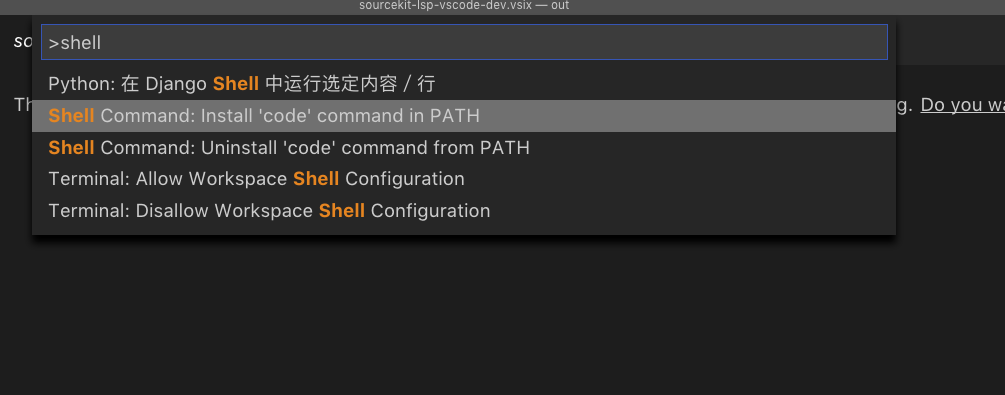
首先要在VSCode中安装code命令,cmd+shift+p,输入shell command,然后安装code命令。如图所示。
重启VSCode。
- 配置sourcekit-lsp
使用快捷键cmd,(或者preference-->settings),进入settings页面,搜索sourcekit-lsp,ToolChain Path中填入之前下载安装的toolchain路径。比如我的是/Library/Developer/Toolchains/swift-DEVELOPMENT-SNAPSHOT-2018-11-25-a.xctoolchain。
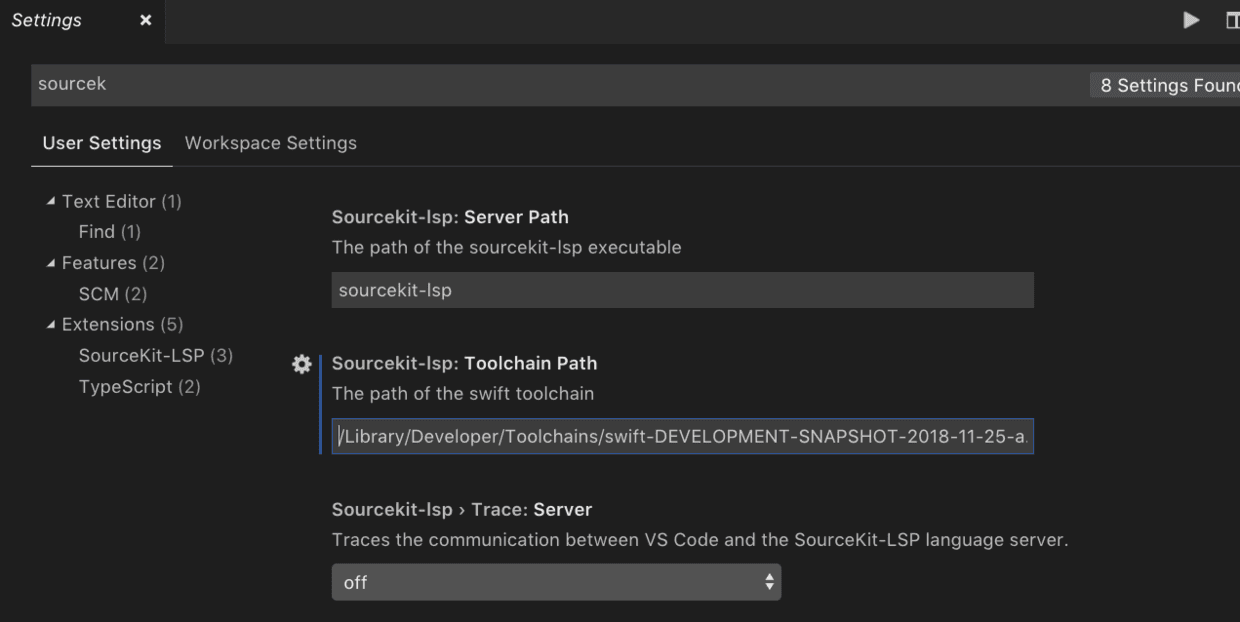
以上就配置完成了。
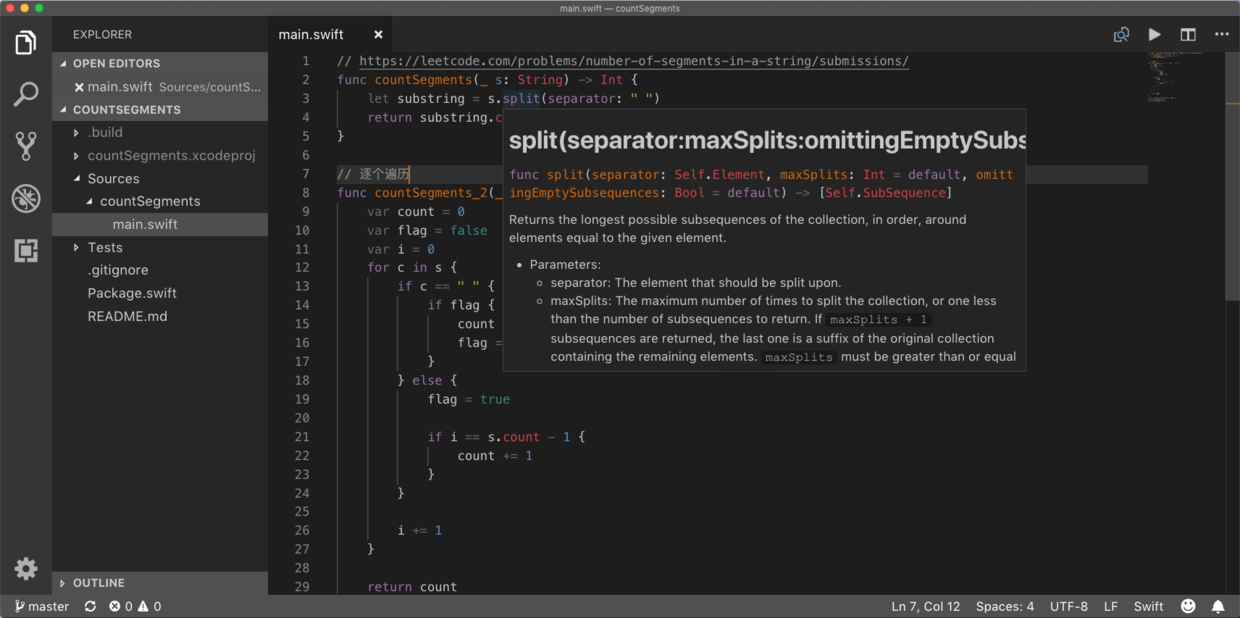
最后,打开一个swift的xcode工程,鼠标停留在关键字上,会展示出具体的定义。如下图。
将设置中的Trace Server打开,设置成message,可以看到请求/响应/通知信息;设置成verbose,会更加详细,具体字段以及内容。其中请求是有id编号的,通知没有。
- 打开工程时,log如下。会依次发送
initialize,initialized,textDocument/didOpen。window/logMessage是server发过来的通知。
[Trace - 3:00:00 PM] Sending request 'initialize - (0)'.
[Trace - 3:00:00 PM] Received notification 'window/logMessage'.
could not open compilation database for /Users/liusilan/Documents/workspace/my/LeetCode/countSegments noEntry
[Trace - 3:00:00 PM] Received notification 'window/logMessage'.
failed to open IndexStoreDB: indexstoredb_index_create error: index store path does not exist: /Users/liusilan/Documents/workspace/my/LeetCode/countSegments/.build/debug/index/store
[Trace - 3:00:00 PM] Received response 'initialize - (0)' in 234ms.
[Trace - 3:00:00 PM] Sending notification 'initialized'.
[Trace - 3:00:00 PM] Sending notification 'textDocument/didOpen'.
[Trace - 3:00:00 PM] Received notification 'textDocument/publishDiagnostics'.
[Trace - 3:00:01 PM] Received notification 'textDocument/publishDiagnostics'.
- 在进行编辑时,log如下。发送
textDocument/didChange,server会返回textDocument/publishDiagnostics。
[Trace - 2:58:57 PM] Sending notification 'textDocument/didChange'.
[Trace - 2:58:57 PM] Received notification 'textDocument/publishDiagnostics'.
[Trace - 2:58:57 PM] Received notification 'textDocument/publishDiagnostics'.
- 鼠标停留时,会发送
textDocument/hover。
[Trace - 2:53:43 PM] Sending request 'textDocument/hover - (3)'.
[Trace - 2:53:43 PM] Received response 'textDocument/hover - (3)' in 3ms.
- 光标点在某行时,会发送
textDocument/documentHighlight。
[Trace - 2:55:07 PM] Sending request 'textDocument/documentHighlight - (22)'.
[Trace - 2:55:07 PM] Received response 'textDocument/documentHighlight - (22)' in 2ms.
- 按住cmd键,查看符号定义时,会发送
textDocument/definition。
[Trace - 2:55:40 PM] Sending request 'textDocument/definition - (43)'.
[Trace - 2:55:40 PM] Received response 'textDocument/definition - (43)' in 8ms.
关于versbose打印的信息,大家可以尝试设置看看。
另外,SouceKit-LSP也是支持Sublime Text的,具体配置可以参照sublime-text配置。
Suorcekit-LSP支持的特性
目前,因为它还在早期开发中,支持的功能还不是很多,相信以后会越来越完善。
| Feature | Status | Notes |
|---|---|---|
| Swift | ✅ | |
| C/C++/ObjC | ❌ | clangd is not available in the recommended toolchain. You can try out C/C++/ObjC support by building clangd from source and putting it in PATH. |
| Code completion | ✅ | |
| Quick Help (Hover) | ✅ | |
| Diagnostics | ✅ | |
| Fix-its | ❌ | |
| Jump to Definition | ✅ | |
| Find References | ✅ | |
| Background Indexing | ❌ | Build project to update the index using Indexing While Building |
| Workspace Symbols | ❌ | |
| Refactoring | ❌ | |
| Formatting | ❌ | |
| Folding | ❌ | |
| Syntax Highlighting | ❌ | Not currently part of LSP. |
| Document Symbols | ❌ |
VSCode调试swift
调试在开发过程中是必不可少的,之前总是生成xcodeproj,然后在xcode中进行调试,总归有些不太方便。
在VSCode中调试swift也挺简单的,步骤如下:
-
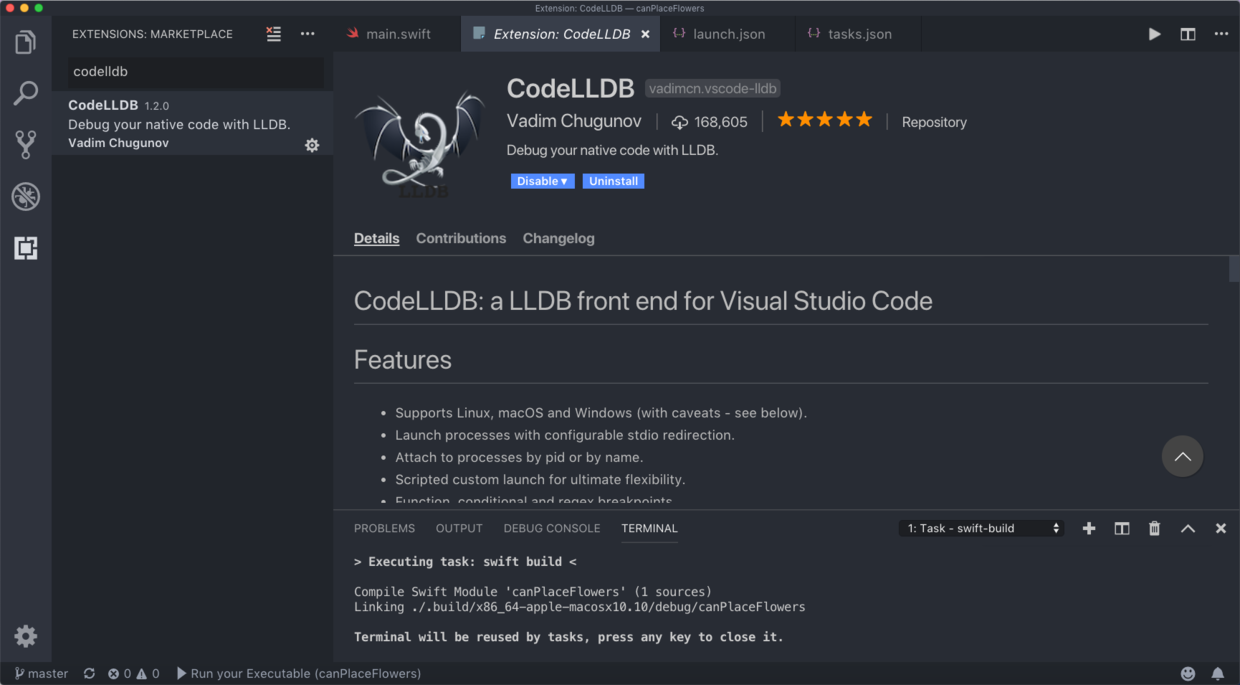
安装插件CoreLLDB
-
配置launch.json
在插件安装完成之后,打开swift工程,按F5,会出现配置弹框,如下。

点击Open launch.json进行配置,具体配置如下:
{
    // Use IntelliSense to learn about possible attributes.
    // Hover to view descriptions of existing attributes.
    // For more information, visit: https://go.microsoft.com/fwlink/?linkid=830387
    "version": "0.2.0",
    "configurations": [
        // Running executables
        {
            "type": "lldb",
            "request": "launch",
            "name": "Run your Executable",
            "program": "${workspaceFolder}/.build/debug/xxx",
            "args": [],
            "cwd": "${workspaceFolder}",
            "preLaunchTask": "swift-build"
        }
    ]
}
注意将"program": "${workspaceFolder}/.build/debug/xxx",中的xxx改成自己工程可执行文件的名字。
- 配置task.json
launch.json配置好后,继续按F5,此时会出现配置task的弹窗,如下图。

点击Configure Task进行配置,如下:
{
    // See https://go.microsoft.com/fwlink/?LinkId=733558
    // for the documentation about the tasks.json format
    "version": "2.0.0",
    "tasks": [
        // compile your SPM project
        {
            "label": "swift-build",
            "type": "shell",
            "command": "swift build"
        },
        // compile your SPM tests
        {
            "label": "swift-build-tests",
            "type": "process",
            "command": "swift",
            "group": "build",
            "args": [
                "build",
                "--build-tests"
            ]
        }]
}
至此,全部配置完成。按F5开始调试,如果仍然出现弹窗,则说明某个地方没配置好,需对比下上面的配置。
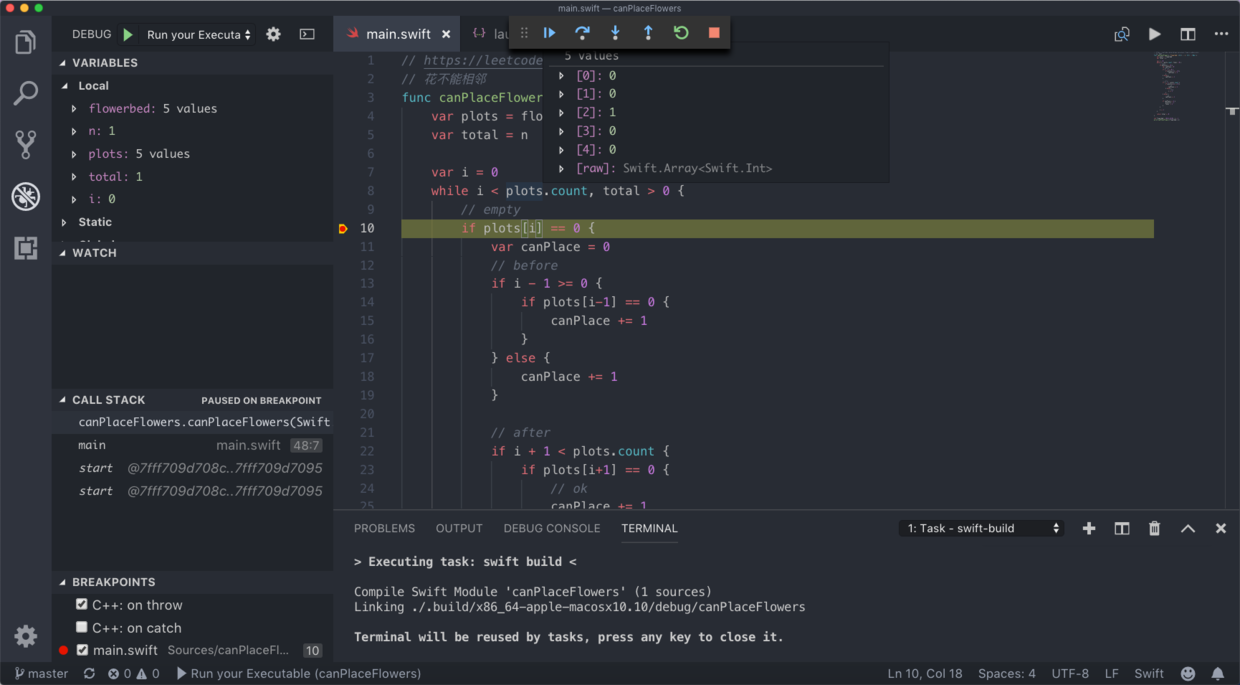
最后就可以愉快的调试了。
