

这一章节进行视频录制,选用MediaCodec, ffmpeg软编效率比较低,这里采用MediaCodec进行编码。
MediaCodec
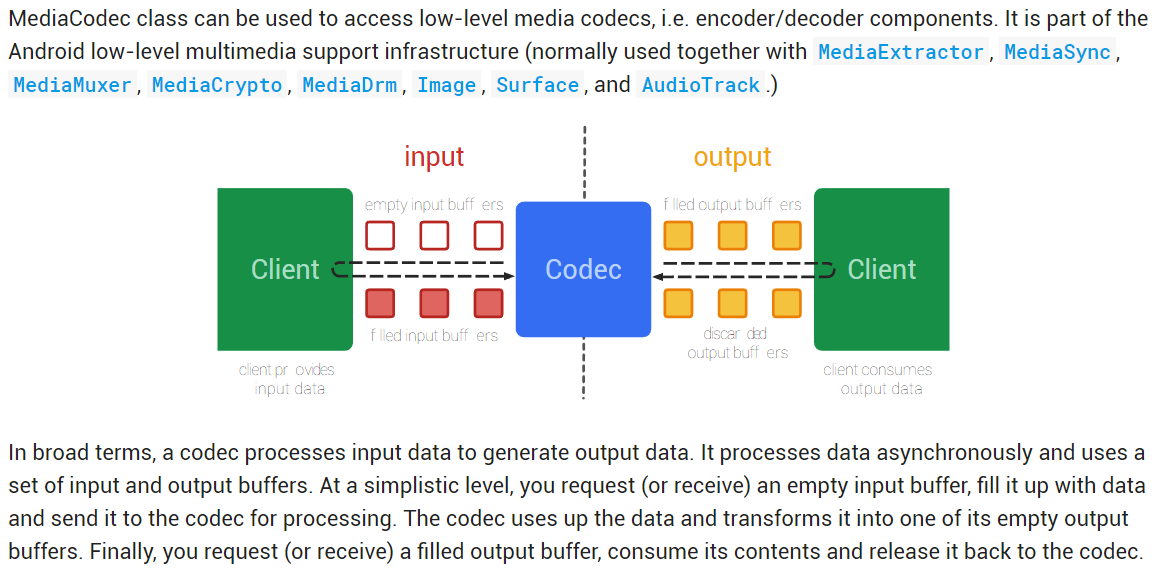
MediaCodec是Android 4.1.2(API 16)提供的一套编解码API。它的使用非常简单,它存在一个输入缓冲区与一个输出缓冲区,在编码时我们将数据塞入输入缓冲区,然后从输出缓冲区取出编码完成后的数据就可以了。
除了直接操作输入缓冲区之外,还有另一种方式来告知MediaCodec需要编码的数据,那就是:
public native final Surface createInputSurface();
使用此接口创建一个Surface,然后我们在这个Surface中"作画",MediaCodec就能够自动的编码Surface中的“画作”,我们只需要从输出缓冲区取出编码完成之后的数据即可。
此前,我们使用OpenGL进行绘画显示在屏幕上,然而想要复制屏幕图像到cpu内存中却不是一件非常轻松的事情。所以我们可以直接将OpenGL显示到屏幕中的图像,同时绘制到MediaCodec#createInputSurface当中去。
PBO(Pixel Buffer Object,像素缓冲对象)通过直接的内存访问(Direct Memory Access,DMA)高速的复制屏幕图像像素数据到CPU内存,但这里我们直接使用
createInputSurface更简单......录制我们在另外一个线程中进行(录制现场),所以录制的EGL环境和显示的EGL环境(
GLSurfaceView,显示线程)是两个独立的工作环境,他们又能够共享上下文资源:显示线程中使用的texture等,需要能够在录制线程中操作(通过录制线程中使用OpenGL绘制到MediaCodec的Surface)。在这个线程中我们需要自己来:
1、配置录制使用的EGL环境(参照GLSurfaceView是怎么配置的)
2、完成将显示的图像绘制到MediaCodec的Surface中
3、编码(H.264)与复用(封装mp4)的工作
视频录制
处理录制Button的回调
recordButton.setOnRecordListener(new RecordButton.OnRecordListener() {
    @Override
    public void onRecordStart() {
    douyinView.startRecord();
    }

    @Override
    public void onRecordStop() {
    douyinView.stopRecord();
    }
 });
然后Douyinview通过 Render中来录制
public void startRecord(float speed) {
        try {
            mMediaRecorder.start(speed);
        } catch (IOException e) {
            e.printStackTrace();
        }
    }

    public void stopRecord() {
        mMediaRecorder.stop();

    }
因为在OpenGL显示到屏幕中的图像的同时绘制到MediaCodec#createInputSurface当中,而这里我们没有GLSurfaceView的EGL环境,所以我们需要自己创建一套EGL环境。
创建编码器MediaRecorder处理类,出入帧率,码率。
/**
 * @param context 上下文
 * @param path 保存视频的地址
 * @param width 视频宽
 * @param height 视频高
 * 还可以让人家传递帧率 fps、码率等参数
*/
public MediaRecorder(Context context, String path, int width, int height, EGLContext eglContext){
        mContext = context.getApplicationContext();
        mPath = path;
        mWidth = width;
        mHeight = height;
        mEglContext = eglContext;
}
给编码器传参:这里的码率、帧率直接写死的。
/**
 * 开始录制视频
*/
public void start(float speed) throws IOException{
   mSpeed = speed;
   /**
    * 配置MediaCodec 编码器
   */
   //视频格式
   // 类型(avc高级编码 h264) 编码出的宽、高
   MediaFormat mediaFormat = MediaFormat.createVideoFormat(
   MediaFormat.MIMETYPE_VIDEO_AVC, mWidth, mHeight);
   //参数配置
   // 1500kbs码率
   mediaFormat.setInteger(MediaFormat.KEY_BIT_RATE, 1500_000);
   //帧率
   mediaFormat.setInteger(MediaFormat.KEY_FRAME_RATE, 20);
   //关键帧间隔
   mediaFormat.setInteger(MediaFormat.KEY_I_FRAME_INTERVAL, 20);
   //颜色格式(RGB\YUV)
   //从surface当中回去
   mediaFormat.setInteger(MediaFormat.KEY_COLOR_FORMAT, MediaCodecInfo.
                         CodecCapabilities.COLOR_FormatSurface);
   //编码器
   mMediaCodec = MediaCodec.createEncoderByType(MediaFormat.MIMETYPE_VIDEO_AVC);
   //将参数配置给编码器
   mMediaCodec.configure(mediaFormat, null, null, MediaCodec.
                        CONFIGURE_FLAG_ENCODE);
   //交给虚拟屏幕 通过opengl 将预览的纹理 绘制到这一个虚拟屏幕中
   //这样MediaCodec 就会自动编码 inputSurface 中的图像
   mInputSurface = mMediaCodec.createInputSurface();
。。。。。。。
}
这样就创建了InputSurface,Mediacodec往这里写数据。
播放的时候我们的顺序是 解封装 ——>解码——>渲染, 所以我们编码完成后,还需要处理对应的封装操作:在GLThread线程中把数据交给我们的虚拟屏幕环境,这里我们通过 HandlerThread拿去Looper给到Handler进行
GLThread跟我们创建的这个子线程之间的通信。
/**
 * 开始录制视频
*/
public void start(float speed) throws IOException{
  //  H.264
  // 播放:
  //  MP4 -> 解复用 (解封装) -> 解码 -> 绘制
  //封装器 复用器
  // 一个 mp4 的封装器 将h.264 通过它写出到文件就可以了
  mMediaMuxer = new MediaMuxer(mPath, MediaMuxer.OutputFormat.MUXER_OUTPUT_MPEG_4);
  /**
   * 配置EGL环境,需要在一个线程中处理,线程间通信
   * Handler
   * Handler: 子线程通知主线程
   * Looper.loop()
   */
  HandlerThread handlerThread = new HandlerThread("VideoCodec");
  handlerThread.start();
  Looper looper = handlerThread.getLooper();
  //用于其他线程 通知子线程
  mHandler = new Handler(looper);
  //子线程:EGL的绑定线程,对我们自己创建的opengl操作都在这个线程当中执行
  mHandler.post(new Runnable() {
    @Override
    public void run() {
        //创建我们的子线程,用于
         mEglBase = new EGLBase(mContext, mWidth, mHeight, mInputSurface, mEglContext);
          //启动编码器
         mMediaCodec.start();
         isStart = true;
       }
     });
}
创建EGL工作环境
- 创建EGLContext
- 创建用于绘制的mEglSurface
- 双缓冲进行绘画 mEglSurface + mEglDisplay进行交替绘制
创建EGLBase来录制Opengl操作需要的EGL环境配置,传入宽、高,surface,参考GLSurfaceView的配置过程。
如代码中所示,创建mEglContext需要传入mEglDisplay、mEglConfig, mEglContext = EGL14.eglCreateContext(mEglDisplay, mEglConfig, eglContext, ctx_attrib_list, 0);
 private void createEGL(EGLContext eglContext) {
        //创建 虚拟显示器
        mEglDisplay = EGL14.eglGetDisplay(EGL14.EGL_DEFAULT_DISPLAY);
        if (mEglDisplay == EGL14.EGL_NO_DISPLAY){
            throw new RuntimeException("eglGetDisplay failed");
        }
        //初始化显示器
        int[] version = new int[2];
        // 12.1020203
        //major:主版本 记录在 version[0]
        //minor : 子版本 记录在 version[1]
        if (!EGL14.eglInitialize(mEglDisplay, version, 0, version, 1)) {
            throw new RuntimeException("eglInitialize failed");
        }
        // egl 根据我们配置的属性 选择一个配置
        int[] attrib_list = {
                EGL14.EGL_RED_SIZE, 8, // 缓冲区中 红分量 位数
                EGL14.EGL_GREEN_SIZE, 8,
                EGL14.EGL_BLUE_SIZE, 8,
                EGL14.EGL_ALPHA_SIZE, 8,
                EGL14.EGL_RENDERABLE_TYPE, EGL14.EGL_OPENGL_ES2_BIT, //egl版本 2
                EGL14.EGL_NONE
        };

        EGLConfig[] configs = new EGLConfig[1];
        int[] num_config = new int[1];
        // attrib_list:属性列表+属性列表的第几个开始
        // configs:获取的配置 (输出参数)
        //num_config: 长度和 configs 一样就行了
        if (!EGL14.eglChooseConfig(mEglDisplay, attrib_list, 0,
                configs, 0, configs.length, num_config, 0)) {
            throw new IllegalArgumentException("eglChooseConfig#2 failed");
        }
        mEglConfig = configs[0];
        int[] ctx_attrib_list = {
                EGL14.EGL_CONTEXT_CLIENT_VERSION, 2, //egl版本 2
                EGL14.EGL_NONE
        };
        //创建EGL上下文
        // 3 share_context: 共享上下文 传绘制线程(GLThread)中的EGL上下文 达到共享资源的目的 发生关系
   mEglContext = EGL14.eglCreateContext(mEglDisplay, mEglConfig, eglContext, ctx_attrib_list, 0);
        // 创建失败
        if (mEglContext == EGL14.EGL_NO_CONTEXT) {
            throw new RuntimeException("EGL Context Error.");
        }
    }
创建完 EglContext,需要将surface传递到 EglDisplay中去,创建
// 绘制线程中的图像 就是往这个mEglSurface 上面去画
 mEglSurface = EGL14.eglCreateWindowSurface(mEglDisplay, mEglConfig, surface, attrib_list, 0);
绑定并向虚拟屏幕上画:
// 绑定当前线程的显示设备及上下文, 之后操作opengl,就是在这个虚拟显示上操作
if (!EGL14.eglMakeCurrent(mEglDisplay,mEglSurface,mEglSurface,mEglContext)) {
  throw  new RuntimeException("eglMakeCurrent 失败!");
}
//向虚拟屏幕画
mScreenFilter = new ScreenFiliter(context);
mScreenFilter.onReady(width,height);
双缓存画画:mEglSurface + mEglDisplay进行交替绘制。
public void draw(int textureId, long timestamp){
  // 绑定当前线程的显示设备及上下文, 之后操作opengl,就是在这个虚拟显示上操作
  if (!EGL14.eglMakeCurrent(mEglDisplay,mEglSurface,mEglSurface,mEglContext)) {
  throw  new RuntimeException("eglMakeCurrent 失败!");
  }
  //画画
  mScreenFilter.onDrawFrame(textureId);
  //刷新eglsurface的时间戳
  EGLExt.eglPresentationTimeANDROID(mEglDisplay, mEglSurface, timestamp);
  //交换数据
  //EGL的工作模式是双缓存模式,内部有两个frame buffer(fb)
  //当EGL将一个fb显示到屏幕上,另一个就在后台等待opengl进行交换
  EGL14.eglSwapBuffers(mEglDisplay, mEglSurface);
}
添加共享的EGLContext, 在创建的EGL环境下的子线程下进行编码,接受传入的视频宽、高,以及Surface,这里直接把渲染线程中的EGLContext给自定义的绘制EGL,作为share_context.
 mHandler.post(new Runnable() {
     @Override
     public void run() {
      //创建我们的子线程EGL环境
      mEglBase = new EGLBase(mContext, mWidth, mHeight, mInputSurface, mEglContext);
      //启动编码器
      mMediaCodec.start();
      isStart = true;
  }
});

 /**
  * 创建好渲染器
  * @param gl
  * @param config
 */
@Override
 public void onSurfaceCreated(GL10 gl, EGLConfig config) {
        。。。。。。。。
   //注意,必须在Gl线程中创建文件
   mCameraFiliter = new CameraFilter(mDouyinView.getContext());
   mScreenFiliter = new ScreenFiliter(mDouyinView.getContext());

   //渲染线程的上下文,需要给到自己的EGL环境下作为share_context
   EGLContext eglContext = EGL14.eglGetCurrentContext();
   mMediaRecorder = new MediaRecorder(mDouyinView.getContext(), "/sdcard/a.mp4", CameraHelper.HEIGHT,CameraHelper.WIDTH, eglContext);
}
绘制、编码、读取output
在子线程中启动编码
//交给虚拟屏幕 通过opengl 将预览的纹理 绘制到这一个虚拟屏幕中
 //这样MediaCodec 就会自动编码 inputSurface 中的图像
 mInputSurface = mMediaCodec.createInputSurface();
        。。。。。。
 mHandler.post(new Runnable() {
     @Override
    public void run() {
    //创建我们的子线程,用于把预览的图像存储到虚拟Diaplay中去。
    mEglBase = new EGLBase(mContext, mWidth, mHeight, mInputSurface, mEglContext);
    //启动编码器
    mMediaCodec.start();
    isStart = true;
  }
});
上边的mMediaCodec.start()之后会从mInputSurface获取data, 而mEglBase会在draw方法里向mInputSurface写入data图像。
public void encodeFrame(final int textureId,final long timestamp) {
        if (!isStart){
            return;
        }
        mHandler.post(new Runnable() {
            @Override
            public void run() {
                //把图像画到虚拟屏幕
                mEglBase.draw(textureId, timestamp);
                //从编码器的输出缓冲区获取编码后的数据就ok了
                getCodec(false);

            }
    });
}
最后在看从输出缓冲区拿取编码后的数据通过mMediaMuxer进行封装,生成path路径对应的MP4文件。
/**
     * 获取编码后 的数据
     *
     * @param endOfStream 标记是否结束录制
     */
    private void getCodec(boolean endOfStream) {

        //不录了, 给mediacodec一个标记
        if (endOfStream) {
            mMediaCodec.signalEndOfInputStream();
        }
        //输出缓冲区
        MediaCodec.BufferInfo bufferInfo = new MediaCodec.BufferInfo();
        // 希望将已经编码完的数据都 获取到 然后写出到mp4文件
        while (true) {
            //等待10 ms
            int status = mMediaCodec.dequeueOutputBuffer(bufferInfo, 10_000);
            //让我们重试  1、需要更多数据  2、可能还没编码为完(需要更多时间)
            if (status == MediaCodec.INFO_TRY_AGAIN_LATER) {
                // 如果是停止 我继续循环
                // 继续循环 就表示不会接收到新的等待编码的图像
                // 相当于保证mediacodec中所有的待编码的数据都编码完成了,不断地重试 取出编码器中的编码好的数据
                // 标记不是停止 ,我们退出 ,下一轮接收到更多数据再来取输出编码后的数据
                if (!endOfStream) {
                    //不写这个 会卡太久了,没有必要 你还是在继续录制的,还能调用这个方法的!
                    break;
                }
                //否则继续
            } else if (status == MediaCodec.INFO_OUTPUT_FORMAT_CHANGED) {
                //开始编码 就会调用一次
                MediaFormat outputFormat = mMediaCodec.getOutputFormat();
                //配置封装器
                // 增加一路指定格式的媒体流 视频
                index = mMediaMuxer.addTrack(outputFormat);

                mMediaMuxer.start();

            } else if (status == MediaCodec.INFO_OUTPUT_BUFFERS_CHANGED) {
                //忽略
            } else {
                //成功 取出一个有效的输出
                ByteBuffer outputBuffer = mMediaCodec.getOutputBuffer(status);
                //如果获取的ByteBuffer 是配置信息 ,不需要写出到mp4
                if ((bufferInfo.flags & MediaCodec.BUFFER_FLAG_CODEC_CONFIG) != 0) {
                    bufferInfo.size = 0;
                }

                if (bufferInfo.size != 0) {
                    bufferInfo.presentationTimeUs = (long) (bufferInfo.presentationTimeUs / mSpeed);
                    //写到mp4
                    //根据偏移定位
                    outputBuffer.position(bufferInfo.offset);
                    //ByteBuffer 可读写总长度
                    outputBuffer.limit(bufferInfo.offset + bufferInfo.size);
                    //写出
                    mMediaMuxer.writeSampleData(index, outputBuffer, bufferInfo);
                }
                //输出缓冲区 我们就使用完了,可以回收了,让mediacodec继续使用
                mMediaCodec.releaseOutputBuffer(status, false);
                //结束
                if ((bufferInfo.flags & MediaCodec.BUFFER_FLAG_END_OF_STREAM) != 0) {
                    break;
                }
            }
        }
    }
