

前言
如果要看理论的童鞋点击这里 redux中文文档 或者 redux官方文档 ,本文不会太刻意去介绍大篇幅的理论,本文不做框架之间的对比,只给想学redux的童鞋提供实质的、高效的、易理解的学习参考资源,分享自己在学习过程中的得到。文章更新完后会比较长,请耐心阅读理解,仔细品味。不熟悉redux也没关系,可以跟着文章思路,将三个demo敲完,相信你一定获益匪浅。(文后有彩蛋 )。
已更新内容
redux基本使用 (附demo)reduxMiddleware使用(附demo)redux集成navigation(附demo)

react native版。
react native版。
集成react-native-navigation后把前两个domo综合。
待更新内容
- 待续......
为什么我要写这个demo
有的童鞋可能会有疑问
问:官方不是Todosdemo吗?为什么还要写这个demo?
答:官方的demo都是react的,而并非react native的。我也找过很多关于介绍redux的文章,但我发现找到的资料要么太基础、要么介绍不全面、提供的demo下载无法使用等等各种问题,迫使我有了自己动手造轮的冲动,而且这个demo并非只是介绍关于redux的基础的东西,而是通过三套demo实践连贯的图文的方式,让读者更好的理解,后面还会陆续更新在使用redux过程中的得到,希望大家鼓励支持。
demo采用的代码规范
通常一个大项目到后期是需要很多开发者参与的,如果每个开发者都使用自己的一套代码规范做事情,这样带来的后果就是:后期的代码管理工作带来非常大的麻烦,浪费更多的时间去重构,而且也会让新人看代码时理解花更多的时间,还容易把别人带沟里去,所以一个大型项目最初构建架构的时候就必须要遵守一些规范。
那么我们怎么能敲出清爽而又优雅的代码呢?又如何检查我们代码质量合格呢?
我在这里极力推荐遵守airbnb/javascript的规范和使用eslint来检查自己代码的代码质量(是否遵守了规范),因为它们已经得到了很多公司和开发者的认可。(这里过多的介绍airbnb eslint,本文只提供思路,想了解更多自行搜索)
在没有使用代码规范前我们可能用各自的风格写了很多年的代码了,突然要适应这套规范可能非常不适应,没关系,多敲多练习,时间长了就习惯了,谁还没有一个过程,过程是痛苦的,但痛苦过后会给你带来质的升华,自己慢慢领悟体会吧。好的事物东西是会被世界所接受,差的事物最终是要被替代的,所以做为一个合格的程序员(特别是前端程序员)要拥抱变化,因为它会使你变得更加的优秀,得到大众的认可,除非你不愿意让自己变得更优秀。
redux能帮我们做什么
两张图示意:


redux特性
-
单一数据源: 整个应用的 state 被储存在一棵 object tree 中,并且这个 object tree 只存在于唯一一个 store 中。
-
State 是只读的:唯一改变 state 的方法就是触发 action,action 是一个用于描述已发生事件的普通对象。
-
使用纯函数来执行修改:为了描述 action 如何改变 state tree ,你需要编写 reducers。
-
预见性:所有的用户的行为都是你提前定义好的。
-
统一管理state:所有的状态都在一个store中分配管理。
哪些开发者和项目适合用redux
这里只针对react native开发而言:
-
初级:刚接触
react native我非常不建议去使用,因为你还不知道怎么用它,建议先达到中级。 -
中级:使用
react native做出一个以上已经上架的不复杂的应用redux,也可以不使用,因为使用它并不能让你在前期快速的迭代开发,在这样的项目下使用redux就好比大炮打蚊子,副作用很大。但是可以先了解起来,并发现它的优点。这类相对简单的应用:当用户触发一个动作(程序需要setState({xxx:xxx}))的时候应用程序状态流程是这样的: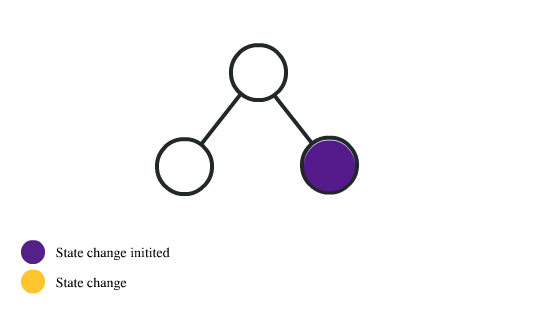
-
高级:使用
react native做出一个以上已经上架的复杂的应用(涉及到即时通讯、界面布局比较复杂,组件嵌套太多层次等),而这类复杂应用:当用户触发一个动作(程序需要setState({xxx:xxx}))的时候应用程序状态流程是这样的: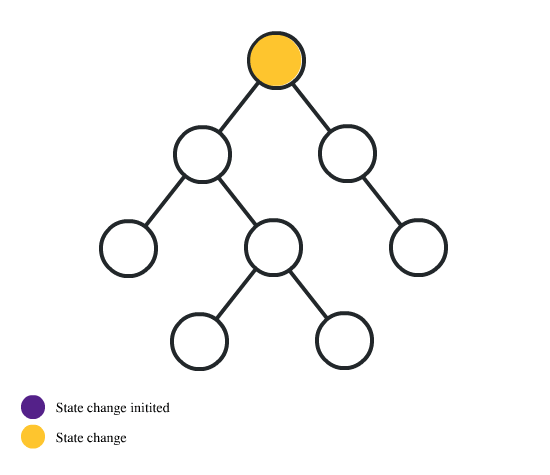
这种状态带来的后果,两方面分析:
- 性能:祖父子组件之间多余的状态传递,导致宝贵的内存资源浪费,同时界面渲染的速度也会变慢,自然用户体验就变差了。
- 状态管理:当程序不断的迭代,界面布局越来越复杂,必然就会产生许多的
state状态,那你是如何有效的管理这些状态?是什么原因导致UI多次渲染?是哪一步操作导致的UI组件的变化?在没有使用redux前你可能已经发现可以使用生命周期函数中的shouldComponentUpdate来减少子组件中没必要的渲染,但终究解决不了状态管理复杂的难题。 当你使用redux后,复杂的应用程序状态流程是这样的: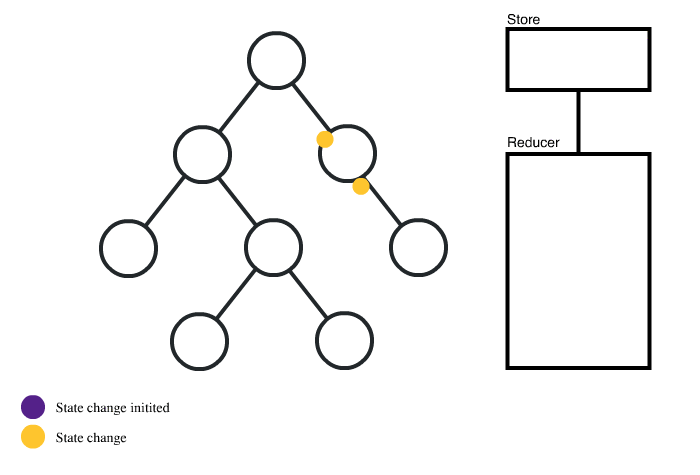
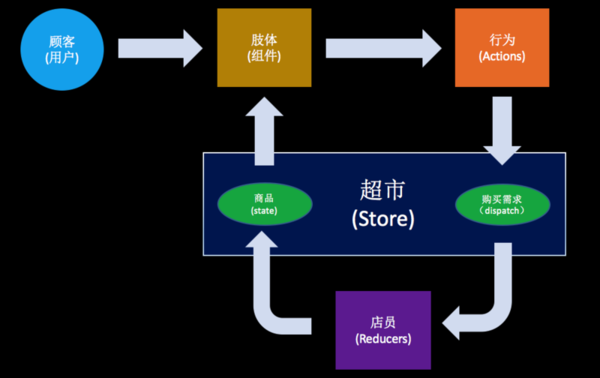
redux for react native 工作逻辑图
感谢@黑森林工作室作者提供的清晰的逻辑图
redux工程结构分析
我对官方的demo小部分位置做了些改造具体看代码分析:
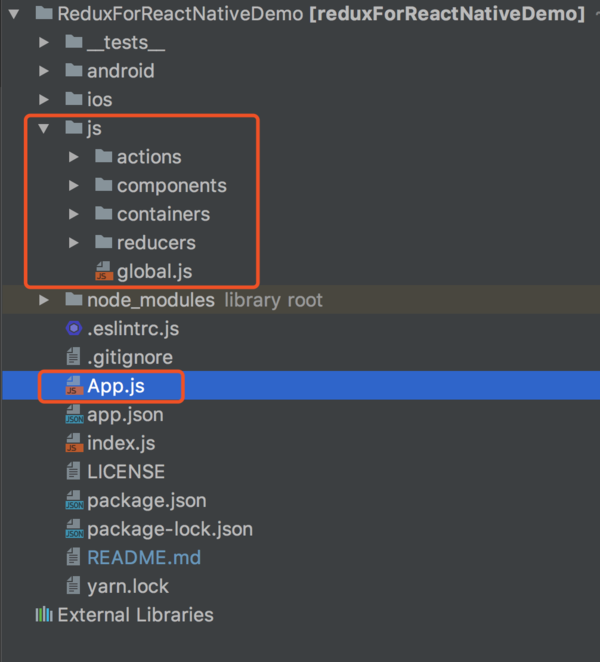
分工明细
js/actions此文件夹下放内容做的事情是:定义用户行为。js/reducers此文件夹下放内容做的事情是:响应用户行为,返回改变后的状态,并发送到store。js/components此文件夹下放内容做的事情是:自定义的组件。js/containers此文件夹下放内容做的事情是:把components文件夹中涉及到状态变化的组件进行第二次封装。App.js入口文件(store在这里),为什么我要把store定义在这里? 因为它是唯一的,而且必须使用react-redux提供的Provider组件包裹入口的其他组件才能使redux中的store生效。global.js存放全局定义的变量、常量、方法等。
需要注意的事
- 一个工程中
redux的store是唯一的,不能在多个store。 - 保持
reducer纯净非常重要。永远不要在reducer里做这些操作:
- 修改传入参数;
- 执行有副作用的操作,如
API请求和路由跳转;- 调用非纯函数,如
Date.now()或Math.random();
- 使用对象展开运算符
...代替Object.assign()才是最好的解决方案。 - 组件名首字母要大写,也就是说
components和containers文件夹下的文件首字母都要大写。 - 应该尽量减少传递到
action中的数据(能传单个数据就不传对象,能传对象就不传数组)
//good
function todoApp(state = initialState, action) {
  switch (action.type) {
    case SET_VISIBILITY_FILTER:
      return Object.assign({}, state, {
        visibilityFilter: action.filter
      })
    default:
      return state
  }
}
//best
function todoApp(state = initialState, action) {
  switch (action.type) {
    case SET_VISIBILITY_FILTER:
      return { ...state, visibilityFilter: action.filter }
    default:
      return state
  }
}
代码详解
js/actions/types.js
//添加列表数据
export const ADD_TODO = 'ADD_TODO';
//筛选
export const SET_VISIBILITY_FILTER = 'SET_VISIBILITY_FILTER';
//文字添加/取消中划线
export const TOGGLE_TODO = 'TOGGLE_TODO';
释:
action定义
为什么我要把用户的action(行为)定义单独抽出来写一个type.js?
- 方便状态管理。
- 复用性。
js/actions/index.js
import  {
    ADD_TODO,
    SET_VISIBILITY_FILTER,
    TOGGLE_TODO,
} from './types'
let nextTodoId = 0;

export const addTodo = text => ({
    type: ADD_TODO,
    id: nextTodoId++,
    text
});

export const setVisibilityFilter = (filter) => ({
    type: SET_VISIBILITY_FILTER,
    filter
});

export const toggleTodo = id => ({
    type: TOGGLE_TODO,
    id
});
释:
Action 创建函数
Action 创建函数 就是生成 action 的方法。“action” 和 “action 创建函数” 这两个概念很容易混在一起,使用时最好注意区分。
在 Redux 中的 action 创建函数只是简单的返回一个 action:
js/reducers/todos.js
import  {
    ADD_TODO,
    TOGGLE_TODO,
} from '../actions/types'

const todos = (state = [], action) => {
    let {id, text, type} = action;
    switch (type) {
        case ADD_TODO:
            return [
                ...state,
                {
                    id: id,
                    text: text,
                    completed: false
                }
            ];
        case TOGGLE_TODO:
            return state.map(todo => (todo.id === id) ? {...todo, completed: !todo.completed} : todo);
        default:
            return state;
    }
};

export  default  todos;
js/reducers/visibilityFilter.js
import { SET_VISIBILITY_FILTER } from '../actions/types'
import { visibilityFilters } from '../global'

const { SHOW_ALL } = visibilityFilters;
const visibilityFilter = (state = SHOW_ALL, action) => {
    let {type, filter} = action;
    switch (type){
        case SET_VISIBILITY_FILTER:
            return filter;
        default:
            return state
    }
};

export default  visibilityFilter;
释:
reducer 就是一个纯函数,接收旧的 state 和 action,返回新的 state(上面两个文件可以看着两个reducer)。
注意:
Redux首次执行时,state为undefined,此时需要设置返回应用的初始state。- 每个
reducer只负责管理全局state中它负责的一部分。每个reducer的state参数都不同,分别对应它管理的那部分state数据。
js/reducers/index.js
import { combineReducers } from 'redux'
import todos from './todos'
import visibilityFilter from './visibilityFilter'

export default combineReducers({
    todos,
    visibilityFilter
})
释:
combineReducers()所做的只是生成一个函数,这个函数来调用你的一系列 reducer,每个 reducer 根据它们的 key 来筛选出 state 中的一部分数据并处理,然后这个生成的函数再将所有 reducer 的结果合并成一个大的对象。
表面上看上去combineReducers()的作用就是把多个reducer合成一个的reducer。
js/components/Todo.js
import React, { Component } from 'react'
import {
    Text,
    TouchableOpacity
} from 'react-native'
import PropTypes from 'prop-types'

export default class Todo extends Component {
    static propTypes = {
        onClick: PropTypes.func.isRequired,
        completed: PropTypes.bool.isRequired,
        text: PropTypes.string.isRequired
    };

    render(){
        let { onClick, completed, text } = this.props;
        return (
            <TouchableOpacity
                style={{
                    flexDirection: 'row',
                    flex: 1,
                    height: 50,
                    alignItems: 'center',
                    justifyContent: 'center',
                    backgroundColor: '#cccccc',
                    marginTop: 10
                }}
                onPress={onClick}>
                <Text style={{ textDecorationLine: completed ? 'line-through' : 'none'}}>{text}</Text>
            </TouchableOpacity>
        );
    }
}
js/components/TodoList.js
import React, { Component } from 'react'
import PropTypes from 'prop-types'
import {
    FlatList
} from 'react-native'
import Todo from './Todo'

export default class TodoList extends Component {
    static propTypes = {
        todos: PropTypes.arrayOf(
            PropTypes.shape({
                id: PropTypes.number.isRequired,
                completed: PropTypes.bool.isRequired,
                text: PropTypes.string.isRequired
            }).isRequired
        ).isRequired,
        toggleTodo: PropTypes.func.isRequired
    };

    _renderItem = (data) => {
       let dataItem = data.item;
       let { id } = dataItem;
       let { toggleTodo } = this.props;
        return (
            <Todo
                {...dataItem}
                onClick={() => toggleTodo(id)}
            />
        )
    };

    render() {
        let { todos } = this.props;
        return (
            <FlatList
                data={todos}
                keyExtractor={(item)=>item.id.toString()}
                renderItem={this._renderItem}
            />
        )
    }
}
js/components/Link.js.js
import React, { Component } from 'react'
import PropTypes from 'prop-types'
import {
    TouchableOpacity,
    Text
} from 'react-native'

export default class Link extends Component {
    static propTypes = {
        active: PropTypes.bool.isRequired,
        filter: PropTypes.string.isRequired,
        onClick: PropTypes.func.isRequired
    };

    render() {
        let { active,  filter, onClick } = this.props;
        return (
           <TouchableOpacity
               style={{
                   marginLeft: 4,
                   height: 40,
                   flex:1,
                   borderWidth: 1,
                   borderColor: '#ccc',
                   alignItems: 'center',
                   justifyContent:'center'
               }}
               onPress={onClick}
           >
               <Text style={{fontSize: 10, color: active ? 'black' : '#cccccc'}}>{filter}</Text>
           </TouchableOpacity>
        );
    }
}
js/components/Filters.js
import React, { Component } from 'react'
import {
    View,
} from 'react-native'
import FilterLink from '../containers/FilterLink'
import { visibilityFilters } from '../global'

const { SHOW_ALL, SHOW_COMPLETED, SHOW_ACTIVE  } = visibilityFilters;

export default  class Filters extends Component {

    render(){
        return(
            <View style={{ flexDirection: 'row', marginTop: 20}}>
                <FilterLink filter={SHOW_ALL} />
                <FilterLink filter={SHOW_COMPLETED} />
                <FilterLink filter={SHOW_ACTIVE} />
            </View>
        )
    }
}
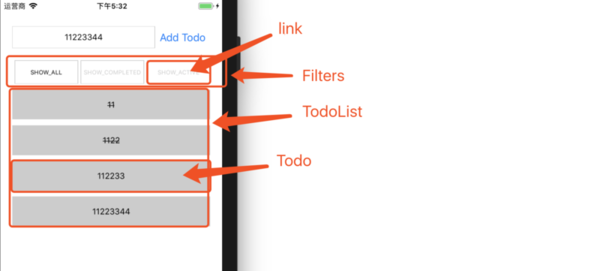
以上四个文件是自定义的四个UI展示组件,这些组件只定义外观并不关心数据来源和如何改变。传入什么就渲染什么。如果你把代码从 Redux 迁移到别的架构,这些组件可以不做任何改动直接使用。它们并不依赖于 Redux。
js/containers/AddTodo.js
import React, { Component } from 'react'
import {
    View,
    TextInput,
    Button,
} from 'react-native'
import { connect } from 'react-redux'
import { addTodo } from '../actions'

class AddTodo extends Component {
    constructor(props){
        super(props);
        this.inputValue = '';
    }

    render(){
        let { dispatch } = this.props;
        return (
            <View style={{flexDirection: 'row'}}>
                <TextInput
                    style={{flex:1, borderWidth: 1, borderColor: '#cccccc', textAlign: 'center'}}
                    onChangeText={text => this.inputValue = text}
                />
                <Button title="Add Todo" onPress={() => dispatch(addTodo(this.inputValue))}/>
            </View>
        )
    }
}

export default connect()(AddTodo)
js/containers/FilterLink.js
import { connect } from 'react-redux'
import { setVisibilityFilter } from '../actions'
import Link from '../components/Link'

const mapStateToProps = (state, ownProps) => ({
    active: ownProps.filter === state.visibilityFilter,
    filterText: ownProps.filter
});

const mapDispatchToProps = (dispatch, ownProps) => ({
    onClick: () => dispatch(setVisibilityFilter(ownProps.filter))
});

export default connect(
    mapStateToProps,
    mapDispatchToProps,
)(Link)
js/containers/VisibleTodoList.js
import { connect } from 'react-redux'
import { toggleTodo } from '../actions'
import TodoList from '../components/TodoList'
import { visibilityFilters } from '../global'

const { SHOW_ALL, SHOW_COMPLETED, SHOW_ACTIVE } = visibilityFilters;

const getVisibleTodos = (todos, filter) => {
    switch (filter) {
        case SHOW_COMPLETED:
            return todos.filter(t => t.completed);
        case SHOW_ACTIVE:
            return todos.filter(t => !t.completed);
        case SHOW_ALL:
            return todos;
        default:
            throw new Error('Unknown filter: ' + filter)
    }
};

const mapStateToProps = state => ({
    todos: getVisibleTodos(state.todos, state.visibilityFilter)
});

const mapDispatchToProps = dispatch => ({
    toggleTodo: id => dispatch(toggleTodo(id))
});

export default connect(
    mapStateToProps,
    mapDispatchToProps,
)(TodoList)
释:
以上三个是容器组件,作用是把展示组件连接到 Redux。
总之:只要记住一句话就可以了:UI展示组件负责 UI 的呈现,容器组件负责管理数据和逻辑。
有时很难分清到底该使用容器组件还是展示组件。如这个小的组件:
AddTodo.js含有“Add”按钮 和 输入框
技术上讲可以把它分成两个组件,但一开始就这么做有点早。在一些非常小的组件里混用容器和展示是可以的。当业务变复杂后,如何拆分就很明显了。所以现在就使用混合型的吧。
上面出现了使用react-redux的connect()方法来把展示组件和容器组件关联在一起,这个方法做了性能优化来避免很多不必要的重复渲染。(这样你就不必为了性能而手动实现 React 性能优化建议 中的 shouldComponentUpdate 方法。)
使用 connect() 前,需要先定义 mapStateToProps 这个函数来指定如何把当前 Redux store state 映射到展示组件的 props 中。例如,VisibleTodoList 需要计算传到 TodoList 中的 todos,所以定义了根据 state.visibilityFilter 来过滤 state.todos 的方法,并在 mapStateToProps 中使用。
除了读取 state,容器组件还能分发 action。类似的方式,可以定义 mapDispatchToProps() 方法接收 dispatch() 方法并返回期望注入到展示组件的 props 中的回调方法。例如,我们希望 VisibleTodoList 向 TodoList 组件中注入一个叫 onTodoClick 的 props ,还希望 onTodoClick能分发 TOGGLE_TODO 这个 action。
最后,使用 connect() 创建 VisibleTodoList,并传入这两个函数。
js/components/Group.js
import React, { Component } from 'react'
import {
    View
} from 'react-native'
import AddTodo from '../containers/AddTodo'
import Filters from '../components/Filters'
import VisibleTodoList from '../containers/VisibleTodoList'

export default class Group extends Component {
    render() {
        return (
            <View style={{paddingHorizontal: 20, paddingVertical: 44}}>
                <AddTodo/>
                <Filters/>
                <VisibleTodoList/>
            </View>
        );
    }
}
释:
Group.js 是把所有的关联后的组件串起来,形成一个完整的界面。
App.js
import React, { Component } from 'react'
import { createStore } from 'redux'
import { Provider } from 'react-redux'
import Group from './js/components/Group'
import rootReducer from './js/reducers'

export default class App extends Component {
    render() {
        const store = createStore(rootReducer);
        return (
            <Provider store={store}>
                <Group />
            </Provider>
        );
    }
}
释:
入口文件传入 Store
- 创建
store传入reducers。 - 使用
Provider组件包裹Group组件,store作为属性传入Provider。
进行到这一步,代码分析完毕。本次写作到此结束。我相信大家如果仔细看完的话,多多少少会有些收获吧,如果demo看不太懂,那就跟着代码分析的思路多敲几遍代码,也就理解了,有空我会继续更新未完成的内容。
〰️〰️〰️〰️〰️〰️〰️〰️〰️〰️〰️〰️〰️〰️〰️〰️〰️〰️〰️〰️〰️〰️〰️〰️〰️〰️
⭐️⭐️⭐️⭐️⭐️⭐️⭐️⭐️⭐️⭐️华丽的分割线⭐️⭐️⭐️⭐️⭐️⭐️⭐️⭐️⭐️⭐️⭐️
〰️〰️〰️〰️〰️〰️〰️〰️〰️〰️〰️〰️〰️〰️〰️〰️〰️〰️〰️〰️〰️〰️〰️〰️〰️〰️
离上次更新已经有好几天了,今天抽空更新的内容是Middleware(中间件)。
Middleware(中间件)的作用
Middleware是在Actions和Dispatcher之间嵌入的为了解决某些问题、提高我们开发效率而存在的工具。
下面介绍三种常用的中间件:
- redux-thunk 中间件:项目中的异步操作需要用到(例如:请求服务器数据、本地存储等)。
- redux-actions 中间件:帮助处理和创建操作
actions(本文不做介绍,后续项目复杂后可以使用它来创建)。 - redux-logger 中间件:用来打印
action日志。 开启react native远程调试模式,操作demo就能在控制台看到打印的状态前后变化。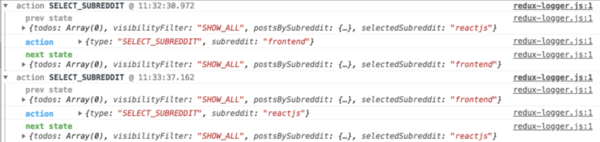
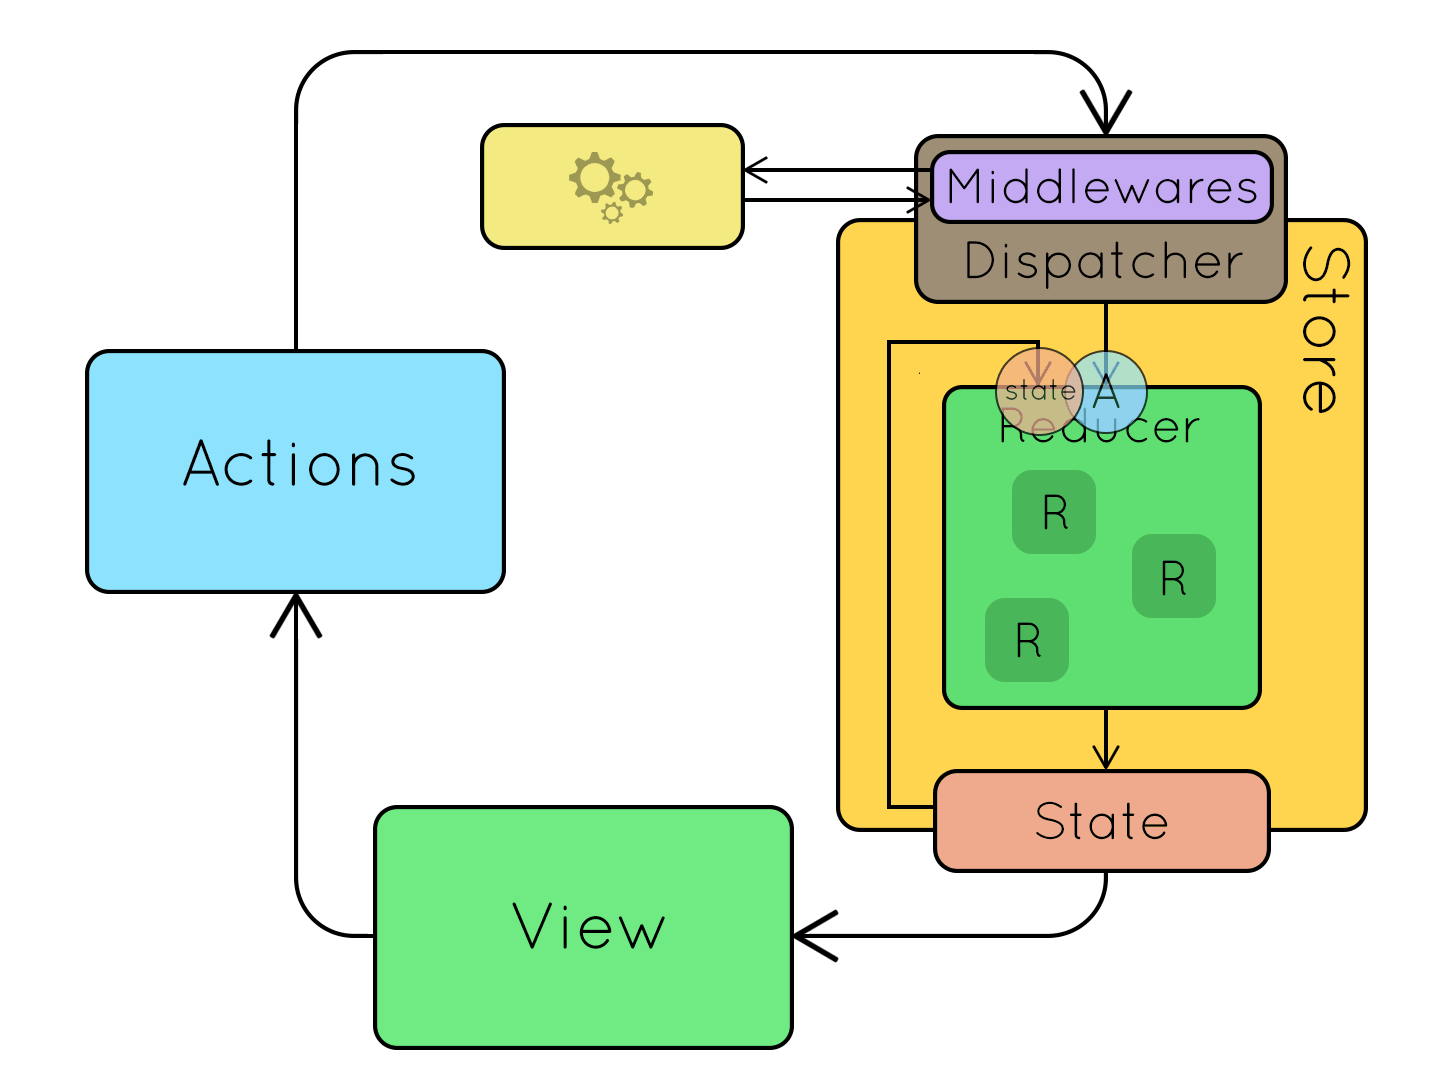
加入中间件后的示意图如下:
核心代码详解
本次demo代码讲解为了减少文章篇幅,只会讲解涉及到Middleware的部分,也就是说 demo中在reducers 、components 、containers文件加下新增的文件不会做过多的解释,如果不理解,可以返回去把第一次更新的内容再解析一遍。
actions/types.js新增如下代码
//请求帖子列表
export const REQUEST_POSTS = 'REQUEST_POSTS';
//帖子返回数据
export const RECEIVE_POSTS = 'RECEIVE_POSTS';
//切换数据源
export const SELECT_SUBREDDIT = 'SELECT_SUBREDDIT';
//使缓存过期失效
export const INVALIDATE_SUBREDDIT = 'INVALIDATE_SUBREDDIT';
actions/index.js新增如下代码
export const selectSubreddit = subreddit => ({
    type: SELECT_SUBREDDIT,
    subreddit
});

export const invalidateSubreddit = subreddit => ({
    type: INVALIDATE_SUBREDDIT,
    subreddit
});

export const requestPosts = subreddit => ({
    type: REQUEST_POSTS,
    subreddit
});

export const receivePosts = (subreddit, json) => ({
    type: RECEIVE_POSTS,
    subreddit,
    posts: json.data,
    receivedAt: Date.now()
});

const fetchPosts = subreddit => dispatch => {
    // API 发起请求
    dispatch(requestPosts(subreddit));
    return fetch(`http://localhost:8081/data/${subreddit}.json`)
        .then(response => response.json())
        .then(json => {
            setTimeout(()=>{
                //使用 API 请求结果来更新应用的 state
                dispatch(receivePosts(subreddit, json))
            },2000);

        })
};

const shouldFetchPosts = (state, subreddit) => {
    const posts = state.postsBySubreddit[subreddit];
    if (!posts) {
        return true
    }
    if (posts.isFetching) {
        return false
    }
    return posts.didInvalidate
};

export const fetchPostsIfNeeded = subreddit => (dispatch, getState) => {
    if (shouldFetchPosts(getState(), subreddit)) {
        return dispatch(fetchPosts(subreddit))
    }
};
释
以上主要需要注意的是
fetchPosts返回了一个函数,而普通的Action 创建函数默认返回一个对象。- 返回的函数的参数是
dispatch和getState这两个Redux方法,普通的Action 创建函数的参数是Action的内容。- 在返回的函数之中,先发出一个
Action: dispatch(requestPosts(subreddit)),表示操作开始。- 异步操作结束之后,再发出一个
Action: receivePosts(subreddit, json),表示操作结束。
demo中数据源解释:
本来打算用官方的 reddit demo API,最终发现官方给出的
demo请求数据会报错,所以使用了本地的json数据,延迟两秒模拟网络API加载数据的过程。
App.js
import React, { Component } from 'react'
import { applyMiddleware, createStore } from 'redux'
import { createLogger } from 'redux-logger'
import { Provider } from 'react-redux'
import thunk from 'redux-thunk'
import LoadPosts from './js/containers/LoadPosts'
import rootReducer from './js/reducers'

export default class App extends Component {
    render() {
        const logger = createLogger();
        const store = createStore(
            rootReducer,
            applyMiddleware(thunk, logger)
        );

        return (
            <Provider store={store}>
                <LoadPosts/>
            </Provider>
        );
    }
}
释
相比前一个demo的App.js,在createStore的时候参数有变化,多了一个applyMiddleware(thunk, logger)中间件的参数。
理解了第一次更新内容的童鞋不难看出,Action 是由store.dispatch方法发送的。而store.dispatch方法正常情况下,参数只能是对象,不能是函数。
为了解决这个问题,就要使用到中间件redux-thunk改造store.dispatch,使store.dispatch可以接受函数作为参数。
注意
有的中间件有次序要求,使用前要查一下文档。比如,logger就一定要放在最后,否则输出结果会不正确。
到此本次写作到此结束。
〰️〰️〰️〰️〰️〰️〰️〰️〰️〰️〰️〰️〰️〰️〰️〰️〰️〰️〰️〰️〰️〰️〰️〰️〰️〰️
⭐️⭐️⭐️⭐️⭐️⭐️⭐️⭐️⭐️⭐️华丽的分割线⭐️⭐️⭐️⭐️⭐️⭐️⭐️⭐️⭐️⭐️⭐️
〰️〰️〰️〰️〰️〰️〰️〰️〰️〰️〰️〰️〰️〰️〰️〰️〰️〰️〰️〰️〰️〰️〰️〰️〰️〰️
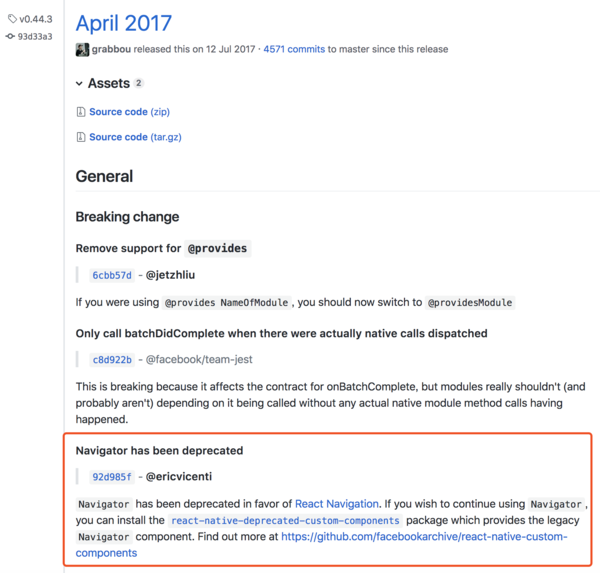
接着更新关于集成navigation的集成,如果使用过比较老版本的react native都知道在react-navigation没有兴起之前,大多数开发者都使用的官方提供的 Navigator,直到 react native v0.44.3 发布时宣布已经遗弃Navigator。
Navigator或者 react-navigation,所以我并不知道市场上还有多少类似的导航解决方案,这次通过项目空档期,又深入了解了一下,目前市场上比较流行的三款导航器:
这是官方推荐的,在
github上已有1.35W+的 🌟,由React Native社区维护,目前,它是最受欢迎的React Native导航库。它完全用JavaScript编写,而不是使用本机API,它重新创建了一些子集。这个选择允许用户定制导航体验的任何部分,而无需学习iOS或Android导航逻辑。因为React Navigation的大部分逻辑都是在JavaScript中而不是在本机中运行,所以任何阻止JavaScript线程的情况都会造成卡顿显现。另外说明一下react navigation的v1版本跟v2版本差别挺大的,如果想了解的童鞋可以看我前面写的这篇文章 [react native 强大的navigation V2.0+ ](www.jianshu.com/p/05fd0e9bc…)。
目前官方文档中已经明确提出:
Warning: in the next major version of React Navigation, to be released in Fall 2018, we will no longer provide any information about how to integrate with Redux and it may cease to work. Issues related to Redux that are posted on the React Navigation issue tracker will be immediately closed. Redux integration may continue to work but it will not be tested against or considered when making any design decisions for the library.
Some folks like to have their navigation state stored in the same place as the rest of their application state. Think twice before you consider doing this, there is an incredibly good chance that you do not need to do this!. Storing your React Navigation state in your own Redux store is likely to give you a very difficult time if you don't know what you're doing.
If your only reason for doing this is that you want to be able to perform navigation actions from outside of your components (eg: from a Redux middleware), you can learn more about this in navigating without the navigation prop.
翻译:
警告: 在下一个大版本的 React Navigation 中, 将在2018年秋季发布, 我们将不再提供有关如何集成 Redux 的任何信息, 并且它可能会停止使用。 发布在 React Navigation issue tracker 中有关 Redux 的 issue,也将立即关闭。 Redux 集成可能会继续工作,但不会在为 library 作出任何设计决策时进行测试或考虑。
有些人喜欢将他们的 navigation state 存储在与其他的应用程序的 state 相同的位置。 在你考虑这样做之前请三思, 但是有一个非常好的机会, 你可以不需要这样做!。 如果你不知道自己要做什么,将 React Navigation state 存储在你自己的 Redux store 中可能会会很困难。
如果你这样做的唯一原因是希望能够从组件外部执行导航操作 (例如: 从 Redux 中间件), 你可以了解更多关于 不使用 navigation prop 进行导航 的信息。
翻译成通俗易懂的话就是:React Navigation在下个版本中将不会再特意考虑去兼容 Redux,用是可以用,但是出了问题需要自行解决。
哎,不理解官方为什么要这么做,可能是减少维护成本吧,但是这样做无疑是一个不明智但选择,也说不定会有惊喜,暂时期待一下吧。如果项目中集成了 redux 我个人不太推荐使用React Navigation。
它是基于
React Navigation,但提供了与其交互的不同API。在github上已有7600+的 🌟,它允许您在一个中心位置定义场景转换,而无需传递导航器对象,并且可以在代码中的任何位置轻松访问。最新的beta版本 - 4,除了其他更改之外,还介绍了抽屉支持和Mob-X驱动的导航状态机,它将导航逻辑与表示层分开。
另一个流行的导航库是由 Wix 开源团队开发的
React Native Navigation,在github上已经接近9000+的 🌟,它的最大优势是跨平台界面覆盖的100%本机平台导航,具有开箱即用的Redux支持。您需要为
iOS和Android单独配置此软件包,其中包括链接iOS库,更新iOS标头搜索路径,在AndroidMainActivity中扩展SplashActivity而不是ReactActivity以及文档中详细描述的其他几个步骤。完成后,您只需要注册所有应用程序的屏幕并启动应用程序。
目前官方文档中也提出:
Note: example redux is deprecated. Since we did not have enough time and resources to maintain both example projects, we decided to stop maintaining the redux example. This does not mean redux can't be used with react-native-navigation (In fact, we use redux in the Wix app). For a working example project which uses redux with RNN you can refer to JuneDomingo/movieapp.
翻译:
注意:不推荐使用示例redux。由于我们没有足够的时间和资源来维护这两个示例项目,因此我们决定停止维护redux示例。这并不意味着redux不能与react-native-navigation一起使用(事实上,我们在Wix应用程序中使用redux)。对于使用带RNN的redux的工作示例项目,您可以参考JuneDomingo / movieapp。
综上所诉:就个人而言,从react navigation 和 react-native-navigation 官方对 Redux的态度完全是不一样的,至少Wix内部在使用Redux。 如果项目中需要使用Redux,我的第一选择会是React Native Navigation,因为它是纯原生体验,而且对Redux支持很好 。如果在不使用Redux 的项目中,可以尝试前两种导航,这两种导航体验也不错的,非常接近原生体验了。
结构分析
本文导航选择使用 react-native-navigation,关于react-native-navigation的集成和API使用请参考官方文档,如果想了解在 React Navigation 中使用 redux 点这里 或者 这里,以下是这次更新改变和新增的文件代码
index.js
//discard (废弃)
import { AppRegistry } from 'react-native';
AppRegistry.registerComponent('ReduxForReactNativeDemo', () => App);
//new
import App from './App';
new App();
App.js
import React, { Component } from 'react'
import { applyMiddleware, createStore } from 'redux'
import { createLogger } from 'redux-logger'
import { Provider } from 'react-redux'
import thunk from 'redux-thunk'
import rootReducer from './js/reducers'
import { Navigation } from 'react-native-navigation'
import { registerScreens } from './js/components/screens'

const logger = createLogger();
const store = createStore(
    rootReducer,
    applyMiddleware(thunk, logger)
);

registerScreens(store, Provider);

export default class App extends Component {

    constructor(props){
       super(props);
       this._startApp();
    }

    _startApp = () => {
        Navigation.startTabBasedApp({
            tabs: [
                {
                    label: 'Home',
                    screen: 'ReduxForReactNativeDemo.HomeScreen',
                    icon: require('./res/img/ic_home.png'),
                    // selectedIcon: require('./img/checkmark.png'),
                    title: 'Home',
                    overrideBackPress: false,
                    navigatorStyle: {}
                },
                {
                    label: 'Posts',
                    screen: 'ReduxForReactNativeDemo.PostsScreen',
                    icon: require('./res/img/ic_news.png'),
                    // selectedIcon: require('./img/checkmark.png'),
                    title: 'Posts',
                    navigatorStyle: {}

                }
            ]
        });
    }

}
比起上个版本的demo,整个App.js文件代码基本都改了
其他改变
在components目录下新增screens目录,该文件夹下放一个一个的界面文件,每个界面里面又由多个组件组成。
Group.js改名为HomeScreen.js。- 新增
PostsDetail.js、PostsScreen.js、index.js,index.js文件作用是注册所有界面文件。 Posts.js新增item点击事件,点击后进入列表详细界面。LoadPosts.js68行新增{...this.props},为了在Posts.js里面可以通过this.props获取到navigator。- 根目录下新增
res资源文件夹。
总结:
本次结构分析就到这里了,说下三个demo版本连贯做下来的感受吧。讲真这次对我本人来说学到很多东西,实践过程中也遇到各种问题,查阅海量资源,有很多疑问,最终一一攻破,答案慢慢浮出水面。看过很多demo千奇百怪的写法都有,很少见到标准的项目工程结构,大多都是为了实现效果为目的,而不能在实际项目中去使用这种项目结构,我文章开始阶段我就介绍我了为什么要花这些时间和精力来写这篇技术文章。我会把这种工程结构运用到以后集成了redux 的项目中。找到一份好的学习资料真的很不容易,如果你也觉得不错的话,不妨把 ❤️ 点亮,让更多人发现它。
彩蛋
附上 demo ,欢迎 ❤️⭐️👏 指出错误或者发布自己的见解探讨,共勉。🤝
注意
直接 clone 下来运行的话,默认看到是最后一次(v3)更新的内容 demo,
执行git tag可以看到的demo有三个 tag,如果切换到前两次更新的 demo内容:根目录下执行:
切换到v0.1
git checkout -b dev v0.1
切换到v0.2
git checkout -b dev v0.2
