

前言:
关于下拉选择框,估计大家都有很多选择,我在以前的文章:项目需求讨论-HyBrid模式需求改造 上写过下拉框选择这一块,正好用的Spinner。
这次正好又有一个下拉框的需求,所以这次我使用了PopupWindow来实现的。然后想到其实PopupWindow很多地方都会用到,但是一直没有好好的总结过,所以就想到了写本文,而且本文也十分的基础和简单,大家也很好理解。
主要分为三部分:
- PopupWindow的使用
- PopupWindow工具类的封装
- PopupWindow源码分析
正文
我们知道上来直接给一大串的源码,很少有人会继续看下去,所以我们就自己先写个下拉选择框demo来进行演示。
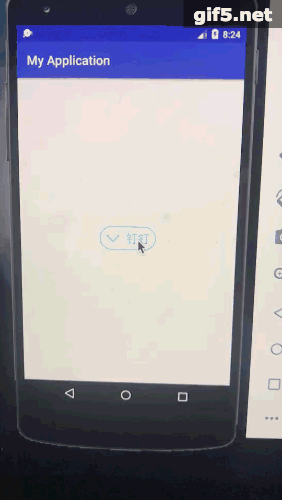
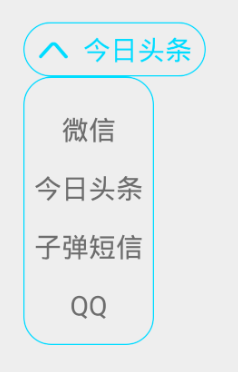
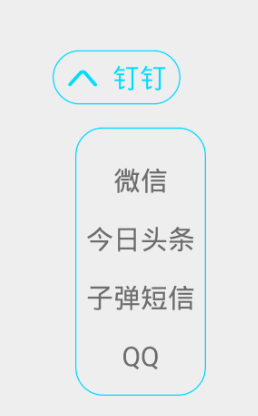
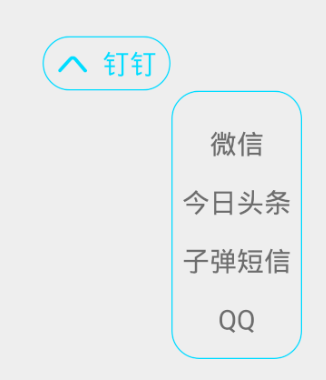
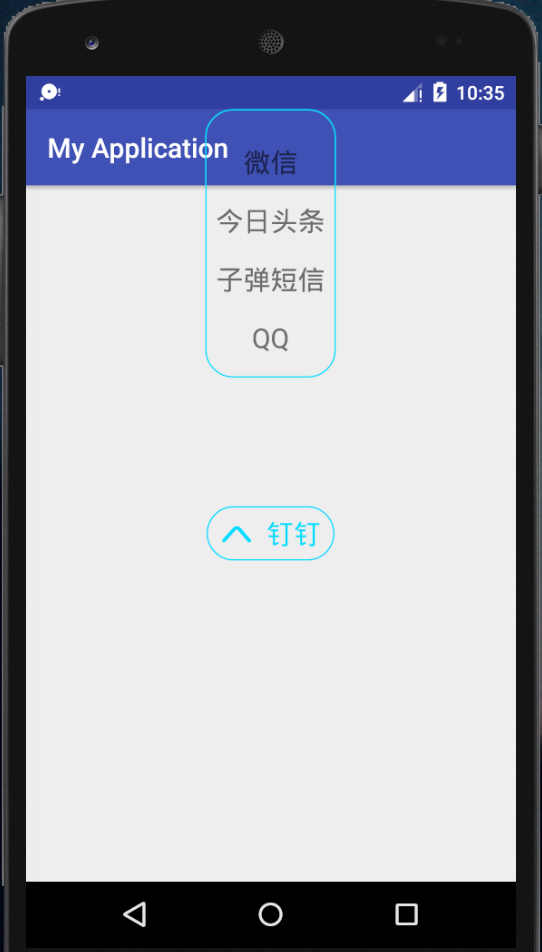
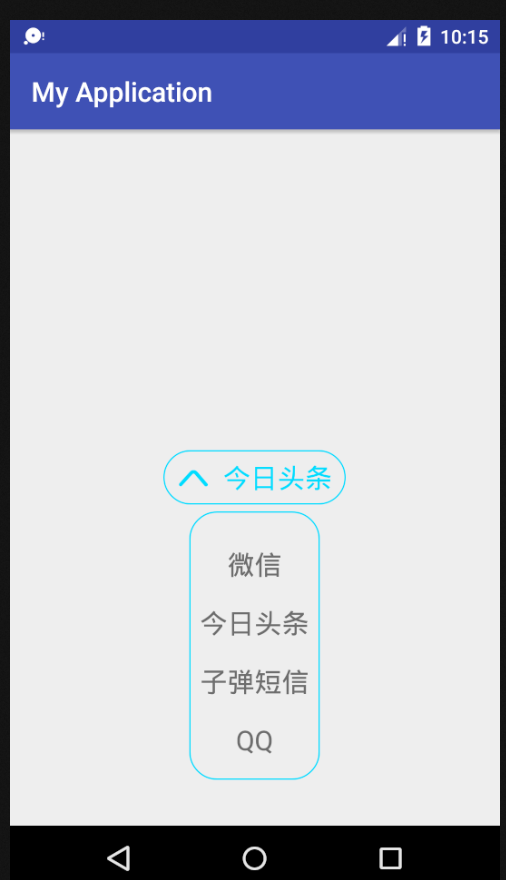
所以我们可以先来看下我们需要的下拉框样式:(为了随便举个例子,所以设计的比较丑):
我们可以一步步来看如何实现:
1.基础使用教程
既然要跳出下面的弹框,而且本文说过要使用PopupWindow,所以就是实现一个PopupWindow即可,十分简单。
1.1 实例化PopupWindow对象
既然实例化PopupWindow对象,所以我们看下它的构造函数:
public PopupWindow() {
    this(null, 0, 0);
}

public PopupWindow(View contentView) {
    this(contentView, 0, 0);
}

public PopupWindow(int width, int height) {
    this(null, width, height);
}

public PopupWindow(View contentView, int width, int height) {
    this(contentView, width, height, false);
}


/**
    @param contentView the popup content
    @param width the popup's width
    @param height the popup's height
    @param focusable true if the popup can be focused, false otherwise
*/

public PopupWindow(View contentView, int width, int height, boolean focusable) {
    if (contentView != null) {
        mContext = contentView.getContext();
        mWindowManager = (WindowManager) mContext.getSystemService(Context.WINDOW_SERVICE);
    }

    setContentView(contentView);
    setWidth(width);
    setHeight(height);
    setFocusable(focusable);
}
我们可以看到不管你用的哪个构造函数,最终一定是调用了最后一个构造函数:PopupWindow(View contentView, int width, int height, boolean focusable)
也就是说我们要告诉PopupWindow这些内容:
- 显示的contentView
- PopupWindow要显示的宽和高,
- PopupWindow是否有获取焦点的能力(默认false)。
假设我们用的第四个构造函数
View contentView = LayoutInflater.from(MainActivity.this).inflate(R.layout.popuplayout, null);
PopupWindow popupWindow = new PopupWindow(contentView,ViewGroup.LayoutParams.WRAP_CONTENT, ViewGroup.LayoutParams.WRAP_CONTENT,true);
1.2 PopupWindow相关设置方法
当然我们也可以使用第一个构造函数生成对象,然后通过相应的SetXXXX方法,设置各种参数。
我们来看下一些常用的Set方法:
设置contentView, 宽和高,获取焦点能力:
popupWindow.setContentView(contentView);
popupWindow.setHeight(height);
popupWindow.setWidth(width);
popupWindow.setFocusable(true);
点击窗体外消失:
// 需要设置一下PopupWindow背景,点击外边消失才起作用
popupWindow.setBackgroundDrawable(new BitmapDrawable(getResources(),(Bitmap) null));
// 点击窗外可取消
popupWindow.setTouchable(true);
popupWindow.setOutsideTouchable(true);
关于窗体会被软件盘遮挡:
// 设置pop被键盘顶上去,而不是遮挡
popupWindow.setSoftInputMode(PopupWindow.INPUT_METHOD_NEEDED);
popupWindow.setSoftInputMode(WindowManager.LayoutParams.SOFT_INPUT_ADJUST_RESIZE);
popupwindow添加各种动画效果(平移,缩放,透明等):
popupWindow.setAnimationStyle(R.style.popwindow_anim_style);
动画的style:
<style name="AnimDown" parent="@android:style/Animation">
    <item name="android:windowEnterAnimation">@anim/push_scale_in</item>
    <item name="android:windowExitAnimation">@anim/push_scale_out</item>
</style>
具体的动画:
<!-- 显示动画-->
<?xml version="1.0" encoding="utf-8"?><!-- 左上角扩大-->
<set xmlns:android="http://schemas.android.com/apk/res/android"
    android:shareInterpolator="true">

    <scale xmlns:android="http://schemas.android.com/apk/res/android"
        android:duration="200"
        android:fromXScale="1.0"
        android:fromYScale="0.0"
        android:interpolator="@android:anim/accelerate_decelerate_interpolator"
        android:toXScale="1.0"
        android:toYScale="1.0" />
</set>
<!-- 隐藏动画-->
<?xml version="1.0" encoding="utf-8"?><!-- 左上角扩大-->
<set xmlns:android="http://schemas.android.com/apk/res/android"
    android:shareInterpolator="true">

    <scale xmlns:android="http://schemas.android.com/apk/res/android"
        android:duration="200"
        android:fromXScale="1.0"
        android:fromYScale="1.0"
        android:interpolator="@android:anim/accelerate_decelerate_interpolator"
        android:toXScale="1.0"
        android:toYScale="0.001" />
</set>
1.3 PopupWindow显示出来
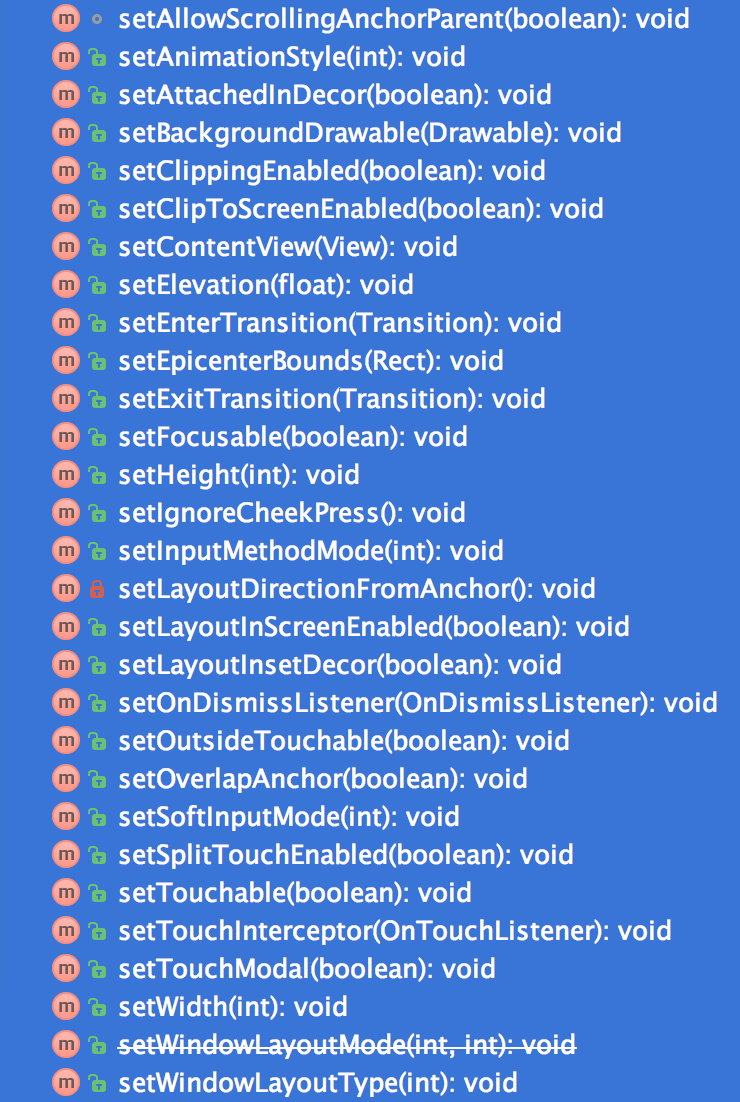
主要是使用showXXXX方法来实现,而这个方法也有好几个:
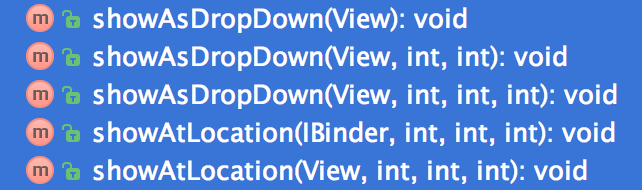
我们先来看showAsDropDown和showAtLocation的区别:
很多人估计用的更多的是showAsDropDown,它们的最大区别简单来说是showAsDropDown是相对于某个控件,然后PopupWindow显示在这个控件的下方;而showAtLocation是相对于屏幕,可以通过设置Gravity来指定PopupWindow显示在屏幕的那个位置。
比如我们现在先看showAsDropDown:
//PopupWindow会显示我们传入的这个View的下方,平切是左边对齐
//(也就是view控件的左下角与popupWindow的左上角对齐)
showAsDropDown(View)
//PopupWindow还是在这个View的下方,
//但是额外可以设置x,y的偏移值,x,y表示坐标偏移量
showAsDropDown(View,int,int);
比如我们代码写为:showAsDropDown(View,50,50);X轴和Y轴都偏移了50。
//PopupWindow可以额外设定Gravity,默认就是Gravity.Left。
//同时设置为Top和Bottom没啥效果,因为是在这个View的下方。
showAsDropDown(View,int,int,int);
比如我们代码写为:popupWindow.showAsDropDown(v,0,0,Gravity.RIGHT);变成了View的右下角与PopupWindow的左上角对齐了。
我们再来看showAtLocation:
因为这个方法是PopupWindow的显示相对于屏幕,所以传入的View也是只要这个屏幕的就可以,因为这个View的传入也只是为了拿到Window Token。
//这个方法最后还是等于调用了另外一个showAtLocation方法,
//传入view只是为了拿到token
//x,y同样是x和y轴的偏移值
public void showAtLocation(View parent, int gravity, int x, int y) {
    showAtLocation(parent.getWindowToken(), gravity, x, y);
}

public void showAtLocation(IBinder token, int gravity, int x, int y){
    .......
}
比如我们写入的代码是:popupWindow.showAtLocation(view, Gravity.RIGHT | Gravity.BOTTOM, 0, 0);
如果我们设置为:popupWindow.showAtLocation(view, Gravity.TOP, 0, 0);
我们发现PopupWindow并没有在statusbar的上面。如果我们想要覆盖statusbar呢,可以再加一句:popupWindow.setClippingEnabled(false);

所以基本使用估计大家都会了。我们来总结下代码:
1.4 总结PopupWindow初级使用代码
LayoutInflater mLayoutInflater = (LayoutInflater) getSystemService(LAYOUT_INFLATER_SERVICE);
//自定义布局
ViewGroup view = (ViewGroup) mLayoutInflater.inflate(R.layout.window, null, true);
PopupWindow popupWindow = new PopupWindow(view, LayoutParams.WRAP_CONTENT,LayoutParams.WRAP_CONTENT, true);

//是否需要点击PopupWindow外部其他界面时候消失
mPopWindow.setBackgroundDrawable(new BitmapDrawable());
mPopWindow.setOutsideTouchable(true);

//设置touchable和focusable
mPopWindow.setFocusable(true);
mPopWindow.setTouchable(true);

/**
然后比如在某个按钮的点击事件中显示PopupWindow
切记不能直接在比如onCreate中直接调用显示popupWindow,
会直接抛出异常,原因后面源码解析会提到
*/
btn.setOnclickListener(v -> {
    if (popupWindow != null) {
        popupWindow.showAsDropDown(v);
    }
})

2.PopupWindow工具类封装
我在以前写过Dialog的封装文章:
项目需求讨论-Android 自定义Dialog实现步骤及封装
我们这次来对PopupWindow来进行封装,我们还是像上面的文章那样,使用Builder模式。
我们先来看我们要注意哪些因素要考虑:
- contentView ,这里有二种可能,一是用户只是传了R.layout.xxx进来,二是用户传了具体的View对象进来。
- PopupWindow的宽和高。 (可能需要传入Px值,可能是dp值,可能是R.dimen.xxx值,如果不传入,就默认为Wrap_Content,也就是会显示你传入的contentView的宽高)
- 是否需要显示动画,如果需要显示动画,那么具体的style参数
- focusable,touchable 的设置
- 是否设置点击外部让PopupWindow消失
- 设置里面的某个View的点击事件
所以初步我们可以写成这样:
public class CustomPopupWindow extends PopupWindow {

    private CustomPopupWindow(Builder builder) {
        super(builder.context);

        builder.view.measure(View.MeasureSpec.UNSPECIFIED, View.MeasureSpec.UNSPECIFIED);
        setContentView(builder.view);
        setHeight(builder.height == 0?ViewGroup.LayoutParams.WRAP_CONTENT:builder.height);
        setWidth(builder.width == 0?ViewGroup.LayoutParams.WRAP_CONTENT:builder.width);
        if (builder.cancelTouchout) {
            setBackgroundDrawable(new ColorDrawable(0x00000000));//设置透明背景
            setOutsideTouchable(builder.cancelTouchout);//设置outside可点击
        }
        setFocusable(builder.isFocusable);
        setTouchable(builder.isTouchable);

        if(builder.animStyle != 0){
            setAnimationStyle(builder.animStyle);
        }
    }

    public static final class Builder {

        private Context context;
        private int height, width;
        private boolean cancelTouchout;
        private boolean isFocusable = true;
        private boolean isTouchable = true;
        private View view;
        private int animStyle;

        public Builder(Context context) {
            this.context = context;
        }

        public Builder view(int resView) {
            view = LayoutInflater.from(context).inflate(resView, null);
            return this;
        }

        public Builder view(View resVew){
            view = resVew;
            return this;
        }

        public Builder heightpx(int val) {
            height = val;
            return this;
        }

        public Builder widthpx(int val) {
            width = val;
            return this;
        }

        public Builder heightdp(int val) {
            height = dip2px(context, val);
            return this;
        }

        public Builder widthdp(int val) {
            width = dip2px(context, val);
            return this;
        }

        public Builder heightDimenRes(int dimenRes) {
            height = context.getResources().getDimensionPixelOffset(dimenRes);
            return this;
        }

        public Builder widthDimenRes(int dimenRes) {
            width = context.getResources().getDimensionPixelOffset(dimenRes);
            return this;
        }

        public Builder cancelTouchout(boolean val) {
            cancelTouchout = val;
            return this;
        }

        public Builder isFocusable(boolean val) {
            isFocusable = val;
            return this;
        }

        public Builder isTouchable(boolean val) {
            isTouchable = val;
            return this;
        }

        public Builder animStyle(int val){
            animStyle = val;
            return this;
        }

        public Builder addViewOnclick(int viewRes, View.OnClickListener listener) {
            view.findViewById(viewRes).setOnClickListener(listener);
            return this;
        }


        public CustomPopupWindow build() {

            return new CustomPopupWindow(this);
        }
    }

    @Override
    public int getWidth() {
        return getContentView().getMeasuredWidth();
    }

    public static int dip2px(Context context, float dipValue) {
        final float scale = context.getResources().getDisplayMetrics().density;
        return (int) (dipValue * scale + 0.5f);
    }
}
所以只要知道我们要设定哪些属性,就很容易封装。
然后使用就可以:
customPopupWindow = new CustomPopupWindow.Builder(this)
                .cancelTouchout(true)
                .view(popupWindowView)
                .isFocusable(true)
                .animStyle(R.style.AnimDown)
                .build();
这里我要额外提上面封装类代码中的二个知识点:
知识点1. 提前知道popupwindow的宽高。
我们可以看到在我们的工具类中,有一段代码:
builder.view.measure(View.MeasureSpec.UNSPECIFIED, View.MeasureSpec.UNSPECIFIED);,
就是把我们传进去的contentView提前绘制,这样我们就可以调用popupwindow.getContentView().getMeasuredWidth()方法来获取这个contentView的宽高了(ps:我们一般设置的popupwindow的宽高肯定跟我们传进去的contentview一致)。
可能有些人就会问了,我们为啥需要提前知道popupwindow的宽高呢,比如下面这个需求:
比如上面的启动PopupWindow的按钮,比下面的选项宽,我们肯定希望咱们的PopupWindow是显示在正中间,所以我们在调用:
showAsDropDown(View anchor, int xoff, int yoff);
时候传入的X值的偏移量就要为上面的按钮宽度减去下面PopupWindow的宽度后的一半。但是平常情况下,我们单纯通过PopupWindow.getWidth()或者contentView.getWidth()方法,在第一次点击出现的时候,获取到的值前者为-2,后者为0,然后再次点击的时候就是正确值了。因为第一次点击前,PopupWindow还没出现在屏幕过,所以也没有被绘制出来过,宽度当然也获取不到准确值了。出现过一次后,第二次点击就能正确获取了。所以第一次PopupWindow就出现在错误位置,后面就对了。
所以我们重新重载了PopupWindow的getWidth方法:
@Override
public int getWidth() {
    return getContentView().getMeasuredWidth();
}
知识点2. Touchable和Focusable的设置
我们一般对上面的按钮设置成这样:
btn.setOnclickListener(v -> {
    if (popupWindow != null) {
        popupWindow.showAsDropDown(v);
    }
})
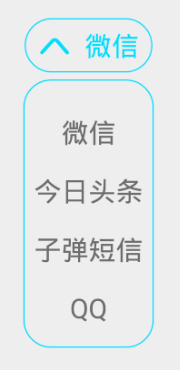
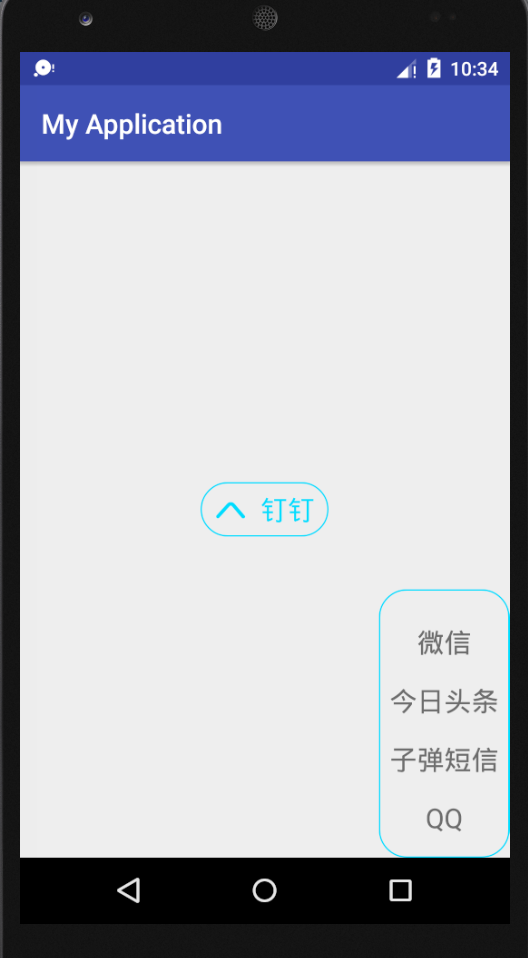
这样点击按钮后就可以出现我们的PopupWindow,但是你再次点击这个按钮,PopupWindow会先消失,然后再次出现,就像下面这样:
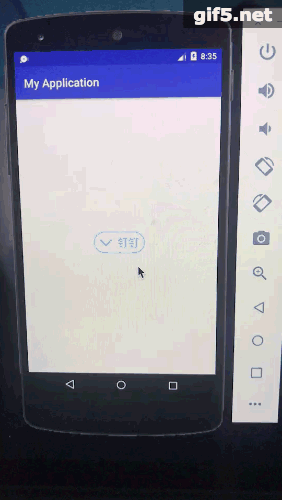
但是我们希望的是点击按钮后,如果PopupWindow在的话就消失。
当然你可以在点击事件里面用:PopupWindow.isShowing();判断,然后让PopupWindow.dismiss();,但是别人用了我们的工具类,总不能还要告诉它要在触发按钮点击事件里面要额外判断吧,所以我们只需要在我们工具类中默认设置PopupWindow的touchable和focusable为true,这样,我们的点击事件啥都不用改,就可以点击一下出现,再点击消失。

3. PopupWindow源码简单分析
很惭愧,很早以前就会用PopupWindow,但是源码一直没有去看过。
在讲解PopupWindow源码前我们先来看下其他的知识。
我们应该都做过或者看见过添加悬浮窗等功能,或者在某些文章看见过Window和WindowManager的介绍,比如在《Android艺术开发之旅》里面,也有相关的一章专门讲这个,大家可以看下:
Android开发艺术探索——第八章:理解Window和WindowManager
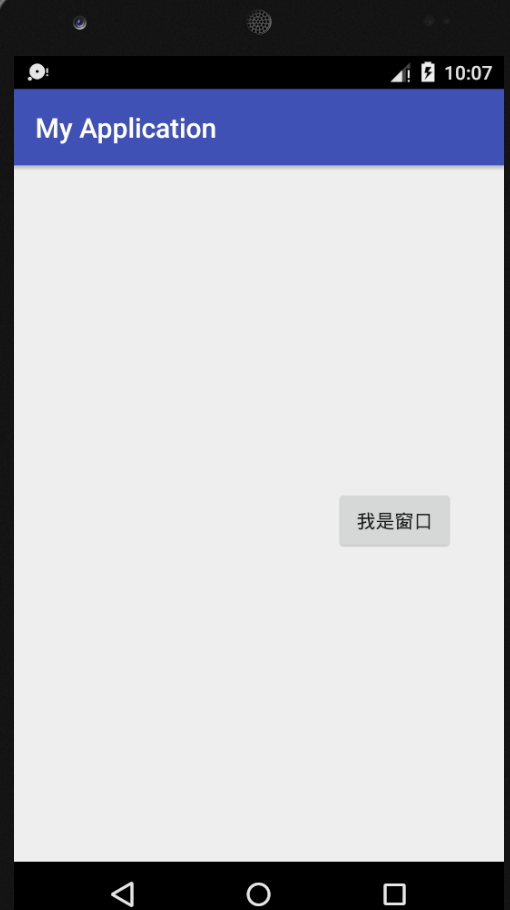
假设我们现在要在应用程序的某处加个按钮,应该怎么样呢:
Button btn = new Button(this);
btn.setText("我是窗口");
WindowManager wm = (WindowManager) getSystemService(WINDOW_SERVICE);
WindowManager.LayoutParams layout = new WindowManager.LayoutParams(WindowManager.LayoutParams.WRAP_CONTENT
    , WindowManager.LayoutParams.WRAP_CONTENT, 0,0,
    PixelFormat.TRANSLUCENT);
layout.flags = WindowManager.LayoutParams.FLAG_NOT_TOUCH_MODAL
        | WindowManager.LayoutParams.FLAG_NOT_FOCUSABLE
        | WindowManager.LayoutParams.FLAG_SHOW_WHEN_LOCKED;
layout.gravity = Gravity.CENTER;
layout.type = WindowManager.LayoutParams.TYPE_APPLICATION;
layout.x = 300;
layout.y = 100;
wm.addView(btn, layout);
只需要通过WindowManager的addView方法,把这个按钮加进来即可,我估计有百分之八九十的安卓开发都大概见过或者知道这种通过WindowManager添加的方式。
我们可以看出有这么几步:
- 创建了要显示的ContentView(此处为Button)
- 创建WindowMananger.LayoutParams对象
- 对LayoutParams对象设置相应的属性值,比如x,y
- WindowMananger对象调用addView(ContentView,LayoutParams);
PS:这里额外提下layout.type = WindowManager.LayoutParams.TYPE_APPLICATION;这个属性,比如我们当前只是在我们的app里面加一个按钮,所以也不需要做其他额外处理;如果我们是想全局添加按钮,也就是我们的app最小化到了后台,在手机桌面还是能看到有个按钮悬浮(类似一些手机清理助手等悬浮小球),需要切换这里的type属性,同时还要声明相应的权限,不然app就会报错,说permission denied for this window type。相应的type介绍大家可以参考:WindowManager.LayoutParams的type属性
没错,咱们的PopupWindow也是类似的。
我们从构造函数开始看起来:
public PopupWindow(View contentView, int width, int height, boolean focusable) {
    if (contentView != null) {
        mContext = contentView.getContext();
        mWindowManager = (WindowManager) mContext.getSystemService(Context.WINDOW_SERVICE);
    }

    setContentView(contentView);
    setWidth(width);
    setHeight(height);
    setFocusable(focusable);
}
我们可以看到,果然获取了WindowManager对象,然后给PopupWindow的内部的contentView、width、height、focusable赋值。
我们看最后显示的方法源码:
public void showAsDropDown(View anchor, int xoff, int yoff, int gravity) {
    if (isShowing() || mContentView == null) {
        return;
    }

    TransitionManager.endTransitions(mDecorView);

    attachToAnchor(anchor, xoff, yoff, gravity);

    mIsShowing = true;
    mIsDropdown = true;

    //'我们可以看到这里果然生成了相应的WindowManager.LayoutParams'
    final WindowManager.LayoutParams p = createPopupLayoutParams(anchor.getWindowToken());

    //'把这个LayoutParams传过去,把PopupWindow真正的样子,也就是view创建出来'
    preparePopup(p);

    //'findDropDownPosition方法确定好PopupWindow要显示的位置'
    final boolean aboveAnchor = findDropDownPosition(anchor, p, xoff, yoff,
            p.width, p.height, gravity);
    updateAboveAnchor(aboveAnchor);
    p.accessibilityIdOfAnchor = (anchor != null) ? anchor.getAccessibilityViewId() : -1;

    //'最终调用windowmanager.addview方法呈现popupwindow'
    invokePopup(p);
}
第一步:创建WindowManager.LayoutParams
我们可以看到创建WindowManager.LayoutParams是通过代码
final WindowManager.LayoutParams p = createPopupLayoutParams(anchor.getWindowToken());我们具体来看下这个方法
private WindowManager.LayoutParams createPopupLayoutParams(IBinder token) {
    final WindowManager.LayoutParams p = new WindowManager.LayoutParams();

    // These gravity settings put the view at the top left corner of the
    // screen. The view is then positioned to the appropriate location by
    // setting the x and y offsets to match the anchor bottom-left
    // corner.
    p.gravity = computeGravity();
    p.flags = computeFlags(p.flags);
    p.type = mWindowLayoutType;
    p.token = token;
    p.softInputMode = mSoftInputMode;
    p.windowAnimations = computeAnimationResource();

    if (mBackground != null) {
        p.format = mBackground.getOpacity();
    } else {
        p.format = PixelFormat.TRANSLUCENT;
    }

    if (mHeightMode < 0) {
        p.height = mLastHeight = mHeightMode;
    } else {
        p.height = mLastHeight = mHeight;
    }

    if (mWidthMode < 0) {
        p.width = mLastWidth = mWidthMode;
    } else {
        p.width = mLastWidth = mWidth;
    }

    p.privateFlags = PRIVATE_FLAG_WILL_NOT_REPLACE_ON_RELAUNCH
            | PRIVATE_FLAG_LAYOUT_CHILD_WINDOW_IN_PARENT_FRAME;

    // Used for debugging.
    p.setTitle("PopupWindow:" + Integer.toHexString(hashCode()));

    return p;
}
第二步:创建View
我们再看preparePopup(p);方法:
private void preparePopup(WindowManager.LayoutParams p) {
    if (mContentView == null || mContext == null || mWindowManager == null) {
        throw new IllegalStateException("You must specify a valid content view by calling setContentView() before attempting to show the popup.");
    }

    // The old decor view may be transitioning out. Make sure it finishes
    // and cleans up before we try to create another one.
    if (mDecorView != null) {
        mDecorView.cancelTransitions();
    }

    // When a background is available, we embed the content view within
    // another view that owns the background drawable.


    /**
    '准备backgroundView,因为一般mBackgroundView是null,
    所以把之前setContentView设置的contentView作为mBackgroundView,
    不然就生成一个PopupBackgroundView(继承FrameLayout),
    把contentView加进去,然后再对这个PopupBackgroundView设置背景'
    */
    if (mBackground != null) {
        mBackgroundView = createBackgroundView(mContentView);
        mBackgroundView.setBackground(mBackground);
    } else {
        mBackgroundView = mContentView;
    }

    /**
    '生成相应的PopupWindow的根View。
    实际也就是实例一个PopupDecorView(继承FrameLayout),然后把contentView add进来
    (ps:是不是想起Activity的根view:DecorView,也是叫这个名字,也是把Activity的contentView加进来)'
    */
    mDecorView = createDecorView(mBackgroundView);

    // The background owner should be elevated so that it casts a shadow.
    mBackgroundView.setElevation(mElevation);

    // We may wrap that in another view, so we will need to manually specify
    // the surface insets.
    p.setSurfaceInsets(mBackgroundView, true /*manual*/, true /*preservePrevious*/);

    mPopupViewInitialLayoutDirectionInherited =
            (mContentView.getRawLayoutDirection() == View.LAYOUT_DIRECTION_INHERIT);
}
第三步:WindowManager.LayoutParams根据我们的参考View来确定具体属性值
主要是通过源码中的下面这个方法:
findDropDownPosition(anchor, p, xoff, yoff,p.width, p.height, gravity);
因为我们可能让PopupWindow出现在我们点击按钮的下面,所以我们会传入按钮的View,我们知道我们让PopupWindow出现在按钮下方,肯定需要设置WindowManager.LayoutParams的x,y值,才能让它出现在指定位置,所以我们肯定要根据按钮的View,获取它的x,y值,然后额外加上我们后来传进来的x,y轴的偏移值,然后最后显示。
我们具体查看源码的内容:
private boolean findDropDownPosition(View anchor, WindowManager.LayoutParams outParams,
        int xOffset, int yOffset, int width, int height, int gravity) {
    final int anchorHeight = anchor.getHeight();
    final int anchorWidth = anchor.getWidth();
    if (mOverlapAnchor) {
        yOffset -= anchorHeight;
    }

    // Initially, align to the bottom-left corner of the anchor plus offsets.
    final int[] drawingLocation = mTmpDrawingLocation;


    /**
    '我们可以看到调用了getLocationInWindow方法,
    来获取我们参考的View的当前窗口内的绝对坐标,
    得到的值为数组:
    location[0] -----> x坐标
    location[1] -----> y坐标'
    */
    anchor.getLocationInWindow(drawingLocation);
    //'我们的PopupWindow的x为当前的参考View的x值加上我们额外传入的偏移值'
    outParams.x = drawingLocation[0] + xOffset;
    //'我们的PopupWindow的y为当前的参考View的y值加上我们参考view的高度及额外传入的偏移值'
    outParams.y = drawingLocation[1] + anchorHeight + yOffset;

    final Rect displayFrame = new Rect();
    anchor.getWindowVisibleDisplayFrame(displayFrame);
    if (width == MATCH_PARENT) {
        width = displayFrame.right - displayFrame.left;
    }
    if (height == MATCH_PARENT) {
        height = displayFrame.bottom - displayFrame.top;
    }

    // Let the window manager know to align the top to y.
    outParams.gravity = computeGravity();
    outParams.width = width;
    outParams.height = height;

    // If we need to adjust for gravity RIGHT, align to the bottom-right
    // corner of the anchor (still accounting for offsets).
    final int hgrav = Gravity.getAbsoluteGravity(gravity, anchor.getLayoutDirection())
            & Gravity.HORIZONTAL_GRAVITY_MASK;

    /**
    '如果是Gravity.RIGHT,我们的x值还需要再做偏移,
    相当于减去(我们的PopupWindow宽度减去参考View的宽度)。'
    */
    if (hgrav == Gravity.RIGHT) {
        outParams.x -= width - anchorWidth;
    }

    final int[] screenLocation = mTmpScreenLocation;
    anchor.getLocationOnScreen(screenLocation);

    // First, attempt to fit the popup vertically without resizing.
    final boolean fitsVertical = tryFitVertical(outParams, yOffset, height,
            anchorHeight, drawingLocation[1], screenLocation[1], displayFrame.top,
            displayFrame.bottom, false);

    // Next, attempt to fit the popup horizontally without resizing.
    final boolean fitsHorizontal = tryFitHorizontal(outParams, xOffset, width,
            anchorWidth, drawingLocation[0], screenLocation[0], displayFrame.left,
            displayFrame.right, false);

    // If the popup still doesn not fit, attempt to scroll the parent.
    if (!fitsVertical || !fitsHorizontal) {
        final int scrollX = anchor.getScrollX();
        final int scrollY = anchor.getScrollY();
        final Rect r = new Rect(scrollX, scrollY, scrollX + width + xOffset,
                scrollY + height + anchorHeight + yOffset);
        if (mAllowScrollingAnchorParent && anchor.requestRectangleOnScreen(r, true)) {
            // Reset for the new anchor position.
            anchor.getLocationInWindow(drawingLocation);
            outParams.x = drawingLocation[0] + xOffset;
            outParams.y = drawingLocation[1] + anchorHeight + yOffset;

            // Preserve the gravity adjustment.
            if (hgrav == Gravity.RIGHT) {
                outParams.x -= width - anchorWidth;
            }
        }

        // Try to fit the popup again and allowing resizing.
        tryFitVertical(outParams, yOffset, height, anchorHeight, drawingLocation[1],
                screenLocation[1], displayFrame.top, displayFrame.bottom, mClipToScreen);
        tryFitHorizontal(outParams, xOffset, width, anchorWidth, drawingLocation[0],
                screenLocation[0], displayFrame.left, displayFrame.right, mClipToScreen);
    }

    // Return whether the popup top edge is above the anchor top edge.
    return outParams.y < drawingLocation[1];
}
第三步:WindowManager添加相应的View
通过最后的invokePopup(p);
private void invokePopup(WindowManager.LayoutParams p) {
    if (mContext != null) {
        p.packageName = mContext.getPackageName();
    }

    final PopupDecorView decorView = mDecorView;
    decorView.setFitsSystemWindows(mLayoutInsetDecor);

    setLayoutDirectionFromAnchor();

    //'最后通过windowmanager的addview方法把decorView加进来'
    mWindowManager.addView(decorView, p);

    if (mEnterTransition != null) {
        decorView.requestEnterTransition(mEnterTransition);
    }
}
补充1:当然我们平常也知道用WindowManager.removeView或者removeViewImmediate方法移除View,而我们的PopupWindow.dismiss()方法也是一样,使用了
mWindowManager.removeViewImmediate(decorView);移除,这步我就不多说了。大家可以自己看下。
补充2:看懂了showAsDropDown的源码,showAsLocation的就更简单了,直接让LayoutParams的x和y值等于你传入的x,y值,其他代码都是类似的。
补充3:我们前面提过在onCreate方法里面直接显示ShowAsDropDown等显示方法会报错:android.view.WindowManager$BadTokenException,因为这时候Activity的相关View都没初始化好,也就拿到的view.token为null了。
结语
PopupWindow小结可能写的不够全,或者哪里写的不对,欢迎大家指出。
