

基于OpenCV与tensorflow object detection API使用迁移学习,基于SSD模型训练实现手势识别完整流程,涉及到数据集收集与标注、VOC2012数据集制作,tfrecord数据生成、SSD迁移学习与模型导出,OpenCV摄像头实时视频流读取与检测处理,整个过程比较长,操作步骤比较多,这里说一下主要阶段与关键注意点。
第一阶段:数据收集与数据标注
第二阶段:VOC2012数据集与训练集制作
第三阶段:基于SSD模型的迁移学习
第四阶段:模型导出与使用
数据收集与数据标注
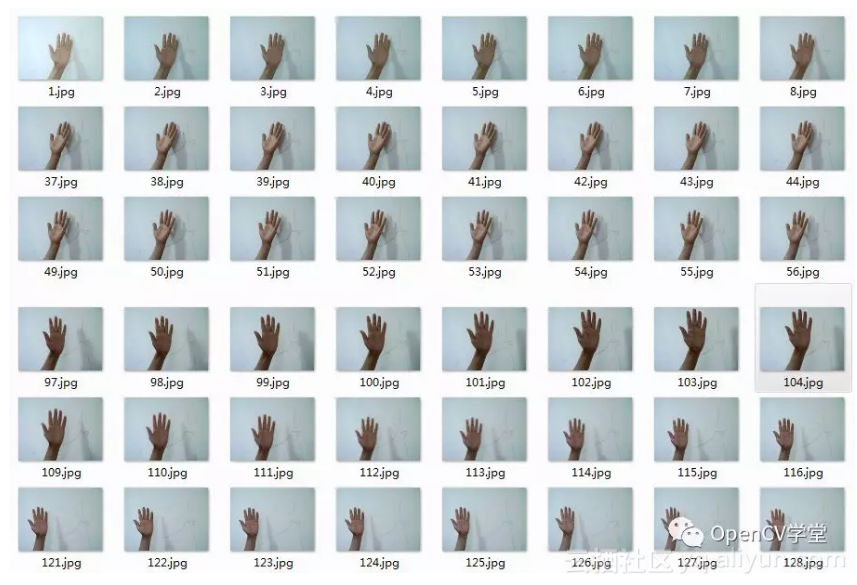
手势数据收集,我通过OpenCV程序打开了一个摄像头,在摄像头前面我尝试了三种手势变换,分别是,我让OpenCV在读取视频流的过程中,对每一帧数据进行了保存,最终挑选得到1000张手势数据。OpenCV打开摄像头与保存手势图像的代码如下:
import cv2 as cv
# image = cv.imread("D:/vcprojects/images/three.png")
capture = cv.VideoCapture("D:/vcprojects/images/visit.mp4")
detector = cv.CascadeClassifier(cv.data.haarcascades + "haarcascade_frontalface_alt.xml")
while True:
ret, image = capture.read()
if ret is True:
cv.imshow("frame", image)
faces = detector.detectMultiScale(image, scaleFactor=1.05, minNeighbors=1,
minSize=(30, 30), maxSize=(120, 120))
for x, y, width, height in faces:
cv.rectangle(image, (x, y), (x+width, y+height), (0, 0, 255), 2, cv.LINE_8, 0)
cv.imshow("faces", image)
c = cv.waitKey(50)
if c == 27:
break
else:
break
cv.destroyAllWindows()
最终我去掉一些模糊过度的图像,生成的手势图像部分数据如下:
数据标注我选择使用labelImg工具,它的GITHUB地址如下:
https://github.com/tzutalin/labelImg
每标注一张图像保存时候它就会生成一个对应的xml文件,这些XML文件格式符合PASCAL VOC2012格式,也是ImageNet中数据集的标准格式。打开标注的界面如下:
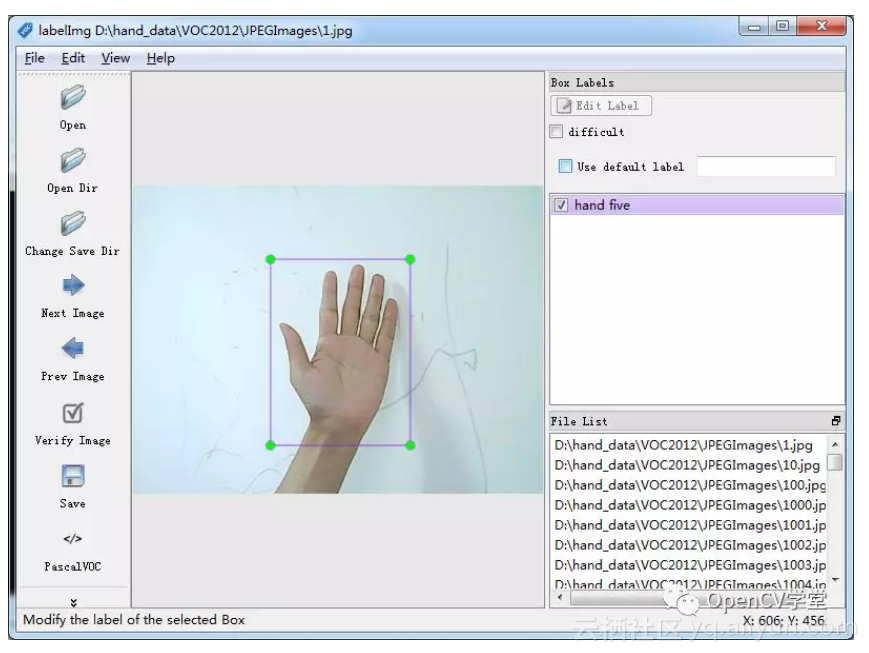
我通过此工具标注了900张图像,完成了Demo程序整个数据标注工作。
VOC2012数据集制作与训练集生成
有了标注好的数据XML文件与图像文件之后,这里需要完成下面几件事情才可以制作生成标准的VOC2012数据集。首先我们需要了解一下PASCAL VOC2012数据集的标准格式,VOC2012标准数据格式目录结构如下:
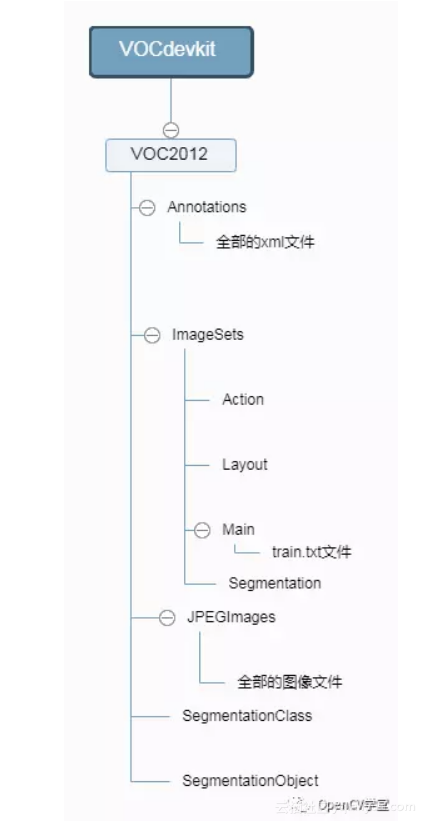
除了根目录VOCdevkit可以修改重命名,其余子目录结构必须完全一致、而且跟我们对象检测数据训练相关的几个目录是必须要有的,它们是:
● VOC2012目录必须存在● Annotations里面是我们在标注数据生成的XML文件
● ImageSets/Main文件夹里面是所有图像数据每个类别对象的classname_train.txt与classname_val.txt文件列表
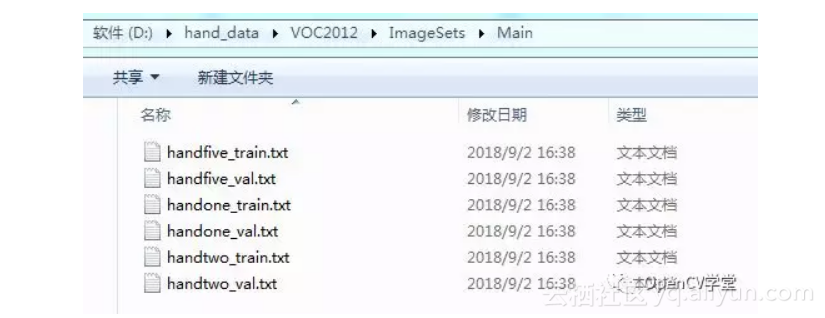
text文件的每一行都是一个文件名+空格+ 1或者-1,其中: 1 表示图像中包含该classname -1 表示不包含该classname 生成该text文件很容易,直接python代码扫描目录,生成XML,代码如下:
def generate_classes_text():
print("start to generate classes text...")
ann_dir = "D:/hand_data/VOC2012/Annotations/"
handone_train = open("D:/hand_data/VOC2012/ImageSets/Main/handone_train.txt", 'w')
handone_val = open("D:/hand_data/VOC2012/ImageSets/Main/handone_val.txt", 'w')
handfive_train = open("D:/hand_data/VOC2012/ImageSets/Main/handfive_train.txt", 'w')
handfive_val = open("D:/hand_data/VOC2012/ImageSets/Main/handfive_val.txt", 'w')
handtwo_train = open("D:/hand_data/VOC2012/ImageSets/Main/handtwo_train.txt", 'w')
handtwo_val = open("D:/hand_data/VOC2012/ImageSets/Main/handtwo_val.txt", 'w')
files = os.listdir(ann_dir)
for xml_file in files:
if os.path.isfile(os.path.join(ann_dir, xml_file)):
xml_path = os.path.join(ann_dir, xml_file)
tree = ET.parse(xml_path)
root = tree.getroot()
for elem in root.iter('filename'):
filename = elem.text
for elem in root.iter('name'):
name = elem.text
if name == "handone":
handone_train.write(filename.replace(".jpg", " ") + str(1) + "\n")
handone_val.write(filename.replace(".jpg", " ") + str(1) + "\n")
handfive_train.write(filename.replace(".jpg", " ") + str(-1) + "\n")
handfive_val.write(filename.replace(".jpg", " ") + str(-1) + "\n")
handtwo_train.write(filename.replace(".jpg", " ") + str(-1) + "\n")
handtwo_val.write(filename.replace(".jpg", " ") + str(-1) + "\n")
if name == "handtwo":
handone_train.write(filename.replace(".jpg", " ") + str(-1) + "\n")
handone_val.write(filename.replace(".jpg", " ") + str(-1) + "\n")
handfive_train.write(filename.replace(".jpg", " ") + str(-1) + "\n")
handfive_val.write(filename.replace(".jpg", " ") + str(-1) + "\n")
handtwo_train.write(filename.replace(".jpg", " ") + str(1) + "\n")
handtwo_val.write(filename.replace(".jpg", " ") + str(1) + "\n")
if name == "handfive":
handone_train.write(filename.replace(".jpg", " ") + str(-1) + "\n")
handone_val.write(filename.replace(".jpg", " ") + str(-1) + "\n")
handfive_train.write(filename.replace(".jpg", " ") + str(1) + "\n")
handfive_val.write(filename.replace(".jpg", " ") + str(1) + "\n")
handtwo_train.write(filename.replace(".jpg", " ") + str(-1) + "\n")
handtwo_val.write(filename.replace(".jpg", " ") + str(-1) + "\n")
handone_train.close()
handone_val.close()
handfive_train.close()
handfive_val.close()
handtwo_train.close()
handtwo_val.close()
●
JPEGImages文件夹里面是所有图像文件,这里特别声明一下我刚开始不知道,在数据生成的时候都保存为PNG格式了,VOC2012根本不会支持,只能是JPG格式才可以。在VOC2012必须有的就是以上的三个目录,其它的目录可以没有,因为在本次对象检测中还用不到。至此我们把数据制作成VOC2012支持的标准格式了,下面创建一个text文件,命名为:
hand_label_map.pbtxt
把下面内容copy进去
item {
id: 1
name: 'handfive'
}
item {
id: 2
name: 'handone'
}
item {
id: 3
name: 'handtwo'
}
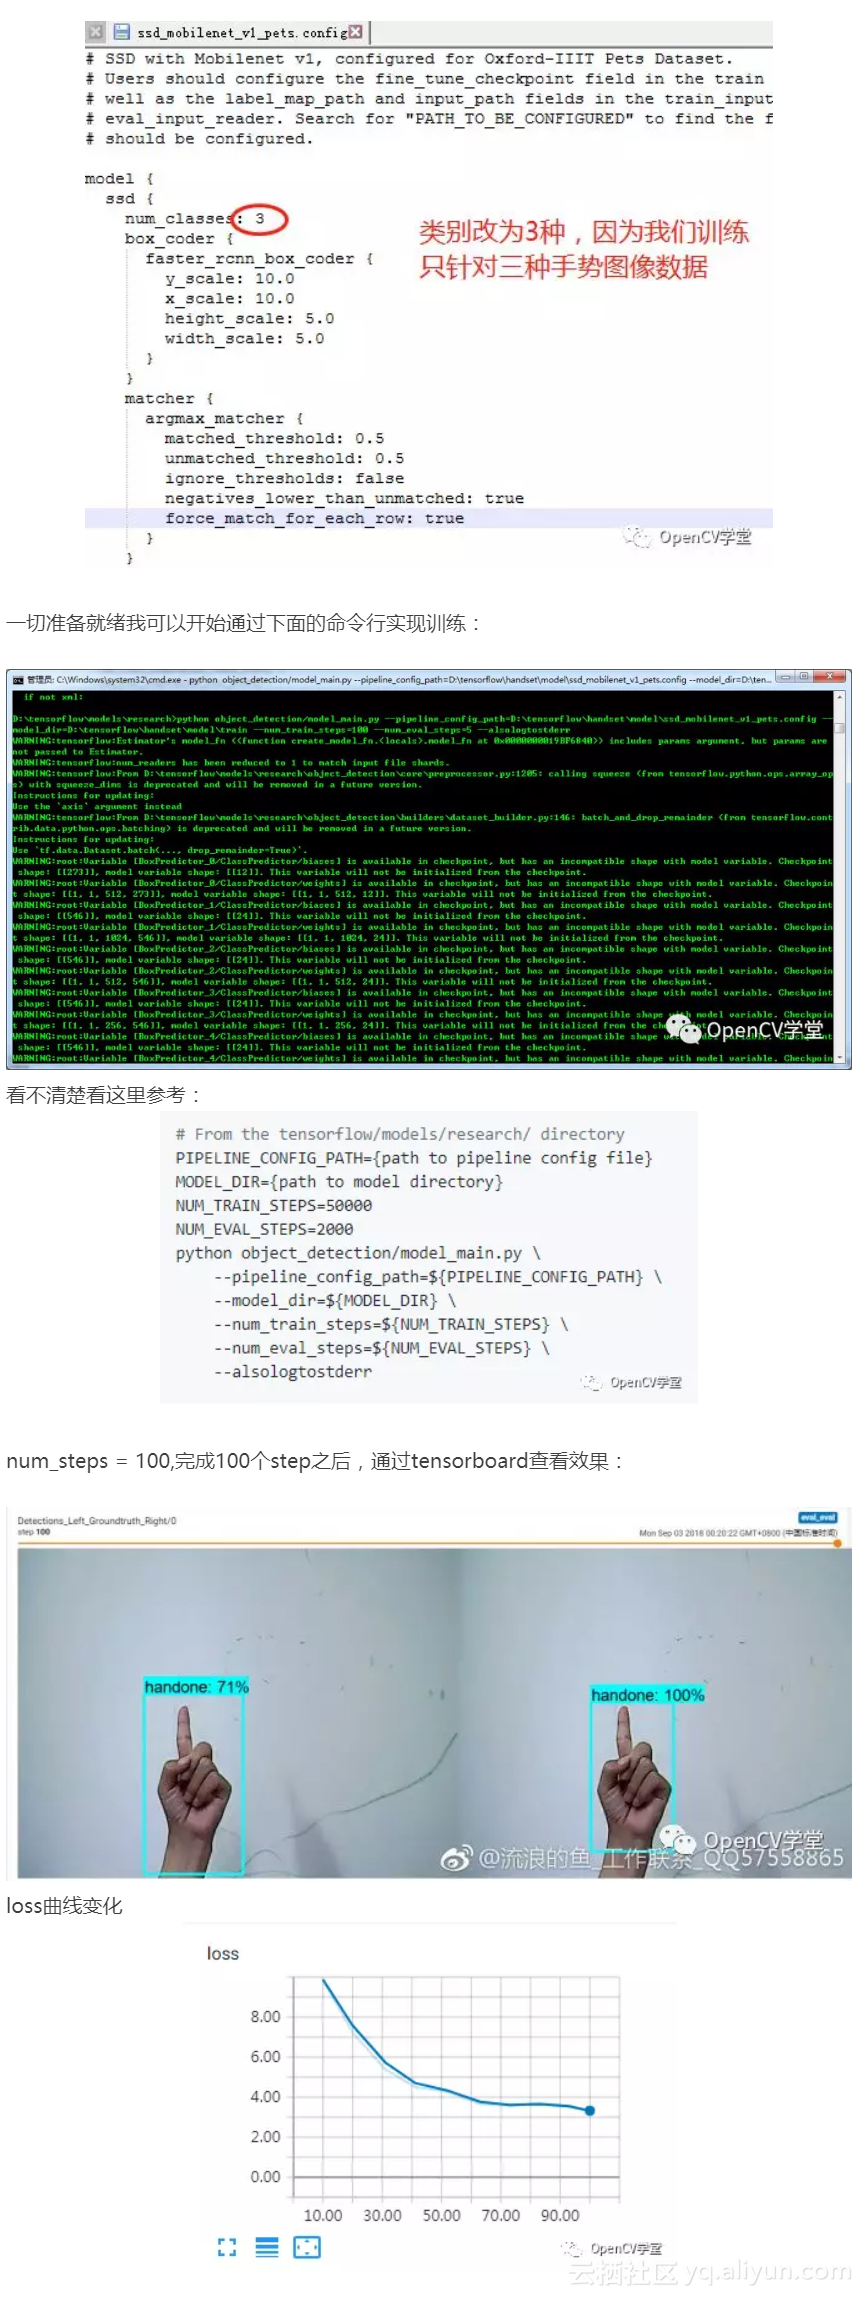
保存之后,运行下面的命令行开始生成tfrecord数据:

有个警告,运行成功,看不清命令行,参考这里:

基于SSD模型的迁移学习
细节不想在重复,之前发过一篇文章,专门讲过如何通过公开数据集,基于tensorflow Object Detection API使用预训练模型实现迁移学习的文章,不懂可以查看这里:
tensorflow object detection API训练公开数据集Oxford-IIIT Pets Dataset
说一下我的config文件里面除了需要修改PATH_TO_BE_CONFIGURED,还需要把这里改一下:
模型导出与使用
训练好之后可以通过tensorflow object detection API自带的工具直接导出模型

frozen_inference_graph.pb
然后用opencv+tensorflow实现一个读摄像头视频流,实时手势检测的程序,代码如下:
import os
import sys
import tarfile
import cv2
import numpy as np
import tensorflow as tf
sys.path.append("..")
cap = cv2.VideoCapture(0)
from utils import label_map_util
from utils import visualization_utils as vis_util
##################################################
# 作者:贾志刚
# 微信:gloomy_fish
# tensorflow object detection tutorial
##################################################
# Path to frozen detection graph
PATH_TO_CKPT = 'D:/tensorflow/handset/export/frozen_inference_graph.pb'
# List of the strings that is used to add correct label for each box.
PATH_TO_LABELS = os.path.join('D:/tensorflow/handset/data', 'hand_label_map.pbtxt')
NUM_CLASSES = 3
detection_graph = tf.Graph()
with detection_graph.as_default():
od_graph_def = tf.GraphDef()
with tf.gfile.GFile(PATH_TO_CKPT, 'rb') as fid:
serialized_graph = fid.read()
od_graph_def.ParseFromString(serialized_graph)
tf.import_graph_def(od_graph_def, name='')
label_map = label_map_util.load_labelmap(PATH_TO_LABELS)
categories = label_map_util.convert_label_map_to_categories(label_map, max_num_classes=NUM_CLASSES, use_display_name=True)
category_index = label_map_util.create_category_index(categories)
def load_image_into_numpy_array(image):
(im_width, im_height) = image.size
return np.array(image.getdata()).reshape(
(im_height, im_width, 3)).astype(np.uint8)
out = cv2.VideoWriter("D:/test.mp4", cv2.VideoWriter_fourcc('D', 'I', 'V', 'X'), 15,
(np.int(640), np.int(480)), True)
with detection_graph.as_default():
with tf.Session(graph=detection_graph) as sess:
while True:
ret, image_np = cap.read()
print(image_np.shape)
# image_np == [1, None, None, 3]
image_np_expanded = np.expand_dims(image_np, axis=0)
image_tensor = detection_graph.get_tensor_by_name('image_tensor:0')
boxes = detection_graph.get_tensor_by_name('detection_boxes:0')
scores = detection_graph.get_tensor_by_name('detection_scores:0')
classes = detection_graph.get_tensor_by_name('detection_classes:0')
num_detections = detection_graph.get_tensor_by_name('num_detections:0')
# Actual detection.
(boxes, scores, classes, num_detections) = sess.run(
[boxes, scores, classes, num_detections],
feed_dict={image_tensor: image_np_expanded})
# Visualization of the results of a detection.
vis_util.visualize_boxes_and_labels_on_image_array(
image_np,
np.squeeze(boxes),
np.squeeze(classes).astype(np.int32),
np.squeeze(scores),
category_index,
use_normalized_coordinates=True,
line_thickness=8)
out.write(image_np)
cv2.imshow('object detection', image_np)
c = cv2.waitKey(10)
if c == 27: # ESC
cv2.imwrite("D:/tensorflow/run_result.png", image_np)
cv2.destroyAllWindows()
break
out.release()
cap.release()
cv2.destroyAllWindows()
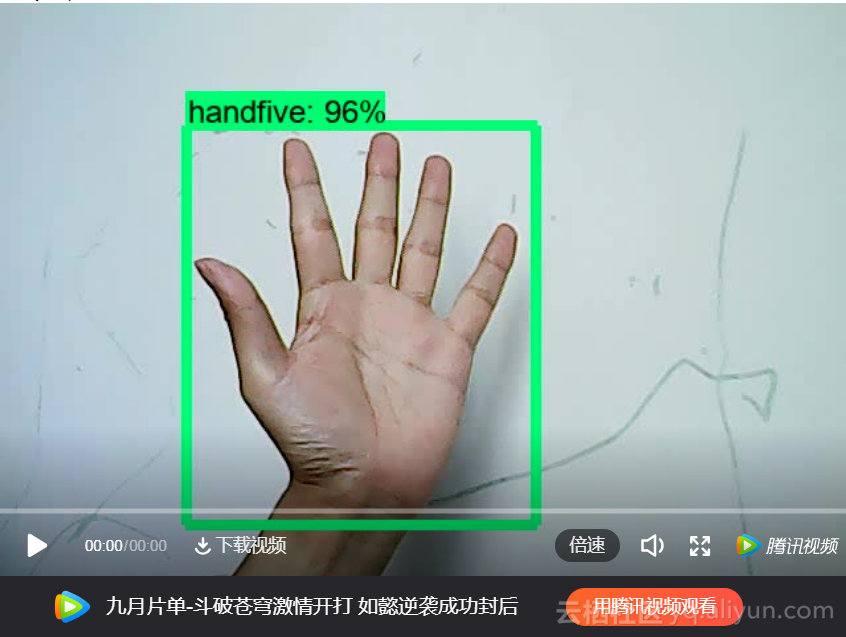
测试结果如下:
原文发布时间为:2018-09-6
本文作者:gloomyfish
