

Unified logging system in a relatively new logging mechanism that was introduced with iOS 10. It’s blazingly fast and gives you a fine-grained control over your logs. In this article we’ll explore the features of unified logging system and see how you can use it to make your debugging time less painful than it has to be.
Console Spammers
On every project one thing inevitably happens… The console gets spammed by a bunch of print statements, we shouldn’t really commit those to begin with  Sometimes it’s the libraries you use, sometimes it’s your colleagues, sometimes it’s you. In any case, you’ll sit there, wasting your time trying to find your print statement in the sea of output. And, as you know, following your own threads,
jumping from one print statement to the next is painful and it breaks your focus.
Sometimes it’s the libraries you use, sometimes it’s your colleagues, sometimes it’s you. In any case, you’ll sit there, wasting your time trying to find your print statement in the sea of output. And, as you know, following your own threads,
jumping from one print statement to the next is painful and it breaks your focus.
If only there was a better way…
Organising The Chaos
Unified logging gives us a way to manage all of this. We have a brand new logging API that came in iOS 10 with some new logging statements. If you’re coming (or still are) from objC they will remind you of NSLog. Obviously, you can print your messages to the console, but you can also group them. There are 5 groups (default, debug, info, error and fault). You can easily filter out your messages based on the log type. But the real power is in submodules, categories and saved filters… We’ll see all this on an example later.
Persisting Logs
The messages that you log can be persisted on the disk. This is determined by the type of the message. For example, errors and faults are persisted to disk by default, while debug messages are only kept in memory. Also, debug and info messages are not displayed in the ‘Console’ app by default, you have to enable them manually. Be conscious of this fact when logging messages. If it’s an error, use the error type, if it’s just your standard print statement, use the debug type.
The ‘Console’ app is in quotes because I wasn’t referring to the Xcode console output here. There is a separate app that you can use to view all the logs. You can find it under ‘Utilities’ in your Applications or by using spotlight search. We’ll be using the Console app here.
An Example
Let’s see all of this on an example. We’ll be using one of our demo projects – ATCompositePattern. First off, you will have to import the new logging framework so all our examples will assume you have ‘import os’ as one of your import statements.
The simplest logging statement will look a lot like your good old NSLog:
ULSSimpleLog.swift 83 Bytes on GitLab
func fleetStats() {
    os_log("FC kills: %d", self.fleetCommander?.kills ?? 0)
}
This log will use the default log and the default type. What we’re interested in are the custom logs. Let’s say you’re working on a section of your app. You’re working on a module called ‘Pilot’. Your custom logs might look something like this:
ULSCustomLog.swift 758 Bytes on GitLab
private let subsystem = "tech.agostini.ATCompositePattern.Pilot"
func shoot(x: Int, y: Int) {
    self.move(x: x, y: y)

    let customLog = OSLog(subsystem: subsystem, category: "Action")
    os_log("Pilot is droping bombs: %@", log: customLog, type: .debug, self.name)

    if x == y { // Some arbitrary piece of logic so we don't kill every time we shoot.
        self.kills += 1
        let customLog = OSLog(subsystem: subsystem, category: "Kill")
        os_log("Pilot scored: %@", log: customLog, type: .error, self.name)
    }
}

func addPlayer(_ player: Player) {
    let customLog = OSLog(subsystem: subsystem, category: "Illegal Op")
    os_log("Pilot can't add players: %@", log: customLog, type: .fault, self.name)
}
We have our ‘Pilot’ module defined as a subsystem. You could also use the multiple categories within the same subsystem. Or you can use the same category name with different subsystems. We’re also demonstrating the use of different log types here.
In this next snippet we’re in a different module, but we’re using the same category names:
ULSCategories.swift 569 Bytes on GitLab
private let subsystem = "tech.agostini.ATCompositePattern.Commander"
func move(x: Int, y: Int) {
    let customLog = OSLog(subsystem: subsystem, category: "Movement")
    os_log("Commander is moving his team: %@", log: customLog, type: .debug, self.name)

    self.players.forEach { $0.move(x: x, y: y) }
}

func shoot(x: Int, y: Int) {
    let customLog = OSLog(subsystem: subsystem, category: "Action")
    os_log("Commander is directing fire: %@", log: customLog, type: .debug, self.name)

    self.players.forEach { $0.shoot(x: x, y: y) }
}
Using categories and modules in this way will allow us to create custom filters. We could filter out all the ‘Actions’ regardless of the submodule they occurred in, or we could filter them based on the submodule.
Using The Console
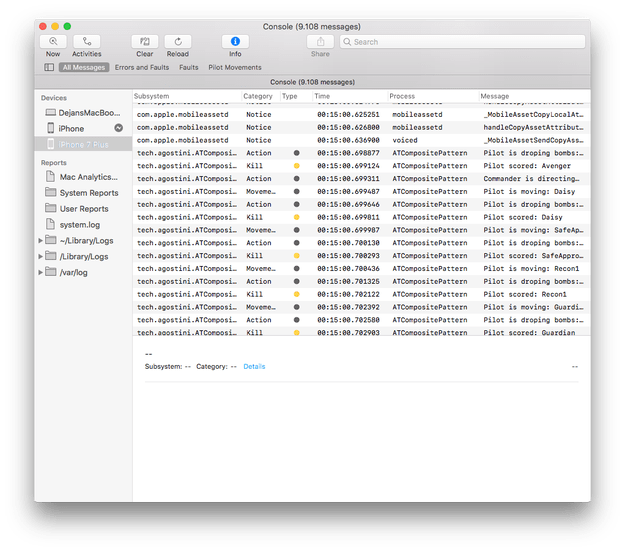
All the log statements that we showed so far will display in your Xcode output, but that’s not where the power lays. If you start the ‘Console’ app you should see the logs being displayed immediately. Console app will display logs from your connected
devices, simulators, system… Everything Find the simulator that you’re using and you’ll see a bunch of logs in it:
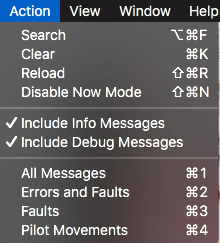
If you don’t see your debug or info messages, enable them from the ‘Action’ menu:
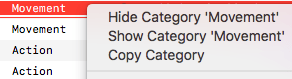
The console will display all the console output for the device. It will display output from your process and all the other processes. But this won’t be a problem, because we can create filters pretty easily. You can create filters on the fly by right clicking any item in the table and selecting an option from the drop-down menu:
In the upper right you can see a search bar. Here you can create your custom filters. Let’s say you want to see all the faults for your app, your filter might look like this:

If you select any of the messages displayed, you can see more info in the details pane that will open at the bottom:

Here’s another example of a filter where we’re displaying all the pilot movements (‘Pilot’ subsystem with the category ‘Movement’):

Every filter that you create, you can save.
You can see the obvious benefit of using the Console app and the filters. The clutter is drastically reduced, and you can focus on what you’re actually working on.
Conclusion
If you’re working in a larger team, or if your Xcode console output is getting out of control, this would be a perfect solution for you. Unified logging system is a relatively new thing, and you might have missed it when it was announced back in 2016,
but it’s never too late to start It’s really easy to get used to and it makes your life much easier. Let’s face it, bugfixing can
sometimes be a pain in the a… and if there’s a way to make it less painful, I’ll take it
I hope you discovered something new today and that I made your life a bit easier with this article
Have a nice day
~D;
More resources
- Apple: Logging
- WWDC: Unified Logging and Activity Tracing
- GitLab: ATCompositePattern
- GitLab: Snippets
You think your friends might like this?
- Click to share on Facebook (Opens in new window)
- Click to share on Twitter (Opens in new window)
- Click to share on LinkedIn (Opens in new window)
- Click to share on Tumblr (Opens in new window)
- Click to share on Pocket (Opens in new window)
- Click to share on Reddit (Opens in new window)
- Click to share on Pinterest (Opens in new window)
- More
