

GitHub Repo:coderZsq.project.ios
Follow: coderZsq · GitHub
Blog: Castie! Note
Resume: coderzsq.github.io/coderZsq.pr…
日常扯淡
emm~~~ 前段时间又出去看了看iOS市场的行情, 除非是BAT, TMD, 这类一线的知名企业, 其他的只要努努力还是可以通过的, 这里分享一些小技巧, 比如当HR,或者别人内推你的时候, 不管要求写的多么的天花乱坠, 千万不要被这些东西给吓到了, 你可以先逆向一下对方的项目, 了解一下工程架构及代码规范, 以及使用了哪些三方库, 其实都是在面试前很好的对对方的初步了解, 知己知彼当然就增添了一份胜算. 当然现在对iOS的要求也是参差不齐, 面试官能力和视野的高低也会无形的给你入职造成一定的困扰, 就比如有一次, 面试官问, 能详细说说Swift么?, 这种如此宽泛的命题, 你让我用什么角度来回答呢... 编译器层面? 语言层面的写时复制? 还是语法层面的? 还是WWDC的新特性? 挑了一方面讲讲, 就被说只有这些么?, 能不能不要只说关键词? 然后就是伴随着的鄙视的眼神... 关键是个妹子面试官, 而且在我逆向其项目时发现代码质量其实也就一般, 算了不吐槽了, 免得又要被说影响不好, 面试不过就瞎bb~~
当然现在对于iOS的要求是比以前有了很大的提高, 只会用OC写个tableview现在是几乎很难找到工作了, 然而我除了公司的项目其他时间基本不会碰OC的代码, 所以当我要写这个OC版的性能优化的时候, 好多语法都不太记得都需要现查... 完全记不住API.
当然在做性能优化的时候, 你还是需要了解一些C系语言的底层知识, 这些虽然不一定能够在代码上能够体现, 但对于理解和设计是有非常大的帮助的, 而且现在网上的讲底层原理的博客实在是太多了, 都是你抄我我抄你的, 可能会有些许的水分, 建议还是从runtime-723, GNUStep, 这类源码来自己看会比较靠谱, 当然看这些代码的时候可能会看不太懂C++的语法, 可以去我的github-page上看看一些我整理的C++语法的总结, 应该会挺有帮助的.
准备工作
对于界面的性能优化, 简单的说就是保持界面流畅不掉帧, 当然原理这种网上一搜一大把, 有空的话看看YYKit也就能够知晓个大概. 硬是要说原理的话, 就是当Vsync信号来临的16.67ms内CPU做完排版, 绘制, 解码, GPU避免离屏渲染之类的, 就会在Runloop下一次来临的时候渲染到屏幕上.
不说那么多原理了, 理论永远不如实践来的有意义, 这也是所谓的贝叶斯算法随时修正的策略. 我们先写一个测试数据来以备后面优化的需要.
const http = require('http');
http.createServer((req, res) => {
if (decodeURI(req.url) == "/fetchMockData") {
console.log(req.url);
let randomNumber = function (n) {
var randomNumber = "";
for (var i = 0; i < n; i++)
randomNumber += Math.floor(Math.random() * 10);
return randomNumber;
}
let randomString = function(len) {  
len = len || 32;  
var $chars = 'ABCDEFGHJKMNPQRSTWXYZabcdefhijkmnprstwxyz2345678';  
var maxPos = $chars.length;  
var randomString = '';  
for (i = 0; i < len; i++) {    
randomString += $chars.charAt(Math.floor(Math.random() * maxPos));  
}  
return randomString;
}
let json = [];
for (let i = 0; i < 100; i++) {
let obj = {};
let texts = [];
let images = [];
for (let i = 0; i < randomNumber(4); i++) {
texts.push(randomString(randomNumber(1)));
}
for (let i = 0; i < 16; i++) {
images.push("https://avatars3.githubusercontent.com/u/19483268?s=40&v=4");
}
obj.texts = texts;
obj.images = images;
json.push(obj);
}
res.writeHead(200, {
'Content-Type': 'application/json'
});
res.end(JSON.stringify({
data: json,
status: 'success'
}));
}
}).listen(8080);
console.log('listen port = 8080');
我就偷个懒用javascript起了个node服务器, 就是用来模拟测试数据用的, 当然如果你的机器没有node环境的话, 建议你去自行安装.
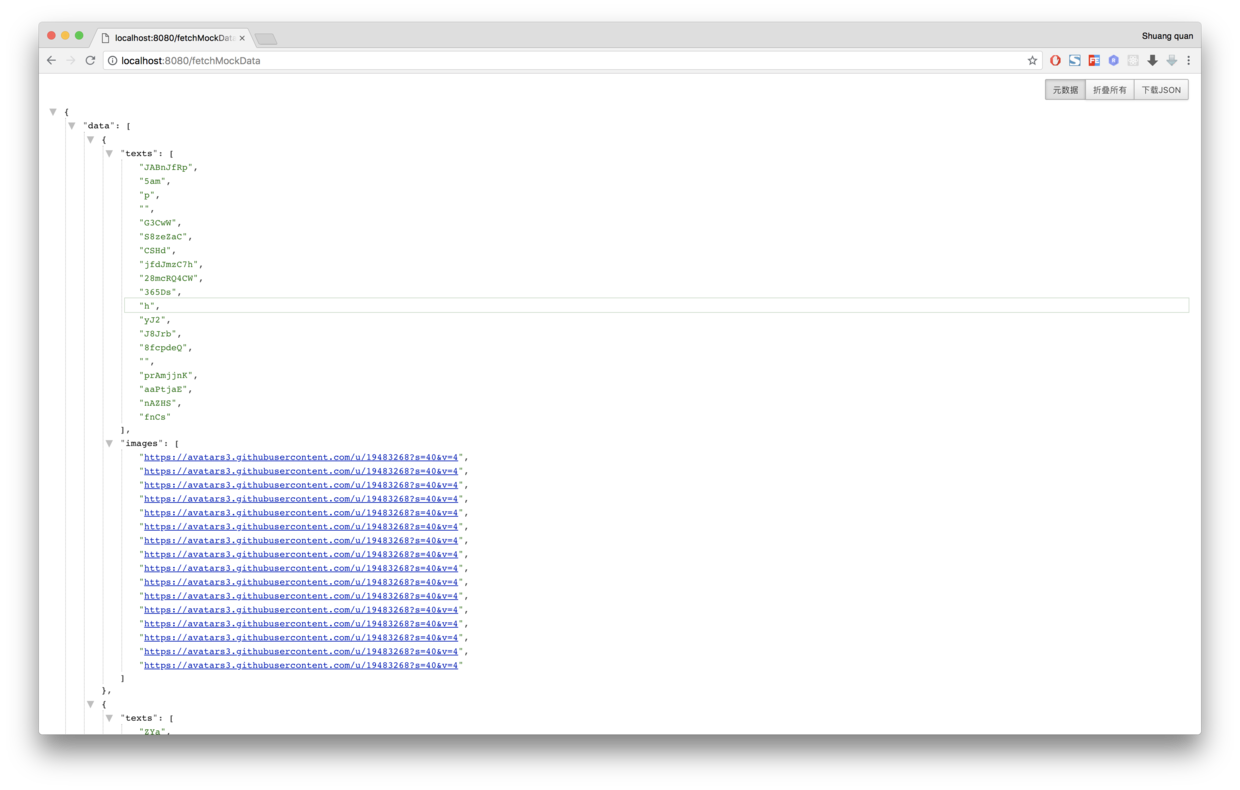
完成之后, 我们通过浏览器访问就能够得到测试数据, 测试数据分为两块, 一块是文字, 一块是图片的url, 由于嫌麻烦, 直接就使用了我github的头像.
预排版
对于界面流畅, 第一个想到的就是预排版了, 而且预排版的作用显著, 原理也很简单, 就是异步预先计算, 避免每次在layoutSubviews中, cell重用的时候进行重复计算. 诶... 又要被说只讲关键词了... 但原理就是那么简单, 还能讲出个啥? 再说的细了代码就写出来了...
#import "Service.h"
#import <AFNetworking.h>

@implementation Service

- (void)fetchMockDataWithParam:(NSDictionary *)parameter completion:(RequestCompletionBlock)completion {

    AFHTTPSessionManager * manager = [AFHTTPSessionManager manager];
    [manager GET:@"http://localhost:8080/fetchMockData" parameters:parameter progress:nil success:^(NSURLSessionDataTask * _Nonnull task, id  _Nullable responseObject) {
        if ([responseObject[@"status"] isEqualToString: @"success"]) {
            completion(responseObject[@"data"], nil);
        }
    } failure:^(NSURLSessionDataTask * _Nullable task, NSError * _Nonnull error) {
        completion(nil, error);
    }];
}

@end
当然你需要请求一下刚才的模拟数据, 注意localhost是http的需要强制越权.
#import "ViewModel.h"
#import "ComponentModel.h"
#import "ComponentLayout.h"
#import "Element.h"
#import <UIKit/UIKit.h>

@implementation ViewModel

- (Service *)service {

    if (!_service) {
        _service = [Service new];
    }
    return _service;
}

- (void)reloadData:(LayoutCompeltionBlock)completion error:(void(^)(void))errorCompletion {

    [self.service fetchMockDataWithParam:nil completion:^(NSArray<ComponentModel *> *models, NSError *error) {
        if (models.count > 0 && error == nil) {
            dispatch_queue_t queue = dispatch_queue_create("queue", DISPATCH_QUEUE_SERIAL);
            dispatch_async(queue, ^{
                NSMutableArray * array = [NSMutableArray new];
                for (ComponentModel * model in models) {
                    ComponentLayout * layout = [self preLayoutFrom:model];
                    [array addObject:layout];
                }
                dispatch_async(dispatch_get_main_queue(), ^{
                    if (completion) {
                        completion(array);
                    }
                });
            });
        } else {
            errorCompletion();
        }
    }];
}

- (void)loadMoreData:(LayoutCompeltionBlock)completion {
    [self reloadData:completion error:nil];
}

- (ComponentLayout *)preLayoutFrom:(ComponentModel *)model {

    ComponentLayout * layout = [ComponentLayout new];
    layout.cellWidth = [UIScreen mainScreen].bounds.size.width;

    CGFloat cursor = 0;

    CGFloat x = 5.;
    CGFloat y = 0.;
    CGFloat height = 0.;

    NSMutableArray * textElements = [NSMutableArray array];
    NSArray * texts = model[@"texts"];
    for (NSUInteger i = 0; i < texts.count; i++) {
        NSString * text = texts[i];
        CGSize size = [text boundingRectWithSize:CGSizeMake(MAXFLOAT, MAXFLOAT) options:NSStringDrawingUsesLineFragmentOrigin | NSStringDrawingUsesFontLeading  attributes:@{NSFontAttributeName : [UIFont systemFontOfSize:7]} context:nil].size;
        if ((x + size.width) > layout.cellWidth) {
            x = 5;
            y += (size.height + 10);
            height = y + size.height + 5;
        }
        CGRect frame = CGRectMake(x, y, size.width + 5, size.height + 5);
        x += (size.width + 10);

        Element * element = [Element new];
        element.value = text;
        element.frame = frame;
        [textElements addObject:element];
    }
    cursor += height + 5;

    x = 5.; y = cursor; height = 0.;

    NSMutableArray * imageElements = [NSMutableArray array];
    NSArray * images = model[@"images"];
    for (NSUInteger i = 0; i < images.count; i++) {
        NSString * url = images[i];
        CGSize size = CGSizeMake(40, 40);
        if ((x + size.width) > layout.cellWidth) {
            x = 5;
            y += (size.height + 5);
            height = (y - cursor) + size.height + 5;
        }
        CGRect frame = CGRectMake(x, y, size.width, size.height);
        x += (size.width + 5);

        Element * element = [Element new];
        element.value = url;
        element.frame = frame;
        [imageElements addObject:element];
    }
    cursor += height + 5;

    layout.cellHeight = cursor;
    layout.textElements = textElements;
    layout.imageElements = imageElements;
    return layout;
}

@end
- (void)setupData:(ComponentLayout *)layout asynchronously:(BOOL)asynchronously {
    _layout = layout; _asynchronously = asynchronously;

    [self displayImageView];
    if (!asynchronously) {
        for (Element * element in layout.textElements) {
            UILabel * label = (UILabel *)[_labelReusePool dequeueReusableObject];
            if (!label) {
                label = [UILabel new];
                [_labelReusePool addUsingObject:label];
            }
            label.text = element.value;
            label.frame = element.frame;
            label.font = [UIFont systemFontOfSize:7];
            [self.contentView addSubview:label];
        }
        [_labelReusePool reset];
    }
}
代码也是非常的简单, 即是根据获取的的数据进行排版而已, 然后cell直接获取排版后的frame进行一步赋值操作而已. 有兴趣也可以看看sunnyxx的FDTemplateLayoutCell.
重用池
眼尖的同学肯定就看到上面代码由类似于cell的重用机制, 这个其实就是下面要讲到的重用池的概念, 原理也是非常简单的, 就是维护了两个队列, 一个是当前队列, 一个是可重用队列.
#import "ReusePool.h"

@interface ReusePool ()
@property (nonatomic, strong) NSMutableSet * waitUsedQueue;
@property (nonatomic, strong) NSMutableSet * usingQueue;
@property (nonatomic, strong) NSLock * lock;
@end

@implementation ReusePool

- (instancetype)init
{
    self = [super init];
    if (self) {
        _waitUsedQueue = [NSMutableSet set];
        _usingQueue = [NSMutableSet set];
        _lock = [NSLock new];
    }
    return self;
}

- (NSObject *)dequeueReusableObject {

    NSObject * object = [_waitUsedQueue anyObject];
    if (object == nil) {
        return nil;
    } else {
        [_lock lock];
        [_waitUsedQueue removeObject:object];
        [_usingQueue addObject:object];
        [_lock unlock];
        return object;
    }
}

- (void)addUsingObject:(UIView *)object {
    if (object == nil) {
        return;
    }
    [_usingQueue addObject:object];
}

- (void)reset {
    NSObject * object = nil;
    while ((object = [_usingQueue anyObject])) {
        [_lock lock];
        [_usingQueue removeObject:object];
        [_waitUsedQueue addObject:object];
        [_lock unlock];
    }
}

@end
这里由于我这个重用队列, 并不仅仅针对于UI, 所以在多线程访问的情况下, 是需要加锁处理的, 这里就用最通用的pthread-mutex进行加锁.
预解码
这里做的就是通过url进行的异步解码的处理, 相关原理的文章其实很多, 自行查阅.
@implementation NSString (Extension)

- (void)preDecodeThroughQueue:(dispatch_queue_t)queue completion:(void(^)(UIImage *))completion {

    dispatch_async(queue, ^{
        CGImageRef cgImage = [UIImage imageWithData:[NSData dataWithContentsOfURL:[NSURL URLWithString:self]]].CGImage;
        CGImageAlphaInfo alphaInfo = CGImageGetAlphaInfo(cgImage) & kCGBitmapAlphaInfoMask;

        BOOL hasAlpha = NO;
        if (alphaInfo == kCGImageAlphaPremultipliedLast ||
            alphaInfo == kCGImageAlphaPremultipliedFirst ||
            alphaInfo == kCGImageAlphaLast ||
            alphaInfo == kCGImageAlphaFirst) {
            hasAlpha = YES;
        }

        CGBitmapInfo bitmapInfo = kCGBitmapByteOrder32Host;
        bitmapInfo |= hasAlpha ? kCGImageAlphaPremultipliedFirst : kCGImageAlphaNoneSkipFirst;

        size_t width = CGImageGetWidth(cgImage);
        size_t height = CGImageGetHeight(cgImage);

        CGContextRef context = CGBitmapContextCreate(NULL, width, height, 8, 0, CGColorSpaceCreateDeviceRGB(), bitmapInfo);
        CGContextDrawImage(context, CGRectMake(0, 0, width, height), cgImage);
        cgImage = CGBitmapContextCreateImage(context);

        UIImage * image = [[UIImage imageWithCGImage:cgImage] cornerRadius:width * 0.5];
        CGContextRelease(context);
        CGImageRelease(cgImage);
        completion(image);
    });
}

@end
预渲染
比如imageView.layer.cornerRadius及imageView.layer.masksToBounds = YES;这类操作会导致离屏渲染, GPU会导致新开缓冲区造成消耗. 为了避免离屏渲染,你应当尽量避免使用 layer 的 border、corner、shadow、mask 等技术,而尽量在后台线程预先绘制好对应内容。这种SDWebImage的缓存策略是有很大的参考意义的.
@implementation UIImage (Extension)

- (UIImage *)cornerRadius:(CGFloat)cornerRadius {

    CGRect rect = CGRectMake(0, 0, self.size.width, self.size.height);
    UIBezierPath * bezierPath = [UIBezierPath bezierPathWithRoundedRect:rect cornerRadius:cornerRadius];
    UIGraphicsBeginImageContextWithOptions(self.size, false, [UIScreen mainScreen].scale);
    CGContextAddPath(UIGraphicsGetCurrentContext(), bezierPath.CGPath);
    CGContextClip(UIGraphicsGetCurrentContext());

    [self drawInRect:rect];

    CGContextDrawPath(UIGraphicsGetCurrentContext(), kCGPathFillStroke);
    UIImage * image = UIGraphicsGetImageFromCurrentImageContext();
    UIGraphicsEndImageContext();
    return image;
}

@end
- (void)displayImageView {
    for (Element * element in _layout.imageElements) {
        UIImageView * imageView = (UIImageView *)[_imageReusePool dequeueReusableObject];
        if (!imageView) {
            imageView = [UIImageView new];
            [_imageReusePool addUsingObject:imageView];
        }
        UIImage * image = (UIImage *)[ComponentCell.asyncReusePool dequeueReusableObject];
        if (!image) {
            NSString * url = element.value;
            [url preDecodeThroughQueue:concurrentQueue completion:^(UIImage * image) {
                [ComponentCell.asyncReusePool addUsingObject:image];
                dispatch_async(dispatch_get_main_queue(), ^{
                    imageView.image = image;
                });
            }];
        } else {
            imageView.image = image;
        }
        imageView.frame = element.frame;
        [self.contentView addSubview:imageView];
    }
    [ComponentCell.asyncReusePool reset];
    [_imageReusePool reset];
}
这样通过和重用池的结合就可以达到很好的效果, 当然因为我这里是一张相同的图片, 正常情况下需要设计一整套的缓存策略, hash一下url什么的.
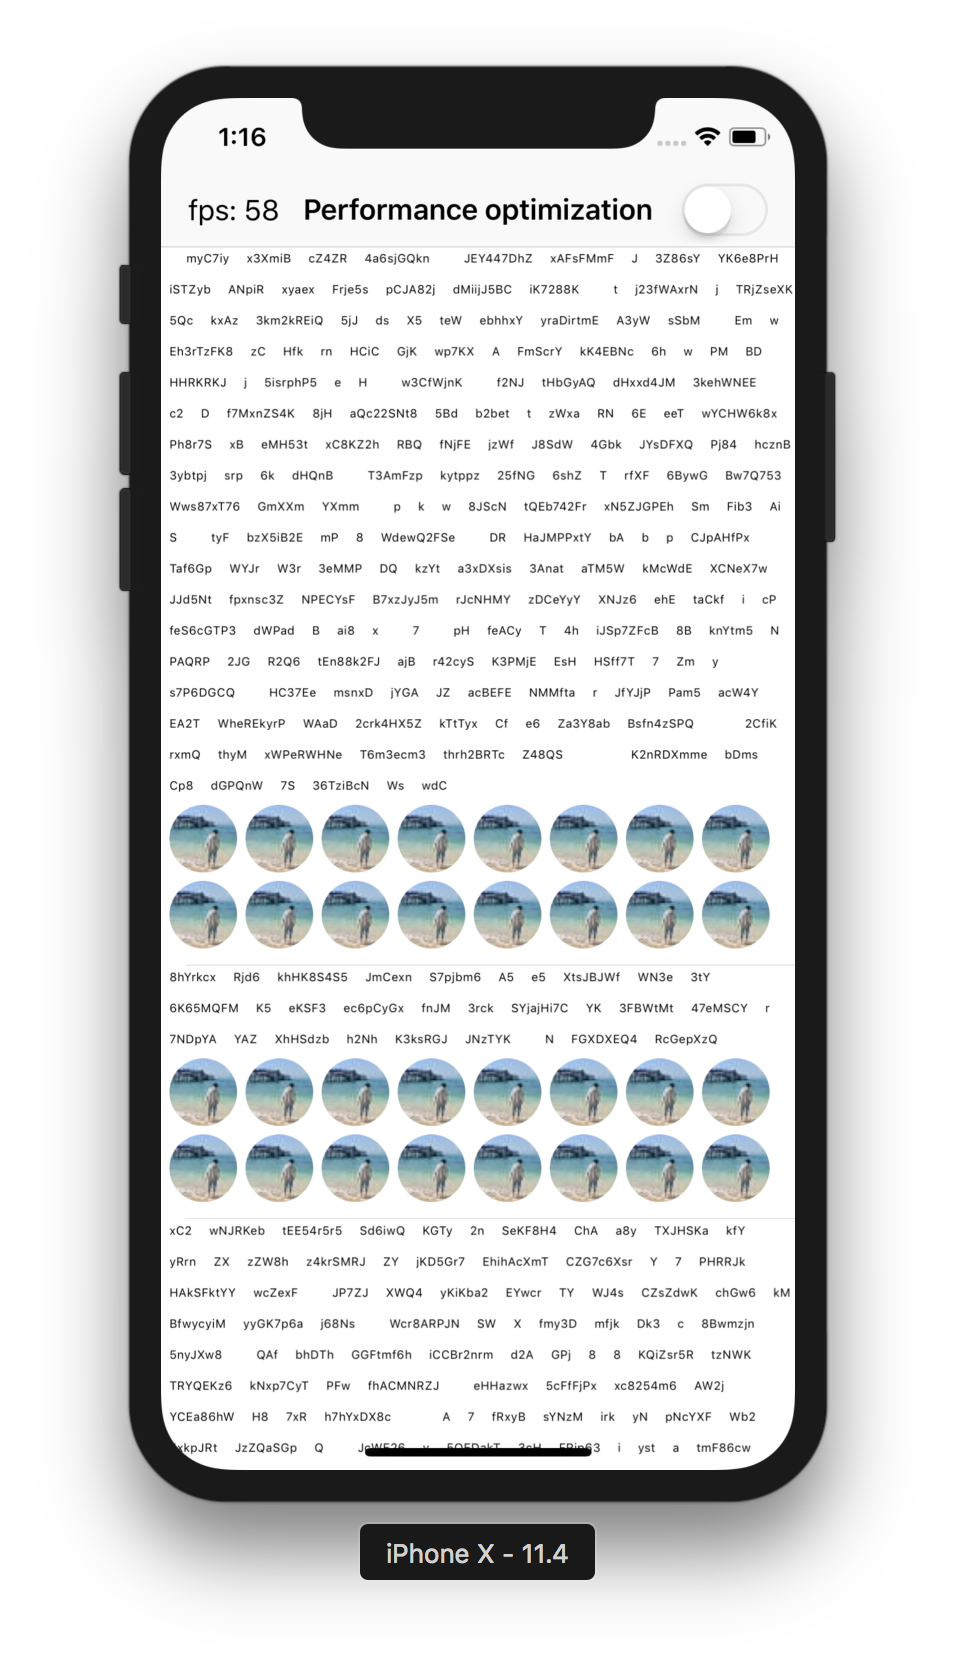
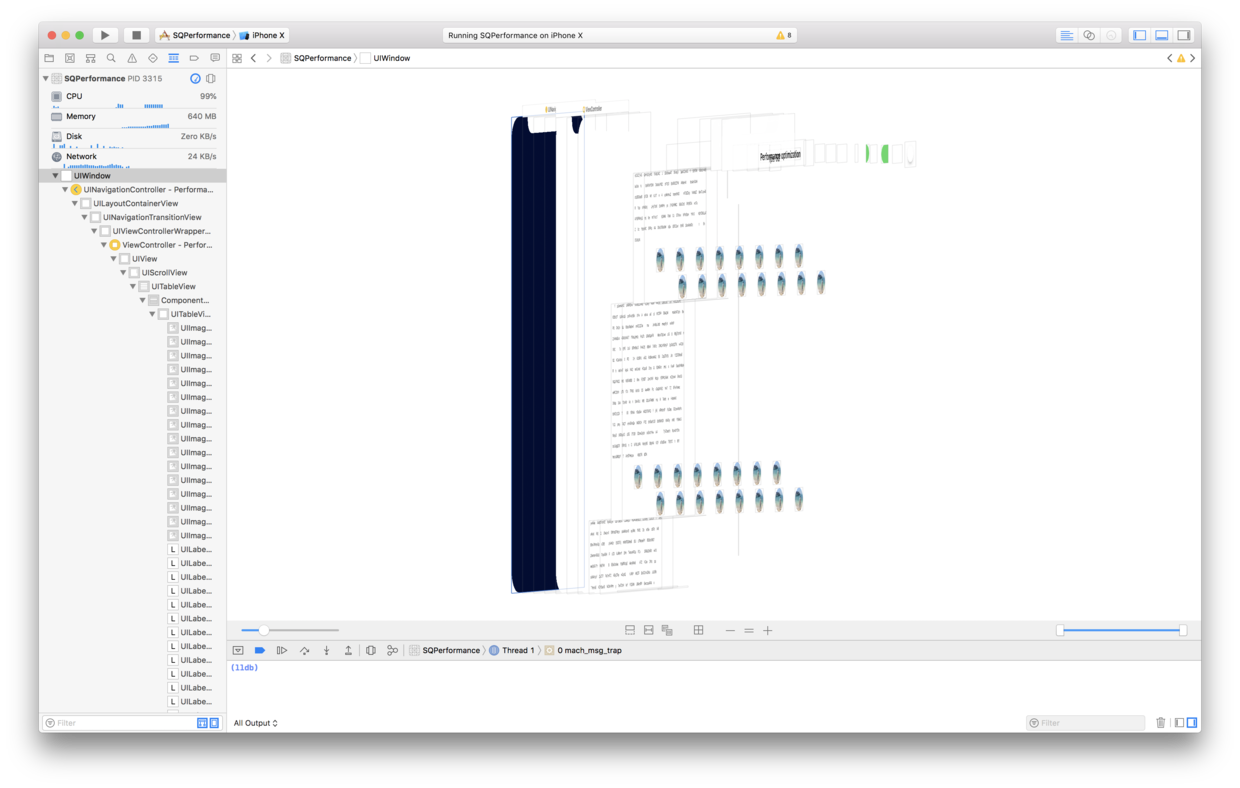
通过上述的方案结合, 我们已经能够比较流畅的显示那么多数据了 而且帧数还是不错的, 但还有优化的空间.
异步绘制
进过了上面的优化, 我们其实已经做的不错了, 但是看下界面的层次, 是不是有点得了密集恐惧症... 接下来要讲的异步绘制就能够很好的解决这个问题. 并更加的优化流畅度.
异步绘制的原理么, 就是异步的drawInLayer, 异步的画在上下文上并统一绘制.
- (void)displayLayer:(CALayer *)layer {

    if (!layer) return;
    if (layer != self.layer) return;
    if (![layer isKindOfClass:[AsyncDrawLayer class]]) return;
    if (!self.isAsynchronously) return;

    AsyncDrawLayer *tempLayer = (AsyncDrawLayer *)layer;
    [tempLayer increaseCount];

    NSUInteger oldCount = tempLayer.drawsCount;
    CGRect bounds = self.bounds;
    UIColor * backgroundColor = self.backgroundColor;

    layer.contents = nil;
    dispatch_async(serialQueue, ^{
        void (^failedBlock)(void) = ^{
            NSLog(@"displayLayer failed");
        };
        if (tempLayer.drawsCount != oldCount) {
            failedBlock();
            return;
        }

        CGSize contextSize = layer.bounds.size;
        BOOL contextSizeValid = contextSize.width >= 1 && contextSize.height >= 1;
        CGContextRef context = NULL;

        if (contextSizeValid) {
            UIGraphicsBeginImageContextWithOptions(contextSize, layer.isOpaque, layer.contentsScale);
            context = UIGraphicsGetCurrentContext();
            CGContextSaveGState(context);
            if (bounds.origin.x || bounds.origin.y) {
                CGContextTranslateCTM(context, bounds.origin.x, -bounds.origin.y);
            }
            if (backgroundColor && backgroundColor != [UIColor clearColor]) {
                CGContextSetFillColorWithColor(context, backgroundColor.CGColor);
                CGContextFillRect(context, bounds);
            }
            [self asyncDraw:YES context:context completion:^(BOOL drawingFinished) {
                if (drawingFinished && oldCount == tempLayer.drawsCount) {
                    CGImageRef CGImage = context ? CGBitmapContextCreateImage(context) : NULL;
                    {
                        UIImage * image = CGImage ? [UIImage imageWithCGImage:CGImage] : nil;
                        dispatch_async(dispatch_get_main_queue(), ^{
                            if (oldCount != tempLayer.drawsCount) {
                                failedBlock();
                                return;
                            }
                            layer.contents = (id)image.CGImage;
                            layer.opacity = 0.0;
                            [UIView animateWithDuration:0.25 delay:0.0 options:UIViewAnimationOptionAllowUserInteraction animations:^{
                                layer.opacity = 1.0;
                            } completion:NULL];
                        });
                    }
                    if (CGImage) {
                        CGImageRelease(CGImage);
                    }
                } else {
                    failedBlock();
                }
            }];
            CGContextRestoreGState(context);
        }
        UIGraphicsEndImageContext();
    });
}
代码其实也没什么好讲的只要注意下多线程重绘时的问题也就可以了.
- (void)asyncDraw:(BOOL)asynchronously context:(CGContextRef)context completion:(void(^)(BOOL))completion {

    for (Element * element in _layout.textElements) {
        NSMutableParagraphStyle * paragraphStyle = [[NSParagraphStyle defaultParagraphStyle] mutableCopy];
        paragraphStyle.lineBreakMode = NSLineBreakByCharWrapping;
        paragraphStyle.alignment = NSTextAlignmentCenter;
        [element.value drawInRect:element.frame withAttributes:@{NSFontAttributeName:[UIFont systemFontOfSize:7],
                                                                 NSForegroundColorAttributeName:[UIColor blackColor],
                                                                 NSParagraphStyleAttributeName:paragraphStyle}];
    }
    completion(YES);
}
layer上, 很好理解的其实.
这样我们的图层就会被合成, 帧率也一直保持在60帧的样子.
语法技巧
OC现在也支持类属性了, 具体的使用可以看我swift的renderTree.
@property (class, nonatomic,strong) ReusePool * asyncReusePool;

static ReusePool * _asyncReusePool = nil;

+ (ReusePool *)asyncReusePool {
    if (_asyncReusePool == nil) {
        _asyncReusePool = [[ReusePool alloc] init];
    }
    return _asyncReusePool;
}

+ (void)setAsyncReusePool:(ReusePool *)asyncReusePool {
    if (_asyncReusePool != asyncReusePool) {
        _asyncReusePool = asyncReusePool;
    }
}
碰到的坑
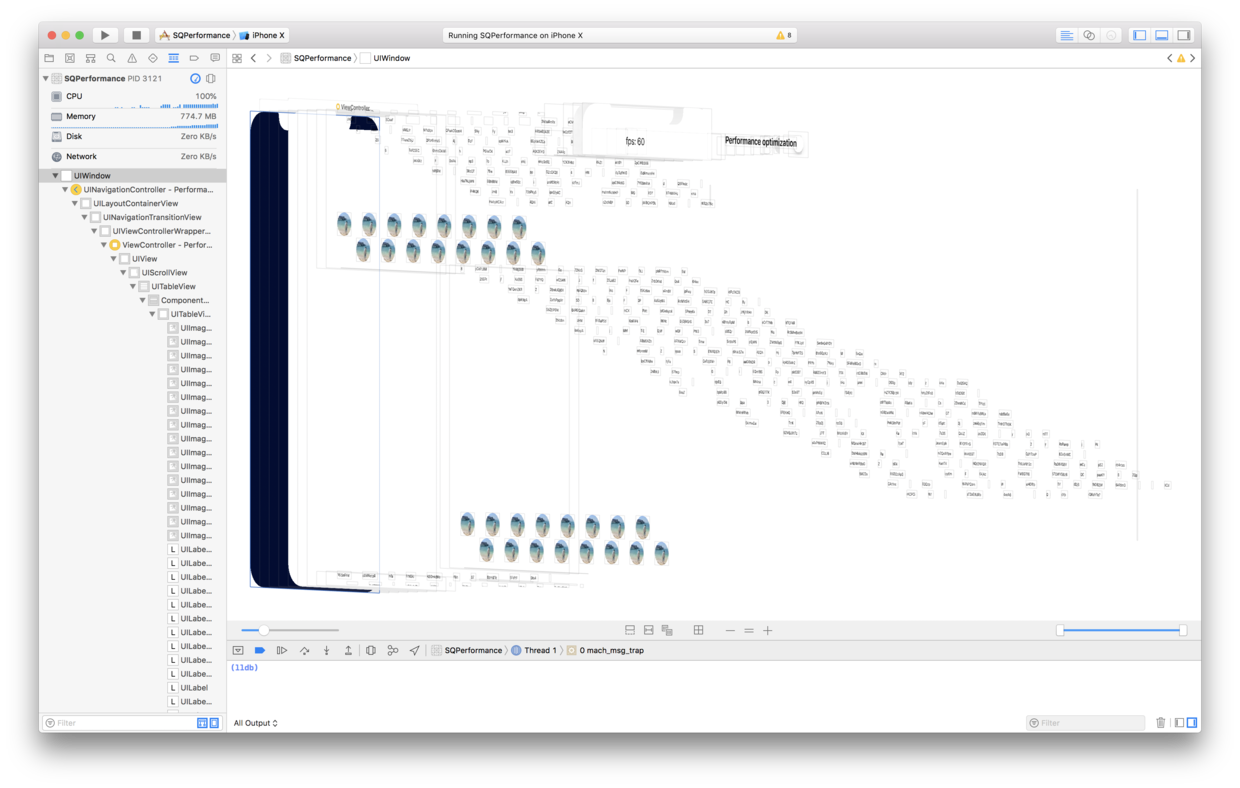
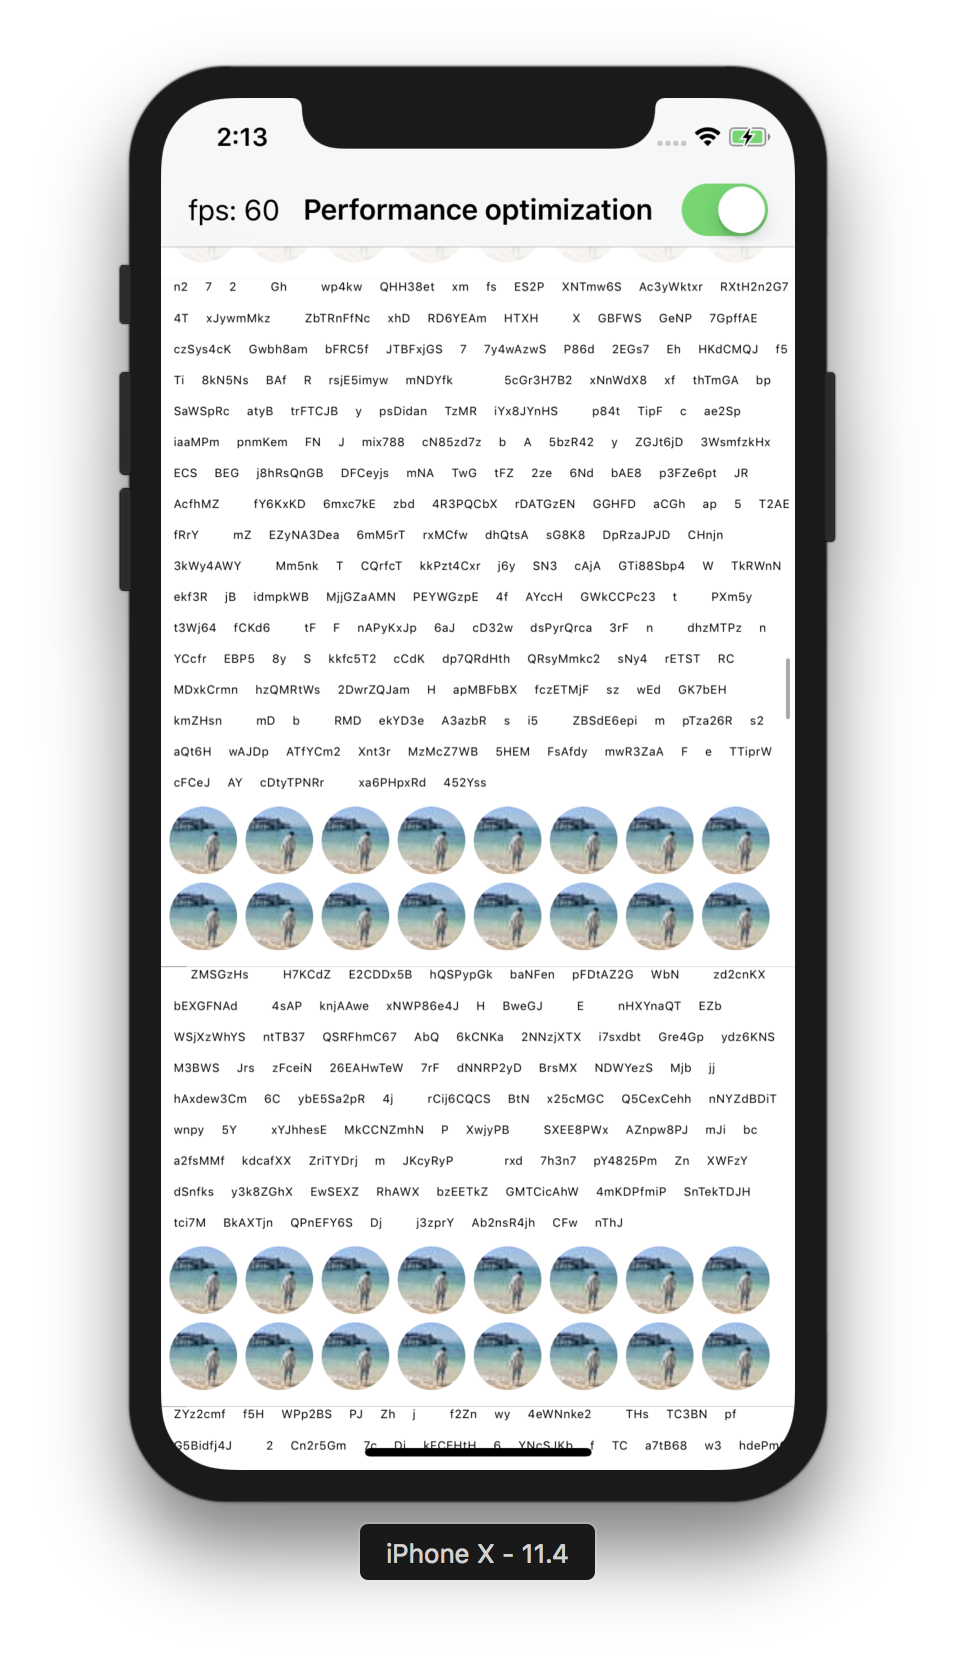
其实理想的效果是如下图这样的. 所有的图片都被异步绘制到layer上.
- (void)asyncDraw:(BOOL)asynchronously context:(CGContextRef)context completion:(void(^)(BOOL))completion {

    for (Element * element in _layout.textElements) {
        NSMutableParagraphStyle * paragraphStyle = [[NSParagraphStyle defaultParagraphStyle] mutableCopy];
        paragraphStyle.lineBreakMode = NSLineBreakByCharWrapping;
        paragraphStyle.alignment = NSTextAlignmentCenter;
        [element.value drawInRect:element.frame withAttributes:@{NSFontAttributeName:[UIFont systemFontOfSize:7],
                                                                 NSForegroundColorAttributeName:[UIColor blackColor],
                                                                 NSParagraphStyleAttributeName:paragraphStyle}];
    }
    completion(YES);
    //TODO:
    //    for (Element * element in _layout.imageElements) {
    //        UIImage * image = (UIImage *)[ComponentCell.asyncReusePool dequeueReusableObject];
    //        if (!image) {
    //            NSString * url = element.value;
    //            [url preDecodeThroughQueue:concurrentQueue completion:^(UIImage * image) {
    //                [ComponentCell.asyncReusePool addUsingObject:image];
    //                [image drawInRect:element.frame]; //这里异步回调上下文获取不到报错
    //                completion(YES);
    //            }];
    //        } else {
    //            [image drawInRect:element.frame];
    //            completion(YES);
    //        }
    //    }
    //    [_asyncReusePool reset];
}
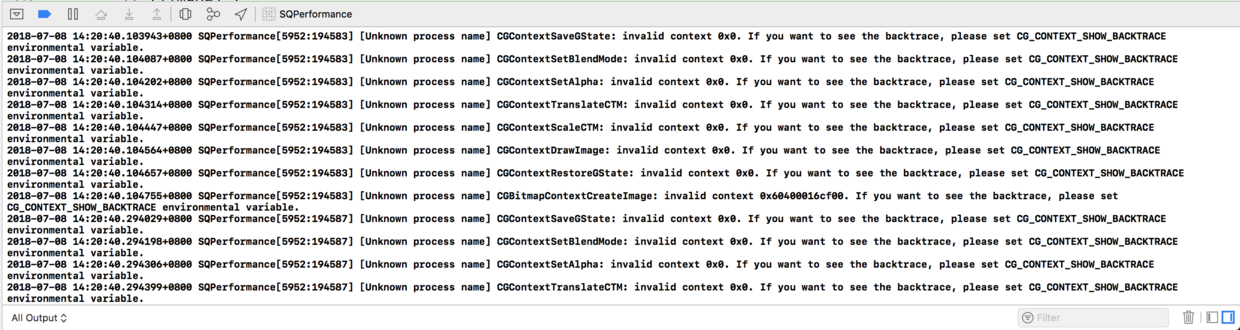
但这里碰到一个问题, CGContextRef, 也就是UIGraphicsGetCurrentContext()拿到的是当前线程的上下文, 而线程和Runloop是一一对应的, 只有当前线程的上下文才能进行绘制, 而网络图片又需要进行异步下载解码, 势必会进行并发下载, 从而上下文获取不到, 绘制不能.报错如下:
我尝试了一下将绘图上下文传入其他线程并渲染:
    for (Element * element in _layout.imageElements) {
        UIImage * image = (UIImage *)[ComponentCell.asyncReusePool dequeueReusableObject];
        if (!image) {
            NSString * url = element.value;
            [url preDecodeThroughQueue:concurrentQueue completion:^(UIImage * image) {
                [ComponentCell.asyncReusePool addUsingObject:image];
                CGContextDrawImage(context, element.frame, image.CGImage);
                completion(YES);
            }];
        } else {
            [image drawInRect:element.frame];
            completion(YES);
        }
    }
    [_asyncReusePool reset];
可惜的是, 使用CGContextDrawImage传入当前上下文也不能解决这个问题, 原因是上一个线程的上下文已经过期了...

常驻线程
碰到这个问题, 首先想到的就是可能是在上一条线程挂了之后, context失效导致的, 那我们可以使用runloop开启一条常驻线程来保住这个上下文.
#import "PermenantThread.h"

@interface Thread : NSThread
@end

@implementation Thread
- (void)dealloc {
    NSLog(@"%s", __func__);
}
@end

@interface PermenantThread()
@property (strong, nonatomic) Thread *innerThread;
@end

@implementation PermenantThread

- (instancetype)init
{
    if (self = [super init]) {
        self.innerThread = [[Thread alloc] initWithBlock:^{
            CFRunLoopSourceContext context = {0};
            CFRunLoopSourceRef source = CFRunLoopSourceCreate(kCFAllocatorDefault, 0, &context);
            CFRunLoopAddSource(CFRunLoopGetCurrent(), source, kCFRunLoopDefaultMode);
            CFRelease(source);
            CFRunLoopRunInMode(kCFRunLoopDefaultMode, 1.0e10, false);
        }];
        [self.innerThread start];
    }
    return self;
}


- (void)executeTask:(PermenantThreadTask)task {
    if (!self.innerThread || !task) return;
    [self performSelector:@selector(__executeTask:) onThread:self.innerThread withObject:task waitUntilDone:NO];
}

- (void)stop {
    if (!self.innerThread) return;
    [self performSelector:@selector(__stop) onThread:self.innerThread withObject:nil waitUntilDone:YES];
}

- (void)dealloc {
    NSLog(@"%s", __func__);
    [self stop];
}

- (void)__stop {
    CFRunLoopStop(CFRunLoopGetCurrent());
    self.innerThread = nil;
}

- (void)__executeTask:(PermenantThreadTask)task {
    task();
}

@end
然而在原以为是因为子线程销毁导致的上下文过期, 在我用Runloop做了一个常驻线程后, 一样没有效果... 真是醉了... 谁知道上下文过期会是什么造成的么?
解决方法
查了一些资料和问了一些大佬, 得到各种反馈的解决方案, dispath_async_f这个函数是没有用的, 传递的上下文和绘图上下文并没有关系, 所以这个是不对的, 最后尝试使用自建上下文解决了这个问题.
CGColorSpaceRef colorSpace = CGColorSpaceCreateDeviceRGB();
CGContextRef context = CGBitmapContextCreate(NULL, contextSize.width, contextSize.height, 8, contextSize.width * 4, colorSpace, kCGImageAlphaPremultipliedFirst | kCGImageByteOrderDefault);
CGColorSpaceRelease(colorSpace);
CGAffineTransform normalState = CGContextGetCTM(context);
CGContextTranslateCTM(context, 0, bounds.size.height);
CGContextScaleCTM(context, 1, -1);
CGContextConcatCTM(context, normalState);
if (backgroundColor && backgroundColor != [UIColor clearColor]) {
    CGContextSetFillColorWithColor(context, backgroundColor.CGColor);
    CGContextFillRect(context, bounds);
}
UIGraphicsPushContext(context);
绘图的时候不使用drawInRect, 而使用CGContextDrawImage的API
    dispatch_group_t group = dispatch_group_create();
    dispatch_queue_t concurrentQueue = dispatch_queue_create("concurrent", DISPATCH_QUEUE_CONCURRENT);
    for (Element * element in _layout.imageElements) {
        UIImage * image = (UIImage *)[ComponentCell.asyncReusePool dequeueReusableObject];
        if (!image) {
            dispatch_group_enter(group);
            dispatch_group_async(group, concurrentQueue, ^{
                NSString * url = element.value;
                [url preDecodeWithCGCoordinateSystem:YES completion:^(UIImage * image) {
                    [ComponentCell.asyncReusePool addUsingObject:image];
                    CGContextDrawImage(context, element.frame, image.CGImage);
//                    completion(YES);
                }];
                dispatch_group_leave(group);
            });
        } else {
            CGContextDrawImage(context, element.frame, image.CGImage);
            completion(YES);
        }
    }
    dispatch_group_notify(group, concurrentQueue, ^{
        completion(YES);
    });
    [_asyncReusePool reset];
由于是异步绘制, 每下载一张图片就进行绘制, 会造成一直刷帧, 所以使用线程组来进行统一绘制.
这里还有一个坑就是 drawInRect和CGContextDrawImage的绘制坐标系不一样, 所以需要加一下判断即可.
最后 本文中所有的源码都可以在github上找到 -> SQPerformance
GitHub Repo:coderZsq.project.ios
Follow: coderZsq · GitHub
Resume: coderzsq.github.io/coderZsq.pr…
