

前言
@vue/cli v3从开始到现在已经经历了四个月的迭代(目前RC3),
除了终端初始化的姿势,还引入了一个新的项目初始化姿势;
Web端的初始化,体验了一下,效果很不错;
后方多图,感兴趣的可以瞧瞧,不感兴趣的请止步,免得浪费你的时间,谢谢..
官网及安装
-
官网 : Vue Cli
-
安装:
npm i -g @vue/cli
常规命令
大体中文注释下
 Usage: vue <command> [options]

  Options:

    -V, --version                         输出当前脚手架版本
    -h, --help                            使用帮助

  Commands:

    create [options] <app-name>           基于vue-cli-service初始化一个项目,终端
    add <plugin> [pluginOptions]          添加插件到该项目
    invoke <plugin> [pluginOptions]       在项目中激活(调用)插件
    inspect [options] [paths...]          检查项目中的webpack选项
    serve [options] [entry]               零配置运行开发模式
    build [options] [entry]               零配置运行生产模式
    ui [options]                          web端界面初始化项目
    init [options] <template> <app-name>  类似`vue-cli`初始化远程的模板(需要遵循v3规格的)

  执行 vue <command> --help 获取该选项更详细的帮助.
其他不多说,今天只想演示下Web端UI初始化...
UI初始化
0.终端跑起来!!!
在终端执行vue ui, 会默认初始化localhost:8000且自动打开
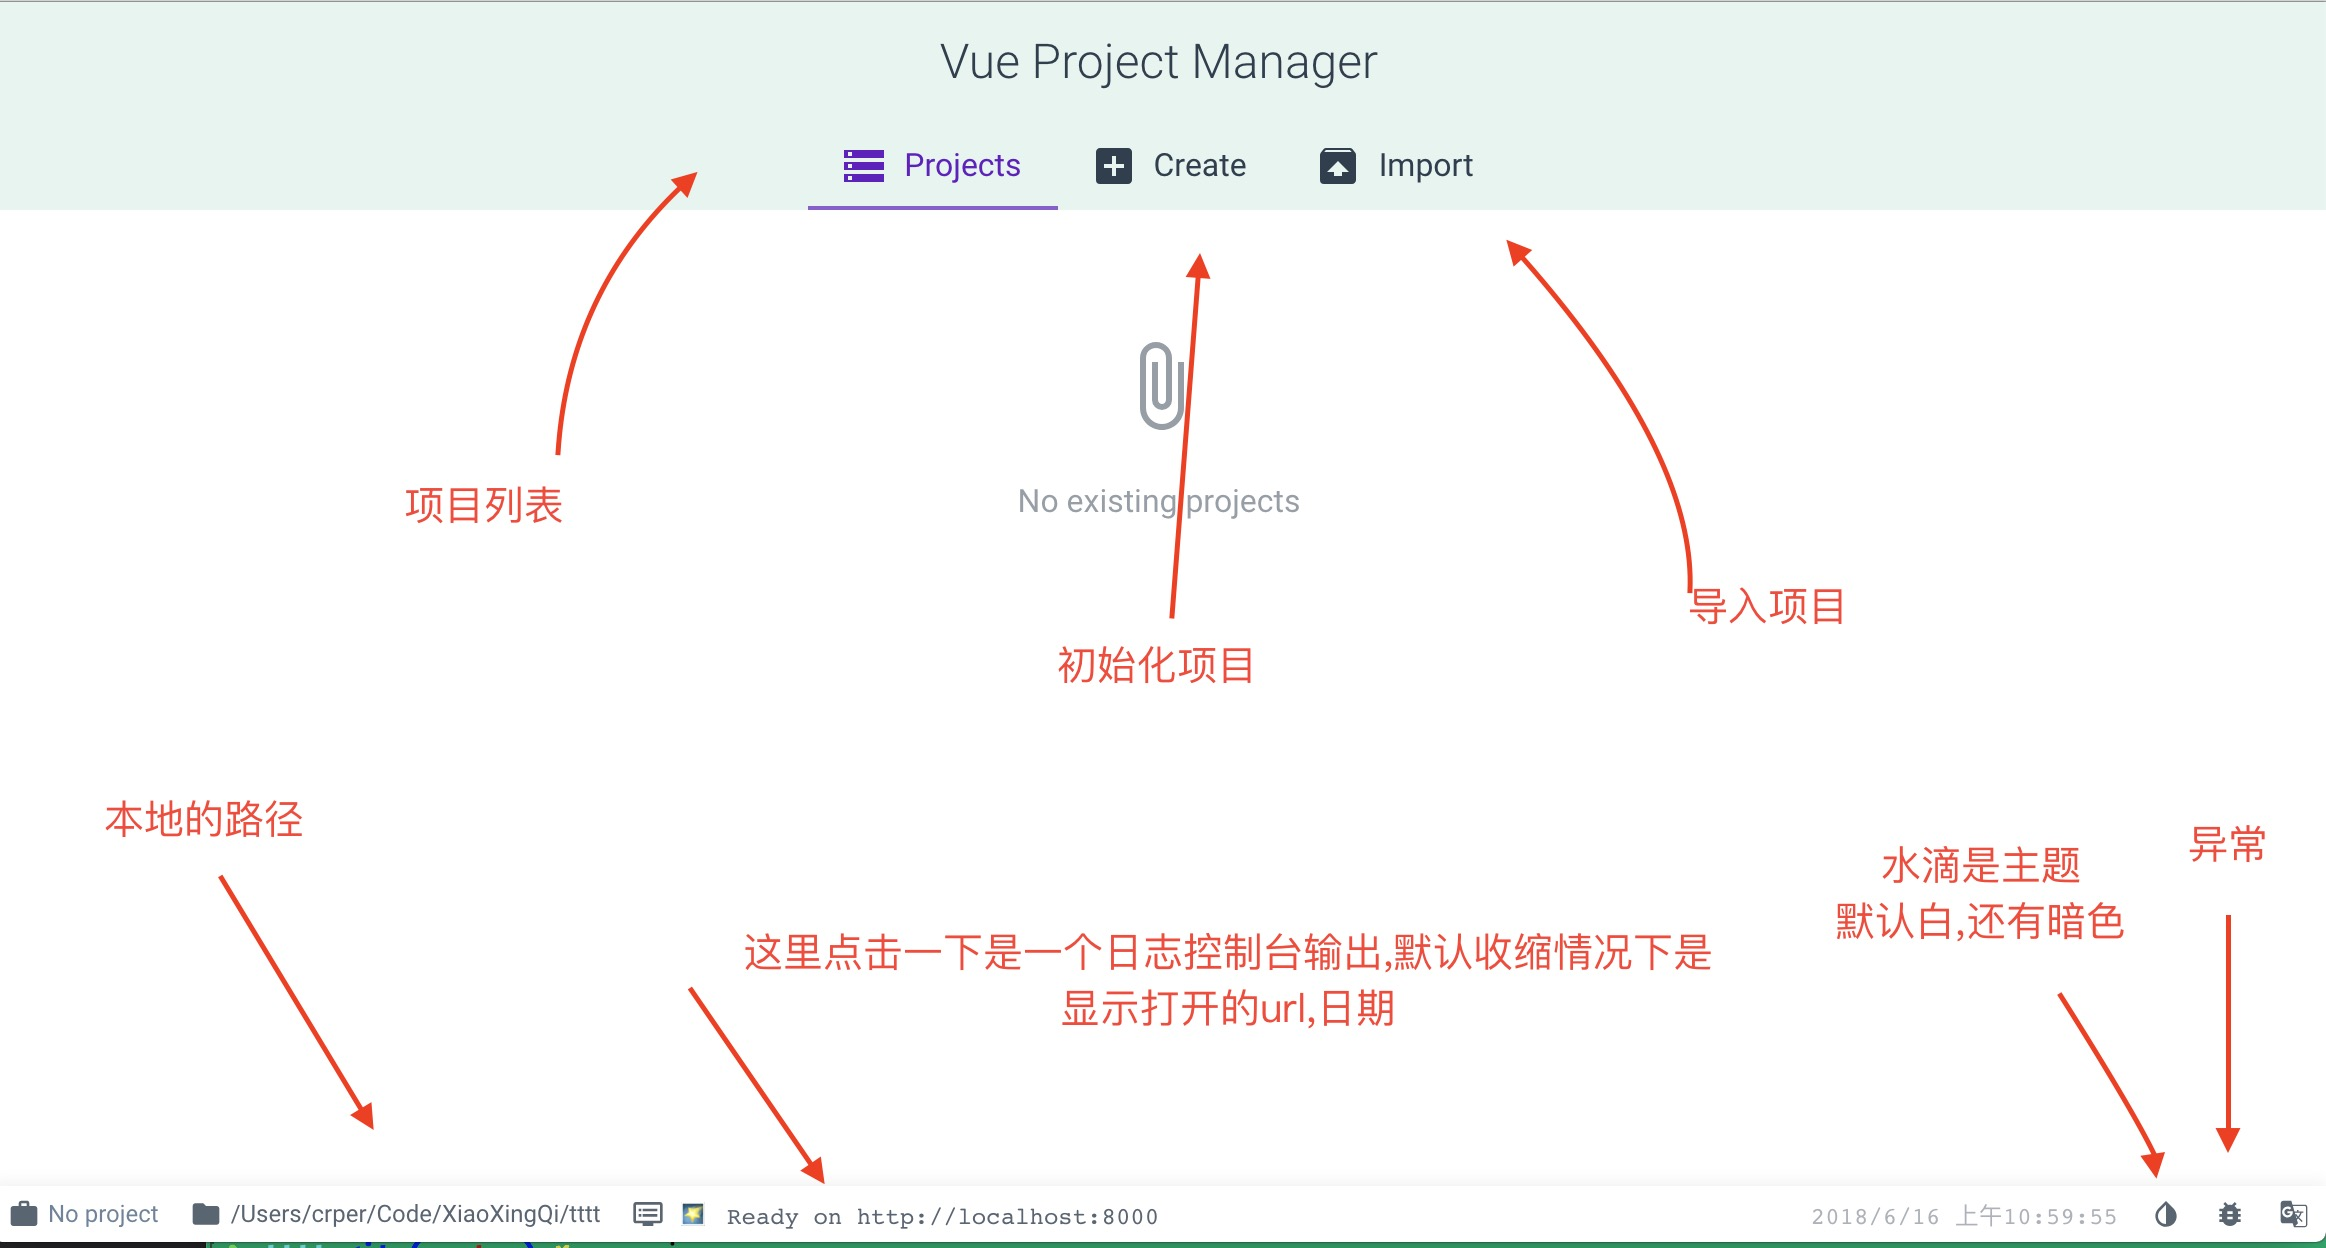
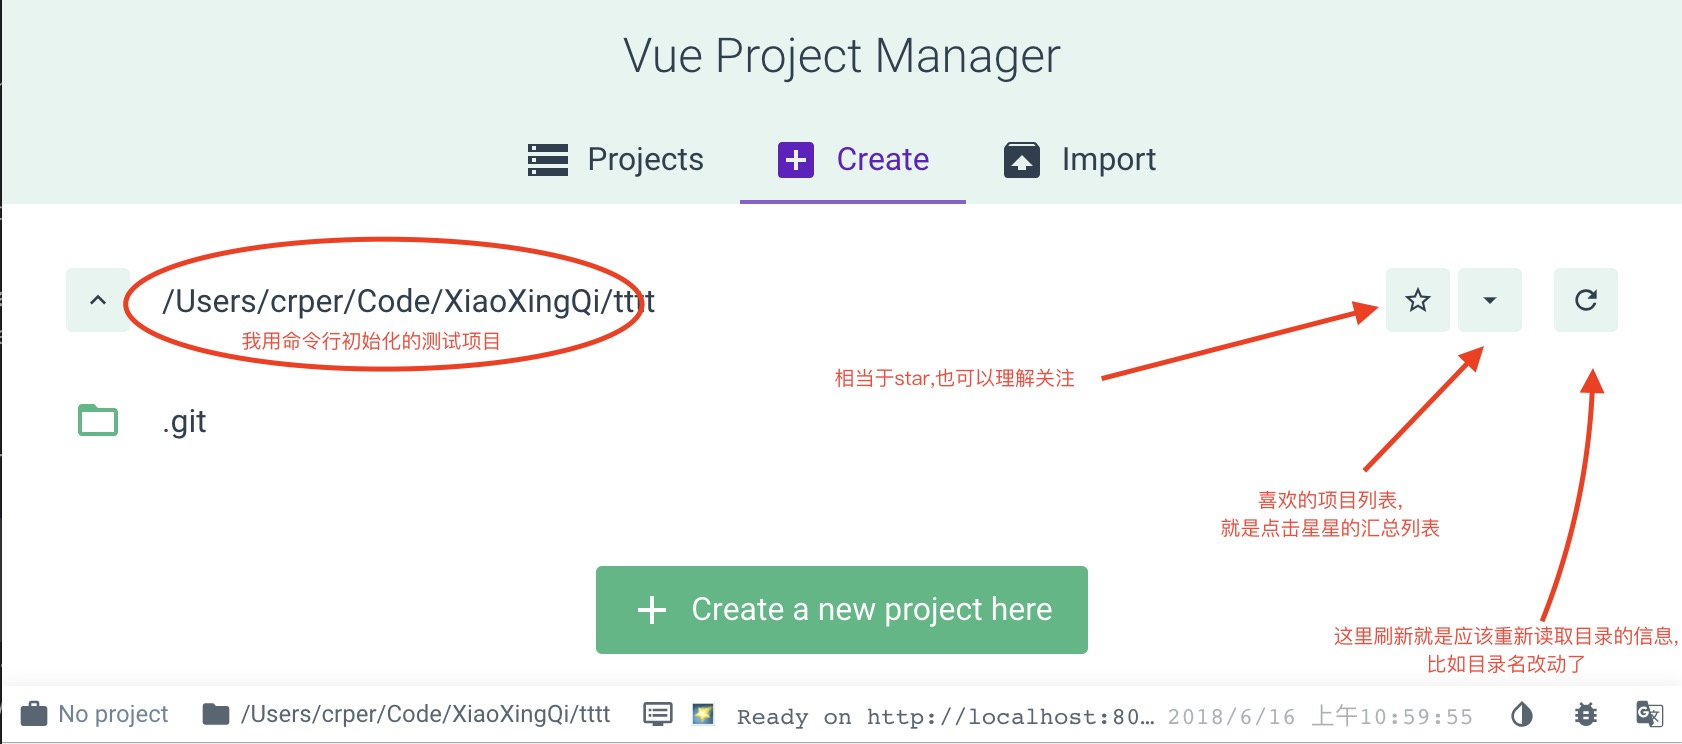
点击顶部tab的Create进入初始化界面, 点击Create a new project here进入新项目初始化
里面的目录都是可以展开的,类似本地目录的体验,会遍历出来展示
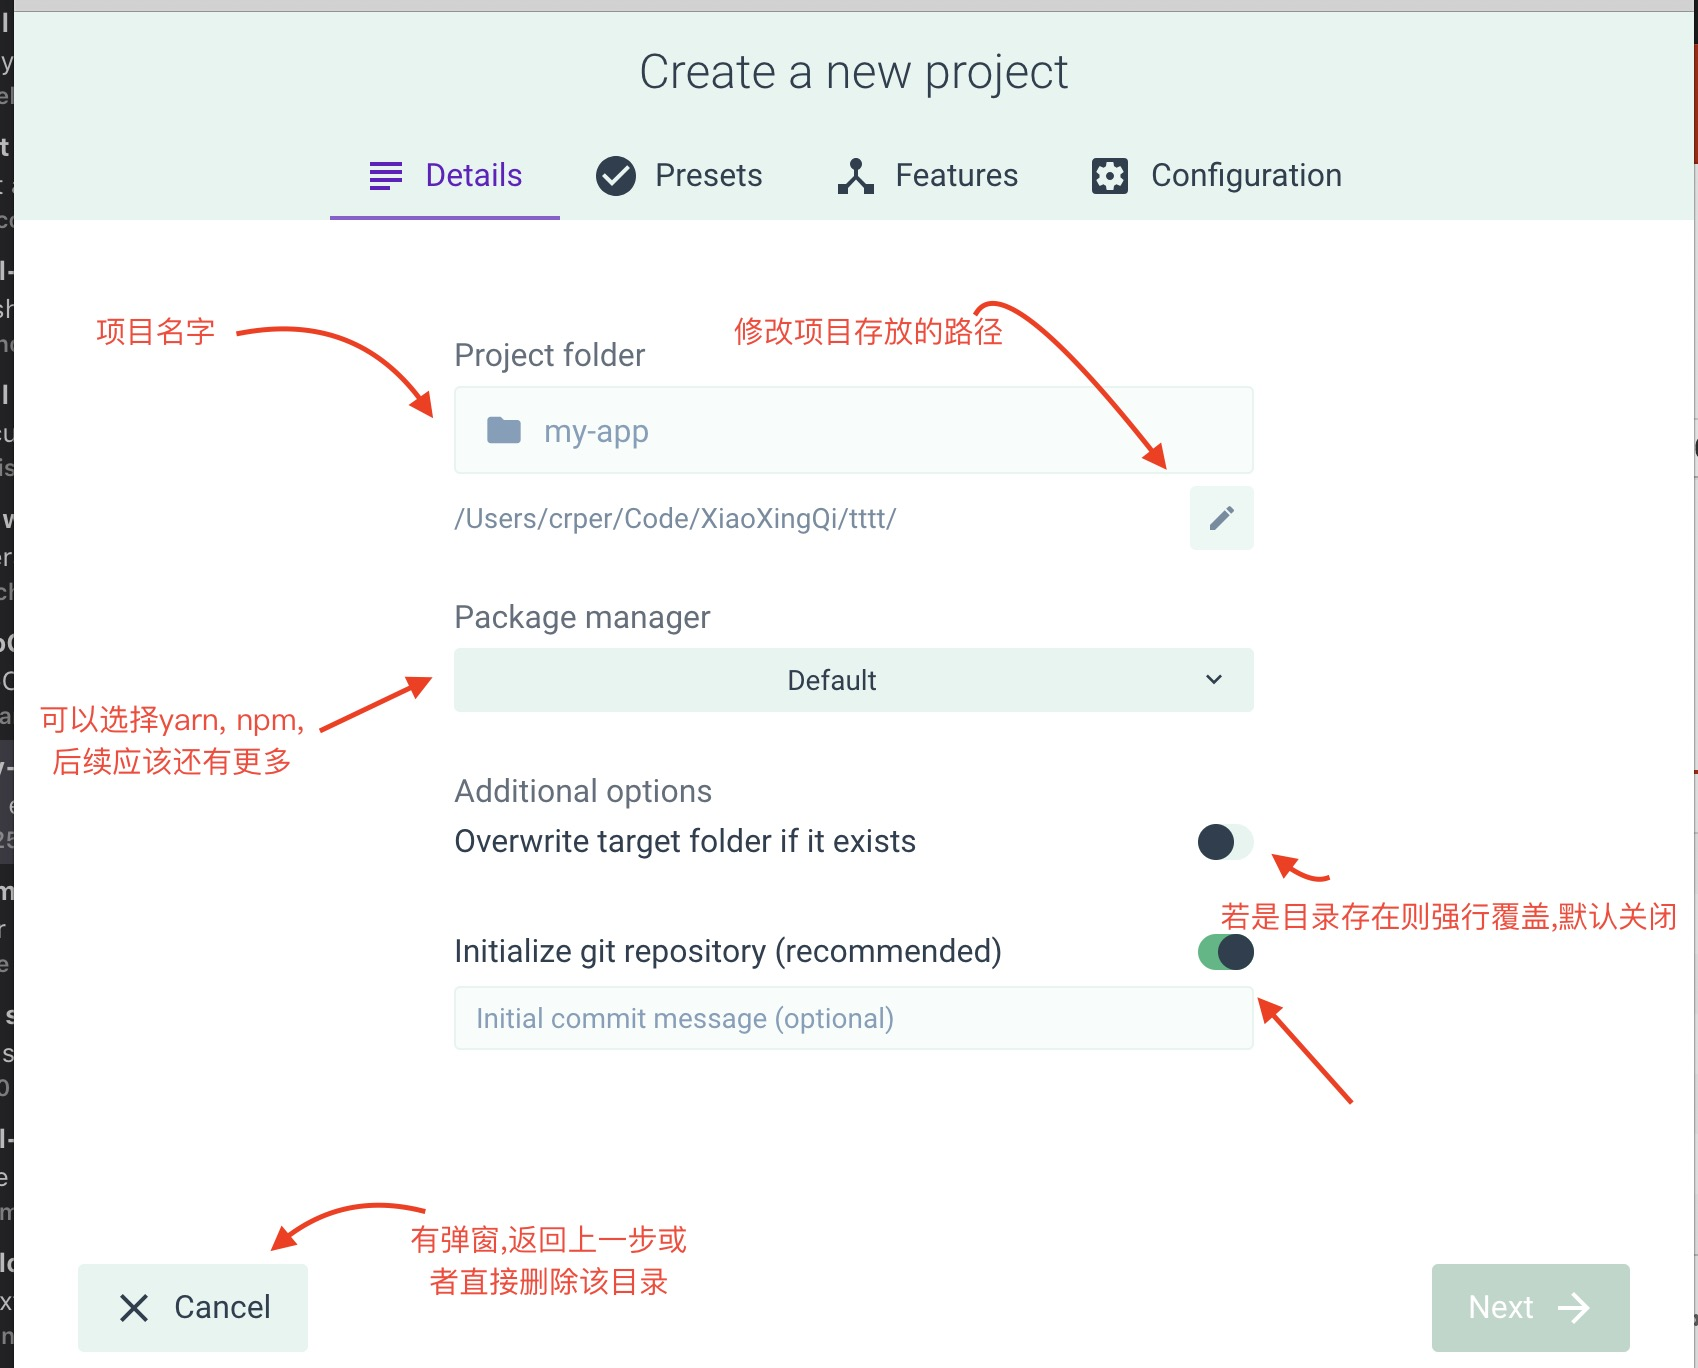
1.填写目录名什么的
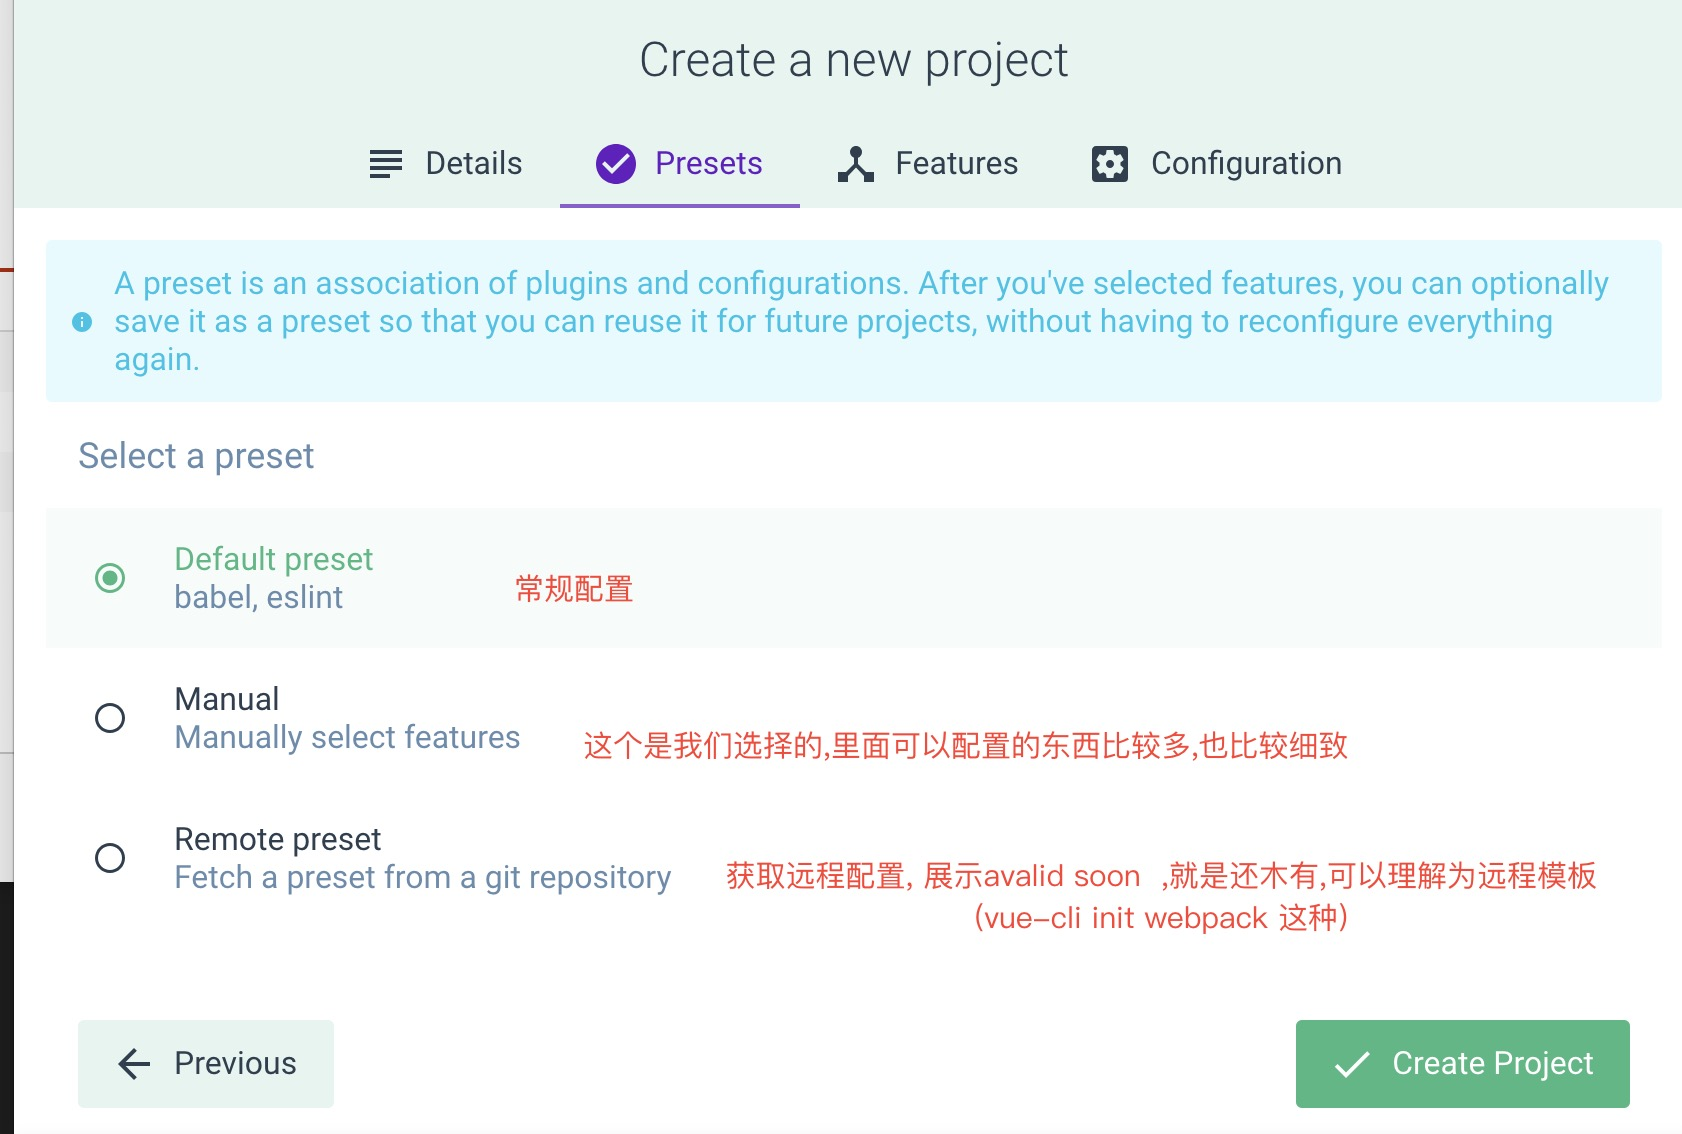
2.选择配置的细粒度
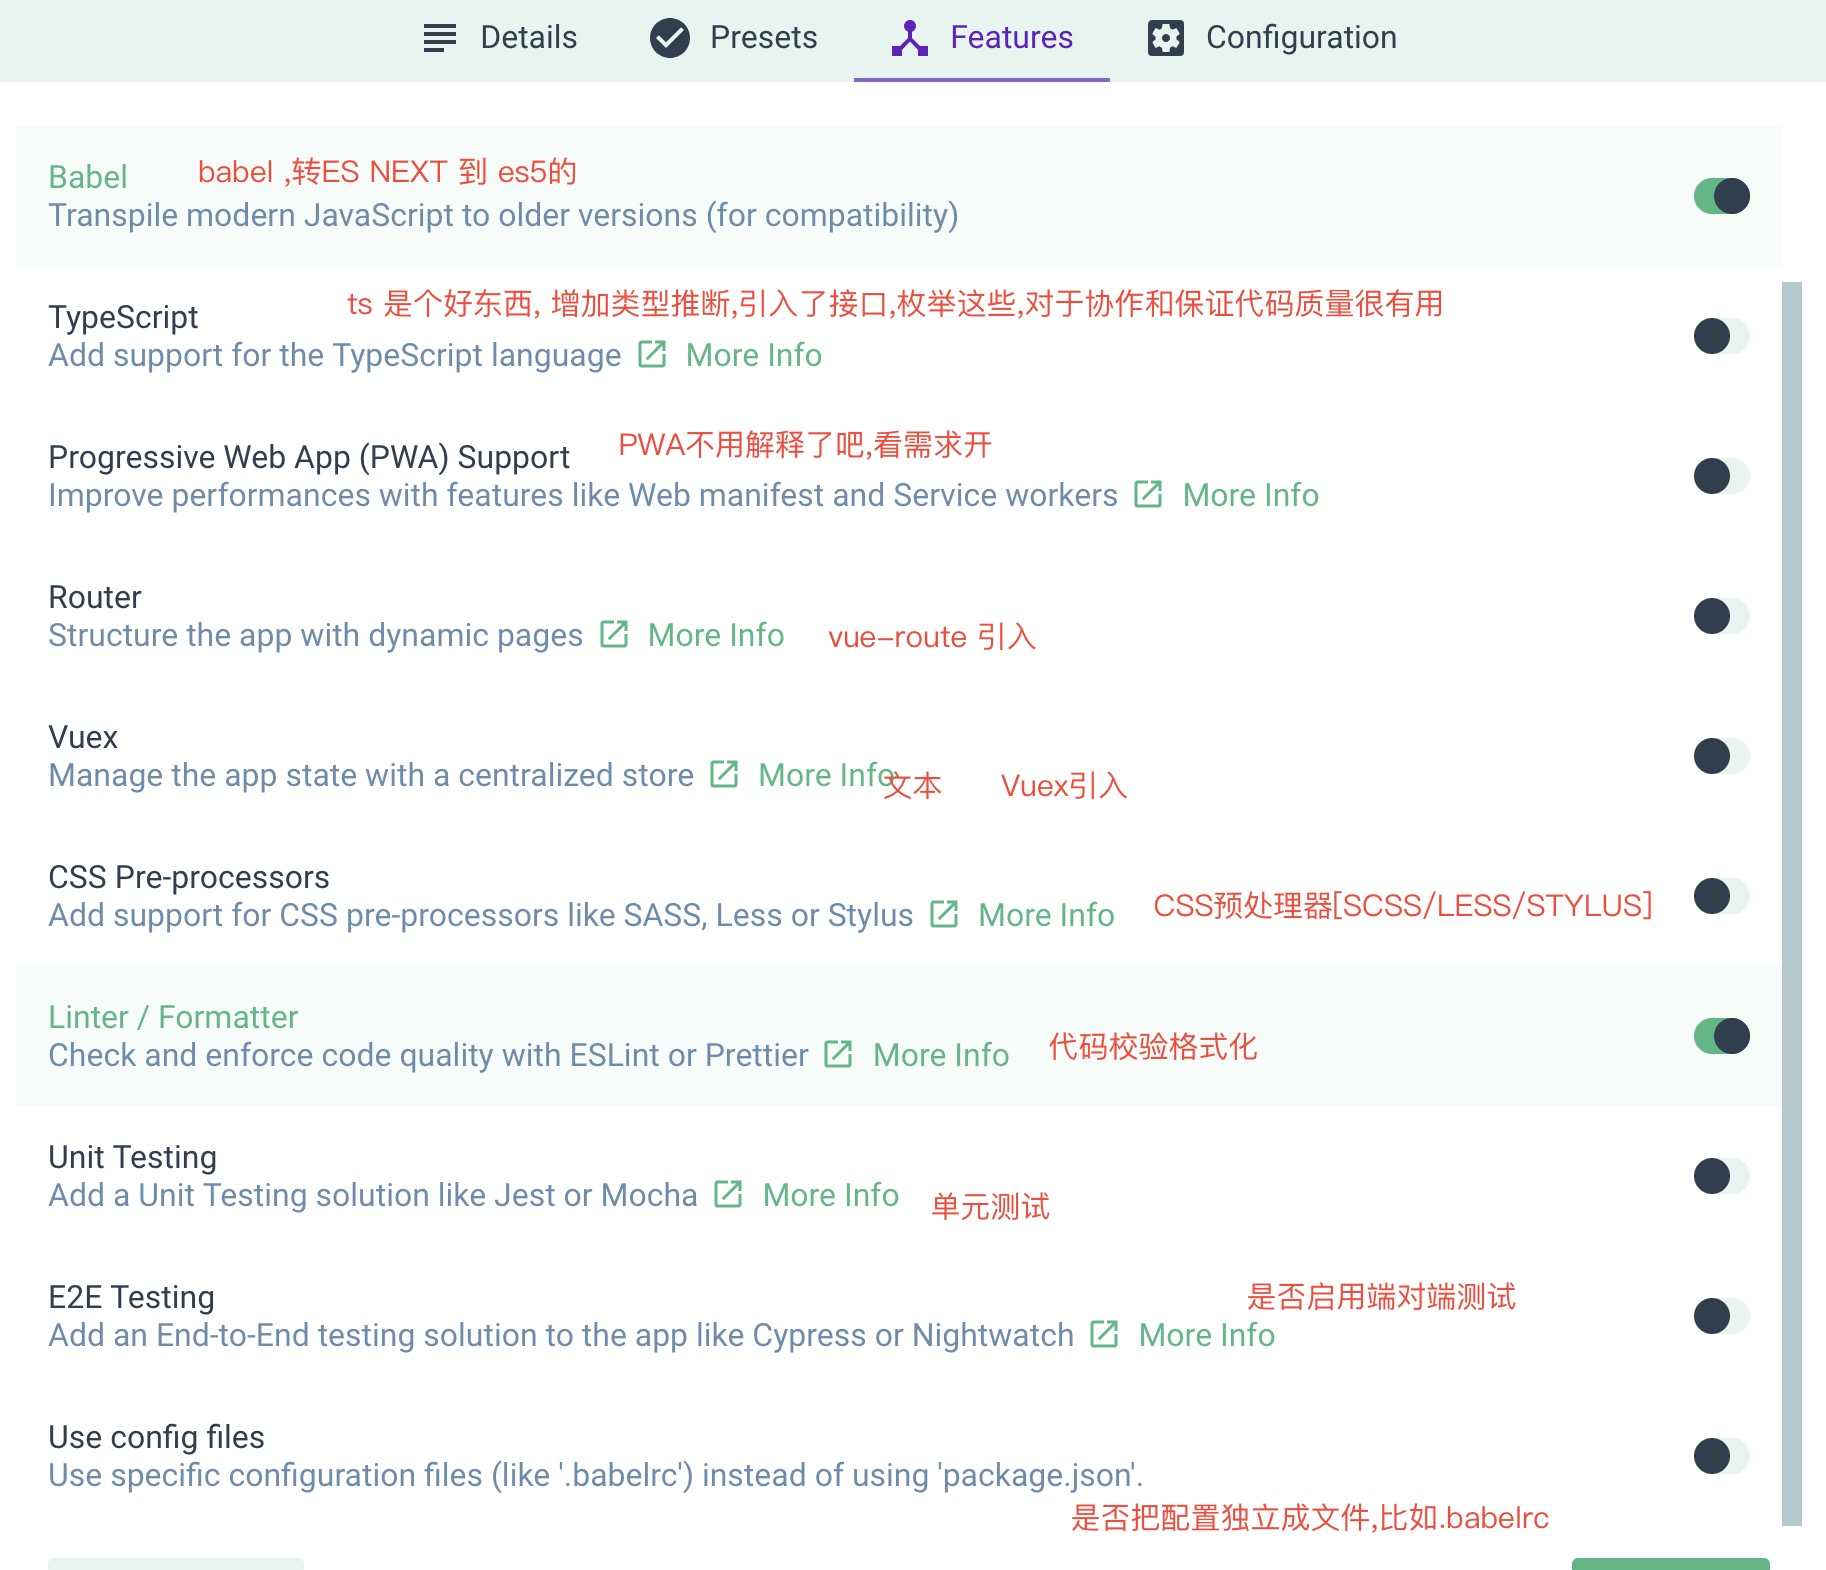
3.选择需要开启的东东
4.针对上一步的选择进一步的配置
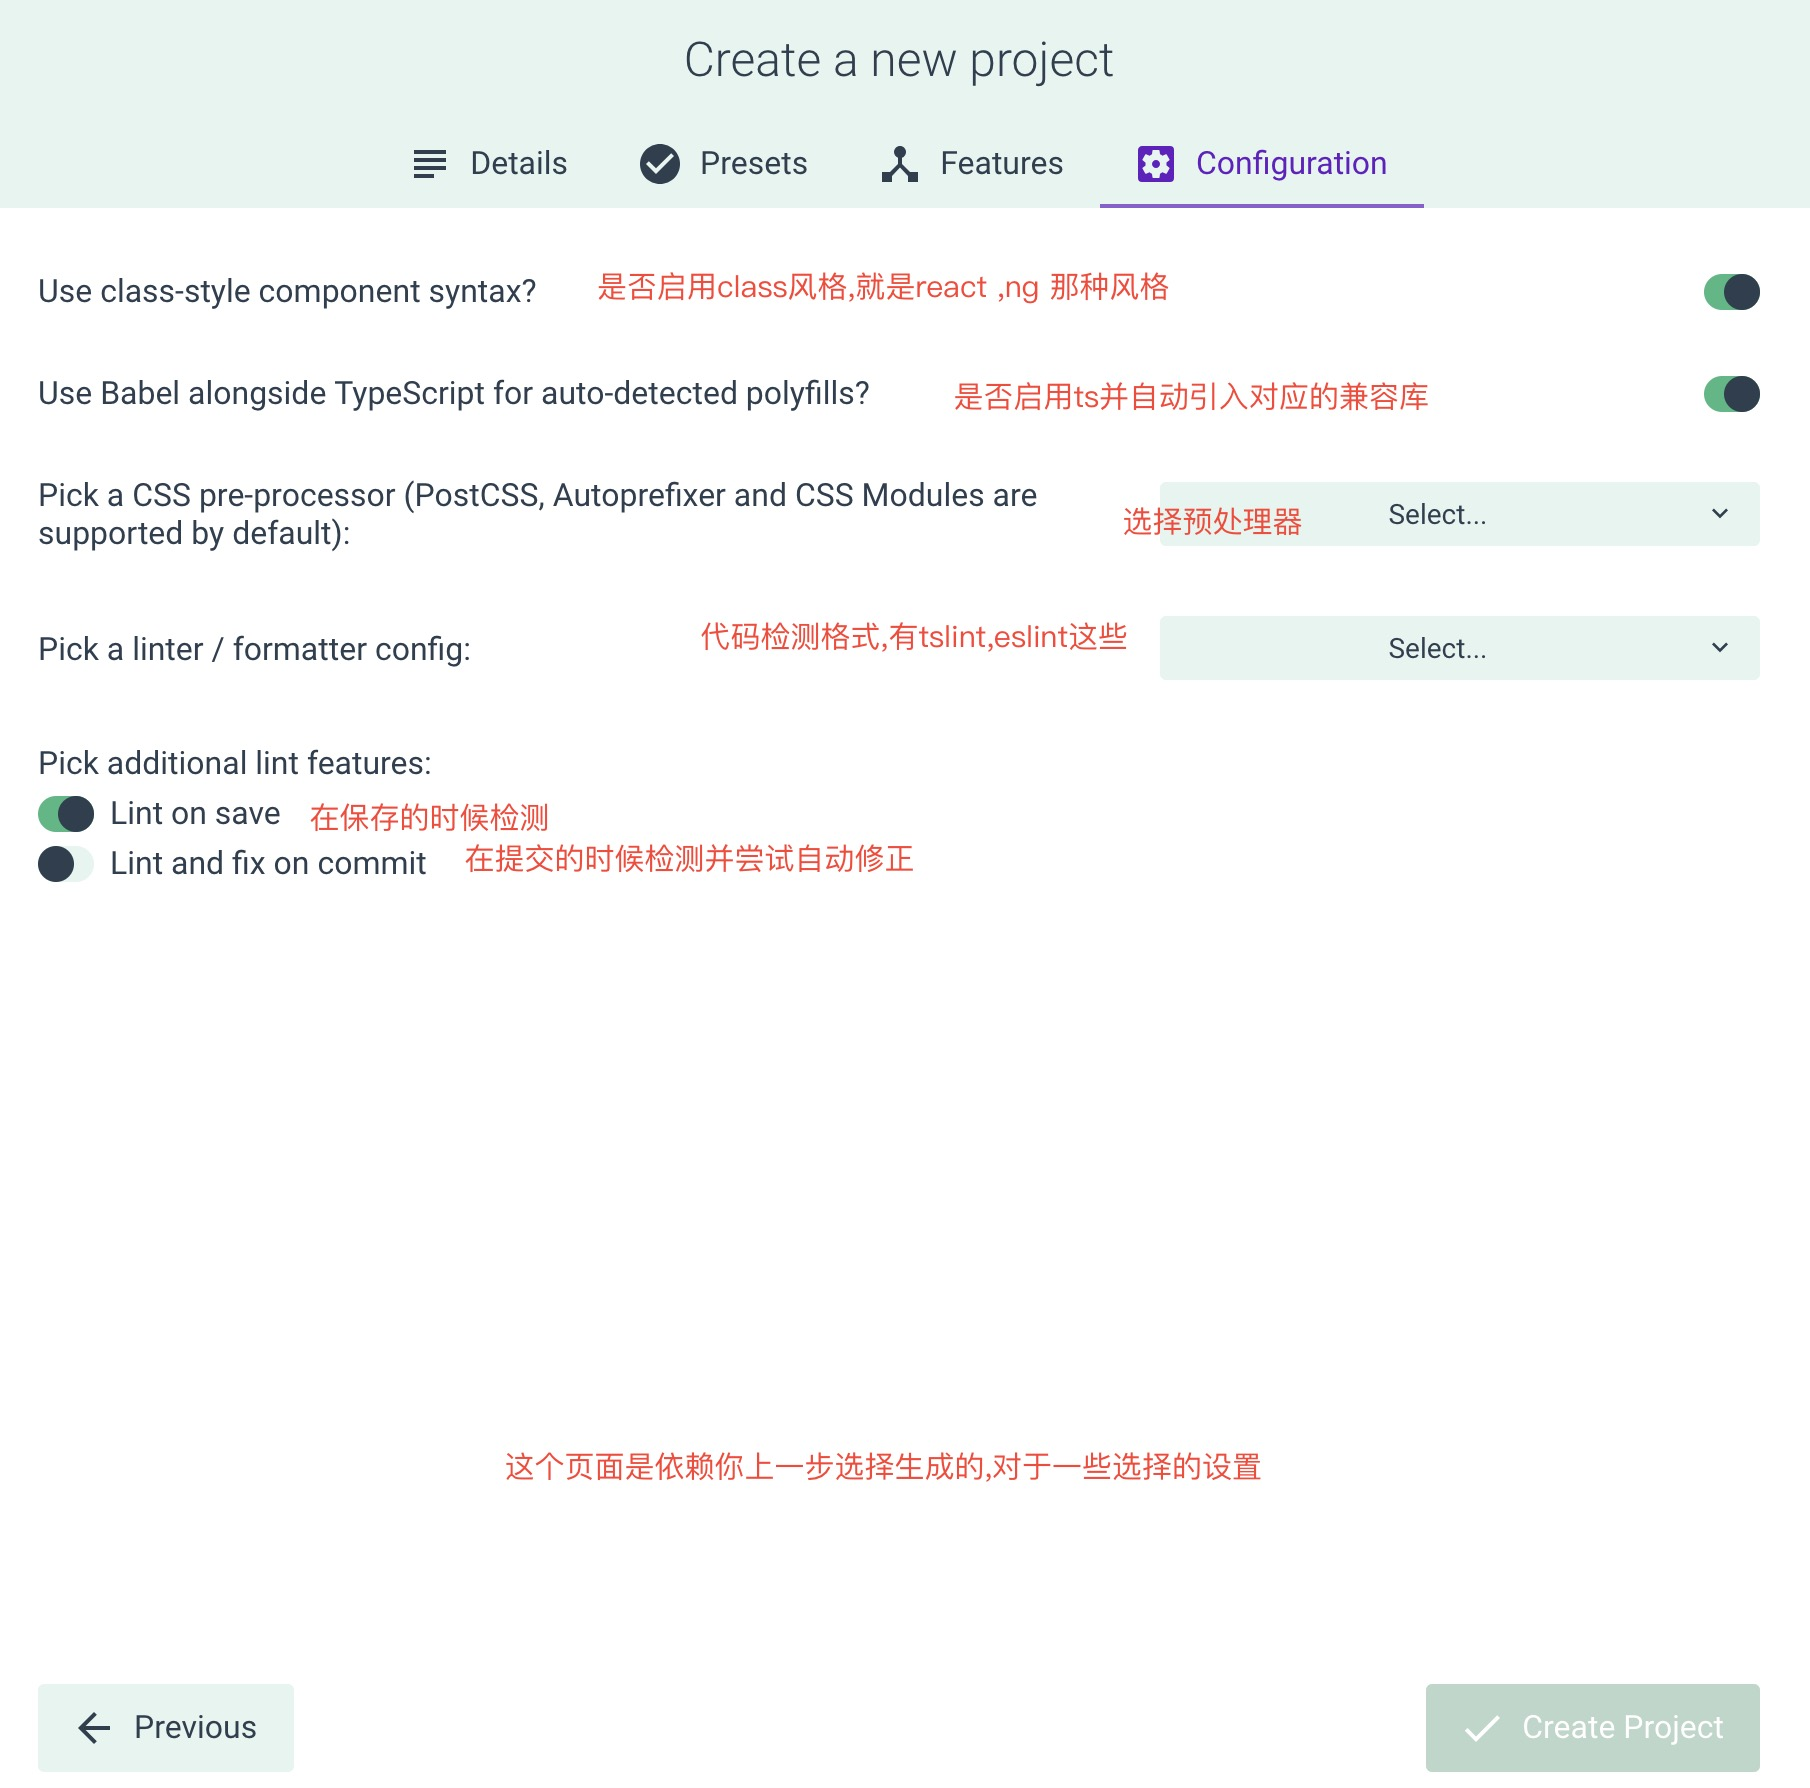
最后点击Create Project就会开始执行相关的操作和安装对应的依赖了
其实就是终端在执行,只是页面也会给你看一些效果,一个遮罩层loading和一些文字
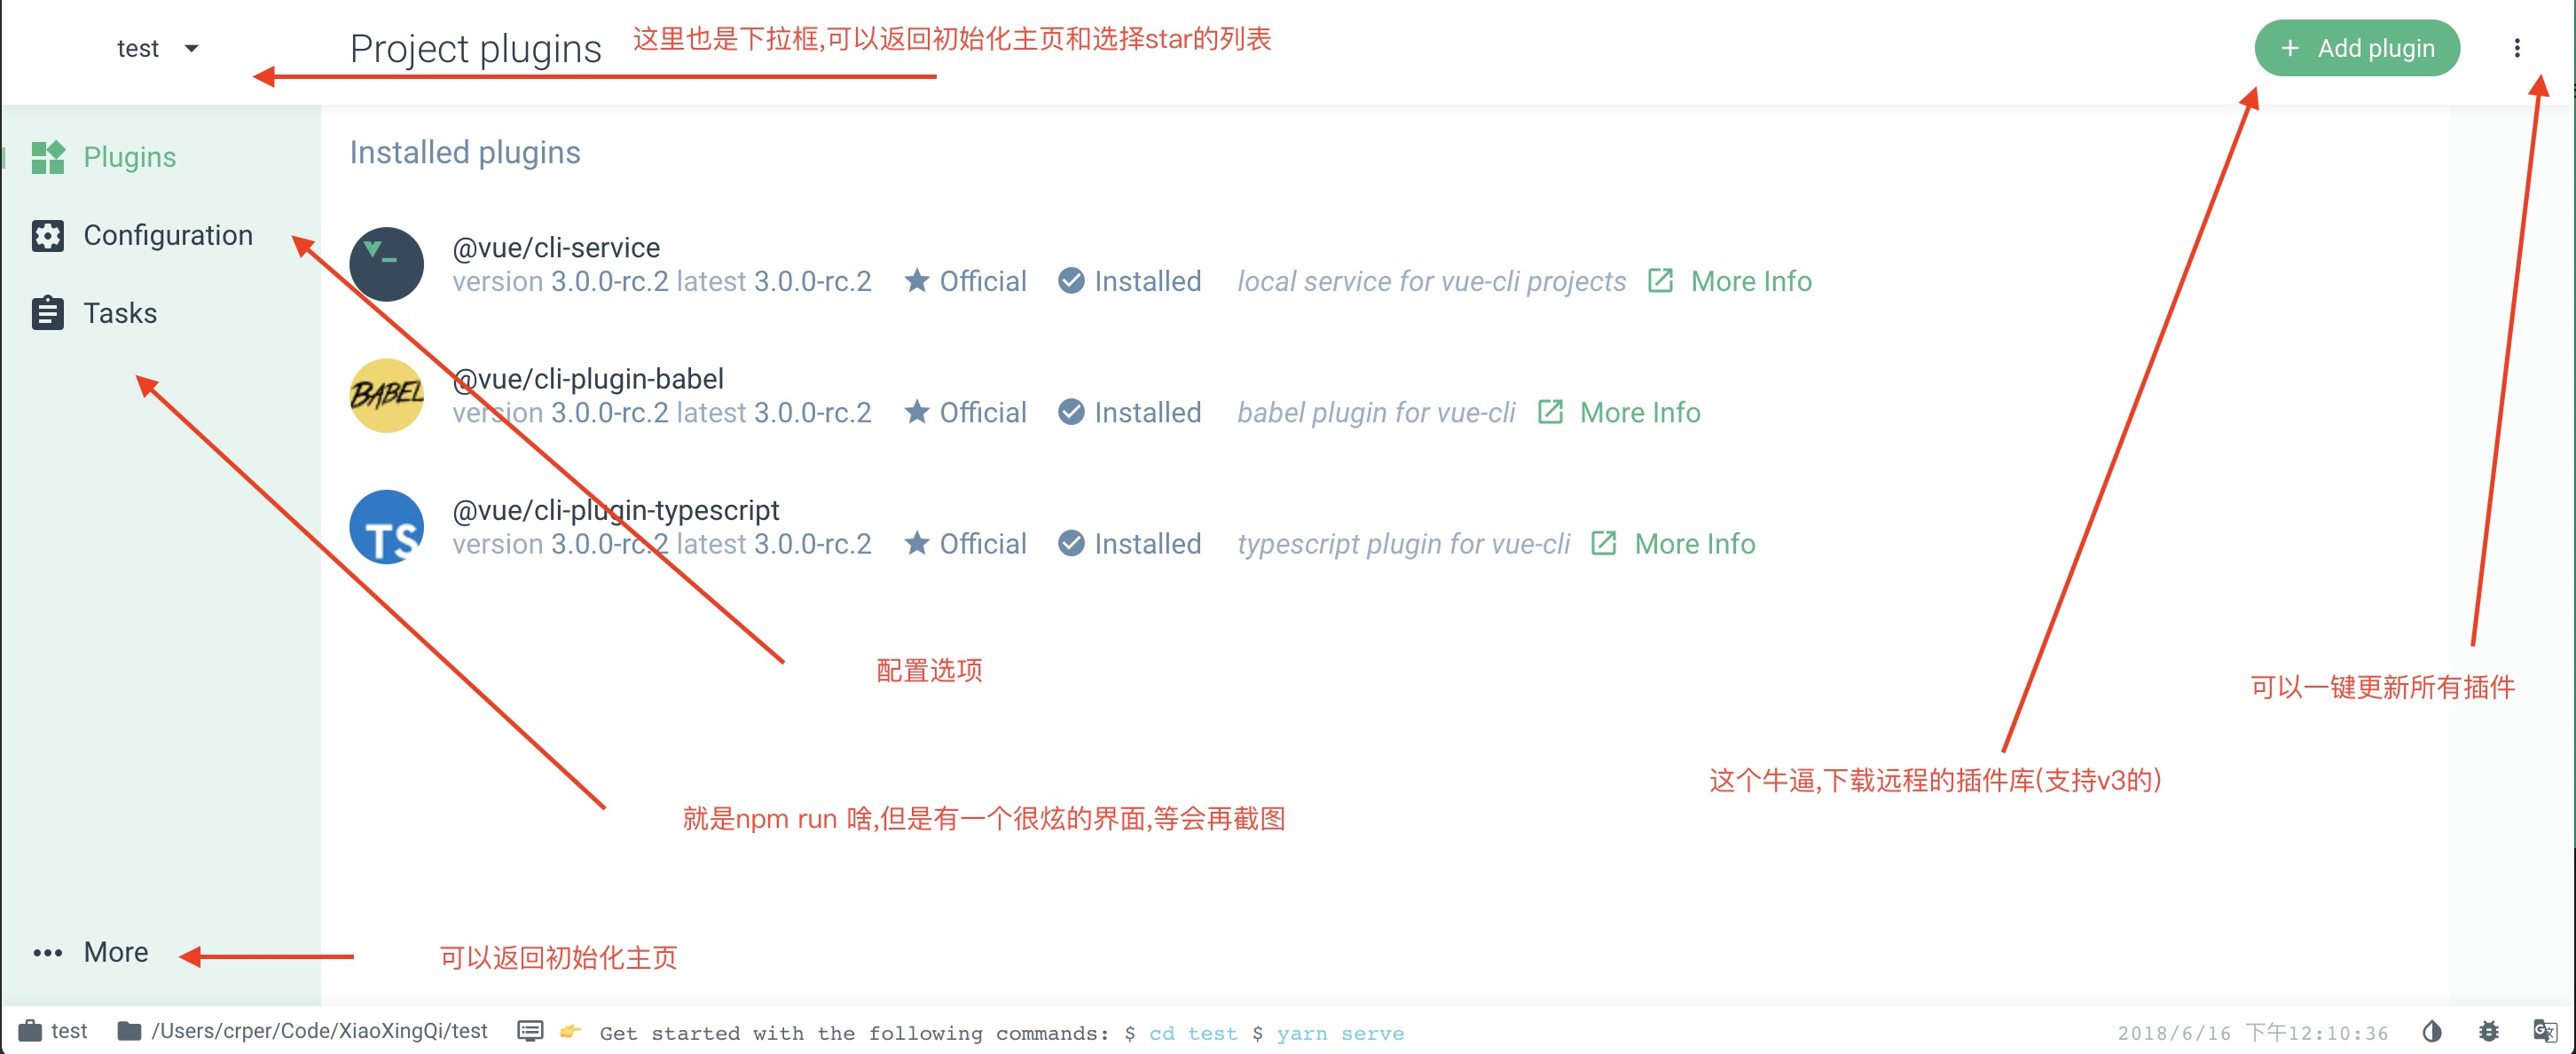
5.创建完毕会有一个管理后台...相当酷炫..
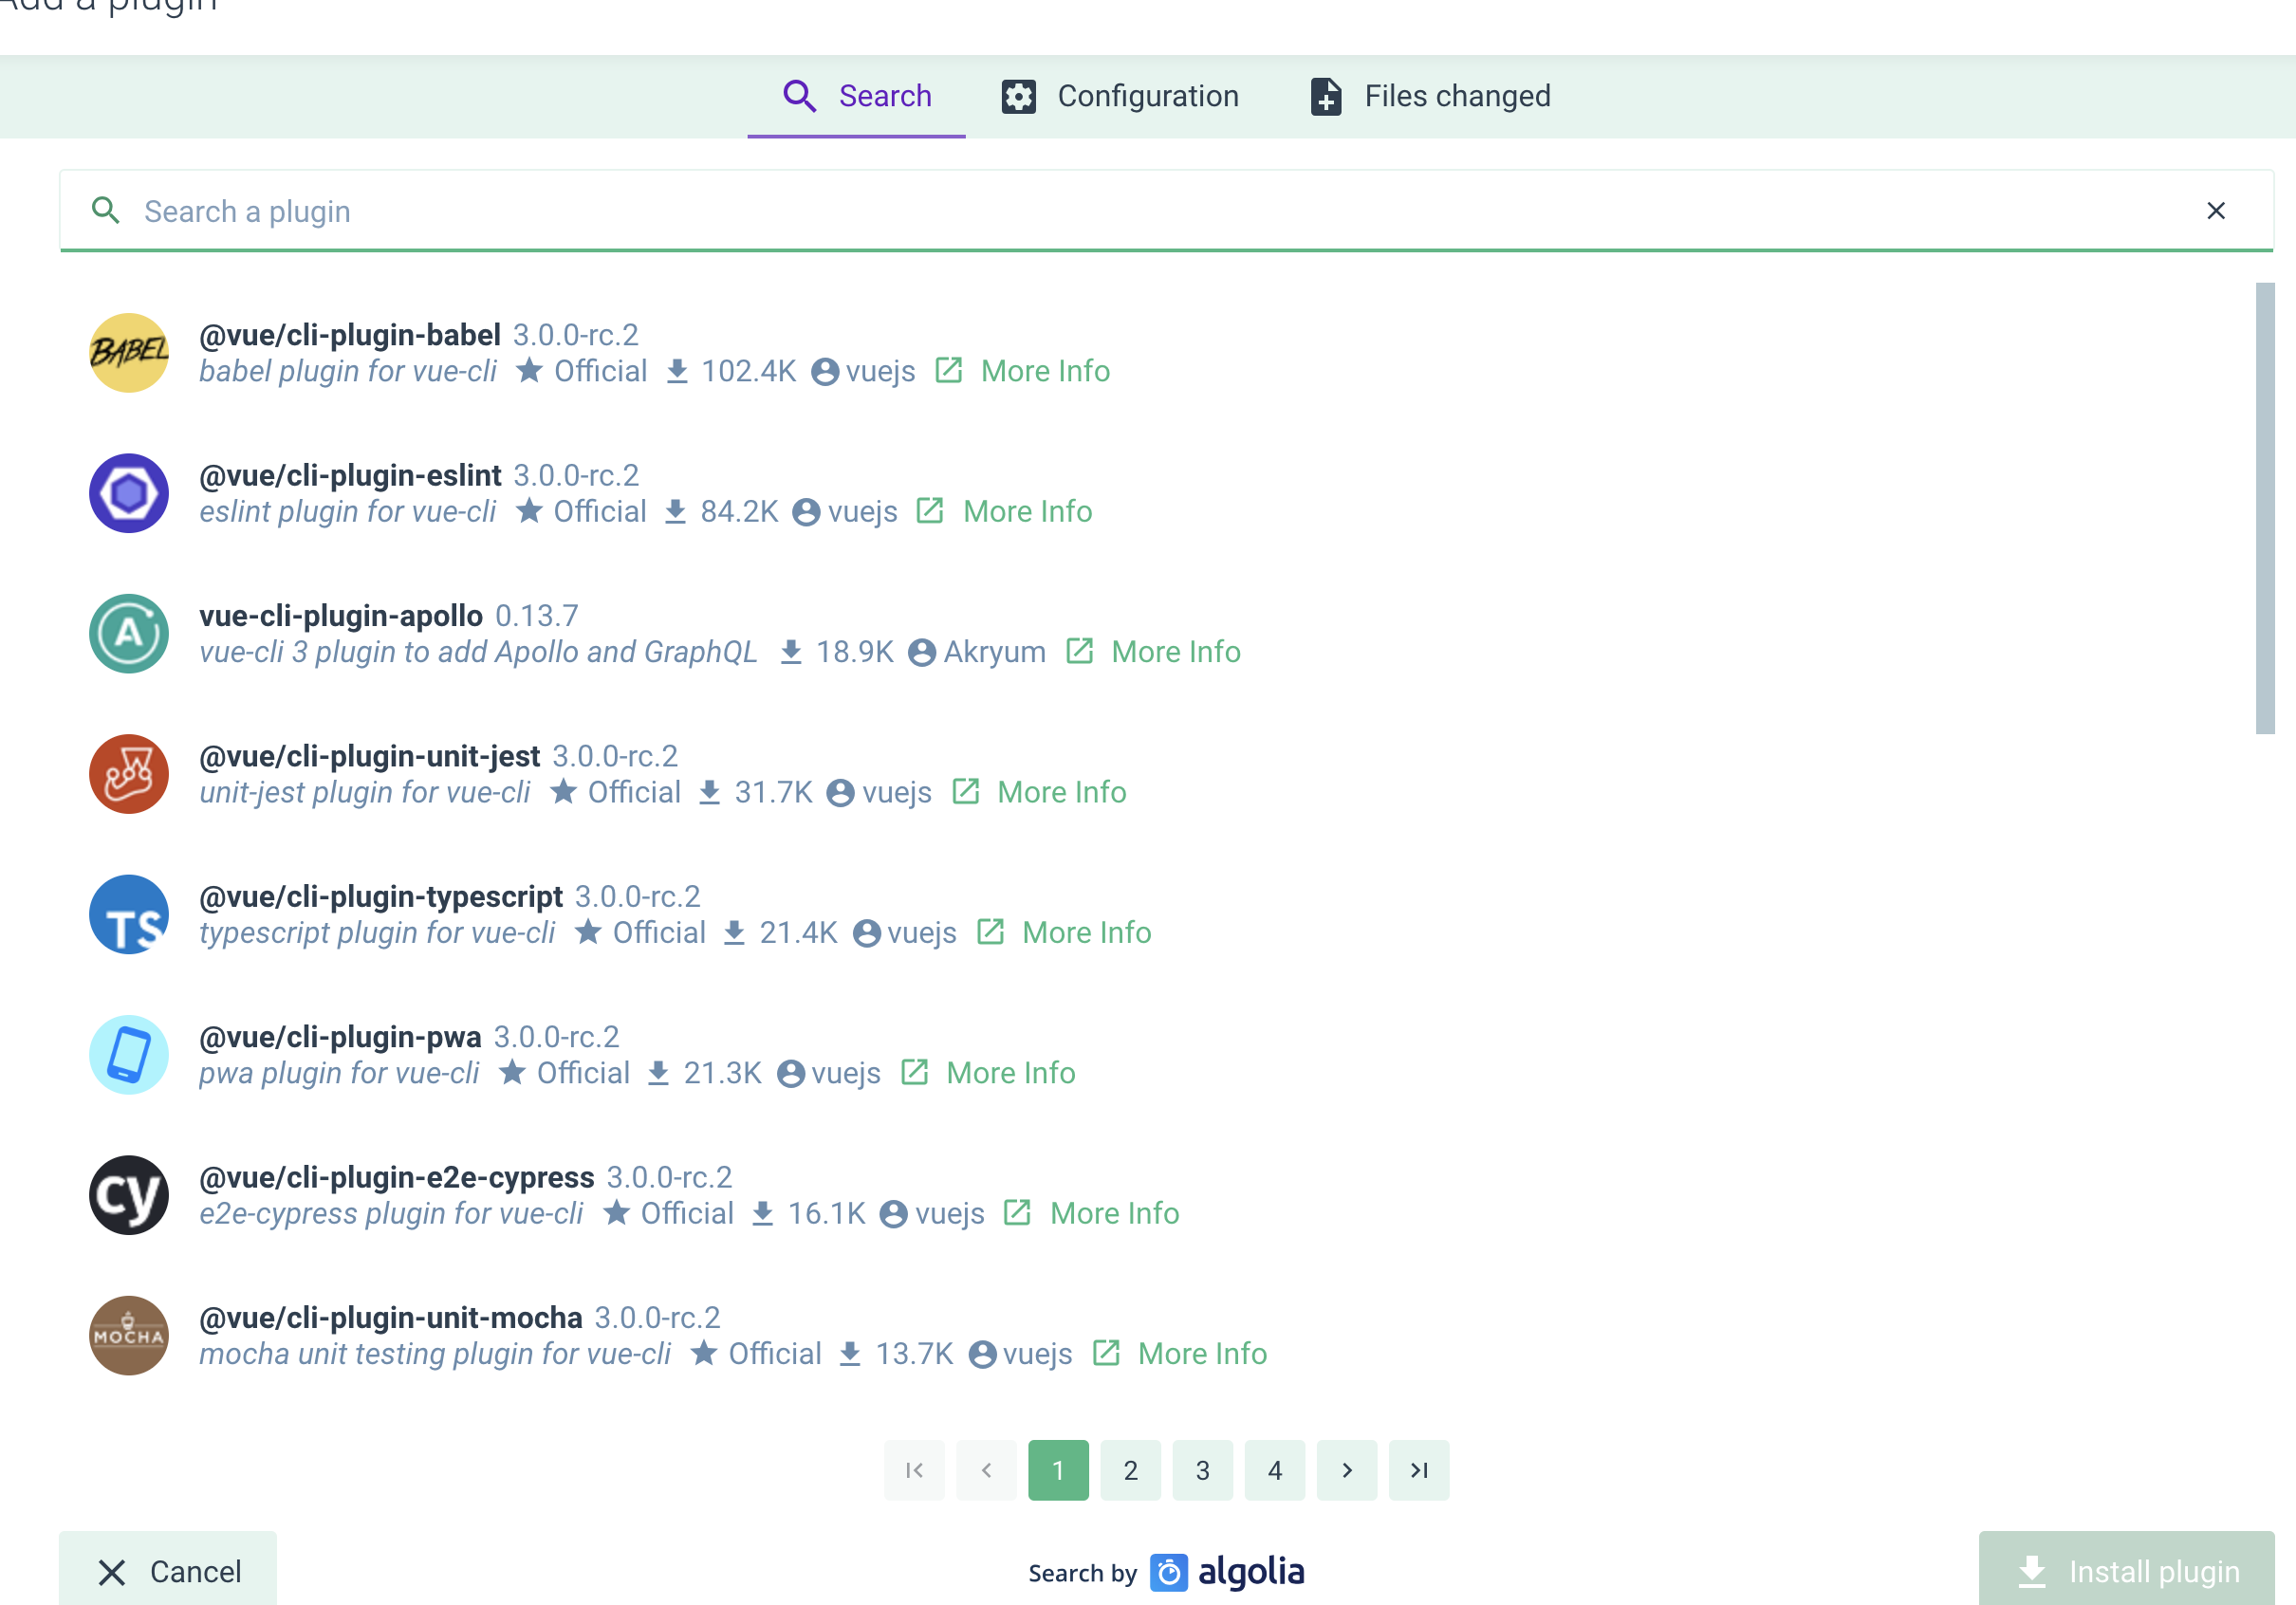
插件库
这个真的很实用,对于项目的拓展什么的
开发运行
详细的记录了模块大小,这是把分析插件展示出来了...这样写代码的时候更能感知项目的大小了
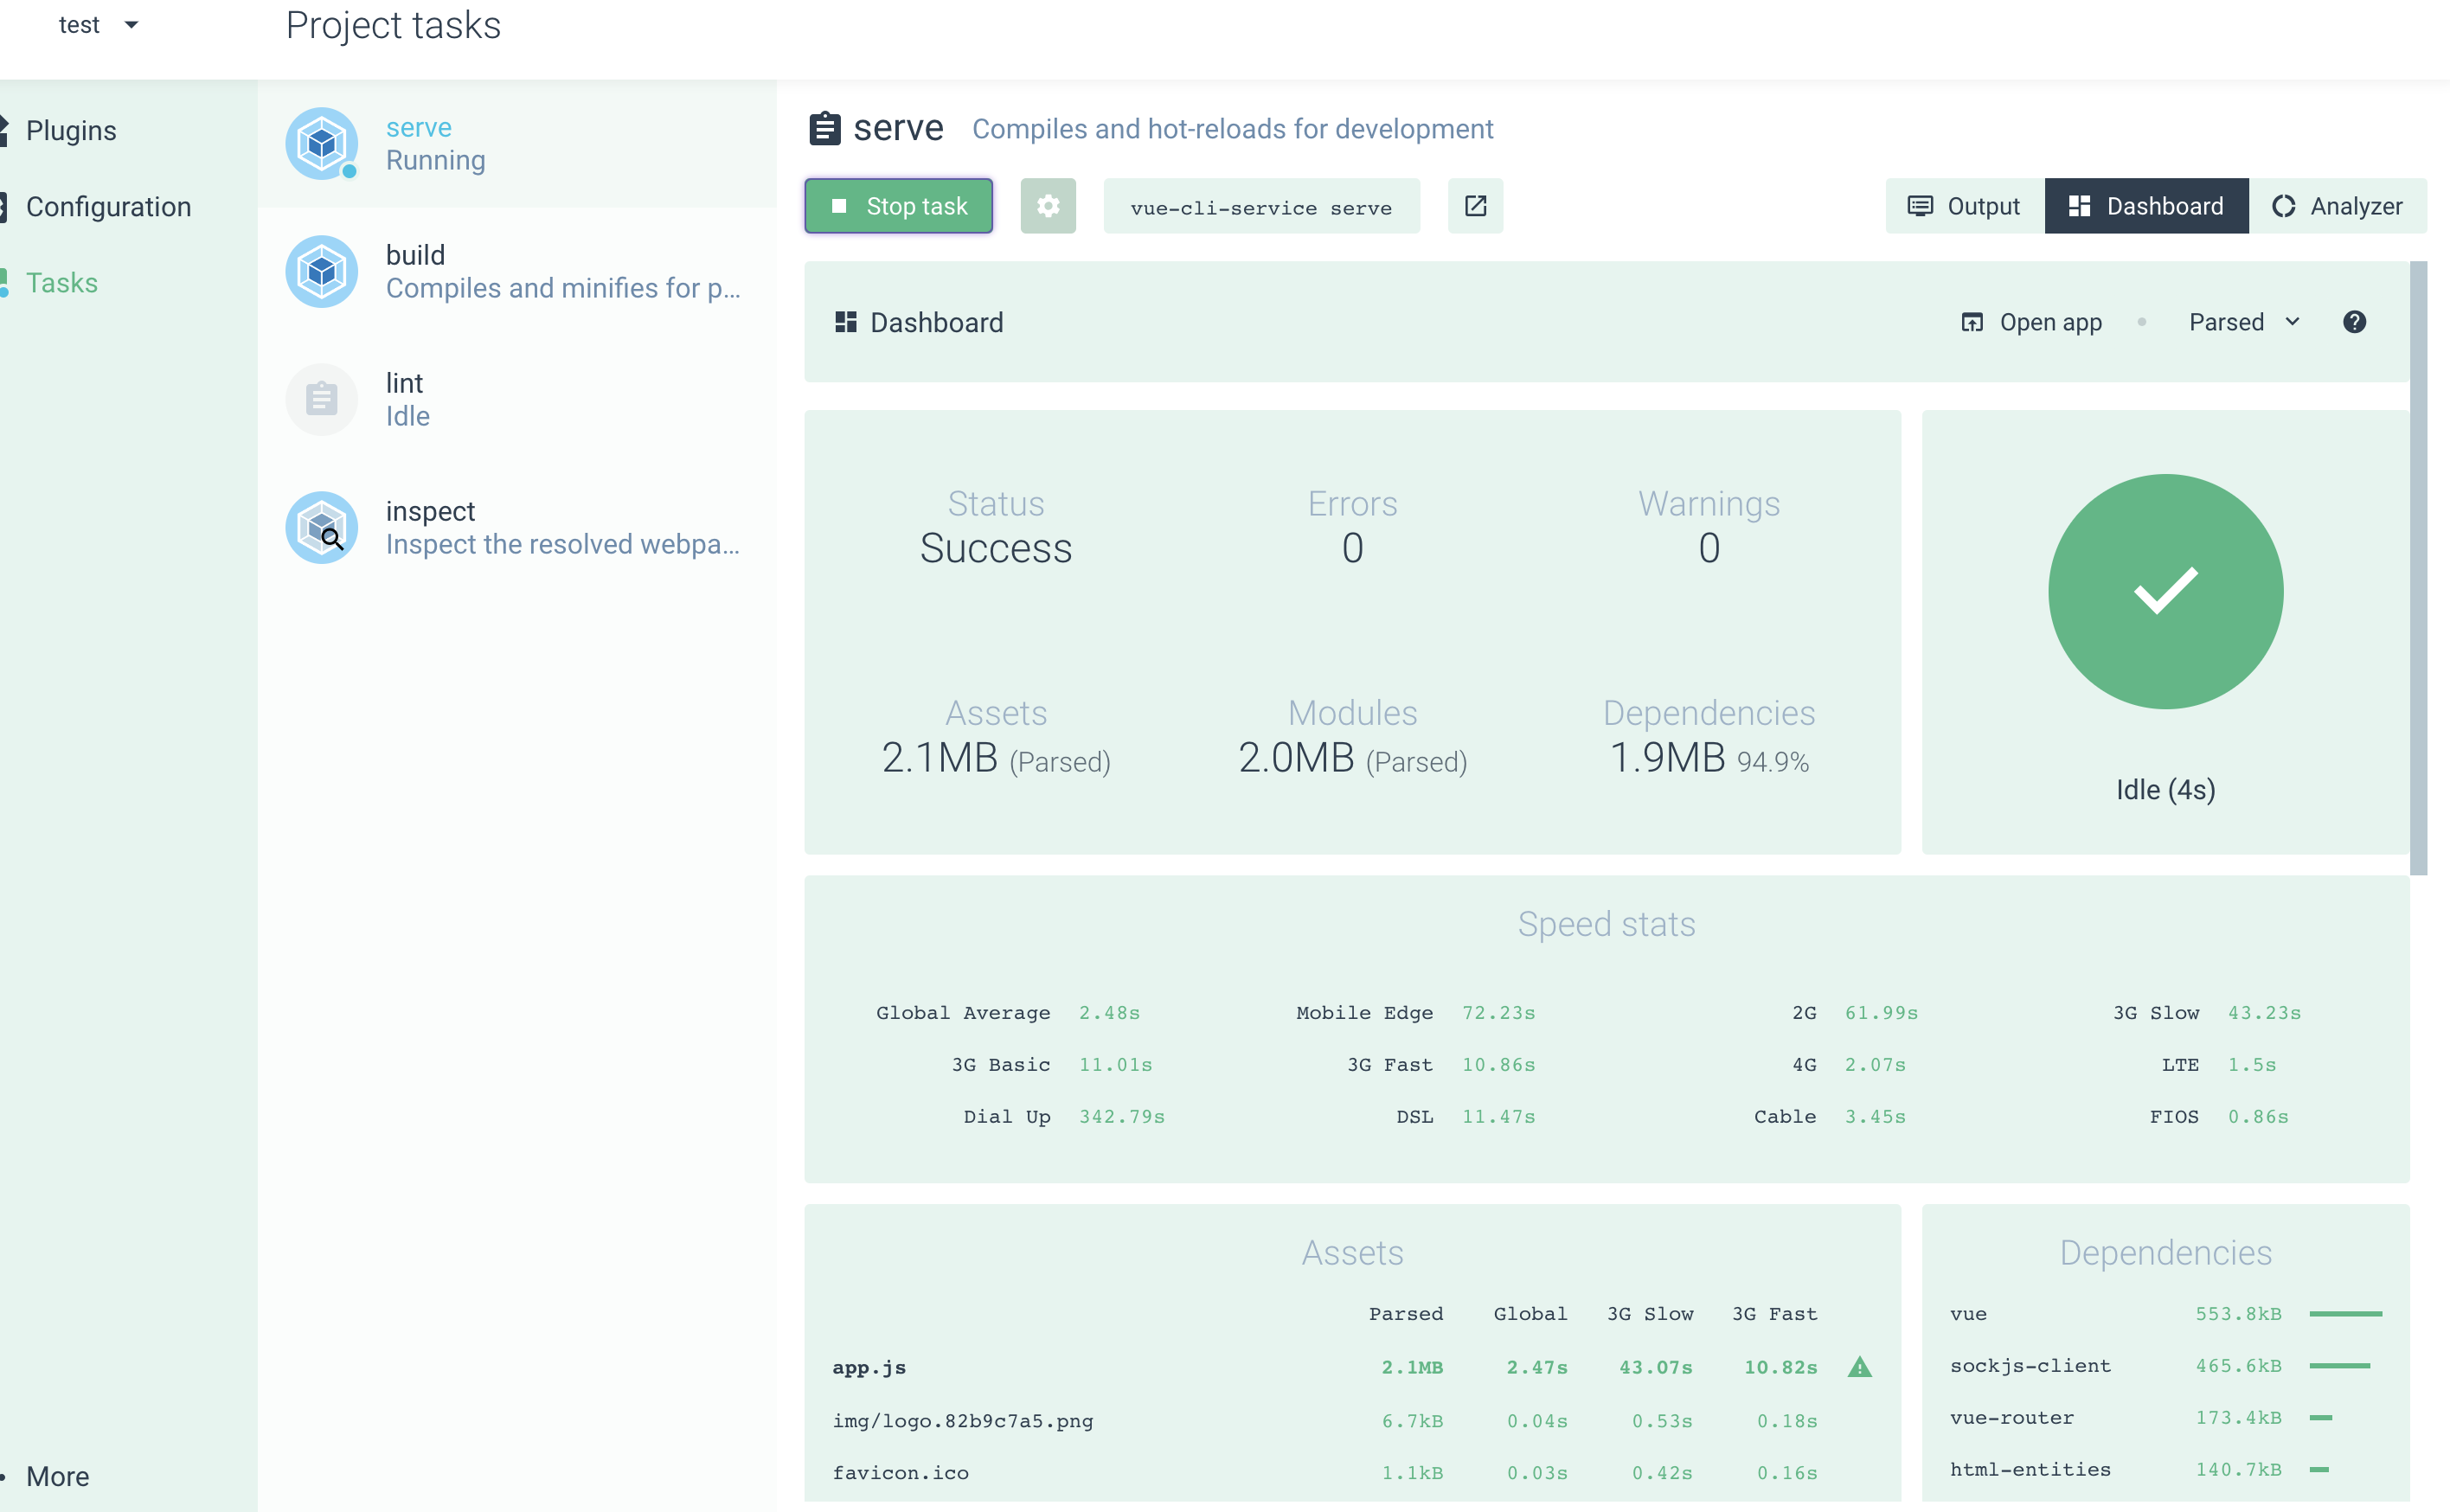
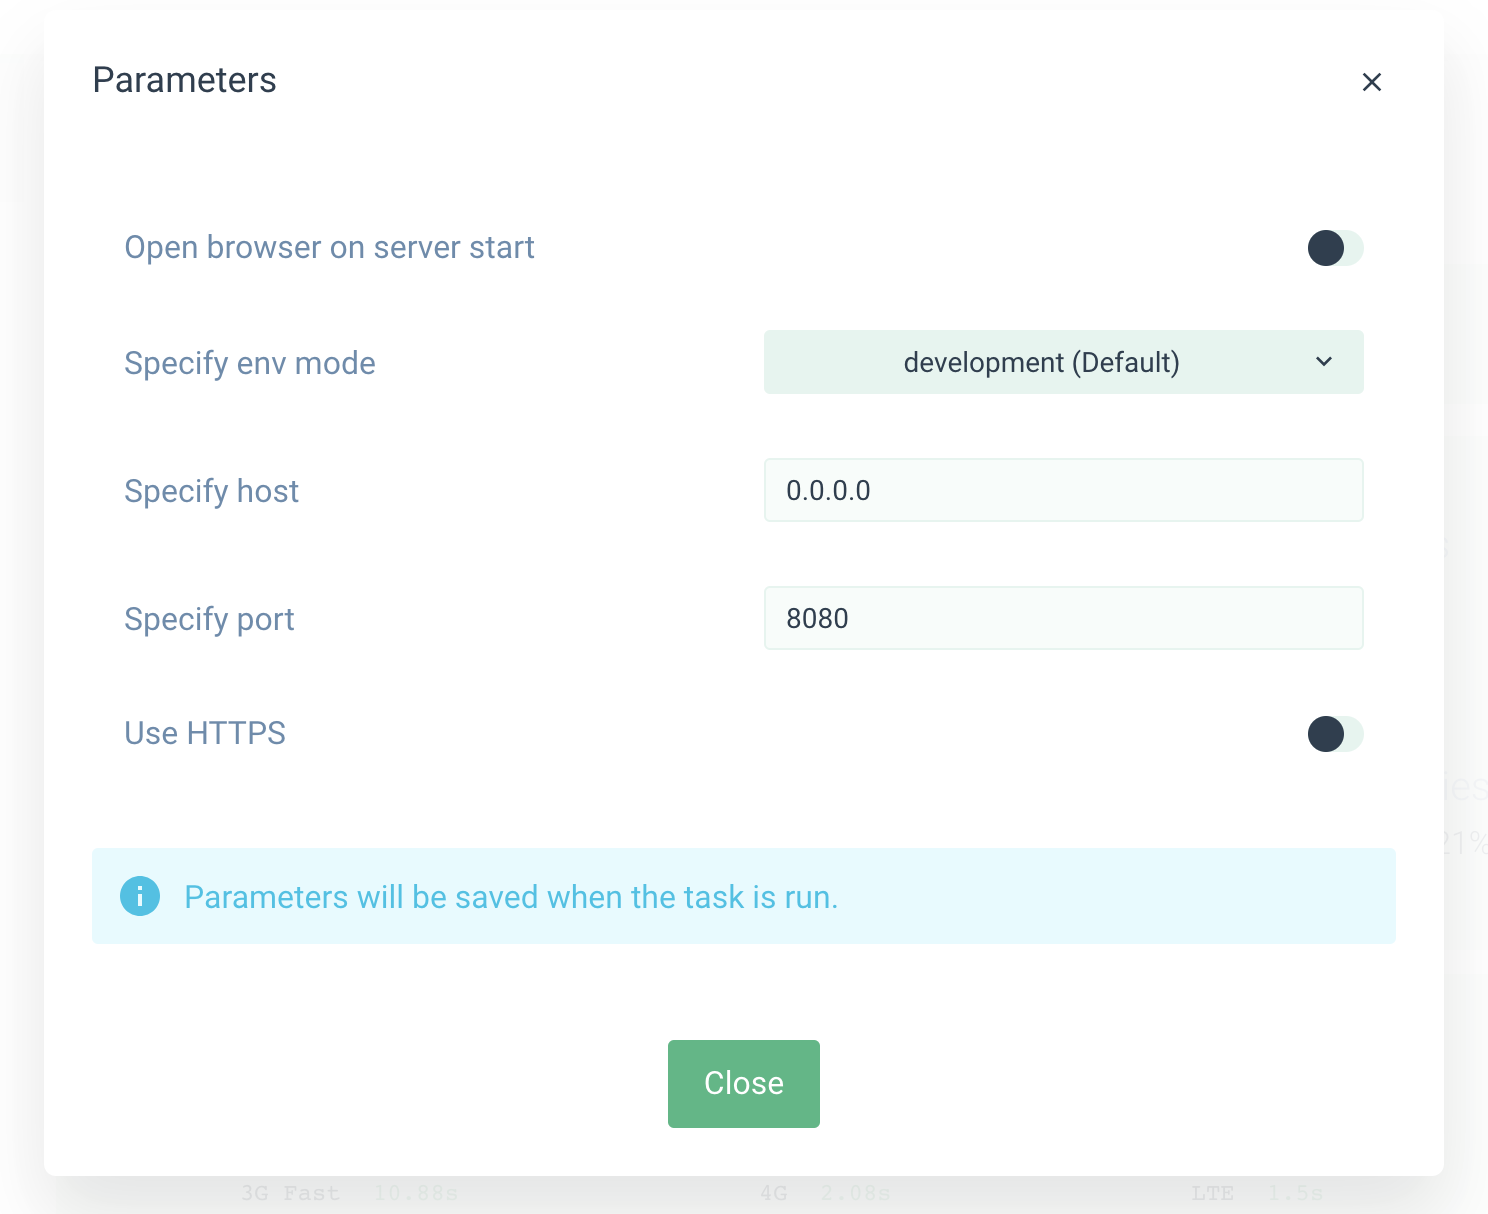
不仅如此,任务还可以配置访问的域名,是否开启https,对应的开发模式
6. 插件更新直观体验
有些更新会有一个感叹号提示该版本可能不稳定,如图所示
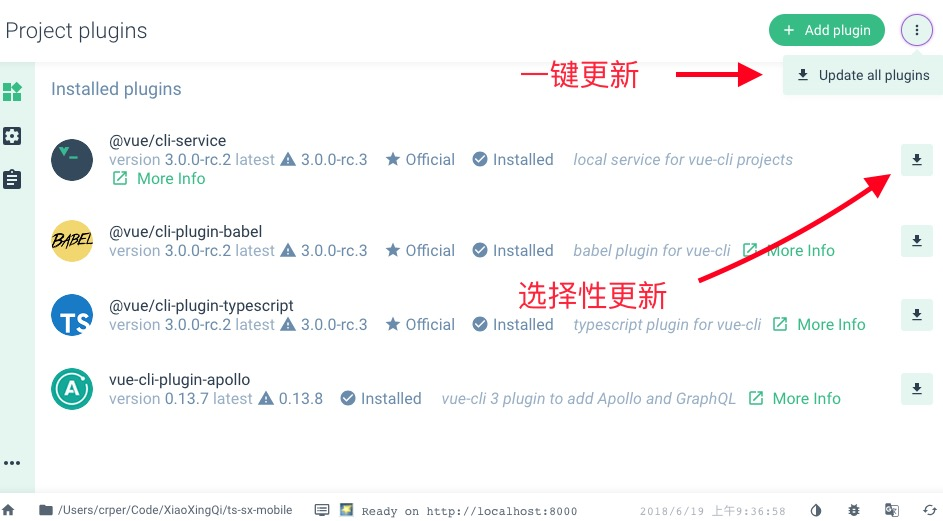
点击更新后显示一个遮罩层,就是终端在安装;
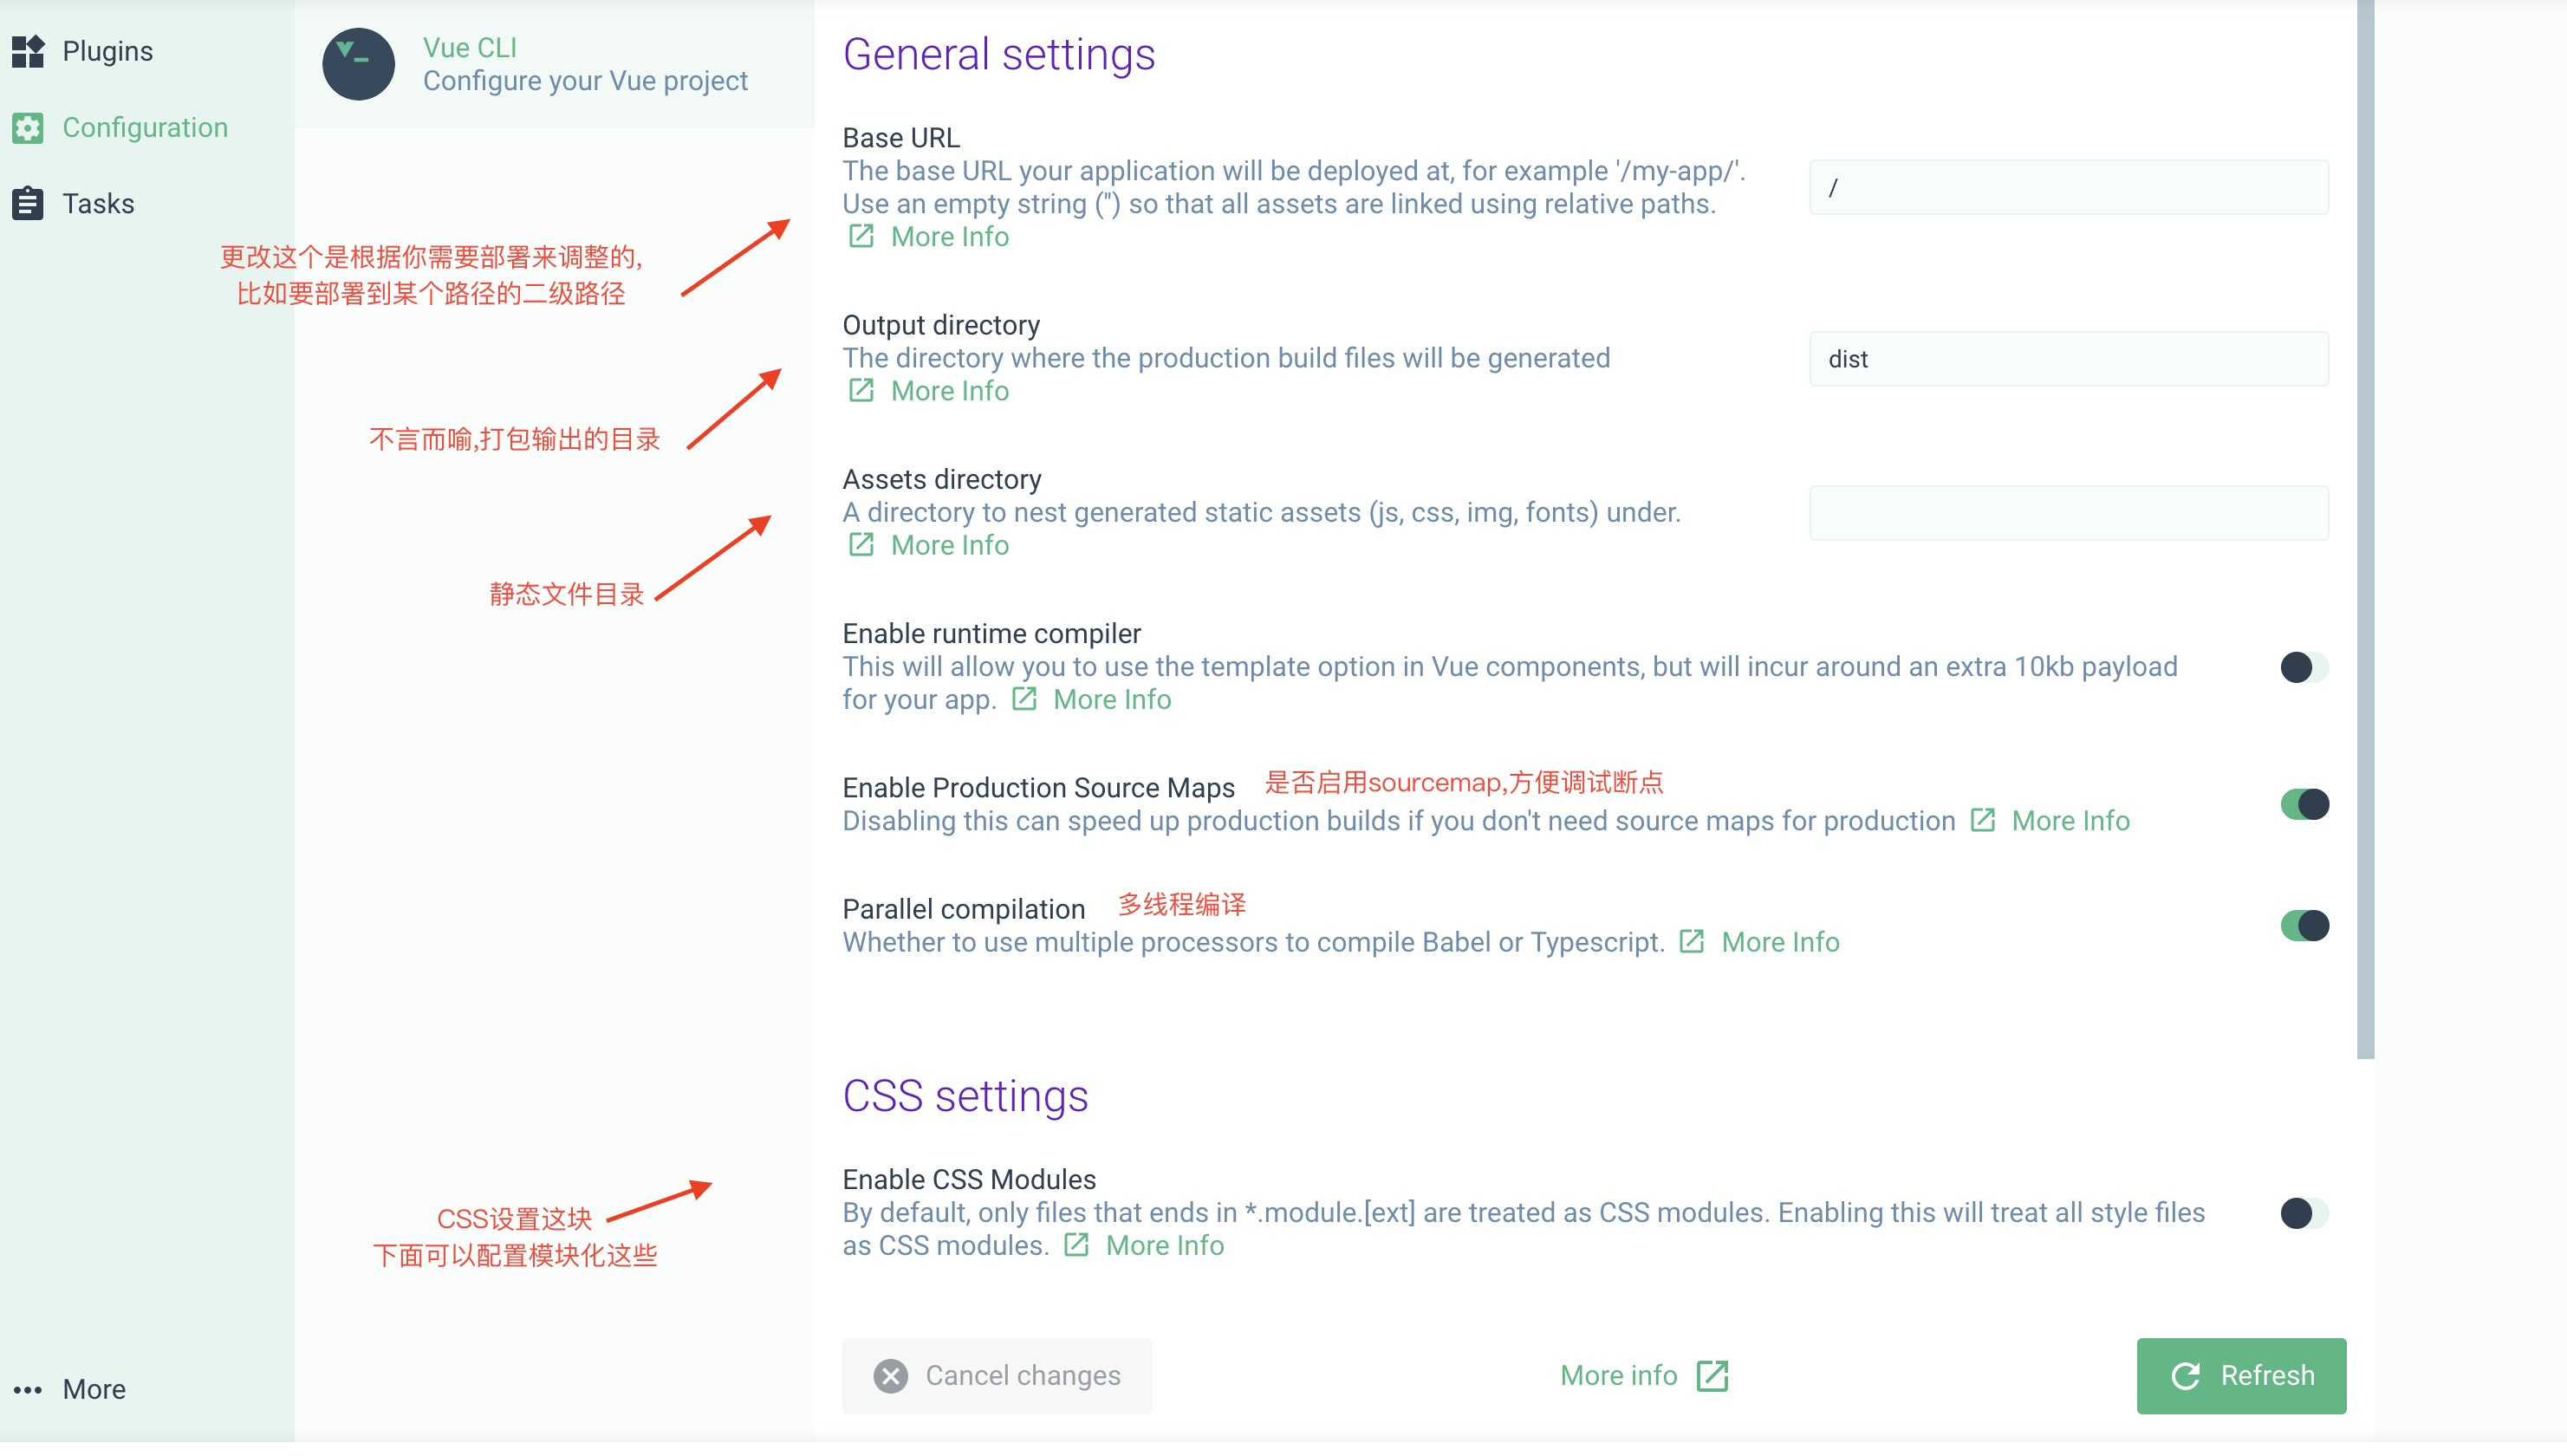
7. 项目配置的可视化
目前这块我看了下还是不大完善的,需要详细配置的还是需要阅读官方脚手架的文档,写一个vue.config.js,
等会我会稍微点一下,也很容易
vue-cli 3的配置文件引入了一个全局配置文件的概念,在根目录新建一个vue.config.js,
比如我们最常用的接口的反向代理,多线程编译(提升编译速度,只有当内核大于1的时候)
vue.config.js
module.exports = {
  devServer: {
    proxy: {
      '/': {
        target: 'xxx'
        changeOrigin: true
        // pathRewrite: {
        //     '^/api': '/'
        // }
      }
    }
  },
  parallel:true,

};
你在项目初始化的还可以选择.babelrc,postcss这类插件文件独立出来,也能集中在package.json
所以说,配置最多分三块,最少是集中化
- 独立文件这类,
.babelrc,.postcssrc.js vue.config.jspackage.json
更多的配置请查阅官方手册: Vue Cli
书写demo
想知道大概写起来是什么样的么..
我拿了一个下载页面来改了改,可以跑起来大概是这样的
产品的url我就不展示了,统一用xxx
- AppDownload.vue
<template>
  <div class="page">
    <div class="appicon">
      <img src="../../assets/share/yourAppIcon@2x.png">
      <p>
        <span>真实的
        </span><br>
        <span>才是最精彩的</span>
      </p>
    </div>
    <wechat-browser-check :check-open="checkBrowser" />
    <a
      :href="downloadUrl"
      class="goto-download"
      @click="checkWXPlatform">{{ storeName }}</a>
  </div>
</template>

<script lang="ts">
    import {Component, Vue} from 'vue-property-decorator';

    import WechatBrowserCheck from '@/components/WechatBrowserCheck.vue';

    import service from '@/api/index.ts';

    const device: any = require('current-device').default;


    @Component({
        components: {
            WechatBrowserCheck,
        },
        metaInfo() {
            return {
                title: 'App Download', // set a title
                titleTemplate: '%s -  Welcome!', // title is now "My Example App - Yay!"
                htmlAttrs: {
                    lang: 'zh'
                }
            }
        }
    })
    export default class AppDownload extends Vue {

        private checkBrowser: boolean = false;// 检测浏览器运行 UA
        private downloadUrl: string = ''; // 下载链接
        private storeName: string = 'APP 下载'; // 商店名称
        private country: string = 'CN' // 国家

        created() {
            // 若是 PC 端
            if (device.desktop()) {
                window.location.href = 'xxx';
            }
            this.fetchBasicInfo();
        }

        checkWXPlatform():void {
            this.checkBrowser = true;
        }

        async fetchBasicInfo() {
            try {
                const [
                    country = 'CN',
                    downloadUrl = 'xxx'
                ] = await Promise.all([
                    service
                        .get('/country')
                        .then((res: any) => res.state === 200 && res.data),
                    service
                        .get('/android_v')
                        .then((res: any) => res.state === 200 && res.data.android_apk_url)
                ]);
                this.getMobileApp(country, downloadUrl);
            } catch (error) {
                console.log('网络错误');
            }
        }

        getMobileApp(country: string, downloadUrl: string): void {
            if (device.ios() || device.ipad() || device.iphone()) {
                country === 'CN'
                    ? (this.storeName = 'IOS 下载')
                    : (this.storeName = 'App Store');
                this.downloadUrl =
                    'xxx';
            }

            // 获取下载链接
            if (
                device.android() ||
                device.androidPhone() ||
                device.androidTablet()
            ) {
                this.country === 'CN'
                    ? (this.storeName = 'Android 下载')
                    : (this.storeName = 'Google Play');
                this.downloadUrl = downloadUrl;

            }
        }


    }
</script>

<style scoped lang="scss">
    .page {
      position: relative;
      -webkit-overflow-scrolling: touch;
      height: 100%;
      background: url(../../assets/share/mountainWater.png) no-repeat left top;
      background-size: cover;

      .appicon {
        position: absolute;
        top: 65px;
        left: 56px;

        width: 251px;
        img {
          display: block;

          width: 150px;
          height: 150px;

          border-radius: 22px;
          box-shadow: 0 0 1px rgba(32, 89, 138, 0.31);
        }
        p {
          margin: 35px 0;

          text-align: left;
          letter-spacing: 1px;

          color: #205b8a;

          font-size: 24px;
          font-weight: 600;
          font-stretch: normal;
          line-height: 15px;
          > span {
            display: block;

            padding: 5px 0;

            white-space: nowrap;
          }
        }
      }

      .goto-download {
        position: absolute;
        z-index: 3;
        bottom: 81px;
        left: 50%;

        display: block;

        width: 638px;
        height: 87px;

        transform: translateX(-50%);
        text-align: center;
        text-decoration: none;

        color: #fff;
        border-radius: 100px;
        background: rgba(70, 55, 61, 1);
        box-shadow: #000 0 2px 4px;

        font-size: 32px;
        line-height: 87px;
      }
    }
</style>
- WechatBrowserCheck.vue
<template>
    <div v-if="showIntro"
         class="intro-layer">
        <div class="desrc">
            <p class="desrc-tips">请点击右上角的选择浏览器打开,谢谢!</p>
        </div>
    </div>
</template>

<script lang="ts">

    import {Component, Emit, Model, Prop, Vue, Watch} from 'vue-property-decorator'

    @Component({})
    export default class WechatBrowserCheck extends Vue {
        private deviceType: string = ''; // 设备类型
        private showIntro: boolean = false;


        @Prop({default: 'wechat'})
        types!: String;

        @Prop({default: false})
        checkOpen!: Boolean;

        @Watch('checkOpen')
        oncheckOpenChanged(val: string, oldVal: string) {
            if (val) {
                this.openAlert();
            }
        }


        openAlert() {
            if (this.checkOpen) {
                if (Array.isArray(this.types)) {
                    this.types.map(item => {
                        if (item === this.deviceEnvCheck()) {
                            this.showIntro = true;
                        }
                        return item;
                    });
                } else {
                    this.deviceEnvCheck() === this.types
                        ? (this.showIntro = true)
                        : (this.showIntro = false);
                }
                console.log('deviceType:' + this.deviceEnvCheck(), 'types:' + this.types);
            }
        }

        deviceEnvCheck() {
            // 检测需要弹窗的设备类型
            // 获取访问的user-agent
            let ua: string = navigator.userAgent.toLowerCase() || window.navigator.userAgent.toLowerCase();

            if (/MicroMessenger/gi.test(ua)) {
                return 'wechat';
            }
            if (/WeiBo/gi.test(ua)) {
                return 'weibo';
            }
            if (/QQ/gi.test(ua)) {
                return 'qq';
            }
            if (/(iPhone|iPad|iPod|iOS)/gi.test(ua)) {
                return 'ios';
            }
        }
    };
</script>

<style lang="scss" scoped>
    .intro-layer {
        position: fixed;
        z-index: 9999;
        top: 0;
        left: 0;

        width: 100%;
        height: 100%;

        background-color: #f2f2f2;
        background-image: url(../assets/share/openbrowser.png);
        background-repeat: no-repeat;
        background-position: center 80px;
        background-size: 100% auto;
        .desrc {
            width: 90%;
            height: auto;
            margin: 10px auto;
            padding: 10px;

            border-radius: 10px;
            background-color: #fff;
            .desrc-tips {
                font-size: 15px;
            }
        }
    }
</style>
编码体验目前来说并不好,周边库还不够完善,需要迭代一段时间才有改善;
目前class书写风格是依赖vue-class-component来实现[装饰器]
一些特性(prop,watch这些)也是依赖一个库vue-property-decorator[装饰器]
jsx结合的也不是很彻底,需要做一些妥协,和react的jsx也有所差异
总结
总体的感觉是很不错的,感觉以后其他的脚手架也会引入这类的WEB UI,大大改善了体验;
不过目前来说,用ts + 装饰器结合Vue的开发体验还不是很好,因为有一些BUG。
对JSX的支持,并不完善,和react的jsx也有所差异
目前来说ts+装饰器组合配合最好的是angular, 从ng2开始就引入了,现在都ng6了;
有不对之处请留言,会及时修正,谢谢阅读
