

WWDC 2018 Session 213: CarPlay Audio and Navigation Apps
查看更多 WWDC 18 相关文章请前往 老司机x知识小集xSwiftGG WWDC 18 专题目录
作者:Lefe_x
CarPlay 从出现至今,逐步开放了它的 API,让第三方 APP 可以轻松地接入,这样当你在开车的时候就可以享受到不一样的开车体验。就在今年(2018),苹果允许第三方导航 APP 使用 CarPlay,这样就可以把第三方的导航数据同步到 CarPlay 上,为此在 iOS12 中新增了 CarPlay framework,是不是很酷。与此同时苹果优化了 CarPlay 对 Audio APP 的支持。在这个 session 中,苹果主要从以下三方面进行讲述:
- 音频 APP 中 CarPlay 的性能提升
- 导航 APP 中新增的 CarPlay 框架
- Guidance
音频 APP 中 CarPlay 的性能提升
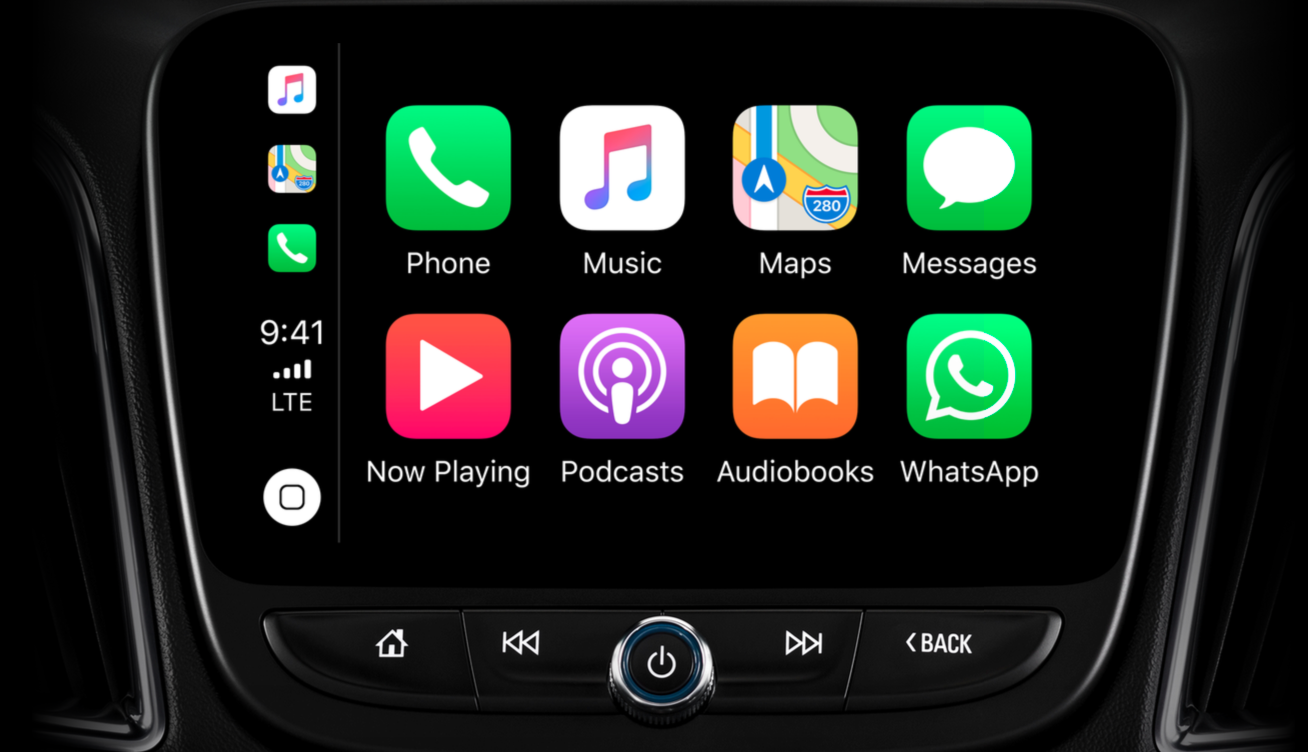
在开始之前,我们需要了解下 CarPlay 的基本特性,比如触摸屏、旋转旋钮和触摸板输入、左右切换按钮、夜间模式和屏幕大小等。这些基本的特性和我们使用手机一样,通过触摸屏和 CarPlay 进行交互。其实关键点是可以把手机上的数据传输到 CarPlay 屏幕上,由于 CarPlay 提供了模版式的 UI,这样就不需要适配各种车型。 目前 CarPlay 中主要支持了以下功能:
- 通过 Automaker 来查看天气预报,收音机,警告等;
- 通过 Messaging 进行发送接收消息;
- 通过 VoIP calling 进行通话;
- 通过 Audio 来播放音乐听广播等;
- 通过 Navigation 进行导航。
而我们今天的主角是 Audio 和 Navigation。
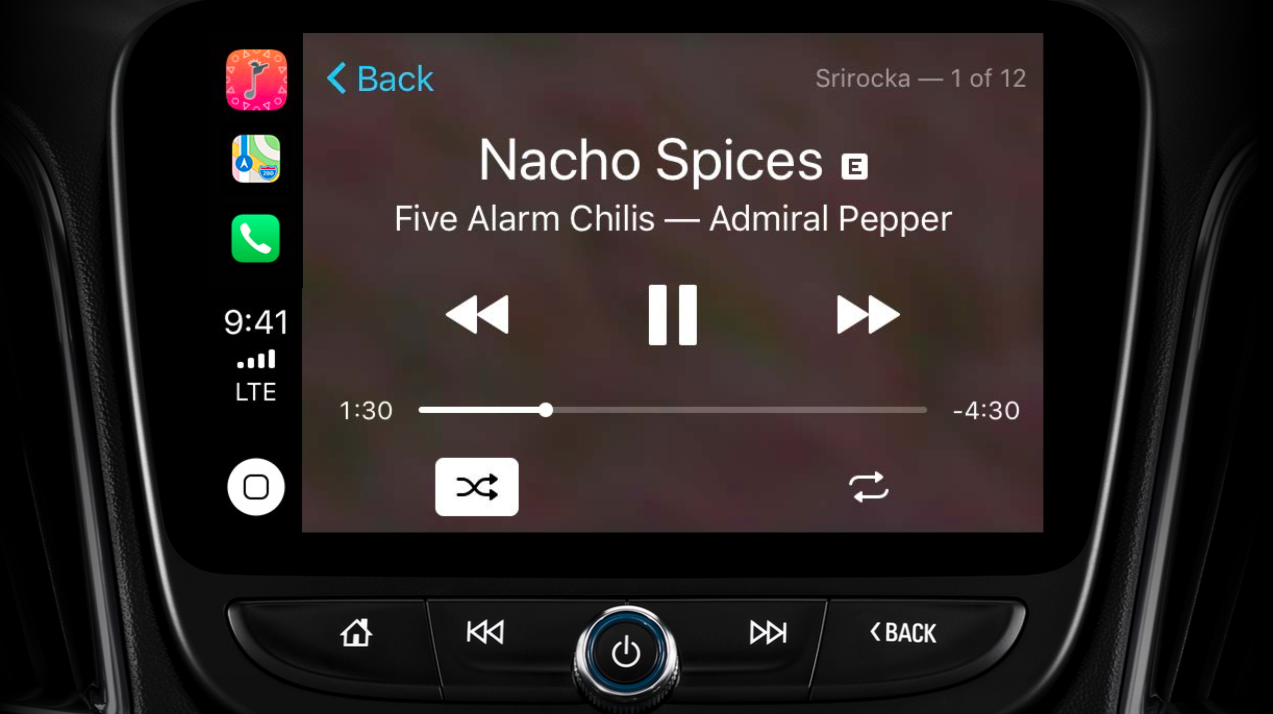
关于 CarPlay 中的音频 APP,官方以一个名叫 Srirocka 的 APP 来进行讲解。在开发一款音频 APP 时,我们可以让它支持 CarPlay,只需要使用 MediaPlayer 这个框架中的 API 即可,它可以在所有的 CarPlay 系统中良好的运行,我们只需要提供给 CarPlay 需要的数据即可。
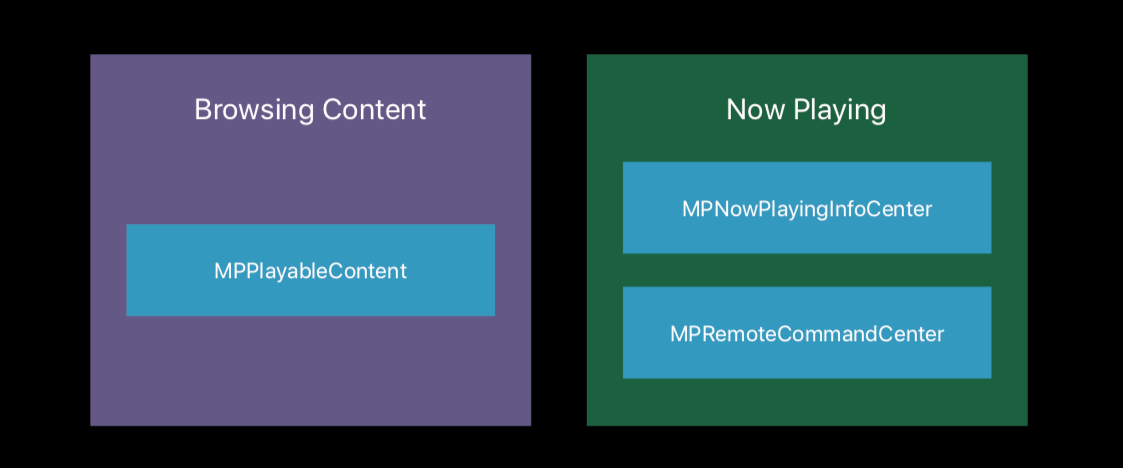
CarPlay 中主要的 API 有三部分,如图所示。MPPlayableContent 负责展示内容,比如播放某个专辑需要显示专辑中的音频列表。显示的数据需要通过 MPPlayableContentManager 来设置他的 dataSource 和 delegate,而这些和 UITableView 非常像;MPNowPlayingInfoCenter 负责显示正在播放的音频信息,比如音频名字,作者,时长等信息;MPRemoteCommandCenter 指令中心,负责接收指令,比如在 CarPlay 中点击了暂停按钮,那么在手机 APP 中需要执行暂停操作。
具体代码可以参考:
// 设置 MPPlayableContentManager 的 data source 和 delegate,为
// MPPlayableContentManager 提供数据
[MPPlayableContentManager sharedContentManager].dataSource = self;
[MPPlayableContentManager sharedContentManager].delegate = self;

// 通过 MPNowPlayingInfoCenter 设置正在播放的音乐的基本信息
[MPNowPlayingInfoCenter defaultCenter].nowPlayingInfo = @{ MPMediaItemPropertyAlbumTitle : @"草原"};

// 响应远程指令
MPRemoteCommandCenter *commandCenter = [MPRemoteCommandCenter sharedCommandCenter];
commandCenter.playCommand.enabled = YES;
[commandCenter.playCommand addTarget:self action:@selector(playCommendActuon)];
以上这些 API 在 iOS12 之前已经提供给了开发者,而在 iOS12 中主要是做了一些优化:
- 提升了
MPPlayableContent的性能; - 提升了启动速度;
- 提升了动画流畅度;
- 提升了 CarPlay 与 APP 的交互性。
苹果建议开发者仅仅在需要的时候调用 MPPlayableContentManager 的 reloadData 方法,以及可以使用 beginUpdates 和 endUpdates 来同时刷新多个数据。
苹果特别强调,开发者需要注意的一些场景,比如连接到 CarPlay 的 iPhone 被密码锁定,弱网情况等。开发者需要预处理一些要播放的内容,比如当要播放下一首音乐的时候,需要预先加载,这样可以有效避免网络异常时出现的错误。可以在下面这个方法来处理预先加载的音频。
- (void)beginLoadingChildItemsAtIndexPath:(NSIndexPath *)indexPath completionHandler:(void (^)(NSError * _Nullable))completionHandler
{
    completionHandler(nil);
}
导航 APP 中新增的 CarPlay 框架
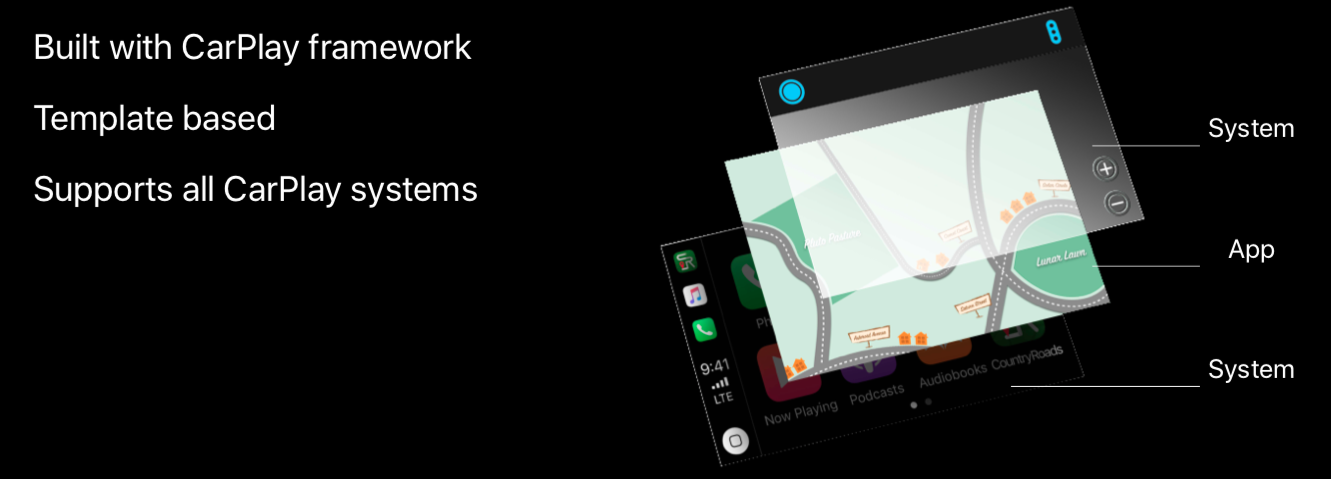
在苹果今年发布的 iOS12 中,CarPlay 可以支持第三方导航,比如谷歌地图。而在 Xcode 10 中可以找到 CarPlay Framework。你可以在导航 APP 中自定义界面来显示导航信息。苹果提供了很多模版来显示不同的视图,开发者需要做的就是把需要展示的数据交给模版,这样 CarPlay 就会显示你所定义的数据。这种灵活性可以让你专注于 CarPlay 的体验而不需要花费力气适配所有支持 CarPlay 的车型。你只需花费一点点精力即可让你的导航 APP 拥有 CarPlay 能力。
在学习 CarPlay 框架的时候,我们需要了解这个框架中各个类的作用,为方便理解,小编(@Lefe_x)做了一个图:
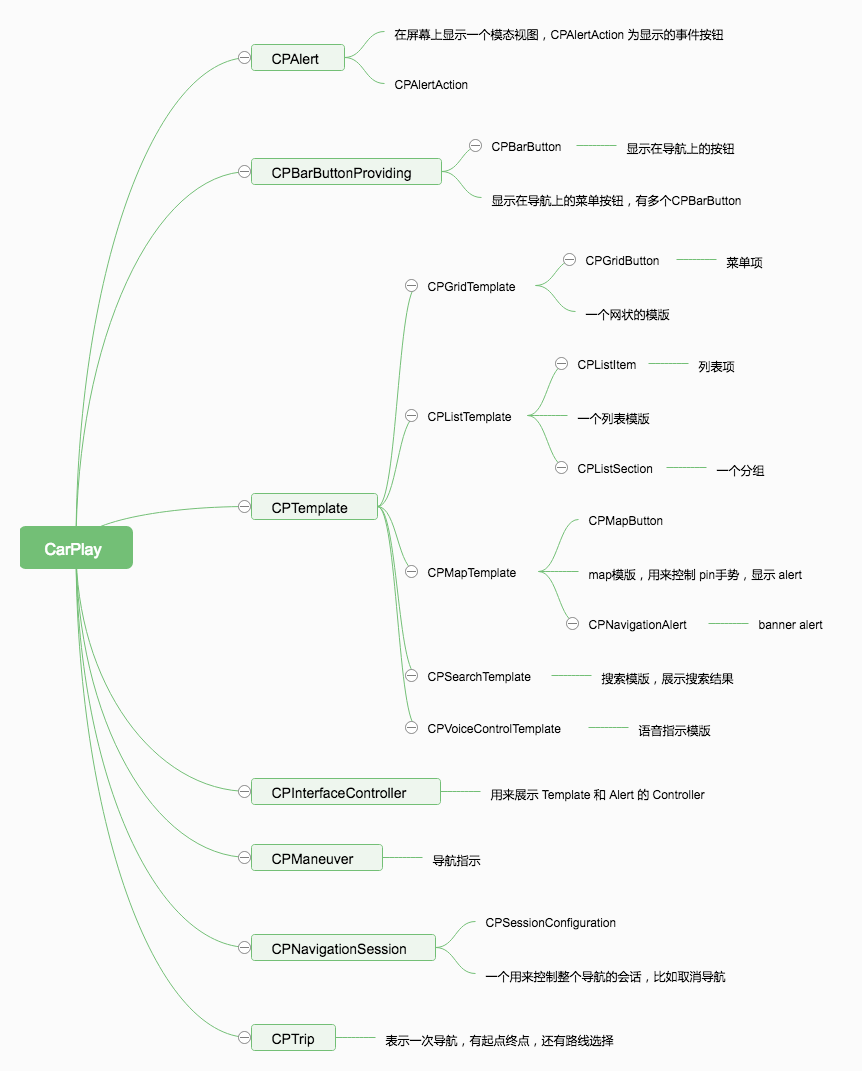
其实看完上面的图,我们可以知道 CarPlay 这个框架所做的事就是显示 UI 到 CarPlay 屏幕上,而这些 UI 都提供了对应的模版,只要按着这些模版创建不同的 UI 即可适配所有的车型。
我们下面跟着代码来看看 CarPlay 的使用:
首先需要实现 CPApplicationDelegate,这个代理主要用来监听与 CarPlay 连接成功和断开连接;监听用户点击 Alert 的事件。
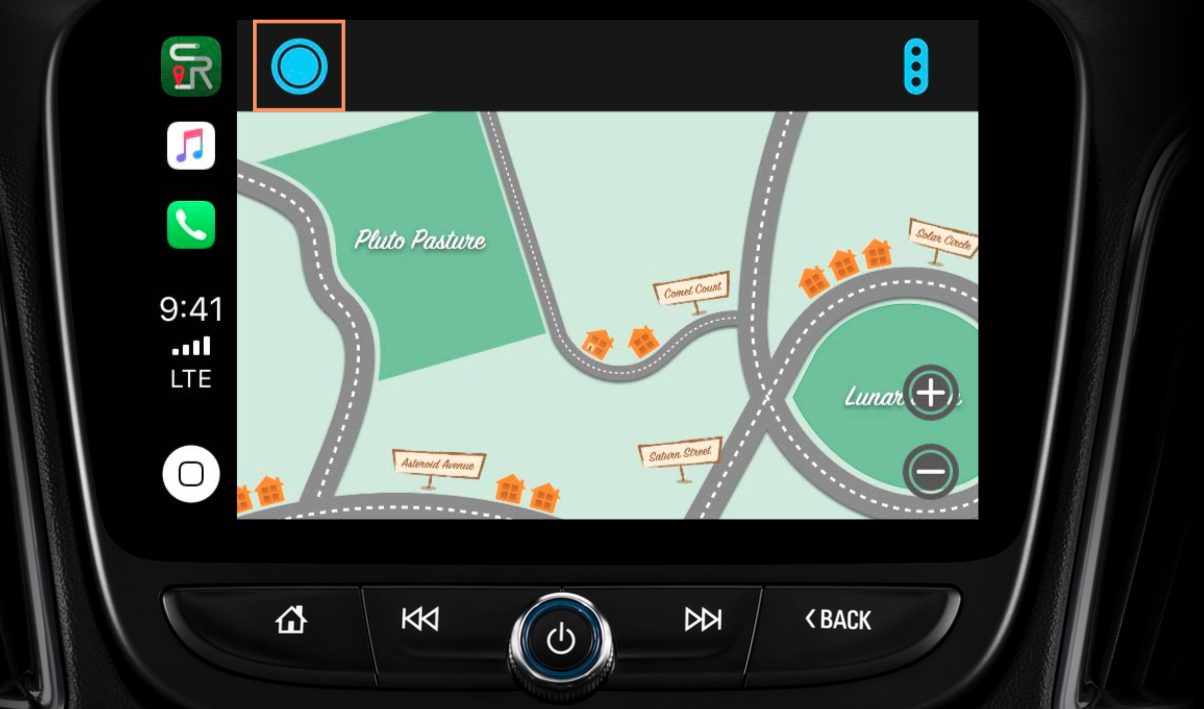
而这一切需要 CPMapTemplate 来承载整个地图界面,它是一个根模版。CPMapTemplate 的作用可以用来管理 Pin 手势,显示导航提示,显示导航条或地图按钮。如下图所示:
// CarPlay 与 APP 连接成功后的回调
- (void)application:(nonnull UIApplication *)application didConnectCarInterfaceController:(nonnull CPInterfaceController *)interfaceController toWindow:(nonnull UIWindow *)window {

    self.interfaceController = interfaceController;
    self.carWindow = window;

    UIViewController *rootVC = [UIViewController new];
    window.rootViewController = rootVC;

    // 创建 rootTemplate,CPMapTemplate 主要用来处理手势,显示导航提示,引导
    CPMapTemplate *rootTemplate = [self createRootTemplate];
    [self.interfaceController setRootTemplate:rootTemplate animated:NO];
}

// CarPlay 与 APP 端开链接后的回调
- (void)application:(nonnull UIApplication *)application didDisconnectCarInterfaceController:(nonnull CPInterfaceController *)interfaceController fromWindow:(nonnull UIWindow *)window {

}

// 创建 CPMapTemplate
- (CPMapTemplate *)createRootTemplate
{
    CPMapTemplate *template = [[CPMapTemplate alloc] init];
    CPBarButton *categorySearchButton = [[CPBarButton alloc] initWithType:CPBarButtonTypeImage handler:^(CPBarButton * _Nonnull barButton) {
        [self displayFavoriteCategories];
    }];
    categorySearchButton.image = [UIImage imageNamed:@"Favorites"];

    CPBarButton *trafficButton = [[CPBarButton alloc] initWithType:CPBarButtonTypeImage handler:^(CPBarButton * _Nonnull barButton) {
        ;
    }];
    trafficButton.image = [UIImage imageNamed:@"traffic"];
    // 导航上添加了两个按钮
    template.trailingNavigationBarButtons = @[trafficButton, categorySearchButton];
    return template;
}
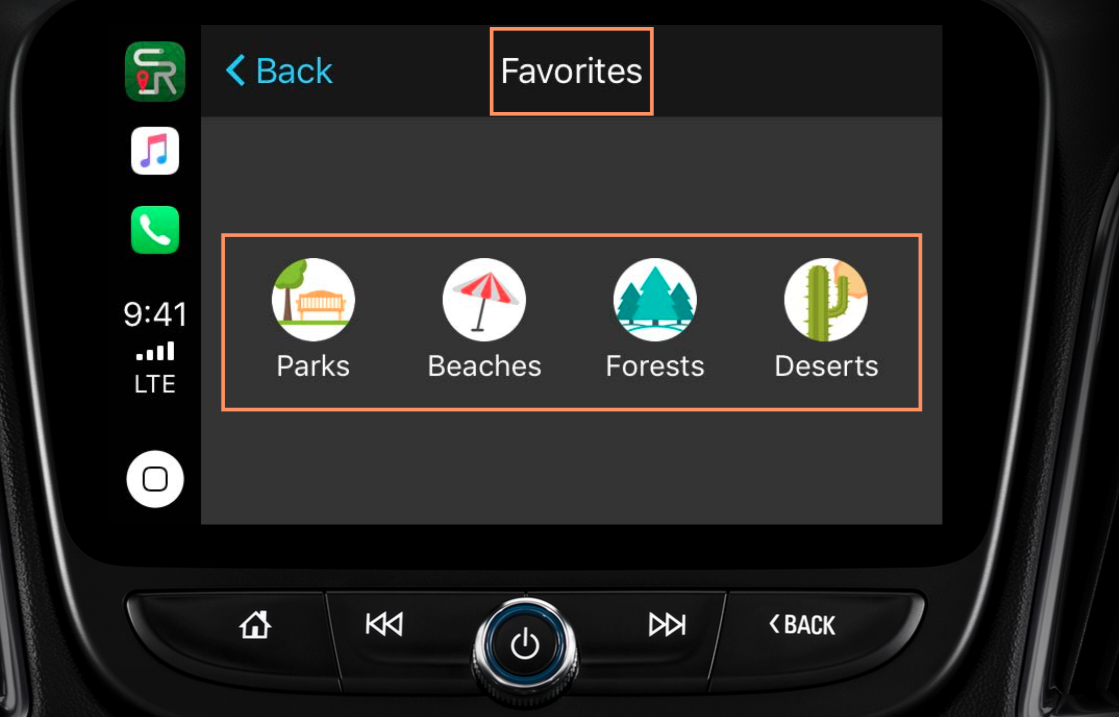
CPGridTemplate 是一个网状的模版,类似于 UICollectionView。最多只显示 8 个按钮,它适合显示多行多列的菜单。
// 创建 CPGridTemplate,它会有多个 CPGridButton
- (void)displayFavoriteCategories
{
    CPGridButton *parksButton = [[CPGridButton alloc] initWithTitleVariants:@[@"Parks"] image:[UIImage imageNamed:@"Parks"] handler:^(CPGridButton * _Nonnull barButton) {
        [self searchForNearbyParks];
    }];

    CPGridButton *beachesButton = [[CPGridButton alloc] initWithTitleVariants:@[@"beaches"] image:[UIImage imageNamed:@"beaches"] handler:^(CPGridButton * _Nonnull barButton) {

    }];

    CPGridButton *forestsButton = [[CPGridButton alloc] initWithTitleVariants:@[@"forests"] image:[UIImage imageNamed:@"forests"] handler:^(CPGridButton * _Nonnull barButton) {

    }];

    CPGridButton *desertsButton = [[CPGridButton alloc] initWithTitleVariants:@[@"deserts"] image:[UIImage imageNamed:@"deserts"] handler:^(CPGridButton * _Nonnull barButton) {

    }];

    NSArray *buttons = @[parksButton, beachesButton, forestsButton, desertsButton];

    CPGridTemplate *template = [[CPGridTemplate alloc] initWithTitle:@"Favorites" gridButtons:buttons];

    [self.interfaceController pushTemplate:template animated:YES];
}
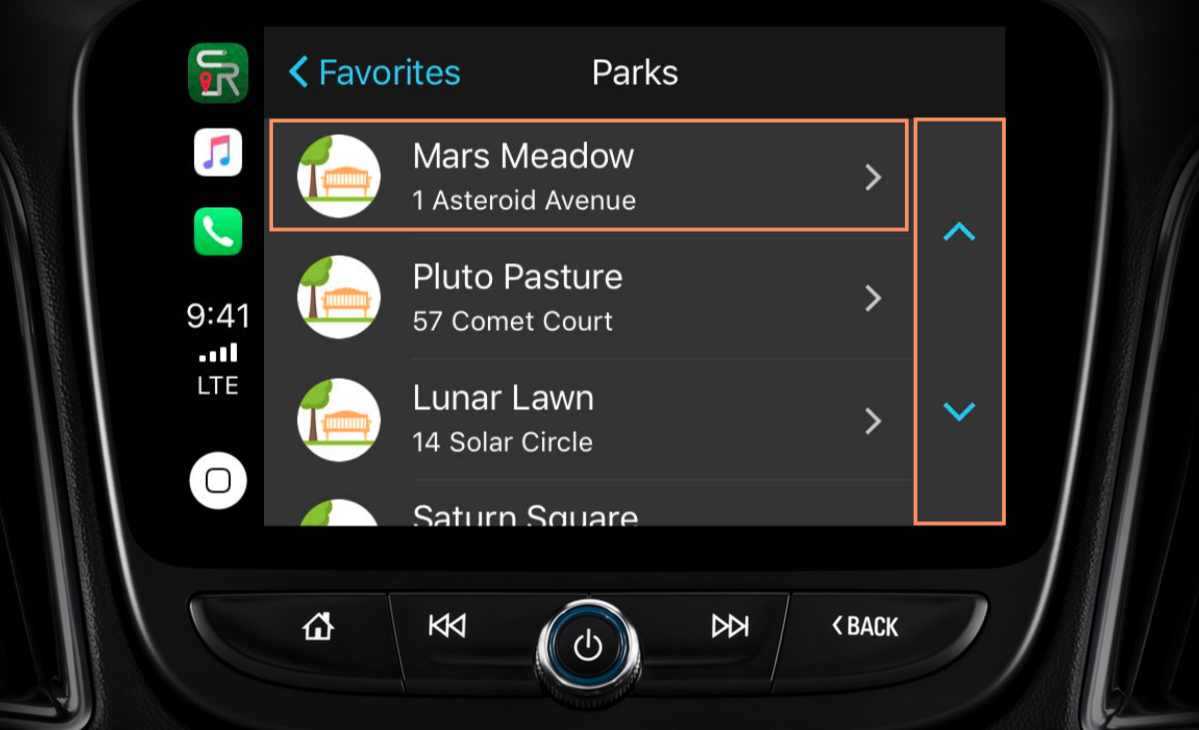
CPListTemplate 和 UITableView 很相似,它由一个或多个分组组成,而每一个分组使用 CPListSection 表示,CPListSection中存放的是 CPListItem,可以设置它的标题,图片,副标题。它适合用于显示列表类型的 UI,犹如 UITableView。
- (void)displayNearbyParks:(NSArray<SearchResult *> *)results
{
    NSMutableArray *listItems = [NSMutableArray array];
    for (int i = 0; i < results.count; i++) {
        SearchResult *item = results[i];
        [listItems addObject:[[CPListItem alloc] initWithText:item.name detailText:item.address image:item.image]];
    }

    CPListSection *section = [[CPListSection alloc] initWithItems:listItems];
    CPListTemplate *listTemplate = [[CPListTemplate alloc] initWithSections:@[section]];
    listTemplate.title = @"Parks";
    listTemplate.delegate = self;

    [self.interfaceController pushTemplate:listTemplate animated:YES];
}
CPSearchTemplate 用来搜索目的地,并显示搜索结果。
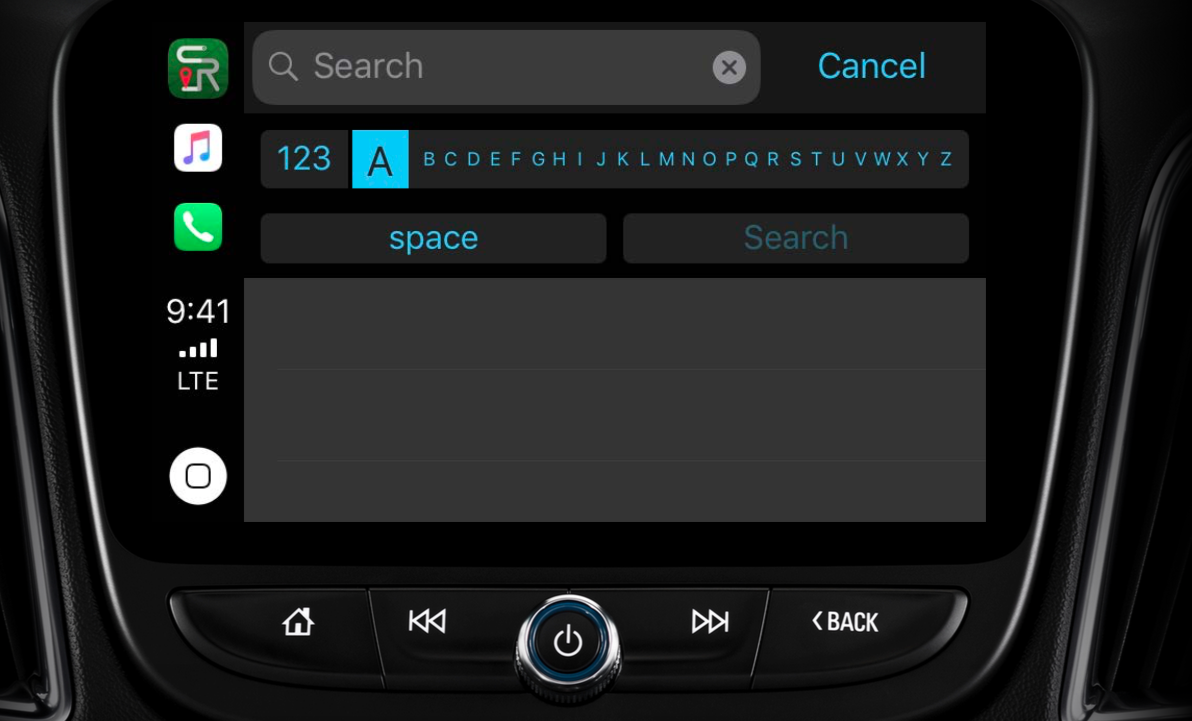
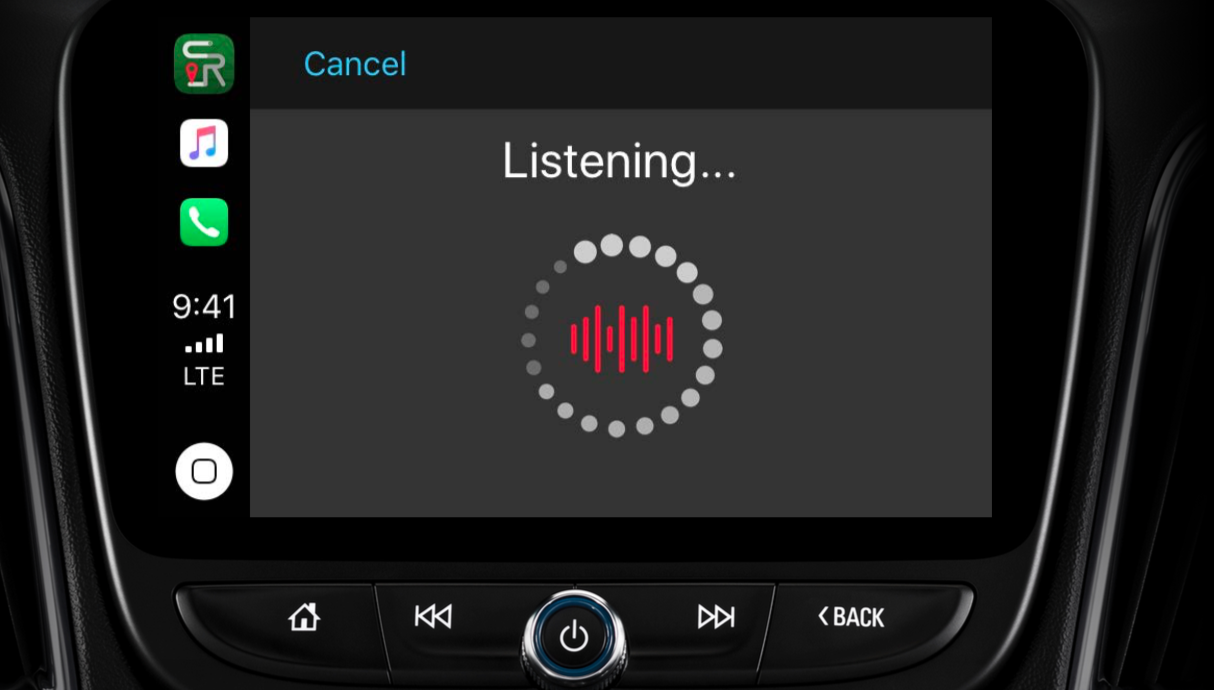
CPVoiceControlTemplate 一个语音控制的模版,用于语音搜索样式。
Guidance
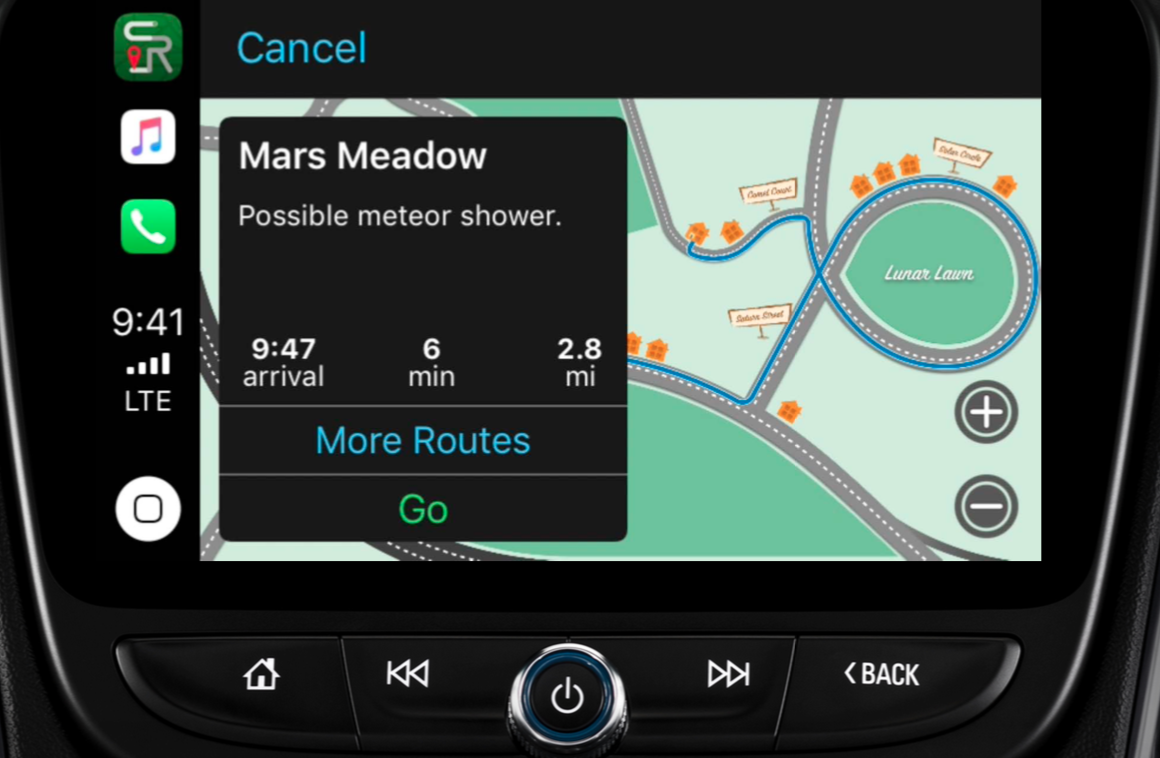
当用户选择一个目的地开启导航后,会弹出一个导航预览,用户确认后开始导航,直到导航结束。下面这张图就是整个导航的流程:

当用户选择好目的地后,这时 CarPlay 会显示一个预览,用户如果点击“确定”,导航便开始。具体可以查看代码:
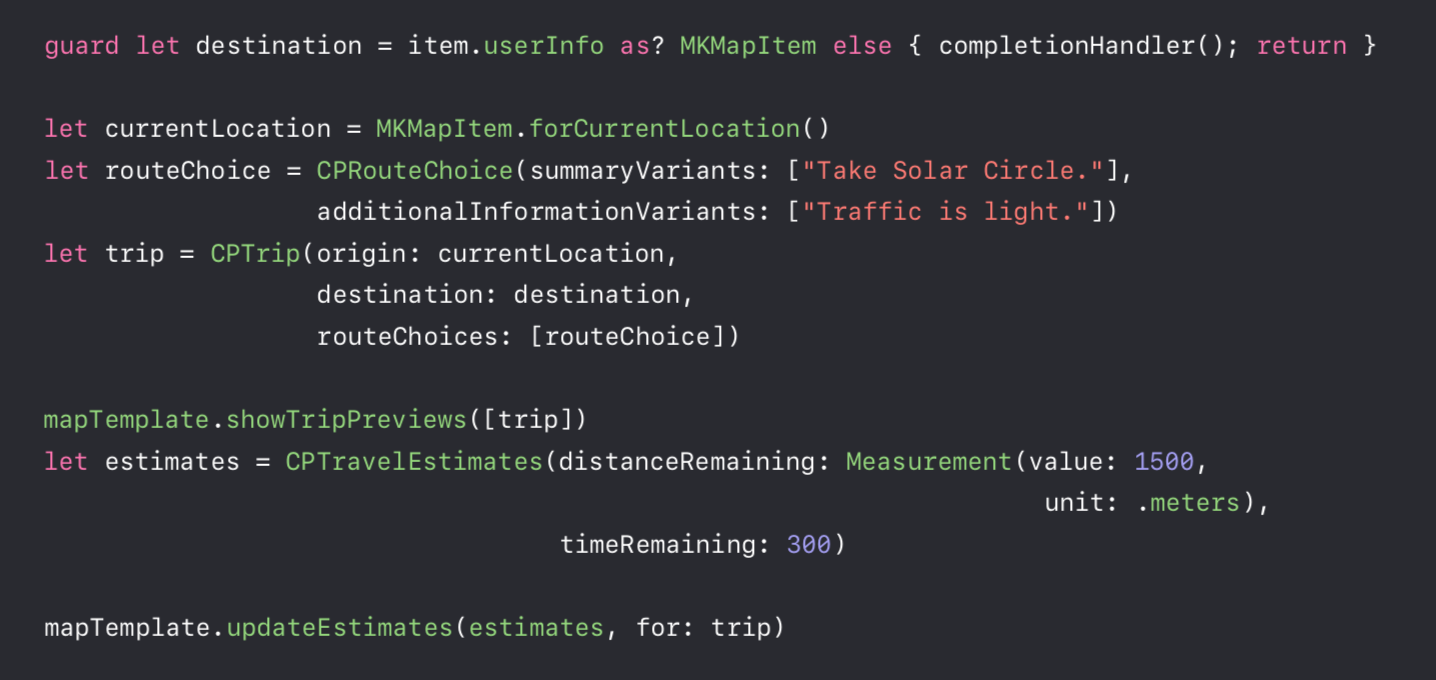
导航开始执行后,下面这个代理方法会执行。我们需要在 CPMapTemplateDelegate 中处理。这个时候需要开启 CPNavigationSession 它表示一次导航会话,可以通过 CPNavigationSession 对这次的导航进行操作,比如取消本次导航。
- (void)mapTemplate:(CPMapTemplate *)mapTemplate startedTrip:(CPTrip *)trip usingRouteChoice:(CPRouteChoice *)routeChoice
{
    [mapTemplate hideTripPreviews];

    // 当用户选择一个路线后将执行
    CPNavigationSession *session = [mapTemplate startNavigationSessionForTrip:trip];
    [session pauseTripForReason:CPTripPauseReasonLoading];
}
可以通过 CPMapTemplateDelegate 代理方法来控制显示当前导航的状态。
- (BOOL)mapTemplate:(CPMapTemplate *)mapTemplate shouldShowNotificationForManeuver:(CPManeuver *)maneuver {return YES;}

- (BOOL)mapTemplate:(CPMapTemplate *)mapTemplate shouldUpdateNotificationForManeuver:(CPManeuver *)maneuver withTravelEstimates:(CPTravelEstimates *)travelEstimates { return YES;}

- (BOOL)mapTemplate:(CPMapTemplate *)mapTemplate shouldShowNotificationForNavigationAlert:(CPNavigationAlert *)navigationAlert{
    return YES; }
总结
总的来说,CarPlay 今年最大的改动就是可以在导航 APP 中使用 CarPlay,提升了 Audio APP 在 CarPlay 中的性能。如果你正在做导航类型的 APP,可以尝试支持 CarPlay。
