本文是 WWDC 2018 Session 225 读后感,其视频及配套 PDF文稿 地址如下 A Tour Of UICollectionView。
这篇文章难度不大,由易到难,逐层深入,是一篇很好的 Session。全文总计约2500字,通读全文花费时间大约15分钟。
看完这篇 Session,给我的直观感受是这篇名为 A Tour Of UICollectionView 的文章,是围绕着一个 CollectionView 的案例,对自定义布局以及其性能优化、数据操作、动画做的一次探讨。虽然没有新增的 API 和特性,但是实际意义蛮大。
我们也按照 Session 的思路,将本文主要分为三个模块:
- CollectionView 概述
- 布局(自定义 Layout)
- 数据的刷新、动画
CollectionView 想必各位已经不陌生了,在我们的日常开发中,它的身影随处可见。如果还有小伙伴对它不熟悉,可以看看之前的 Session :
- WWDC 2016 - What`s New In CollectionView In iOS 10 。
- WWDC 2017 - Drag and Drop with Collection and Table View。
如果我们想搭建一个如下图的 App ,需要涉及到三点:布局、刷新、动画,我们今天的话题也是围绕着这三点展开。

CollectionView 概述
CollectionView 的核心概念有三点:布局(Layout)、数据源(Data Source)、代理(Delegate)。
UICollectionViewLayout
UICollectionViewLayout 负责管理 UICollectionViewLayoutAttributes,一个 UICollectionViewLayoutAttributes 对象管理着一个 CollectionView 中一个 Item 的布局相关属性。包括 Bounds、center、frame 等。同时要注意在当 Bounds 在改变时是否需要刷新 Layout, 以及布局时的动画。
UICollectionViewFlowLayout
UICollectionViewFlowLayout 是 UICollectionViewLayout 的子类,是系统提供给我们一个封装好的流式布局的类。
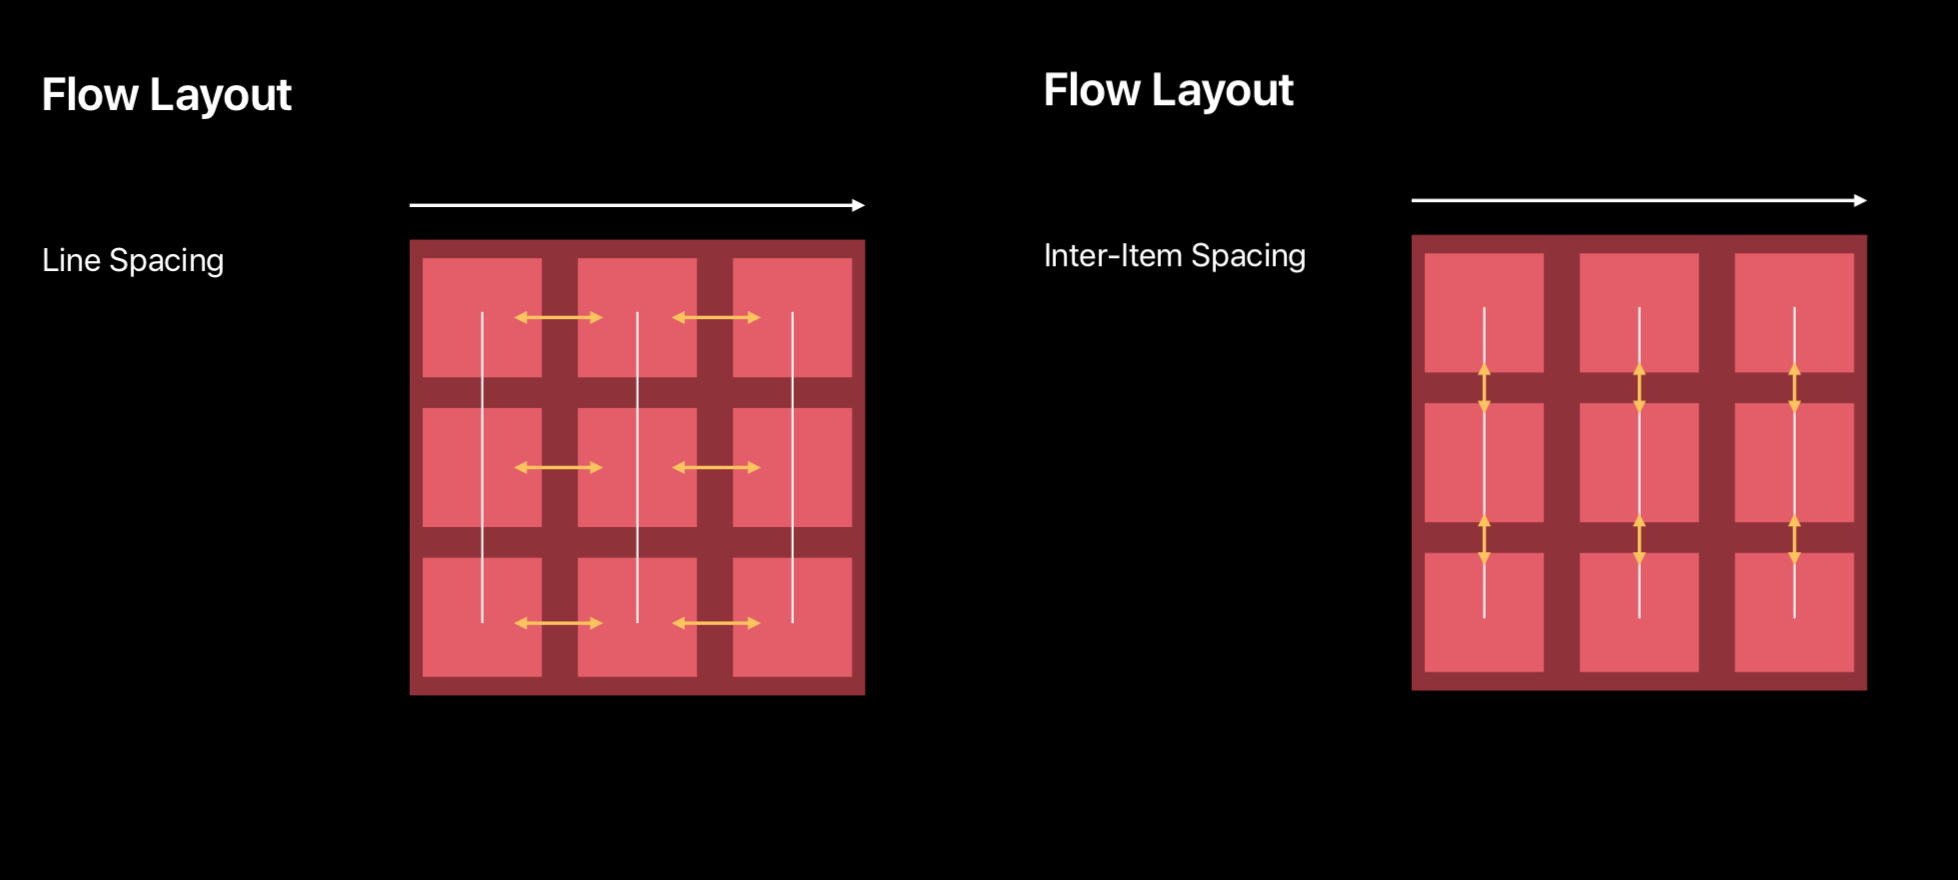
横向流式布局(白色线代表布局方向)

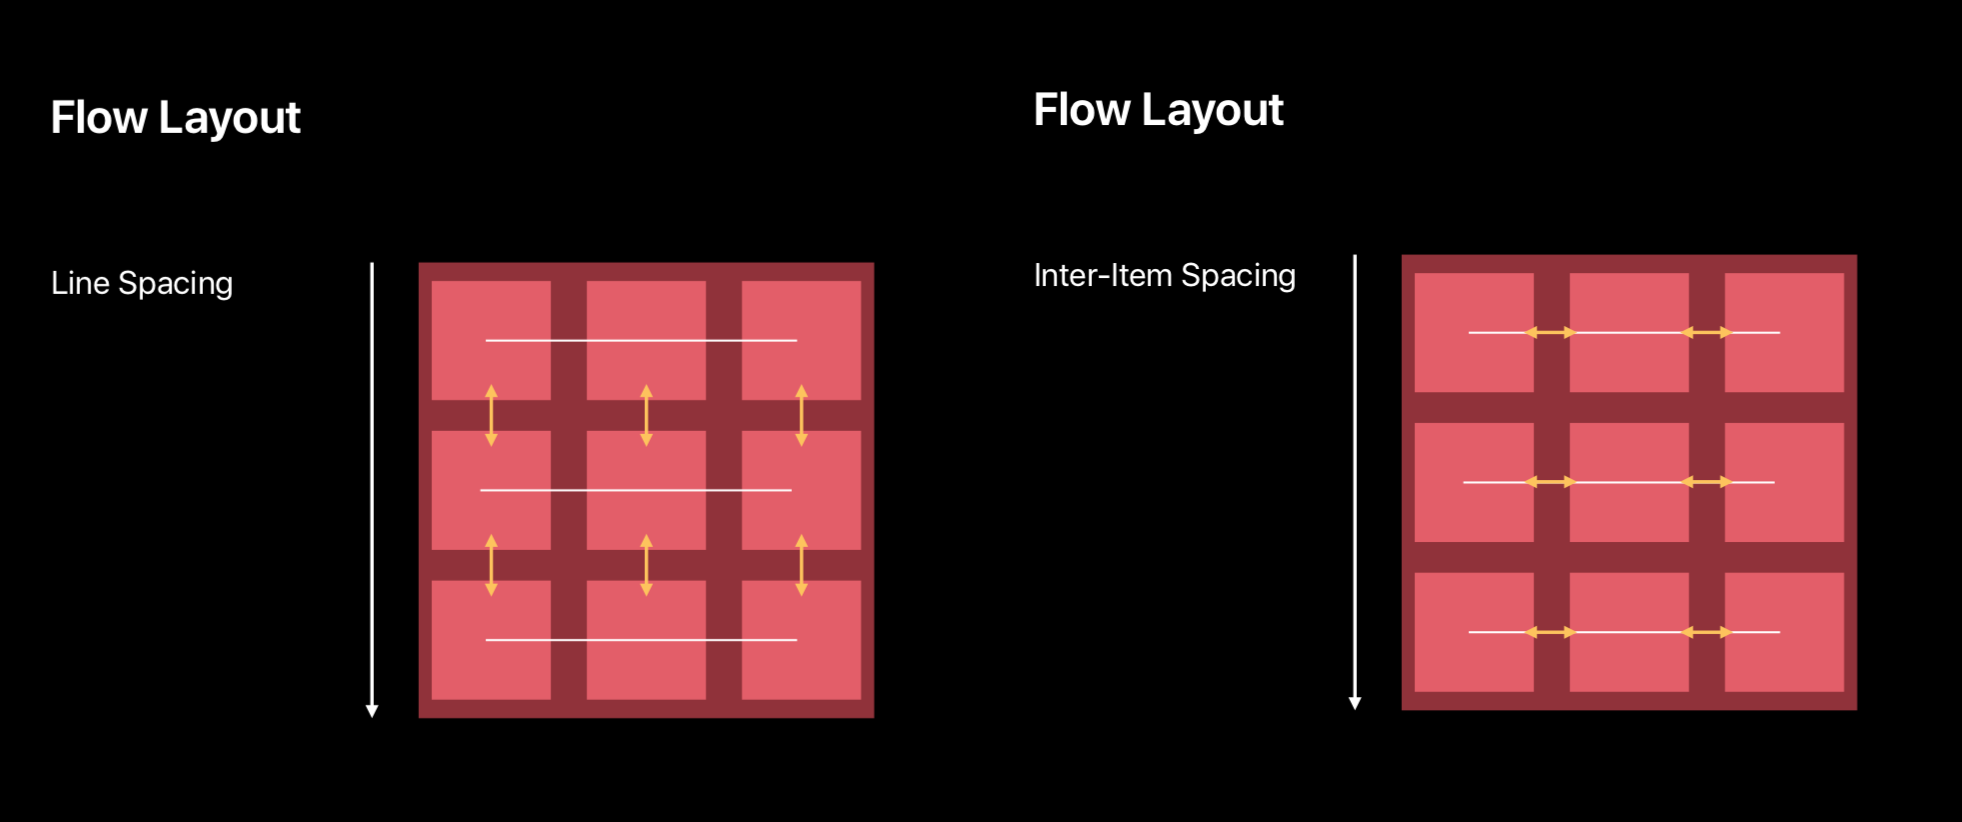
纵向流式布局(白色线代表布局方向)

这种流式布局需要区分方向,方向不同,具体的 Line Spacing 和 Item Spacing 所代表的含义不同,具体差异,可以通过上面的两张图进行区分。
因为流式布局其强大的适用性,所以在设计中这种布局方式被广泛使用。
UICollectionViewDataSource
数据源:顾名思义,提供数据的分组信息、每组中 Item 数量以及每个 Item 的实际内容。
optional func numberOfSections(in collectionView: UICollectionView) -> Int

func collectionView(_ collectionView: UICollectionView, numberOfItemsInSection section: Int) -> Int

func collectionView(_ collectionView: UICollectionView, cellForItemAt indexPath: IndexPath) -> UICollectionViewCell
UICollectionViewDelegate
delegate 提供了一些细颗粒度的方法:
- Highlighting
- Selection
还有一些视图的显示事件:
- willDisplayItem
- didEndDisplayingItem
布局 - 自定义 Layout
系统提供的
UICollectionViewFlowLayout 虽然使用起来方便快捷,能够满足基本的布局需要。但是遇到如下图的布局样式,显然就无法达到我们所需的效果,这时就需要自定义 FlowLayout 了。

自定义 FlowLayout 并不复杂 ,有以下四步:
1.提供滚动范围
override var collectionViewContentSize: CGSize
2.提供布局属性对象
func layoutAttributesForElements(in rect: CGRect) -> [UICollectionViewLayoutAttributes]?

func layoutAttributesForItem(at indexPath: IndexPath) -> UICollectionViewLayoutAttributes?
3.布局的相关准备工作
// 为每个 invalidateLayout 调用
// 缓存 UICollectionViewLayoutAttributes
// 计算 collectionViewContentSize
func prepare()
4.处理自定义布局中的边界更改
// 在 CollectionView 滚动时是否允许刷新布局
func shouldInvalidateLayout(forBoundsChange newBounds: CGRect) -> Bool
性能优化部分
通过以上的方法,我们可以轻松实现自定义 layout 的布局。但是在实际开发中,有一个对性能提升很实用的小技巧很值得我们借鉴。
通常,我们获取当前屏幕上所有显示的 UICollectionViewLayoutAttributes 会这么写
override func layoutAttributesForElements(in rect: CGRect) -> [UICollectionViewLayoutAttributes]? {
    return cachedAttributes.filter { (attributes:UICollectionViewLayoutAttributes) -> Bool in
        return rect.intersects(attributes.frame)
    }
}
采用以上的写法,我们会遍历缓存了所有 UICollectionViewLayoutAttributes 的 cachedAttributes 数组。而随着用户的拖动屏幕,这个方法会被频繁的调用,也就是会做大量的计算。当 cachedAttributes 数组的量级达到一定的规模,对性能的负面影响就会非常明显,用户在使用过程中会出现卡顿的负面体验。
苹果工程师采用的办法可以很好地解决这一问题。所有的 UICollectionViewLayoutAttributes 都按照顺序被存储在 cachedAttributes 数组中,既然是一个有序的数组,那么只要我们通过二分查找,拿到任何一个在当前页面显示的 Attribures 对象,就可以以这个 Attribures 对象为中心,向前向后遍历查找符合条件的 Attribures 对象即可,这样查找的范围就被大大缩小了。相应地,计算量变小,对性能的提升非常明显。

为了让大家易于理解,画了一张图,虽然有点丑,但表达思想足够了。 当前显示的 CollectionView 的范围就是 rect。在 rect 内部通过二分查找,找到第一个合适的 UICollectionViewLayoutAttributes 作为 firstMatchIndex,也就是那个 Attributes 对象。
在 rect 内, firstMatchIndex 以上的 Attributes 都符合 attributes.frame.maxY >= rect.minY,而在 firstMatchIndex 以下的 Attributes 也都符合 attributes.frame.maxY <= rect.maxY 的条件。
优化后的代码如下
override func layoutAttributesForElements(in rect: CGRect) -> [UICollectionViewLayoutAttributes]? {

    var attributesArray = [UICollectionViewLayoutAttributes]()

    // 找到在当前区域内的任何一个 Attributes 的 Index
    guard let firstMatchIndex = binarySearchAttributes(range: 0...cachedAttributes.endIndex, rect:rect) else { return attributesArray }

    // 从后向前反向遍历,缩小查找范围
    for attributes in cachedAttributes[..<firstMatchIndex].reversed {
        guard attributes.frame.maxY >= rect.minY  else {break}
        attributesArray.append(attributes)
    }
    // 从前向后正向遍历,缩小查找范围
    for attributes in cachedAttributes[firstMatchIndex...] {
        guard attributes.frame.minY <= rect.maxY  else {break}
        attributesArray.append(attributes)
    }

    return attributesArray
}
通过二分查找的方式,在处理当前页面显示的 UICollectionViewLayoutAttributes 的过程中可以减少遍历的数据量,在实际体验中页面滑动更加顺滑,体验更好,这种处理 Attribures 对象的方式,值得我们在开发过程中借鉴。
数据刷新和动画
我们会遇到对 CollectionView 进行编辑的场景,编辑操作一般是新增、删除、刷新、插入等。在本 Session 中,主讲人为我们做了一个示例。

- 对最后一条数据进行刷新操作
- 将原本在最后位置的数据移动到第一条的位置
- 删除原本的第三条数据
为了便于理解,还是贴一下代码吧:
// 原函数
func performUpdates() {
    people[3].isUpdated = true

    let movedPerson = people[3]
    people.remove(at:3)
    people.remove(at:2)

    people.insert(movedPerson, at:0)

    // Update Collection View
    collectionView.reloadItems(at: [IndexPath(item:3, section:0)])
    collectionView.reloadItems(at: [IndexPath(item:2, section:0)])
    collectionView.moveItem(at: IndexPath(item:3, section:0), to:IndexPath(item:0, section:0))
}
这个例子在操作过程中报错,原因如下:我们删除和移动的是同一个索引位置的元素。我们显示地调用了 reloadData() , reloadData() 是一个异步执行的函数,会直接访问数据源方法,进行重新布局,多次调用容易出错,同时这样写也没有动画效果。

performBatchUpdates
上面出错的场景其实挺常见,为了规范操作,避免在编辑的场景下出现问题,应当将对 CollectionView 的新增、删除、刷新、插入等操作都放入到 performBatchUpdates() 中的 updates 闭包内,CollectionView 中 Item 的更新顺序我们不需要关心,但是数据源更新的顺序是很重要的。
首先认识一下这个方法
func performBatchUpdates(_ updates: (() -> Void)?, completion: ((Bool) -> Void)? = nil)

1.其中 updates 闭包内部会执行新增、删除、刷新、插入等一系列操作。

2.而 completion 闭包会在 updates 闭包执行完毕后开始执行,updates 闭包中的相关操作会触发一些动画,
  当这些动画执行成功会返回 True,当动画被打断或者执行失败会返回 false,这个参数也有可能会返回 nil。
这个方法可以用来对 collectionView 中的元素进行批量的新增、删除、刷新、插入等操作,同时将触发collectionView 的 layout 的对应动画:
1.func initialLayoutAttributesForAppearingItem(at itemIndexPath: IndexPath) -> NSCollectionViewLayoutAttributes?

2.func initialLayoutAttributesForAppearingDecorationElement(ofKind elementKind: NSCollectionView.DecorationElementKind, at decorationIndexPath: IndexPath) -> NSCollectionViewLayoutAttributes?

3.func finalLayoutAttributesForDisappearingItem(at itemIndexPath: IndexPath) -> NSCollectionViewLayoutAttributes?

4.func finalLayoutAttributesForDisappearingDecorationElement(ofKind elementKind: String, at decorationIndexPath: IndexPath) -> UICollectionViewLayoutAttributes?
原因是因为在执行完 performBatchUpdates 操作之后,CollectionView 会自动 reloadData 调用数据源方法重新布局。所以我们在 Updates 闭包中对数据的编辑操作执行完毕后,一定要同步更新数据源,否则有极大的几率出现数据越界等错误情况。
易出错的合并更新一般有以下几种
- 1.移动与删除同一个索引
- 2.移动与插入同一个索引
- 3.将多个对象移动到同一个索引
- 4.引用了一个无效的索引
既然在执行操作时容易出现问题,我们就该想办法去规避,苹果的工程师给出了很好的建议。在上面我们讲过对 CollectionView 的新增、删除、刷新、插入等操作都放入到 performBatchUpdates() 中的 updates 闭包内,CollectionView 中 Item 的更新顺序我们不需要关心,但是数据源更新的顺序很重要。最后的 Item 更新顺序和数据源的更新顺序是怎么回事呢?
你可以这样理解:
- 在 Updates 闭包内,你可以选择先删除一个索引,然后插入一个新的索引,或是把两者的顺序颠倒过来进行操作,这都没有问题,你可以按照自己的喜好,随意指定顺序。
- 但是涉及到数据源更新的方法,必须按照一定的顺序和规则来操作。
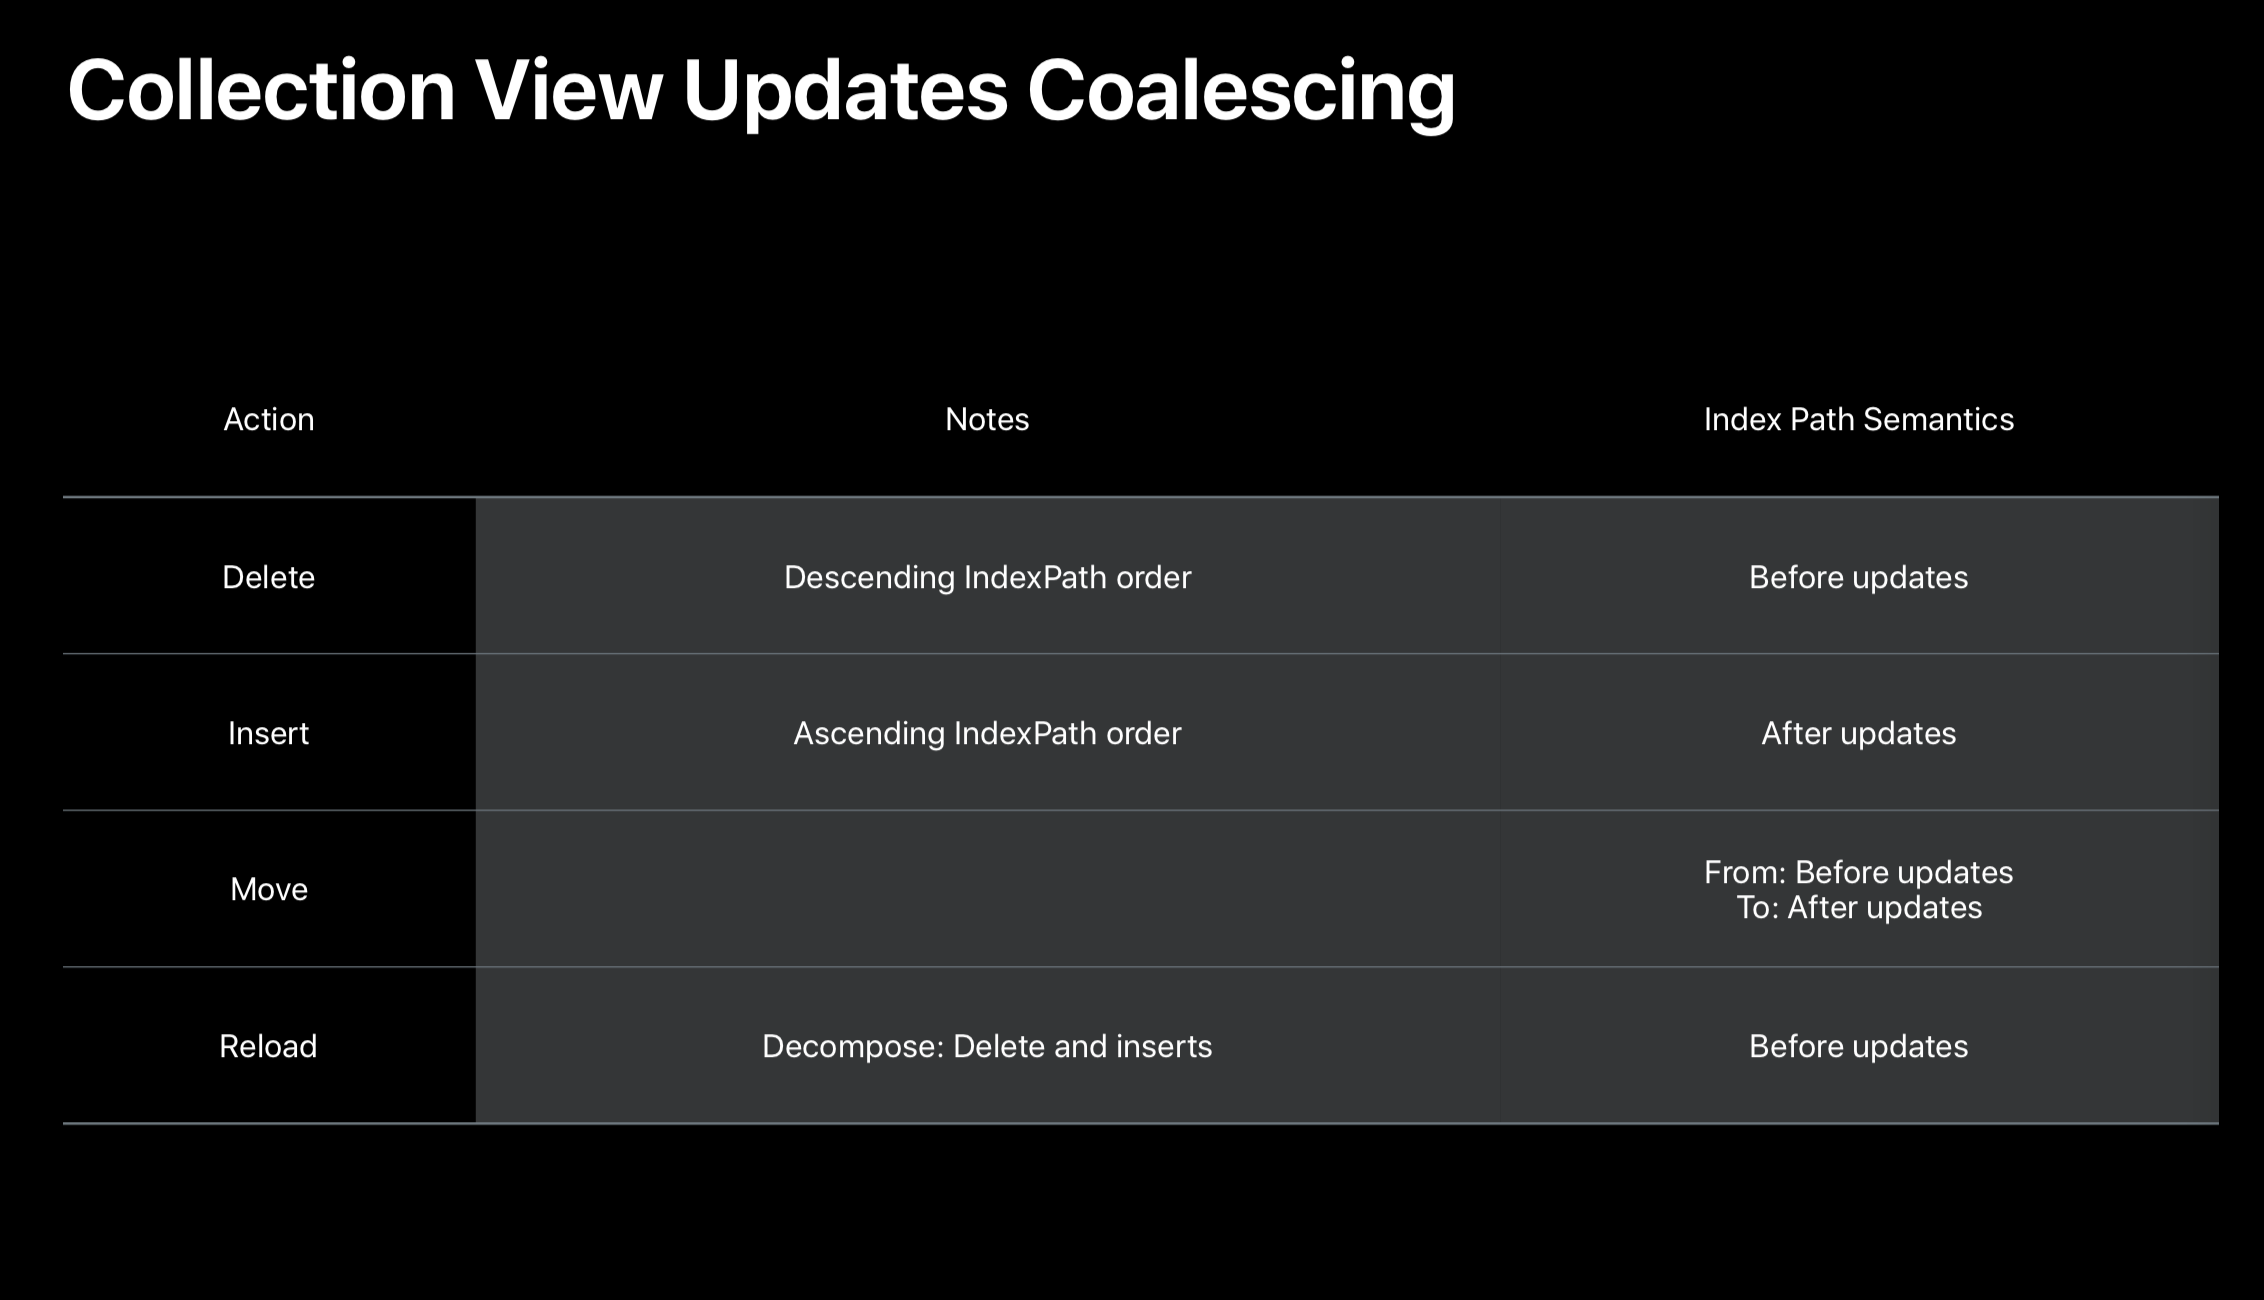
数据源执行操作的顺序及规则
- 1.将移动操作拆分成删除和插入。
- 2.将所有的删除操作合并到一起,同理将所有的插入操作也合并到一起。
- 3.以降序优先处理删除操作。
- 4.最后以升序处理插入操作。

然后我们将刚才出错的代码,改为如下:
// 新的实现
func performUpdates() {

    UIView.performWithoutAnimation {
        // 先将数据刷新
        CollectionView.performBatchUpdates({
            people[3].isUpdate = true
            CollectionView.reloadItems(at: [IndexPath(item:3, section:0)])
        })

        // 再将移动拆分成删除之后再插入两个动作
        CollectionView.performBatchUpdates({
            let movedPerson = people[3]
            people.remove(at: 3)
            people.remove(at: 2)
            people.insert(movedPerson, at:0)
            CollectionView.deleteItems(at: [IndexPath(item:2, section:0)])
            collectionView.moveItem(at: IndexPath(item:3, section:0), to:IndexPath(item:0, section:0))
        })
    }
}
最后总结一下,苹果的工程师建议我们通过自定义布局来实现精美的布局样式,同时采取二分查找的方式来高效的处理数据,提升界面的流畅性和用户体验。
其次对 CollectionView 的操作建议我们通过 performBatchUpdates 来进行处理,我们不需要去考虑动画的执行,因为默认都帮助我们处理好了,我们只需要注意数据源处理的原则和顺序,确保数据处理的安全与稳定。
如果对这篇 Session 很感兴趣的话,可以在 Twitter 上联系作者,只需要在 Twitter 搜索 A Tour Of CollectionView 即可,作者还是很热心的。
最后声明,笔者的英语听力比较惨,有些地方听得不是特别明白,一旦发现我的信息有遗漏或者传达的信息有误,还望大家不吝指教。
查看更多 WWDC 18 相关文章请前往 老司机x知识小集xSwiftGG WWDC 18 专题目录