

我们在开发应用的过程中,往往在很多地方需要倒计时,比如说轮播图,验证码,活动倒计时等等。而在实现这些功能的时候,我们往往会遇到很多坑需要我们小心的规避掉。 因为文章内容的关系,要求大家都有一些runloop的基础知识,当然如果没有,也没什么特别大的问题。这里推荐一下 ibireme的这篇文章。
话不多说,直接上正题:
倒计时的种类
在开发过程中,我们基本上只用了这几种方式来实现倒计时
- PerformSelecter
- NSTimer
- CADisplayLink
- GCD
PerformSelecter
我们使用下面的代码可以实现指定延迟之后执行:
- (void)performSelector:(SEL)aSelector withObject:(id)anArgument afterDelay:(NSTimeInterval)delay;
它的方法描述如下
Invokes a method of the receiver on the current thread using the default mode after a delay. This method sets up a timer to perform the aSelector message on the current thread’s run loop. The timer is configured to run in the default mode (NSDefaultRunLoopMode). When the timer fires, the thread attempts to dequeue the message from the run loop and perform the selector. It succeeds if the run loop is running and in the default mode; otherwise, the timer waits until the run loop is in the default mode. If you want the message to be dequeued when the run loop is in a mode other than the default mode, use the performSelector:withObject:afterDelay:inModes: method instead. If you are not sure whether the current thread is the main thread, you can use the performSelectorOnMainThread:withObject:waitUntilDone: or performSelectorOnMainThread:withObject:waitUntilDone:modes:method to guarantee that your selector executes on the main thread. To cancel a queued message, use the cancelPreviousPerformRequestsWithTarget: or cancelPreviousPerformRequestsWithTarget:selector:object:method.
这个方法在Foundation框架下的NSRunLoop.h文件下。当我们调用NSObject 这个方法的时候,在runloop的内部是会创建一个Timer并添加到当前线程的 RunLoop 中。所以如果当前线程没有 RunLoop,则这个方法会失效。而且还有几个很大的缺陷:
- 这个方法必须在NSDefaultRunLoopMode下才能运行
- 因为它基于RunLoop实现,所以可能会造成精确度上的问题。 这个问题在其他两个方法上也会出现,所以我们下面细说
- 内存管理上非常容易出问题。 当我们执行 [self performSelector: afterDelay:]的时候,系统会将self的引用计数加1,执行完这个方法时,还会将self的引用计数减1,当方法还没有执行的时候,要返回父视图释放当前视图的时候,self的计数没有减少到0,而导致无法调用dealloc方法,出现了内存泄露。
因为它有如此之多的缺陷,所以我们不应该使用它,或者说,不应该在倒计时这方法使用它。
NSTimer
+ (NSTimer *)timerWithTimeInterval:(NSTimeInterval)ti invocation:(NSInvocation *)invocation repeats:(BOOL)yesOrNo;
+ (NSTimer *)scheduledTimerWithTimeInterval:(NSTimeInterval)ti invocation:(NSInvocation *)invocation repeats:(BOOL)yesOrNo;
+ (NSTimer *)timerWithTimeInterval:(NSTimeInterval)ti target:(id)aTarget selector:(SEL)aSelector userInfo:(nullable id)userInfo repeats:(BOOL)yesOrNo;
+ (NSTimer *)scheduledTimerWithTimeInterval:(NSTimeInterval)ti target:(id)aTarget selector:(SEL)aSelector userInfo:(nullable id)userInfo repeats:(BOOL)yesOrNo;
+ (NSTimer *)timerWithTimeInterval:(NSTimeInterval)interval repeats:(BOOL)repeats block:(void (^)(NSTimer *timer))block API_AVAILABLE(macosx(10.12), ios(10.0), watchos(3.0), tvos(10.0));
+ (NSTimer *)scheduledTimerWithTimeInterval:(NSTimeInterval)interval repeats:(BOOL)repeats block:(void (^)(NSTimer *timer))block API_AVAILABLE(macosx(10.12), ios(10.0), watchos(3.0), tvos(10.0));
方法描述如下
A timer that fires after a certain time interval has elapsed, sending a specified message to a target object. Timers work in conjunction with run loops. Run loops maintain strong references to their timers, so you don’t have to maintain your own strong reference to a timer after you have added it to a run loop. To use a timer effectively, you should be aware of how run loops operate. See Threading Programming Guide for more information. A timer is not a real-time mechanism. If a timer’s firing time occurs during a long run loop callout or while the run loop is in a mode that isn't monitoring the timer, the timer doesn't fire until the next time the run loop checks the timer. Therefore, the actual time at which a timer fires can be significantly later. See also Timer Tolerance. NSTimer is toll-free bridged with its Core Foundation counterpart, CFRunLoopTimerRef. See Toll-Free Bridging for more information.
这个方法在Foundation框架下的NSTimer.h文件下。一个NSTimer的对象只能注册在一个RunLoop当中,但是可以添加到多个RunLoop Mode当中。 NSTimer 其实就是 CFRunLoopTimerRef,他们之间是 Toll-Free Bridging 的。它的底层是由XNU 内核的 mk_timer来驱动的。一个 NSTimer 注册到 RunLoop 后,RunLoop 会为其重复的时间点注册好事件。例如 10:00, 10:10, 10:20 这几个时间点。RunLoop为了节省资源,并不会在非常准确的时间点回调这个Timer。Timer 有个属性叫做Tolerance (宽容度),标示了当时间点到后,容许有多少最大误差。 在文件中,系统提供了一共8个方法,其中三个方法是直接将timer添加到了当前runloop 的DefaultMode,而不需要我们自己操作,当然这样的代价是runloop只能是当前runloop,模式是DefaultMode:
+ (NSTimer *)scheduledTimerWithTimeInterval:(NSTimeInterval)ti invocation:(NSInvocation *)invocation repeats:(BOOL)yesOrNo;
+ (NSTimer *)scheduledTimerWithTimeInterval:(NSTimeInterval)ti target:(id)aTarget selector:(SEL)aSelector userInfo:(id)userInfo repeats:(BOOL)yesOrNo;
+ (NSTimer *)scheduledTimerWithTimeInterval:(NSTimeInterval)interval repeats:(BOOL)repeats block:(void (^)(NSTimer *timer))block;
其他五个方法,是不会自动添加到RunLoop的,还需要调用addTimer:forMode::
+ (NSTimer *)timerWithTimeInterval:(NSTimeInterval)interval repeats:(BOOL)repeats block:(void (^)(NSTimer *timer))block;
+ (NSTimer *)timerWithTimeInterval:(NSTimeInterval)ti invocation:(NSInvocation *)invocation repeats:(BOOL)yesOrNo;
+ (NSTimer *)timerWithTimeInterval:(NSTimeInterval)ti target:(id)aTarget selector:(SEL)aSelector userInfo:(id)userInfo repeats:(BOOL)yesOrNo;
- (instancetype)initWithFireDate:(NSDate *)date interval:(NSTimeInterval)ti target:(id)t selector:(SEL)s userInfo:(id)ui repeats:(BOOL)rep;
- (instancetype)initWithFireDate:(NSDate *)date interval:(NSTimeInterval)interval repeats:(BOOL)repeats block:(void (^)(NSTimer *timer))block;
假如我们开启了NSTimer,但是却没有运行,我们可以检查RunLoop是否运行,以及运行的Mode是否正确
NSTimer和PerformSelecter有很多类似的地方,比如说两者的创建和撤销都必须要在同一个线程上,内存管理上都有泄露的风险,精度上都有问题。下面让我们讲一下后两个问题。
内存泄露
当我们使用了NSTimer的时候,RunLoop会强持有一个NSTimer,而NSTimer内部持有一个self的target,而控制器又持有NSTimer对象,这样就造成了一个循环引用。虽然系统提供了一个invalidate方法来把NSTimer从RunLoop中释放掉并取消强引用,但是往往找不到应有的位置来放置。 我们解决这个问题的思路很简单,初始化NSTimer时把触发事件的target替换成一个单独的对象,然后这个对象中NSTimer的SEL方法触发时让这个方法在当前的视图self中实现。 利用RunTime在target对象中动态的创建SEL方法,然后target对象关联当前的视图self,当target对象执行SEL方法时,取出关联对象self,然后让self执行该方法。 实现代码如下:
.h
#import <Foundation/Foundation.h>
@interface NSTimer (Brex)
/**
 *  创建一个不会造成循环引用的循环执行的Timer
 */
+ (instancetype)brexScheduledTimerWithTimeInterval:(NSTimeInterval)ti target:(id)aTarget selector:(SEL)aSelector userInfo:(id)userInfo;
@end
.m
#import "NSTimer+Brex.h"
@interface BrexTimerTarget : NSObject
@property (nonatomic, weak) id target;
@property (nonatomic, assign) SEL selector;
@property (nonatomic, weak) NSTimer *timer;
@end
@implementation PltTimerTarget
- (void)brexTimerTargetAction:(NSTimer *)timer
{
    if (self.target) {
        [self.target performSelector:self.selector withObject:timer afterDelay:0.0];
    } else {
        [self.timer invalidate];
        self.timer = nil;
    }
}
@end
@implementation NSTimer (Brex)
+ (instancetype)brexScheduledTimerWithTimeInterval:(NSTimeInterval)ti target:(id)aTarget selector:(SEL)aSelector userInfo:(id)userInfo
{
    BrexTimerTarget *timerTarget = [[BrexTimerTarget alloc] init];
    timerTarget.target = aTarget;
    timerTarget.selector = aSelector;
    NSTimer *timer = [NSTimer timerWithTimeInterval:ti target:timerTarget selector:@selector(brexTimerTargetAction:) userInfo:userInfo repeats:YES];
    [[NSRunLoop mainRunLoop] addTimer:timer forMode:NSRunLoopCommonModes];
    timerTarget.timer = timer;
    return timerTarget.timer;
}
@end
当然,真正在使用的时候,还是需要通过测试再来验证。
精度问题
上面我们也提到了,其实NSTimer并不是非常准确的。 NSTimer其实算不上一个真正的时间机制。它只有在被加入到RunLoop的时候才能触发。 假如在一个RunLoop下没能检测到定时器,那么它会在下一个RunLoop中检查,并不会延后执行。换个说法,我们可以理解为:“这趟火车没赶上,等下一班吧”。 另外,有时候RunLoop正在处理一个很费事的操作,比如说遍历一个非常非常大的数组,那么也可能会“忘记”查看定时器了。这么我们可以理解为“火车晚点了”。 当然,这两种情况表现起来其实都是NSTimer不准确。 所以,真正的定时器触发时间不是自己设定的那个时间,而是可能加入了一个RunLoop的触发时间。并且,NSRunLoop算不上真正的线程安全,假如NSTimer没有在一个线程中操作,那么可能会触发不可意料的后果。
Warning The NSRunLoop class is generally not considered to be thread-safe and its methods should only be called within the context of the current thread. You should never try to call the methods of an NSRunLoop object running in a different thread, as doing so might cause unexpected results. NSRunLoop类通常不被认为是线程安全的,它的方法应该只在当前线程中调用。您不应尝试调用在不同线程中运行的NSRunLoop对象的方法,因为这样做可能会导致意外的结果。
CADisplayLink
创建方法
self.displayLink = [CADisplayLink displayLinkWithTarget:self selector:@selector(handleDisplayLink:)];
[self.displayLink addToRunLoop:[NSRunLoop currentRunLoop] forMode:NSDefaultRunLoopMode];
停止方法
[self.displayLink invalidate];
self.displayLink = nil;
CADisplayLink是一个能让我们以和屏幕刷新率同步的频率将特定的内容画到屏幕上的定时器类。它和NSTimer在实现上有些类似。不过区别在于每当屏幕显示内容刷新结束的时候,runloop就会向CADisplayLink指定的target发送一次指定的selector消息, 而NSTimer以指定的模式注册到runloop后,每当设定的周期时间到达后,runloop会向指定的target发送一次指定的selector消息。 当然,和NSTimer类似,CADisplayLink也会因为同样的原因出现精问题,不过单就精度而言,CADisplayLink会更高一点。这里的表现就就是画面掉帧了。 我们通常情况下,会把它使用在界面的不停重绘,比如视频播放的时候需要不停地获取下一帧用于界面渲染,还有动画的绘制等地方。
GCD
终于,我们讲到重点了:GCD倒计时
dispatch_source_t timer = dispatch_source_create(DISPATCH_SOURCE_TYPE_TIMER, 0, 0, queue);
dispatch_source_set_timer(timer, dispatch_walltime(NULL, 0), 10*NSEC_PER_SEC, 1*NSEC_PER_SEC); //每10秒触发timer,误差1秒
dispatch_source_set_event_handler(timer, ^{
    // 定时器触发时执行的 block
});
dispatch_resume(timer);
了解GCD倒计时的原理,需要我们最好阅读一下libdispatch源码。当然,如果你不想阅读,直接往下看也可以。
dispatch_source_create这个API为一个dispatch_source_t类型的结构体ds做了分配内存和初始化操作,然后将其返回。
下面从底层源码的角度来研究这几行代码的作用。首先是 dispatch_source_create 函数,它和之前见到的 create 函数都差不多,对 dispatchsourcet 对象做了一些初始化工作:
dispatch_source_t ds = NULL;
ds = _dispatch_alloc(DISPATCH_VTABLE(source), sizeof(struct dispatch_source_s));
_dispatch_queue_init((dispatch_queue_t)ds);
ds->do_suspend_cnt = DISPATCH_OBJECT_SUSPEND_INTERVAL;
ds->do_targetq = &_dispatch_mgr_q;
dispatch_set_target_queue(ds, q);
return ds;
这里涉及到两个队列,其中 q 是用户指定的队列,表示事件触发的回调在哪个队列执行。而 _dispatch_mgr_q 则表示由哪个队列来管理这个 source,mgr 是 manager 的缩写.
其次是 dispatch_source_set_timer,
void
dispatch_source_set_timer(dispatch_source_t ds,
	dispatch_time_t start,
	uint64_t interval,
	uint64_t leeway)
{
	......
	struct dispatch_set_timer_params *params;
    ......
	dispatch_barrier_async_f((dispatch_queue_t)ds, params,
			_dispatch_source_set_timer2);
}
这段代码中,首先会对参数进行一个过滤和重新设置,然后创建一个dispatch_set_timer_params的指针:
//这个 params 负责绑定定时器对象与他的参数
struct dispatch_set_timer_params {
    dispatch_source_t ds;
    uintptr_t ident;
    struct dispatch_timer_source_s values;
};
最后调用
dispatch_barrier_async_f((dispatch_queue_t)ds, params, _dispatch_source_set_timer2);
随后调用_dispatch_source_set_timer2方法:
static void _dispatch_source_set_timer2(void *context) {
    // Called on the source queue
    struct dispatch_set_timer_params *params = context;
    dispatch_suspend(params->ds);
    dispatch_barrier_async_f(&_dispatch_mgr_q, params,
            _dispatch_source_set_timer3);
}
然后接着调用_dispatch_source_set_timer3方法:
static void _dispatch_source_set_timer3(void *context)
{
	// Called on the _dispatch_mgr_q
	struct dispatch_set_timer_params *params = context;
    ......
	_dispatch_timer_list_update(ds);
    ......
}
_dispatch_timer_list_update 函数的作用是根据下一次触发时间将 timer 排序。
接下来,当初分发到 manager 队列的 block 将要被执行,走到 _dispatch_mgr_invoke 函数,其中有如下代码:
r = select(FD_SETSIZE, &tmp_rfds, &tmp_wfds, NULL, sel_timeoutp);
可见,GCD定时器的底层是由XNU内核中的select方法实现的。熟悉socket编程的朋友可能对这个方法很熟悉。这个方法可以用来处理阻塞,粘包等问题。
因为方法来自于最底层,GCD倒计时算得上最精确的。
那么有没有可能出现不精确的问题呢?
答案是也有可能!
这里我们看一张图
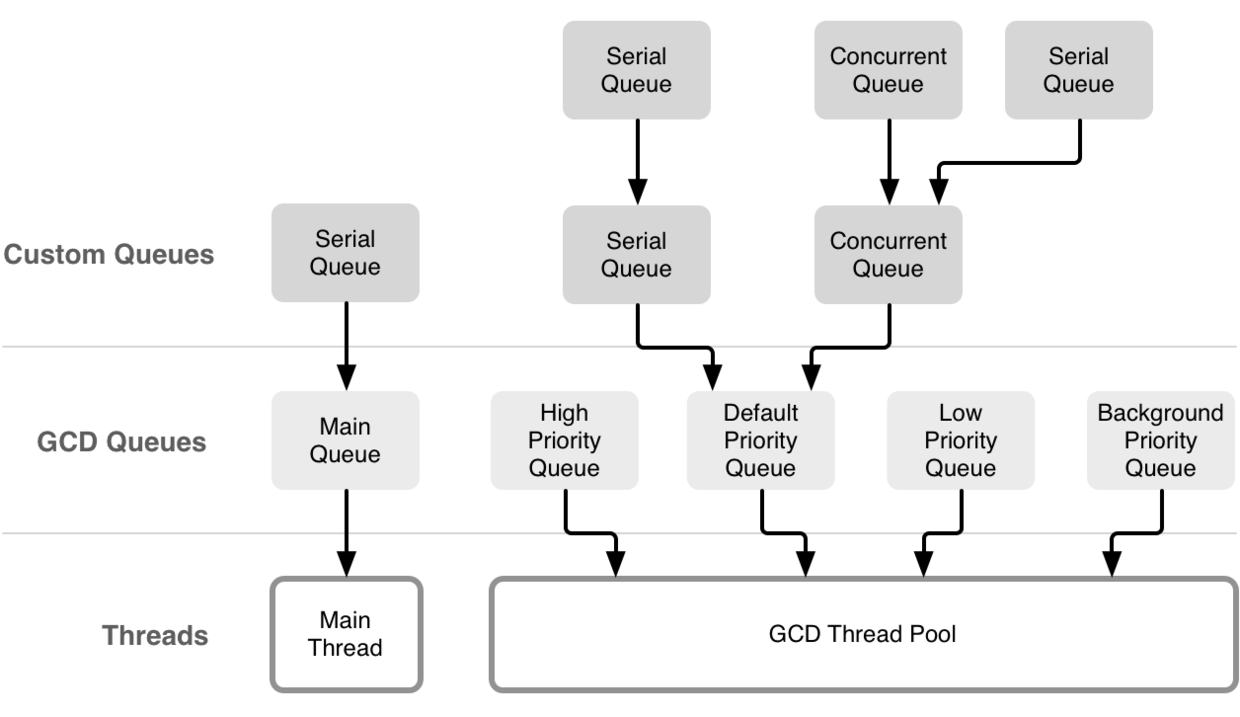
假如存在很多的High的任务,或者255个线程都卡住了(这个其实不太可能),GCD的倒计时也是会受到一定影响的。而且它本身可能也会受到线程分配的影响,创建过多线程也是要耗费一定资源的。
结论
假如你对时间的精确的没有特别高的要求,比如说轮播图什么的,可以选择使用NSTimer;创建动画什么的,可以使用CADisplayLink;想要追求高精度,可以使用GCD倒计时;至于PerformSelecter,还是算了吧。
实践
1.轮播图
我当初曾经将一个轮播图作为一个tableview的headerView。测试的时候发现一个大家可能都会遇到的问题,滑动tableview的时候轮播图不滑了。这个问题很好解决,
[[NSRunLoop currentRunLoop] addTimer:timer forMode:NSRunLoopCommonModes];
更换RunLoop的mode,就可以了。
2.检测FPS
这个我是受到了FPSLabel的启发,在它的基础上扩展了一下,只做了一个在页面最上层滑动的View。它主要是用来在debug模式下进行测试,上面展示了页面本身的FPS,App版本号,iOS版本号,手机型号等等数据。我们一般情况下认为,FPS在55-60之间,算的上流畅,低于55就要找问题,解决问题了。当然,这个view本身添加的本身也会影响到当前页面的FPS。“观察者效应”嘛。
3.多个活动的倒计时
当初曾经接触到一个需求,要在一个tableview上实现多个带倒计时cell。最开始的时候我是使用NSTimer一个一个来实现的,但是后来发现,当cell多起来的时候,页面会变得非常卡顿。为了解决这个,我自己想出了一个办法:我实现了一个倒计时的单例,每过1秒就会发出一个对应页面的block(当时有好几个页面需要),以及一个总的通知,里面只包含一个当前的时间戳,并且公开开启倒计时以及关闭倒计时的方法。这样,一个页面就可以只使用一个倒计时来实现了。每个cell只需要持有一个倒计时的终点时间就可以了。
我就是在当时开始研究倒计时的问题,甚至自己用select函数实现了一个倒计时单例。
    dispatch_async(dispatch_get_global_queue(DISPATCH_QUEUE_PRIORITY_DEFAULT, 0), ^{
            [[NSThread currentThread] setName:@"custom Timer"];
             ......
            fd_set read_fd_set;
            FD_ZERO(&read_fd_set);
            FD_SET(self.fdCustomTimerModifyWaitTimeReadPipe, &read_fd_set);
            struct timeval tv;
            tv.tv_sec = self.customTimerWaitTimeInterval;
            tv.tv_usec = 0;
            ......
            long ret = select(self.fdCustomTimerModifyWaitTimeReadPipe + 1, &read_fd_set, NULL, NULL, &tv);//核心
            self.customTimerSelectTime = [[NSDate date] timeIntervalSince1970];
            ......
          if(ret == 0){
                NSLog(@"select 超时!\n");
                NSLog(@"self.customTimerWaitTimeInterval:%lld", self.customTimerWaitTimeInterval);
                if(self.customTimerNeedNotification)
                {
                    dispatch_sync(dispatch_get_main_queue(), ^{
                        [[NSNotificationCenter defaultCenter] postNotificationName:customTimerIntervalNotification object:nil];
                    });
                }
                if(self.auctionHouseDetailViewControllerTimerCallBack)
                {
                    dispatch_sync(dispatch_get_main_queue(), ^{
                        self.auctionHouseDetailViewControllerTimerCallBack();
                    });

                }
}
后来思考了一下,为了项目的稳定,还是返回去用GCD来重新实现了。
后来测试的时候又发现了一个可能出现的问题,用户手机的时间可能不是准确的,或者经过的修改,跟服务器时间有很大的差距。这样就出现了一个很可笑的状况:8点开始的活动,因为手机本身时间的不准确,本来应该还有一个小时的时间,但是显示出来就只有40分钟了。这就很尴尬了。
为了解决这个问题,我们将方法修改了一下:
在进入页面的时候,我们要返回一个服务器时间,同时获取一个本地时间,计算出两者的差值,在计算倒计时的时候,把这个差值计算进去,以便保持时间的相对准确。同时,假如用户在本页面进入了后台模式又返回到前台模式,我们通过一个接口接收当前的服务器时间,在进行之前的计算,假如两次的得到的时间差大致相等,我们就不做处理;假如发现时间差发生了很大的变化(主要是为了防止用户修改系统时间),就强制刷新页面。
方法借鉴
我阅读MrPeak的这篇文章,学习了另外一个办法:
首先还是会依赖于接口和服务器时间做同步,每次同步记录一个serverTime(Unix time),同时记录当前客户端的时间值lastSyncLocalTime,到之后算本地时间的时候先取curLocalTime,算出偏移量,再加上serverTime就得出时间了:
uint64_t realLocalTime = 0;
if (serverTime != 0 && lastSyncLocalTime != 0) {
    realLocalTime = serverTime + (curLocalTime - lastSyncLocalTime);
}
else {
    realLocalTime = [[NSDate date] timeIntervalSince1970]*1000;
}
如果从来没和服务器时间同步过,就只能取本地的系统时间了,这种情况几乎也没什么影响,说明客户端还没开始用过。
关键在于如果获取本地的时间,可以用一个小技巧来获取系统当前运行了多长时间,用系统的运行时间来记录当前客户端的时间:
//get system uptime since last boot
- (NSTimeInterval)uptime
{
    struct timeval boottime;
    int mib[2] = {CTL_KERN, KERN_BOOTTIME};
    size_t size = sizeof(boottime);

    struct timeval now;
    struct timezone tz;
    gettimeofday(&now, &tz);

    double uptime = -1;

    if (sysctl(mib, 2, &boottime, &size, NULL, 0) != -1 && boottime.tv_sec != 0)
    {
        uptime = now.tv_sec - boottime.tv_sec;
        uptime += (double)(now.tv_usec - boottime.tv_usec) / 1000000.0;
    }
    return uptime;
}
gettimeofday和sysctl都会受系统时间影响,但他们二者做一个减法所得的值,就和系统时间无关了。这样就可以避免用户修改时间了。当然用户如果关机,过段时间再开机,会导致我们获取到的时间慢与服务器时间,真实场景中,慢于服务器时间往往影响较小,我们一般担心的是客户端时间快于服务器时间。
这种方法原理上和我的差不多,但是请求次数会比我的少一些,但是缺点上文也说了:有可能会导致我们获取到的时间慢与服务器时间。
4.验证码
用户在发送完验证码,然后误触退出页面再重新进入,很多app都是会重新刷新发送验证码的按钮,当然,出于保护机制,往往第二个验证码不会很快的发送过来。因为之前已经实现了一个倒计时的单例,我把这个页面的倒计时的终点时间,设置为倒计时的一个单例属性,在进入下一步。在重新进入这个页面的时候,进行上一条中做出的操作,进行判断。
感谢:
深入理解RunLoop
从NSTimer的失效性谈起(二):关于GCD Timer和libdispatch
iOS关于时间的处理
