

Tensorflow是Google推出的人工智能框架,而Core ML是苹果推出的人工智能框架,两者是有很大的区别,其中Tensorflow是包含了训练模型和评估模型,Core ML只支持在设备上评估模型,不能训练模型。 通常而言我们通过Tensorflow训练模型,导出我们训练的模型pb,然后转换了Core ML的格式mlmodel,从而实现在iOS实现评估模型。
系列文章
《机器学习Tensorflow笔记1:Hello World到MNIST实验》
《机器学习Tensorflow笔记2:超详细剖析MNIST实验》
《机器学习Tensorflow笔记3:Python训练MNIST模型,在Android上实现评估》
《机器学习Tensorflow笔记4:iOS通过Core ML使用Tensorflow训练模型》
导出MNIST训练模型
我们在上一篇文章介绍了如何导出.pb格式的解决,但是这种格式只适合在Tensorflow框架上使用,如果要在iOS上使用,那么就要转换到CoreML能够使用的.mlmodel格式。如何导出.pb格式的教程请看我的另一篇文章
《机器学习Tensorflow笔记3:Python训练MNIST模型,在Android上实现评估》
安装tfcoreml
安装tfcoreml很简单,github 上也有详细的介绍。我的Tensorflow是通过Virtualenv安装的,如果安装tfcoreml,那么需要先激活环境,通过pip安装即可。
$ cd targetDirectory
$ source ./bin/activate
(targetDirectory) $ pip install -U tfcoreml
把pb转换成mlmodel
import tfcoreml as tf_converter

tf_converter.convert(tf_model_path='model/mnist2.pb',
                     mlmodel_path='my_model.mlmodel',
                     output_feature_names=['Softmax:0'],input_name_shape_dict={"input/x_input:0":[1,784]})
项目添加mlmodel模型文件
把.mlmodel文件添加到项目中
 image.png
 需要保证文件已经添加到Compile Sources
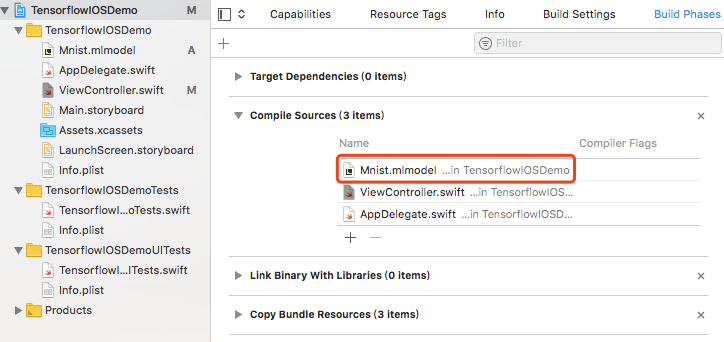 image.png
分析原理
我们可以点击.mlmodel文件的箭头,就可以看到一个代码文件,实际上mlmodel是保护了三个类,Mnist,MnistInput,MnistOutput,通过这几个类就可以实现模型的评估。
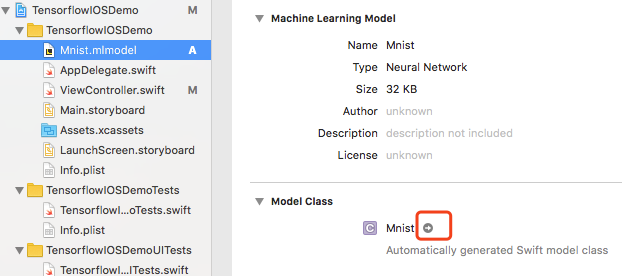 image.png
评估模型
do{
    let image = [0,0,0,0,0,0,0,0,0,0,0,0,0,0,0,0,0,0,0,0,0,0,0,0,0,0,0,0,0,0,0,0,0,0,0,0,0,0,0,0,0,0,0,0,0,0,0,0,0,0,0,0,0,0,0,0,0,0,0,0,0,0,0,0,0,0,0,0,0,0,0,0,0,0,0,0,0,0,0,0,0,0,0,0,0,0,0,0,0,0,0,0,0,0,0,0,0,0,0,0,0,0,0,0,0,0,0,0,0,0,0,0,0,0,0,0,0,0,0,0,0,0,0,0,0,0,0,0,0,0,0,0,0,0,0,0,0,0,0,0,0,0,0,0,0,0,0,0,0,0,0,0,3,18,18,18,126,136,175,26,166,255,247,127,0,0,0,0,0,0,0,0,0,0,0,0,30,36,94,154,170,253,253,253,253,253,225,172,253,242,195,64,0,0,0,0,0,0,0,0,0,0,0,49,238,253,253,253,253,253,253,253,253,251,93,82,82,56,39,0,0,0,0,0,0,0,0,0,0,0,0,18,219,253,253,253,253,253,198,182,247,241,0,0,0,0,0,0,0,0,0,0,0,0,0,0,0,0,0,0,80,156,107,253,253,205,11,0,43,154,0,0,0,0,0,0,0,0,0,0,0,0,0,0,0,0,0,0,0,14,1,154,253,90,0,0,0,0,0,0,0,0,0,0,0,0,0,0,0,0,0,0,0,0,0,0,0,0,0,139,253,190,2,0,0,0,0,0,0,0,0,0,0,0,0,0,0,0,0,0,0,0,0,0,0,0,0,11,190,253,70,0,0,0,0,0,0,0,0,0,0,0,0,0,0,0,0,0,0,0,0,0,0,0,0,0,35,241,225,160,108,1,0,0,0,0,0,0,0,0,0,0,0,0,0,0,0,0,0,0,0,0,0,0,0,81,240,253,253,119,25,0,0,0,0,0,0,0,0,0,0,0,0,0,0,0,0,0,0,0,0,0,0,0,45,186,253,253,150,27,0,0,0,0,0,0,0,0,0,0,0,0,0,0,0,0,0,0,0,0,0,0,0,16,93,252,253,187,0,0,0,0,0,0,0,0,0,0,0,0,0,0,0,0,0,0,0,0,0,0,0,0,0,249,253,249,64,0,0,0,0,0,0,0,0,0,0,0,0,0,0,0,0,0,0,0,0,0,46,130,183,253,253,207,2,0,0,0,0,0,0,0,0,0,0,0,0,0,0,0,0,0,0,0,39,148,229,253,253,253,250,182,0,0,0,0,0,0,0,0,0,0,0,0,0,0,0,0,0,0,24,114,221,253,253,253,253,201,78,0,0,0,0,0,0,0,0,0,0,0,0,0,0,0,0,0,23,66,213,253,253,253,253,198,81,2,0,0,0,0,0,0,0,0,0,0,0,0,0,0,0,0,18,171,219,253,253,253,253,195,80,9,0,0,0,0,0,0,0,0,0,0,0,0,0,0,0,0,55,172,226,253,253,253,253,244,133,11,0,0,0,0,0,0,0,0,0,0,0,0,0,0,0,0,0,0,136,253,253,253,212,135,132,16,0,0,0,0,0,0,0,0,0,0,0,0,0,0,0,0,0,0,0,0,0,0,0,0,0,0,0,0,0,0,0,0,0,0,0,0,0,0,0,0,0,0,0,0,0,0,0,0,0,0,0,0,0,0,0,0,0,0,0,0,0,0,0,0,0,0,0,0,0,0,0,0,0,0,0,0,0,0,0,0,0,0,0,0,0,0,0,0,0,0,0,0,0,0,0,0,0,0,0,0]
    // print shape
    for i in 0...783{
        if(i % 28 == 0){
            print("")
        }
        print("\(String(format: "% 2x", image[i]))",terminator: "")
    }
    print("")

    let array = try MLMultiArray(shape: [784], dataType: MLMultiArrayDataType.float32)
    for i in 0...(image.count-1) {
        let value = Double(image[i]) / 255.0
        array[i]  = NSNumber(floatLiteral: value)
    }
    let mnistInput = MnistInput(input__x_input__0: array)
    let result = try mnist.prediction(input: mnistInput)
    for i in 0...(result.Softmax__0.count - 1){
        let item = result.Softmax__0[i]
        print("\(i) possibility : \(String(format:"%.2f",item.floatValue))")
    }
}catch{
    print(error)
}
结果:
最可能是值是 5
0 possibility : 0.00
1 possibility : 0.00
2 possibility : 0.00
3 possibility : 0.14
4 possibility : 0.00
5 possibility : 0.86
6 possibility : 0.00
7 possibility : 0.00
8 possibility : 0.00
9 possibility : 0.00
评估模型(改进)
上面是直接使用数组进行评估模型,下面我们直接读取图片文件来实现评估模型。
let imagePath = Bundle.main.path(forResource: "test_image", ofType: "png")
let imageData:UIImage = UIImage(contentsOfFile: imagePath!)!
imageView.image = imageData
let width = imageData.cgImage?.width
let height = imageData.cgImage?.height

let data:UnsafePointer<UInt8> = CFDataGetBytePtr(imageData.cgImage?.dataProvider?.data!)
var image = Array<Int>()
for i in 0...(width! * height! - 1){
    let postion = i*4
    image.append(Int(data[postion]))
}

let mnist = Mnist()
do{
    // print shape
    for i in 0...783{
        if(i % 28 == 0){
            print("")
        }
        print("\(String(format: "% 2x", image[i]))",terminator: "")
    }
    print("")

    let array = try MLMultiArray(shape: [784], dataType: MLMultiArrayDataType.float32)
    for i in 0...(image.count-1) {
        let value = Double(image[i]) / 255.0
        array[i]  = NSNumber(floatLiteral: value)
    }
    let mnistInput = MnistInput(input__x_input__0: array)
    let result = try mnist.prediction(input: mnistInput)
    var text = ""
    for i in 0...(result.Softmax__0.count - 1){
        let item = result.Softmax__0[i]
        text += "\(i) possibility : \(String(format:"%.2f",item.floatValue))\n"
    }
    label.text = text
}catch{
    print(error)
}
添加图片
 test_image.png
  image.png
  image.png
测试结果
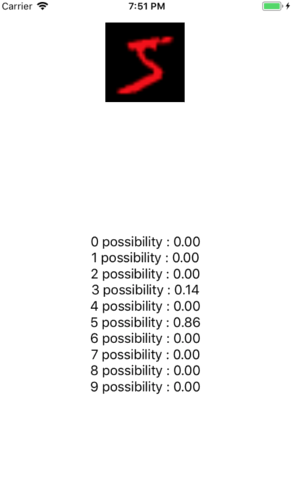 image.png
