

在现在的Android开发中,请求网络获取数据基本上成了我们的标配。在早期的Android开发中会有人使用HttpClient、HttpUrlConnection或者Volley等网络请求方式,但对于如今(2018年)而言,绝大多数的开发者都会使用OkHttp+Retrofit+RxJava进行网络请求,而对于这三者而言,实际请求网络的框架是OkHttp,所以OkHttp的重要性不言而喻。
OkHttp的基本用法
//创建OkHttpClient对象
OkHttpClient client = new OkHttpClient();

String run(String url) throws IOException {
   //创建Request请求对象
  Request request = new Request.Builder()
      .url(url)
      .build();

   //创建Call对象,并执行同步获取网络数据
  Response response = client.newCall(request).execute();
  return response.body().string();
}
使用OkHttp基本是以下四步:
- 创建OkHttpClient对象
- 创建Request请求对象
- 创建Call对象
- 同步请求调用call.execute();异步请求调用call.enqueue(callback) 接下来我会对这四步进行详细的说明。
创建OkHttpClient对象
通常来说,我们使用OkHttp并不会直接通过new OkHttpClient()来创建出一个OkHttpClient。一般来说,我们会对这个OkHttpClient做一些配置,比如:
OkHttpClient.Builder().connectTimeout(
                DEFAULT_MILLISECONDS, TimeUnit.SECONDS).readTimeout(
                DEFAULT_MILLISECONDS, TimeUnit.SECONDS).addInterceptor { chain ->
            val builder = chain.request().newBuilder()
            headerMap?.forEach {
                builder.addHeader(it.key, it.value)
            }
            val request = builder.build()
            chain.proceed(request)
        }.addInterceptor(httpLoggingInterceptor).build()
上面是一段使用Kotlin代码创建OkHttpClient的过程,很明显,OkHttpClient内部是使用了 Builder 模式,好处很明显: 我们在创建对象的同时可以自由的配置我们需要的参数 。我们简单看一下OkHttpClient内部类Builder中的构造方法,看一下OkHttpClient内部都可以做哪些配置:
public Builder() {
       //默认的分发器
      dispatcher = new Dispatcher();
      protocols = DEFAULT_PROTOCOLS;
      connectionSpecs = DEFAULT_CONNECTION_SPECS;
      //事件监听工厂
      eventListenerFactory = EventListener.factory(EventListener.NONE);
      proxySelector = ProxySelector.getDefault();
      cookieJar = CookieJar.NO_COOKIES;
      socketFactory = SocketFactory.getDefault();
      hostnameVerifier = OkHostnameVerifier.INSTANCE;
      certificatePinner = CertificatePinner.DEFAULT;
      proxyAuthenticator = Authenticator.NONE;
      authenticator = Authenticator.NONE;
      connectionPool = new ConnectionPool();
      dns = Dns.SYSTEM;
      followSslRedirects = true;
      followRedirects = true;
      retryOnConnectionFailure = true;
      //默认连接超时10s
      connectTimeout = 10_000;
      //默认读取超时10s
      readTimeout = 10_000;
      //默认写入超时10s
      writeTimeout = 10_000;
      pingInterval = 0;
    }
上面的代码中我们非常熟悉的就是连接超时、读取超时、写入超时,它们的默认事件都是10s,其实这也提醒我们,如果我们想要设置的超时时间也是10s的话,完全没有必要重复进行配置,其实我的建议也是不需要配置,直接使用默认的就好。值得注意的是 Dispatcher 这个类,这是一个网络请求的分发器,主要作用是在同步,异步网络请求时会做一些不同的分发处理,我们先有个印象即可, Dispatcher 会在之后详细的分析。
可能细心的小伙伴这时候会说了:我平时会对OkHttpClient加上一些interceptor来拦截网络请求,比方说在请求之前加上token等请求头之类的,上面这段代码为什么没有拦截器相关的变量呢?
没错,OkHttpClient中的Builder类内部确实是有拦截器相关成员变量,只不过没写在Builder的构造方法内:
public static final class Builder {
    //省略无关代码......
    final List<Interceptor> interceptors = new ArrayList<>();
    final List<Interceptor> networkInterceptors = new ArrayList<>();
    //省略无关代码......
}
我们平常添加的interceptor就存放在interceptors这个ArrayList中。OkHttpClient对象的配置创建不是什么难以理解的点,接下来我们看Request对象的创建。
创建Request请求对象
为什么要创建Request对象,很简单,我们请求网络需要一些必要的参数,比如url,请求方式是get或者post等等信息。而Request这个类就是对这些网络请求参数的统一封装。看一下代码就一目了然了:
public final class Request {
  final HttpUrl url;
  final String method;
  final Headers headers;
  final @Nullable RequestBody body;
  final Object tag;

  private volatile CacheControl cacheControl; // Lazily initialized.
  //省略无关代码......
}
相信大家都能看明白,这个Request类中封装了url、请求方式、请求头、请求体等等网络请求相关的信息。Request里面也是一个Builder模式,这里就不赘述了。
创建Call对象
Call对象我们可以这样理解:Call对象是对 一次 网络请求的封装。注意这个关键字: 一次 ,熟悉OkHttp的同学应该都知道,一个Call对象只能被执行一次,不论是同步execute还是异步的enqueue,那么这个只能执行一次的特性是如何保证的呢?我们来看代码:
@Override public Call newCall(Request request) {
    //实际上是通过 RealCall.newRealCall 来获取Call对象
    return RealCall.newRealCall(this, request, false /* for web socket */);
  }
上面的代码能看到OkHttpClient的newCall实际上是通过RealCall.newRealCall(this, request, false /* for web socket */)来获得的,我们来看一下这个RealCall:
final class RealCall implements Call {
  final OkHttpClient client;
  //错误重试与重定向拦截器
  final RetryAndFollowUpInterceptor retryAndFollowUpInterceptor;
  //监听OkHttp网络请求各个阶段的事件监听器
  private EventListener eventListener;
  final Request originalRequest;
  final boolean forWebSocket;
  //判断Call对象是否被执行过的标志变量
  private boolean executed;

  private RealCall(OkHttpClient client, Request originalRequest, boolean forWebSocket) {
    this.client = client;
    this.originalRequest = originalRequest;
    this.forWebSocket = forWebSocket;
    this.retryAndFollowUpInterceptor = new RetryAndFollowUpInterceptor(client, forWebSocket);
  }

  static RealCall newRealCall(OkHttpClient client, Request originalRequest, boolean forWebSocket) {
    // Call只是一个接口,我们实际创建的是Call的实现类RealCall的对象
    RealCall call = new RealCall(client, originalRequest, forWebSocket);
    call.eventListener = client.eventListenerFactory().create(call);
    return call;
  }

  Override public Response execute() throws IOException {
    //确保线程安全的情况下通过executed来保证每个Call只被执行一次
    synchronized (this) {
      if (executed) throw new IllegalStateException("Already Executed");
      executed = true;
    }
   //省略无关代码......
  }

  @Override public void enqueue(Callback responseCallback) {
     /确保线程安全的情况下通过executed来保证每个Call只被执行一次
    synchronized (this) {
      if (executed) throw new IllegalStateException("Already Executed");
      executed = true;
    }
    //省略无关代码
  }
  //省略无关代码......
}
我们可以看到,Call只是一个接口,我们创建的实际上是RealCall对象。在RealCall中存在一个 execute 的成员变量,在execute()和enqueue(Callback responseCallback) 方法中都是通过 execute 来确保每个RealCall对象只会被执行一次。
创建Call对象的过程其实也是很简单的,麻烦的地方在最后一步: **execute()和enqueue(Callback responseCallback) **
同步请求与异步请求
前三步非常简单,我们可以知道并没有涉及网络的请求,所以核心肯定是在这关键的第四步。
同步请求execute()和异步请求enqueue(Callback responseCallback)
先说同步请求,看代码:
@Override public Response execute() throws IOException {
    //通过executed确保每个Call对象只会被执行一次
    synchronized (this) {
      if (executed) throw new IllegalStateException("Already Executed");
      executed = true;
    }
    captureCallStackTrace();
    //网络请求开始的回调
    eventListener.callStart(this);
    try {
      //调用分发器的executed(this)方法
      client.dispatcher().executed(this);
      //真实的网络请求是在这里处理的
      Response result = getResponseWithInterceptorChain();
      if (result == null) throw new IOException("Canceled");
      return result;
    } catch (IOException e) {
      //网络请求失败的回调
      eventListener.callFailed(this, e);
      throw e;
    } finally {
      //网络请求结束
      client.dispatcher().finished(this);
    }
  }
execute() 方法中首先通过executed确保每个Call对象只会被执行一次,之后调用了eventListener.callStart(this);来执行网络请求开始的回调。接下来调用了client.dispatcher().executed(this),那么这句代码具体是做了什么呢:
public Dispatcher dispatcher() {
    //返回了一个OkHttpClient内部的dispather分发器
    return dispatcher;
  }
这句代码首先返回一个 dispatcher ,这个分发器我们在上面也提到过,这是一个比较重要的概念,来看一下这个分发器:
public final class Dispatcher {
  //最大请求数
  private int maxRequests = 64;
  //每个host的最大请求数
  private int maxRequestsPerHost = 5;
  //网络请求处于空闲时的回调
  private @Nullable Runnable idleCallback;
  //线程池的实现
  private @Nullable ExecutorService executorService;
  //就绪等待网络请求的异步队列
  private final Deque<AsyncCall> readyAsyncCalls = new ArrayDeque<>();
  //正在执行网络请求的异步队列
  private final Deque<AsyncCall> runningAsyncCalls = new ArrayDeque<>();
  //正在执行网络请求的同步队列
  private final Deque<RealCall> runningSyncCalls = new ArrayDeque<>();

  //忽略无关代码......

  synchronized void enqueue(AsyncCall call) {
    if (runningAsyncCalls.size() < maxRequests && runningCallsForHost(call) < maxRequestsPerHost) {
      runningAsyncCalls.add(call);
      executorService().execute(call);
    } else {
      readyAsyncCalls.add(call);
    }
  }

  synchronized void executed(RealCall call) {
    //将call对象加入网络请求的同步队列中
    runningSyncCalls.add(call);
  }

  //忽略无关代码......
}
可以看到 Dispatcher 这个分发器类内部定义了很多的成员变量:maxRequests 最大请求个数,默认值是64; maxRequestsPerHost 每个host的最大请求个数,这个host是什么?举个栗子,一个URL为 http://gank.io/api ,那么host就是 http://gank.io/ 相当于baseUrl。 ** idleCallback** 这是一个空闲状态时的回调,当我们的所有的网络请求队列为空时会执行。 executorService 这是一个线程池,主要是为了高效执行异步的网络请求而创建的线程池,之后会再次提到它。接下来就是比较重要的三个队列:
- readyAsyncCalls -> 在就绪等待的异步Call队列
- runningAsyncCalls -> 正在执行的异步Call队列
- runningSyncCalls -> 正在执行的同步Call队列
对于这三个队列来说,执行同步请求的Call对象会加入到runningSyncCalls中;执行异步请求的Call对象会加入到readyAsyncCalls或者runningAsyncCalls中,那么什么时候加入到等待队列,什么时候加入到执行队列呢?简单的说,如果执行异步网络请求的线程池很忙,异步请求的Call对象会加入到等待队列;反之则加入到执行队列。那么这个忙于不忙的标准是什么呢?很简单,在enqueue方法中有runningAsyncCalls.size() < maxRequests && runningCallsForHost(call) < maxRequestsPerHost一个判断的标准,即正在执行的异步队列中Call对象个数小于maxRequests(64)并且执行队列中的同一个host对应的Call对象个数小于maxRequestsPerHost(5)的时候。
说完了 Dispatcher 关键的成员变量,我们来看一下它的 **executed(RealCall call) ** 方法:
 synchronized void executed(RealCall call) {
    //将call对象加入网络请求的同步队列中
    runningSyncCalls.add(call);
  }
这是一个synchronized修饰的方法,为了确保线程安全。Dispatcher中的executed(RealCall call)方法及其简单,就是把Call对象加入到同步Call队列中。对,你没有看错,它确实就只有这一行代码,没什么复杂的操作。
说完了 Dispatcher 中的同步方法,我们再来看一下异步:
  synchronized void enqueue(AsyncCall call) {
      //判断Call对象应该添加到等待队列还是执行队列
    if (runningAsyncCalls.size() < maxRequests && runningCallsForHost(call) < maxRequestsPerHost) {
      //加入执行队列
      runningAsyncCalls.add(call);
      //线程池开启线程执行异步网络请求
      executorService().execute(call);
    } else {
      //加入等待队列
      readyAsyncCalls.add(call);
    }
  }
和同步方法相比,异步方法中的内容要稍微多一点。首先是判断Call对象应该添加到等待队列还是执行队列,这个判断上面已经说过。加入执行队列后,开启线程池并执行Call对象。这里需要注意的是异步请求时的Call对象和同步请求时不一样,会转换成一个 AsyncCall 对象,这个 AsyncCall 实际上是一个 NamedRunnable ,那既然是一个 Runnable ,我们肯定要看一下它的execute()方法:
@Override protected void execute() {
      boolean signalledCallback = false;
      try {
        //核心的请求网络方法
        Response response = getResponseWithInterceptorChain();
        if (retryAndFollowUpInterceptor.isCanceled()) {
          signalledCallback = true;
          responseCallback.onFailure(RealCall.this, new IOException("Canceled"));
        } else {
          signalledCallback = true;
          responseCallback.onResponse(RealCall.this, response);
        }
      } catch (IOException e) {
        if (signalledCallback) {
          // Do not signal the callback twice!
          Platform.get().log(INFO, "Callback failure for " + toLoggableString(), e);
        } else {
          eventListener.callFailed(RealCall.this, e);
          responseCallback.onFailure(RealCall.this, e);
        }
      } finally {
        client.dispatcher().finished(this);
      }
    }
  }
其实整段代码看似非常多,核心就只有Response response = getResponseWithInterceptorChain()这一句:通过拦截器链获取网络返回结果。其实不止是异步请求,同步请求的核心也是这一行代码。我们继续看一下RealCall中的execute方法:
@Override public Response execute() throws IOException {
    synchronized (this) {
      if (executed) throw new IllegalStateException("Already Executed");
      executed = true;
    }
    captureCallStackTrace();
    eventListener.callStart(this);
    try {
      client.dispatcher().executed(this);
      //跟异步请求一样,核心也是通过拦截器链来获取网络数据
      Response result = getResponseWithInterceptorChain();
      if (result == null) throw new IOException("Canceled");
      return result;
    } catch (IOException e) {
      eventListener.callFailed(this, e);
      throw e;
    } finally {
      client.dispatcher().finished(this);
    }
  }
很明显,在client.dispatcher().executed(this)将Call对象加入同步请求队列中之后,同样调用的是Response result = getResponseWithInterceptorChain()。明白了吗,不论是在同步请求或者是异步请求,最终获取网络数据的核心处理都是一致的:getResponseWithInterceptorChain() 。
接下来我们来分析这个在OkHttp中非常核心的方法:
Response getResponseWithInterceptorChain() throws IOException {
    //创建存放拦截器的list
    List<Interceptor> interceptors = new ArrayList<>();
    //拦截器列表加入我们配置OkHttpClient时添加的拦截器
    interceptors.addAll(client.interceptors());
    //加入重试与重定向拦截器
    interceptors.add(retryAndFollowUpInterceptor);
    //加入桥接拦截器
    interceptors.add(new BridgeInterceptor(client.cookieJar()));
    //加入缓存拦截器
    interceptors.add(new CacheInterceptor(client.internalCache()));
    //加入连接拦截器
    interceptors.add(new ConnectInterceptor(client));
    if (!forWebSocket) {
      //如果不是针对WebSocket的网络访问,加入网络拦截器
      interceptors.addAll(client.networkInterceptors());
    }
    interceptors.add(new CallServerInterceptor(forWebSocket));
    //创建拦截器链
    Interceptor.Chain chain = new RealInterceptorChain(interceptors, null, null, null, 0,
        originalRequest, this, eventListener, client.connectTimeoutMillis(),
        client.readTimeoutMillis(), client.writeTimeoutMillis());

    //执行拦截器链
    return chain.proceed(originalRequest);
  }
在这个方法中首先创建了一个ArrayList,用来存放所有的拦截器。从上到下可以看到,一共是添加了7中不同的拦截器:
- client.interceptors() -> 我们自己添加的请求拦截器,通常是做一些添加统一的token之类操作
- retryAndFollowUpInterceptor -> 主要负责错误重试和请求重定向
- BridgeInterceptor -> 负责添加网络请求相关的必要的一些请求头,比如Content-Type、Content-Length、Transfer-Encoding、User-Agent等等
- CacheInterceptor -> 负责处理缓存相关操作
- ConnectInterceptor -> 负责与服务器进行连接的操作
- networkInterceptors -> 同样是我们可以添加的拦截器的一种,它与client.interceptors() 不同的是二者拦截的位置不一样。
- CallServerInterceptor -> 在这个拦截器中才会进行真实的网络请求
在添加完各种拦截器后,创建了一个拦截器链,然后执行了拦截器链的proceed方法,我们来看一下这个proceed方法:
@Override public Response proceed(Request request) throws IOException {
    return proceed(request, streamAllocation, httpCodec, connection);
  }
这个方法调用的是 RealInterceptorChain 内部的另一个proceed方法,再跟进去看一下:
public Response proceed(Request request, StreamAllocation streamAllocation, HttpCodec httpCodec,
     RealConnection connection) throws IOException {
   //忽略无关代码......

   // 获取拦截链中的下一个拦截器
   RealInterceptorChain next = new RealInterceptorChain(interceptors, streamAllocation, httpCodec,
       connection, index + 1, request, call, eventListener, connectTimeout, readTimeout,
       writeTimeout);
   Interceptor interceptor = interceptors.get(index);
   //通过调用拦截器的intercept方法获取网络数据
   Response response = interceptor.intercept(next);

   //忽略无关代码......

   return response;
 }
这个方法中主要分为两步:获取拦截链中的下一个拦截器,然后调用这个拦截器的 intercept(next) 方法,在构建OkHttpClietn时添加过interceptor的同学应该都比较清楚,在intercept()方法中我们必须要存在chain.proceed(request)这样一句代码。类似于这样:
OkHttpClient.Builder().connectTimeout(
                DEFAULT_MILLISECONDS, TimeUnit.SECONDS).readTimeout(
                DEFAULT_MILLISECONDS, TimeUnit.SECONDS).addInterceptor { chain ->
            val builder = chain.request().newBuilder()
            headerMap?.forEach {
                builder.addHeader(it.key, it.value)
            }
            val request = builder.build()
            //将拦截器链执行下去
            chain.proceed(request)
        }.addInterceptor(httpLoggingInterceptor).build()
每个拦截器内部的intercept方法内部必须存在chain.proceed(request),同样,OkHttp提供的拦截器的intercept方法内部都必须存在chain.proceed(request)这句代码,除了最后一个拦截器CallServerInterceptor。
整个逻辑是不是有些混乱,没关系,我们来整理一下。
- getResponseWithInterceptorChain()方法通过调用chain.proceed(originalRequest)开启拦截链。
- 在RealInterceptorChain的proceed(request)方法中会调用下一个拦截器中的intercept(chain)方法
- 在拦截器中的intercept(chain)中会调用chain.proceed(request)
上面是一个循环调用,由于每次获取的拦截器是拦截器列表中的下一个拦截器,所以实现了顺序调用拦截器列表中的每个不同的拦截器的拦截方法。因为最后一个拦截器并没有调用
chain.proceed(request),所以能够结束循环调用。
再来张图,加深大家对拦截器链的理解:
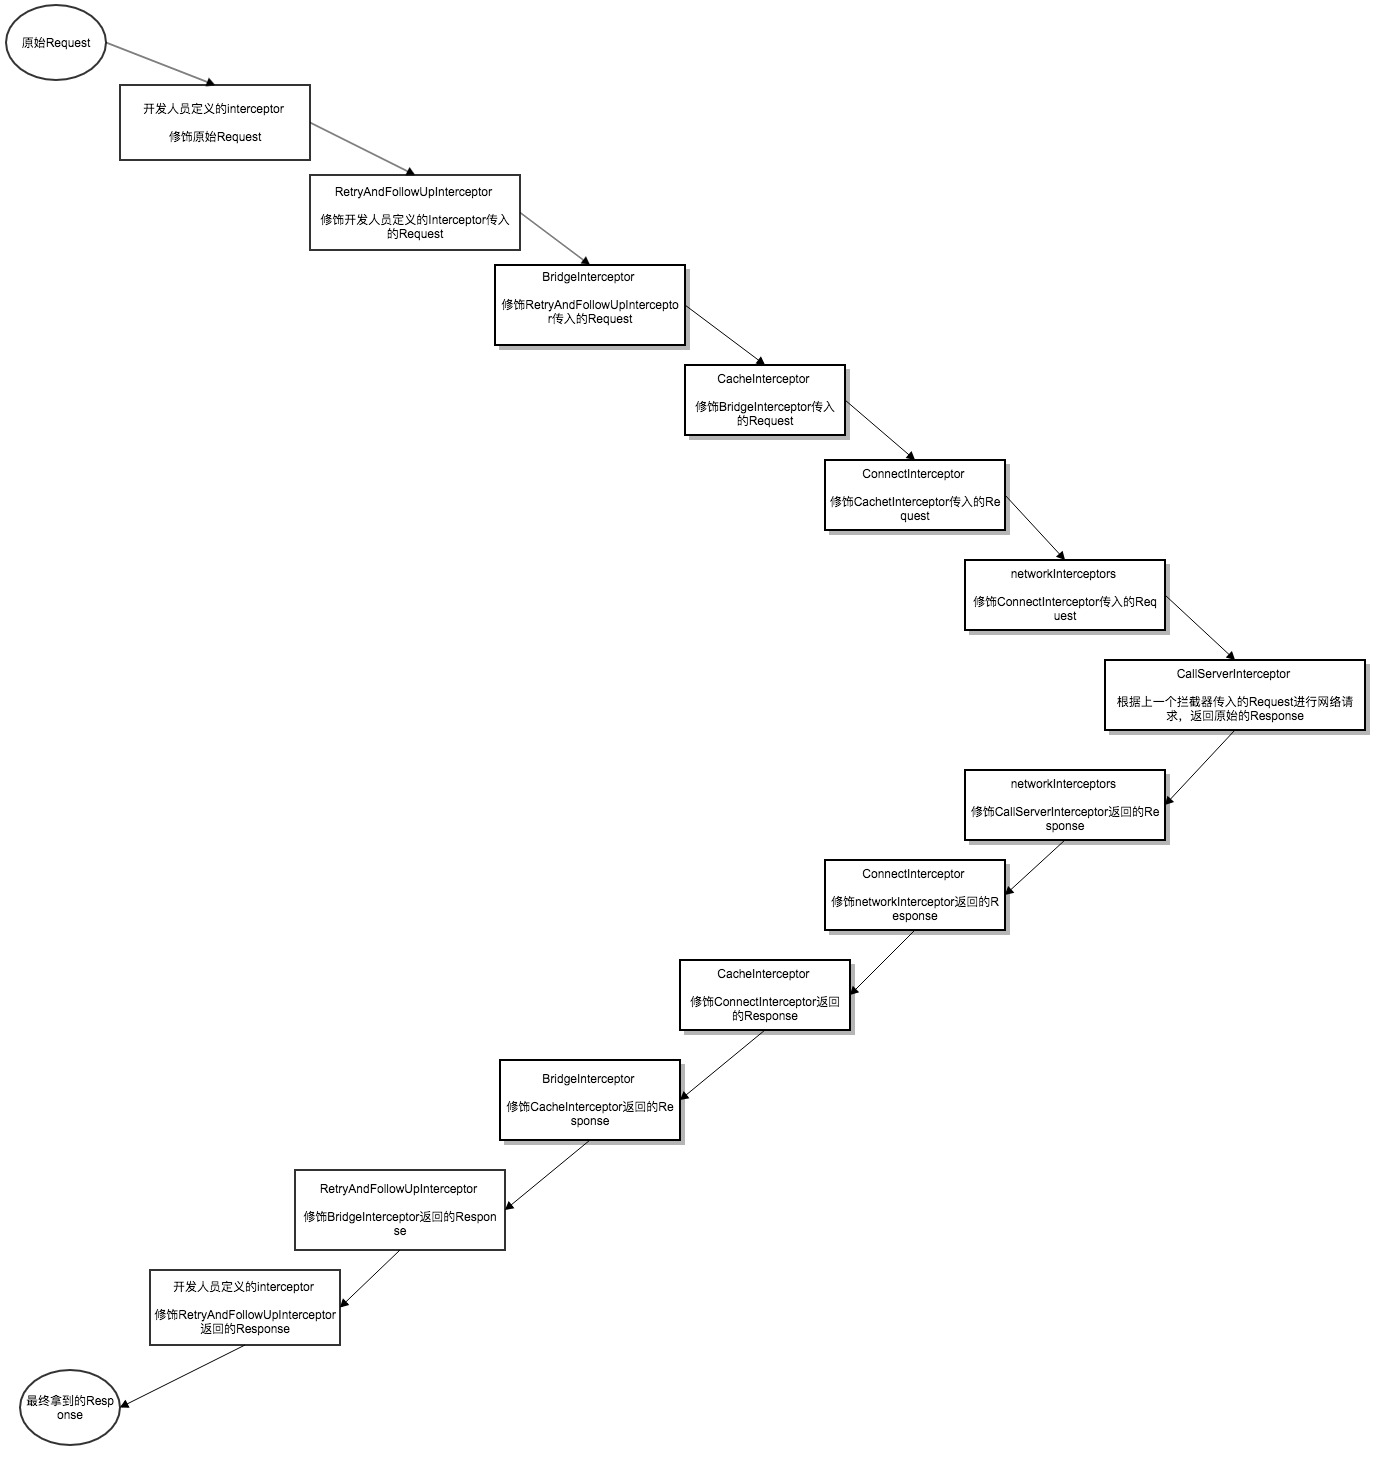
看完这张图,小伙伴们应该会对整个拦截器链的运作流程有一定的了解。到此为止,OkHttp的源码分析就告一段落了,具体每个拦截器中的实现细节,大家如果有兴趣的话可以自己去深入了解一下,我这里就不再赘述了。
