

目录
- 什么是服务端渲染技术及其应用场景
- 什么是预渲染技术,服务端渲染 VS 预渲染
- 服务端渲染实现的原理
- 搭建一个服务端渲染项目
- 服务端渲染性能优化
什么是Vue服务端渲染(SSR)
所谓的Vue服务端渲染就是,将vue实例在服务端渲染成HTML字符串,将它们直接发送给浏览器,最后将静态标记“混合”为客户端上完全交互的应用程序。
为什么需要使用服务端渲染(SSR)
- 更好的SEO,由于搜索引擎爬虫抓取工具可以直接查看完全渲染的页面。
- 更快的首屏渲染速度。特别是对于网路速度慢或者运行缓慢的设备,无需等待所有的js都下载和解析完成才渲染页面,而是在服务端渲染好直接发送给客户端渲染页面。
服务端渲染(SSR) VS 预渲染(Prerendering)
- 相同点:都是解决单页面SEO的问题,更快的内容到达时间。
- 不同点: 1、实现原理和方案不同:SSR的实现依赖于node.js服务器做服务端构建静态资源, prerender的实现依赖于webpack集成为prerender-spa-plugin,将静态资源提取出来展示给前端。 2、服务端渲染可以做到服务端的实时编译,prerender只是在构建时简单的生成针对特定路由的静态HTML文件,来达到SEO的效果,prerender的优点是配置更简单,并可以把前端作为一个完全静态的站点。
Prerender的webpack配置
const path = require('path')
const PrerenderSPAPlugin = require('prerender-spa-plugin')

module.exports = {
  plugins: [
    ...
    new PrerenderSPAPlugin({
      // Required - The path to the webpack-outputted app to prerender.
      staticDir: path.join(__dirname, 'dist'),
      // Required - Routes to render.
      routes: [ '/', '/about', '/some/deep/nested/route' ],
    })
  ]
}
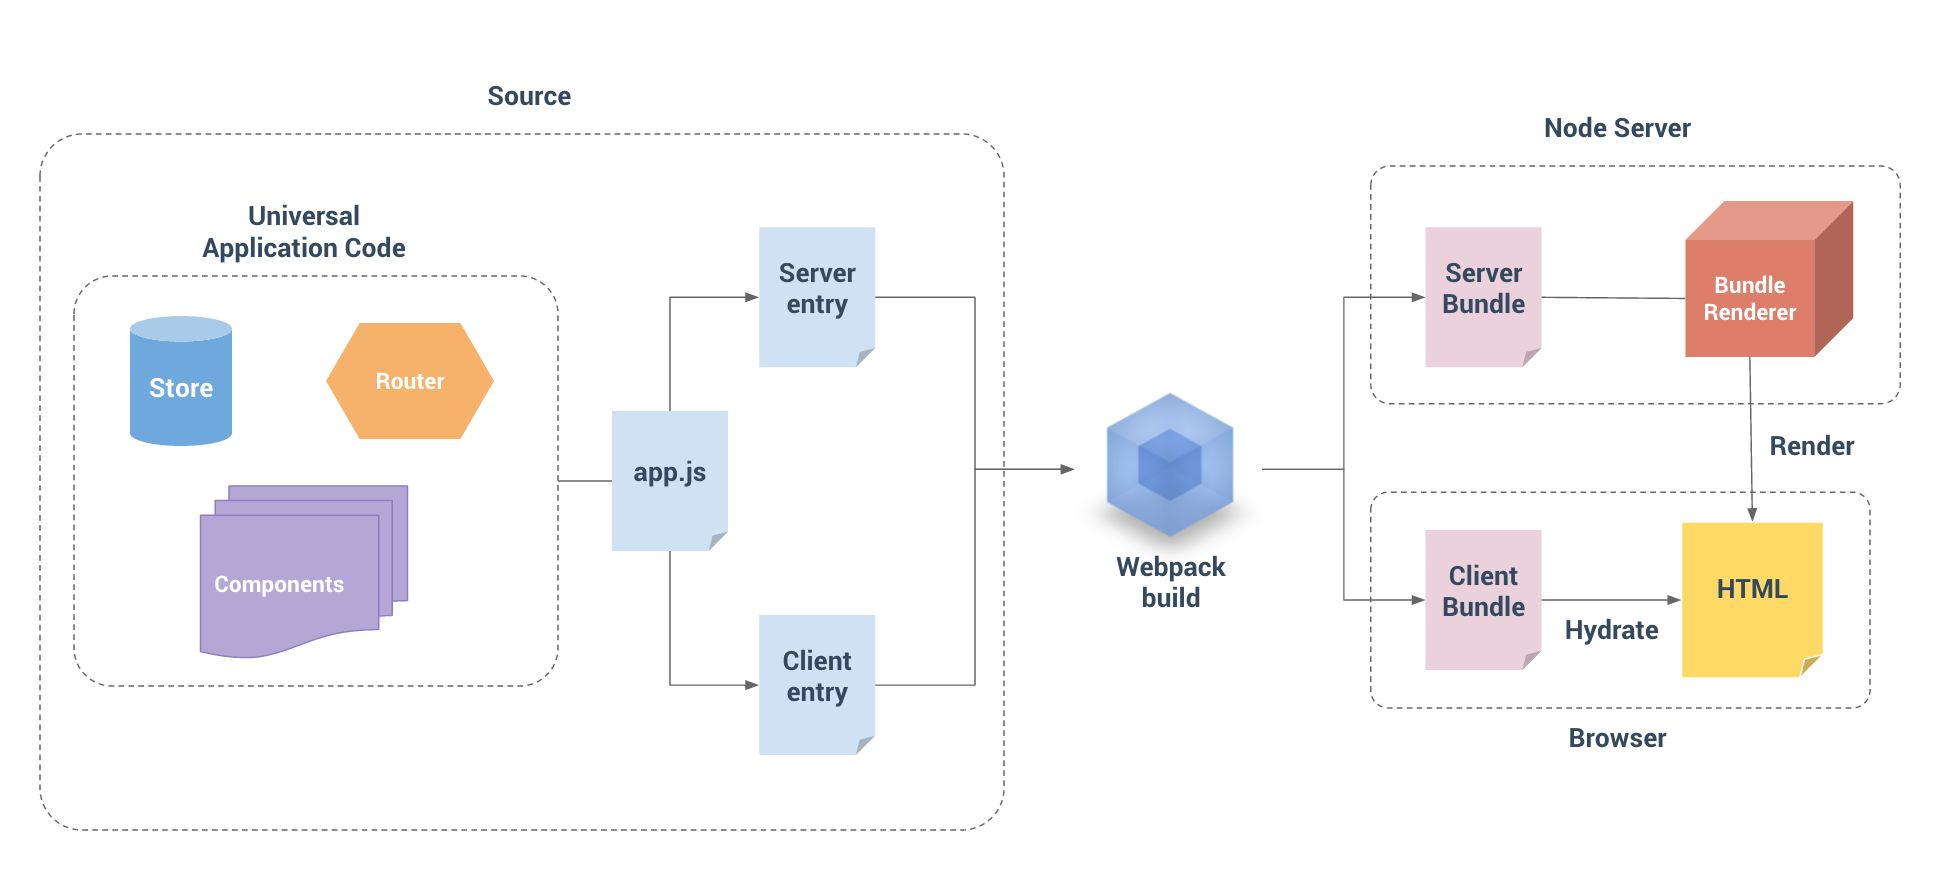
服务端渲染原理图解
SSR实现技术栈
服务端:Nodejs 前端框架 Vue2.0+ 前端构建工具:webpack 代码检查:eslint 源码:es6 前端路由:vue-router 状态管理:vuex 服务端通信:axios 日志管理:log4js 项目自动化部署工具:jenkins
服务端渲染一个Vue实例
// 第 1 步:创建一个 Vue 实例
const Vue = require('vue')
const app = new Vue({
  template: `<div>Hello World</div>`
})
// 第 2 步:创建一个 renderer
const renderer = require('vue-server-renderer').createRenderer()
// 第 3 步:将 Vue 实例渲染为 HTML
renderer.renderToString(app, (err, html) => {
  if (err) throw err
  console.log(html)
  // => <div data-server-rendered="true">Hello World</div>
})
集成Express的node服务
const Vue = require('vue')
const server = require('express')()
const renderer = require('vue-server-renderer').createRenderer()
server.get('*', (req, res) => {
  const app = new Vue({
    data: {
      url: req.url
    },
    template: `<div>访问的 URL 是: {{ url }}</div>`
  })
  renderer.renderToString(app, (err, html) => {
    if (err) {
      res.status(500).end('Internal Server Error')
      return
    }
    res.end(`
      <!DOCTYPE html>
      <html lang="en">
        <head><title>Hello</title></head>
        <body>${html}</body>
      </html>
    `)
  })
})
server.listen(8080)
服务端渲染项目目录结构

app.js 代码结构
import Vue from 'vue'
import App from './App.vue'
import store from './store'
import router from './router'
import { sync } from 'vuex-router-sync'
import Element from 'element-ui'
Vue.use(Element)

// sync the router with the vuex store.
// this registers `store.state.route`
sync(store, router)

/**
 * 创建vue实例
 * 在这里注入 router  store 到所有的子组件
 * 这样就可以在任何地方使用 `this.$router` and `this.$store`
 * @type {Vue$2}
 */
const app = new Vue({
  router,
  store,
  render: h => h(App)
})

/**
 * 导出 router and store.
 * 在这里不需要挂载到app上。这里和浏览器渲染不一样
 */
export { app, router, store }
entry-client.js代码结构
import 'es6-promise/auto'
import { app, store, router } from './app'

// prime the store with server-initialized state.
// the state is determined during SSR and inlined in the page markup.
if (window.__INITIAL_STATE__) {
  store.replaceState(window.__INITIAL_STATE__)
}

/**
 * 异步组件
 */
router.onReady(() => {
  // 开始挂载到dom上
  app.$mount('#app')
})

// service worker
if (process.env.NODE_ENV === 'production' && 'serviceWorker' in navigator) {
  navigator.serviceWorker.register('/service-worker.js')
}
server-entry.js代码结构
import { app, router, store } from './app'

const isDev = process.env.NODE_ENV !== 'production'

// This exported function will be called by `bundleRenderer`.
// This is where we perform data-prefetching to determine the
// state of our application before actually rendering it.
// Since data fetching is async, this function is expected to
// return a Promise that resolves to the app instance.
export default context => {
  const s = isDev && Date.now()

  return new Promise((resolve, reject) => {
    // set router's location
    router.push(context.url)

    // wait until router has resolved possible async hooks
    router.onReady(() => {
      const matchedComponents = router.getMatchedComponents()
      // no matched routes
      if (!matchedComponents.length) {
        reject({ code: 404 })
      }
      // Call preFetch hooks on components matched by the route.
      // A preFetch hook dispatches a store action and returns a Promise,
      // which is resolved when the action is complete and store state has been
      // updated.
      Promise.all(matchedComponents.map(component => {
        return component.preFetch && component.preFetch(store)
      })).then(() => {
        isDev && console.log(`data pre-fetch: ${Date.now() - s}ms`)
        // After all preFetch hooks are resolved, our store is now
        // filled with the state needed to render the app.
        // Expose the state on the render context, and let the request handler
        // inline the state in the HTML response. This allows the client-side
        // store to pick-up the server-side state without having to duplicate
        // the initial data fetching on the client.
        context.state = store.state
        resolve(app)
      }).catch(reject)
    })
  })
}
编写通用代码注意事项
我们的通用代码是一套代码可以分别在浏览器环境和node.js环境跑起来的,所以书写代码有些事情需要注意: 1、服务端渲染过程中只有beforeCreate和created生命周期函数会被调用。其他生命周期只能在浏览器环境惰性调用,node.js 会忽略掉这部分生命周期函数。 2、通用代码不可接受特定平台的 API(比如document、window),使用跨平台的axios(对浏览器和node.js暴露相同的API)做浏览器和node.js环境的请求发送。 3、大多数自定义指令直接操作 DOM,因此会在服务器端渲染(SSR)过程中导致错误
路由和代码分割
1、引入vue-router来做页面的单页应用 2、代码分割:应用程序的代码分割或惰性加载,有助于减少浏览器在初始渲染中下载的资源体积,可以极大地改善大体积 bundle 的可交互时间 (TTI - time-to-interactive)。这里的关键在于,对初始首屏而言,”只加载所需"。
// 这里进行修改……
import Foo from './Foo.vue'
// 改为这样:
const Foo = () => import('./Foo.vue')
数据预取和状态
在服务器端渲染(SSR)期间,我们本质上是在渲染我们应用程序的"快照",所以如果应用程序依赖于一些异步数据,那么在开始渲染过程之前,需要先预取和解析好这些数据。
另一个需要关注的问题是在客户端,在挂载(mount)到客户端应用程序之前,需要获取到与服务器端应用程序完全相同的数据 - 否则,客户端应用程序会因为使用与服务器端应用程序不同的状态,然后导致混合失败。
为了解决这个问题,获取的数据需要位于视图组件之外,即放置在专门的数据预取存储容器(data store)或"状态容器(state container))"中。首先,在服务器端,我们可以在渲染之前预取数据,并将数据填充到 store 中。此外,我们将在 HTML 中序列化(serialize)和内联预置(inline)状态。这样,在挂载(mount)到客户端应用程序之前,可以直接从 store 获取到内联预置(inline)状态。
为此,我们将使用官方状态管理库 Vuex。
客户端混合
所谓客户端激活,指的是 Vue 在浏览器端接管由服务端发送的静态 HTML,使其变为由 Vue 管理的动态 DOM 的过程。 如果你检查服务器渲染的输出结果,你会注意到应用程序的根元素有一个特殊的属性:
<div id="app" data-server-rendered="true">
data-server-rendered 特殊属性,让客户端 Vue 知道这部分 HTML 是由 Vue 在服务端渲染的,并且应该以激活模式进行挂载。
在开发模式下,Vue 将推断客户端生成的虚拟 DOM 树 (virtual DOM tree),是否与从服务器渲染的 DOM 结构 (DOM structure)匹配。如果无法匹配,它将退出混合模式,丢弃现有的 DOM 并从头开始渲染。在生产模式下,此检测会被跳过,以避免性能损耗。
客户端构建配置
客户端配置(client config)和基本配置(base config)大体上相同。显然你需要把 entry 指向你的客户端入口文件。除此之外,如果你使用 CommonsChunkPlugin,请确保仅在客户端配置(client config)中使用,因为服务器包需要单独的入口 chunk
const webpack = require('webpack')
const merge = require('webpack-merge')
const baseConfig = require('./webpack.base.config.js')
const VueSSRClientPlugin = require('vue-server-renderer/client-plugin')
module.exports = merge(baseConfig, {
  entry: '/path/to/entry-client.js',
  plugins: [
    // 重要信息:这将 webpack 运行时分离到一个引导 chunk 中,
    // 以便可以在之后正确注入异步 chunk。
    // 这也为你的 应用程序/vendor 代码提供了更好的缓存。
    new webpack.optimize.CommonsChunkPlugin({
      name: "manifest",
      minChunks: Infinity
    }),
    // 此插件在输出目录中
    // 生成 `vue-ssr-client-manifest.json`。
    new VueSSRClientPlugin()
  ]
})
服务端构建配置
服务器配置,是用于生成传递给 createBundleRenderer 的 server bundle。它应该是这样的:
const merge = require('webpack-merge')
const nodeExternals = require('webpack-node-externals')
const baseConfig = require('./webpack.base.config.js')
const VueSSRServerPlugin = require('vue-server-renderer/server-plugin')
module.exports = merge(baseConfig, {
  // 将 entry 指向应用程序的 server entry 文件
  entry: '/path/to/entry-server.js',
  // 这允许 webpack 以 Node 适用方式(Node-appropriate fashion)处理动态导入(dynamic import),
  // 并且还会在编译 Vue 组件时,
  // 告知 `vue-loader` 输送面向服务器代码(server-oriented code)。
  target: 'node',
  // 对 bundle renderer 提供 source map 支持
  devtool: 'source-map',
  // 此处告知 server bundle 使用 Node 风格导出模块(Node-style exports)
  output: {
    libraryTarget: 'commonjs2'
  },
  // https://webpack.js.org/configuration/externals/#function
  // https://github.com/liady/webpack-node-externals
  // 外置化应用程序依赖模块。可以使服务器构建速度更快,
  // 并生成较小的 bundle 文件。
  externals: nodeExternals({
    // 不要外置化 webpack 需要处理的依赖模块。
    // 你可以在这里添加更多的文件类型。例如,未处理 *.vue 原始文件,
    // 你还应该将修改 `global`(例如 polyfill)的依赖模块列入白名单
    whitelist: /\.css$/
  }),
  // 这是将服务器的整个输出
  // 构建为单个 JSON 文件的插件。
  // 默认文件名为 `vue-ssr-server-bundle.json`
  plugins: [
    new VueSSRServerPlugin()
  ]
})
缓存
在大多数情况下,服务器渲染的应用程序依赖于外部数据,因此本质上页面内容是动态的,不能持续长时间缓存。然而,如果内容不是用户特定(user-specific)(即对于相同的 URL,总是为所有用户渲染相同的内容),我们可以利用名为 micro-caching 的缓存策略,来大幅度提高应用程序处理高流量的能力。
const microCache = LRU({
  max: 100,
  maxAge: 1000 // 重要提示:条目在 1 秒后过期。
})
const isCacheable = req => {
  // 实现逻辑为,检查请求是否是用户特定(user-specific)。
  // 只有非用户特定(non-user-specific)页面才会缓存
}
server.get('*', (req, res) => {
  const cacheable = isCacheable(req)
  if (cacheable) {
    const hit = microCache.get(req.url)
    if (hit) {
      return res.end(hit)
    }
  }
  renderer.renderToString((err, html) => {
    res.end(html)
    if (cacheable) {
      microCache.set(req.url, html)
    }
  })
})
流式渲染
对于 vue-server-renderer 的基本 renderer 和 bundle renderer 都提供开箱即用的流式渲染功能。所有你需要做的就是,用 renderToStream 替代 renderToString:
const stream = renderer.renderToStream(context)
返回的值是 Node.js stream:
let html = ''
stream.on('data', data => {
  html += data.toString()
})
stream.on('end', () => {
  console.log(html) // 渲染完成
})
stream.on('error', err => {
  // handle error...
})
Nuxt.js
从头搭建一个服务端渲染的应用是相当复杂的。Nuxt 是一个基于 Vue 生态的更高层的框架,为开发服务端渲染的 Vue 应用提供了极其便利的开发体验
