


前言
各位大佬们都来了就花点时间看看吧 看了之后来个小心心吧 不然没有动力继续写下去呀 哈哈
开始
预备知识
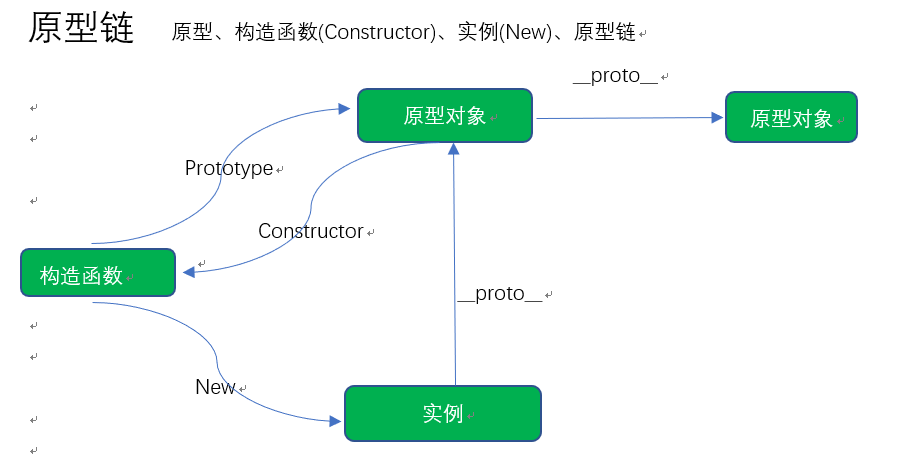
原型链知识---话不多说先上图,一图胜千言
function Test () {
    this.name = 'test';
}
var fn = new Test;
console.log(fn.name);
//我们称Test为构造函数  fn为构造函数Test的实例
//Test的prototype(原型)和实例的__proto__(原型)都指向了原型同一个原型对象
//原型对象的constructor指向了构造函数
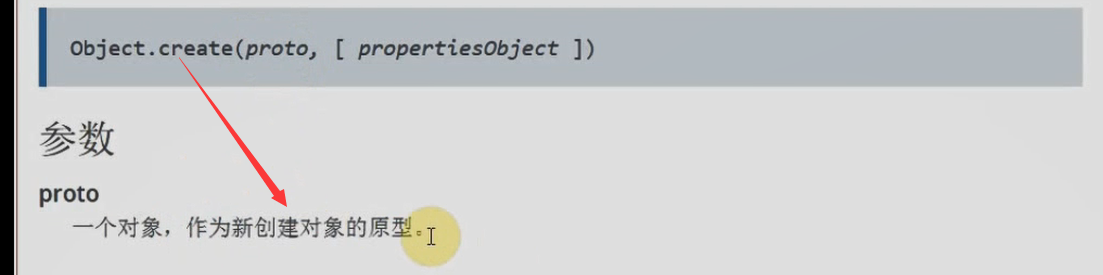
Object.create 再来一张图片很清晰的解释它的作用
第一类 最简单的继承---原型继承
// 原型继承
function A() {
    this.x = 'test';
}

A.prototype.getX = function () {
    console.log(this.x);

};

function B() {
    this.y = 'test2';
}

B.prototype = new A;
var fn = new B;
console.log(fn.x);//=>test
console.log(fn.y);//=>test2
fn.getX();//=>test
总结
这样就实现了B的实例fn继承了父类(A)中的所有属性和方法。我们把A自己的属性和方法(x)叫做私有属性,父类(A)原型上的方法和属性(getX)叫做公有属性。这种继承方式就是把父类(A)的公有属性和私有属性都继承到了子类(B)的公有属性中。
优点:简单实用
缺点:因为只是改变了prototype的指向导致constructor都指向了A,且都变成了自己的公有属性
改进方法
// 原型继承
function A() {
    this.x = 'test';
}

A.prototype.getX = function () {
    console.log(this.x);

};

function B() {
    this.y = 'test2';
}

B.prototype = new A;
B.prototype.constructor = B;//手动改变constructor
var fn = new B;
console.log(fn.x);//=>test
console.log(fn.y);//=>test2
fn.getX();//=>test
第二种 利用call改变this指向---call继承
// call继承
function A() {
    this.x = 'test';
}

A.prototype.getX = function () {
    console.log(this.x);

};

function B() {
    this.y = 'test2';
    A.call(this);
}

var fn = new B;
console.log(fn.x);//=>test
console.log(fn.y);//=>test2
总结
这样就实现了B的实例fn继承了A中的私有属性和方法。这种继承方式就是把A的私有有属性继承到了B的私有属性中。
优点:简单
缺点:只能继承父类的私有属性
第三种 复制属性实现继承---冒充对象继承
//冒充对象继承
function A() {
    this.x = 'test';
}

A.prototype.getX = function () {
    console.log(this.x);

};

function B() {
    this.y = 'test2';
    var temp = new A;
    for (key in temp) {
        // this=>实例fn
        this[key] = temp[key];
    }
    temp = null;
}
var fn = new B;
console.log(fn.x);//=>test
console.log(fn.y);//=>test2
总结
这样就实现了B的实例fn继承了A中的私有属性和方法。这种继承方式就是把A的私有有属性继承到了B的私有属性中。
缺点:只能继承父类的私有属性
第四种 混合模式继承
//混合模式继承
function A() {
    this.x = 'test';
}

A.prototype.getX = function () {
    console.log(this.x);

};

function B() {
    this.y = 'test2';
    A.call(this);

}

B.prototype = new A;
B.prototype.constructor = B;//手动改变constructor
var fn = new B;
console.log(fn.x);//=>test
console.log(fn.y);//=>test2
fn.getX();//=>test
总结
这样就实现了B的实例fn继承了A中的所有属性和方法。这种继承方式就是把父类(A)的公有属性和私有属性都继承到了子类(B)的公有属性中并且把父类的私有属性继承到了子类的私有属性中。
优点:很全面
缺点:因为只是改变了prototype的指向导致constructor都指向了父类(A),复制了两份父类的私有属性
第五种 Create继承模式
//Create模式继承
function A() {
    this.x = 'test';
}

A.prototype.getX = function () {
    console.log(this.x);

};

function B() {
    this.y = 'test2';
    A.call(this);

}

B.prototype = Object.create(A.prototype);
B.prototype.constructor = B;//手动改变constructor
var fn = new B;
console.log(fn.x);//=>test
console.log(fn.y);//=>test2
fn.getX();//=>test
总结
这样就实现了B的实例fn继承了A中的所有属性和方法。**这种继承方式就是把父类(A)的公有属性和私有属性分别都对应继承到了子类(B)的公有属性和私有属性中。
优点:很全面
缺点:Obiect.create 方法不支持IE 6 7 8
改进为兼容版本
//Create模式继承  兼容
function A() {
    this.x = 'test';
}

A.prototype.getX = function () {
    console.log(this.x);

};

function B() {
    this.y = 'test2';
    A.call(this);

}

B.prototype = myCreate(A.prototype);
B.prototype.constructor = B;//手动改变constructor
var fn = new B;
console.log(fn.x);//=>test
console.log(fn.y);//=>test2
fn.getX();//=>test

function myCreate (o) {
    function fn () {}
    fn.prototype = o ;
    return new fn;
}
总结
每种方式都有优点和缺点,推荐想简单使用第一种但最好使用最后一种。

写文章不容易希望各位小哥哥、小姐姐、大佬们给个小心心吧。
