

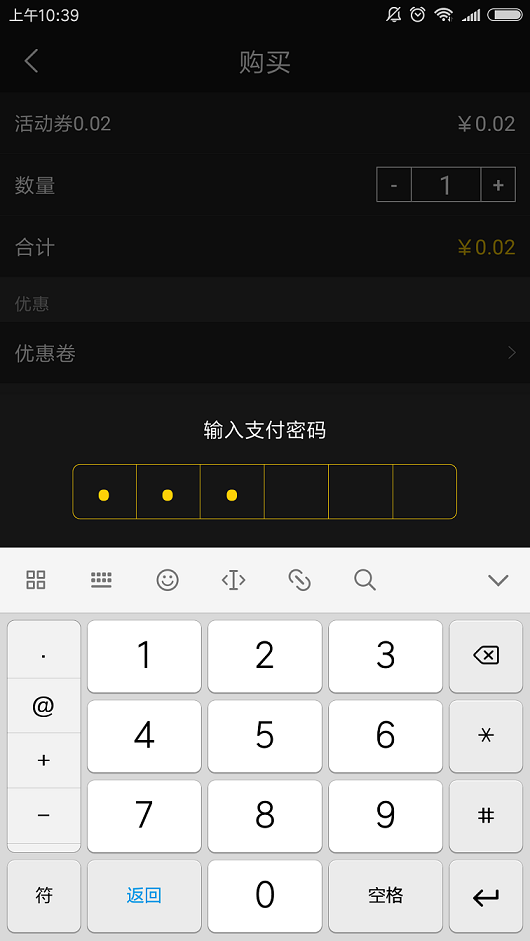
一.小伙伴们在做钱包支付中,相信会有个绕不过去的输入支付密码页面。下面小编给个效果图:
 898342572738938468.png
实现的原理很简单,要点如下:
a.自定义EditTextView
b.自定义EditTextView嵌套入Dialog中,点击紧贴软键盘弹出。
c.监听软键盘的弹出和收起事件,当软键盘收起,dialog也关闭。
二.下面开始讲述实现的步骤(围绕上面原理,按三个步骤阐述)。
步骤1.自定义EditTextView.这里,小编采用的解决方案是网上一个开源的EditTextView,源码如下:
public class PayPwdEditText extends RelativeLayout {

private EditText editText; //文本编辑框
private Context context;

private LinearLayout linearLayout; //文本密码的文本
private TextView[] textViews; //文本数组

private int pwdlength = 6; //密码长度, 默认6

private OnTextFinishListener onTextFinishListener;


public PayPwdEditText(Context context) {
    this(context, null);
}

public PayPwdEditText(Context context, AttributeSet attrs) {
    this(context, attrs, 0);
}

public PayPwdEditText(Context context, AttributeSet attrs, int defStyleAttr) {
    super(context, attrs, defStyleAttr);
    this.context = context;
}

/**
 * @param bgdrawable 背景drawable
 * @param pwdlength 密码长度
 * @param splilinewidth 分割线宽度
 * @param splilinecolor 分割线颜色
 * @param pwdcolor 密码字体颜色
 * @param pwdsize 密码字体大小
 */
public void initStyle(int bgdrawable, int pwdlength, float splilinewidth, int splilinecolor, int pwdcolor, int pwdsize)
{
    this.pwdlength = pwdlength;
    initEdit(bgdrawable);
    initShowInput(bgdrawable, pwdlength, splilinewidth, splilinecolor, pwdcolor, pwdsize);
}

/**
 * 初始化编辑框
 * @param bgcolor
 */
private void initEdit(int bgcolor)
{
    editText = new EditText(context);
    editText.setBackgroundResource(bgcolor);
    editText.setCursorVisible(false);
    editText.setTextSize(0);
    editText.setInputType(InputType.TYPE_NUMBER_VARIATION_PASSWORD | InputType.TYPE_CLASS_NUMBER);
    editText.setFilters(new InputFilter[]{new InputFilter.LengthFilter(pwdlength)});
    editText.addTextChangedListener(new TextWatcher() {
        @Override
        public void beforeTextChanged(CharSequence s, int start, int count, int after) {
            Editable etext = editText.getText();
            Selection.setSelection(etext, etext.length());
        }

        @Override
        public void onTextChanged(CharSequence s, int start, int before, int count) {

        }

        @Override
        public void afterTextChanged(Editable s) {
            initDatas(s);
            if(s.length() == pwdlength)
            {
                if(onTextFinishListener != null)
                {
                    onTextFinishListener.onFinish(s.toString().trim());
                }
            }
        }
    });
    LayoutParams lp = new LayoutParams(LayoutParams.MATCH_PARENT, ViewGroup.LayoutParams.MATCH_PARENT);
    lp.addRule(RelativeLayout.ALIGN_PARENT_BOTTOM, RelativeLayout.TRUE);
    addView(editText, lp);

}

/**
 * @param bgcolor 背景drawable
 * @param pwdlength 密码长度
 * @param slpilinewidth 分割线宽度
 * @param splilinecolor 分割线颜色
 * @param pwdcolor 密码字体颜色
 * @param pwdsize 密码字体大小
 */
public void initShowInput(int bgcolor, int pwdlength, float slpilinewidth, int splilinecolor, int pwdcolor, int pwdsize)
{
    //添加密码框父布局
    linearLayout = new LinearLayout(context);
    linearLayout.setBackgroundResource(bgcolor);
    LayoutParams layoutParams = new LayoutParams(LayoutParams.MATCH_PARENT, LayoutParams.MATCH_PARENT);
    linearLayout.setLayoutParams(layoutParams);
    linearLayout.setOrientation(LinearLayout.HORIZONTAL);
    addView(linearLayout);

    //添加密码框
    textViews = new TextView[pwdlength];
    LinearLayout.LayoutParams params = new LinearLayout.LayoutParams(0, LayoutParams.MATCH_PARENT);
    params.weight = 1;
    params.gravity = Gravity.CENTER;

    LinearLayout.LayoutParams params2 = new LinearLayout.LayoutParams(dip2px(context, slpilinewidth), LayoutParams.MATCH_PARENT);
    for(int i = 0; i < textViews.length; i++)
    {
        final int index = i;
        TextView textView = new TextView(context);
        textView.setGravity(Gravity.CENTER);
        textViews[i] = textView;
        textViews[i].setTextSize(pwdsize);
        textViews[i].setTextColor(context.getResources().getColor(pwdcolor));
        textViews[i].setInputType(InputType.TYPE_NUMBER_VARIATION_PASSWORD | InputType.TYPE_CLASS_NUMBER);
        linearLayout.addView(textView, params);


        if(i < textViews.length - 1)
        {
            View view = new View(context);
            view.setBackgroundColor(context.getResources().getColor(splilinecolor));
            linearLayout.addView(view, params2);
        }
    }
}

/**
 * 是否显示明文
 * @param showPwd
 */
public void setShowPwd(boolean showPwd) {
    int length = textViews.length;
    for(int i = 0; i < length; i++) {
        if (showPwd) {
            textViews[i].setTransformationMethod(PasswordTransformationMethod.getInstance());
        } else {
            textViews[i].setTransformationMethod(HideReturnsTransformationMethod.getInstance());
        }
    }
}

/**
 * 设置显示类型
 * @param type
 */
public void setInputType(int type)
{
    int length = textViews.length;
    for(int i = 0; i < length; i++) {
        textViews[i].setInputType(type);
    }
}

/**
 * 清除文本框
 */
public void clearText()
{
    editText.setText("");
    for(int i = 0; i < pwdlength; i++)
    {
        textViews[i].setText("");
    }
}

public void setOnTextFinishListener(OnTextFinishListener onTextFinishListener) {
    this.onTextFinishListener = onTextFinishListener;
}

/**
 * 根据输入字符,显示密码个数
 * @param s
 */
public void initDatas(Editable s)
{
    if(s.length() > 0)
    {
        int length = s.length();
        for(int i = 0; i < pwdlength; i++)
        {
            if(i < length)
            {
                for(int j = 0; j < length; j++)
                {
                    char ch = s.charAt(j);
                    textViews[j].setText(String.valueOf(ch));
                }
            }
            else
            {
                textViews[i].setText("");
            }
        }
    }
    else
    {
        for(int i = 0; i < pwdlength; i++)
        {
            textViews[i].setText("");
        }
    }
}

public String getPwdText()
{
    if(editText != null)
        return editText.getText().toString().trim();
    return "";
}

public static int dip2px(Context context, float dipValue) {
    final float scale = context.getResources().getDisplayMetrics().density;
    return (int) (dipValue * scale + 0.5f);
}

public interface OnTextFinishListener
{
    void onFinish(String str);
}

public void setFocus()
{
    editText.requestFocus();
    editText.setFocusable(true);
    showKeyBord(editText);
}
/**
 * 显示键盘
 * @param view
 */
public void showKeyBord(View view)
{
    InputMethodManager imm = (InputMethodManager) context.getSystemService(Context.INPUT_METHOD_SERVICE);
    imm.showSoftInput(view, InputMethodManager.SHOW_FORCED);

  }
}
该PayPwdEditText使用方法也很简单:
a.调用initStyle方法创建你需要设置的样式(参数说明,详见源码里面有方法注释):
  final PayPwdEditText ppet = (PayPwdEditText) view.findViewById(R.id.dialog_ppet);
  /**
   * @param bgcolor 背景drawable
   * @param pwdlength 密码长度
   * @param slpilinewidth 分割线宽度
   * @param splilinecolor 分割线颜色
   * @param pwdcolor 密码字体颜色
   * @param pwdsize 密码字体大小
   */
  ppet.initStyle(R.drawable.edit_num_bg, 6, 0.33f, R.color.yellow, R.color.yellow, 30);
其中,背景R.drawable.edit_num_bg所对应的样式代码如下:
  <?xml version="1.0" encoding="utf-8"?>
<selector xmlns:android="http://schemas.android.com/apk/res/android" >
<item android:state_pressed="false">
    <shape>
        <!--圆角大小-->
        <corners android:radius="5dip"/>
        <!--背景填充色-->
        <solid android:color="@color/rdb_bg"/>
        <!--背景外围分割线颜色及宽度-->
        <stroke android:color="@color/yellow" android:width="0.3dp"/>
    </shape>
</item>
</selector>
以上&&以下需要使用到的色值如下:
<color name="rdb_bg">#151515</color>
<color name="yellow">#fdd108</color>
<color name="transparent">#00000000</color>
b.设置密码输入完成后的回调:
   ppet.setOnTextFinishListener(new PayPwdEditText.OnTextFinishListener() {
        @Override
        public void onFinish(String str) {//密码输入完后的回调
            //手动收起软键盘
            InputMethodManager imm = (InputMethodManager)
                    getSystemService(Context.INPUT_METHOD_SERVICE);
            imm.hideSoftInputFromWindow(ppet.getWindowToken(), 0);
            //支付密码输入框消失
            walletDialog.dismiss();
        }
    });
c.延迟弹起软键盘,使PayPwdEditText获取焦点:
  new Handler().postDelayed(new Runnable() {
        @Override
        public void run() {
            ppet.setFocus();
        }
    }, 100);
步骤2.自定义的EditTextView设置好了,那么,得将它放到Dialog中加以使用了:
  //将此方法放在按钮的点击事件中即可弹出输入支付密码页面
   private void showEditPayPwdDialog() {
    View view = getLayoutInflater().inflate(R.layout.dialog_et_paypwd, null);
    walletDialog = new Dialog(this, R.style.walletFrameWindowStyle);
    walletDialog.setContentView(view, new ViewGroup.LayoutParams(ViewGroup.LayoutParams.MATCH_PARENT, ViewGroup.LayoutParams.WRAP_CONTENT));

    final Window window = walletDialog.getWindow();
    WindowManager.LayoutParams wl = window.getAttributes();
    //紧贴软键盘弹出
    wl.gravity = Gravity.BOTTOM;
    // 以下这两句是为了保证按钮可以水平满屏
    wl.width = ViewGroup.LayoutParams.MATCH_PARENT;
    wl.height = ViewGroup.LayoutParams.WRAP_CONTENT;
    walletDialog.onWindowAttributesChanged(wl);
    walletDialog.setCanceledOnTouchOutside(false);
    walletDialog.show();

    final PayPwdEditText ppet = (PayPwdEditText) view.findViewById(R.id.dialog_ppet);
   //调用initStyle方法创建你需要设置的样式
    ppet.initStyle(R.drawable.edit_num_bg, 6, 0.33f, R.color.yellow, R.color.yellow, 30);
    ppet.setOnTextFinishListener(new PayPwdEditText.OnTextFinishListener() {
        @Override
        public void onFinish(String str) {//密码输入完后的回调

            //手动收起软键盘
            InputMethodManager imm = (InputMethodManager)
                    getSystemService(Context.INPUT_METHOD_SERVICE);
            imm.hideSoftInputFromWindow(ppet.getWindowToken(), 0);
            //支付密码输入框消失
            walletDialog.dismiss();
             //可在此执行下一步操作

        }
    });
    //延迟弹起软键盘,使PayPwdEditText获取焦点
    new Handler().postDelayed(new Runnable() {
        @Override
        public void run() {
            ppet.setFocus();
        }
    }, 100);
}
Dialog对应的xml文件代码如下(@dimen/y30等为小编采用的适配方案,大家可自行转换为等值的px):
<?xml version="1.0" encoding="utf-8"?>
<LinearLayout xmlns:android="http://schemas.android.com/apk/res/android"
android:layout_width="match_parent"
android:layout_height="wrap_content"
android:alpha="13"
android:background="@color/transparent"
android:orientation="vertical">

<LinearLayout
    android:layout_width="match_parent"
    android:layout_height="wrap_content"
    android:layout_gravity="center"
    android:background="@color/rdb_bg"
    android:orientation="vertical">

    <RelativeLayout
        android:layout_width="match_parent"
        android:layout_height="match_parent">

        <TextView
            android:id="@+id/tv_title"
            android:layout_width="wrap_content"
            android:layout_height="wrap_content"
            android:layout_centerHorizontal="true"
            android:layout_marginTop="@dimen/y30"
            android:text="输入支付密码"
            android:textColor="@color/white" />

        <com.enterprise.moshare.xdht.view.widget.PayPwdEditText
            android:id="@+id/dialog_ppet"
            android:layout_marginTop="@dimen/y30"
            android:layout_width="@dimen/x544"
            android:layout_height="@dimen/y78"
            android:layout_below="@+id/tv_title"
            android:layout_marginBottom="@dimen/y40"
            android:layout_centerHorizontal="true" />
    </RelativeLayout>

  </LinearLayout>

</LinearLayout>
Dialog对应的style样式如下:
 <!--支付密码Dialog筛选器-->
<style name="walletFrameWindowStyle" parent="android:style/Theme.Dialog">
    <item name="android:windowBackground">@android:color/transparent</item>
    <item name="android:windowNoTitle">true</item>
</style>
步骤3:监听软键盘的弹出和收起事件,当软键盘收起,dialog也关闭。实现思路很简单:监听窗体的不可见区域的高度,判断是否大于屏幕高度的1/4即可(实现此步骤的目的是,当你点击软键盘中的收起按钮时,也能自行关闭Dialog)。
在Activity的onCreate方法中,加入如下代码即可实现监听:
    final View decorView = getWindow().getDecorView();
    decorView.getViewTreeObserver().addOnGlobalLayoutListener(new ViewTreeObserver.OnGlobalLayoutListener() {
        @Override
        public void onGlobalLayout() {
            Rect rect = new Rect();
            //1、获取main在窗体的可视区域
            decorView.getWindowVisibleDisplayFrame(rect);
            //2、获取main在窗体的不可视区域高度,在键盘没有弹起时,main.getRootView().getHeight()调节度应该和rect.bottom高度一样
            int mainInvisibleHeight = decorView.getRootView().getHeight() - rect.bottom;
            int screenHeight = decorView.getRootView().getHeight();//屏幕高度
            //3、不可见区域大于屏幕本身高度的1/4:说明键盘弹起了
            if (mainInvisibleHeight > screenHeight / 4) {     //软键盘显示
                LogUtils.d(TAG, "show------------" + rect.bottom + "----" + decorView.getRootView().getHeight());
            } else {                                            //软键盘隐藏
                if (walletDialog!=null){                //在软键盘隐藏时,关闭Dialog。
                    walletDialog.dismiss();
                }
            }
        }
    });
三.到此,就已经实现了输入支付密码的功能。随手分享,喜欢的朋友可以关注简书号MiHomes,后续会有更多更好的博客推送给您。
另:欢迎指出不足,会进行更正
