

- 1.父子组件传值过程中,子组件包含echart,加载过程中子组件没有获取到option数据,echart报错。通过设置延迟获取数据解决。
setTimeout(function (){
    myChart.setOption(option);//option是父组件传值
}, 100);
- 2.在使用vue-cli生成的项目中,浏览器地址栏总会自动出现‘#’,一直无法去掉。查看vue-router官方文档后发现vue-router的模式有好几种,如下
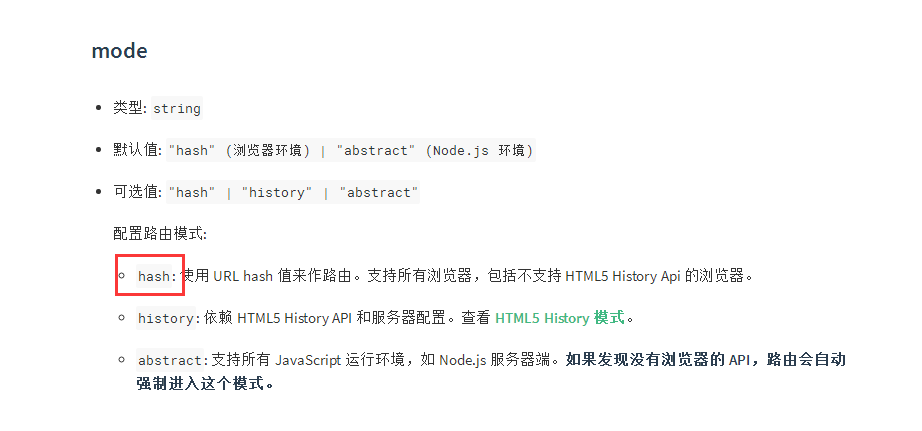
export default new Router({
  mode: 'history',
  routes: [...]
})
不过改成这种模式需要后台的配合。具体查看router.vuejs.org/zh-cn/essen…
- 3.解决vue方法中实现路由跳转的方法。之前用
this.$router.go('/tt');//其中tt是你定义的一个路由模块
这样会导致页面刷新。后改为
this.$router.push({path:'/tt'});
perfect!!!
- 4.平时用vue-cli生成的项目默认是SPA,如果实际项目需要改成多页面应用的话,怎么做呢???这就涉及到修改webpack脚本配置了。具体如下: (1)在 src 目录下新建一个 test.js,为方便起见,直接将 main.js 中的内容复制过去。然后,修改 build/webpack.base.conf.js 的 entry 为多个。
entry: {
  app: './src/main.js',
  test: './src/test.js'
},
(2)在工程根目录下新建一个test.html文件,同样将 index.html 的内容复制过去。为了区分,修改下标题。 (3)修改config/index.js中的build配置,新增一条配置
index: path.resolve(__dirname, '../dist/index.html'),
test: path.resolve(__dirname, '../dist/test.html'),//新增
(4)修改build/webpack.prod.conf.js的plugins中关于html的配置。修改
new HtmlWebpackPlugin({
  filename: config.build.index,
  template: 'index.html',
  inject: true,
  minify: {
    removeComments: true,
    collapseWhitespace: true,
    removeAttributeQuotes: true
    // more options:
    // https://github.com/kangax/html-minifier#options-quick-reference
  },
  // necessary to consistently work with multiple chunks via CommonsChunkPlugin
  chunksSortMode: 'dependency',
  chunks: ['manifest', 'vendor', 'app']
})
改写filename,filename直接写死为展示页面名称,同时为防止加载不必要的js,添加chunks 配置。另外之后增加另外一个配置
new HtmlWebpackPlugin({
  filename: config.build.demo,
  template: 'demo.html',
  inject: true,
  minify: {
    removeComments: true,
    collapseWhitespace: true,
    removeAttributeQuotes: true
    // more options:
    // https://github.com/kangax/html-minifier#options-quick-reference
  },
  // necessary to consistently work with multiple chunks via CommonsChunkPlugin
  chunksSortMode: 'dependency',
  thunks: ['manifest', 'vendor', 'demo']
}),
(5)执行npm run build,进行打包。然后进入dist目录,执行hs(前提是安装了http-server),启动服务。就可以看到index.html和test.html页面了。如果不想启动服务查看页面的话,需要将 config/index.js文件
assetsPublicPath: './'
之后重新打包即可访问dist目录下的index.html和test.html。
参考资料:vue-cli多页面应用
谨以此作为日常工作学习记录,便于日后查阅。向大神学习,慢慢进步。
