前言
-
Glide,该功能非常强大Android图片加载开源框架 相信大家并不陌生
-
正由于他的功能强大,所以它的源码非常复杂,这导致很多人望而却步
-
本人尝试将
Glide的功能进行分解,并单独针对每个功能进行源码分析,从而降低Glide源码的复杂度。
接下来,我将推出一系列关于
Glide的功能源码分析,有兴趣可以继续关注
- 今天,我将主要源码分析
Glide的基础功能:图片加载 ,希望你们会喜欢。
由于文章较长,希望读者先收藏 & 预留足够时间进行查看。
目录
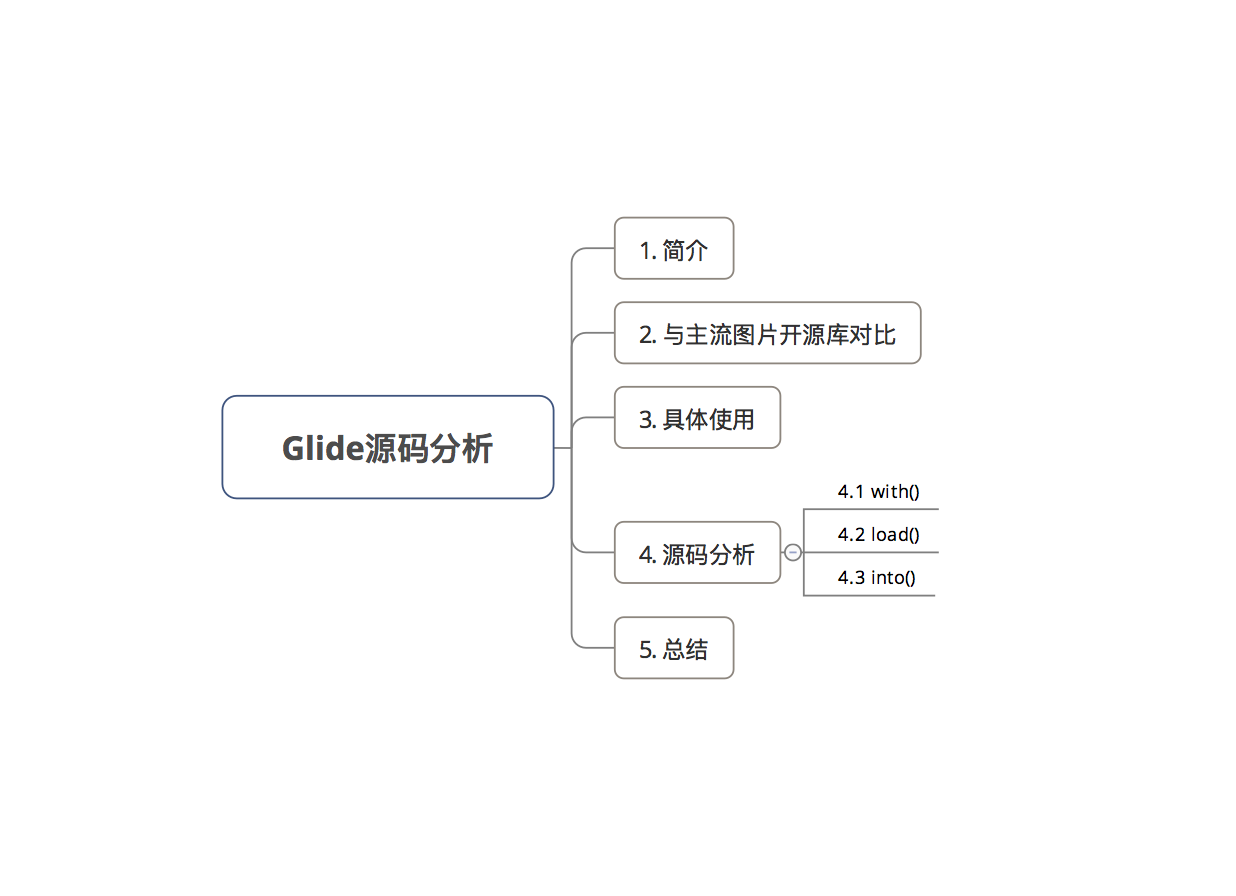
1. 简介
- 定义:
Google开发者Sam sjudd出品的 一个Android开源库 - 作用:图片加载
- 具体功能列表
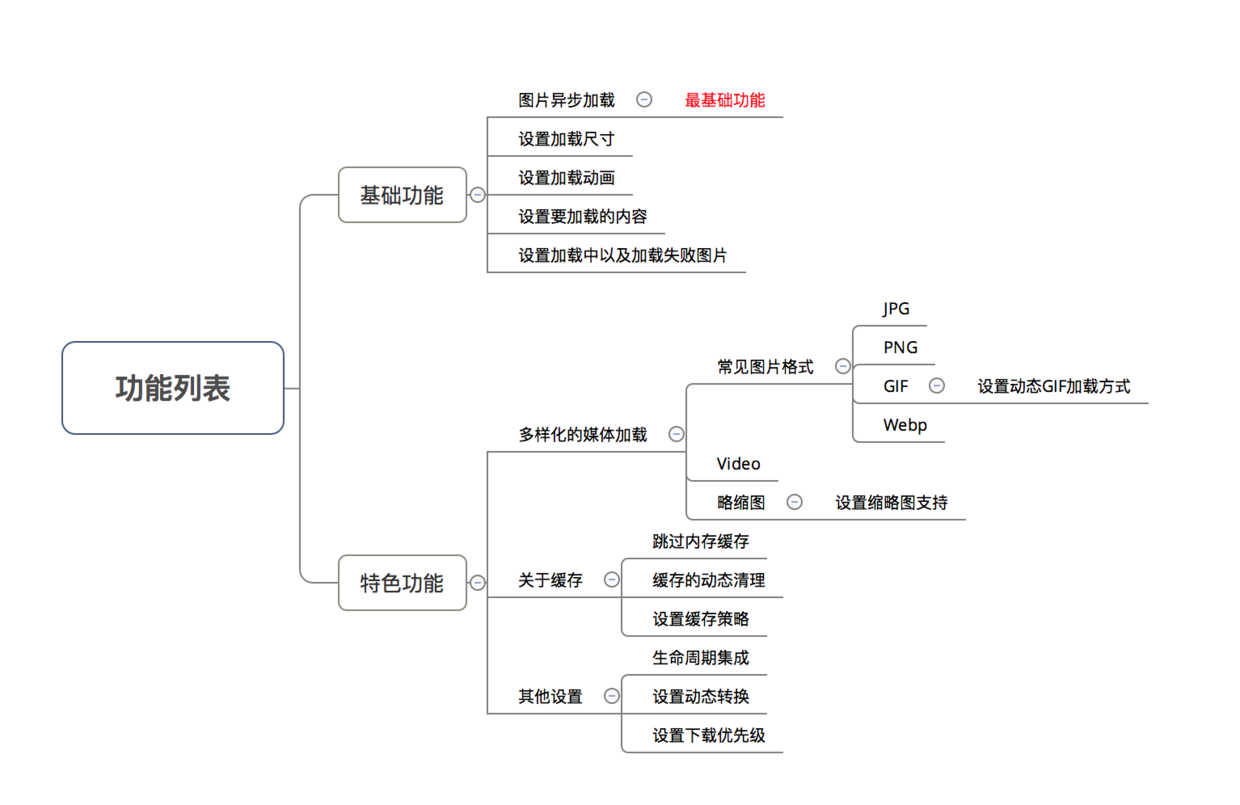
注:从上面可看出,Glide不仅解决了 图片异步加载 的问题,还解决了Android加载图片时的一些常见问题,功能十分强大。
2. 与主流图片开源库对比
关于Glide与主流图片开源库(Universal-Image-Loader、Picasso、Fresco),请看文章:3分钟全面了解Android主流图片加载库
3. 具体使用
关于Glide的各种使用方法,请看文章:Android图片加载库:最全面解析Glide用法
4. 源码分析
在进行源码分析前,有几点需要特别说明:
- 本次源码分析是基于
Glide 3.7.0,版本下载地址 - 本次源码分析是主要分析
Glide的基本功能:图片加载,所以关于其他功能的代码本文一律忽略
因为
Glide的功能实在太多了,所以源码非常复杂,无法同时分析多个功能。但其他功能将下Glide的系列文章继续分析。
Glide源码较为难懂、难分析的其中一个原因是:许多对象都是很早之前就初始化好,而并非在使用前才初始化。所以当真正使用该对象时,开发者可能已经忘记是在哪里初始化、该对象是作什么用的了。所以本文会在每个阶段进行一次总结,而读者则需要经常往返看该总结,从而解决上述问题。
下面,我们将根据 Glide 的加载图片的使用步骤一步步源码分析。
Glide的使用步骤如下:
Glide.with(this).load(url).into(imageView);
// 参数说明
// 参数1:Context context
// Context对于很多Android API的调用都是必须的,这里就不多说了

// 参数2:String imageUrl:被加载图像的Url地址
// 大多情况下,一个字符串代表一个网络图片的URL

// 参数3:ImageView targetImageView:图片最终要展示的地方。
- 所以
Glide的源码分析分为三步:.with().load().into()
4.1 with()
-
定义:
Glide类中的静态方法,根据传入 不同参数 进行 方法重载 -
作用:
- 得到一个
RequestManager对象 - 根据传入
with()方法的参数 将Glide图片加载的生命周期与Activity/Fragment的生命周期进行绑定,从而实现自动执行请求,暂停操作
- 得到一个
-
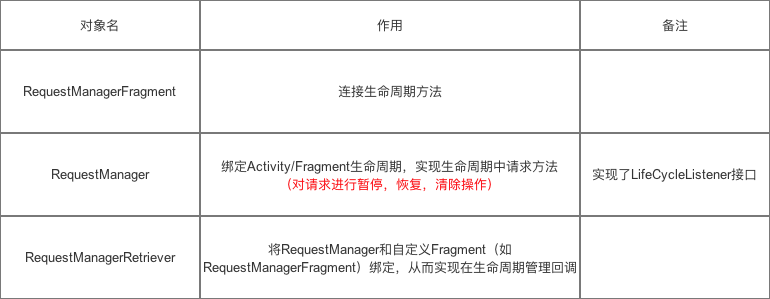
下面先说明一些重要对象名
- 具体源码
public class Glide {
    ...

    // with()重载种类非常多,根据传入的参数可分为:
    // 1. 非Application类型的参数(Activity & Fragment  )
    // 2. Application类型的参数(Context)
    // 下面将详细分析

// 参数1:Application类型
 public static RequestManager with(Context context) {
        RequestManagerRetriever retriever = RequestManagerRetriever.get();
        // 步骤1:调用RequestManagerRetriever类的静态get()获得RequestManagerRetriever对象 - 单例实现
        return retriever.get(context);
        // 步骤2:调用RequestManagerRetriever实例的get()获取RequestManager对象 & 绑定图片加载的生命周期 ->>分析1
    }

// 参数2:非Application类型(Activity & Fragment )
    public static RequestManager with(Activity activity) {
        RequestManagerRetriever retriever = RequestManagerRetriever.get();
        return retriever.get(activity);
    }

    public static RequestManager with(Fragment fragment) {
        RequestManagerRetriever retriever = RequestManagerRetriever.get();
        return retriever.get(fragment);

  @TargetApi(Build.VERSION_CODES.HONEYCOMB)
    public static RequestManager with(android.app.Fragment fragment) {
        RequestManagerRetriever retriever = RequestManagerRetriever.get();
        return retriever.get(fragment);
    }

    }
}

<-- 分析1:RequestManagerRetriever对象的实例 get()-->
// 作用:
  // 1. 获取RequestManager对象
  // 2. 将图片加载的生命周期与Activity/Fragment的生命周期进行绑定

  public class RequestManagerRetriever implements Handler.Callback {
      ...

    // 实例的get()重载种类很多,参数分为:(与with()类似)
    // 1. Application类型(Context)
    // 2. 非Application类型(Activity & Fragment )- >>分析3
    // 下面会详细分析

// 参数1:Application类型(Context)
   public RequestManager get(Context context) {
        return getApplicationManager(context);
        // 调用getApplicationManager()最终获取一个RequestManager对象 ->>分析2
        // 因为Application对象的生命周期即App的生命周期
        // 所以Glide加载图片的生命周期是自动与应用程序的生命周期绑定,不需要做特殊处理(若应用程序关闭,Glide的加载也会终止)
    }

// 参数2:非Application类型(Activity & Fragment  )
// 将Glide加载图片的生命周期与Activity生命周期同步的具体做法:向当前的Activity添加一个隐藏的Fragment
// 原因:因Fragment的生命周期 与 Activity 的是同步的,通过添加隐藏的Fragment 从而监听Activity的生命周期,从而实现Glide加载图片的生命周期与Activity的生命周期 进行同步。
 @TargetApi(Build.VERSION_CODES.HONEYCOMB)
    public RequestManager get(Activity activity) {
        if (Util.isOnBackgroundThread() || Build.VERSION.SDK_INT < Build.VERSION_CODES.HONEYCOMB) {
            return get(activity.getApplicationContext());
        } else {

            assertNotDestroyed(activity);
             //判断activity是否已经销毁

            android.app.FragmentManager fm = activity.getFragmentManager();
            // 获取FragmentManager 对象

            return fragmentGet(activity, fm);
           // 通过fragmentGet返回RequestManager->>分析4


        }
    }

    public RequestManager get(FragmentActivity activity) {
      // 逻辑同上,此处不作过多描述
      ...

    }

    public RequestManager get(Fragment fragment) {
        // 逻辑同上,此处不作过多描述
      ...
    }

}

<-- 分析2:getApplicationManager(context)-->
private RequestManager getApplicationManager(Context context) {

      ...

        Glide glide = Glide.get(context);
        // 通过单例模式创建Glide实例 ->>分析3
        applicationManager =
            new RequestManager(
                glide, new ApplicationLifecycle(), new EmptyRequestManagerTreeNode());
      }
    }
  }
  return applicationManager;
}

<-- 分析3:Glide.get(context) -->
public static Glide get(Context context) {
  if (glide == null) {
  // 单例模式的体现
    synchronized (Glide.class) {
      if (glide == null) {
        Context applicationContext = context.getApplicationContext();

        List<GlideModule> modules = new ManifestParser(applicationContext).parse();
        // 解析清单文件配置的自定义GlideModule的metadata标签,返回一个GlideModule集合

        GlideBuilder builder = new GlideBuilder(applicationContext);
        // 步骤1:创建GlideBuilder对象
        for (GlideModule module : modules) {
          module.applyOptions(applicationContext, builder);
        }
        glide = builder.createGlide();
        // 步骤2:根据GlideBuilder对象创建Glide实例
        // GlideBuilder会为Glide设置一默认配置,如:Engine,RequestOptions,GlideExecutor,MemorySizeCalculator

        for (GlideModule module : modules) {
          module.registerComponents(applicationContext, glide.registry);
           // 步骤3:利用GlideModule 进行延迟性的配置和ModelLoaders的注册
        }
      }
    }
  }
  return glide;
}
// 回到分析1 进入 分析2的地方


<--分析4:fragmentGet() -->
// 作用:
           // 1. 创建Fragment
           // 2. 向当前的Activity中添加一个隐藏的Fragment
           // 3. 将RequestManager与该隐藏的Fragment进行绑定
 RequestManager fragmentGet(Context context, android.app.FragmentManager fm) {

        RequestManagerFragment current = getRequestManagerFragment(fm);
        // 获取RequestManagerFragment
        // 作用:利用Fragment进行请求的生命周期管理

        RequestManager requestManager = current.getRequestManager();

        // 若requestManager 为空,即首次加载初始化requestManager
        if (requestManager == null) {
            // 创建RequestManager传入Lifecycle实现类,如ActivityFragmentLifecycle
            requestManager = new RequestManager(context, current.getLifecycle(), current.getRequestManagerTreeNode());
            current.setRequestManager(requestManager);
            // 调用setRequestManager设置到RequestManagerFragment
        }
        return requestManager;
    }
总结
with()是为得到一个RequestManager对象 从而将Glide加载图片周期 与Activity 和Fragment进行绑定,从而管理Glide加载图片周期
- 最终返回
RequestManager对象- 由于本文主要讲解图片加载的功能,所以关于加载图片生命周期的内容暂时不讲解。
4.2 load()
-
定义 由于
.with()返回的是一个RequestManager对象,所以 第2步中调用的是RequestManager类的load() -
作用 预先创建好对图片进行一系列操作(加载、编解码、转码)的对象,并全部封装到
DrawableTypeRequest`对象中。
Glide支持加载 图片的URL字符串、图片本地路径等,因此RequestManager类 存在load()的重载- 此处主要讲解 最常见的加载图片
URL字符串的load(),即load(String url)
- 具体过程
public class RequestManager implements LifecycleListener {
// 仅贴出关键代码
...
public DrawableTypeRequest<String> load(String string) {
return (DrawableTypeRequest<String>) fromString().load(string);
// 先调用fromString()再调用load()
// load()作用:传入图片URL地址
// fromString()作用 ->>分析1
}
<-- 分析1:fromString()-->
public DrawableTypeRequest<String> fromString() {
return loadGeneric(String.class);
// loadGeneric()的作用 ->>分析2
}
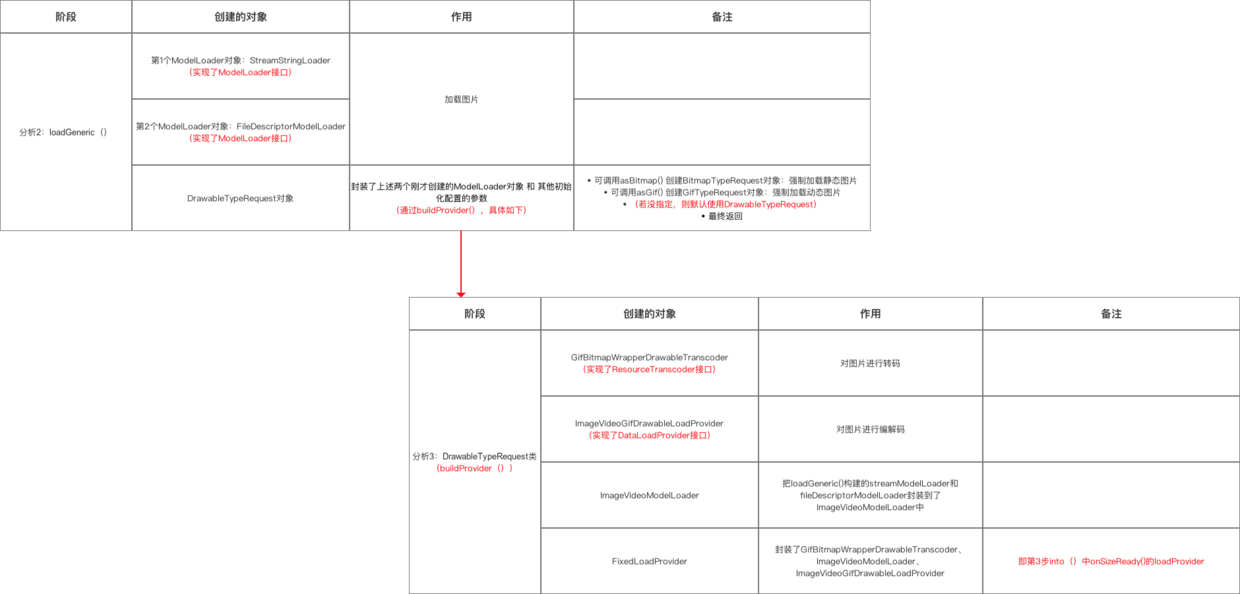
<-- 分析2:loadGeneric()-->
private <T> DrawableTypeRequest<T> loadGeneric(Class<T> modelClass) {
ModelLoader<T, InputStream> streamModelLoader = Glide.buildStreamModelLoader(modelClass, context);
// 创建第1个ModelLoader对象;作用:加载图片
// Glide会根据load()方法传入不同类型参数,得到不同的ModelLoader对象
// 此处传入参数是String.class,因此得到的是StreamStringLoader对象(实现了ModelLoader接口)
ModelLoader<T, ParcelFileDescriptor> fileDescriptorModelLoader = Glide.buildFileDescriptorModelLoader(modelClass, context);
// 创建第2个ModelLoader对象,作用同上:加载图片
// 此处得到的是FileDescriptorModelLoader对象
return optionsApplier.apply(
new DrawableTypeRequest<T>(modelClass, streamModelLoader, fileDescriptorModelLoader, context,
glide, requestTracker, lifecycle, optionsApplier));
// 创建DrawableTypeRequest对象 & 传入刚才创建的ModelLoader对象 和 其他初始化配置的参数
// DrawableTypeRequest类分析 ->>分析3
}
...
<-- 分析3:DrawableTypeRequest类()-->
public class DrawableTypeRequest<ModelType> extends DrawableRequestBuilder<ModelType> implements DownloadOptions {
// 关注1:构造方法
DrawableTypeRequest(Class<ModelType> modelClass, ModelLoader<ModelType, InputStream> streamModelLoader,
ModelLoader<ModelType, ParcelFileDescriptor> fileDescriptorModelLoader, Context context, Glide glide,
RequestTracker requestTracker, Lifecycle lifecycle, RequestManager.OptionsApplier optionsApplier) {
super(context, modelClass,
buildProvider(glide, streamModelLoader, fileDescriptorModelLoader, GifBitmapWrapper.class,
GlideDrawable.class, null),
glide, requestTracker, lifecycle);
// 调用buildProvider()方法 -->分析4
// 并把上述创建的streamModelLoader和fileDescriptorModelLoader等参数传入到buildProvider()中
// 关注2:DrawableTypeRequest类主要提供2个方法: asBitmap() & asGif()
// asBitmap()作用:强制加载 静态图片
public BitmapTypeRequest<ModelType> asBitmap() {
return optionsApplier.apply(new BitmapTypeRequest<ModelType>(this, streamModelLoader,
fileDescriptorModelLoader, optionsApplier));
// 创建BitmapTypeRequest对象
}
// asGif() 作用:强制加载 动态图片
public GifTypeRequest<ModelType> asGif() {
return optionsApplier.apply(new GifTypeRequest<ModelType>(this, streamModelLoader, optionsApplier));
// 创建GifTypeRequest对象
// 注:若没指定,则默认使用DrawableTypeRequest
}
}
<-- 分析4:buildProvider()-->
private static <A, Z, R> FixedLoadProvider<A, ImageVideoWrapper, Z, R> buildProvider(Glide glide,
ModelLoader<A, InputStream> streamModelLoader,
ModelLoader<A, ParcelFileDescriptor> fileDescriptorModelLoader, Class<Z> resourceClass,
Class<R> transcodedClass,
ResourceTranscoder<Z, R> transcoder) {
if (transcoder == null) {
transcoder = glide.buildTranscoder(resourceClass, transcodedClass);
// 创建GifBitmapWrapperDrawableTranscoder对象(实现了ResourceTranscoder接口)
// 作用:对图片进行转码
}
DataLoadProvider<ImageVideoWrapper, Z> dataLoadProvider = glide.buildDataProvider(ImageVideoWrapper.class,
resourceClass);
// 创建ImageVideoGifDrawableLoadProvider对象(实现了DataLoadProvider接口)
// 作用:对图片进行编解码
ImageVideoModelLoader<A> modelLoader = new ImageVideoModelLoader<A>(streamModelLoader,
fileDescriptorModelLoader);
// 创建ImageVideoModelLoader
// 并把上面创建的两个ModelLoader:streamModelLoader和fileDescriptorModelLoader封装到了ImageVideoModelLoader中
return new FixedLoadProvider<A, ImageVideoWrapper, Z, R>(modelLoader, transcoder, dataLoadProvider);
// 创建FixedLoadProvider对象
// 把上面创建的GifBitmapWrapperDrawableTranscoder、ImageVideoModelLoader、ImageVideoGifDrawableLoadProvider都封装进去
// 注:FixedLoadProvider对象就是第3步into()中onSizeReady()的loadProvider对象
}
// 回到分析3的关注点2
- 在
RequestManager的load()中,通过fromString()最终返回一个DrawableTypeRequest对象,并调用该对象的load()传入图片的URL地址
请回看分析1上面的代码
- 但从上面的分析3可看出,
DrawableTypeRequest类中并没有load()和第3步需要分析的into(),所以load()和into()是在DrawableTypeRequest类的父类中:DrawableRequestBuilder类中。继承关系如下:

public class DrawableRequestBuilder<ModelType>
        extends GenericRequestBuilder<ModelType, ImageVideoWrapper, GifBitmapWrapper, GlideDrawable>
        implements BitmapOptions, DrawableOptions {

        ...

// 最终load()方法返回的其实就是一个DrawableTypeRequest对象
@Override
    public Target<GlideDrawable> into(ImageView view) {
        return super.into(view);
    }

// 特别注意:DrawableRequestBuilder类中有很多使用Glide的API方法,此处不做过多描述

}
至此,第2步的 load()分析完成
总结
load()中预先创建好对图片进行一系列操作(加载、编解码、转码)的对象,并全部封装到 DrawableTypeRequest对象中。
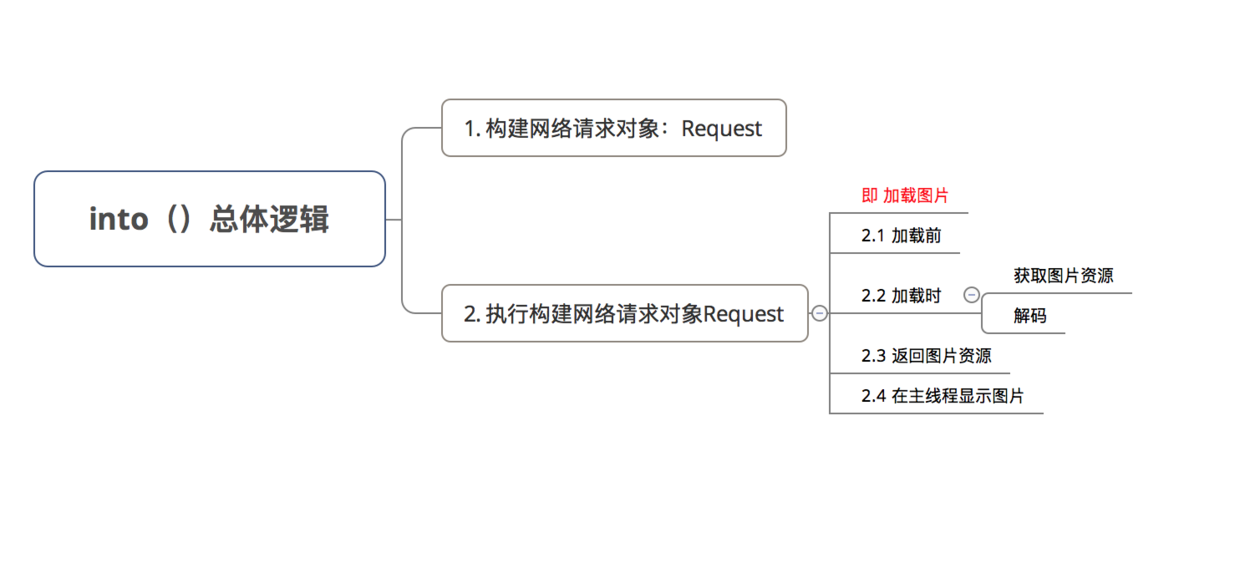
4.3 into()
- 作用:构建网络请求对象 并 执行 该网络请求
即 获取图片资源 & 加载图片并显示
-
总体逻辑如下:
-
详细过程:
在第2步的RequestManager的load()中,最终返回一个DrawableTypeRequest对象
封装好了对图片进行一系列操作(加载、编解码、转码)的对象
- 但
DrawableTypeRequest类中并没有load()和第3步需要分析的into(),所以load()和into()是在DrawableTypeRequest类的父类中:DrawableRequestBuilder类
继承关系如下
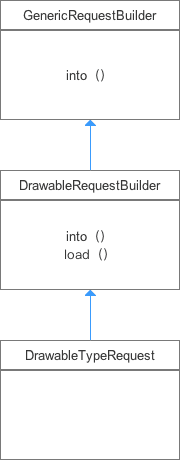
所以,第三步是调用DrawableRequestBuilder类的 into()完成图片的最终加载。
public class DrawableRequestBuilder<ModelType>
        extends GenericRequestBuilder<ModelType, ImageVideoWrapper, GifBitmapWrapper, GlideDrawable>
        implements BitmapOptions, DrawableOptions {

 @Override
    public Target<GlideDrawable> into(ImageView view) {
        return super.into(view);
  // 调用DrawableRequestBuilder的父类GenericRequestBuilder的into() ->>分析1
    }
}

<-- 分析1:GenericRequestBuilder类的into()-->
public class GenericRequestBuilder<ModelType> {

  ...

  public Target<TranscodeType> into(ImageView view) {

  // 判断是否在主线程(跟新UI只能在主线程)
  // 此处逻辑先不讲解,后面会详细说明,直接跳到方法的最后一行
    Util.assertMainThread();
    if (view == null) {
        throw new IllegalArgumentException("You must pass in a non null View");
    }
    if (!isTransformationSet && view.getScaleType() != null) {
        switch (view.getScaleType()) {
            case CENTER_CROP:
                applyCenterCrop();
                break;
            case FIT_CENTER:
            case FIT_START:
            case FIT_END:
                applyFitCenter();
                break;
            //$CASES-OMITTED$
            default:
                // Do nothing.
        }
    }
    return into(glide.buildImageViewTarget(view, transcodeClass));
    // 创建Target对象:用于最终展示图片 ->>分析2
    // 从分析3回来
  }
}

<-- 分析2:buildImageViewTarget()-->
<R> Target<R> buildImageViewTarget(ImageView imageView, Class<R> transcodedClass) {
    return imageViewTargetFactory.buildTarget(imageView, transcodedClass);
    // ->>分析3

}

<-- 分析3:ImageViewTargetFactory的buildTarget()-->

public class ImageViewTargetFactory {

    public <Z> Target<Z> buildTarget(ImageView view, Class<Z> clazz) {


        // 根据传入的class参数构建不同的Target对象,分为三种情况:
        // 情况1:若加载图片时调用了asBitmap(),那么构建的是BitmapImageViewTarget对象
       // 情况2:否则构建的是GlideDrawableImageViewTarget对象
       // 情况3:DrawableImageViewTarget对象基本用不到,此处忽略
       // 具体请看以下代码
        if (GlideDrawable.class.isAssignableFrom(clazz)) {
            return (Target<Z>) new GlideDrawableImageViewTarget(view);
        } else if (Bitmap.class.equals(clazz)) {
            return (Target<Z>) new BitmapImageViewTarget(view);
        } else if (Drawable.class.isAssignableFrom(clazz)) {
            return (Target<Z>) new DrawableImageViewTarget(view);
        } else {
            throw new IllegalArgumentException("Unhandled class: " + clazz
                    + ", try .as*(Class).transcode(ResourceTranscoder)");
        }
    }
}

- 此处得到了
GlideDrawableImageViewTarget对象(大多数情况下) - 回到上面分析1 -
GenericRequestBuilder类的into()最后一行:将GlideDrawableImageViewTarget对象传入到GenericRequestBuilder的into(Target target)中
我们继续看 GenericRequestBuilder的into(Target target) 的源码:
public <Y extends Target<TranscodeType>> Y into(Y target) {

    Request request = buildRequest(target);
    // 关注1:构建Request对象:发出加载图片请求
    target.setRequest(request);
    // 将请求设置到target
    lifecycle.addListener(target);
    // 将target加入到lifecycle
    requestTracker.runRequest(request);
    // 关注2:执行网络请求Request
    return target;

}
- 此处是 发送加载图片网络请求
- 有2个关注点:构建
Request对象 & 执行Request
4.3.1 构建Request对象
- 作用
创建
GenericRequest对象 & 初始化(即将load()中的API参数赋值到GenericRequest对象中)
<-- 分析4:buildRequest() -->
// 作用:构建Request对象
private Request buildRequest(Target<TranscodeType> target) {
    return buildRequestRecursive(target, null);
    // 往下调用
}

private Request buildRequestRecursive(Target<TranscodeType> target, ThumbnailRequestCoordinator parentCoordinator) {
        // 90%的代码用于处理缩略图,此处仅关注主流程,即如何构建Request对象
        // 仅贴出关键代码(如何构建Request对象)
        ...

        ThumbnailRequestCoordinator coordinator = new ThumbnailRequestCoordinator(parentCoordinator);
        Request fullRequest = obtainRequest(target, sizeMultiplier, priority, coordinator);
        // 往下调用

private Request obtainRequest(Target<TranscodeType> target, float sizeMultiplier, Priority priority,
        RequestCoordinator requestCoordinator) {

    return GenericRequest.obtain(
            loadProvider,
            model,
            signature,
            context,
            priority,
            target,
            sizeMultiplier,
            placeholderDrawable,
            placeholderId,
            errorPlaceholder,
            errorId,
            fallbackDrawable,
            fallbackResource,
            requestListener,
            requestCoordinator,
            glide.getEngine(),
            transformation,
            transcodeClass,
            isCacheable,
            animationFactory,
            overrideWidth,
            overrideHeight,
            diskCacheStrategy);
    // 调用了GenericRequest的obtain()
    // 作用:将在load()中调用的所有API参数都组装到Request对象当中 -->分析5
}

<-- 分析5:GenericRequest的obtain()  -->
public final class GenericRequest<A, T, Z, R> implements Request, SizeReadyCallback,
        ResourceCallback {
    // 仅贴出关键代码
    ...

    public static <A, T, Z, R> GenericRequest<A, T, Z, R> obtain(
            LoadProvider<A, T, Z, R> loadProvider,
            A model,
            Key signature,
            Context context,
            Priority priority,
            Target<R> target,
            float sizeMultiplier,
            Drawable placeholderDrawable,
            int placeholderResourceId,
            Drawable errorDrawable,
            int errorResourceId,
            Drawable fallbackDrawable,
            int fallbackResourceId,
            RequestListener<? super A, R> requestListener,
            RequestCoordinator requestCoordinator,
            Engine engine,
            Transformation<Z> transformation,
            Class<R> transcodeClass,
            boolean isMemoryCacheable,
            GlideAnimationFactory<R> animationFactory,
            int overrideWidth,
            int overrideHeight,
            DiskCacheStrategy diskCacheStrategy) {
        @SuppressWarnings("unchecked")
        GenericRequest<A, T, Z, R> request = (GenericRequest<A, T, Z, R>) REQUEST_POOL.poll();
        if (request == null) {
            request = new GenericRequest<A, T, Z, R>();
            // 创建GenericRequest对象
        }
        // init()作用:将传入的Load()中的API参数赋值到GenericRequest的成员变量
        request.init(loadProvider,
                model,
                signature,
                context,
                priority,
                target,
                sizeMultiplier,
                placeholderDrawable,
                placeholderResourceId,
                errorDrawable,
                errorResourceId,
                fallbackDrawable,
                fallbackResourceId,
                requestListener,
                requestCoordinator,
                engine,
                transformation,
                transcodeClass,
                isMemoryCacheable,
                animationFactory,
                overrideWidth,
                overrideHeight,
                diskCacheStrategy);
        return request;
        // 返回GenericRequest对象
    }

    ...
}
至此,一个 发送加载图片的网络请求 Request 对象GenericRequest 创建完毕。
本文主要针对图片加载功能,关于发送加载图片的网络请求细节将在下篇文章进行描述。
总结

4.3.2 执行网络请求对象Request
public <Y extends Target<TranscodeType>> Y into(Y target) {

    Request request = buildRequest(target);
    // 关注1:构建Request对象:发出加载图片请求
    target.setRequest(request);
    lifecycle.addListener(target);
    requestTracker.runRequest(request);
    // 关注2:执行Request ->>分析6
    return target;
}
/**
  * 步骤1:加载前
**/
<-- 分析6:runRequest(request) -->
public void runRequest(Request request) {
    // 此时的Request是GenericRequest对象
    requests.add(request);
    // 将每个提交的请求加入到一个set中:管理请求

    // 判断Glide当前是否处于暂停状态
    if (!isPaused) {
        // 若不处于暂停状态,则调用GenericRequest的begin()来执行Request ->>分析7
        request.begin();
    } else {
        // 若处于暂停,则先将Request添加到待执行队列里面,等暂停状态解除后再执行
        pendingRequests.add(request);
    }
}

/**
  * 步骤2:加载时
**/
<-- 分析7:GenericRequest的begin() -->
public void begin() {

// 有2个关注点

// 关注1
    // model = 第2步load()传入的图片URL地址
    // 若model()等于null,会调用onException()
    // onException()内部调用setErrorPlaceholder()
    if (model == null) {
        onException(null);
        return;
    }
    status = Status.WAITING_FOR_SIZE;

// 关注2:
// 图片加载情况分两种:
// 1. 开发者使用了override() API为图片指定了一个固定的宽高
// 2. 无使用

// 情况1:使用了override() API为图片指定了一个固定的宽高
    if (Util.isValidDimensions(overrideWidth, overrideHeight)) {
        onSizeReady(overrideWidth, overrideHeight);
        // 调用onSizeReady()加载

// 否则,则是情况2,调用target.getSize()
    } else {
        target.getSize(this);
        // target.getSize()的内部会根据ImageView的layout_width和layout_height值做一系列的计算,来算出图片显示的宽高
        // 计算后,也会调用onSizeReady()方法进行加载
    }
    if (!isComplete() && !isFailed() && canNotifyStatusChanged()) {
        target.onLoadStarted(getPlaceholderDrawable());
        // 从分析8看回来的:在图片请求开始前,会先使用Loading占位图代替最终的图片显示
    }

}
在begin()方法中有两个关注点:
- 关注点1:若
model(第2步load()传入的图片URL地址)等于null,会调用onException() - 关注点2:图片加载情况 下面将详细说明
关注1
若model(第2步load()传入的图片URL地址)等于null,会调用onException()(内部调用setErrorPlaceholder())
private void setErrorPlaceholder(Exception e) {

    Drawable error = model == null ? getFallbackDrawable() : null;

    // 若有error的占位图,则采用先获取error的占位图
    if (error == null) {
      error = getErrorDrawable();
    }
    // 若没有error的占位图,则再去获取一个loading占位图
    if (error == null) {
        error = getPlaceholderDrawable();
    }
    target.onLoadFailed(e, error);
    // 将占位图(error / loading)传入到onLoadFailed()中 ->>分析8
}

<-- 分析8:onLoadFailed() -->
public abstract class ImageViewTarget<Z> extends ViewTarget<ImageView, Z> implements GlideAnimation.ViewAdapter {
    ...

    @Override
    public void onLoadFailed(Exception e, Drawable errorDrawable) {
        view.setImageDrawable(errorDrawable);
        // 将该error占位图显示到ImageView
    }

    @Override
    public void onLoadStarted(Drawable placeholder) {
        view.setImageDrawable(placeholder);
        // 在图片请求开始前,会先使用Loading占位图代替最终的图片显示
        // 在begin()时调用(回看分析7)
    }


    ...
}
所以此处显示出Glide的用法:
- 若传入图片的
url为Null,会采用error / loading的占位图进行代替 - 图片请求开始前,会先使用
Loading占位图 代替 最终的图片显示
关注2
图片加载情况(重点关注)
<-- 分析7:GenericRequest的begin() -->
public void begin() {

// 关注1(请跳过,直接看关注2)
    // 若model(第2步load()传入的图片URL地址)等于null,会调用onException()
    // onException()内部调用setErrorPlaceholder()
    if (model == null) {
        onException(null);
        return;
    }
    status = Status.WAITING_FOR_SIZE;

// 关注2:
  // 图片加载情况分两种:
    // 1. 为图片指定加载固定的宽高(使用override() 的API)
    // 2. 无指定加载的宽高

// 情况1:为图片指定加载固定的宽高(使用override() 的API)
    if (Util.isValidDimensions(overrideWidth, overrideHeight)) {
        onSizeReady(overrideWidth, overrideHeight);
        // 调用onSizeReady()加载->>分析9

// 否则,则是情况2:无指定加载的宽高
    } else {
        target.getSize(this);
        // target.getSize()会根据ImageView的layout_width和layout_height值做一系列的计算,来算出图片显示的宽高
        // 计算后,最终也会调用onSizeReady()进行加载
    }


}

<-- 分析9:onSizeReady()-->
public void onSizeReady(int width, int height) {

    // loadProvider 对象 即 第2步load()中的FixedLoadProvider对象
    // 里面封装了GifBitmapWrapperDrawableTranscoder、ImageVideoModelLoader、ImageVideoGifDrawableLoadProvider对象)
    // ->>请回看第2步load()中的 分析3:DrawableTypeRequest类

    ModelLoader<A, T> modelLoader = loadProvider.getModelLoader();
    // 从loadProvider 对象中获取ImageVideoModelLoader对象
    ResourceTranscoder<Z, R> transcoder = loadProvider.getTranscoder();
    // 从loadProvider 对象中获取GifBitmapWrapperDrawableTranscoder对象

    final DataFetcher<T> dataFetcher = modelLoader.getResourceFetcher(model, width, height);
    // ->>分析10
    // 创建ImageVideoFetcher对象(传入HttpUrlFetcher对象)

    loadStatus = engine.load(signature, width, height, dataFetcher, loadProvider, transformation, transcoder,
            priority, isMemoryCacheable, diskCacheStrategy, this);
    // 将上述获得的ImageVideoFetcher、GifBitmapWrapperDrawableTranscoder等一起传入到了Engine的load()方法中 ->>分析11

    }
    ...
}

<--分析10:ImageVideoModelLoader的getResourceFetcher() -->

public class ImageVideoModelLoader<A> implements ModelLoader<A, ImageVideoWrapper> {

    @Override
    public DataFetcher<ImageVideoWrapper> getResourceFetcher(A model, int width, int height) {

         DataFetcher<ParcelFileDescriptor> fileDescriptorFetcher = null;
         if (fileDescriptorLoader != null) {
            fileDescriptorFetcher = fileDescriptorLoader.getResourceFetcher(model, width, height);
            // fileDescriptorLoader是在第2步load()中创建的FileDescriptorModelLoader:用于加载图片
           // 调用FileDescriptorModelLoader的getResourceFetcher()会得到一个HttpUrlFetcher对象
        }

        DataFetcher<InputStream> streamFetcher = null;
        if (streamLoader != null) {
            streamFetcher = streamLoader.getResourceFetcher(model, width, height);
            // streamLoader是在第2步load()中创建的StreamStringLoader:用于加载图片
           // 调用streamLoader的getResourceFetcher()会得到一个HttpUrlFetcher对象
        }


        if (streamFetcher != null || fileDescriptorFetcher != null) {
            return new ImageVideoFetcher(streamFetcher, fileDescriptorFetcher);
        // 创建ImageVideoFetcher对象,并把上述获得的2个HttpUrlFetcher对象传进去
        // 即调用ImageVideoModelLoader的getResourceFetcher()得到的是ImageVideoFetcher
        } else {
            return null;
        }
    }
}
// 回到分析9原处
<-- 分析11:Engine的load() -->
public class Engine implements EngineJobListener,
        MemoryCache.ResourceRemovedListener,
        EngineResource.ResourceListener {

      ...
      // 省略关键代码

        EngineJob engineJob = engineJobFactory.build(key, isMemoryCacheable);
        // 创建EngineJob对象
        // 作用:开启线程(作异步加载图片)

        DecodeJob<T, Z, R> decodeJob = new DecodeJob<T, Z, R>(key, width, height, fetcher, loadProvider, transformation,
                transcoder, diskCacheProvider, diskCacheStrategy, priority);
        // 创建DecodeJob对象
        // 作用:对图片解码(较复杂,下面会详细说明)

        EngineRunnable runnable = new EngineRunnable(engineJob, decodeJob, priority);
        // 创建EngineRunnable对象
        jobs.put(key, engineJob);
        engineJob.addCallback(cb);
        engineJob.start(runnable);
        // 执行EngineRunnable对象
        // 即在子线程中执行EngineRunnable的run()方法 ->>分析12

        return new LoadStatus(cb, engineJob);
    }

    ...
}

<--分析12:EngineRunnable的run() -->
    @Override
    public void run() {

    try {
        resource = decode();
        // 调用decode() 并 返回了一个Resource对象 ->>分析13

    } catch (Exception e) {
        if (Log.isLoggable(TAG, Log.VERBOSE)) {
            Log.v(TAG, "Exception decoding", e);
        }
       ...
}

<--分析13:decode() -->
private Resource<?> decode() throws Exception {

// 分两种情况:从缓存当中读(解码)图片 & 不从缓存中读(解码)图片

    if (isDecodingFromCache()) {
    // 若从缓存中decode图片:执行decodeFromCache()
    // 本文先不讨论缓存情况
        return decodeFromCache();
    } else {
        // 不从缓存中读(解码)图片:执行decodeFromSource()  ->>分析14
        return decodeFromSource();
    }
}

<--分析14:decodeFromSource()  -->
private Resource<?> decodeFromSource() throws Exception {
    return decodeJob.decodeFromSource();
    // 调用了DecodeJob的decodeFromSource()方法 ->>分析15
}


<--分析15:DecodeJob.decodeFromSource() -->
class DecodeJob<A, T, Z> {
    ...

   public Resource<Z> decodeFromSource() throws Exception {
        Resource<T> decoded = decodeSource();
        // 获得Resource对象 ->>分析16
        return transformEncodeAndTranscode(decoded);
        // 调用transformEncodeAndTranscode()方法来处理该Resource对象。
    }

<--分析16: decodeSource()  -->
    private Resource<T> decodeSource() throws Exception {
    ...

        try {
            final A data = fetcher.loadData(priority);
            // 该fetcher是在分析10:onSizeReady()中得到的ImageVideoFetcher对象
            // 即调用ImageVideoFetcher的loadData() - >>分析17

            // 从分析17回来时看这里:
            decoded = decodeFromSourceData(data);
            // 将分析17创建的ImageVideoWrapper对象传入到decodeFromSourceData(),解码该对象 -->分析19

      }

    ...
}

<--分析17: fetcher.loadData()  -->
@Override
public ImageVideoWrapper loadData(Priority priority) throws Exception {
    InputStream is = null;

    if (streamFetcher != null) {
        try {
            is = streamFetcher.loadData(priority);
           // 该streamFetcher是创建ImageVideoFetcher对象时传入的HttpUrlFetcher
          // 因此这里调用的是HttpUrlFetcher的loadData() ->>分析18
        } catch (Exception e) {

    return new ImageVideoWrapper(is, fileDescriptor);
    // 从分析18回来时看这里
    // 创建ImageVideoWrapper对象 & 传入分析18创建的InputStream ->>回到分析16
}


<--分析18:HttpUrlFetcher的loadData()  -->
// 此处是网络请求的代码
public class HttpUrlFetcher implements DataFetcher<InputStream> {

    @Override
    public InputStream loadData(Priority priority) throws Exception {
        return loadDataWithRedirects(glideUrl.toURL(), 0 /*redirects*/, null /*lastUrl*/, glideUrl.getHeaders());
        // 继续往下看
    }

    private InputStream loadDataWithRedirects(URL url, int redirects, URL lastUrl, Map<String, String> headers)
           ...

        // 静态工厂模式创建HttpURLConnection对象
        urlConnection = connectionFactory.build(url);
        for (Map.Entry<String, String> headerEntry : headers.entrySet()) {
          urlConnection.addRequestProperty(headerEntry.getKey(), headerEntry.getValue());
        }
        //设置请求参数
        //设置连接超时时间2500ms
        urlConnection.setConnectTimeout(2500);
        //设置读取超时时间2500ms
        urlConnection.setReadTimeout(2500);
        //不使用http缓存
        urlConnection.setUseCaches(false);
        urlConnection.setDoInput(true);

        // Connect explicitly to avoid errors in decoders if connection fails.
        urlConnection.connect();
        if (isCancelled) {
            return null;
        }
        final int statusCode = urlConnection.getResponseCode();
        if (statusCode / 100 == 2) {
              //请求成功
            return getStreamForSuccessfulRequest(urlConnection);
            // 继续往下看
        }
    }

      private InputStream getStreamForSuccessfulRequest(HttpURLConnection urlConnection)
            throws IOException {
        if (TextUtils.isEmpty(urlConnection.getContentEncoding())) {
            int contentLength = urlConnection.getContentLength();
            stream = ContentLengthInputStream.obtain(urlConnection.getInputStream(), contentLength);
        } else {
            if (Log.isLoggable(TAG, Log.DEBUG)) {
                Log.d(TAG, "Got non empty content encoding: " + urlConnection.getContentEncoding());
            }
            stream = urlConnection.getInputStream();
        }
        return stream;
        // 最终返回InputStream对象(但还没开始读取数据)
        // 回到分析17中的最后一行
    }

    }
}
分析19:图片的解码
<--分析19:decodeFromSourceData()()  -->
private Resource<T> decodeFromSourceData(A data) throws IOException {

        decoded = loadProvider.getSourceDecoder().decode(data, width, height);
        // 调用loadProvider.getSourceDecoder()得到的是GifBitmapWrapperResourceDecoder对象
        // 即调用GifBitmapWrapperResourceDecoder对象的decode()来对图片进行解码 ->>分析20

    return decoded;
}

<--分析20:GifBitmapWrapperResourceDecoder对象的decode()  -->
    public class GifBitmapWrapperResourceDecoder implements ResourceDecoder<ImageVideoWrapper, GifBitmapWrapper> {

    ...

    @Override
    public Resource<GifBitmapWrapper> decode(ImageVideoWrapper source, int width, int height) throws IOException {

            wrapper = decode(source, width, height, tempBytes);
            // 传入参数,并调用了另外一个decode()进行重载 ->>分析21

    }

<--分析21:重载的decode() -->
    private GifBitmapWrapper decode(ImageVideoWrapper source, int width, int height, byte[] bytes) throws IOException {
        final GifBitmapWrapper result;
        if (source.getStream() != null) {
            result = decodeStream(source, width, height, bytes);
            // 作用:从服务器返回的流当中读取数据- >>分析22

        } else {
            result = decodeBitmapWrapper(source, width, height);
        }
        return result;
    }

<--分析22:decodeStream() -->
// 作用:从服务器返回的流当中读取数据
// 读取方式:
        // 1. 从流中读取2个字节的数据:判断该图是GIF图还是普通的静图
        // 2. 若是GIF图,就调用decodeGifWrapper() 解码
        // 3. 若普通静图,就调用decodeBitmapWrapper() 解码
        // 此处仅分析 对于静图解码
    private GifBitmapWrapper decodeStream(ImageVideoWrapper source, int width, int height, byte[] bytes)
            throws IOException {

        // 步骤1:从流中读取两个2字节数据进行图片类型的判断
        InputStream bis = streamFactory.build(source.getStream(), bytes);
        bis.mark(MARK_LIMIT_BYTES);
        ImageHeaderParser.ImageType type = parser.parse(bis);
        bis.reset();
        GifBitmapWrapper result = null;

        // 步骤2:若是GIF图,就调用decodeGifWrapper() 解码
        if (type == ImageHeaderParser.ImageType.GIF) {
            result = decodeGifWrapper(bis, width, height);
        }

        // 步骤3:若是普通静图,就调用decodeBitmapWrapper()解码
        if (result == null) {
            ImageVideoWrapper forBitmapDecoder = new ImageVideoWrapper(bis, source.getFileDescriptor());
            result = decodeBitmapWrapper(forBitmapDecoder, width, height);
            // ->>分析23
        }
        return result;
    }

<-- 分析23:decodeBitmapWrapper() -->
    private GifBitmapWrapper decodeBitmapWrapper(ImageVideoWrapper toDecode, int width, int height) throws IOException {
        GifBitmapWrapper result = null;
        Resource<Bitmap> bitmapResource = bitmapDecoder.decode(toDecode, width, height);
       //  bitmapDecoder是一个ImageVideoBitmapDecoder对象
       // 即调用ImageVideoBitmapDecoder对象的decode()->>分析24
        if (bitmapResource != null) {
            result = new GifBitmapWrapper(bitmapResource, null);
        }
        return result;
    }

    ...
}

<-- 分析24:ImageVideoBitmapDecoder.decode() -->
public class ImageVideoBitmapDecoder implements ResourceDecoder<ImageVideoWrapper, Bitmap> {

    ...

    @Override
    public Resource<Bitmap> decode(ImageVideoWrapper source, int width, int height) throws IOException {
        Resource<Bitmap> result = null;
        InputStream is = source.getStream();
        // 步骤1:获取到服务器返回的InputStream
        if (is != null) {
            try {
                result = streamDecoder.decode(is, width, height);
                // 步骤2:调用streamDecoder.decode()进行解码
                // streamDecode是一个StreamBitmapDecoder对象 ->>分析25

            } catch (IOException e) {
    ...
}

<-- 分析25:StreamBitmapDecoder.decode() -->
public class StreamBitmapDecoder implements ResourceDecoder<InputStream, Bitmap> {

    ...

    @Override
    public Resource<Bitmap> decode(InputStream source, int width, int height) {
        Bitmap bitmap = downsampler.decode(source, bitmapPool, width, height, decodeFormat);
        // Downsampler的decode() ->>分析26

        // 从分析26回来看这里:
        return BitmapResource.obtain(bitmap, bitmapPool);
        // 作用:将分析26中返回的Bitmap对象包装成Resource<Bitmap>对象
        // 因为decode()返回的是一个Resource<Bitmap>对象;而从Downsampler中得到的是一个Bitmap对象,需要进行类型的转换
        // 经过这样一层包装后,如果还需要获取Bitmap,只需要调用Resource<Bitmap>的get()即可
        // 接下来,我们需要一层层地向上返回(请向下看直到跳出该代码块)
    }

    ...
}

<-- 分析26:downsampler.decode()  -->
// 主要作用:读取服务器返回的InputStream & 加载图片
// 其他作用:对图片的压缩、旋转、圆角等逻辑处理
public abstract class Downsampler implements BitmapDecoder<InputStream> {

    ...

    @Override
    public Bitmap decode(InputStream is, BitmapPool pool, int outWidth, int outHeight, DecodeFormat decodeFormat) {
        final ByteArrayPool byteArrayPool = ByteArrayPool.get();
        final byte[] bytesForOptions = byteArrayPool.getBytes();
        final byte[] bytesForStream = byteArrayPool.getBytes();
        final BitmapFactory.Options options = getDefaultOptions();
        // Use to fix the mark limit to avoid allocating buffers that fit entire images.
        RecyclableBufferedInputStream bufferedStream = new RecyclableBufferedInputStream(
                is, bytesForStream);
        // Use to retrieve exceptions thrown while reading.
        // TODO(#126): when the framework no longer returns partially decoded Bitmaps or provides a way to determine
        // if a Bitmap is partially decoded, consider removing.
        ExceptionCatchingInputStream exceptionStream =
                ExceptionCatchingInputStream.obtain(bufferedStream);
        // Use to read data.
        // Ensures that we can always reset after reading an image header so that we can still attempt to decode the
        // full image even when the header decode fails and/or overflows our read buffer. See #283.
        MarkEnforcingInputStream invalidatingStream = new MarkEnforcingInputStream(exceptionStream);
        try {
            exceptionStream.mark(MARK_POSITION);
            int orientation = 0;
            try {
                orientation = new ImageHeaderParser(exceptionStream).getOrientation();
            } catch (IOException e) {
                if (Log.isLoggable(TAG, Log.WARN)) {
                    Log.w(TAG, "Cannot determine the image orientation from header", e);
                }
            } finally {
                try {
                    exceptionStream.reset();
                } catch (IOException e) {
                    if (Log.isLoggable(TAG, Log.WARN)) {
                        Log.w(TAG, "Cannot reset the input stream", e);
                    }
                }
            }
            options.inTempStorage = bytesForOptions;
            final int[] inDimens = getDimensions(invalidatingStream, bufferedStream, options);
            final int inWidth = inDimens[0];
            final int inHeight = inDimens[1];
            final int degreesToRotate = TransformationUtils.getExifOrientationDegrees(orientation);
            final int sampleSize = getRoundedSampleSize(degreesToRotate, inWidth, inHeight, outWidth, outHeight);
            final Bitmap downsampled =
                    downsampleWithSize(invalidatingStream, bufferedStream, options, pool, inWidth, inHeight, sampleSize,
                            decodeFormat);
            // BitmapFactory swallows exceptions during decodes and in some cases when inBitmap is non null, may catch
            // and log a stack trace but still return a non null bitmap. To avoid displaying partially decoded bitmaps,
            // we catch exceptions reading from the stream in our ExceptionCatchingInputStream and throw them here.
            final Exception streamException = exceptionStream.getException();
            if (streamException != null) {
                throw new RuntimeException(streamException);
            }
            Bitmap rotated = null;
            if (downsampled != null) {
                rotated = TransformationUtils.rotateImageExif(downsampled, pool, orientation);
                if (!downsampled.equals(rotated) && !pool.put(downsampled)) {
                    downsampled.recycle();
                }
            }
            return rotated;
        } finally {
            byteArrayPool.releaseBytes(bytesForOptions);
            byteArrayPool.releaseBytes(bytesForStream);
            exceptionStream.release();
            releaseOptions(options);
        }
    }

    private Bitmap downsampleWithSize(MarkEnforcingInputStream is, RecyclableBufferedInputStream  bufferedStream,
            BitmapFactory.Options options, BitmapPool pool, int inWidth, int inHeight, int sampleSize,
            DecodeFormat decodeFormat) {
        // Prior to KitKat, the inBitmap size must exactly match the size of the bitmap we're decoding.
        Bitmap.Config config = getConfig(is, decodeFormat);
        options.inSampleSize = sampleSize;
        options.inPreferredConfig = config;
        if ((options.inSampleSize == 1 || Build.VERSION_CODES.KITKAT <= Build.VERSION.SDK_INT) && shouldUsePool(is)) {
            int targetWidth = (int) Math.ceil(inWidth / (double) sampleSize);
            int targetHeight = (int) Math.ceil(inHeight / (double) sampleSize);
            // BitmapFactory will clear out the Bitmap before writing to it, so getDirty is safe.
            setInBitmap(options, pool.getDirty(targetWidth, targetHeight, config));
        }
        return decodeStream(is, bufferedStream, options);
    }

    /**
     * A method for getting the dimensions of an image from the given InputStream.
     *
     * @param is The InputStream representing the image.
     * @param options The options to pass to
     *          {@link BitmapFactory#decodeStream(InputStream, android.graphics.Rect,
     *              BitmapFactory.Options)}.
     * @return an array containing the dimensions of the image in the form {width, height}.
     */
    public int[] getDimensions(MarkEnforcingInputStream is, RecyclableBufferedInputStream bufferedStream,
            BitmapFactory.Options options) {
        options.inJustDecodeBounds = true;
        decodeStream(is, bufferedStream, options);
        options.inJustDecodeBounds = false;
        return new int[] { options.outWidth, options.outHeight };
    }

    private static Bitmap decodeStream(MarkEnforcingInputStream is, RecyclableBufferedInputStream bufferedStream,
            BitmapFactory.Options options) {
         if (options.inJustDecodeBounds) {
             // This is large, but jpeg headers are not size bounded so we need something large enough to minimize
             // the possibility of not being able to fit enough of the header in the buffer to get the image size so
             // that we don't fail to load images. The BufferedInputStream will create a new buffer of 2x the
             // original size each time we use up the buffer space without passing the mark so this is a maximum
             // bound on the buffer size, not a default. Most of the time we won't go past our pre-allocated 16kb.
             is.mark(MARK_POSITION);
         } else {
             // Once we've read the image header, we no longer need to allow the buffer to expand in size. To avoid
             // unnecessary allocations reading image data, we fix the mark limit so that it is no larger than our
             // current buffer size here. See issue #225.
             bufferedStream.fixMarkLimit();
         }

        final Bitmap result = BitmapFactory.decodeStream(is, null, options);
        return result;
        // decode()方法执行后会返回一个Bitmap对象
        // 此时图片已经被加载出来
        // 接下来的工作是让加载了的Bitmap显示到界面上
        // 请回到分析25
    }

    ...
}
步骤3:返回图片资源
加载完图片后,需要一层层向上返回
-
返回路径
StreamBitmapDecoder(分析25)->ImageVideoBitmapDecoder(分析24)->GifBitmapWrapperResourceDecoder``decodeBitmapWrapper()(分析23) -
由于隔得太远,我重新把(分析23)
decodeBitmapWrapper()贴出
<-- 分析23:decodeBitmapWrapper -->
private GifBitmapWrapper decodeBitmapWrapper(ImageVideoWrapper toDecode, int width, int height) throws IOException {
    GifBitmapWrapper result = null;
    Resource<Bitmap> bitmapResource = bitmapDecoder.decode(toDecode, width, height);
    if (bitmapResource != null) {
        result = new GifBitmapWrapper(bitmapResource, null);
        // 将Resource<Bitmap>封装到了一个GifBitmapWrapper对象
    }
    return result;
   // 最终返回的是一个GifBitmapWrapper对象:既能封装GIF,又能封装Bitmap,从而保证了不管是什么类型的图片,Glide都能加载
   // 接下来我们分析下GifBitmapWrapper() ->>分析27
}

<-- 分析27:GifBitmapWrapper() -->
// 作用:分别对gifResource和bitmapResource做了一层封装
public class GifBitmapWrapper {
    private final Resource<GifDrawable> gifResource;
    private final Resource<Bitmap> bitmapResource;

    public GifBitmapWrapper(Resource<Bitmap> bitmapResource, Resource<GifDrawable> gifResource) {
        if (bitmapResource != null && gifResource != null) {
            throw new IllegalArgumentException("Can only contain either a bitmap resource or a gif resource, not both");
        }
        if (bitmapResource == null && gifResource == null) {
            throw new IllegalArgumentException("Must contain either a bitmap resource or a gif resource");
        }
        this.bitmapResource = bitmapResource;
        this.gifResource = gifResource;
    }

    /**
     * Returns the size of the wrapped resource.
     */
    public int getSize() {
        if (bitmapResource != null) {
            return bitmapResource.getSize();
        } else {
            return gifResource.getSize();
        }
    }

    /**
     * Returns the wrapped {@link Bitmap} resource if it exists, or null.
     */
    public Resource<Bitmap> getBitmapResource() {
        return bitmapResource;
    }

    /**
     * Returns the wrapped {@link GifDrawable} resource if it exists, or null.
     */
    public Resource<GifDrawable> getGifResource() {
        return gifResource;
    }
}
- 然后该
GifBitmapWrapper对象会一直向上返回 - 直到返回到
GifBitmapWrapperResourceDecoder的decode()时(分析20),会对GifBitmapWrapper对象再做一次封装,如下所示:
此处将上面的分析20再次粘贴过来
<--分析20:GifBitmapWrapperResourceDecoder对象的decode()  -->
public class GifBitmapWrapperResourceDecoder implements ResourceDecoder<ImageVideoWrapper, GifBitmapWrapper> {

    ...
    @Override
    public Resource<GifBitmapWrapper> decode(ImageVideoWrapper source, int width, int height) throws IOException {

        try {
            wrapper = decode(source, width, height, tempBytes);
        } finally {
            pool.releaseBytes(tempBytes);
        }

        // 直接看这里
        return wrapper != null ? new GifBitmapWrapperResource(wrapper) : null;
        // 将GifBitmapWrapper封装到一个GifBitmapWrapperResource对象中(Resource<GifBitmapWrapper>类型) 并返回
        // 该GifBitmapWrapperResource和上述的BitmapResource类似- 实现了Resource接口,可通过get()来获取封装的具体内容
        // GifBitmapWrapperResource()源码分析 - >>分析28
    }

<-- 分析28: GifBitmapWrapperResource()-->
// 作用:经过这层封装后,我们从网络上得到的图片就能够以Resource接口的形式返回,并且还能同时处理Bitmap图片和GIF图片这两种情况。
public class GifBitmapWrapperResource implements Resource<GifBitmapWrapper> {
    private final GifBitmapWrapper data;

    public GifBitmapWrapperResource(GifBitmapWrapper data) {
        if (data == null) {
            throw new NullPointerException("Data must not be null");
        }
        this.data = data;
    }

    @Override
    public GifBitmapWrapper get() {
        return data;
    }

    @Override
    public int getSize() {
        return data.getSize();
    }

    @Override
    public void recycle() {
        Resource<Bitmap> bitmapResource = data.getBitmapResource();
        if (bitmapResource != null) {
            bitmapResource.recycle();
        }
        Resource<GifDrawable> gifDataResource = data.getGifResource();
        if (gifDataResource != null) {
            gifDataResource.recycle();
        }
    }
}
继续返回到DecodeJob的decodeFromSourceData()(分析19)中:
<-- 分析19:decodeFromSourceData()()  -->
private Resource<T> decodeFromSourceData(A data) throws IOException {

        decoded = loadProvider.getSourceDecoder().decode(data, width, height);

    return decoded;
    // 该方法返回的是一个`Resource<T>`对象,其实就是Resource<GifBitmapWrapper>对象
}
- 继续向上返回,最终返回到
DecodeJob的decodeFromSource()中(分析15) - 如下所示:
<-- 分析15:DecodeJob的decodeFromSource()  -->
class DecodeJob<A, T, Z> {
    ...

 public Resource<Z> decodeFromSource() throws Exception {
        Resource<T> decoded = decodeSource();
        // 返回到这里,最终得到了这个Resource<T>对象,即Resource<GifBitmapWrapper>对象
        return transformEncodeAndTranscode(decoded);
        // 作用:将该Resource<T>对象 转换成 Resource<Z>对象 -->分析29
    }


<--分析29:transformEncodeAndTranscode() -->
private Resource<Z> transformEncodeAndTranscode(Resource<T> decoded) {

    Resource<Z> result = transcode(transformed);
     // 把Resource<T>对象转换成Resource<Z>对象 ->>分析30
    if (Log.isLoggable(TAG, Log.VERBOSE)) {
        logWithTimeAndKey("Transcoded transformed from source", startTime);
    }
    return result;
}

<-- 分析30:transcode(transformed)  -->

private Resource<Z> transcode(Resource<T> transformed) {
    if (transformed == null) {
        return null;
    }
    return transcoder.transcode(transformed);
    // 调用了transcoder的transcode()
    // 这里的transcoder就是第二步load()中的GifBitmapWrapperDrawableTranscoder对象(回看下第2步生成对象的表)
    // 接下来请看 ->>分析31
}

<-- 分析31:GifBitmapWrapperDrawableTranscoder.transcode(transformed) -->
// 作用:转码,即从Resource<GifBitmapWrapper>中取出GifBitmapWrapper对象,然后再从GifBitmapWrapper中取出Resource<Bitmap>对象。
// 因为GifBitmapWrapper是无法直接显示到ImageView上的,只有Bitmap或者Drawable才能显示到ImageView上。

public class GifBitmapWrapperDrawableTranscoder implements ResourceTranscoder<GifBitmapWrapper, GlideDrawable> {

...

    @Override
    public Resource<GlideDrawable> transcode(Resource<GifBitmapWrapper> toTranscode) {
        GifBitmapWrapper gifBitmap = toTranscode.get();
        // 步骤1:从Resource<GifBitmapWrapper>中取出GifBitmapWrapper对象(上面提到的调用get()进行提取)
        Resource<Bitmap> bitmapResource = gifBitmap.getBitmapResource();
        // 步骤2:从GifBitmapWrapper中取出Resource<Bitmap>对象

        final Resource<? extends GlideDrawable> result;


        // 接下来做了一个判断:

        // 1. 若Resource<Bitmap>不为空
        if (bitmapResource != null) {
            result = bitmapDrawableResourceTranscoder.transcode(bitmapResource);
            // 则需要再做一次转码:将Bitmap转换成Drawable对象
            // 因为要保证静图和动图的类型一致性,否则难以处理->>分析32
        } else {

      // 2. 若Resource<Bitmap>为空(说明此时加载的是GIF图)
      // 那么直接调用getGifResource()方法将图片取出
      // 因为Glide用于加载GIF图片是使用的GifDrawable这个类,它本身就是一个Drawable对象
            result = gifBitmap.getGifResource();
        }
        return (Resource<GlideDrawable>) result;
    }

    ...
}

<-- 分析32:bitmapDrawableResourceTranscoder.transcode(bitmapResource)-->
// 作用:再做一次转码:将Bitmap转换成Drawable对象
public class GlideBitmapDrawableTranscoder implements ResourceTranscoder<Bitmap, GlideBitmapDrawable> {

...

    @Override
    public Resource<GlideBitmapDrawable> transcode(Resource<Bitmap> toTranscode) {

        GlideBitmapDrawable drawable = new GlideBitmapDrawable(resources, toTranscode.get());
        // 创建GlideBitmapDrawable对象,并把Bitmap封装到里面

        return new GlideBitmapDrawableResource(drawable, bitmapPool);
        // 对GlideBitmapDrawable再进行一次封装,返回Resource<GlideBitmapDrawable>对象
    }

}
- 此时,无论是静图的
Resource<GlideBitmapDrawable>对象,还是动图的Resource<GifDrawable>对象,它们都属于父类Resource<GlideDrawable>对象 - 因此
transcode()返回的是Resource<GlideDrawable>对象,即转换过后的Resource<Z>
所以,分析15DecodeJob的decodeFromSource()中,得到的Resource对象 是 Resource<GlideDrawable>对象
步骤4:在主线程显示图片
继续向上返回,最终返回到 EngineRunnable 的 run() 中(分析12)
重新贴出这部分代码
<--分析12:EngineRunnable的run() -->
@Override
public void run() {

    try {
        resource = decode();
        // 最终得到了Resource<GlideDrawable>对象
        // 接下来的工作:将该图片显示出来

    } catch (Exception e) {
        if (Log.isLoggable(TAG, Log.VERBOSE)) {
            Log.v(TAG, "Exception decoding", e);
        }
        exception = e;
    }
    if (isCancelled) {
        if (resource != null) {
            resource.recycle();
        }
        return;
    }
    if (resource == null) {
        onLoadFailed(exception);
    } else {
        onLoadComplete(resource);
        // 表示图片加载已经完成 ->>分析33
    }
}

<-- 分析33:  onLoadComplete(resource) -->
private void onLoadComplete(Resource resource) {
    manager.onResourceReady(resource);
    // 该manager即EngineJob对象
    // 实际上调用的是EngineJob的onResourceReady() - >>分析34
}

<-- 分析34:EngineJob的onResourceReady() : -->
class EngineJob implements EngineRunnable.EngineRunnableManager {
    ...

    private static final Handler MAIN_THREAD_HANDLER = new Handler(Looper.getMainLooper(), new MainThreadCallback());
    // 创建线程,并绑定主线程的Looper
    private final List<ResourceCallback> cbs = new ArrayList<ResourceCallback>();

    @Override
    public void onResourceReady(final Resource<?> resource) {
        this.resource = resource;
        MAIN_THREAD_HANDLER.obtainMessage(MSG_COMPLETE, this).sendToTarget();
       // 使用Handler发出一条 MSG_COMPLETE 消息
      // 那么在MainThreadCallback的handleMessage()方法中就会收到这条消息 ->>分析35
      // 从此处开始,所有逻辑又回到主线程中进行了,即更新UI

    }

<-- 分析35:MainThreadCallback的handleMessage()-->
    private static class MainThreadCallback implements Handler.Callback {

        @Override
        public boolean handleMessage(Message message) {
            if (MSG_COMPLETE == message.what || MSG_EXCEPTION == message.what) {
                EngineJob job = (EngineJob) message.obj;
                if (MSG_COMPLETE == message.what) {
                    job.handleResultOnMainThread();
                    // 调用 EngineJob的handleResultOnMainThread() ->>分析36
                } else {
                    job.handleExceptionOnMainThread();
                }
                return true;
            }
            return false;
        }
    }

    ...
}

<-- 分析36:handleResultOnMainThread() -->
private void handleResultOnMainThread() {

        // 通过循环,调用了所有ResourceCallback的onResourceReady()
        for (ResourceCallback cb : cbs) {
            if (!isInIgnoredCallbacks(cb)) {
                engineResource.acquire();
                cb.onResourceReady(engineResource);
                // ResourceCallback 是在addCallback()方法当中添加的->>分析37
            }
        }
        engineResource.release();
    }

<-- 分析37:addCallback() -->
//
    public void addCallback(ResourceCallback cb) {
        Util.assertMainThread();
        if (hasResource) {
            cb.onResourceReady(engineResource);
            // 会向cbs集合中去添加ResourceCallback
        } else if (hasException) {
            cb.onException(exception);
        } else {
            cbs.add(cb);
        }
    }

// 而addCallback()是在分析11:Engine的load()中调用的:
<-- 上面的分析11:Engine的load() -->
public class Engine implements EngineJobListener,
        MemoryCache.ResourceRemovedListener,
        EngineResource.ResourceListener {

      ...

      public <T, Z, R> LoadStatus load(Key signature, int width, int height, DataFetcher<T> fetcher,
            DataLoadProvider<T, Z> loadProvider, Transformation<Z> transformation, ResourceTranscoder<Z, R> transcoder, Priority priority,
            boolean isMemoryCacheable, DiskCacheStrategy diskCacheStrategy, ResourceCallback cb) {

              engineJob.addCallback(cb);
           // 调用addCallback()注册了一个ResourceCallback
           // 上述参数cb是load()传入的的最后一个参数
            // 而load()是在GenericRequest的onSizeReady()调用的->>回到分析9(下面重新贴多了一次)
        return new LoadStatus(cb, engineJob);
    }

    ...
}

<-- 上面的分析9:onSizeReady() -->
public void onSizeReady(int width, int height) {

...
    loadStatus = engine.load(signature, width, height, dataFetcher, loadProvider, transformation, transcoder,
            priority, isMemoryCacheable, diskCacheStrategy, this);
            // load()最后一个参数是this
            // 所以,ResourceCallback类型参数cb是this
            // 而GenericRequest本身实现了ResourceCallback接口
            // 因此,EngineJob的回调 = cb.onResourceReady(engineResource) = 最终回调GenericRequest的onResourceReady() -->>分析6

    }
}

<-- 分析38:GenericRequest的onResourceReady() -->
// onResourceReady()存在两个方法重载

// 重载1
public void onResourceReady(Resource<?> resource) {
    Object received = resource.get();
    // 获取封装的图片对象(GlideBitmapDrawable对象 或 GifDrawable对象

       onResourceReady(resource, (R) received);
      // 然后将该获得的图片对象传入到了onResourceReady()的重载方法中 ->>看重载2
}


// 重载2
private void onResourceReady(Resource<?> resource, R result) {

        ...

        target.onResourceReady(result, animation);
        // Target是在第3步into()的最后1行调用glide.buildImageViewTarget()方法来构建出的Target:GlideDrawableImageViewTarget对象
        // ->>分析39

    }

<-- 分析39:GlideDrawableImageViewTarget.onResourceReady  -->
public class GlideDrawableImageViewTarget extends ImageViewTarget<GlideDrawable> {

    @Override
    public void onResourceReady(GlideDrawable resource, GlideAnimation<? super GlideDrawable> animation) {
        if (!resource.isAnimated()) {
            float viewRatio = view.getWidth() / (float) view.getHeight();
            float drawableRatio = resource.getIntrinsicWidth() / (float) resource.getIntrinsicHeight();
            if (Math.abs(viewRatio - 1f) <= SQUARE_RATIO_MARGIN
                    && Math.abs(drawableRatio - 1f) <= SQUARE_RATIO_MARGIN) {
                resource = new SquaringDrawable(resource, view.getWidth());
            }
        }
        super.onResourceReady(resource, animation);
        // 若是静态图片,就调用父类的.onResourceReady() 将GlideDrawable显示到ImageView上
        // GlideDrawableImageViewTarget的父类是ImageViewTarget ->>分析40
        this.resource = resource;
        resource.setLoopCount(maxLoopCount);
        resource.start();
        // 如果是GIF图片,就调用resource.start()方法开始播放图片
    }

    @Override
    protected void setResource(GlideDrawable resource) {
        view.setImageDrawable(resource);
    }

 ...
}

<-- 分析40:ImageViewTarget.onResourceReady() -->
public abstract class ImageViewTarget<Z> extends ViewTarget<ImageView, Z> implements GlideAnimation.ViewAdapter {

    ...

    @Override
    public void onResourceReady(Z resource, GlideAnimation<? super Z> glideAnimation) {
        if (glideAnimation == null || !glideAnimation.animate(resource, this)) {
            setResource(resource);
            // 继续往下看
        }
    }

    protected abstract void setResource(Z resource);
    // setResource()是一个抽象方法
   // 需要在子类具体实现:请回看上面分析39子类GlideDrawableImageViewTarget类重写的setResource():调用view.setImageDrawable(),而这个view就是ImageView
  // 即setResource()的具体实现是调用ImageView的setImageDrawable() 并 传入图片,于是就实现了图片显示。

}
终于,静图 / Gif图 成功显示出来
总结
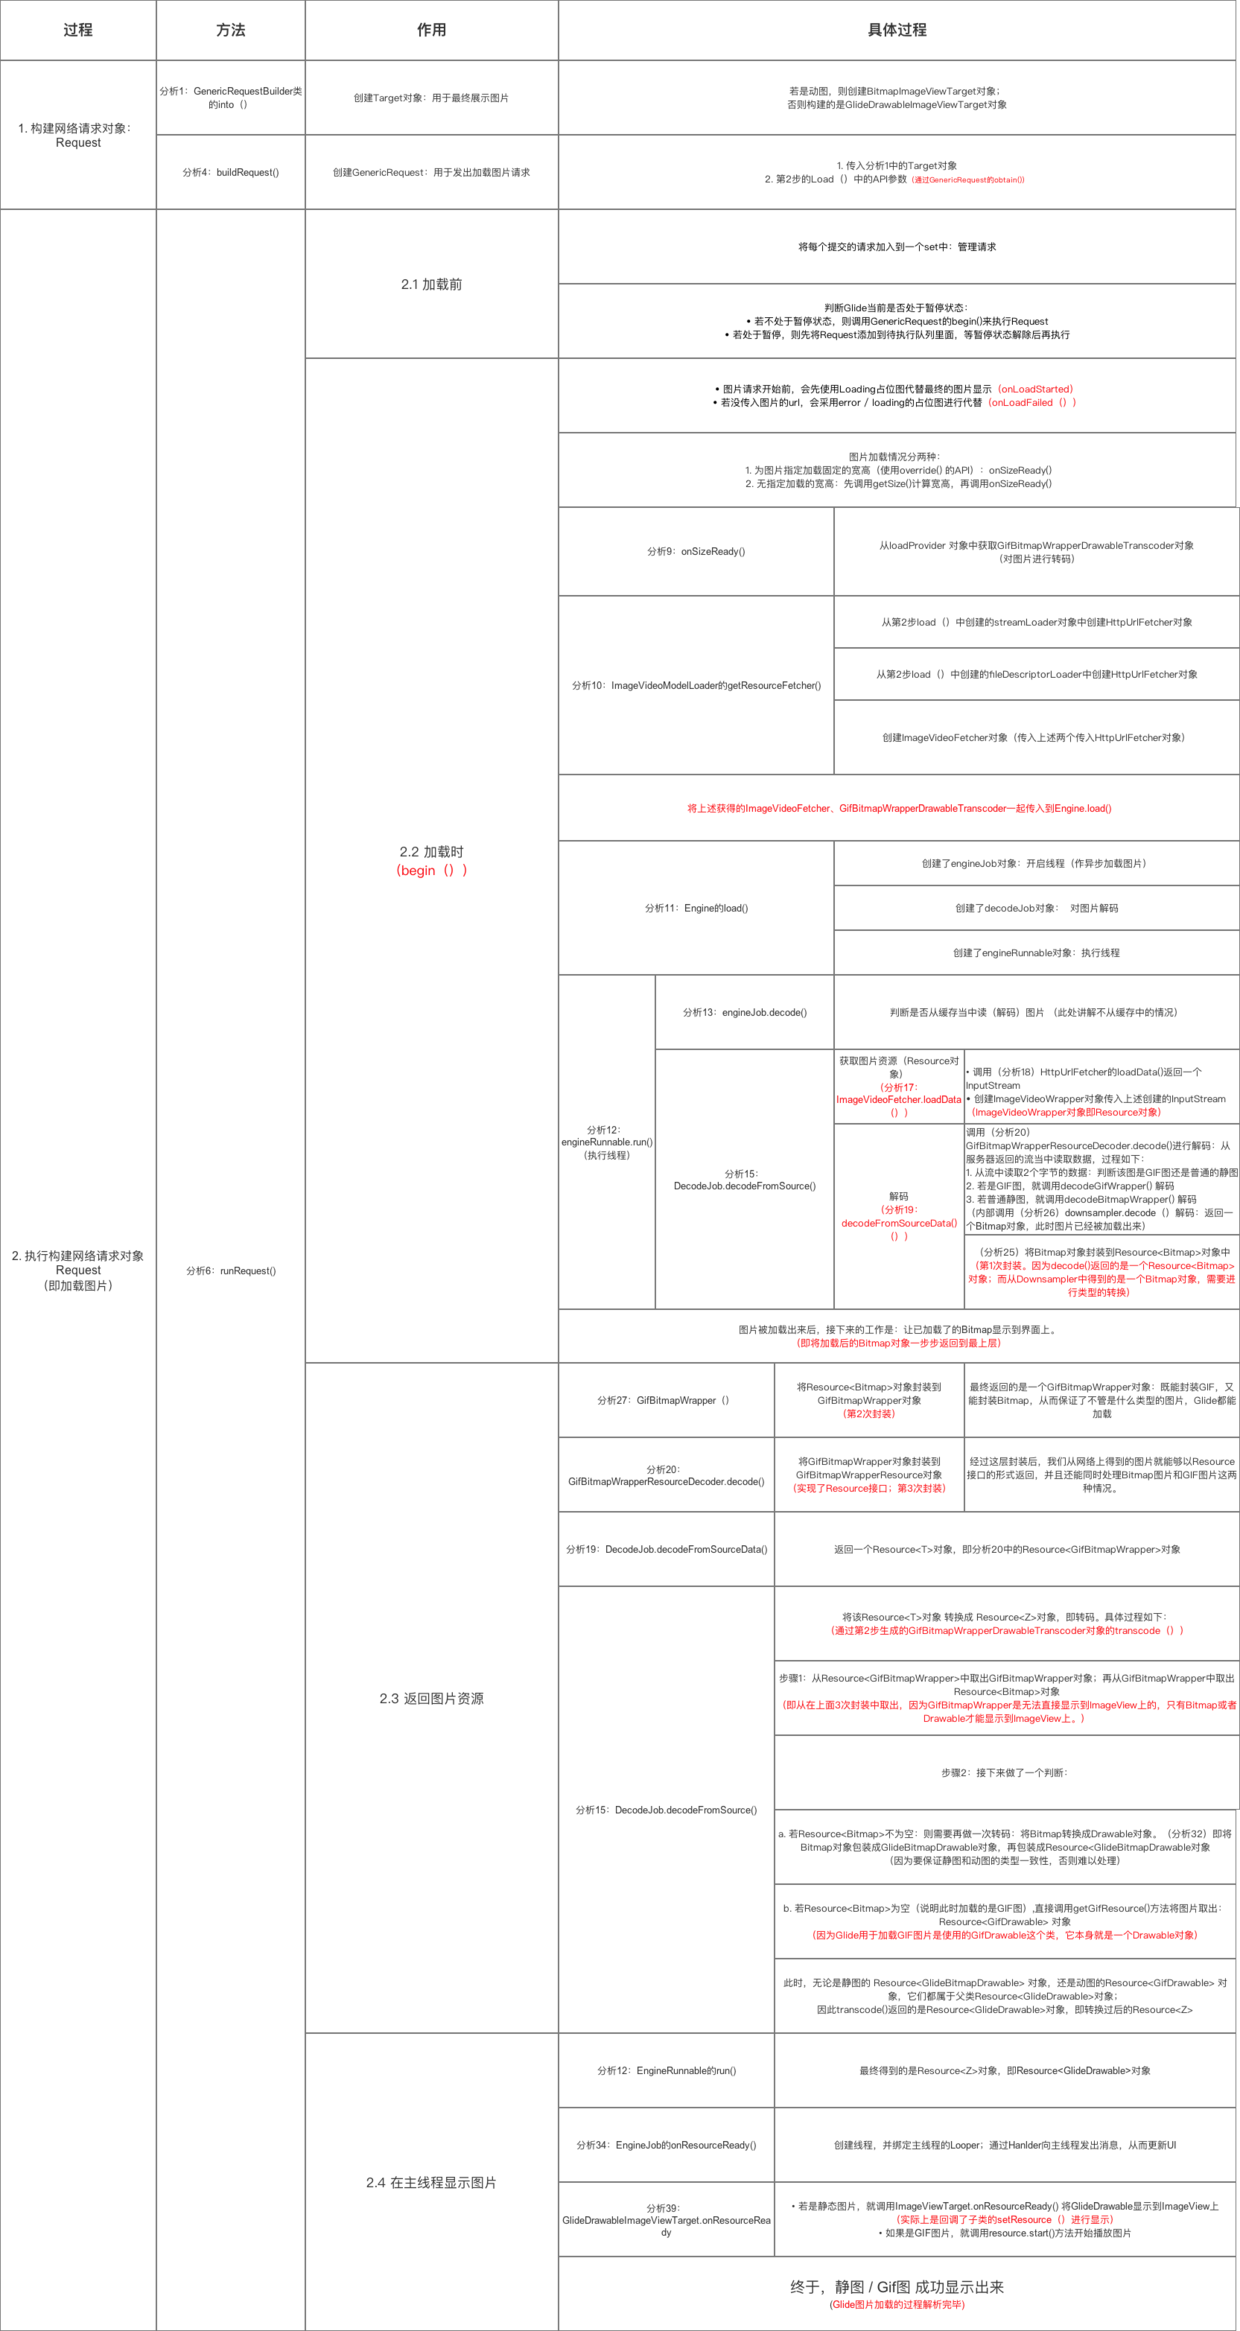
至此,Glide的基本功能 图片加载的全功能 解析完毕。
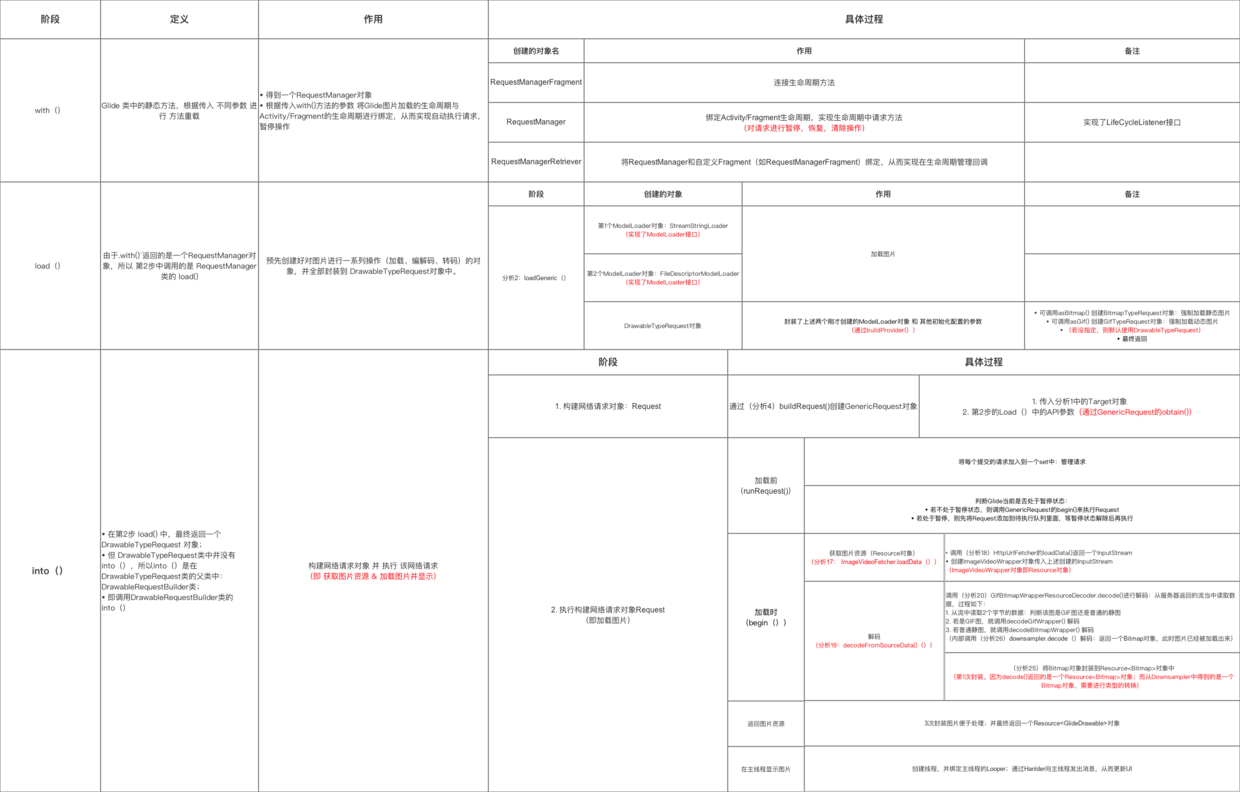
5. 总结
一图总结Glide的基本功能 图片加载的全过程
- 下面我将继续对
Glide的其他功能进行源码分析 ,有兴趣可以继续关注Carson_Ho的安卓开发笔记
请点赞!因为你的鼓励是我写作的最大动力!
欢迎关注carson_ho的微信公众号