

(Webpack 4.0+, React 16.0.0+, Babel 7+)
作者: 赵玮龙
写在开头: 在怀着激动和忐忑的心情写出团队第一篇文章时,这个兴奋感一方面来自团队组建以来这是我们首次对外部开启一扇窗,另一方面我们也会持续听取意见,维持一个交流的心态。
自React在master分支2017.09.27更新了16.0.0以来,到至今为止发过多个版本(虽然fiber算法带来的异步加载还没有开放稳定版本API,但是不远啦...)
但是除去这个我们翘首以盼的改变外,也同样有很多我们值得一提的东西。
结合Webpack 4.0,Babel 7我们会在这里实现一个基本满足日常开发需求的前端脚手架
(有亮点哦!! 我们自己实现了我们自己的react-loadable和react-redux的功能借助新特性)
我们先从编译文件开始我们看看Babel 7和Webpack 4给我的编译和构建带来那些便利。
以往的.babelrc都离不开babel-preset-es20**包括stage-*等级的配置,在新的版本里作者觉得这些过于繁琐,干脆直接支持最新版本好啦(可以看看他们的调研和理由)。于是我们的.babelrc就变成这样啦
  {
    "presets": [
      ["@babel/preset-env",{
          "modules": false,          // 依然是对于webpack的tree-shaking兼容做法
      }],
      "@babel/preset-react",
      "@babel/preset-stage-0",
    ],
    "plugins": [
      "@babel/plugin-syntax-dynamic-import"
    ],
  }
很容易发现react还是需要单独配置的stage-0只有0级的规范啦,支持新的原生api还是需要syntax-dynamic-import这个存在。 还有个问题可能你也注意到了,所有Babel 7的Packages都是这么写的(@babel/x),原因在blog也有。
再来说说Webpack 4的一些改变
首先说说最大改变可能也是parcel出现0配置给本身配置就比较繁琐的webpack更多压力了 这回官方破釜沉舟的也推出0配置选项。 使用方式提供cli模式,当然你也可以在配置文件中声明,我们后面会指出
webpack --mode production
webpack --mode development
那么这个默认模式里会包含以往哪些配置选项
官网是这么解释的:
development环境包含
- 浏览器debugging的工具(默认设置了devtool)
- 更快的编译环境周期(设置cache)
- 运行过程中有用的报错信息 production环境包含 1.文件输出大小压缩(ugliy处理) 2.更快的打包时间 3.设置全局环境变量production 4.不暴露源码和文件路径 5.容易使用的output资源(会有很多类似于hosting内部代码编译后优化默认使用)
(两种模式甚至于还帮你默认设置了入口entry和output路径,但是为了配置的易读性和可配置性我们还是留给我们自己设置比较好。)
还有一个重要的改变是官方废弃掉了CommonsChunkPlugin这个插件 原因有如下: 1.官方认为首先这个api不容易理解并且不好用 2.并且提取公共文件中含有大量的冗余代码 3.在做异步加载的时候这个文件必须每次都首先加载 (这么看来废弃也确实理所应当啦!)
取而代之的是现在默认就支持的code-splitting(只要你采用动态加载的api => import()) webpack会默认帮你做代码拆分并且异步加载,并且不受上面提到mode模式的限制(意味着mode为none也是可以work的,这就是拆包即用了吧!)
写法如下:
const Contract = asyncRoute(() => import('./pages/contract'), {
  loading: Loading,
})
上面的写法看起来有点怪,正常的写法直接应该是import返回一个promise
import(/* webpackChunkName: "lodash" */ 'lodash').then(_ => {
    var element = document.createElement('div')
    element.innerHTML = _.join(['Hello', 'webpack'], ' ')
    return element
}).catch(error => 'An error occurred while loading the component')
但是我们返回的是个React的component所以需要做一些处理,并且在异步加载的时候因为是发起一次网络请求你可能还会需要一个友好地loading界面(异步加载的具体细粒度也需要你自己确定,比较常见的是根据页面route去请求自己的container然后加载页面里的相应component)
这里我们自己封装了这个asyncRoute它的作用除去返回给我们一个正常的component之外我们还可以给他传递一个loading,用来处理loading界面和请求过程中捕获的error信息,如果我们需要支持ssr还需要给个特殊标记用以做不同的处理,废话不多说上代码如何实现这个asyncRoute
// 这里是它的用法
// e.x   author: zhaoweilong
// const someRouteContainer = asyncRoute(() => import('../componet'), {
//   loading: <Loading>loading...</Loading>
// })
// <Route exact path='/router' componet={someRouteContainer} />

// function Loading(props) {
//   if (props.error) {
//     return <div>Error!</div>;
//   } else {
//     return <div>Loading...</div>;
//   }
// }

const asyncRoute = (getComponent, opts) => {
  return class AsyncRoute extends React.Component {
    static Component = null

    state = {
      Component: AsyncRoute.Component,
      error: null,
    }

    componentWillMount() {
      if (!this.state.Component) {
        getComponent()
          .then(module => module.default || module)
          .then(Component => {
            AsyncRoute.Component = Component
            this.setState({ Component })
          })
          .catch(error => {
            this.setState({ error })
          })
      }
    }

    render() {
      const { Component, error } = this.state
      const loading = opts.loading

      if (loading && !Component) {
        return React.createElement(loading, {
          error,
        })
      } else if (Component) {
        return <Component {...this.props}/>
      }
      return null
    }
  }
}
(上面的写法不包含ssr的处理,ssr还要你把这些component提前加载好preload) 说了这么多。。。还没说如果我们真正的webpack的配置文件长什么样子:
const path = require('path')
const HtmlWebpackPlugin = require('html-webpack-plugin')

const port = process.env.PORT || 3000

module.exports = {
  target: 'web',
  entry: {
    bundle: [
      './src/index.js',
    ],
  },
  output: {
    path: path.resolve(__dirname, 'dist'),
    filename: '[name].js',
    publicPath: '/',
  },
  module: {
    rules: [
      {
        test: /\.js$/,
        use: 'babel-loader',
        exclude: [/node_modules/],
      },
    ],
  },
  mode: 'development',
  devtool: 'cheap-module-source-map',  //这里需要替换掉默认的devtool设置eval为了兼容后面我们提到的react 的ErrorBoundary
  plugins: [
    new HtmlWebpackPlugin(
      {
        filename: './src/index.html',
      }
    ),
  ]
}
可以看到我们只用了HtmlWebpackPlugin来动态加载编译过后的文件,entry和output也是因为需要定制化和方便维护性我们自己定义,配置文件极其简单,那么你可能会好奇开发环境简单,那么生产环境呢?
const webpack = require('webpack')
const devConfig = require('./webpack.config')

const ASSET_PATH = process.env.ASSET_PATH || '/static/'

module.exports = Object.assign(devConfig, {
  entry: {
    bundle: './src/index.js',
  },
  output: Object.assign(devConfig.output, {
    filename: '[name].[chunkhash].js',
    publicPath: ASSET_PATH,
  }),
  module: {
    rules: [
      ...devConfig.module.rules,
    ]
  },
  mode: 'production',
  devtool: 'none',
})
它好像更加简单啦,我们只需要对output做一些我们需要的定制化,完全没有插件选项,看看我们build之后文件是什么样子的:
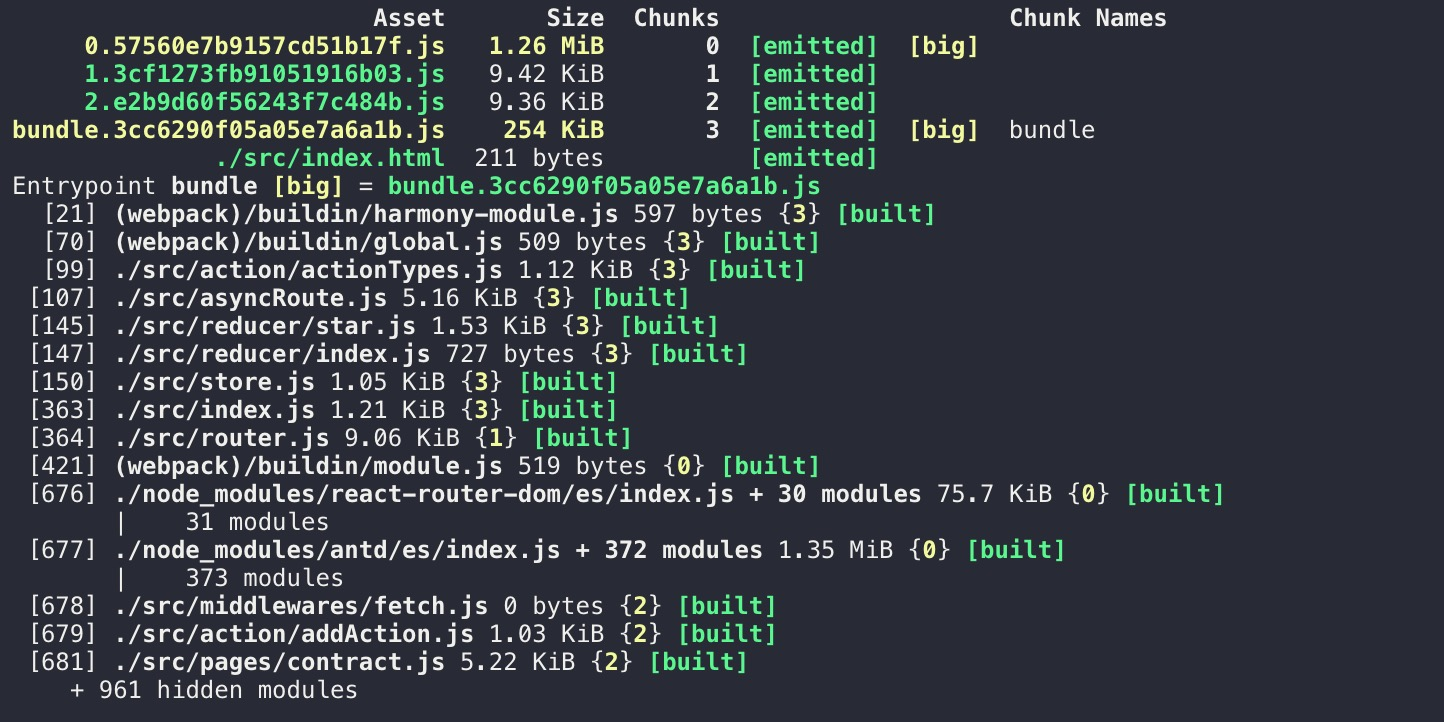
可以看到我们除去bundle的入口文件之外多了0,1,2三个文件这里面分别提取了react和index以及异步加载的一个路由contract相应js文件
我们搞定配置之后,来看看激动人心的React新特性以及一些应用
我们着重介绍4个特性并且实战3个特性
- 增加ErrorBoundary组件catch组件错误
- 废弃componentWillReceiveProps更换为static getDerivedStateFromProps
- 增加render props写法
- 新的context API
我们先介绍下第一个改动
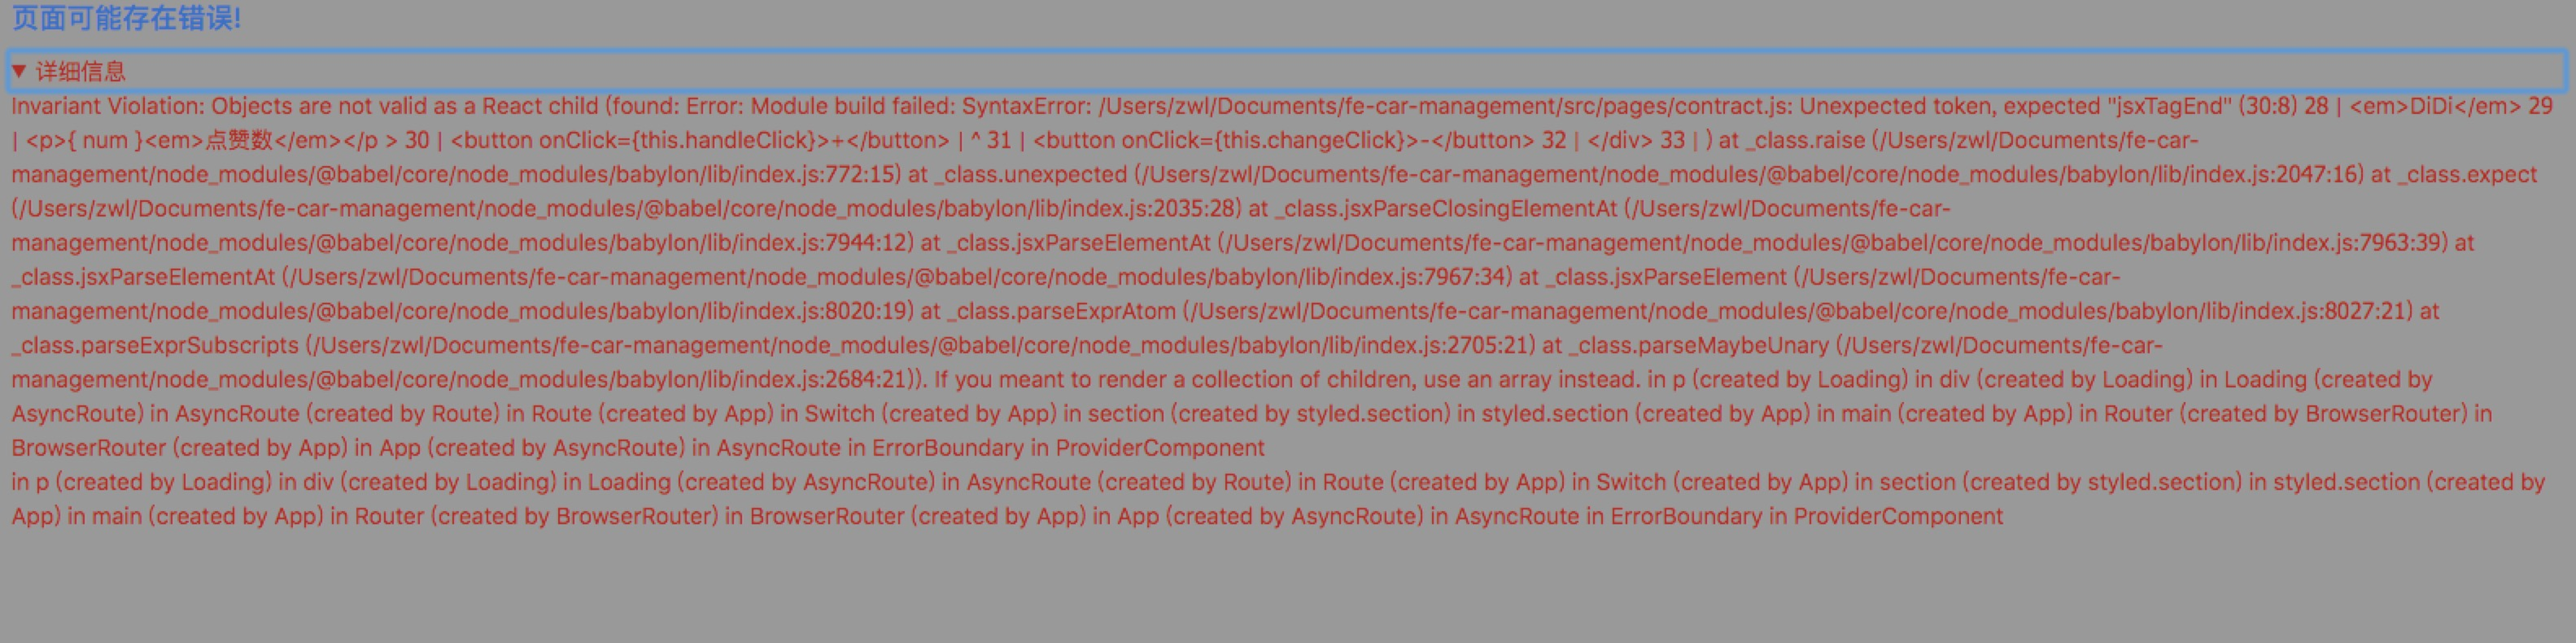
这里React觉得之前的开发报错机制过于不人性化了,所以允许我们在组件外层包裹组件ErrorBoundary而这个自定义的组件会有一个自己的生命周期componentDidCatch用来补货错误,我们废话不多说来看看代码:
import React from 'react'
import styled from 'styled-components'

const StyledBoundaryBox = styled.div`
  background: rgba(0,0,0,0.4);
  position: fixed;
  top: 0;
  left: 0;
  right: 0;
  bottom: 0;
  width: 100%;
  height: 100%;
  z-index: 2;
`
const Title = styled.h2`
  position: relative;
  padding: 0 10px;
  font-size: 17px;
  color: #0070c9;
  z-index: 1991;
`

const Details = styled.details`
  position: relative;
  padding: 0 10px;
  color: #bb1d1d;
  z-index: 1991;
`

class ErrorBoundary extends React.Component {
  state = {
    hasError: false,
    error: null,
    errorInfo: null,
  }

  componentDidCatch(error, info) {
    this.setState({
      hasError: true,
      error: error,
      errorInfo: info,
    })
  }

  render() {
    if (this.state.hasError) {
      return(
        <StyledBoundaryBox>
          <Title>页面可能存在错误!</Title>
          <Details>
            {this.state.error && this.state.error.toString()}
            <br/>
            {this.state.errorInfo.componentStack}
          </Details>
        </StyledBoundaryBox>
      )
    }
    return this.props.children
  }
}

export default ErrorBoundary
把它包裹在你想catch的组件外层。我直接放到了最外层。当然你可以按照Dan的做法分别catch页面相应的部分 其实你会发现这个组件非常类似于我们js中的try{}catch{}代码块,其实确实是React希望这样的开发体验更佳接近于原生js的一种思路
当有报错的时候你会发现在详情中有一个报错组件的调用栈,方便你去定位错误,当然报错的样式你可以自己定义这里过于丑陋请忽略!!!
//以前
class ExampleComponent extends React.Component {
  state = {
    derivedData: computeDerivedState(this.props)
  };

  componentWillReceiveProps(nextProps) {
    if (this.props.someValue !== nextProps.someValue) {
      this.setState({
        derivedData: computeDerivedState(nextProps)
      });
    }
  }
}

//以后
class ExampleComponent extends React.Component {
  state = {};

  static getDerivedStateFromProps(nextProps, prevState) {
    if (prevState.someMirroredValue !== nextProps.someValue) {
      return {
        derivedData: computeDerivedState(nextProps),
        someMirroredValue: nextProps.someValue
      };
    }
    return null;
    }
  }
}
我们发现首先我们不需要在改变的时候 this.setState 了,而是 return 有改变的部分(这里就是setState的作用),如果没有return null其他的属性会依旧保持原来的状态。
它还有一个作用是之前cwrp()没有的,cwrp()只在组件props update时候更新
但是新的gdsfp()确在首次挂在inital mount的时候也会走,你可能会觉得很奇怪我以前明明习惯使用(this.props 和nextProps)做判断为何现在非要放到state里去判断呢,我们可以从这个api的名字看出从state取得props也就是希望你能存一份props到state如果你需要做对比直接比之前存的和之后可能改变的nextprops就好啦,后面无论是dispatch(someAction)还有return{}都可以。但是问题是如果我采用redux我还要存一份改变的数据在state而不是都在全局的store中吗?这个地方还真是一个非常敏感并且很大的话题(因为它关系到React本身发展未来和相对以来这些redux包括react-redux的未来)如果你感兴趣你可以看下包括redux作者Dan和几位核心成员的讨论,很具有启发性,当api稳定后我们后续文章也会来讨论下来它的可能性。如果你持续关注我们!!!
下面我们来说下render props这个更新可是让我个人很兴奋的,因为它直接影响到我们在的编程体验
其实这个概念之前在react-router4中就有体现如果你还记得类似这种写法:
  <Route
    exact
    path='/'
    render={() => <Pstyled>欢迎光临!</Pstyled>}
  />
如果这时候你还在用Mixins那貌似我们之间就有点gap了。之前我们谈到HOC的实现一般都会想到高阶组件,但是本身它却有一些弊端(我们来看一下):
(借助官方一个例子)
import React from 'react'
import ReactDOM from 'react-dom'

const withMouse = (Component) => {
  return class extends React.Component {
    state = { x: 0, y: 0 }

    handleMouseMove = (event) => {
      this.setState({
        x: event.clientX,
        y: event.clientY
      })
    }

    render() {
      return (
        <div style={{ height: '100%' }} onMouseMove={this.handleMouseMove}>
          <Component {...this.props} mouse={this.state}/>
        </div>
      )
    }
  }
}

const App = React.createClass({
  render() {
    // Instead of maintaining our own state,
    // we get the mouse position as a prop!
    const { x, y } = this.props.mouse
    return (
      <div style={{ height: '100%' }}>
        <h1>The mouse position is ({x}, {y})</h1>
      </div>
    )
  }
})

const AppWithMouse = withMouse(App)

ReactDOM.render(<AppWithMouse/>, document.getElementById('app'))
- 问题一 是你不知道hoc中到底传递给你什么改变了你的props,如果他还是第三方的。那更是黑盒问题。
- 问题二 命名冲突,因为你总会有个函数名这里叫做withMouse
那我们看看render props如果解决这两个问题呢?
import React from 'react'
import ReactDOM from 'react-dom'
import PropTypes from 'prop-types'

// 我们可以用普通的component来实现hoc
class Mouse extends React.Component {
  static propTypes = {
    render: PropTypes.func.isRequired
  }

  state = { x: 0, y: 0 }

  handleMouseMove = (event) => {
    this.setState({
      x: event.clientX,
      y: event.clientY
    })
  }

  render() {
    return (
      <div style={{ height: '100%' }} onMouseMove={this.handleMouseMove}>
      {this.props.render(this.state)}
      </div>
    )
  }
}

const App = React.createClass({
  render() {
    return (
      <div style={{ height: '100%' }}>
        <Mouse render={({ x, y }) => (
          // 这里面的传递很清晰
          <h1>The mouse position is ({x}, {y})</h1>
        )}/>
      </div>
    )
  }
})

ReactDOM.render(<App/>, document.getElementById('app'))
是不是觉得无论从传值到最后的使用都那么的简洁如初!!!(最重要的是this.props.children也可以用来当函数哦!)
那么接下来重头戏啦,如何用它实现react-redux首先我们都知道connect()()就是一个典型的HOC
下面是我们的实现:
import PropTypes from 'prop-types'
import React, { Component } from 'react'

const dummyState = {}

class ConnectConsumer extends Component {
  static propTypes = {
    context: PropTypes.shape({
      dispatch: PropTypes.func.isRequired,
      getState: PropTypes.func.isRequired,
      subscribe: PropTypes.func.isRequired,
    }),
    children: PropTypes.func.isRequired,
  }

  componentDidMount() {
    const { context } = this.props
    this.unsubscribe = context.subscribe(() => {
      this.setState(dummyState)
    })
  }

  componentWillUnmount() {
    this.unsubscribe()
  }

  render() {
    const { context } = this.props
    const passProps = this.props
    return this.props.children(context.getState(), context.dispatch)
  }
}
是不是很酷那他怎么用呢?我们传递了state,dispatch那它的用法和之前传递的方式就类似了而且可能更加直观。
const ConnectContract = () => (
  <Connect>
    {(state, dispatch, passProps) => {
      //这里无论是select还是你想用reselect都没问题的因为这就是一个function,Do ever you want
      const { addStars: { num } } = state
      const props = {
        num,
        onAddStar: (...args) => dispatch(addStar(...args)),
        onReduceStart: (...args) => dispatch(reduceStar(...args)),
      }
      return (
        <Contract {...props}/>
      )
    }}
  </Connect>
)
你可能会质疑,等等。。。我们的<Provider store={store}/>呢?
来啦来啦,React 16.3.0新的context api我们来试水下
import React, { createContext, Children } from 'react'

export const StoreContext = createContext({
  store: {},
})

export const ProviderComponent = ({ children, store }) => (
  <StoreContext.Provider value={store}>
    {Children.only(children)}
  </StoreContext.Provider>
)
import { StoreContext } from './provider'


const Connect = ({ children }) => (
  <StoreContext.Consumer>
    {(context) => (
      <ConnectConsumer context={context}>
        {children}
      </ConnectConsumer>
    )}
  </StoreContext.Consumer>
)
啊这就是新的api你可能会发现调用方法该了createContext生成对象两个属性分别是一个react component一个叫做provider 一个叫做consumer,你可能好奇为什么要这么改,这里就不得不提到之前的context遇到一些问题,详细的原因都在这里啦
我这里就不多嘴啦,但是主要原因我还是要说一下原来的传递方式会被shouldComponentUpdate blocks context changes会被这个生命周期阻断更新,但是新的方法就不会因为你会在你需要的时候consumer并且通过我们之前说的render props的写法以参数的形式传递给你真正需要用到的子组件。是不是感觉他甚至都不那么的全局概念了呢?
介绍了这么多酷酷的东西,好像我们的新架构也出具模样啦,嘿嘿!
