

一个简易版的Spring框架
功能
- 支持singleton类型的bean,包括初始化、属性注入、以及依赖bean注入。
- 可从xml中读取配置。
- 可以使用Aspectj的方式进行AOP编写,支持接口和类代理。
说明
如果你有幸能看到
- 1、本文简易Spring框架参考Github,代码注释参考Github.
- 2、所有权归原作者,在这里自己只是临摹,参考注释还原过程。不懂的可以看作者的视频。
- 3、大家一起努力,一起学习,有兴趣的也可以看下我的Github。上传了Spring源码。大佬可以看看。
- 4、看本文之前希望你有一份Spring源码。对照着找你想要的接口和类。加深印象。
- 5、本文只为自己以后复习用,如果不对还请谅解。
tiny-spring是为了学习Spring的而开发的,可以认为是一个Spring的精简版。Spring的代码很多,层次复杂,阅读起来费劲。我尝试从使用功能的角度出发,参考Spring的实现,一步一步构建,最终完成一个精简版的Spring。
有人把程序员与画家做比较,画家有门基本功叫临摹,tiny-spring可以算是一个程序的临摹版本-从自己的需求出发,进行程序设计,同时对著名项目进行参考。
第一部分:IoC容器
早看到也不浪费时间了,唉。
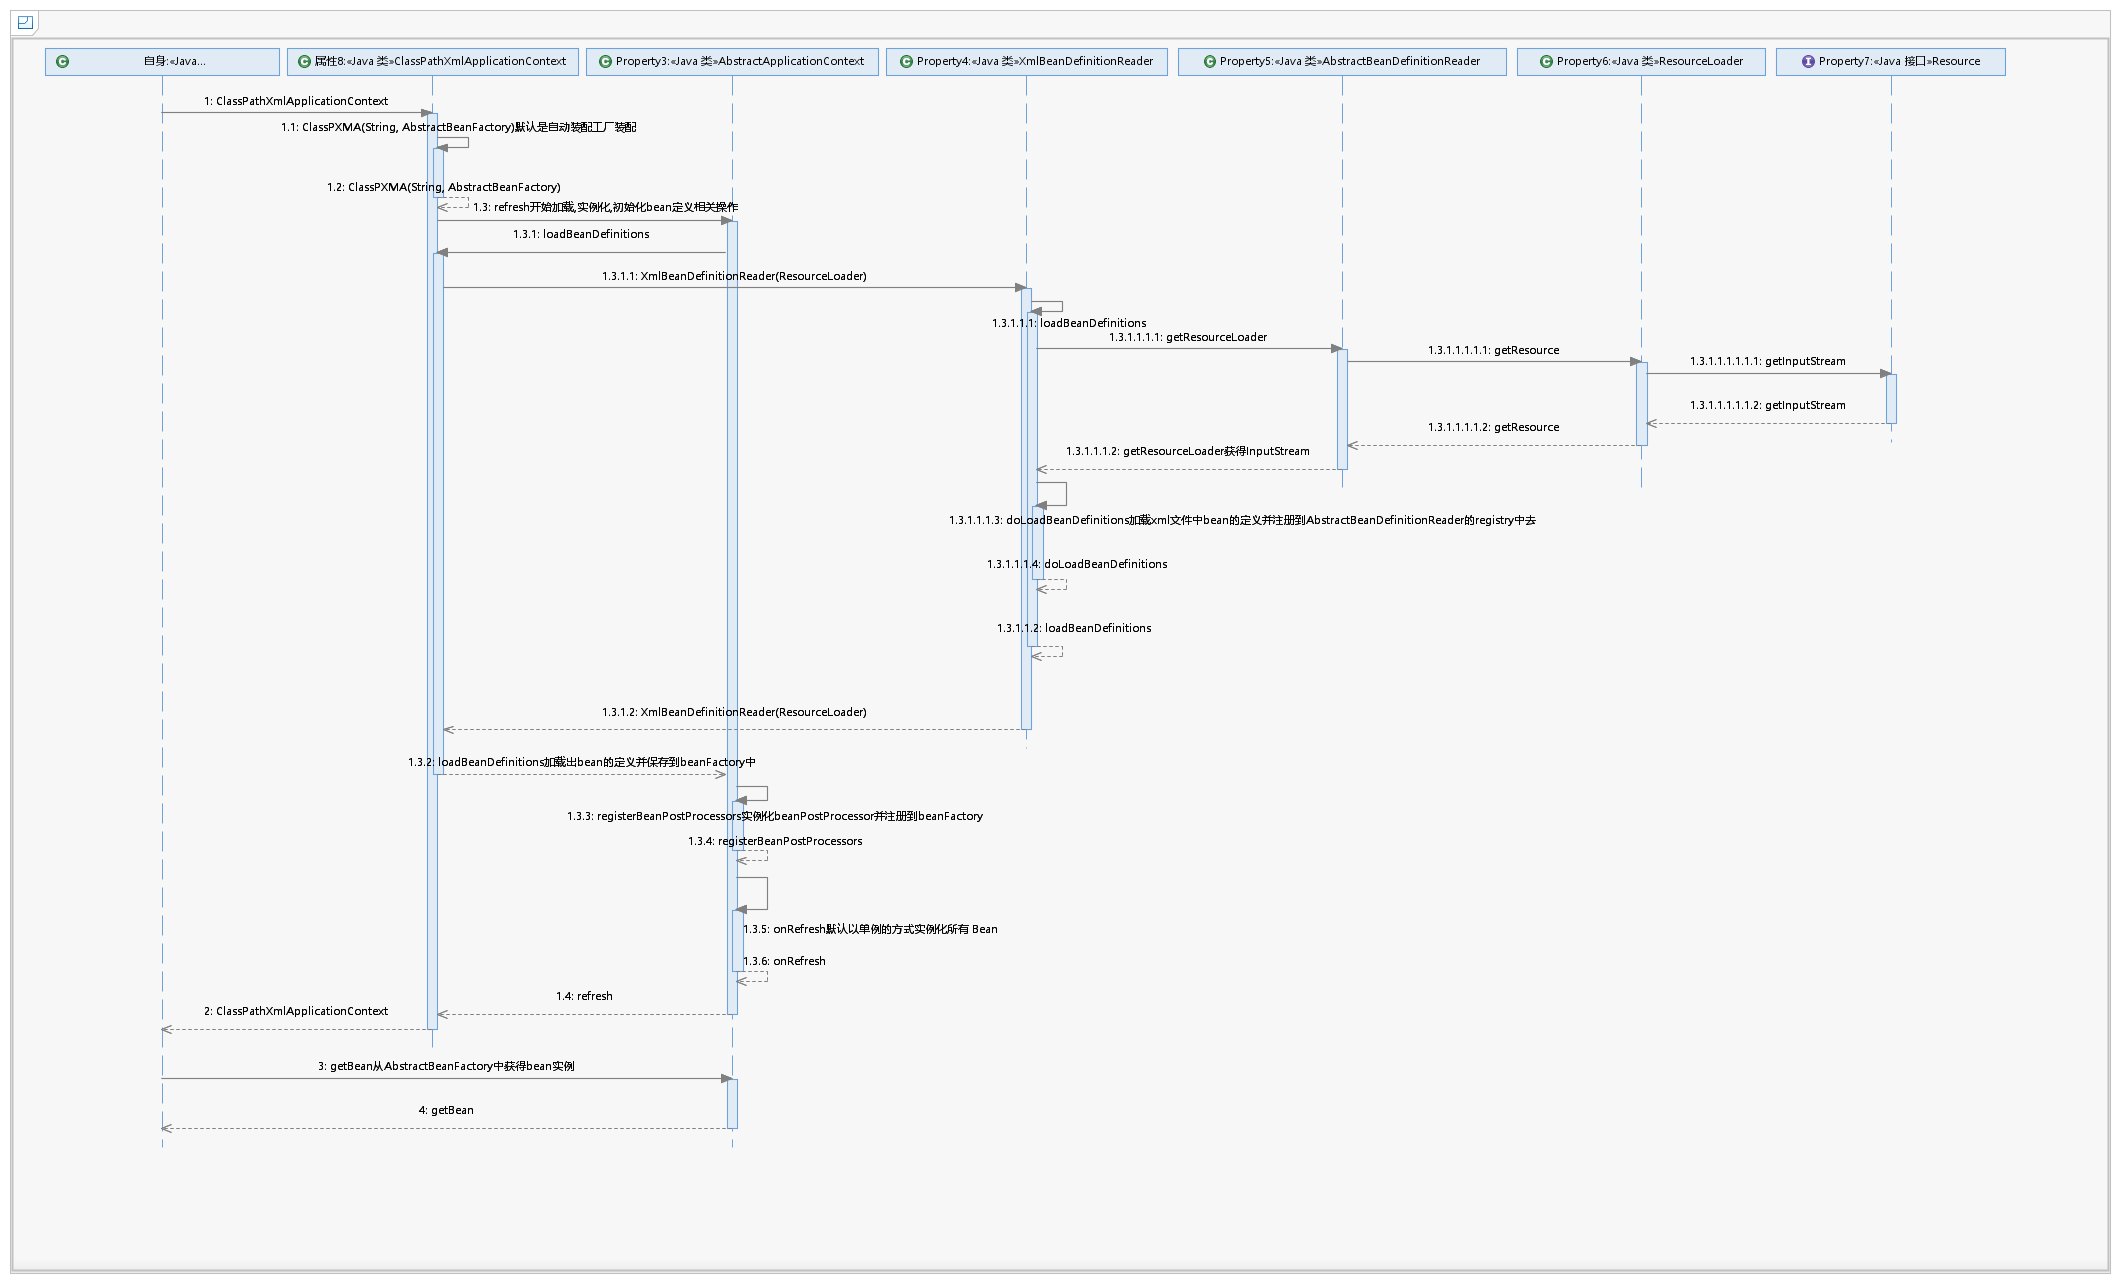
1、时序图-普通bean的加载过程
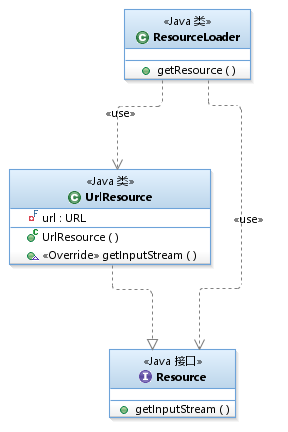
2、加载资源的主要相关类
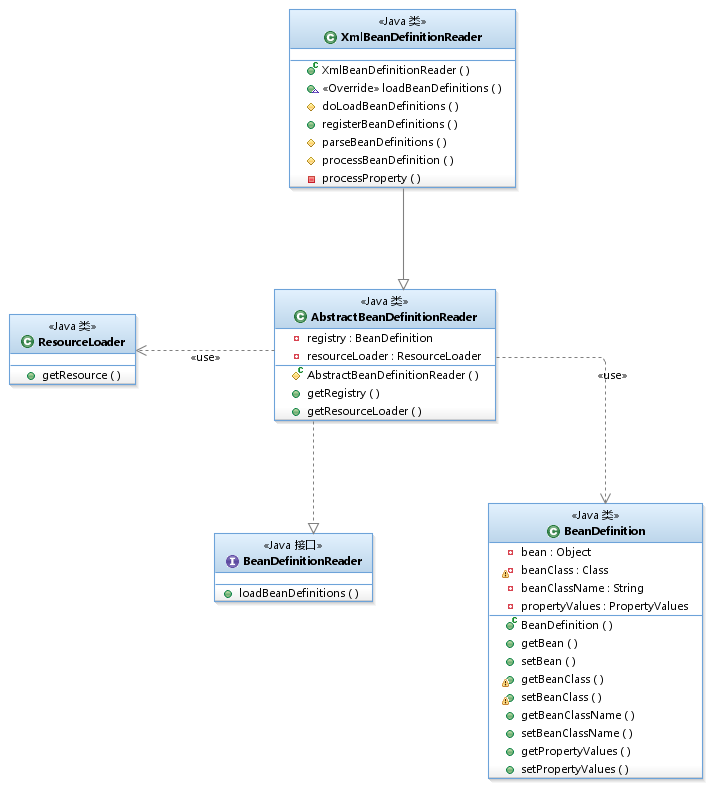
3、从xml中加载bean定义的主要相关类
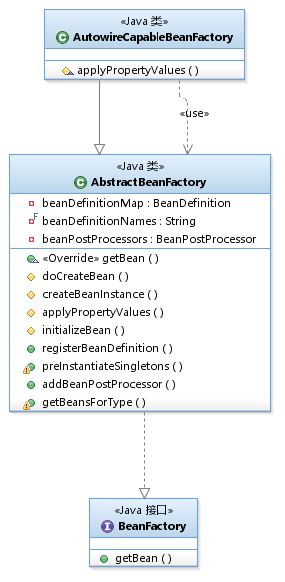
4、装配bean的主要相关类
5、实现ApplicationContext接口的相关类
1.step1-最基本的容器
IoC最基本的角色有两个:容器(BeanFactory)和Bean本身。这里使用BeanDefinition来封装了bean对象,这样可以保存一些额外的元信息。测试代码:
// 1.初始化beanfactory
BeanFactory beanFactory = new BeanFactory();

// 2.注入bean
BeanDefinition beanDefinition = new BeanDefinition(new HelloWorldService());
beanFactory.registerBeanDefinition("helloWorldService", beanDefinition);

// 3.获取bean
HelloWorldService helloWorldService = (HelloWorldService) beanFactory.getBean("helloWorldService");
helloWorldService.helloWorld();
1、首先我们来看下整体代码结构,这里的要点是BeanFactory接口。我们应该面向接口编程。
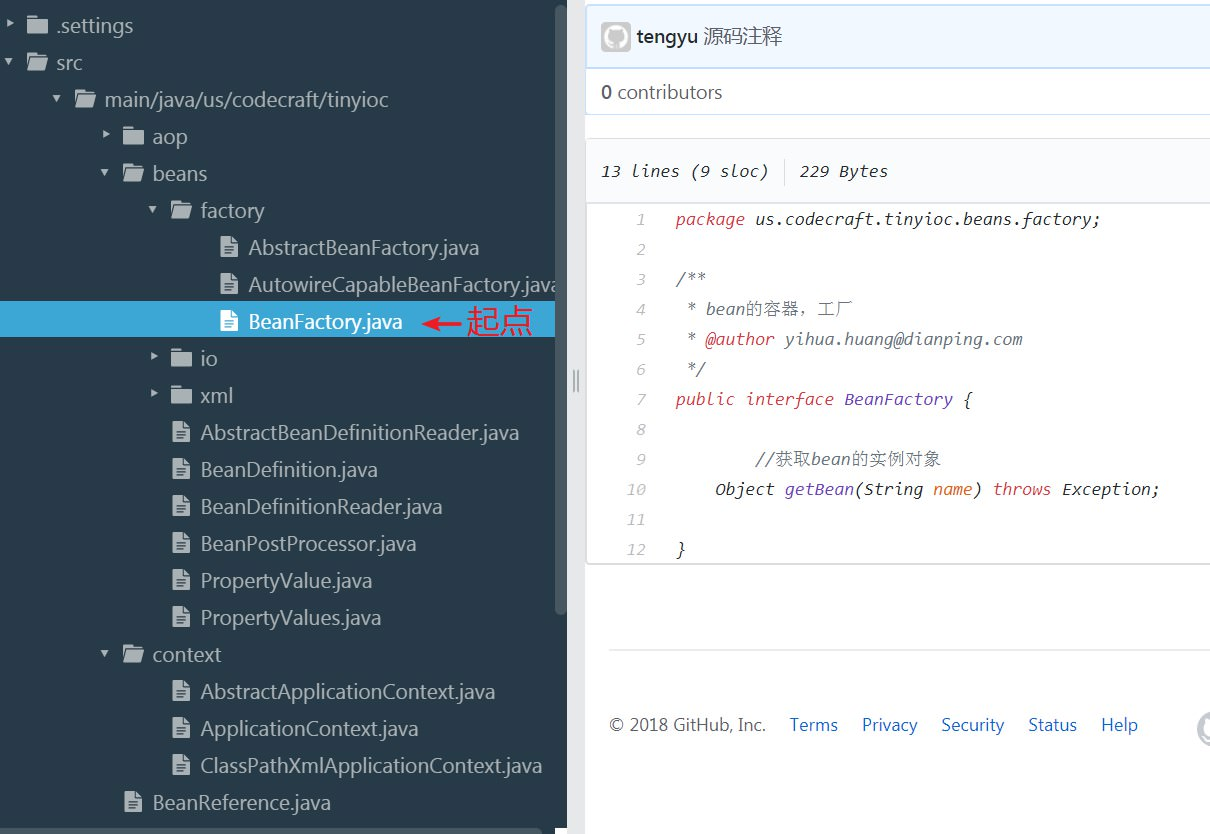
/**
 * Created by guo on 3/1/2018.
 * bean的容器,工厂
 */
public interface BeanFactory {
    Object getBean(String name) throws Exception;
}

/**
 * Created by guo on 3/1/2018.
 * 抽象bean工厂
 */
public abstract class AbstractBeanFactory implements BeanFactory {
}

``

2、大家想知道AbstractBeanFactory抽象类有什么作用吗?和接口有什么区别吗?什么时候用接口什么时候用抽象类?

- 1、如果你拥有一些方法想让他们中的一些默认实现,那么使用抽象类。
- 2、如果你想实现多重继承,那么你必须使用接口。由于java不支多继承,子类不能够继承多个类,但可以实现多个接口
- 3、如果基本功能在不断改变,那么就需要使用抽象类。如果不断改变基本功能并且使用接口 ,那么就需要改变所有实现了该接口的类。

3、有了bean工厂你总得bean的定义吧。`BeanDefinition`来了。bean的定义

```java
/**
 * Created by guo on 3/1/2018.
 * bean的内容及元数据,保存在beanFactory中,包装bean的实体。
 */
public class BeanDefinition {

  private Object bean;

  //类的class信息
  private Class beanClass;

  //类名
  private String beanClassName;

  //保存所有的属性,
  private PropertyValues  propertyValues  = new PropertyValues();

  public BeanDefinition() {

  }

    public BeanDefinition() {}

    //setters and gettes 略
    public void setBeanClassName(String beanClassName) {
        this.beanClassName = beanClassName;
        try {
            //加载类,并返回class对象
            //这里已经有类的实例来,但是没有引用,怎么可以获取这个引用呢?
            this.beanClass = Class.forName(beanClassName);
        } catch (ClassNotFoundException e) {
            e.printStackTrace();
        }
    }
}
4、有了bean的定义你总得创建啊,初始化那,注册啊,验证啊,不然一点卵用都没有。来瞅瞅。这时候我们来看下AbstractBeanFactory抽象类具体的实现。
/**
 * Created by guo on 3/1/2018.
 * 抽象bean工厂
 */
public abstract class AbstractBeanFactory implements BeanFactory {

    //bean工程里维护类的字典,类名+class对象
    private Map<String, BeanDefinition> beanDefinitionMap = new ConcurrentHashMap<String, BeanDefinition>();

    private final List<String> beanDefinitionNames = new ArrayList<String>();

    private List<BeanPostProcessor> beanPostProcessors = new ArrayList<BeanPostProcessor>();

    /**
     * 获取bean的时候,才创建类的实例对象,原来只是保存类名和类的Class对象 。
     * 到这一步会根据Class对象创建类的实例
     *
     * @param name
     * @return
     * @throws Exception
     */
    @Override
    public Object getBean(String name) throws Exception {
        BeanDefinition beanDefinition = beanDefinitionMap.get(name);
        if (beanDefinition == null) {
            throw new IllegalArgumentException("no bean named " + name + "is defined");
        }
        Object bean = beanDefinition.getBean();
        if (bean == null) {
            //1、刚创建的对象,其他什么都没做
            bean = doCreateBean(beanDefinition);
            //2、初始化bean对象
            bean = initializeBean(bean,name);
            //3、这里的bean是初始化之后的bean,与刚开始创建的bean不一样。
            beanDefinition.setBean(bean);
        }
        return bean;
    }
}
5、我们在来看看具体的doCreateBean、initializeBean、registerBeanDefinition
  /**
   * 初始化bean,BeanPostProcessor初始化前后处理器。
   */
  protected Object initializeBean(Object bean, String name) throws Exception {
      for (BeanPostProcessor beanPostProcessor : beanPostProcessors) {
          bean = beanPostProcessor.postProcessBeforeInitialization(bean, name);
      }

      for (BeanPostProcessor beanPostProcessor : beanPostProcessors) {
          bean = beanPostProcessor.postProcessAfterInitialization(bean, name);
      }
      return bean;
  }

  /**
   * 创建bean的实例
   */
  protected Object createBeanInstance(BeanDefinition beanDefinition) throws Exception {
      return beanDefinition.getBeanClass().newInstance();
  }

  /**
   * 注册bean,即将类名和定义保存到内存中(map对象)中
   */
  public void registerBeanDefinition(String name, BeanDefinition beanDefinition) throws Exception {
      beanDefinitionMap.put(name, beanDefinition);
      //保存一份做准备
      beanDefinitionNames.add(name);
  }

  /**
   * 创建bean并设置bean的引用
   */
  protected Object doCreateBean(BeanDefinition beanDefinition) throws Exception {
      //这里会创建bean的实例对象
      Object bean = createBeanInstance(beanDefinition);

      //将bean的实例对象设置到beandefinition中去
      beanDefinition.setBean(bean);
      //设置bean的引用的实例对象
      applyPropertyValues(bean, beanDefinition);

      return bean;
  }
6、无关紧要的方法暂时就不贴出来了,描述个大概过程。带着这些类和接口在源码中找。请忽略第二步和第三步。直接跳到第四步。记得是在Spring源码,这个简单多了,但是基本功能有
2.step2-将bean创建放入工厂
step1中的bean是初始化好之后再set进去的,实际使用中,我们希望容器来管理bean的创建。于是我们将bean的初始化放入BeanFactory中。为了保证扩展性,我们使用Extract Interface的方法,将BeanFactory替换成接口,而使用AbstractBeanFactory和AutowireCapableBeanFactory作为其实现。"AutowireCapable"的意思是“可自动装配的”,为我们后面注入属性做准备。
// 1.初始化beanfactory
BeanFactory beanFactory = new AutowireCapableBeanFactory();

// 2.注入bean
BeanDefinition beanDefinition = new BeanDefinition();
beanDefinition.setBeanClassName("us.codecraft.tinyioc.HelloWorldService");
beanFactory.registerBeanDefinition("helloWorldService", beanDefinition);

// 3.获取bean
HelloWorldService helloWorldService = (HelloWorldService) beanFactory.getBean("helloWorldService");
helloWorldService.helloWorld();
3.step3-为bean注入属性
这一步,我们想要为bean注入属性。我们选择将属性注入信息保存成PropertyValue对象,并且保存到BeanDefinition中。这样在初始化bean的时候,我们就可以根据PropertyValue来进行bean属性的注入。Spring本身使用了setter来进行注入,这里为了代码简洁,我们使用Field的形式来注入。
// 1.初始化beanfactory
BeanFactory beanFactory = new AutowireCapableBeanFactory();

// 2.bean定义
BeanDefinition beanDefinition = new BeanDefinition();
beanDefinition.setBeanClassName("us.codecraft.tinyioc.HelloWorldService");

// 3.设置属性
PropertyValues propertyValues = new PropertyValues();
propertyValues.addPropertyValue(new PropertyValue("text", "Hello World!"));
beanDefinition.setPropertyValues(propertyValues);

// 4.生成bean
beanFactory.registerBeanDefinition("helloWorldService", beanDefinition);

// 5.获取bean
HelloWorldService helloWorldService = (HelloWorldService) beanFactory.getBean("helloWorldService");
helloWorldService.helloWorld();
step4-读取xml配置来初始化bean
1、看到读取你总得有IO流吧 ,还有有资源啊(Xxx.xml),还有一个读取器。让我们看下重要的接口和实现类。
/**
 * Resource是Spring内部定位资源接口
 */
public interface Resource {
    InputStream getInputStream() throws Exception;
}
-----------------加载资源------------------------------
public class ResourceLoader {

    //获取资源
    public Resource getResource(String location){
        URL resource = this.getClass().getClassLoader().getResource(location);
        return new UrlResource(resource);
    }
}
--------------------------------------------------
*/
public class UrlResource implements Resource {

   private final URL url;

   public UrlResource(URL url) {
       this.url = url;
   }

   @Override
   //根据URL载入输入流
   public InputStream getInputStream() throws IOException{
       URLConnection urlConnection = url.openConnection();
       urlConnection.connect();
       return urlConnection.getInputStream();
   }
}

--------------------测试--------------------------------
public class ResourceLoaderTest {

	@Test
	public void test() throws IOException {
		ResourceLoader resourceLoader = new ResourceLoader();
        Resource resource = resourceLoader.getResource("tinyioc.xml");
        InputStream inputStream = resource.getInputStream();
        Assert.assertNotNull(inputStream);
    }
}
2、接下来就让我们看看更为重要的接口和实现类
public interface BeanDefinitionReader {

    void loadBeanDefinitions(String location) throws Exception;
}

----------------------重要实现----------------------------------
/**
 * Created by guo on 3/1/2018.
 * 从配置文件中读取BeanDifinition 抽象类
 */
public abstract class AbstractBeanDefinitionReader implements BeanDefinitionReader {

    //bean集合
    private Map<String,BeanDefinition> registry;

    //资源加载器
    private ResourceLoader resourceLoader;

    protected AbstractBeanDefinitionReader(ResourceLoader resourceLoader) {
        this.registry = new HashMap<String, BeanDefinition>();
        this.resourceLoader = resourceLoader;
    }
      //setter。getter
}
3、最终的实现来了
public class XmlBeanDefinitionReader extends AbstractBeanDefinitionReader {

    public XmlBeanDefinitionReader(ResourceLoader resourceLoader) {
        super(resourceLoader);
    }

    @Override
    public void loadBeanDefinitions(String location) throws Exception {
        InputStream inputStream = getResourceLoader().getResource(location).getInputStream();
        doLoadBeanDefinitions(inputStream);

    }
4、为了便于理解 ,我把方法抽出来了。这里主要是解析和注册
protected void doLoadBeanDefinitions(InputStream inputStream) throws Exception {
    //xml解析
    DocumentBuilderFactory factory = DocumentBuilderFactory.newInstance();
    DocumentBuilder docBuilder = factory.newDocumentBuilder();
    Document doc = docBuilder.parse(inputStream);
    // 解析bean
    registerBeanDefinitions(doc);
    inputStream.close();
}

public void registerBeanDefinitions(Document doc) {
    Element root = doc.getDocumentElement();
    parseBeanDefinitions(root);
}
5、真正的解析在这里。
protected void parseBeanDefinitions(Element root) {
    NodeList nl = root.getChildNodes();
    for (int i = 0; i < nl.getLength(); i++) {
        Node node = nl.item(i);
        if (node instanceof Element) {
            Element ele = (Element) node;
            processBeanDefinition(ele);
        }
    }
}

protected void processBeanDefinition(Element ele) {
    //获取id和classname
    String name = ele.getAttribute("id");
    String className = ele.getAttribute("class");
    BeanDefinition beanDefinition = new BeanDefinition();
    //处理属性
    processProperty(ele, beanDefinition);
    //注册Class
    beanDefinition.setBeanClassName(className);
    getRegistry().put(name, beanDefinition);
}

//添加bean的属性,和ref引用
private void processProperty(Element ele, BeanDefinition beanDefinition) {
    NodeList propertyNode = ele.getElementsByTagName("property");
    for (int i = 0; i < propertyNode.getLength(); i++) {
        Node node = propertyNode.item(i);
        if (node instanceof Element) {
            Element propertyEle = (Element) node;
            String name = propertyEle.getAttribute("name");
            String value = propertyEle.getAttribute("value");
            if (value != null && value.length() > 0) {
                beanDefinition.getPropertyValues().addPropertyValue(new PropertyValue(name, value));
            } else {
                String ref = propertyEle.getAttribute("ref");
                if (ref == null || ref.length() == 0) {
                    throw new IllegalArgumentException("Configuration problem: <property> element for property '"
                            + name + "' must specify a ref or value");
                }
                //bean对其他对象的引用,直接放到自己的属性里面
                BeanReference beanReference = new BeanReference(ref);
                beanDefinition.getPropertyValues().addPropertyValue(new PropertyValue(name, beanReference));
            }
        }
    }
}
}
6、这里是测试代码
@Test
public void test() throws Exception {
    XmlBeanDefinitionReader xmlBeanDefinitionReader = new XmlBeanDefinitionReader(new ResourceLoader());
    xmlBeanDefinitionReader.loadBeanDefinitions("tinyioc.xml");
    Map<String, BeanDefinition> registry = xmlBeanDefinitionReader.getRegistry();
    Assert.assertTrue(registry.size() > 0);
}
这么大一坨初始化代码让人心烦。这里的BeanDefinition只是一些配置,我们还是用xml来初始化吧。我们定义了BeanDefinitionReader初始化bean,它有一个实现是XmlBeanDefinitionReader。
// 1.读取配置
XmlBeanDefinitionReader xmlBeanDefinitionReader = new XmlBeanDefinitionReader(new ResourceLoader());
xmlBeanDefinitionReader.loadBeanDefinitions("tinyioc.xml");

// 2.初始化BeanFactory并注册bean
BeanFactory beanFactory = new AutowireCapableBeanFactory();
for (Map.Entry<String, BeanDefinition> beanDefinitionEntry : xmlBeanDefinitionReader.getRegistry().entrySet()) {
        beanFactory.registerBeanDefinition(beanDefinitionEntry.getKey(), beanDefinitionEntry.getValue());
}

// 3.获取bean
HelloWorldService helloWorldService = (HelloWorldService) beanFactory.getBean("helloWorldService");
helloWorldService.helloWorld();
5.step5-为bean注入bean
使用xml配置之后,似乎里我们熟知的Spring更近了一步!但是现在有一个大问题没有解决:我们无法处理bean之间的依赖,无法将bean注入到bean中,所以它无法称之为完整的IoC容器!如何实现呢?我们定义一个BeanReference,来表示这个属性是对另一个bean的引用。这个在读取xml的时候初始化,并在初始化bean的时候,进行解析和真实bean的注入。
for (PropertyValue propertyValue : mbd.getPropertyValues().getPropertyValues()) {
    Field declaredField = bean.getClass().getDeclaredField(propertyValue.getName());
    declaredField.setAccessible(true);
    Object value = propertyValue.getValue();
    if (value instanceof BeanReference) {
        BeanReference beanReference = (BeanReference) value;
        value = getBean(beanReference.getName());
    }
    declaredField.set(bean, value);
}
同时为了解决循环依赖的问题,我们使用lazy-init的方式,将createBean的事情放到getBean的时候才执行,是不是一下子方便很多?这样在注入bean的时候,如果该属性对应的bean找不到,那么就先创建!因为总是先创建后注入,所以不会存在两个循环依赖的bean创建死锁的问题。
// 1.读取配置
XmlBeanDefinitionReader xmlBeanDefinitionReader = new XmlBeanDefinitionReader(new ResourceLoader());
xmlBeanDefinitionReader.loadBeanDefinitions("tinyioc.xml");

// 2.初始化BeanFactory并注册bean
AbstractBeanFactory beanFactory = new AutowireCapableBeanFactory();
for (Map.Entry<String, BeanDefinition> beanDefinitionEntry : xmlBeanDefinitionReader.getRegistry().entrySet()) {
    beanFactory.registerBeanDefinition(beanDefinitionEntry.getKey(), beanDefinitionEntry.getValue());
}

// 3.初始化bean
beanFactory.preInstantiateSingletons();

// 4.获取bean
HelloWorldService helloWorldService = (HelloWorldService) beanFactory.getBean("helloWorldService");
helloWorldService.helloWorld();
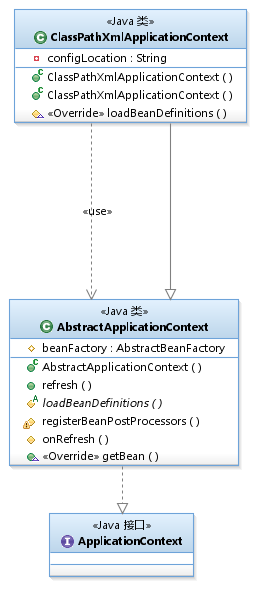
6.step6-ApplicationContext登场
不管三七二十一,我们先看重要的接口以及重要实现
/**
 * 继承beanFactory,继承了factory所有的遗产
 */
public interface ApplicationContext extends BeanFactory {
}
-----------------------------------------------------------------
public abstract class AbstractApplicationContext implements ApplicationContext {
	protected AbstractBeanFactory beanFactory;

	public AbstractApplicationContext(AbstractBeanFactory beanFactory) {
		this.beanFactory = beanFactory;
	}

	public void refresh() throws Exception {
		//加载bean
		loadBeanDefinitions(beanFactory);
		//注册之前,干点什么事情
		registerBeanPostProcessors(beanFactory);
		onRefresh();
	}

	//调用beanfactory工厂获取bean的实例对象
	@Override
	public Object getBean(String name) throws Exception {
		return beanFactory.getBean(name);
	}
}
2、为了方便,方法放这里
protected abstract void loadBeanDefinitions(AbstractBeanFactory beanFactory) throws Exception;

protected void registerBeanPostProcessors(AbstractBeanFactory beanFactory) throws Exception {
  List beanPostProcessors = beanFactory.getBeansForType(BeanPostProcessor.class);
  for (Object beanPostProcessor : beanPostProcessors) {
    beanFactory.addBeanPostProcessor((BeanPostProcessor) beanPostProcessor);
  }
}

protected void onRefresh() throws Exception{
      beanFactory.preInstantiateSingletons();
  }
3、熟悉的东东出场了
public class ClassPathXmlApplicationContext extends AbstractApplicationContext {

	private String configLocation;

	public ClassPathXmlApplicationContext(String configLocation) throws Exception {
		this(configLocation, new AutowireCapableBeanFactory());     //可自动装配内容的BeanFactory
	}

	public ClassPathXmlApplicationContext(String configLocation, AbstractBeanFactory beanFactory) throws Exception {
		super(beanFactory);
		this.configLocation = configLocation;
		//直接全部初始化
		refresh();
	}

	@Override
	protected void loadBeanDefinitions(AbstractBeanFactory beanFactory) throws Exception {
		//定位bean,然后加载bean
		XmlBeanDefinitionReader xmlBeanDefinitionReader = new XmlBeanDefinitionReader(new ResourceLoader());
		xmlBeanDefinitionReader.loadBeanDefinitions(configLocation);
		//注册bean,这里bean已经加载到虚拟机中,但还没有实例化对象,先不急嘛。
		for (Map.Entry<String, BeanDefinition> beanDefinitionEntry : xmlBeanDefinitionReader.getRegistry().entrySet()) {
			beanFactory.registerBeanDefinition(beanDefinitionEntry.getKey(), beanDefinitionEntry.getValue());
		}
	}
3、测试代码
@Test
public void test() throws Exception {
    //就是把beanfactory封装一下,使调用更加方便。注册,全部初始化。
    ApplicationContext applicationContext = new ClassPathXmlApplicationContext("tinyioc.xml");
    HelloWorldService helloWorldService = (com.guo.codecraft.tinyioc.HelloWorldService) applicationContext.getBean("helloWorldService");
    helloWorldService.helloWorld();
}

@Test
public void testPostBeanProcessor() throws Exception {
    ApplicationContext applicationContext = new ClassPathXmlApplicationContext("tinyioc-postbeanprocessor.xml");
    HelloWorldService helloWorldService = (com.guo.codecraft.tinyioc.HelloWorldService) applicationContext.getBean("helloWorldService");
    helloWorldService.helloWorld();
}
现在BeanFactory的功能齐全了,但是使用起来有点麻烦。于是我们引入熟悉的ApplicationContext接口,并在AbstractApplicationContext的refresh()方法中进行bean的初始化工作。
ApplicationContext applicationContext = new ClassPathXmlApplicationContext("tinyioc.xml");
HelloWorldService helloWorldService = (HelloWorldService) applicationContext.getBean("helloWorldService");
helloWorldService.helloWorld();
是不是非常熟悉?至此为止,我们的tiny-spring的IoC部分可说完工了。这部分的类、方法命名和作用,都是对应Spring中相应的组件。虽然代码量只有400多行,但是已经有了基本的IoC功能!
