

前言
Context被翻译为上下文,在编程领域,这是一个经常会接触到的概念,React中也有。
在React的官方文档中,Context被归类为高级部分(Advanced),属于React的高级API,但官方并不建议在稳定版的App中使用Context。
The vast majority of applications do not need to use content.
If you want your application to be stable, don't use context. It is an experimental API and it is likely to break in future releases of React.
不过,这并非意味着我们不需要关注Context。事实上,很多优秀的React组件都通过Context来完成自己的功能,比如react-redux的<Provider />,就是通过Context提供一个全局态的store,拖拽组件react-dnd,通过Context在组件中分发DOM的Drag和Drop事件,路由组件react-router通过Context管理路由状态等等。在React组件开发中,如果用好Context,可以让你的组件变得强大,而且灵活。
今天就想跟大家聊一聊,我在开发当中,所认识到的这个Context,以及我是如何使用它来进行组件开发的。
注:本文中所有提到的App皆指Web端App。
初识React Context
官方对于Context的定义
React文档官网并未对Context给出“是什么”的定义,更多是描述使用的Context的场景,以及如何使用Context。
官网对于使用Context的场景是这样描述的:
In Some Cases, you want to pass data through the component tree without having to pass the props down manuallys at every level. you can do this directly in React with the powerful "context" API.
简单说就是,当你不想在组件树中通过逐层传递props或者state的方式来传递数据时,可以使用Context来实现跨层级的组件数据传递。
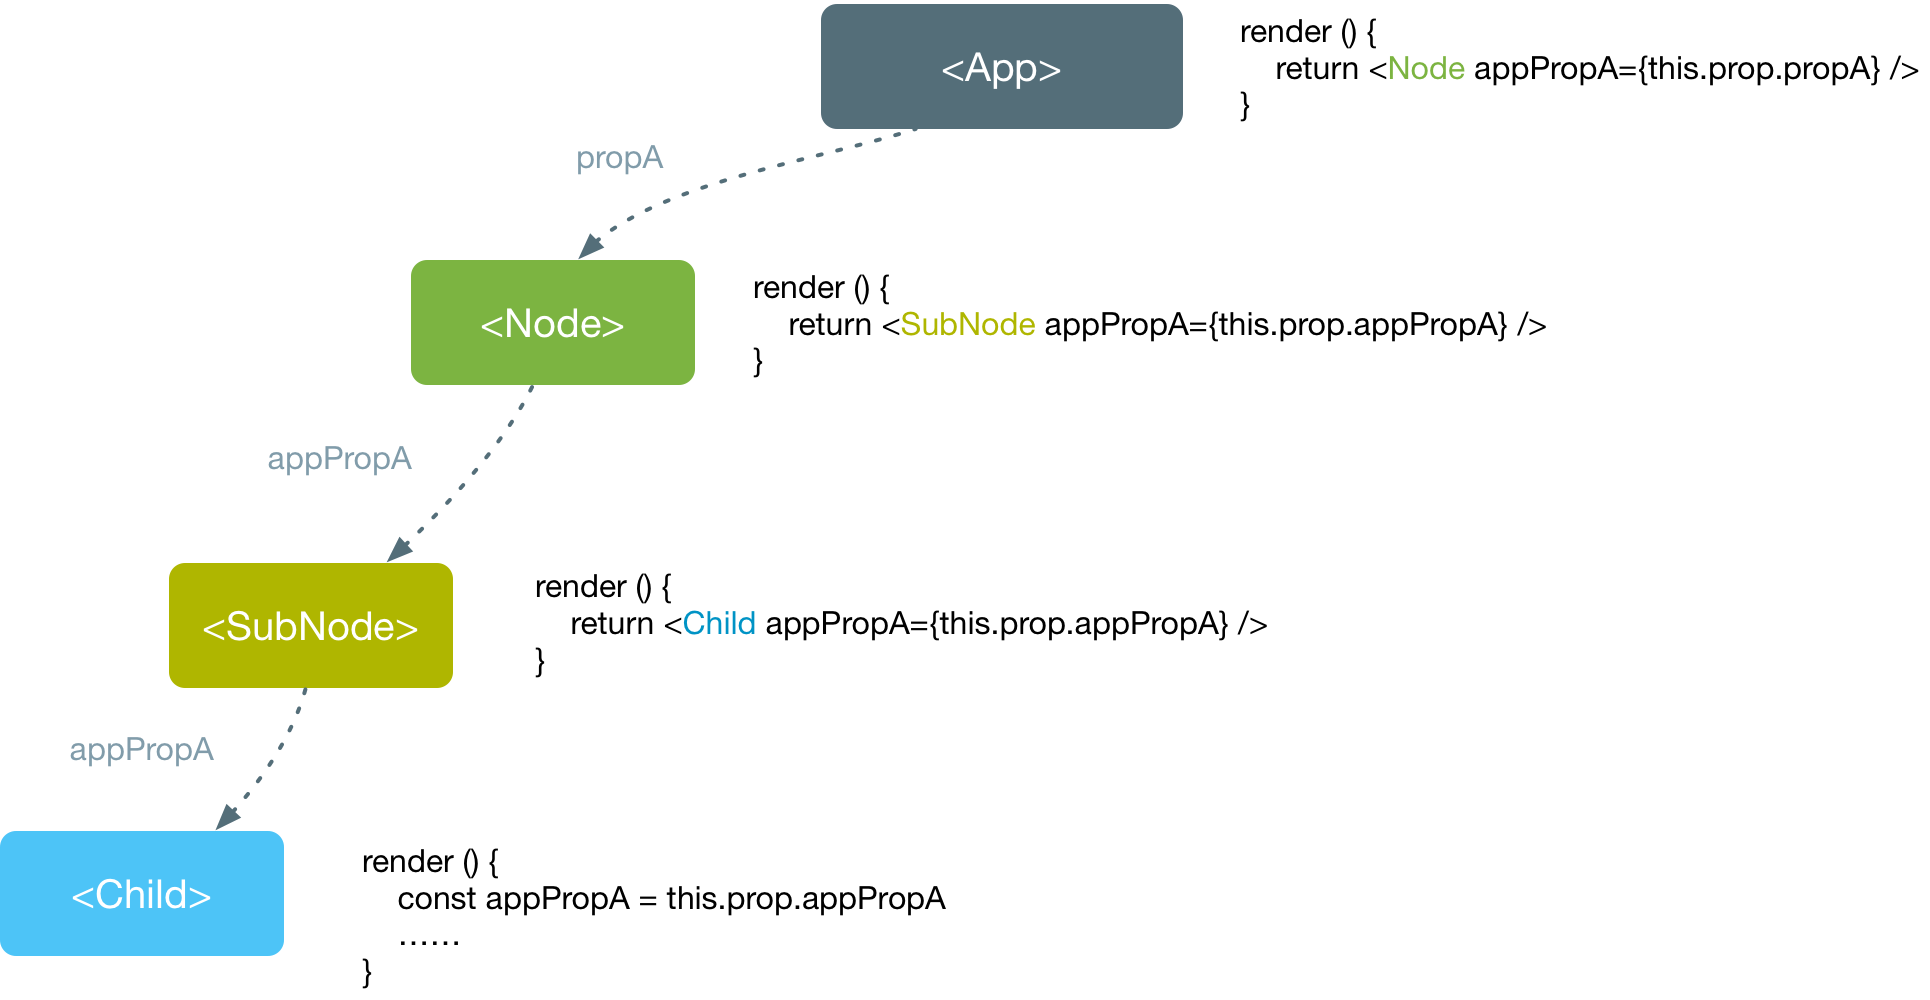
使用props或者state传递数据,数据自顶下流。
使用Context,可以跨越组件进行数据传递。
如何使用Context
如果要Context发挥作用,需要用到两种组件,一个是Context生产者(Provider),通常是一个父节点,另外是一个Context的消费者(Consumer),通常是一个或者多个子节点。所以Context的使用基于生产者消费者模式。
对于父组件,也就是Context生产者,需要通过一个静态属性childContextTypes声明提供给子组件的Context对象的属性,并实现一个实例getChildContext方法,返回一个代表Context的纯对象 (plain object) 。
import React from 'react'
import PropTypes from 'prop-types'

class MiddleComponent extends React.Component {
  render () {
    return <ChildComponent />
  }
}

class ParentComponent extends React.Component {
  // 声明Context对象属性
  static childContextTypes = {
    propA: PropTypes.string,
    methodA: PropTypes.func
  }

  // 返回Context对象,方法名是约定好的
  getChildContext () {
    return {
      propA: 'propA',
      methodA: () => 'methodA'
    }
  }

  render () {
    return <MiddleComponent />
  }
}
而对于Context的消费者,通过如下方式访问父组件提供的Context。
import React from 'react'
import PropTypes from 'prop-types'

class ChildComponent extends React.Component {
  // 声明需要使用的Context属性
  static contextTypes = {
    propA: PropTypes.string
  }

  render () {
    const {
      propA,
      methodA
    } = this.context

    console.log(`context.propA = ${propA}`)  // context.propA = propA
    console.log(`context.methodA = ${methodA}`)  // context.methodA = undefined

    return ...
  }
}
子组件需要通过一个静态属性contextTypes声明后,才能访问父组件Context对象的属性,否则,即使属性名没写错,拿到的对象也是undefined。
对于无状态子组件(Stateless Component),可以通过如下方式访问父组件的Context
import React from 'react'
import PropTypes from 'prop-types'

const ChildComponent = (props, context) => {
  const {
    propA
  } = context

  console.log(`context.propA = ${propA}`)  // context.propA = propA

  return ...
}

ChildComponent.contextProps = {
  propA: PropTypes.string
}
而在接下来的发行版本中,React对Context的API做了调整,更加明确了生产者消费者模式的使用方式。
import React from 'react';
import ReactDOM from 'react-dom';

const ThemeContext = React.createContext({
  background: 'red',
  color: 'white'
});
通过静态方法React.createContext()创建一个Context对象,这个Context对象包含两个组件,<Provider />和<Consumer />。
class App extends React.Component {
  render () {
    return (
      <ThemeContext.Provider value={{background: 'green', color: 'white'}}>
        <Header />
      </ThemeContext.Provider>
    );
  }
}
<Provider />的value相当于现在的getChildContext()。
class Header extends React.Component {
  render () {
    return (
      <Title>Hello React Context API</Title>
    );
  }
}

class Title extends React.Component {
  render () {
    return (
      <ThemeContext.Consumer>
        {context => (
          <h1 style={{background: context.background, color: context.color}}>
            {this.props.children}
          </h1>
        )}
      </ThemeContext.Consumer>
    );
  }
}
<Consumer />的children必须是一个函数,通过函数的参数获取<Provider />提供的Context。
可见,Context的新API更加贴近React的风格。
几个可以直接获取Context的地方
实际上,除了实例的context属性(this.context),React组件还有很多个地方可以直接访问父组件提供的Context。比如构造方法:
constructor(props, context)
比如生命周期:
componentWillReceiveProps(nextProps, nextContext)shouldComponentUpdate(nextProps, nextState, nextContext)componetWillUpdate(nextProps, nextState, nextContext)
对于面向函数的无状态组件,可以通过函数的参数直接访问组件的Context。
const StatelessComponent = (props, context) => (
  ......
)
以上是Context的基础,更具体的指南内容可参见这里
我对Context的理解
OK,说完基础的东西,现在聊一聊我对React的Context的理解。
把Context当做组件作用域
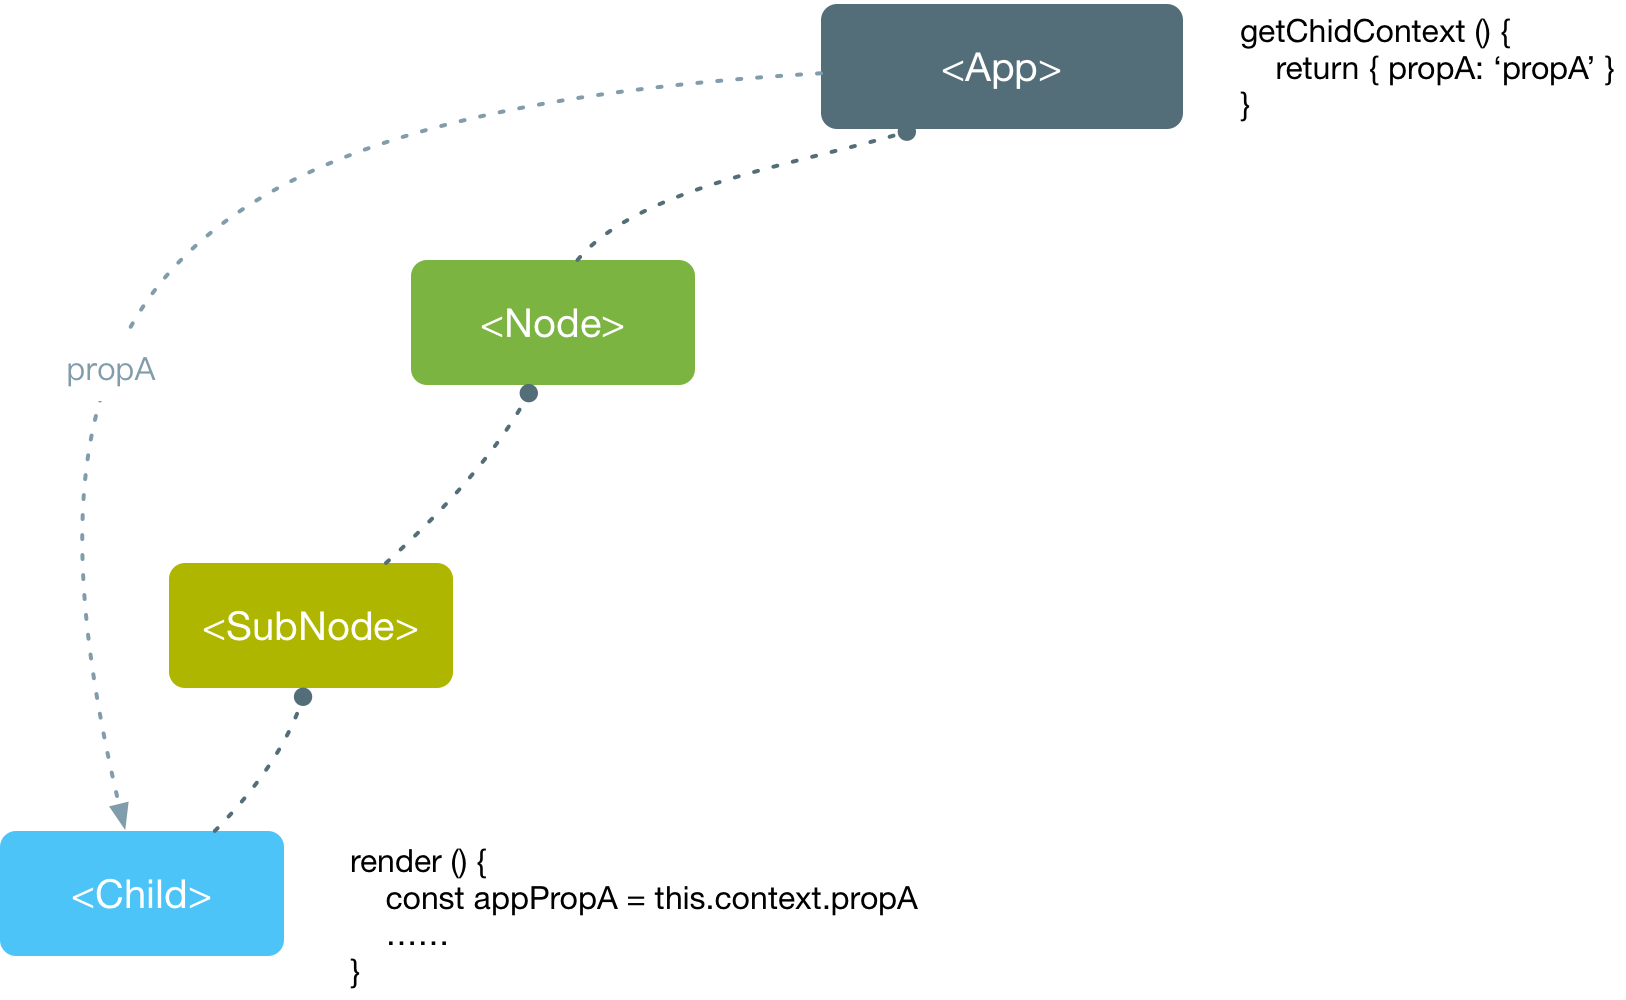
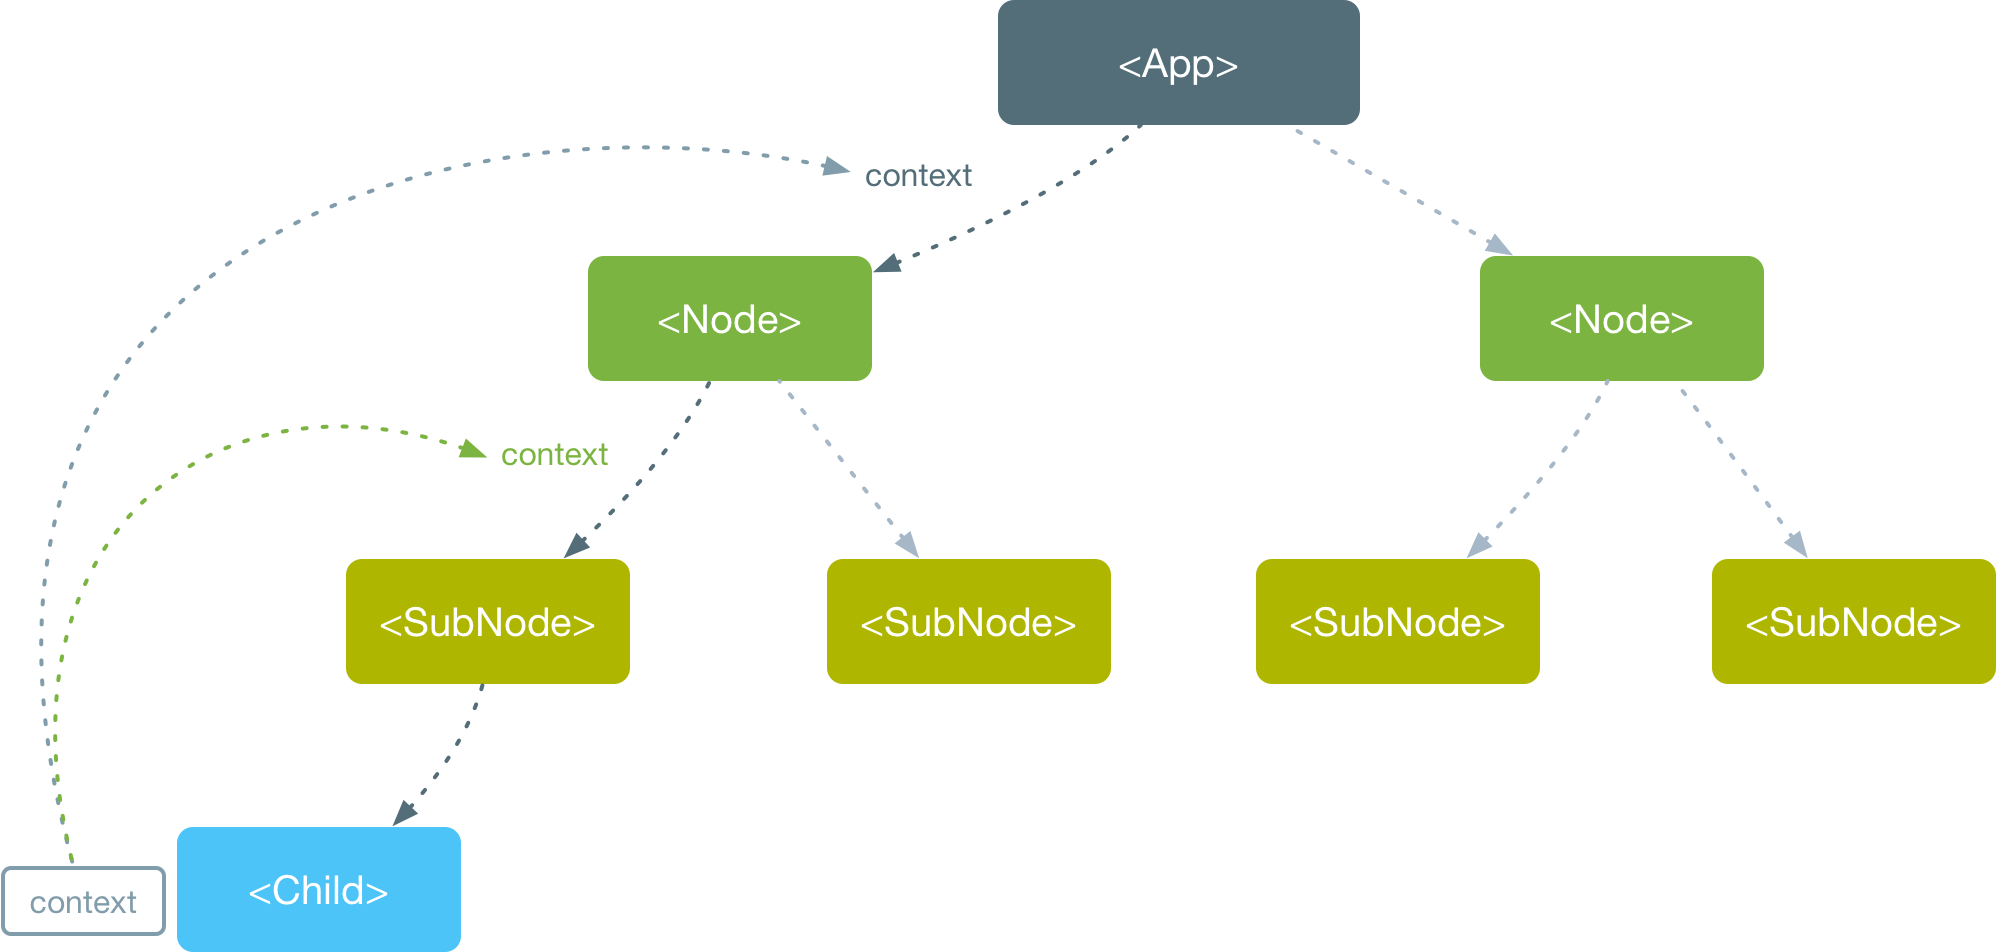
使用React的开发者都知道,一个React App本质就是一棵React组件树,每个React组件相当于这棵树上的一个节点,除了App的根节点,其他每个节点都存在一条父组件链。
例如上图,<Child />的父组件链是<SubNode /> -- <Node /> -- <App />,<SubNode />的父组件链是<Node /> -- <App />,<Node />的父组件链只有一个组件节点,就是<App />。
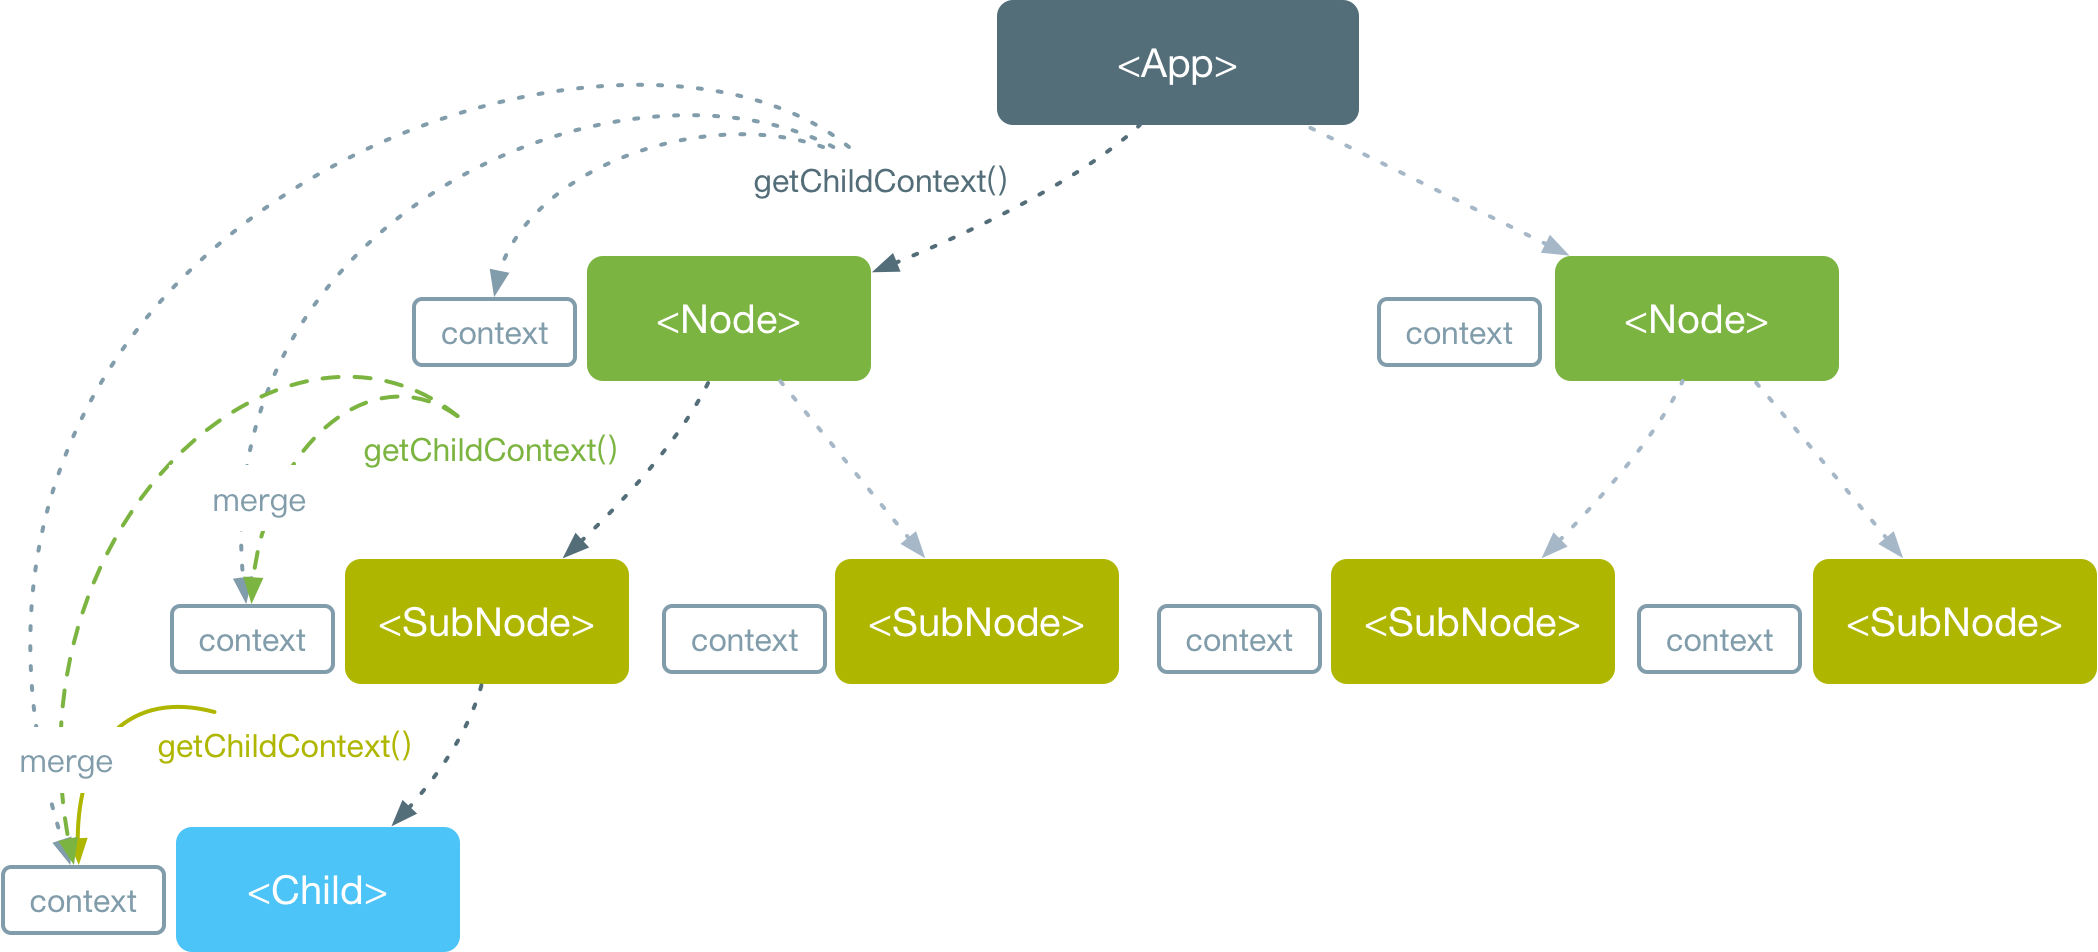
这些以树状连接的组件节点,实际上也组成了一棵Context树,每个节点的Context,来自父组件链上所有组件节点通过getChildContext()所提供的Context对象组合而成的对象。
有了解JS作用域链概念的开发者应该都知道,JS的代码块在执行期间,会创建一个相应的作用域链,这个作用域链记录着运行时JS代码块执行期间所能访问的活动对象,包括变量和函数,JS程序通过作用域链访问到代码块内部或者外部的变量和函数。
假如以JS的作用域链作为类比,React组件提供的Context对象其实就好比一个提供给子组件访问的作用域,而Context对象的属性可以看成作用域上的活动对象。由于组件的Context由其父节点链上所有组件通过getChildContext()返回的Context对象组合而成,所以,组件通过Context是可以访问到其父组件链上所有节点组件提供的Context的属性。
所以,我借鉴了JS作用域链的思路,把Context当成是组件的作用域来使用。
关注Context的可控性和影响范围
不过,作为组件作用域来看待的Context与常见的作用域的概念 (就我个人目前接触到的编程语言而言) 是有所区别的。我们需要关注Context的可控性和影响范围。
在我们平时的开发中,用到作用域或者上下文的场景是很常见,很自然,甚至是无感知的,然而,在React中使用Context并不是那么容易。父组件提供Context需要通过childContextTypes进行“声明”,子组件使用父组件的Context属性需要通过contextTypes进行“申请”,所以,我认为React的Context是一种**“带权限”的组件作用域**。
这种“带权限”的方式有何好处?就我个人的理解,首先是保持框架API的一致性,和propTypes一样,使用声明式编码风格。另外就是,可以在一定程度上确保组件所提供的Context的可控性和影响范围。
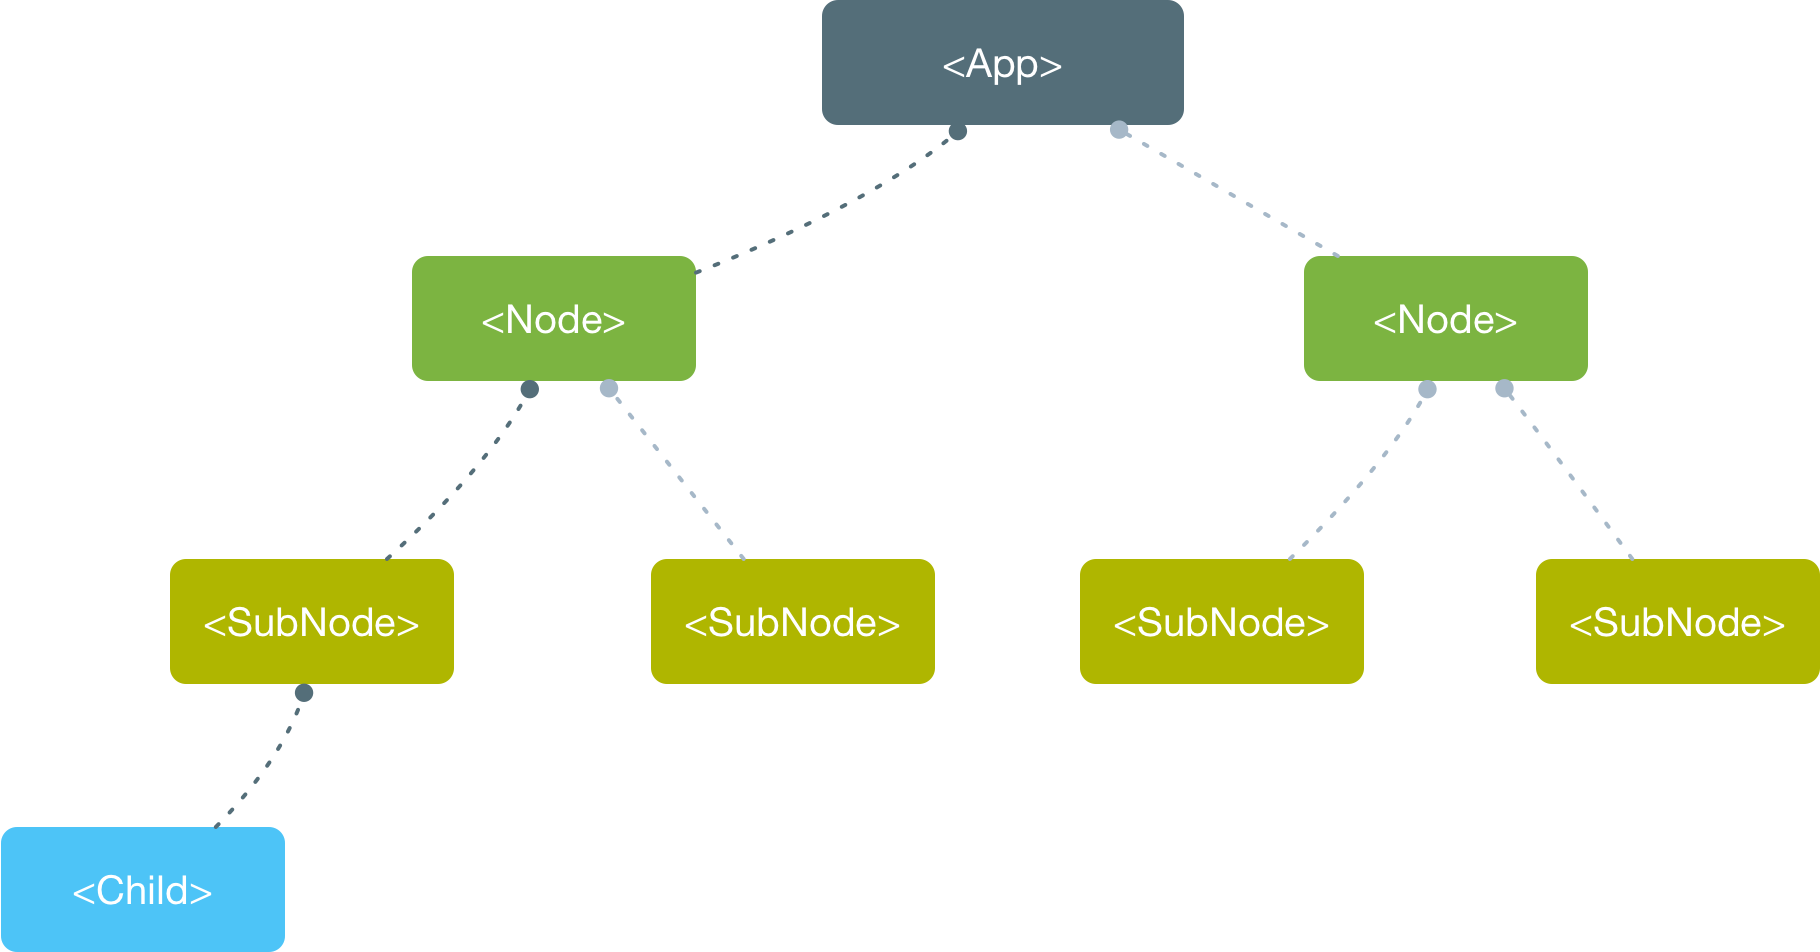
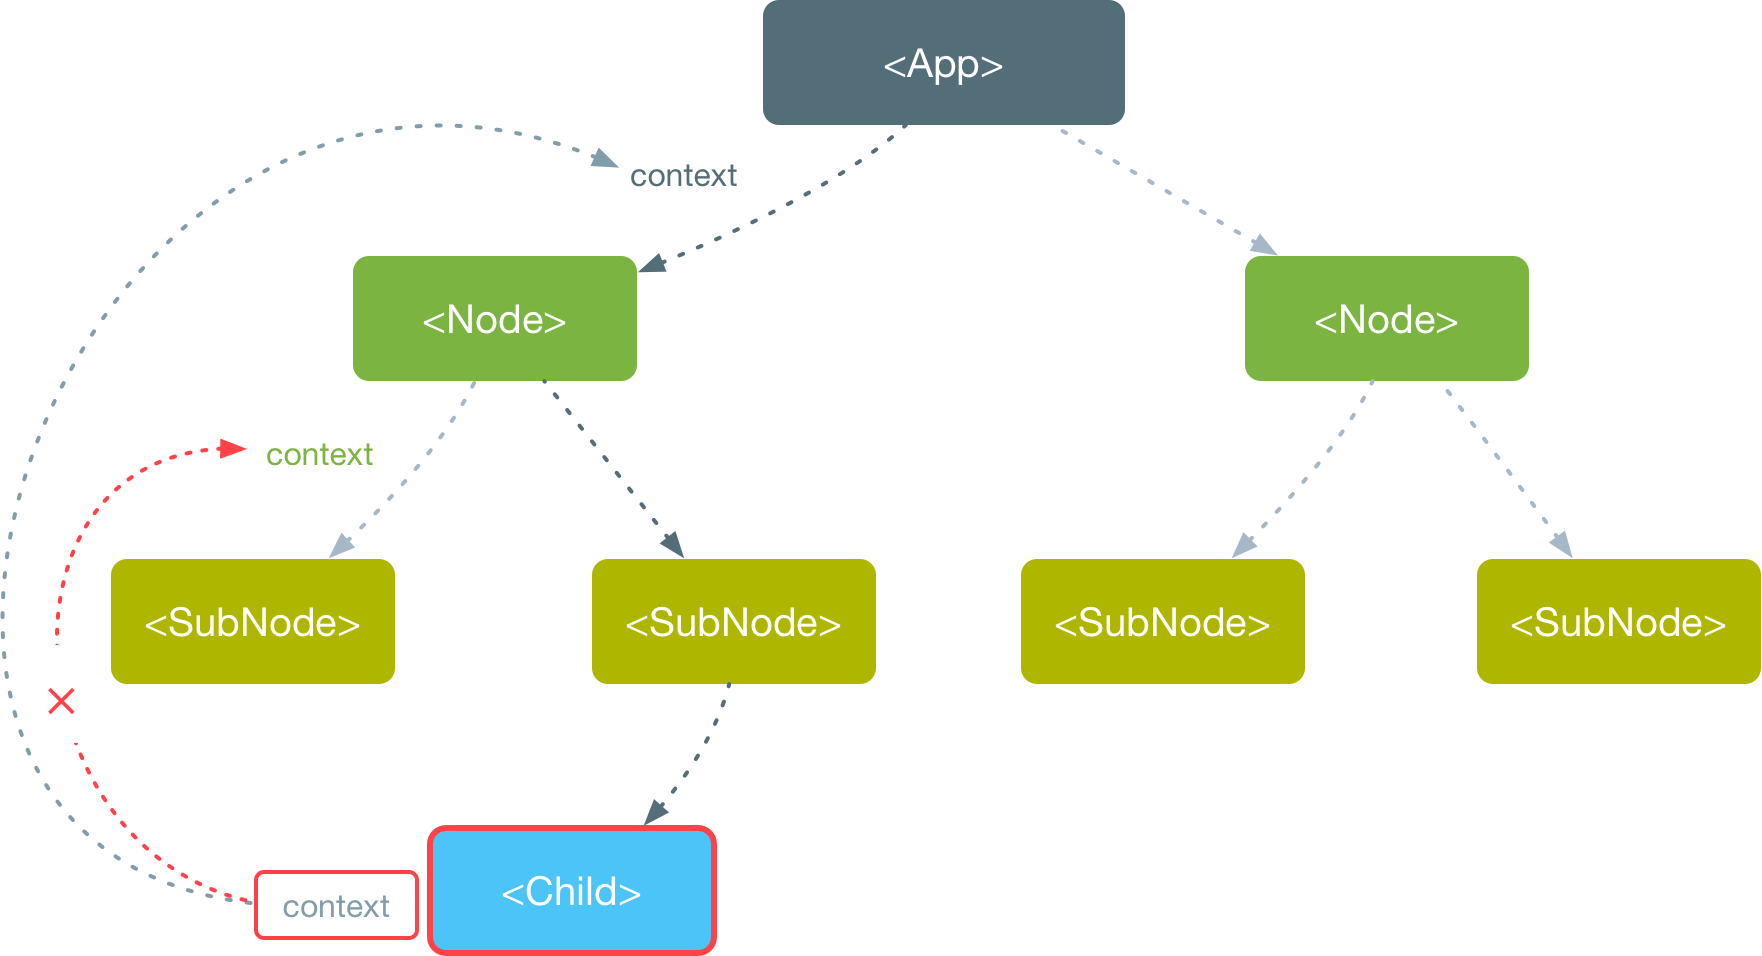
React App的组件是树状结构,一层一层延伸,父子组件是一对多的线性依赖。随意的使用Context其实会破坏这种依赖关系,导致组件之间一些不必要的额外依赖,降低组件的复用性,进而可能会影响到App的可维护性。
通过上图可以看到,原本线性依赖的组件树,由于子组件使用了父组件的Context,导致<Child />组件对<Node />和<App />都产生了依赖关系。一旦脱离了这两个组件,<Child />的可用性就无法保障了,减低了<Child />的复用性。
在我看来,通过Context暴露数据或者API不是一种优雅的实践方案,尽管react-redux是这么干的。因此需要一种机制,或者说约束,去降低不必要的影响。
通过childContextTypes和contextTypes这两个静态属性的约束,可以在一定程度保障,只有组件自身,或者是与组件相关的其他子组件才可以随心所欲的访问Context的属性,无论是数据还是函数。因为只有组件自身或者相关的子组件可以清楚它能访问Context哪些属性,而相对于那些与组件无关的其他组件,无论是内部或者外部的 ,由于不清楚父组件链上各父组件的childContextTypes“声明”了哪些Context属性,所以没法通过contextTypes“申请”相关的属性。所以我理解为,给组件的作用域Context“带权限”,可以在一定程度上确保Context的可控性和影响范围。
在开发组件过程中,我们应该时刻关注这一点,不要随意的使用Context。
不需要优先使用Context
作为React的高级API,React并不推荐我们优先考虑使用Context。我的理解是:
Context目前还处于实验阶段,可能会在后面的发行版本中有大的变化,事实上这种情况已经发生了,所以为了避免给今后升级带来较大影响和麻烦,不建议在App中使用Context。- 尽管不建议在App中使用
Context,但对于组件而言,由于影响范围小于App,如果可以做到高内聚,不破坏组件树的依赖关系,那么还是可以考虑使用Context的。 - 对于组件之间的数据通信或者状态管理,优先考虑用
props或者state解决,然后再考虑用其他第三方成熟库解决的,以上方法都不是最佳选择的时候,那么再考虑使用Context。 Context的更新需要通过setState()触发,但是这并不是可靠的。Context支持跨组件访问,但是,如果中间的子组件通过一些方法不响应更新,比如shouldComponentUpdate()返回false,那么不能保证Context的更新一定可达使用Context的子组件。因此,Context的可靠性需要关注。不过更新的问题,在新版的API中得以解决。
简而言之,只要你能确保Context是可控的,使用Context并无大碍,甚至如果能够合理的应用,Context其实可以给React组件开发带来很强大的体验。
用Context作为共享数据的媒介
官方所提到Context可以用来进行跨组件的数据通信。而我,把它理解为,好比一座桥,作为一种作为媒介进行数据共享。数据共享可以分两类:App级与组件级。
- App级的数据共享
App根节点组件提供的Context对象可以看成是App级的全局作用域,所以,我们利用App根节点组件提供的Context对象创建一些App级的全局数据。现成的例子可以参考react-redux,以下是<Provider />组件源码的核心实现:
export function createProvider(storeKey = 'store', subKey) {
    const subscriptionKey = subKey || `${storeKey}Subscription`

    class Provider extends Component {
        getChildContext() {
          return { [storeKey]: this[storeKey], [subscriptionKey]: null }
        }

        constructor(props, context) {
          super(props, context)
          this[storeKey] = props.store;
        }

        render() {
          return Children.only(this.props.children)
        }
    }

    // ......

    Provider.propTypes = {
        store: storeShape.isRequired,
        children: PropTypes.element.isRequired,
    }
    Provider.childContextTypes = {
        [storeKey]: storeShape.isRequired,
        [subscriptionKey]: subscriptionShape,
    }

    return Provider
}

export default createProvider()
App的根组件用<Provider />组件包裹后,本质上就为App提供了一个全局的属性store,相当于在整个App范围内,共享store属性。当然,<Provider />组件也可以包裹在其他组件中,在组件级的全局范围内共享store。
- 组件级的数据共享
如果组件的功能不能单靠组件自身来完成,还需要依赖额外的子组件,那么可以利用Context构建一个由多个子组件组合的组件。例如,react-router。
react-router的<Router />自身并不能独立完成路由的操作和管理,因为导航链接和跳转的内容通常是分离的,因此还需要依赖<Link />和<Route />等子组件来一同完成路由的相关工作。为了让相关的子组件一同发挥作用,react-router的实现方案是利用Context在<Router />、<Link />以及<Route />这些相关的组件之间共享一个router,进而完成路由的统一操作和管理。
下面截取<Router />、<Link />以及<Route />这些相关的组件部分源码,以便更好的理解上述所说的。
// Router.js

/**
 * The public API for putting history on context.
 */
class Router extends React.Component {
  static propTypes = {
    history: PropTypes.object.isRequired,
    children: PropTypes.node
  };

  static contextTypes = {
    router: PropTypes.object
  };

  static childContextTypes = {
    router: PropTypes.object.isRequired
  };

  getChildContext() {
    return {
      router: {
        ...this.context.router,
        history: this.props.history,
        route: {
          location: this.props.history.location,
          match: this.state.match
        }
      }
    };
  }

  // ......

  componentWillMount() {
    const { children, history } = this.props;

    // ......

    this.unlisten = history.listen(() => {
      this.setState({
        match: this.computeMatch(history.location.pathname)
      });
    });
  }

  // ......
}
尽管源码还有其他的逻辑,但<Router />的核心就是为子组件提供一个带有router属性的Context,同时监听history,一旦history发生变化,便通过setState()触发组件重新渲染。
// Link.js

/**
 * The public API for rendering a history-aware <a>.
 */
class Link extends React.Component {

  // ......

  static contextTypes = {
    router: PropTypes.shape({
      history: PropTypes.shape({
        push: PropTypes.func.isRequired,
        replace: PropTypes.func.isRequired,
        createHref: PropTypes.func.isRequired
      }).isRequired
    }).isRequired
  };

  handleClick = event => {
    if (this.props.onClick) this.props.onClick(event);

    if (
      !event.defaultPrevented &&
      event.button === 0 &&
      !this.props.target &&
      !isModifiedEvent(event)
    ) {
      event.preventDefault();
      // 使用<Router />组件提供的router实例
      const { history } = this.context.router;
      const { replace, to } = this.props;

      if (replace) {
        history.replace(to);
      } else {
        history.push(to);
      }
    }
  };

  render() {
    const { replace, to, innerRef, ...props } = this.props;

    // ...

    const { history } = this.context.router;
    const location =
      typeof to === "string"
        ? createLocation(to, null, null, history.location)
        : to;

    const href = history.createHref(location);
    return (
      <a {...props} onClick={this.handleClick} href={href} ref={innerRef} />
    );
  }
}
<Link />的核心就是渲染<a>标签,拦截<a>标签的点击事件,然后通过<Router />共享的router对history进行路由操作,进而通知<Router />重新渲染。
// Route.js

/**
 * The public API for matching a single path and rendering.
 */
class Route extends React.Component {

  // ......

  state = {
    match: this.computeMatch(this.props, this.context.router)
  };

  // 计算匹配的路径,匹配的话,会返回一个匹配对象,否则返回null
  computeMatch(
    { computedMatch, location, path, strict, exact, sensitive },
    router
  ) {
    if (computedMatch) return computedMatch;

    // ......

    const { route } = router;
    const pathname = (location || route.location).pathname;

    return matchPath(pathname, { path, strict, exact, sensitive }, route.match);
  }

  // ......

  render() {
    const { match } = this.state;
    const { children, component, render } = this.props;
    const { history, route, staticContext } = this.context.router;
    const location = this.props.location || route.location;
    const props = { match, location, history, staticContext };

    if (component) return match ? React.createElement(component, props) : null;

    if (render) return match ? render(props) : null;

    if (typeof children === "function") return children(props);

    if (children && !isEmptyChildren(children))
      return React.Children.only(children);

    return null;
  }
}
<Route />有一部分源码与<Router />相似,可以实现路由的嵌套,但其核心是通过Context共享的router,判断是否匹配当前路由的路径,然后渲染组件。
通过上述的分析,可以看出,整个react-router其实就是围绕着<Router />的Context来构建的。
使用Context开发组件
之前,通过Context开发过一个简单的组件,插槽分发组件。本章就借着这个插槽分发组件的开发经历,聊聊如何使用Context进行组件的开发。
插槽分发组件
首先说说什么是插槽分发组件,这个概念最初是在Vuejs中认识的。插槽分发是一种通过组件的组合,将父组件的内容插入到子组件模板的技术,在Vuejs中叫做Slot。
为了让大家更加直观的理解这个概念,我从Vuejs搬运了一段关于插槽分发的Demo。
对于提供的插槽的组件<my-component />,模板如下:
<div>
  <h2>我是子组件的标题</h2>
  <slot>
    只有在没有要分发的内容时显示
  </slot>
</div>
对于父组件,模板如下:
<div>
  <h1>我是父组件的标题</h1>
  <my-component>
    <p>这是一些初始内容</p>
    <p>这是更多的初始内容</p>
  </my-component>
</div>
最终渲染的结果:
<div>
  <h1>我是父组件的标题</h1>
  <div>
    <h2>我是子组件的标题</h2>
    <p>这是一些初始内容</p>
    <p>这是更多的初始内容</p>
  </div>
</div>
可以看到组件<my-component /> 的<slot />节点最终被父组件中<my-component />节点下的内容所替换。
Vuejs还支持具名插槽。
例如,一个布局组件<app-layout />:
<div class="container">
  <header>
    <slot name="header"></slot>
  </header>
  <main>
    <slot></slot>
  </main>
  <footer>
    <slot name="footer"></slot>
  </footer>
</div>
而在父组件模板中:
<app-layout>
  <h1 slot="header">这里可能是一个页面标题</h1>
  <p>主要内容的一个段落。</p>
  <p>另一个段落。</p>
  <p slot="footer">这里有一些联系信息</p>
</app-layout>
最终渲染的结果:
<div class="container">
  <header>
    <h1>这里可能是一个页面标题</h1>
  </header>
  <main>
    <p>主要内容的一个段落。</p>
    <p>另一个段落。</p>
  </main>
  <footer>
    <p>这里有一些联系信息</p>
  </footer>
</div>
插槽分发的好处体现在,它可以让组件具有可抽象成模板的能力。组件自身只关心模板结构,具体的内容交给父组件去处理,同时,不打破HTML描述DOM结构的语法表达方式。我觉得这是一项很有意义的技术,可惜,React对于这项技术的支持不是那么友好。于是我便参考Vuejs的插槽分发组件,开发了一套基于React的插槽分发组件,可以让React组件也具模板化的能力。
对于<AppLayout />组件,我希望可以写成下面这样:
class AppLayout extends React.Component {
  static displayName = 'AppLayout'

  render () {
    return (
      <div class="container">
        <header>
          <Slot name="header"></Slot>
        </header>
        <main>
          <Slot></Slot>
        </main>
        <footer>
          <Slot name="footer"></Slot>
        </footer>
      </div>
    )
  }
}
在外层使用时,可以写成这样:
<AppLayout>
  <AddOn slot="header">
    <h1>这里可能是一个页面标题</h1>
  </AddOn>
  <AddOn>
    <p>主要内容的一个段落。</p>
  	<p>另一个段落。</p>
  </AddOn>
  <AddOn slot="footer">
    <p>这里有一些联系信息</p>
  </AddOn>
</AppLayout>
组件的实现思路
根据前面所想的,先整理一下实现思路。
不难看出,插槽分发组件需要依靠两个子组件——插槽组件<Slot />和分发组件<AddOn />。插槽组件,负责打桩,提供分发内容的坑位。分发组件,负责收集分发内容,并提供给插槽组件去渲染分发内容,相当于插槽的消费者。
显然,这里遇到了一个问题,<Slot />组件与<AddOn />组件是独立的,如何将<AddOn />的内容填充到<Slot />中呢?解决这个问题不难,两个独立的模块需要建立联系,就给他们建立一个桥梁。那么这个桥梁要如何搭建呢?回过头来看看之前的设想的代码。
对于<AppLayout />组件,希望写成下面这样:
class AppLayout extends React.Component {
  static displayName = 'AppLayout'

  render () {
    return (
      <div class="container">
        <header>
          <Slot name="header"></Slot>
        </header>
        <main>
          <Slot></Slot>
        </main>
        <footer>
          <Slot name="footer"></Slot>
        </footer>
      </div>
    )
  }
}
在外层使用时,写成这样:
<AppLayout>
  <AddOn slot="header">
    <h1>这里可能是一个页面标题</h1>
  </AddOn>
  <AddOn>
    <p>主要内容的一个段落。</p>
  	<p>另一个段落。</p>
  </AddOn>
  <AddOn slot="footer">
    <p>这里有一些联系信息</p>
  </AddOn>
</AppLayout>
无论是<Slot />还是<AddOn />,其实都在<AppLayout />的作用域内。<Slot />是<AppLayout />组件render()方法返回的组件节点,而<AddOn />则是<AppLayout />的children节点,所以,可以将<AppLayout />视为<Slot />与<AddOn />的桥梁的角色。那么,<AppLayout />通过什么给<Slot />和<AddOn />建立联系呢?这里就用到本文的主角——Context。接下来的问题就是,如何使用Context给<Slot />和<AddOn />建立联系?
前面提到了<AppLayout />这座桥梁。在外层组件,<AppLayout />负责通过<AddOn />收集为插槽填充的内容。<AppLayout />自身借助Context定义一个获取填充内容的接口。在渲染的时候,因为<Slot />是<AppLayout />渲染的节点,所以,<Slot />可以通过Context获取到<AppLayout />定义的获取填充内容的接口,然后通过这个接口,获取到填充内容进行渲染。
按照思路实现插槽分发组件
由于<AddOn />是<AppLayout />的children节点,并且<AddOn />是特定的组件,我们可以通过name或者displayName识别出来,所以,<AppLayout />在渲染之前,也就是render()的return之前,对children进行遍历,以slot的值作为key,将每一个<AddOn />的children缓存下来。如果<AddOn />没有设置slot,那么将其视为给非具名的<Slot />填充内容,我们可以给这些非具名的插槽定一个key,比如叫?default。
对于<AppLayout />,代码大致如下:
class AppLayout extends React.Component {

  static childContextTypes = {
    requestAddOnRenderer: PropTypes.func
  }

  // 用于缓存每个<AddOn />的内容
  addOnRenderers = {}

  // 通过Context为子节点提供接口
  getChildContext () {
    const requestAddOnRenderer = (name) => {
      if (!this.addOnRenderers[name]) {
        return undefined
      }
      return () => (
        this.addOnRenderers[name]
      )
    }
    return {
      requestAddOnRenderer
    }
  }

  render () {
    const {
      children,
      ...restProps
    } = this.props

    if (children) {
      // 以k-v的方式缓存<AddOn />的内容
      const arr = React.Children.toArray(children)
      const nameChecked = []
      this.addOnRenderers = {}
      arr.forEach(item => {
        const itemType = item.type
        if (item.type.displayName === 'AddOn') {
          const slotName = item.props.slot || '?default'
          // 确保内容唯一性
          if (nameChecked.findIndex(item => item === stubName) !== -1) {
            throw new Error(`Slot(${slotName}) has been occupied`)
          }
          this.addOnRenderers[stubName] = item.props.children
          nameChecked.push(stubName)
        }
      })
    }

    return (
      <div class="container">
        <header>
          <Slot name="header"></Slot>
        </header>
        <main>
          <Slot></Slot>
        </main>
        <footer>
          <Slot name="footer"></Slot>
        </footer>
      </div>
    )
  }
}
<AppLayout />定义了一个Context接口requestAddOnRenderer(),requestAddOnRenderer()接口根据name返回一个函数,这个返回的函数会根据name访问addOnRenderers的属性,addOnRenderers就是<AddOn />的内容缓存对象。
<Slot />的实现很简单,代码如下:
//            props,              context
const Slot = ({ name, children }, { requestAddOnRenderer }) => {
  const addOnRenderer = requestAddOnRenderer(name)
  return (addOnRenderer && addOnRenderer()) ||
    children ||
    null
}

Slot.displayName = 'Slot'
Slot.contextTypes = { requestAddOnRenderer: PropTypes.func }
Slot.propTypes = { name: PropTypes.string }
Slot.defaultProps = { name: '?default' }
可以看到<Slot />通过context获取到<AppLayout />提供的接口requestAddOnRenderer(),最终渲染的主要对象就是缓存在<AppLayout />中的<AddOn />的内容。如果没有获取到指定的<AddOn />的内容,则渲染<Slot />自身的children。
<AddOn />更简单:
const AddOn = () => null

AddOn.propTypes = { slot: PropTypes.string }
AddOn.defaultTypes = { slot: '?default' }
AddOn.displayName = 'AddOn'
<AddOn />不做任何事情,仅仅返回null,它的作用就是让<AppLayout />缓存分发给插槽的内容。
可以让<AppLayout />更具通用性
通过上文的代码,基本将<AppLayout />改造成了一个具备插槽分发能力的组件,但是很明显的,<AppLayout />并不具备通用性,我们可以将它提升成一个独立通用的组件。
我给这个组件命名为SlotProvider
function getDisplayName (component) {
  return component.displayName || component.name || 'component'
}

const slotProviderHoC = (WrappedComponent) => {
  return class extends React.Component {
    static displayName = `SlotProvider(${getDisplayName(WrappedComponent)})`

    static childContextTypes = {
      requestAddOnRenderer: PropTypes.func
    }

    // 用于缓存每个<AddOn />的内容
    addOnRenderers = {}

    // 通过Context为子节点提供接口
    getChildContext () {
      const requestAddOnRenderer = (name) => {
        if (!this.addOnRenderers[name]) {
          return undefined
        }
        return () => (
          this.addOnRenderers[name]
        )
      }
      return {
        requestAddOnRenderer
      }
    }

    render () {
      const {
        children,
        ...restProps
      } = this.props

      if (children) {
        // 以k-v的方式缓存<AddOn />的内容
        const arr = React.Children.toArray(children)
        const nameChecked = []
        this.addOnRenderers = {}
        arr.forEach(item => {
          const itemType = item.type
          if (item.type.displayName === 'AddOn') {
            const slotName = item.props.slot || '?default'
            // 确保内容唯一性
            if (nameChecked.findIndex(item => item === stubName) !== -1) {
              throw new Error(`Slot(${slotName}) has been occupied`)
            }
            this.addOnRenderers[stubName] = item.props.children
            nameChecked.push(stubName)
          }
        })
      }

      return (<WrappedComponent {...restProps} />)
    }
  }
}

export const SlotProvider = slotProviderHoC
使用React的高阶组件对原来的<AppLayout />进行改造,将其转变为一个独立通用的组件。对于原来的<AppLayout />,可以使用这个SlotProvider高阶组件,转换成一个具备插槽分发能力的组件。
import { SlotProvider } from './SlotProvider.js'

class AppLayout extends React.Component {
  static displayName = 'AppLayout'

  render () {
    return (
      <div class="container">
        <header>
          <Slot name="header"></Slot>
        </header>
        <main>
          <Slot></Slot>
        </main>
        <footer>
          <Slot name="footer"></Slot>
        </footer>
      </div>
    )
  }
}

export default SlotProvider(AppLayout)
通过以上的经历,可以看到,当设计开发一个组件时,
- 组件可能需要由一个根组件和多个子组件一起合作来完成组件功能。比如插槽分发组件实际上需要
SlotProvider与<Slot />和<AddOn />一起配合使用,SlotProvider作为根组件,而<Slot />和<AddOn />都算是子组件。 - 子组件相对于根组件的位置或者子组件之间的位置是不确定。对于
SlotProvider而言,<Slot />的位置是不确定的,它会处在被SlotProvider这个高阶组件所包裹的组件的模板的任何位置,而对于<Slot />和<AddOn />,他们直接的位置也不确定,一个在SlotProvider包装的组件的内部,另一个是SlotProvider的children。 - 子组件之间需要依赖一些全局态的API或者数据,比如
<Slot />实际渲染的内容来自于SlotProvider收集到的<AddOn />的内容。
这时我们就需要借助一个中间者作为媒介来共享数据,相比额外引入redux这些第三方模块,直接使用Context可以更优雅。
尝试一下新版本的Context API
使用新版的Context API对之前的插槽分发组件进行改造。
// SlotProvider.js

function getDisplayName (component) {
  return component.displayName || component.name || 'component'
}

export const SlotContext = React.createContext({
  requestAddOnRenderer: () => {}
})

const slotProviderHoC = (WrappedComponent) => {
  return class extends React.Component {
    static displayName = `SlotProvider(${getDisplayName(WrappedComponent)})`

    // 用于缓存每个<AddOn />的内容
    addOnRenderers = {}

    requestAddOnRenderer = (name) => {
      if (!this.addOnRenderers[name]) {
        return undefined
      }
      return () => (
        this.addOnRenderers[name]
      )
    }

    render () {
      const {
        children,
        ...restProps
      } = this.props

      if (children) {
        // 以k-v的方式缓存<AddOn />的内容
        const arr = React.Children.toArray(children)
        const nameChecked = []
        this.addOnRenderers = {}
        arr.forEach(item => {
          const itemType = item.type
          if (item.type.displayName === 'AddOn') {
            const slotName = item.props.slot || '?default'
            // 确保内容唯一性
            if (nameChecked.findIndex(item => item === stubName) !== -1) {
              throw new Error(`Slot(${slotName}) has been occupied`)
            }
            this.addOnRenderers[stubName] = item.props.children
            nameChecked.push(stubName)
          }
        })
      }

      return (
        <SlotContext.Provider value={
            requestAddOnRenderer: this.requestAddOnRenderer
          }>
          <WrappedComponent {...restProps} />
        </SlotContext.Provider>
      )
    }
  }
}

export const SlotProvider = slotProviderHoC
移除了之前的childContextTypes和getChildContext(),除了局部的调整,整体核心的东西没有大变化。
// Slot.js

import { SlotContext } from './SlotProvider.js'

const Slot = ({ name, children }) => {
  return (
    <SlotContext.Consumer>
      {(context) => {
        const addOnRenderer = requestAddOnRenderer(name)
          return (addOnRenderer && addOnRenderer()) ||
            children ||
            null
      }}
    </SlotContext.Consumer>
  )
}

Slot.displayName = 'Slot'
Slot.propTypes = { name: PropTypes.string }
Slot.defaultProps = { name: '?default' }
由于之前就按照生产者消费者的模式来使用Context,加上组件自身也比较简单,因此使用新的API进行改造后,差别不大。
总结
- 相比
props和state,React的Context可以实现跨层级的组件通信。 - Context API的使用基于生产者消费者模式。生产者一方,通过组件静态属性
childContextTypes声明,然后通过实例方法getChildContext()创建Context对象。消费者一方,通过组件静态属性contextTypes申请要用到的Context属性,然后通过实例的context访问Context的属性。 - 使用
Context需要多一些思考,不建议在App中使用Context,但如果开发组件过程中可以确保组件的内聚性,可控可维护,不破坏组件树的依赖关系,影响范围小,可以考虑使用Context解决一些问题。 - 通过
Context暴露API或许在一定程度上给解决一些问题带来便利,但个人认为不是一个很好的实践,需要慎重。 - 旧版本的
Context的更新需要依赖setState(),是不可靠的,不过这个问题在新版的API中得以解决。 - 可以把
Context当做组件的作用域来看待,但是需要关注Context的可控性和影响范围,使用之前,先分析是否真的有必要使用,避免过度使用所带来的一些副作用。 - 可以把
Context当做媒介,进行App级或者组件级的数据共享。 - 设计开发一个组件,如果这个组件需要多个组件关联组合的,使用
Context或许可以更加优雅。
以上是我的分享内容,如有不足或者错误的地方,欢迎批评指正。
引用
- Context - https://reactjs.org/docs/context.html
- React 16.3来了:带着全新的Context API - http://cnodejs.org/topic/5a7bd5c4497a08f571384f03
- Content Distribution with Slots - https://vuejs.org/v2/guide/components.html#Content-Distribution-with-Slots
- 题图 - http://www.mafengwo.cn/poi/36580.html
