

AOP是啥这里就不展开讲了,想了解的可以搜搜搜。
那实现AOP用什么?
在Android绝大部分使用ASM和AspectJ
关于ASM可以去看看作者同事的文章
或者巴掌的文章
下面开始讲AspectJ
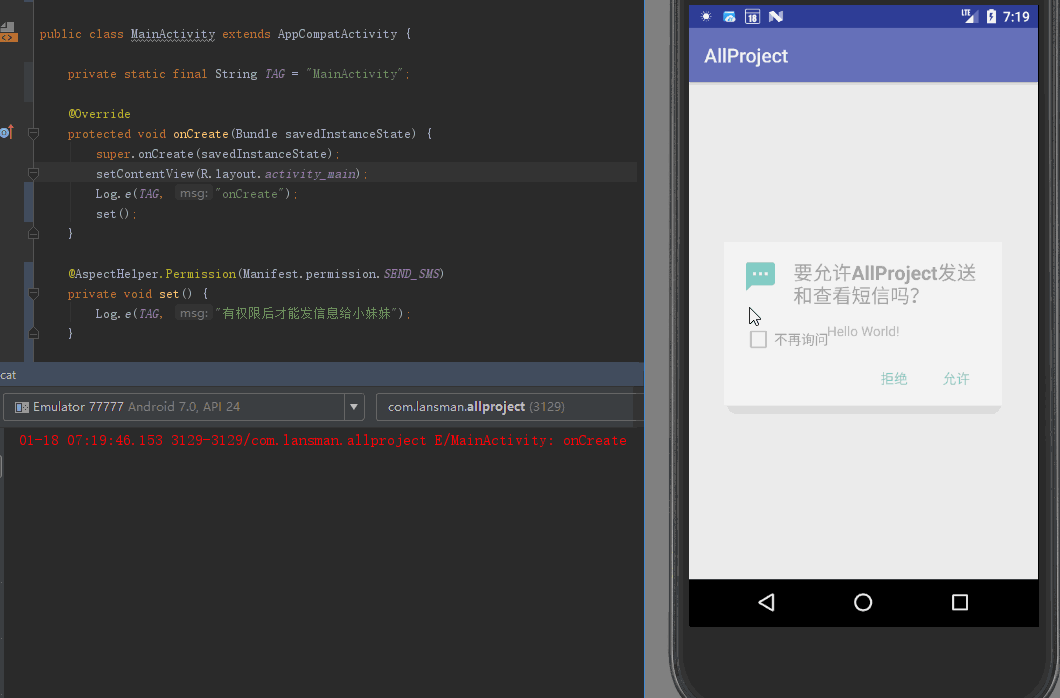
一:效果演示
场景:我有一段代码需要在拥有某个权限后才能执行 效果:一行注解完成工作
二:准备工作
很多人都会卡在这里,各种配置不通过。 第一种方式:使用医生的库https://github.com/HujiangTechnology/gradle_plugin_android_aspectjx 第二种方式:原生方式 这里展开讲讲第二种
- 根
build.gradle增加依赖
        classpath 'org.aspectj:aspectjtools:1.8.9'
        classpath 'org.aspectj:aspectjweaver:1.8.9'
- 新建一个
Android Library Module并在build.gradle增加代码
import com.android.build.gradle.LibraryPlugin
import org.aspectj.bridge.IMessage
import org.aspectj.bridge.MessageHandler
import org.aspectj.tools.ajc.Main
compile 'org.aspectj:aspectjrt:1.8.9'
android.libraryVariants.all { variant ->
    LibraryPlugin plugin = project.plugins.getPlugin(LibraryPlugin)
    JavaCompile javaCompile = variant.javaCompile
    javaCompile.doLast {
        String[] args = ["-showWeaveInfo",
                         "-1.5",
                         "-inpath", javaCompile.destinationDir.toString(),
                         "-aspectpath", javaCompile.classpath.asPath,
                         "-d", javaCompile.destinationDir.toString(),
                         "-classpath", javaCompile.classpath.asPath,
                         "-bootclasspath", android.bootClasspath.join(
                File.pathSeparator)]

        MessageHandler handler = new MessageHandler(true);
        new Main().run(args, handler)

        def log = project.logger
        for (IMessage message : handler.getMessages(null, true)) {
            switch (message.getKind()) {
                case IMessage.ABORT:
                case IMessage.ERROR:
                case IMessage.FAIL:
                    log.error message.message, message.thrown
                    break;
                case IMessage.WARNING:
                case IMessage.INFO:
                    log.info message.message, message.thrown
                    break;
                case IMessage.DEBUG:
                    log.debug message.message, message.thrown
                    break;
            }
        }
    }
}
加黑标注注意:"-bootclasspath", android.bootClasspath.join这里的bootClasspath前面用android很多人根据网上的配置编译不通过是因为这里。因为高版本的 gradle(作者gradle版本为2.3.2)需要改成这样子
3. 回到app(你的项目)module的build.gradle增加
import org.aspectj.bridge.IMessage
import org.aspectj.bridge.MessageHandler
import org.aspectj.tools.ajc.Main
compile project(':刚刚的module')
final def log = project.logger
final def variants = project.android.applicationVariants

variants.all { variant ->
    if (!variant.buildType.isDebuggable()) {
        log.debug("Skipping non-debuggable build type '${variant.buildType.name}'.")
        return;
    }

    JavaCompile javaCompile = variant.javaCompile
    javaCompile.doLast {
        String[] args = ["-showWeaveInfo",
                         "-1.5",
                         "-inpath", javaCompile.destinationDir.toString(),
                         "-aspectpath", javaCompile.classpath.asPath,
                         "-d", javaCompile.destinationDir.toString(),
                         "-classpath", javaCompile.classpath.asPath,
                         "-bootclasspath", project.android.bootClasspath.join(File.pathSeparator)]
        log.debug "ajc args: " + Arrays.toString(args)

        MessageHandler handler = new MessageHandler(true);
        new Main().run(args, handler);
        for (IMessage message : handler.getMessages(null, true)) {
            switch (message.getKind()) {
                case IMessage.ABORT:
                case IMessage.ERROR:
                case IMessage.FAIL:
                    log.error message.message, message.thrown
                    break;
                case IMessage.WARNING:
                    log.warn message.message, message.thrown
                    break;
                case IMessage.INFO:
                    log.info message.message, message.thrown
                    break;
                case IMessage.DEBUG:
                    log.debug message.message, message.thrown
                    break;
            }
        }
    }
}
赶紧去编译一下看看通过没
代码来了
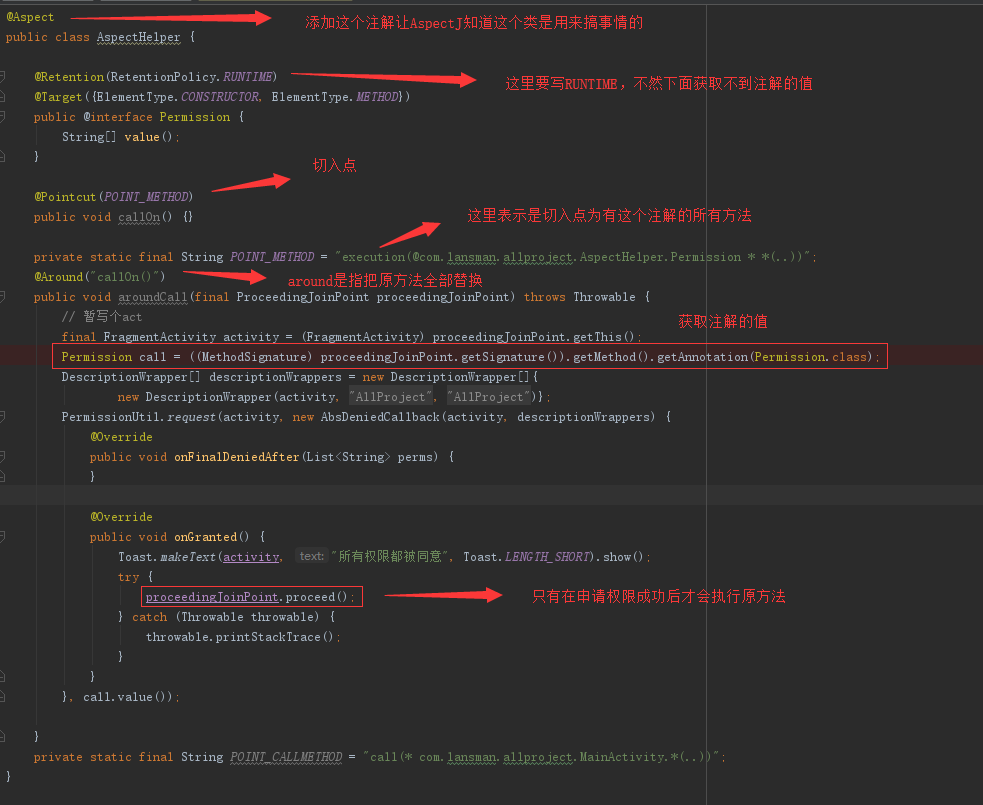
AspectJ会寻找@Aspect注解的类,使用里面的@point所描述的特征,遍历所有class进行操作。而@Around是具体的操作行为,会对所有符合@point特征的方法替换为它所注解的方法。这里是权限申请,然后在申请成功后再使用原方法。这样就达到了原方法必须在申请权限成功后才会执行下去了。看一下编译后的代码
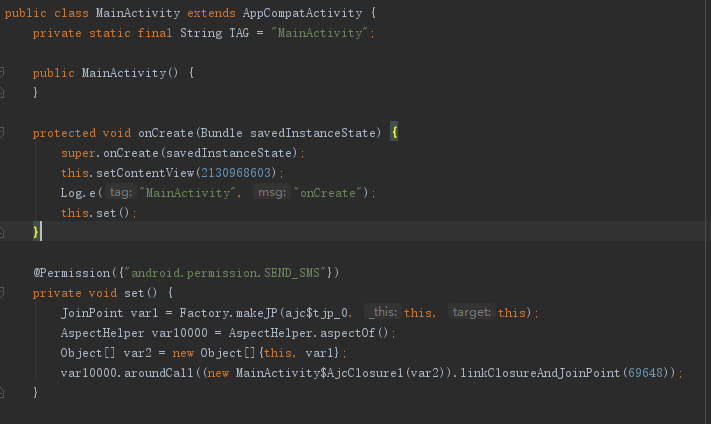
AspectJ的方法了。
类似@Around的还有@Before、@After等,这里就不多介绍用法,毕竟这不是介绍用法的文章,不够专业,腰板硬。
这里提供一个思路,不仅可以用的登录啊、缓存啊、统计啊什么的。不过据大佬们的说法,这个东西存在兼容性的问题,尚未清楚具体的兼容性问题,忘告知。
