

前言:
swiper,关于滑块的一些效果无缝,断点,视差等等...我想这里就不用做太多的赘述,这里给大家分享一下实战项目中使用circular(衔接)的一点小特性、小技巧,当然你也可以理解为遇到了一个小坑,因为不能把整个项目搬上来,所以这里用一个小事例去简单的描述一下。
功能介绍
swiper滑块视图容器(轮播效果)
可配置项
这里只简单列出示例中所需的一些属性,如需了解更多【请点击,了解更多详情】
    indicatorDots: true, //  是否显示面板指示点
    autoplay: false, // 是否自动切换
    circular: true, // 是否采用衔接滑动
    current: 0, // 当前所在页面的 index
    interval: 500, // 自动切换时间间隔
    duration: 500 // 滑动动画时长
示例
场景
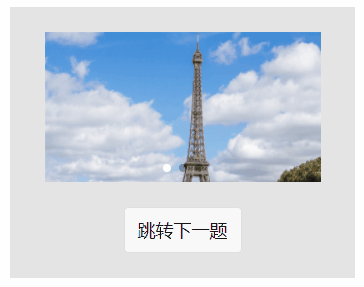
类答题效果,答对本题自动跳转下一题,并保持滑块的衔接效果(这里我们用按钮来代替自动跳转)
WXML:
   <page>
        <view class='wrap-swiper'>
          <swiper indicator-dots="{{indicatorDots}}" autoplay="{{autoplay}}" interval="{{interval}}" duration="{{duration}}" circular="{{circular}}" current="{{current}}" bindchange='testDetails' indicator-active-color='#fff'>
            <block wx:for="{{imgUrls}}" wx:key="key">
         <swiper-item>
           <image src="https://p1-jj.byteimg.com/tos-cn-i-t2oaga2asx/gold-user-assets/2018/1/15/160f8b440965adf5~tplv-t2oaga2asx-image.image" class="slide-image" width="355" height="150" />
         </swiper-item>
            </block>
          </swiper>
          <view class="wrap">
           <button bindtap='nextPage'>跳转下一题</button>
          </view>
        </view>
</page>
WXSS:
swiper{
  width: 80%;
  margin: 0 auto;
  margin-top: 20%;
  padding-top: 25px;
}
.wrap{
  display: flex;
  justify-content: space-around;
  margin-top: 25px;
}
.wrap-swiper{
  background: rgba(0,0,0, 0.1) ;
  padding-bottom: 25px;
  margin-left: 15px;
  margin-right: 15px;
}
JS:
 Page({
  data: {
    imgUrls: [
      'http://img02.tooopen.com/images/20150928/tooopen_sy_143912755726.jpg',
      'http://img06.tooopen.com/images/20160818/tooopen_sy_175866434296.jpg',
      'http://img06.tooopen.com/images/20160818/tooopen_sy_175833047715.jpg'
    ],
    indicatorDots: true, //  是否显示面板指示点
    autoplay: false, // 是否自动切换
    circular: true, // 是否采用衔接滑动
    current: 0, // 当前所在页面的 index
    interval: 500, // 自动切换时间间隔
    duration: 500 // 滑动动画时长
  },
  testDetails (e) {
    // bindchange事件
    console.log(e)
  },
  nextPage () {
    // 跳转下一题
     let current = this.data.current
     current++
     if (current > 2) {
      current = 0
     }
  }
})
运行效果:

对比
通过上述,首先我们看到,当我们左右滑动时候,衔接效果是没有毛病的,但是当我们去模拟跳转的时候,问题出现了,衔接失效?这究竟是怎么回事呢?现在我们就来看一下在bindchange事件(testDetails)的两次log中发生了什么?
问题
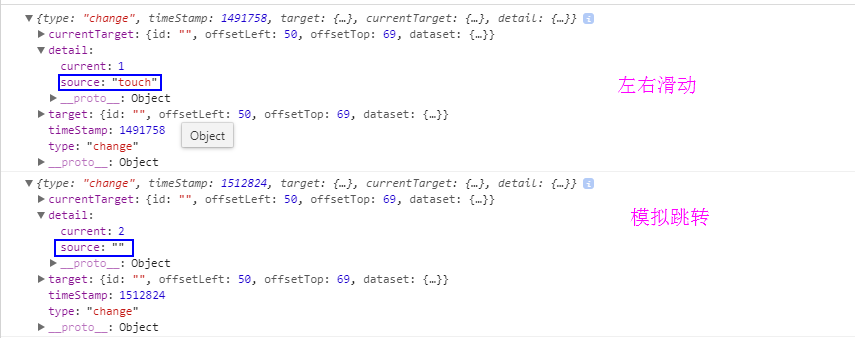
如上图所属,source(来源) 出现问题,模拟跳转改变current方式改变了内部衔接跳转的机制,那既然知道原因,那下一步的就要考虑如何模拟swiper内部的机制动作,那又该如何模拟呢?就要从autoplay这个内置属性操刀了,废话不说直接上代码!
JS(修改后)
小特性: 主动触发swiper的autoplay特性,检测bindchange事件的source来源,做动态动态关闭处理
 Page({
  data: {
    imgUrls: [
      'http://img02.tooopen.com/images/20150928/tooopen_sy_143912755726.jpg',
      'http://img06.tooopen.com/images/20160818/tooopen_sy_175866434296.jpg',
      'http://img06.tooopen.com/images/20160818/tooopen_sy_175833047715.jpg'
    ],
    indicatorDots: true, //  是否显示面板指示点
    autoplay: false, // 是否自动切换
    circular: true, // 是否采用衔接滑动
    current: 0, // 当前所在页面的 index
    interval: 500, // 自动切换时间间隔
    duration: 500 // 滑动动画时长
  },
  testDetails (e) {
    console.log(e)
    if (e.detail.source == 'autoplay') {
      this.setData({
        autoplay: false
      })
    }
  },
  nextPage () {
    // 跳转下一题
    this.setData({
      autoplay: true
    })
  }
})
对比log(修改后)
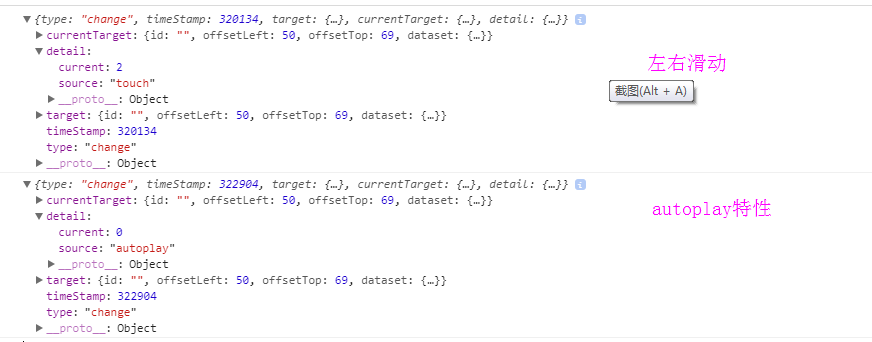
运行效果(修改后)
跑起来瞅一眼
总结
本篇文章更多的是对于一些用法的分享,简单的特性说明,更深层次的内容,有兴趣的道友还是可以去研究下的,另外欢迎大家关注点赞,多谢!(持续更新中...)
(注:封面来源于互联网,如有侵权,请联系作者删除;如需转载,请附原文链接及署名,多谢)
