

一、引言
关于这篇文章内容适合哪些同学,可以先提几个问题请大家考虑下。
1、如果通过一个 ImageView 类型的 view.getContext() 来获取到的 context 是什么类型?
2、Activity 中调用 setContentView() 与 addContentView() 方法有什么区别?
3、AppCompatActivity 相对于 Activity 的 setContentView() 方法会有什么区别么?
4、Android 是如何从 XML 里读取并构建视图的(或者说是如何创建一个 View 的)?
5、support-v7 包里如何针对不同版本 API 做到兼容和扩展的?
6、AppCompatActivity 里如何将一些基础类型控件替换为 AppCompatXXX 控件?具体哪些控件会被替换?什么时候替换?
如果对上述的问题有疑惑或者有不确定的,都可以在下文里找到答案。我们会从项目调试时发现的问题入手,逐步分析找到原因,所以本文可能会有些长,着急的小伙伴可以按照标题找到自己关心的内容。
另外本文所贴的源码版本为:android-25 、support-v7-25.4.0
为了简化阅读,本文中“不相关”的代码会有些省略,所以有需要的小伙伴可以依照本文给的线索,自行查看所有源码。
1.1 View.getContext()
 Context context = imageView.getContext();
 if (context instanceof Activity) {
     Activity activity = (Activity)context;
 	  // ...
 }
从上面的代码举例中可以看到,从 imageView 控件里获取到 context ,转化为 Activity 来继续操作。这个 imageView 是来自 XML 布局中的一个控件,但在实际项目运行时有的手机并未走到转换类型的 if 分支里去,表明这个 context 并非 Activity 类型。这个就很奇怪了,为什么呢?
/**
 * Simple constructor to use when creating a view from code.
 *
 * @param context The Context the view is running in, through which it can
 *        access the current theme, resources, etc.
 */
public View(Context context) {
    mContext = context;
	 //...省略
}

@ViewDebug.CapturedViewProperty
public final Context getContext() {
    return mContext;
}
我们点进去看下 View.getContext() 方法,返回 mContext 成员变量,而且 mContext 赋值只有在构造函数里。依据印象,这个 imageView 是写在 XML 中的,在 setContextView(R.layout.xxx) 时候,实际调用的应该就是 PhoneWindow 里的 setContextView() 方法,那构建使用的 context 应该就是 Activity 类型啊?
这时候我又回去仔细 Debug 了一回,发现出现问题的都是在 5.0 以下的手机里。所以上面的印象是有问题的,在 5.0 以下,这个 imageView.getContext() 获取到的 context 类型不是我一开始以为的 Activity 类型,而是 TintContextWrapper 类型。
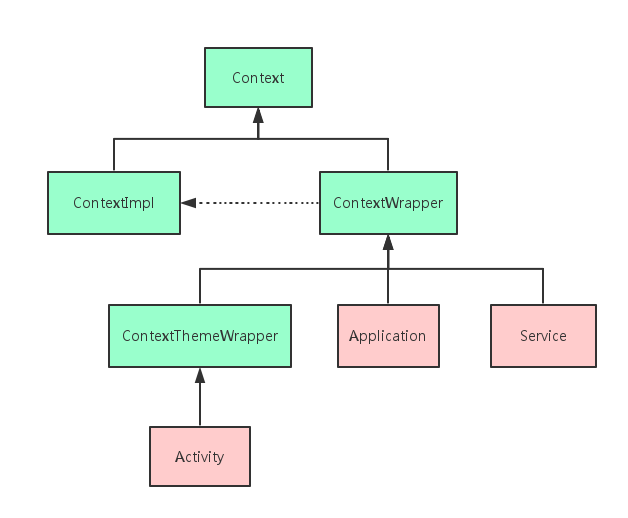
1.2 Context 类型
这个 TintContextWrapper 是什么 Wrapper ?我印象中 Context 的继承关系中没有这个啊。 关于 Context 类型 www.jianshu.com/p/94e0f9ab3… 的讲解,不清楚的小伙伴可以自行搜索下,这里就不展开了,网上能讲清楚的也不少,这里贴个图看下。
确实也没有这个 TintContextWrapper 这个类型,从名字看应该也是个 Wrapper 类型的 Context ,还和 Tint 有关系。那剩下的线索还有这个 imageView ,再 Debug 一次,发现这个 imageView 的类型也不是原先在 XML 中定义的 ImageView 类型,而是 AppCompatImageView 类型。
猛然醒悟,控件所在的 Activity 是继承自 AppCompatActivity ,这个 context 类型的变化一定是和 v7 包里的 AppCompatActivity 有关系。之前所谓的印象已经出了两次错误,何不读源码解惑?
注意:下面的文章并不是完全依照查问题时的顺序来的,而是阅读完相关源码后,整理出来的相关知识点。已经清楚的小伙伴可以挑着阅读。
二、Activity 中 setContentView() 与 addContentView() 的区别
如果多次调用 setContentView() ,则之后每次都会清空 mContentParent 容器。然后组装资源 layoutResID 。
如果多次调用 addContentView() ,则之后每次都会将 View 添加到 mContentParent 容器中。最后产生 View 的叠加效果。
这个 mContentParent 存在于 PhoneWindow 中。
// This is the view in which the window contents are placed. It is either
// mDecor itself, or a child of mDecor where the contents go.
ViewGroup mContentParent;
三、AppCompatActivity 和 Activity 的 setContentView() 方法的区别?
setContentView() 方法有两类,其中一类的必要参数是 XML 布局 id ,另一类的必要参数是 View 类型。
setContentView(@LayoutRes int layoutResID)
setContentView(View view)
这里我们以参数为 View 类型的代码讨论。
3.1 Activity
3.1.1 Activity.setContentView()
// Activity代码
public void setContentView(View view) {
    getWindow().setContentView(view);
    initWindowDecorActionBar();
}

public Window getWindow() {
    return mWindow;
}
Activity 中 setContentView() 代码,获取 window 来 setContentView() 。
// Window代码
public abstract void setContentView(View view);
而这个 window 其实就是 PhoneWindow ,看下面的代码。
// Activity代码
final void attach(Context context, ActivityThread aThread,
        Instrumentation instr, IBinder token, int ident,
        Application application, Intent intent, ActivityInfo info,
        CharSequence title, Activity parent, String id,
        NonConfigurationInstances lastNonConfigurationInstances,
        Configuration config, String referrer, IVoiceInteractor voiceInteractor,
        Window window) {
    //...省略

    mWindow = new PhoneWindow(this, window);

    //...省略
}
3.1.2 PhoneWindow.setContentView()
@Override
public void setContentView(View view) {
    setContentView(view, new ViewGroup.LayoutParams(MATCH_PARENT, MATCH_PARENT));
}

@Override
public void setContentView(View view, ViewGroup.LayoutParams params) {
    // Note: FEATURE_CONTENT_TRANSITIONS may be set in the process of installing the window
    // decor, when theme attributes and the like are crystalized. Do not check the feature
    // before this happens.
    if (mContentParent == null) {
        installDecor();
    } else if (!hasFeature(FEATURE_CONTENT_TRANSITIONS)) {
        mContentParent.removeAllViews();
    }

    if (hasFeature(FEATURE_CONTENT_TRANSITIONS)) {
        view.setLayoutParams(params);
        final Scene newScene = new Scene(mContentParent, view);
        transitionTo(newScene);
    } else {
        mContentParent.addView(view, params);
    }
    //...省略
}
代码第12行,确保 mContentParent 已经初始化过。
第14行,如果没有 FEATURE_CONTENT_TRANSITIONS ,先清空 mContentParent 里内容。
第22行, mContentParent 将 view 当子孩子添加进来。
第17行,如果有 FEATURE_CONTENT_TRANSITIONS ,调用 transitionTo(newScene) 。这部分不展开了,最终也是调用以下代码,逻辑步骤都是一样的。
//Scene 代码
//mSceneRoot 就是刚才的 mContentParent
//mLayout 就是 setContentView 方法传进来的 view

public Scene(ViewGroup sceneRoot, View layout) {
    mSceneRoot = sceneRoot;
    mLayout = layout;
}

public void enter() {
    // Apply layout change, if any
    if (mLayoutId > 0 || mLayout != null) {
        // empty out parent container before adding to it
        getSceneRoot().removeAllViews();

        if (mLayoutId > 0) {
            LayoutInflater.from(mContext).inflate(mLayoutId, mSceneRoot);
        } else {
            mSceneRoot.addView(mLayout);
        }
    }
	//...省略
}
3.2 AppCompatActivity
可以看到 Activity 中 setContentView() 流程还是比较简单的,基本上就是调用了PhoneWindow 里的相应方法。下面我们来看看 AppCompatActivity 中有什么特别的。
3.2.1 AppCompatActivity.setContentView() 方法
// AppCompatActivity
@Override
public void setContentView(@LayoutRes int layoutResID) {
    getDelegate().setContentView(layoutResID);
}

 /**
 * @return The {@link AppCompatDelegate} being used by this Activity.
 */
@NonNull
public AppCompatDelegate getDelegate() {
    if (mDelegate == null) {
        mDelegate = AppCompatDelegate.create(this, this);
    }
    return mDelegate;
}
mDelegate 是一个代理类,由 AppCompatDelegate 根据不同的 SDK 版本生成不同的实际执行类,就是个代理的兼容模式。看下面的代码:
/**
 * Create a {@link android.support.v7.app.AppCompatDelegate} to use with {@code activity}.
 *
 * @param callback An optional callback for AppCompat specific events
 */
public static AppCompatDelegate create(Activity activity, AppCompatCallback callback) {
    return create(activity, activity.getWindow(), callback);
}

private static AppCompatDelegate create(Context context, Window window,
        AppCompatCallback callback) {
    final int sdk = Build.VERSION.SDK_INT;
    if (BuildCompat.isAtLeastN()) {
        return new AppCompatDelegateImplN(context, window, callback);
    } else if (sdk >= 23) {
        return new AppCompatDelegateImplV23(context, window, callback);
    } else if (sdk >= 14) {
        return new AppCompatDelegateImplV14(context, window, callback);
    } else if (sdk >= 11) {
        return new AppCompatDelegateImplV11(context, window, callback);
    } else {
        return new AppCompatDelegateImplV9(context, window, callback);
    }
}
我们可以看到最基础的就是 AppCompatDelegateImplV9 这个版本,其他的实现类最终都是继承自这个 AppCompatDelegateImplV9 类的。我们后面要查看的方法都在 AppCompatDelegateImplV9 这个类实现里。
所以我们在 AppCompatActivity 中调用 setContentView() 方法,实际最终实现都是 AppCompatDelegateImplV9 里。
3.2.2 AppCompatDelegateImplV9.setContentView() 方法。
// 代理类的具体实现类 AppCompatDelegateImplV9 中 setContentView() 方法
@Override
public void setContentView(View v, ViewGroup.LayoutParams lp) {
    ensureSubDecor();
    ViewGroup contentParent = (ViewGroup) mSubDecor.findViewById(android.R.id.content);
    contentParent.removeAllViews();
    contentParent.addView(v, lp);
    mOriginalWindowCallback.onContentChanged();
}
从代码第 5 - 7 行,从 mSubDector(类型 ViewGroup )中取出个 android.R.id.content 标识的 contentParent ,然后重新添加 view 。第 8 行回调通知。
那第 4 行代码从名字上可以看出是确保这个 mSubDector 初始化的方法。我们进去看下:
 private void ensureSubDecor() {
    if (!mSubDecorInstalled) {
        mSubDecor = createSubDecor();

        //...省略...
    }
}
 private ViewGroup createSubDecor() {
	 //...省略... 这部分主要针对 AppCompat 样式检查和适配

    // Now let's make sure that the Window has installed its decor by retrieving it
    mWindow.getDecorView();

    final LayoutInflater inflater = LayoutInflater.from(mContext);
    ViewGroup subDecor = null;

    //...省略... 这部分主要针对不同的样式设置来初始化不同的 subDecor(inflater 不同的布局 xml )

    if (subDecor == null) {
        throw new IllegalArgumentException(
                "AppCompat does not support the current theme features: { "
                        + "windowActionBar: " + mHasActionBar
                        + ", windowActionBarOverlay: "+ mOverlayActionBar
                        + ", android:windowIsFloating: " + mIsFloating
                        + ", windowActionModeOverlay: " + mOverlayActionMode
                        + ", windowNoTitle: " + mWindowNoTitle
                        + " }");
    }

    //...省略...

    // Make the decor optionally fit system windows, like the window's decor
    ViewUtils.makeOptionalFitsSystemWindows(subDecor);

    final ContentFrameLayout contentView = (ContentFrameLayout) subDecor.findViewById(
            R.id.action_bar_activity_content);

    final ViewGroup windowContentView = (ViewGroup) mWindow.findViewById(android.R.id.content);
    if (windowContentView != null) {
        // There might be Views already added to the Window's content view so we need to
        // migrate them to our content view
        while (windowContentView.getChildCount() > 0) {
            final View child = windowContentView.getChildAt(0);
            windowContentView.removeViewAt(0);
            contentView.addView(child);
        }

        // Change our content FrameLayout to use the android.R.id.content id.
        // Useful for fragments.
        windowContentView.setId(View.NO_ID);
        contentView.setId(android.R.id.content);

        // The decorContent may have a foreground drawable set (windowContentOverlay).
        // Remove this as we handle it ourselves
        if (windowContentView instanceof FrameLayout) {
            ((FrameLayout) windowContentView).setForeground(null);
        }
    }

    // Now set the Window's content view with the decor
    mWindow.setContentView(subDecor);

    //...省略...

    return subDecor;
}
下面我们重点看一下代码 28 - 31 行,从 subDecor 中取出了 R.id.action_bar_activity_content 标示的 FrameLayout ,从 window 中取出我们熟悉的 android.R.id.content 标示 view 。这个 view 呢其实就是 PhoneWindow 中 DecorView 里的 contentView 了。
代码 35 - 38 行,就是将 window 里取出的 windowContentView 里已有的 childview 依次挪到这个 subDector 取出的 contentView 中去,并清空这个 windowContentView 。这里就达到狸猫换太子的第一步。
代码 43 - 44 行,接下来将原来 window 里的 windowContentView 的 id( android.R.id.content )替换给我们 subDecor 里的 contentView。
代码 54 行,狸猫换太子的最后一步,将狸猫 subDecor 设置给 mWindow 。
分析完上述代码,我们再回过来看一下 setContentView() 方法的代码第 4 行,就不难理解为什么可以通过 android.R.id.content 来取到 “根 View ” 了。
 @Override
public void setContentView(View v, ViewGroup.LayoutParams lp) {
    ensureSubDecor();
    ViewGroup contentParent = (ViewGroup) mSubDecor.findViewById(android.R.id.content);
    contentParent.removeAllViews();
    contentParent.addView(v, lp);
    mOriginalWindowCallback.onContentChanged();
}
四、如何从 XML 里读取并构建一个 View?
刚才我们讨论了一类参数为 View 的 setContentView() 方法,现在我们来看下另一个参数为布局 id 的 setContentView() 方法。
4.1 LayoutInflater.inflate() 方法
当我们在 Activity 的 onCreate() 方法里调用 setContentView(R.layout.xxx) 来设置一个页面时,最终都会走到类似如下的方法:
LayoutInflater.from(mContext).inflate(resId, contentParent);
所以下面我们来看下怎么 inflate 一个页面出来。
// LayoutInflater 代码
public View inflate(@LayoutRes int resource, @Nullable ViewGroup root) {
    return inflate(resource, root, root != null);
}

public View inflate(@LayoutRes int resource, @Nullable ViewGroup root, boolean attachToRoot) {
    final Resources res = getContext().getResources();
    if (DEBUG) {
        Log.d(TAG, "INFLATING from resource: \"" + res.getResourceName(resource) + "\" ("
                + Integer.toHexString(resource) + ")");
    }

    final XmlResourceParser parser = res.getLayout(resource);
    try {
        return inflate(parser, root, attachToRoot);
    } finally {
        parser.close();
    }
}
看代码第 13 行,通过 XML 解析器 XmlResourceParser 来解析我们传进来的布局文件的。下面我们贴下第 14 行代码方法的详细。
public View inflate(XmlPullParser parser, @Nullable ViewGroup root, boolean attachToRoot) {
    synchronized (mConstructorArgs) {
        Trace.traceBegin(Trace.TRACE_TAG_VIEW, "inflate");

        final Context inflaterContext = mContext;
        final AttributeSet attrs = Xml.asAttributeSet(parser);
        Context lastContext = (Context) mConstructorArgs[0];
        mConstructorArgs[0] = inflaterContext;
        View result = root;

        try {
            // Look for the root node.
            int type;
            while ((type = parser.next()) != XmlPullParser.START_TAG &&
                    type != XmlPullParser.END_DOCUMENT) {
                // Empty
            }

            if (type != XmlPullParser.START_TAG) {
                throw new InflateException(parser.getPositionDescription()
                        + ": No start tag found!");
            }

            final String name = parser.getName();

            if (DEBUG) {
                System.out.println("**************************");
                System.out.println("Creating root view: "
                        + name);
                System.out.println("**************************");
            }

            if (TAG_MERGE.equals(name)) {
                if (root == null || !attachToRoot) {
                    throw new InflateException("<merge /> can be used only with a valid "
                            + "ViewGroup root and attachToRoot=true");
                }

                rInflate(parser, root, inflaterContext, attrs, false);
            } else {
                // Temp is the root view that was found in the xml
                final View temp = createViewFromTag(root, name, inflaterContext, attrs);

                ViewGroup.LayoutParams params = null;

                if (root != null) {
                    if (DEBUG) {
                        System.out.println("Creating params from root: " +
                                root);
                    }
                    // Create layout params that match root, if supplied
                    params = root.generateLayoutParams(attrs);
                    if (!attachToRoot) {
                        // Set the layout params for temp if we are not
                        // attaching. (If we are, we use addView, below)
                        temp.setLayoutParams(params);
                    }
                }

                if (DEBUG) {
                    System.out.println("-----> start inflating children");
                }

                // Inflate all children under temp against its context.
                rInflateChildren(parser, temp, attrs, true);

                if (DEBUG) {
                    System.out.println("-----> done inflating children");
                }

                // We are supposed to attach all the views we found (int temp)
                // to root. Do that now.
                if (root != null && attachToRoot) {
                    root.addView(temp, params);
                }

                // Decide whether to return the root that was passed in or the
                // top view found in xml.
                if (root == null || !attachToRoot) {
                    result = temp;
                }
            }

        } catch (XmlPullParserException e) {
            final InflateException ie = new InflateException(e.getMessage(), e);
            ie.setStackTrace(EMPTY_STACK_TRACE);
            throw ie;
        } catch (Exception e) {
            final InflateException ie = new InflateException(parser.getPositionDescription()
                    + ": " + e.getMessage(), e);
            ie.setStackTrace(EMPTY_STACK_TRACE);
            throw ie;
        } finally {
            // Don't retain static reference on context.
            mConstructorArgs[0] = lastContext;
            mConstructorArgs[1] = null;

            Trace.traceEnd(Trace.TRACE_TAG_VIEW);
        }

        return result;
    }
}
可以看到上面的代码不是特别多,主要就是根据一个个 XML 中的标签( </> 封装的内容),用 parser 来解析并做相应处理。
代码第 74 行将 view 添加到 root 中去。而这个 root 就是一开始传下来的 contentParent(类型 ViewGroup )。
那就有疑问了,读取到标签,知道是什么标签了,比如是个 TextView ,那在什么地方创建一个 View 呢?
代码第 41 - 42 行,调用 createViewFromTag() 方法来创建 View 的。
// Temp is the root view that was found in the xml
final View temp = createViewFromTag(root, name, inflaterContext, attrs);
4.2 createViewFromTag() 方法
我们简化掉一部分代码。
// LayoutInflater 代码
View createViewFromTag(View parent, String name, Context context, AttributeSet attrs, boolean ignoreThemeAttr) {
//...省略...
try {
        View view;
        if (mFactory2 != null) {
            view = mFactory2.onCreateView(parent, name, context, attrs);
        } else if (mFactory != null) {
            view = mFactory.onCreateView(name, context, attrs);
        } else {
            view = null;
        }

        if (view == null && mPrivateFactory != null) {
            view = mPrivateFactory.onCreateView(parent, name, context, attrs);
        }

        if (view == null) {
            final Object lastContext = mConstructorArgs[0];
            mConstructorArgs[0] = context;
            try {
                if (-1 == name.indexOf('.')) {
                    view = onCreateView(parent, name, attrs);
                } else {
                    view = createView(name, null, attrs);
                }
            } finally {
                mConstructorArgs[0] = lastContext;
            }
        }

        return view;
    } catch
//...省略捕获异常...
}
其中 Factory 、 Factory2 都是接口,都提供了 onCreateView() 方法,其中 Factory2 继承自 Factory ,扩展了个字段。
public interface Factory {
        /**
         * Hook you can supply that is called when inflating from a LayoutInflater.
         * You can use this to customize the tag names available in your XML
         * layout files.
         *
         * <p>
         * Note that it is good practice to prefix these custom names with your
         * package (i.e., com.coolcompany.apps) to avoid conflicts with system
         * names.
         *
         * @param name Tag name to be inflated.
         * @param context The context the view is being created in.
         * @param attrs Inflation attributes as specified in XML file.
         *
         * @return View Newly created view. Return null for the default
         *         behavior.
         */
        public View onCreateView(String name, Context context, AttributeSet attrs);
    }

    public interface Factory2 extends Factory {
        /**
         * Version of {@link #onCreateView(String, Context, AttributeSet)}
         * that also supplies the parent that the view created view will be
         * placed in.
         *
         * @param parent The parent that the created view will be placed
         * in; <em>note that this may be null</em>.
         * @param name Tag name to be inflated.
         * @param context The context the view is being created in.
         * @param attrs Inflation attributes as specified in XML file.
         *
         * @return View Newly created view. Return null for the default
         *         behavior.
         */
        public View onCreateView(View parent, String name, Context context, AttributeSet attrs);
    }
如果所有 factory 都为空或者 factory 构建的 view 为空,则最终调用 CreareView() 方法了,关于此方法代码就不贴了,就是通过控件名字( XML 中标签名)反射生成个对象,贴一段注释就明白了。
Low-level function for instantiating a view by name. This attempts to instantiate a view class of the given name found in this LayoutInflater's ClassLoader.
最后的疑问就是这个 Factory(或 Factory2 )接口类型的成员变量什么时候会赋值了?请往下看。
4.3 Activity 中 Factory 赋值
我们先看看 Activity 是实现了 LayoutInflater.Factory2 接口的。
public class Activity extends ContextThemeWrapper
        implements LayoutInflater.Factory2,
        Window.Callback, KeyEvent.Callback,
        OnCreateContextMenuListener, ComponentCallbacks2,
        Window.OnWindowDismissedCallback, WindowControllerCallback {
        //...省略

   /**
     * Standard implementation of
     * {@link android.view.LayoutInflater.Factory#onCreateView} used when
     * inflating with the LayoutInflater returned by {@link #getSystemService}.
     * This implementation does nothing and is for
     * pre-{@link android.os.Build.VERSION_CODES#HONEYCOMB} apps.  Newer apps
     * should use {@link #onCreateView(View, String, Context, AttributeSet)}.
     *
     * @see android.view.LayoutInflater#createView
     * @see android.view.Window#getLayoutInflater
     */
        @Nullable
    public View onCreateView(String name, Context context, AttributeSet attrs) {
        return null;
    }

    /**
     * Standard implementation of
     * {@link android.view.LayoutInflater.Factory2#onCreateView(View, String, Context, AttributeSet)}
     * used when inflating with the LayoutInflater returned by {@link #getSystemService}.
     * This implementation handles <fragment> tags to embed fragments inside
     * of the activity.
     *
     * @see android.view.LayoutInflater#createView
     * @see android.view.Window#getLayoutInflater
     */
    public View onCreateView(View parent, String name, Context context, AttributeSet attrs) {
        if (!"fragment".equals(name)) {
            return onCreateView(name, context, attrs);
        }

        return mFragments.onCreateView(parent, name, context, attrs);
    }

}
这里我们有了一个额外的收获,就是这个 “fragment”。如果我们的 XML 中用 fragment 标签来嵌入一个 Fragment ,在解析 XML 时候,会在 Activity 中调用 mFragments 的 onCreateView() 方法来返回一个 View ,最后加入到 contentParent 中。
4.3.1 Activity 与 LayoutInflater 关联
// Activity 代码
final void attach(Context context, ActivityThread aThread,
        Instrumentation instr, IBinder token, int ident,
        Application application, Intent intent, ActivityInfo info,
        CharSequence title, Activity parent, String id,
        NonConfigurationInstances lastNonConfigurationInstances,
        Configuration config, String referrer, IVoiceInteractor voiceInteractor,
        Window window) {
    //...省略

    mWindow = new PhoneWindow(this, window);
    mWindow.setWindowControllerCallback(this);
    mWindow.setCallback(this);
    mWindow.setOnWindowDismissedCallback(this);
    mWindow.getLayoutInflater().setPrivateFactory(this);
还是这个 attach() 方法( Internal API ),在代码第 15 行调用了 PhoneWindow 的 getLayoutInflater() 方法,设置了 privateFactory 。
public PhoneWindow(Context context) {
    super(context);
    mLayoutInflater = LayoutInflater.from(context);
}

/**
 * Return a LayoutInflater instance that can be used to inflate XML view layout
 * resources for use in this Window.
 *
 * @return LayoutInflater The shared LayoutInflater.
 */
@Override
public LayoutInflater getLayoutInflater() {
    return mLayoutInflater;
}
代码已经说明了一切,注释也很清楚了。
4.4 AppCompatActivity 中 Factory 赋值
请往下看
五、AppCompatActivity
我们之前的内容都是一些准备知识,我们最初的问题是 ImageView 里 getContext() 的类型为什么在 5.0 以下会是 TintContextWrapper ?什么时候以及是替换掉的?还没有解答,下面会陆续给出答案。小伙伴们坚持下!
5.1 AppCompatActivity.onCreate() 方法分析
@Override
protected void onCreate(@Nullable Bundle savedInstanceState) {
    final AppCompatDelegate delegate = getDelegate();
    delegate.installViewFactory();
    delegate.onCreate(savedInstanceState);
    if (delegate.applyDayNight() && mThemeId != 0) {
        // If DayNight has been applied, we need to re-apply the theme for
        // the changes to take effect. On API 23+, we should bypass
        // setTheme(), which will no-op if the theme ID is identical to the
        // current theme ID.
        if (Build.VERSION.SDK_INT >= 23) {
            onApplyThemeResource(getTheme(), mThemeId, false);
        } else {
            setTheme(mThemeId);
        }
    }
    super.onCreate(savedInstanceState);
}
怎么样第 3 行代码是不是很熟悉,代理加兼容模式,这个 AppCompatDelegate 具体实现类我们再看一遍。
// AppCompatActivity 代码,代码 8 行的 this 就是这个 Activity 本身。
/**
 * @return The {@link AppCompatDelegate} being used by this Activity.
 */
@NonNull
public AppCompatDelegate getDelegate() {
    if (mDelegate == null) {
        mDelegate = AppCompatDelegate.create(this, this);
    }
    return mDelegate;
}

// AppCompatDelegate代码
private static AppCompatDelegate create(Context context, Window window,
            AppCompatCallback callback) {
    final int sdk = Build.VERSION.SDK_INT;
    if (BuildCompat.isAtLeastN()) {
        return new AppCompatDelegateImplN(context, window, callback);
    } else if (sdk >= 23) {
        return new AppCompatDelegateImplV23(context, window, callback);
    } else if (sdk >= 14) {
        return new AppCompatDelegateImplV14(context, window, callback);
    } else if (sdk >= 11) {
        return new AppCompatDelegateImplV11(context, window, callback);
    } else {
        return new AppCompatDelegateImplV9(context, window, callback);
    }
}
AppCompatActivity.onCreate() 代码里,第 4 行
delegate.installViewFactory() 。具体的实现是在 AppCompatDelegateImplV9 里。看如下代码:
@Override
public void installViewFactory() {
    LayoutInflater layoutInflater = LayoutInflater.from(mContext);
    if (layoutInflater.getFactory() == null) {
        LayoutInflaterCompat.setFactory(layoutInflater, this);
    } else {
        if (!(LayoutInflaterCompat.getFactory(layoutInflater)
                instanceof AppCompatDelegateImplV9)) {
            Log.i(TAG, "The Activity's LayoutInflater already has a Factory installed"
                    + " so we can not install AppCompat's");
        }
    }
}
代码第 3 - 5 行,如果 layoutInflater 的factory为空,则将自身设置给layoutInflater,达到设置 factory 的效果( 4.3 章节问题解决),也达到了自定义 contentView 的效果。
对比下之前的 setContentView(View view) 代码,有区别就是在下面的第 6 行。
@Override
public void setContentView(int resId) {
    ensureSubDecor();
    ViewGroup contentParent = (ViewGroup) mSubDecor.findViewById(android.R.id.content);
    contentParent.removeAllViews();
    LayoutInflater.from(mContext).inflate(resId, contentParent);
    mOriginalWindowCallback.onContentChanged();
}
还不明白 AppCompatActivity 如何自定义 contentView 的小伙伴,可以回去看看第四章,看看 4.2 createViewFromTag() 方法 章节。对 contentParent 有疑问的看看第三章。
联系下我们最初的问题,在这里传给 LayoutInflater 的 mContext 已经替换TintContextWrapper 了么?当然不是,从 AppCompatActivity.onCreate() 方法里一路传下来的 context 都是 AppCompatActivity 自身。我们还得往下看。
5.2 AppCompatDelegateImplV9.onCreateView() 方法分析
从 5.1 的代码我们已经可以看到在 AppCompatActivity 中通过 AppCompatDelegateImplV9 将自己与 LayoutInflater 的 setFactory 系列方法关联。具体实现 Factory 接口方法也自然在 AppCompatDelegateImplV9 中了。
这里我们先将 support-v4 包里 LayoutInflaterFactory 接口等同与 LayoutInflater 的 Factory2 接口,具体如何等效我们后面第 6 章节会讲述。
class AppCompatDelegateImplV9 extends AppCompatDelegateImplBase
        implements MenuBuilder.Callback, LayoutInflaterFactory {

 //...省略...

 /**
 * From {@link android.support.v4.view.LayoutInflaterFactory}
 */
@Override
public final View onCreateView(View parent, String name, Context context, AttributeSet attrs) {
    // First let the Activity's Factory try and inflate the view
    final View view = callActivityOnCreateView(parent, name, context, attrs);
    if (view != null) {
        return view;
    }

    // If the Factory didn't handle it, let our createView() method try
    return createView(parent, name, context, attrs);
}

//...省略...

@Override
public View createView(View parent, final String name, @NonNull Context context,
        @NonNull AttributeSet attrs) {
    if (mAppCompatViewInflater == null) {
        mAppCompatViewInflater = new AppCompatViewInflater();
    }

	//...省略...

    return mAppCompatViewInflater.createView(parent, name, context, attrs, inheritContext,
            IS_PRE_LOLLIPOP, /* Only read android:theme pre-L (L+ handles this anyway) */
            true, /* Read read app:theme as a fallback at all times for legacy reasons */
            VectorEnabledTintResources.shouldBeUsed() /* Only tint wrap the context if enabled */
    );
}

//...省略...
}
从上面的代码可以看到,LayoutInflate 里 Factory2 接口 onCreateView() 方法的实现,是在 AppCompatDelegateImplV9 ( AppCompatActivity 中代理实现类)中并且使用的是 AppCompatViewInflater 。忘记了可以回去看看第四章。
我们再进去看看这个 AppCompatViewInflater 的 createView() 是做了什么事情。
5.3 AppCompatViewInflater
“duang duang duang”!
public final View createView(View parent, final String name, @NonNull Context context,
            @NonNull AttributeSet attrs, boolean inheritContext,
            boolean readAndroidTheme, boolean readAppTheme, boolean wrapContext) {
    final Context originalContext = context;

    // We can emulate Lollipop's android:theme attribute propagating down the view hierarchy
    // by using the parent's context
    if (inheritContext && parent != null) {
        context = parent.getContext();
    }
    if (readAndroidTheme || readAppTheme) {
        // We then apply the theme on the context, if specified
        context = themifyContext(context, attrs, readAndroidTheme, readAppTheme);
    }
    if (wrapContext) {
        context = TintContextWrapper.wrap(context);
    }

    View view = null;

    // We need to 'inject' our tint aware Views in place of the standard framework versions
    switch (name) {
        case "TextView":
            view = new AppCompatTextView(context, attrs);
            break;
        case "ImageView":
            view = new AppCompatImageView(context, attrs);
            break;
        case "Button":
            view = new AppCompatButton(context, attrs);
            break;
        case "EditText":
            view = new AppCompatEditText(context, attrs);
            break;
        case "Spinner":
            view = new AppCompatSpinner(context, attrs);
            break;
        case "ImageButton":
            view = new AppCompatImageButton(context, attrs);
            break;
        case "CheckBox":
            view = new AppCompatCheckBox(context, attrs);
            break;
        case "RadioButton":
            view = new AppCompatRadioButton(context, attrs);
            break;
        case "CheckedTextView":
            view = new AppCompatCheckedTextView(context, attrs);
            break;
        case "AutoCompleteTextView":
            view = new AppCompatAutoCompleteTextView(context, attrs);
            break;
        case "MultiAutoCompleteTextView":
            view = new AppCompatMultiAutoCompleteTextView(context, attrs);
            break;
        case "RatingBar":
            view = new AppCompatRatingBar(context, attrs);
            break;
        case "SeekBar":
            view = new AppCompatSeekBar(context, attrs);
            break;
    }

    if (view == null && originalContext != context) {
        // If the original context does not equal our themed context, then we need to manually
        // inflate it using the name so that android:theme takes effect.
        view = createViewFromTag(context, name, attrs);
    }

    if (view != null) {
        // If we have created a view, check it's android:onClick
        checkOnClickListener(view, attrs);
    }

    return view;
}
代码 15 - 17 行,如果 wrapContext 为 true ,将 context 用 TintContextWrapper 包了一次。我们终于第一次看到这个 TintContextWrapper 了!!!下面我们再详细看。
代码 23 - 61 行,将一些常见的基础 View 转变为 AppCompatXXX 了。终于知道在 AppCompatActivity 中哪些基础控件会被替换了,具体参见上面的 case 。
代码 23 - 61 行,将一些常见的基础 View 转变为 AppCompatXXX 了。终于知道在 AppCompatActivity 中哪些基础控件会被替换了,具体参见上面的 case 。
这里我们只看下 AppCompatImageView 的构造函数(其他类似),也将 context 用 TintContextWrapper包下。
   public AppCompatImageView(Context context, AttributeSet attrs) {
        this(context, attrs, 0);
    }

    public AppCompatImageView(Context context, AttributeSet attrs, int defStyleAttr) {
        super(TintContextWrapper.wrap(context), attrs, defStyleAttr);
		 //...省略...
    }
5.4 TintContextWrapper
代码直接告诉我们 SDK 版本低于 21 ( android 5.0 ),将 Context 包装成 TintContextWrapper 类型。 这就是为什么 XML 中的 ImageView 获取到的 Context 可能是 TintContextWrapper 类型了。
 public static Context wrap(@NonNull final Context context) {
    if (shouldWrap(context)) {
        synchronized (CACHE_LOCK) {
            //...省略...

            // If we reach here then the cache didn't have a hit, so create a new instance
            // and add it to the cache
            final TintContextWrapper wrapper = new TintContextWrapper(context);

            //...省略...

            return wrapper;
        }
    }
    return context;
}

private static boolean shouldWrap(@NonNull final Context context) {
    if (context instanceof TintContextWrapper
            || context.getResources() instanceof TintResources
            || context.getResources() instanceof VectorEnabledTintResources) {
        // If the Context already has a TintResources[Experimental] impl, no need to wrap again
        // If the Context is already a TintContextWrapper, no need to wrap again
        return false;
    }
    return Build.VERSION.SDK_INT < 21 || VectorEnabledTintResources.shouldBeUsed();
}
5.5 VectorEnabledTintResources.shouldBeUsed()
无论是在 5.2 章节里 mAppCompatViewInflater.createView() 方法里还是 TintContextWrapper.shouldWrap() 方法里都有这句 VectorEnabledTintResources.shouldBeUsed() 。我们继续看下代码:
@RestrictTo(LIBRARY_GROUP)
public class VectorEnabledTintResources extends Resources {

    public static boolean shouldBeUsed() {
        return AppCompatDelegate.isCompatVectorFromResourcesEnabled()
                && Build.VERSION.SDK_INT <= MAX_SDK_WHERE_REQUIRED;
    }

    /**
     * The maximum API level where this class is needed.
     */
    public static final int MAX_SDK_WHERE_REQUIRED = 20;

    //...省略...
}
//AppCompatDelegate代码
//...省略...
private static boolean sCompatVectorFromResourcesEnabled = false;
//...省略...
/**
* Sets whether vector drawables on older platforms (< API 21) can be used within
* {@link android.graphics.drawable.DrawableContainer} resources.
*
* <p>When enabled, AppCompat can intercept some drawable inflation from the framework, which
* enables implicit inflation of vector drawables within
* {@link android.graphics.drawable.DrawableContainer} resources. You can then use those
* drawables in places such as {@code android:src} on {@link android.widget.ImageView},
* or {@code android:drawableLeft} on {@link android.widget.TextView}. Example usage:</p>
*
* <pre>
* <selector xmlns:android="...">
* <item android:state_checked="true"
* android:drawable="@drawable/vector_checked_icon" />
* <item android:drawable="@drawable/vector_icon" />
* </selector>
*
* <TextView
* ...
* android:drawableLeft="@drawable/vector_state_list_icon" />
* </pre>
*
* <p>This feature defaults to disabled, since enabling it can cause issues with memory usage,
* and problems updating {@link Configuration} instances. If you update the configuration
* manually, then you probably do not want to enable this. You have been warned.</p>
*
* <p>Even with this disabled, you can still use vector resources through
* {@link android.support.v7.widget.AppCompatImageView#setImageResource(int)} and it's
* {@code app:srcCompat} attribute. They can also be used in anything which AppCompat inflates
* for you, such as menu resources.</p>
*
* <p>Please note: this only takes effect in Activities created after this call.</p>
*/
public static void setCompatVectorFromResourcesEnabled(boolean enabled) {
sCompatVectorFromResourcesEnabled = enabled;
}
/**
* Returns whether vector drawables on older platforms (< API 21) can be accessed from within
* resources.
*
* @see #setCompatVectorFromResourcesEnabled(boolean)
*/
public static boolean isCompatVectorFromResourcesEnabled() {
return sCompatVectorFromResourcesEnabled;
}
那什么时候 VectorEnabledTintResources.shouldBeUsed() 返回 true ?当版本低于 5.0 且调用 AppCompatDelegate.setCompatVectorFromResourcesEnabled 设置为 true (注意是静态方法)。
这个 VectorEnabledTintResources.shouldBeUsed() 方法其实是判断当系统在 5.0 以下时,是否要支持矢量图资源,默认 false 。对这块有疑惑的同学,可以搜索相关的矢量图使用方法,兼容低版本策略,这里就不展开了。
5.6 我们小结下
1、在 AppCompatActivity 中,onCreate() 方法里先建立了自己的代理实现类,该类实现了 LayoutInflater.Fatory2 接口(其实是 support-v4 包里的 LayoutInflaterFactory 接口)。
2、再调用 installViewFactory() 方法,将代理实现类和 LayoutInflater 里的 factory 成员变量绑定。
3、当我们自己调用 setContentView(R.layout.xxx) 方法后,解析 XML 时会调用到 LayoutInflater 里的 inflate() 方法,再接着是 createViewFromTag() 方法。
4、createViewFromTag() 方法里如果有 factory 系列的本地变量,就先调用这些接口的 onCreateView() 方法。在 AppCompatActivity 中 onCreateView() 是在 AppCompatDelegateImplV9 里。
5、AppCompatDelegateImplV9 里用 AppCompatViewInflater 来生成 View。所以有了替换基础控件的内容,有了 5.0 以下系统将 Context 包装成TintContextWrapper ,构建 AppCompatxxx 控件时,传入的 context 被替换成了 TintContextWrapper 类型。
六、V4包的LayoutInflater接口如何等效LayoutInflter的Factory2接口?
@Override
public void installViewFactory() {
    LayoutInflater layoutInflater = LayoutInflater.from(mContext);
    if (layoutInflater.getFactory() == null) {
        LayoutInflaterCompat.setFactory(layoutInflater, this);
    } else {
     //...省略...
    }

}
最后的疑问了:代码第 5 行,如何将 layoutInflater 接受的Factory(Factory2)类型变为接受 this(实现了 android.support.v4.view.LayoutInflaterFactory 接口)??
先看下 v4 包里关于 LayoutInflaterFactory 的注释,可以明白其意图。如何实现这样的目的,我们往下看 6.1 章。
/**
 * Used with {@code LayoutInflaterCompat.setFactory()}. Offers the same API as
 * {@code LayoutInflater.Factory2}.
 */
public interface LayoutInflaterFactory {

/**
 * Hook you can supply that is called when inflating from a LayoutInflater.
 * You can use this to customize the tag names available in your XML
 * layout files.
 *
 * @param parent The parent that the created view will be placed
 * in; <em>note that this may be null</em>.
 * @param name Tag name to be inflated.
 * @param context The context the view is being created in.
 * @param attrs Inflation attributes as specified in XML file.
 *
 * @return View Newly created view. Return null for the default
 *         behavior.
 */
public View onCreateView(View parent, String name, Context context, AttributeSet attrs);

}
6.1 LayoutInflaterCompat
我们回到 android.support.v4.view.LayoutInflaterCompat 里看做了什么。
// 代码android.support.v4.view.LayoutInflaterCompat

/**
 * Attach a custom Factory interface for creating views while using
 * this LayoutInflater. This must not be null, and can only be set once;
 * after setting, you can not change the factory.
 *
 * @see LayoutInflater#setFactory(android.view.LayoutInflater.Factory)
 */
public static void setFactory(LayoutInflater inflater, LayoutInflaterFactory factory) {
    IMPL.setFactory(inflater, factory);
}

static final LayoutInflaterCompatImpl IMPL;

static {
    final int version = Build.VERSION.SDK_INT;
    if (version >= 21) {
        IMPL = new LayoutInflaterCompatImplV21();
    } else if (version >= 11) {
        IMPL = new LayoutInflaterCompatImplV11();
    } else {
        IMPL = new LayoutInflaterCompatImplBase();
    }
}
又是我们熟悉的代理模式,实现类 IMP 又是一个兼容模式。
我们看一个最简单的 LayoutInflaterCompatBase 的代码实现就明白了。
//代码LayoutInflaterCompat

interface LayoutInflaterCompatImpl {
    public void setFactory(LayoutInflater layoutInflater, LayoutInflaterFactory factory);
    public LayoutInflaterFactory getFactory(LayoutInflater layoutInflater);
}

static class LayoutInflaterCompatImplBase implements LayoutInflaterCompatImpl {
    @Override
    public void setFactory(LayoutInflater layoutInflater, LayoutInflaterFactory factory) {
        LayoutInflaterCompatBase.setFactory(layoutInflater, factory);
    }

    @Override
    public LayoutInflaterFactory getFactory(LayoutInflater layoutInflater) {
        return LayoutInflaterCompatBase.getFactory(layoutInflater);
    }
}
6.2 LayoutInflaterCompatBase
class LayoutInflaterCompatBase {

static class FactoryWrapper implements LayoutInflater.Factory {

    final LayoutInflaterFactory mDelegateFactory;

    FactoryWrapper(LayoutInflaterFactory delegateFactory) {
        mDelegateFactory = delegateFactory;
    }

    @Override
    public View onCreateView(String name, Context context, AttributeSet attrs) {
        return mDelegateFactory.onCreateView(null, name, context, attrs);
    }

    public String toString() {
        return getClass().getName() + "{" + mDelegateFactory + "}";
    }
}

static void setFactory(LayoutInflater inflater, LayoutInflaterFactory factory) {
    inflater.setFactory(factory != null ? new FactoryWrapper(factory) : null);
}

//...省略...
}
代码第 22 行,将 v4 包里的 LayoutInflaterFactory 包装成 FactoryWrapper 类型,再调用 LayoutInflater 的 setFactory() 方法。
代码 13 行,运用代理模式。FactoryWrapper 实现了 LayoutInflater 的 Factory 接口,在具体的 onCreateView() 方法实现中替换为代理类来实现。
代码第 7 行,FactoryWrapper 的构造函数入参就是个代理类,类型正是 v4 包里的 LayoutInflaterFactory 接口。
6.3 小结一下:
1、在 LayoutInflaterCompat.setFactory(layoutInflater, this); 里,通过一系列的代理兼容模式,将 LayoutInflater 的 setFactory() 系列方法接收的参数,变化为 v4 包里的 LayoutInflaterFactory 接口类型参数。
2、传入的 this 就是 AppCompatDelegateImplV9 本身。所以 Factory 系列接口的 onCreateView() 方法实现,就落到了 AppCompatDelegateImplV9 里的方法里。
七、解决办法
1、问题 View.getContext() 如何强制转为 Activity ?
下面给个常用思路作为参考:
@Nullable
private Activity getActivity(@NonNull View view) {
    if (null != view) {
        Context context = view.getContext();
        while (context instanceof ContextWrapper) {
            if (context instanceof Activity) {
                return (Activity) context;
            }
            context = ((ContextWrapper) context).getBaseContext();
        }
    }

    return null;
}
八、其他
首先这篇文章贴的源码有点多,分析的内容也只是源码中的一部分。再加上这么长的内容,并没有一个很好的叙述顺序将这些内容有趣味性地串起来。所以坚持下来的小伙伴们,给你们点个赞!
本文起因来自一个需要修复的项目 bug ,后来在团队内的技术交流会中分享后,重新完善写下来的。文字对比现场讲解还是少了些互动交流,所以有写得疏漏地方和错误地方,请大家不吝指教。谢谢了!
欢迎留言或者发邮件给我:fanzhu@imdada.cn
