

这次先发汉化版
在上一篇中我们分析了整个渲染流程的前奏,即从一个JSX表达式到ReactCompositeComponent的生成过程。最后我们讨论到batchedMountComponentIntoNode()。本篇会从这个函数开始继续打通简单组件渲染的流程。
本篇涉及的文件:
renderers/dom/client/ReactMount.js: defines mountComponentIntoNode(), 本篇涉及逻辑的总入口;和 ReactDOMContainerInfo 为DOM渲染提供信息
renderers/shared/stack/reconciler/ReactReconciler.js: 调用各种 ReactXXXComponent 的 mountComponent
renderers/shared/stack/reconciler/ReactCompositeComponent.js: 调用 mountComponent 来实例化 TopLevelWrapper; 和调用performInitialMount 来实例化ReactDOMComponent
renderers/dom/shared/ReactDOMComponent.js: 定义 ReactDOMComponent
本篇用到的静态的调用栈:
|=ReactMount.render(nextElement, container, callback)     ___
|=ReactMount._renderSubtreeIntoContainer()                 |
  |-ReactMount._renderNewRootComponent()                   |
    |-instantiateReactComponent()                          |
    |~batchedMountComponentIntoNode()                     表层
      |~mountComponentIntoNode()                       (平台无关)
        |-ReactReconciler.mountComponent()                 |
          |-ReactCompositeComponent.mountComponent()       |
          |-ReactCompositeComponent.performInitialMount()  |
            |-instantiateReactComponent()                 _|_
            |-ReactDOMComponent.mountComponent()          里层
        |-_mountImageIntoNode()                      (HTML DOM相关)
                                                          _|_
batchedMountComponentIntoNode()这个函数本身没做啥。它仅仅是调用了另一个函数mountComponentIntoNode()而已。
现在我们暂时忽略间接调用,而把它们看成直接函数调用。后续我会详细讨论transaction和batched updates相关的机制。
mountComponentIntoNode() — 表里层的交汇点
mountComponentIntoNode()是平台无关代码(在本篇中称为表层代码)和HTML DOM相关代码(里层代码)的交汇处。 所有关于这次渲染的工作都会在这个函数,或者它的子调用里完成。具体来说 1) 从ReactCompositeComponent[T]派生出一个ReactDOMComponent对象;2) 将ReactDOMComponent渲染成具体的 DOM元素;以及3)
将DOM元素加入到document对象。
function mountComponentIntoNode(
  wrapperInstance,   // scr: -----> ReactCompositeComponent[T]
  container,         // scr: -----> document.getElementById(‘root’)
  transaction,       // scr: -----> not of interest
  shouldReuseMarkup, // scr: -----> null
  context,           // scr: -----> emptyObject
) {
...
  var markup = ReactReconciler.mountComponent( // scr: -----> 1),2)
    wrapperInstance,
    transaction,
    null,
    ReactDOMContainerInfo(wrapperInstance, container),
    context,
    0 /* parentDebugID */,
  );
...
 ReactMount._mountImageIntoNode(              // scr: -----> 3)
    markup,
    container,
    wrapperInstance,
    shouldReuseMarkup,
    transaction,
  );

ReactMount@renderers/dom/client/ReactMount.js
在这个过程中,1) 仍属于表层代码,而2) ,3)则是实实在在的DOM操作。当2)完成后,我们就可以在屏幕上看到<h1 style={{“color”:”blue”}}>hello world</h1>这个元素被浏览器绘制的结果了。
在1)中,ReactReconciler.mountComponent()又是一个简单函数, 它会直接调用作为internalInstance参数传给它的对象的mountComponent()。在我们这是ReactCompositeComponent[T]。
mountComponent: function(
 internalInstance,
 transaction,
 hostParent,
 hostContainerInfo,
 context,
 parentDebugID, // 0 in production and for roots
 ) {
  var markup = internalInstance.mountComponent(
    transaction,
    hostParent,
    hostContainerInfo,
    context,
    parentDebugID,
  );
... // scr: transaction related code
  return markup;
},

ReactReconciler@renderers/shared/stack/reconciler/ReactReconciler.js
其中一个特殊的参数是ReactDOMContainerInfo,这个参数会在传给ReactReconciler.mountComponent()的同时实例化:
function ReactDOMContainerInfo(topLevelWrapper, node) {
  var info = {
    _topLevelWrapper: topLevelWrapper, // scr: -------------------> ReactCompositeComponent[T]
    _idCounter: 1,
    _ownerDocument: node ? node.nodeType === DOC_NODE_TYPE ? node : node.ownerDocument : null, // scr: -----> node.nowerDocument
    _node: node, // src: -----> document.getElementById(‘root’)
    _tag: node ? node.nodeName.toLowerCase() : null, // scr: -----> 'div'
    _namespaceURI: node ? node.namespaceURI : null   // scr: ----->
element.namespaceURI
};
... // scr: DEV code
  return info;
}

ReactDOMContainerInfo@renderers/dom/client/ReactMount.js
这个构造函数的结果对象是ReactDOMContainerInfo[ins],这个对象会被用在3)。
走完了几个简单函数组成的隧道,我们面前现在是下一个关键节点。
ReactCompositeComponent.mountComponent()—初
始化 ReactCompositeComponent[T]
见证反应(reaction)的时刻
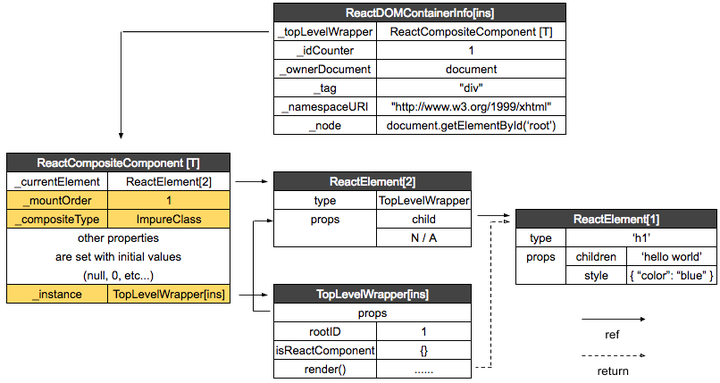
在上一个步骤中,仅仅ReactCompositeComponent[T]的_currentElement被赋值为ReactElement[2],于是显得这个对象有一点呆。 然而,正是这个_currentElement属性随后会被展开,然后触发将ReactCompositeComponent[T]转变成可渲染对象的反应。
先上目标结构:
然后是调用栈:
ReactDOM.render
|=ReactMount.render(nextElement, container, callback)
|=ReactMount._renderSubtreeIntoContainer()
  |-ReactMount._renderNewRootComponent()
  |-instantiateReactComponent()
    |~batchedMountComponentIntoNode(
        componentInstance, // scr: -----> ReactCompositeComponent[T]
        container,        // scr: -> document.getElementById(‘root’)
        shouldReuseMarkup, // scr: -----> null
        context,           // scr: -----> emptyObject
      )
      |~mountComponentIntoNode(
          wrapperInstance, // scr: -----> ReactCompositeComponent[T]
          container,       // scr: -----> same
          transaction,     // scr: -----> not of interest
          shouldReuseMarkup, // scr: ---> same
          context,         // scr: -----> not of interest
        )
        |-ReactReconciler.mountComponent(
            internalInstance, // scr: --> ReactCompositeComponent[T]
            transaction,      // scr: --> not of interest
            hostParent,       // scr: --> null
            hostContainerInfo,// scr: --> ReactDOMContainerInfo[ins]
            context,          // scr: --> not of interest
            parentDebugID,    // scr: --> 0
          )
          /* 我们在这 */
          |-ReactCompositeComponent[T].mountComponent(same)
然后我们来看ReactCompositeComponent.mountComponent()的实现。
这里我省略小函数的实现,直接放上结果
mountComponent: function(
 transaction,
 hostParent,
 hostContainerInfo,
 context,
// scr: this ------> ReactCompositeComponent[T]
 ) {
// scr: --------------------------------------------------------> 1)
  this._context = context;          // scr: -----> emptyObject
  this._mountOrder = nextMountID++; // scr: ----------------------> global veriable, accumulative
  this._hostParent = hostParent;    // scr: -----> null
  this._hostContainerInfo = hostContainerInfo; // scr: -----------> ReactDOMContainerInfo[ins]
 var publicProps = this._currentElement.props; // scr: ----------> { child: ReactElement[1] }
 var publicContext = this._processContext(context); // scr: -----> meaning less, emptyObject
// scr: --------------------------------------------------------> 2)
  var Component = this._currentElement.type; // scr: -------------> TopLevelWrapper
 var updateQueue = transaction.getUpdateQueue(); // scr: --------> not of interest
// Initialize the public class
  var doConstruct = shouldConstruct(Component); // scr: ----------> true, for TopLevelWrapper.prototype.isReactComponent = {};
 var inst = this._constructComponent(
    doConstruct,
    publicProps,
    publicContext,
    updateQueue,
  ); // scr: ----------> call TopLevelWrapper’s constructor
 var renderedElement;
// Support functional components
  if (!doConstruct && (inst == null || inst.render == null)) {
…
  } else {
    if (isPureComponent(Component)) { // scr: --------------------> TopLevelWrapper.prototype.isPureReactComponent is not defined
…
    } else {
      this._compositeType = CompositeTypes.ImpureClass;
    }
  }
// scr: --------------------------------------------------------> 3)
// These should be set up in the constructor, but as a convenience
// for simpler class abstractions, we set them up after the fact.
  inst.props = publicProps; // scr: ----> { child: ReactElement[1] }
…
// scr: --------------------------------------------------------> 4)
  this._instance = inst; // scr: ---------------------------------> link the ReactCompositeComponent[T] to the TopLevelWrapper instance
// Store a reference from the instance back to the internal representation
  ReactInstanceMap.set(inst, this); // scr: ----------------------> link the TopLevelWrapper instance back to ReactCompositeComponent[T]
…
 var markup;
  if (inst.unstable_handleError) { // scr: -----------------------> false, TopLevelWrapper.prototype.unstable_handleError is not defined
…
  } else {
// scr: --------------------------------------------------------> 5)
    markup = this.performInitialMount( // scr: a initial at the end?
      renderedElement,
      hostParent,
      hostContainerInfo,
      transaction,
      context,
    );
  }
…
 return markup;
}

ReactCompositeComponent@renderers/shared/stack/reconciler/ReactCompositeComponent.js
这个函数是在ReactCompositeComponent[T]上下文中运行的,它
1) 把传入参数直接复制给对应的ReactCompositeComponent[T]成员变量和本地变量。这里要注意的一个变量是publicProps,马上会用到;
2)把TopLevelWrapper从this._currentElement.type取出,然后调用它的构造器来创建TopLevelWrapper实例。在这个过程中:
shouldConstruct(Component)
检查TopLevelWrapper.prototype.isReactComponent有没有值,有?返回true;然后
this._constructComponent()
如果上一步返回true的话,这个函数会直接调用TopLevelWrapper的构造器。我们把这一步生成的对象叫做TopLevelWrapper[ins];
现在你可能需要去上篇看一下TopLevelWrapper的定义,需要的话请搜索***
3) 用publicProps的值(ReactElement[2])初始化TopLevelWrapper[ins].props
4) 创建this(ReactCompositeComponent[T])和TopLevelWrapper[ins]的双向链接。正向链接用this._instance来连,反向则用ReactInstanceMap。this._instance会在下一步马上就用。而ReactInstanceMap的用处就要等以后的文章了;
这里我打四个星****,方便以后回来查阅
5) 去下一步。
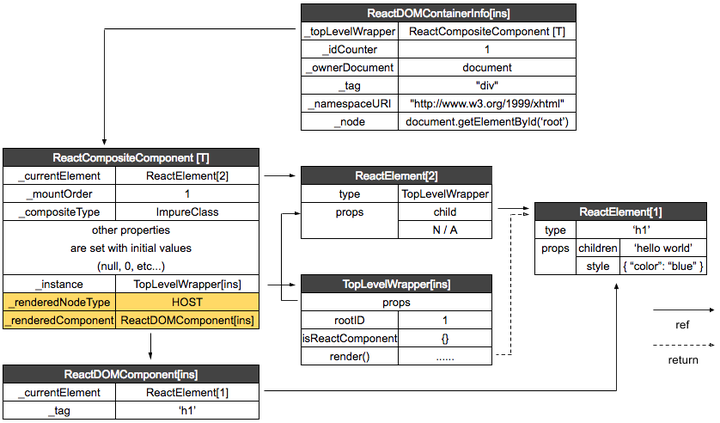
ReactCompositeComponent.performInitialMount()
- 用 ReactElement[1] 创建ReactDOMComponent
这一步将包装类wrapper剥离,然后创建ReactDOMComponent实例。这里,我们会第一次遇到ReactHostComponent,这个类被用来连接表层和里层的函数调用。
老规矩,数据结构:
然后是调用栈:
ReactDOM.render
|=ReactMount.render(nextElement, container, callback)
|=ReactMount._renderSubtreeIntoContainer()
  |-ReactMount._renderNewRootComponent()
    |-instantiateReactComponent()
    |~batchedMountComponentIntoNode()
      |~mountComponentIntoNode()
        |-ReactReconciler.mountComponent()
          |-ReactCompositeComponent[T].mountComponent(same)
            /* we are here */
            |-ReactCompositeComponent[T].performInitialMount(
                renderedElement,   // scr: -------> undefined
                hostParent,        // scr: -------> null
                hostContainerInfo, // scr: -------> ReactDOMContainerInfo[ins]
                transaction,       // scr: -------> not of interest
                context,           // scr: -------> not of interest
              )
ReactCompositeComponent.performInitialMount()做了三件事。1)取出ReactElement[1](前面说过了);2)依照ReactElement[1].type实例化ReactDOMComponent ;3)调用ReactDOMComponent.mountComponent()来渲染DOM元素
为啥performInitialMount会在mountComponent结尾处调用呢? 哦,因为它初始化了另一轮的mountComponent
performInitialMount: function(
 renderedElement,
 hostParent,
 hostContainerInfo,
 transaction,
 context,
) {
  var inst = this._instance;
 var debugID = 0;
 if (inst.componentWillMount) { // scr: ----------> undefined
…
  }
 // scr: ------------------------------------------------------> 1)
  // If not a stateless component, we now render
  if (renderedElement === undefined) {
    renderedElement = this._renderValidatedComponent(); // scr: ---> calls TopLevelWrapper.render() to extract ReactElement[1].
  }
 // scr: ------------------------------------------------------> 2)
  var nodeType = ReactNodeTypes.getType(renderedElement); // scr: -> ReactNodeTypes.HOST
 this._renderedNodeType = nodeType;
  var child = this._instantiateReactComponent(
    renderedElement,
    nodeType !== ReactNodeTypes.EMPTY /* shouldHaveDebugID */,
  );
 this._renderedComponent = child;
 // scr: ------------------------------------------------------> 3)
  var markup = ReactReconciler.mountComponent(
    child,
    transaction,
    hostParent,
    hostContainerInfo,
    this._processChildContext(context),
    debugID,
  );
 return markup;
},

ReactCompositeComponent@renderers/shared/stack/reconciler/ReactCompositeComponent.js
详细解释下各个步骤:
1)this._renderValidatedComponent()会直接调用TopLevelWrapper.render(),然后ReactElement[1]会从TopLevelWrapper[T].props.child取得(刚看过实现了应该还有点印象)。然后赋值给renderedElement。
2)this._instantiateReactComponent()是instantiateReactComponent@renderers/shared/stack/reconciler/instantiateReactComponent.js的一个别名。这个函数上篇已经讨论过。但这次我们用它来创造一个ReactDOMComponent实例...
等等,
如果我们去看_instantiateReactComponent()的实现
...
// Special case string values
 if (typeof element.type === ‘string’) { // scr: -------> this time
   instance = ReactHostComponent.createInternalComponent(element);
 }
...

_instantiateReactComponent@renderers/shared/stack/reconciler/instantiateReactComponent.js
这次的前置条件(ReactElement[1].type 是 “h1”)会让ReactHostComponent.createInternalComponent() 被调用。而这个函数会实例化一个genericComponentClass:
function createInternalComponent(element) {
...
  return new genericComponentClass(element);
}

ReactHostComponent@renderers/shared/stack/reconciler/ReactHostComponent.js
这跟ReactDOMComponent有毛关系啊?
实际上,平台相关组件ReactDOMComponent是在编译期插入ReactHostComponent的genericComponentClass 字段的。现在我们暂时认为这个两个是一个东西,以后再来讨论这个插入的过程。
这里我打*5
ReactDOMComponent的构造函数和ReactCompositeComponent的有点类似:
function ReactDOMComponent(element) {
  var tag = element.type;         // scr: --------> 'h1'
...
  this._currentElement = element; // scr: --------> ReactElement[1]
  this._tag = tag.toLowerCase();  // scr: --------> 'h1'
... // scr: default values, null, 0, etc.
}

ReactDOMComponent@renderers/dom/shared/ReactDOMComponent.js
我们这次叫这个对象为ReactDOMComponent[ins];
3)ReactReconciler.mountComponent()这个函数讨论过了。它会调用第一个参数的mountComponent()函数,这里是ReactDOMComponent[ins]。现在逻辑已经走到的里层。
待续...
今天先写到这。如果您觉得这篇不错,可以点赞或关注这个专栏。
感谢阅读!👋
Originally published at
Understanding The React Source Code - Initial Rendering (Simple Component) IIholmeshe.me