

本文框架搭建主要参考 github.com/Snailclimb/… 该文仅对其中的一些关键代码和问题进行分析
项目需求
- Spring Boot版本为2.0.3;
- Spring Security版本为5.1.6;
- Mybatis版本为1.3.2
- 使用插件lombook
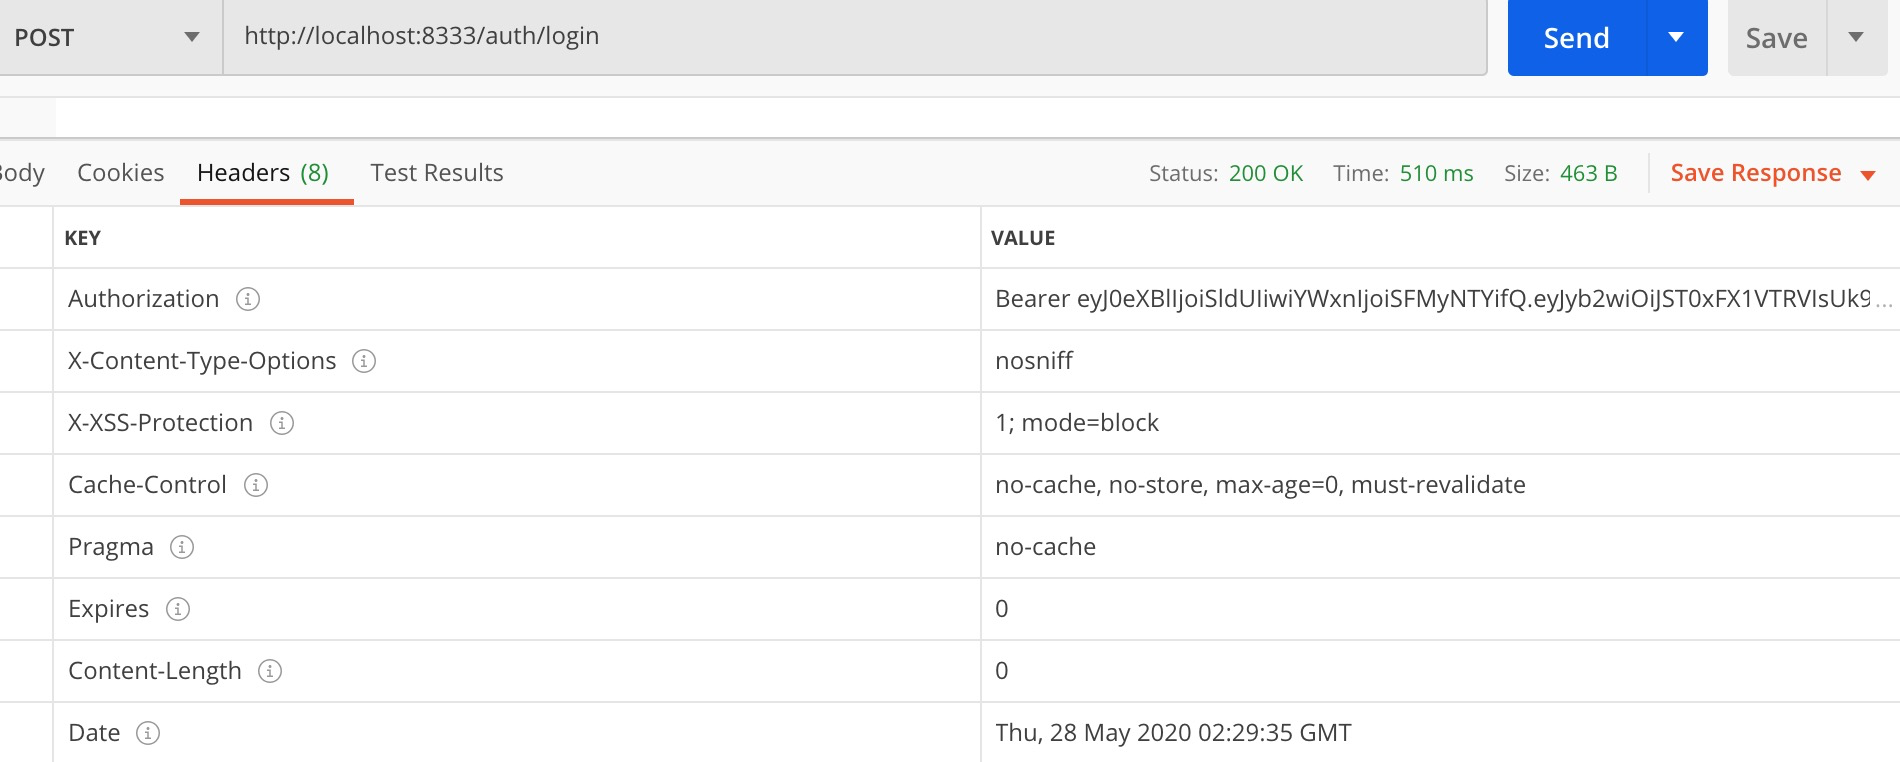
效果展示
使用postman来进行效果展示。其中一些效果需要配合我的下一篇文章中介绍的filter异常捕获来实现。
- 正确登录,返回的header中key为Authorization的value即为token。
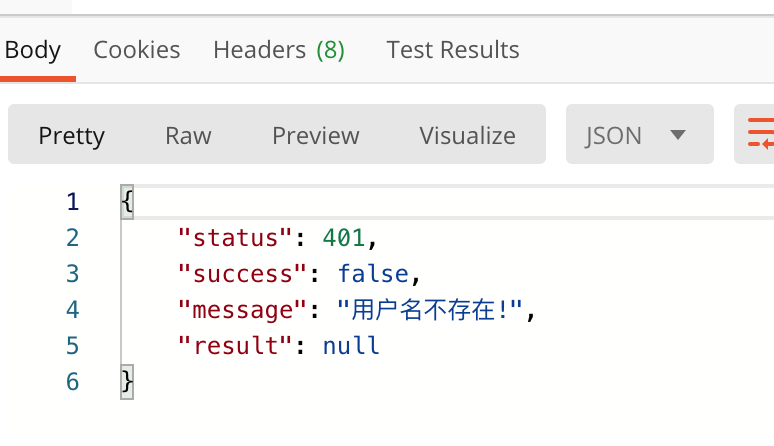
- 账号错误
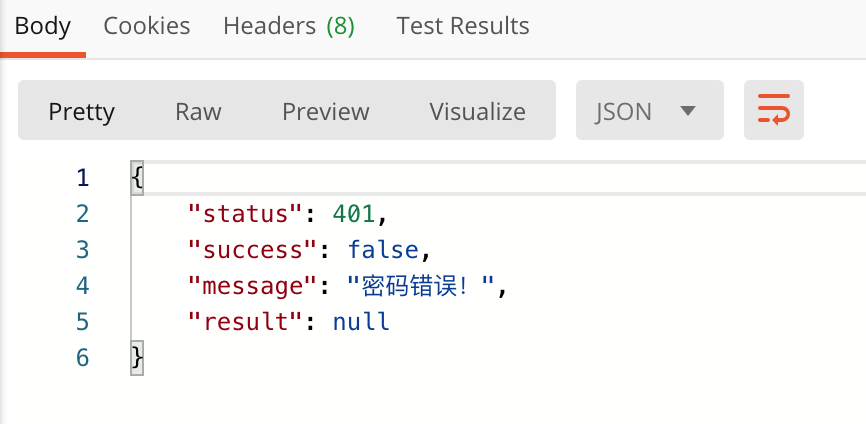
- 密码错误
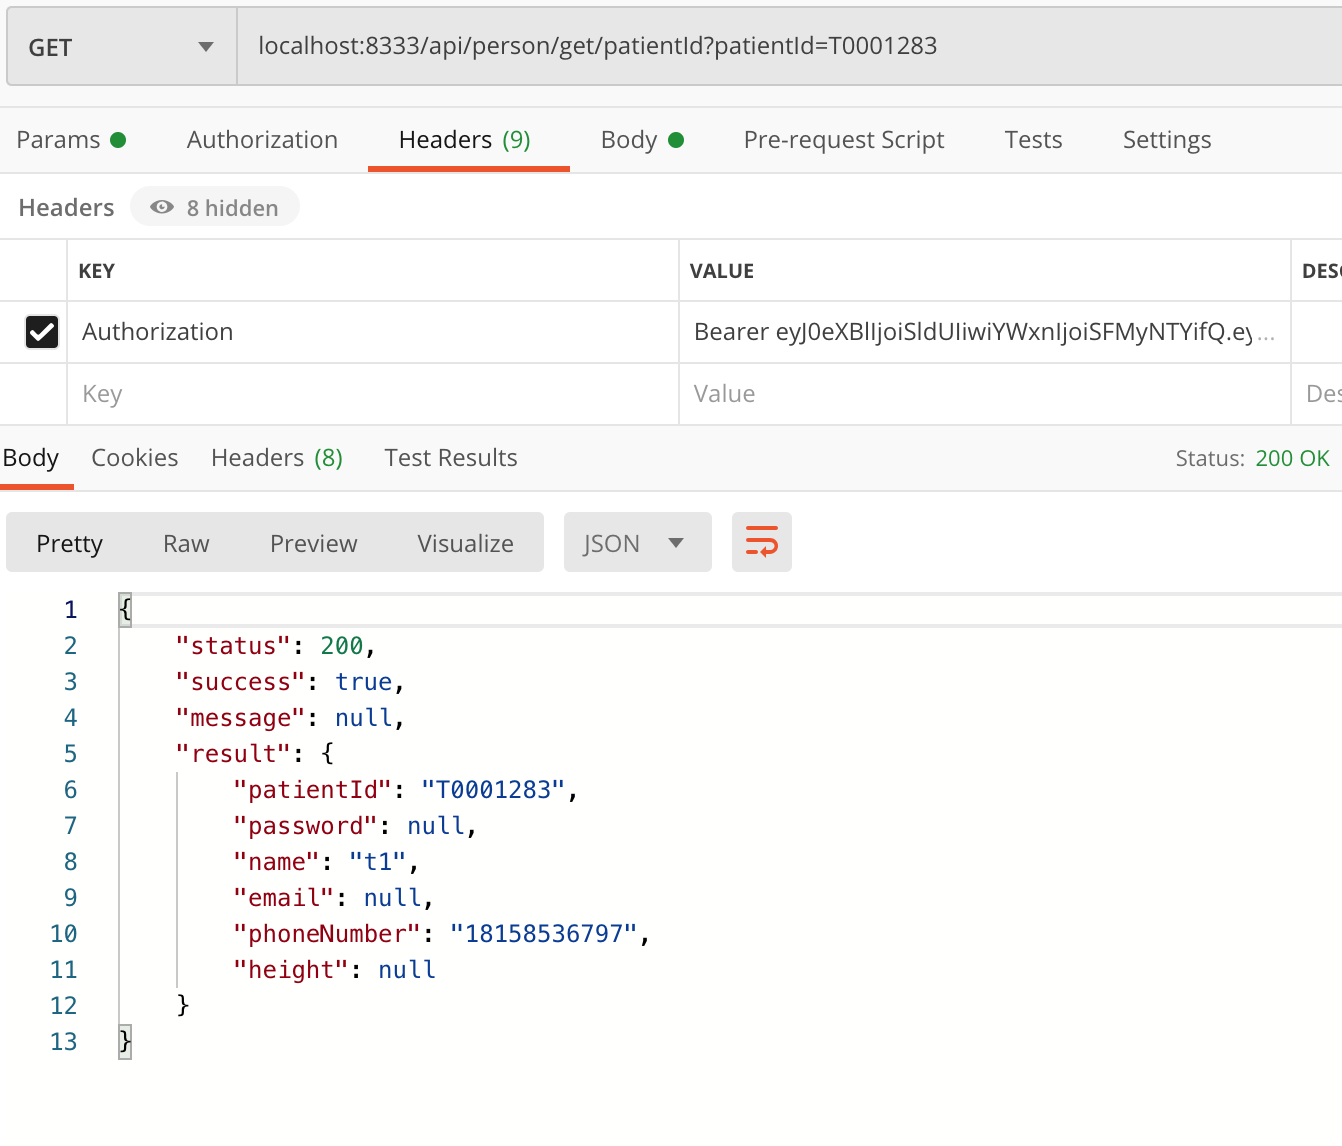
- header中携带正确token访问
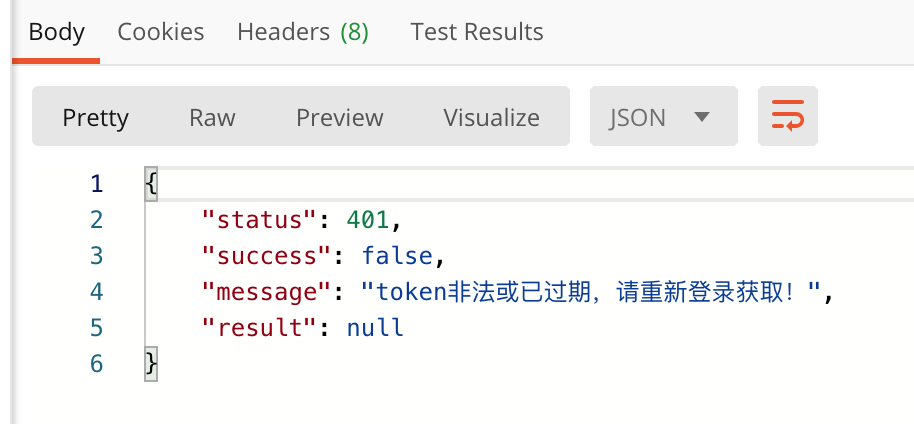
- 携带错误或者过期的token
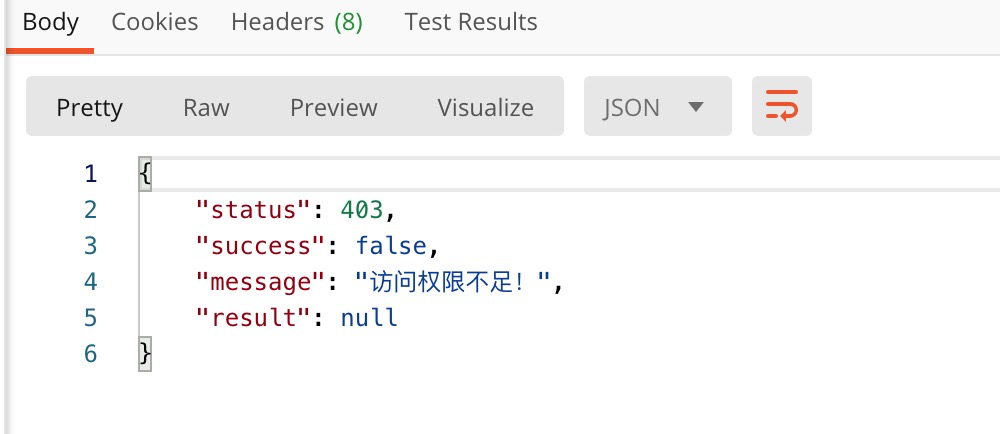
- 访问权限不足
1. 创建用户实体User与权限实体UserRole
@Entity
@Data
public class User {

    @Id
    @GeneratedValue(strategy = GenerationType.IDENTITY)
    private Integer id;

    private String username;

    private String password;
}
@Data
@Entity
public class UserRole {

    @Id
    @GeneratedValue(strategy = GenerationType.IDENTITY)
    private Long id;

    private String username;

    private String role;

}
在数据库中建立对应数据表。 构建Mapper,查询语句为
@Select("select * from user_role where username = #{username}")
    List<UserRole> getUserRoleByUserName(String username);
2. 创建登录实体
该实体仅用于登录功能
@Data
public class LoginRequest {
    private String username;
    private String password;
}
3. 实现UserDetails
该项为spring security中必须实现的接口。
private Collection<? extends GrantedAuthority> authorities;

public JwtUser(User user) {
        this.id = user.getId();
        this.username = user.getUsername();
        this.password = user.getPassword();
        this.authorities = CurrentUserUtils.getCurrentUserRoles(this.username);
    }
其中,getCurrentUserRoles为工具类中的一个静态方法,用于获取当前登录用户的权限。
public static List<SimpleGrantedAuthority> getCurrentUserRoles(String username) {
        List<UserRole> userRoles = currentUserUtils.userService.getUserRolesByUsername(username);//在这里加了一层userService的封装,也可以直接调用mapper
        List<SimpleGrantedAuthority> authorities = new ArrayList<>();
        userRoles.forEach(userRole -> authorities.add(new SimpleGrantedAuthority("ROLE_" + userRole.getRole())));
        return authorities;
    }
注意,在工具类中注入Bean需要使用如下代码,否则使用@Autrowired,Spring无法找到相应Bean注入
@PostConstruct
    public void init() {
        currentUserUtils = this;
        currentUserUtils.userService = this.userService;
    }
4. 实现UserDeatilsService
该项为spring security中必须实现的接口,必须实现其中的loadUserByUsername()函数,来正确地通过用户名来找到相应的用户。该函数会抛出UsernameNotFountException。但是要注意,spring security默认将该异常转换为BadCredentialsException,可以通过在配置中进行配置实现正确抛出该异常,与密码错误相区别,该内容将在下方配置内容中介绍。
@Override
    public UserDetails loadUserByUsername(String username) throws UsernameNotFoundException {
        User user = userService.findUserByUsername(username);
        if(user==null) {
            throw new UsernameNotFoundException("用户名不存在!");
        }
        return new JwtUser(user);
    }
5. Token创建工具类
使用工具类JwtTokenUtils.java,通过io.jsonwebtoken.Jwts来实现token的生成,具体代码如下
private static final byte[] apiKeySecretBytes = DatatypeConverter.parseBase64Binary(SecurityConstants.JWT_SECRET_KEY);
//JWT_SECRET_KEY = "C*F-JaNdRgUkXn2r5u8x/A?D(G+KbPeShVmYq3s6v9y$B&E)H@McQfTjWnZr4u7w";用于加密
private static final Key secretKey = Keys.hmacShaKeyFor(apiKeySecretBytes);

public static String createToken(String username, List<String> roles) {
        final Date createdDate = new Date();
        final Date expirationDate = new Date(createdDate.getTime() + SecurityConstants.EXPIRATION * 1000);
        //EXPIRATION = 60 * 60L;过期时间为1小时
        String tokenPrefix = Jwts.builder()
                .setHeaderParam("type", SecurityConstants.TOKEN_TYPE)
                //TOKEN_HEADER = "Authorization";返回的header字段
                .signWith(secretKey, SignatureAlgorithm.HS256)
                //加密算法
                .claim(SecurityConstants.ROLE_CLAIMS, String.join(",", roles))
                //ROLE_CLAIMS = "rol";将权限加密
                .setIssuer("Ddm")
                //签发者
                .setIssuedAt(createdDate)
                //创建时间
                .setSubject(username)
                .setExpiration(expirationDate)
                .compact();
        return SecurityConstants.TOKEN_PREFIX + tokenPrefix;
    }
6. 自定义过滤器filter实现
1. 授权过滤器
授权就是在用户登录的时候,验证他的登录信息,如果准确无误,就为他创建一个token并在header中进行返回。
自定义授权过滤器需要实现UsernamePasswordAuthenticationFilter(),主要是实现attemptAuthentication()、successfulAuthentication()、unsuccessfullAuthentication()这三个函数。
实现自定义授权过滤器的目的如下:
-
- 通过自定义的登录信息来正确地验证用户名、密码等信息,如果有除了username、password外的信息,或者username、password字段被修改了,无法正确获取。实际上不太会发生这种情况,所以该函数也可以选择不重写。
-
- UsernamePasswordAuthenticationFilter()中没有successfulAuthentication()的默认实现,需要我们来实现用户名密码验证完成后的授权工作。我们通过自定义的token创建工具(即JwtTokenUtils中的createToken())来创建token,可以与之后的token解析相互对应。
-
- 简单实现unsuccessfulAuthentication(),如果验证用户名与密码错误,就会进入到该函数。
    @Override
    public Authentication attemptAuthentication(HttpServletRequest request,
                                                HttpServletResponse response) throws AuthenticationException {

        ObjectMapper objectMapper = new ObjectMapper();
        try {
            // 获取登录的信息,源码中通过request.getParameter来获取,实际效果一样
            LoginRequest loginRequest = objectMapper.readValue(request.getInputStream(), LoginRequest.class);
            // 这部分和attemptAuthentication方法中的源码是一样的
            UsernamePasswordAuthenticationToken authentication = new UsernamePasswordAuthenticationToken(
                    loginRequest.getUsername(), loginRequest.getPassword());
            return authenticationManager.authenticate(authentication);//验证用户名与密码
        } catch (IOException e) {
            e.printStackTrace();
            return null;
        }
    }

    /**
     * 如果验证成功,就生成token并返回
     */
    @Override
    protected void successfulAuthentication(HttpServletRequest request,
                                            HttpServletResponse response,
                                            FilterChain chain,
                                            org.springframework.security.core.Authentication authentication) {

        JwtUser jwtUser = (JwtUser) authentication.getPrincipal();
        List<String> authorities = jwtUser.getAuthorities()
                .stream()
                .map(GrantedAuthority::getAuthority)
                .collect(Collectors.toList());
        // 创建 Token
        String token = JwtTokenUtils.createToken(jwtUser.getUsername(), authorities);
        // Http Response Header 中返回 Token
        response.setHeader(SecurityConstants.TOKEN_HEADER, token);
    }

    @Override
    protected void unsuccessfulAuthentication(HttpServletRequest request, HttpServletResponse response, AuthenticationException authenticationException) throws IOException {
        response.sendError(HttpServletResponse.SC_UNAUTHORIZED, authenticationException.getMessage());
    }
2. 认证过滤器
用户已经得到了授权,但是想要访问我们的其他服务,必须要在header中携带我们之前为他生成的token,这步token验证称为认证,只有通过了认证的用户,才能正确地访问到相应的服务。
自定义认证过滤器主要是重写一下doFilterInternal这个函数,让它通过我们自定义的JwtTokenUtils来获取相应的信息,否则用默认方法,无法得到正确的信息。
 @Override
    protected void doFilterInternal(HttpServletRequest request,
                                    HttpServletResponse response,
                                    FilterChain chain) throws IOException, ServletException {

        String token = request.getHeader(SecurityConstants.TOKEN_HEADER);
        if (token == null || !token.startsWith(SecurityConstants.TOKEN_PREFIX)) {
            SecurityContextHolder.clearContext();
        } else {
            UsernamePasswordAuthenticationToken authentication = getAuthentication(token);
            SecurityContextHolder.getContext().setAuthentication(authentication);
        }
        chain.doFilter(request, response);
    }

    /**
     * 获取用户认证信息 Authentication
     */
    private UsernamePasswordAuthenticationToken getAuthentication(String authorization) {
        String token = authorization.replace(SecurityConstants.TOKEN_PREFIX, "");
        try {
            String username = JwtTokenUtils.getUsername(token);
            logger.info("checking username:" + username);
            if (!StringUtils.isEmpty(username)) {
                // 这里我们是又从数据库拿了一遍,避免用户的角色信息有变
                UserDetails userDetails = userDetailsService.loadUserByUsername(username);
                UsernamePasswordAuthenticationToken usernamePasswordAuthenticationToken = new UsernamePasswordAuthenticationToken(username, null, userDetails.getAuthorities());
                return userDetails.isEnabled() ? usernamePasswordAuthenticationToken : null;
            }
        } catch (ExpiredJwtException | MalformedJwtException | IllegalArgumentException exception) {
            logger.warning("Request to parse JWT with invalid signature . Detail : " + exception.getMessage());
        }
        return null;
    }
7. 异常处理
1. token错误或者过期
通过实现AuthenticationEntryPoint()函数来解决该异常信息。
public class JwtAuthenticationEntryPoint implements AuthenticationEntryPoint {
    /**
     * 当用户尝试访问需要权限才能的REST资源而不提供Token或者Token错误或者过期时,
     * 将调用此方法发送401响应以及错误信息
     */
    @Override
    public void commence(HttpServletRequest request,
                         HttpServletResponse response,
                         AuthenticationException authException) throws IOException {
        response.sendError(HttpServletResponse.SC_UNAUTHORIZED, SecurityConstants.TOKEN_ILLEGAL);
    }
}
2. 访问权限不足
比如一个资源必须拥有ADMIN权限才可以访问,USER权限访问就会被拦截,通过实现AcessDeniedHandler()来处理该问题。
public class JwtAccessDeniedHandler implements AccessDeniedHandler {
    /**
     * 当用户尝试访问需要权限才能的REST资源而权限不足的时候,
     * 将调用此方法发送403响应以及错误信息
     */
    @Override
    public void handle(HttpServletRequest request, HttpServletResponse response, AccessDeniedException accessDeniedException) throws IOException {
        response.sendError(HttpServletResponse.SC_FORBIDDEN, SecurityConstants.AUTHORITY_DENY);
    }
}
8. 总体配置
- 先将刚才定义的userDetailsServiceImpl,两个异常处理以及BCryptPasswordEncoder(密码加密器,使用后在数据库中无法看到正确的密码)作为@Bean进行注入或初始化。此处,我们就可以通过setHideUserNotFountExceptions(false)来让spring正确返回UsernameNotFoundException。
 @Bean
    public DaoAuthenticationProvider authenticationProvider() {
        DaoAuthenticationProvider provider = new DaoAuthenticationProvider();
        provider.setHideUserNotFoundExceptions(false);//用于区分用户名错误与密码错误
        provider.setPasswordEncoder(bCryptPasswordEncoder());
        provider.setUserDetailsService(userDetailsServiceImpl);
        return provider;
    }

    @Override
    protected void configure(AuthenticationManagerBuilder auth) {
        // 设置自定义的userDetailsService以及密码编码器
        auth.authenticationProvider(authenticationProvider());
    }
- 重写configure(AuthenticationManagerBuilder auth)与configure(HttpSecurity http)。
@Override
    protected void configure(HttpSecurity http) throws Exception {
        http.cors().and()
                // 禁用 CSRF
                .csrf().disable()
                .authorizeRequests()
                .antMatchers(HttpMethod.POST, "/auth/*").permitAll()
                // 指定路径下的资源需要验证了的用户才能访问)
                .antMatchers(HttpMethod.GET, "/api/**").hasRole("USER")
                .antMatchers(HttpMethod.DELETE, "/api/**").hasRole("ADMIN")
                // 其他都放行了
                .anyRequest().permitAll()
                .and()
                //添加自定义Filter
                .addFilter(new JwtAuthenticationFilter(authenticationManager()))
                .addFilter(new JwtAuthorizationFilter(authenticationManager(), userDetailsServiceImpl))
                // 不需要session(不创建会话)
                .sessionManagement().sessionCreationPolicy(SessionCreationPolicy.STATELESS).and()
                // 授权异常处理
                .exceptionHandling().authenticationEntryPoint(jwtAuthenticationEntryPoint())
                .accessDeniedHandler(jwtAccessDeniedHandler());
        // 防止H2 web 页面的Frame 被拦截
        http.headers().frameOptions().disable();
    }
至此,spring security已经全部配置完毕,已经可以实现token授权与认证功能了。
